

Abstract
Arthroscopy frequently has been used to treat a variety of shoulder conditions, including rotator cuff tears. Arthroscopic techniques, when compared with open techniques, are associated with less morbidity, leading to lower complication rates, easier recovery, and improved outcomes. As technology improves, we continue to develop less-invasive surgical techniques to treat rotator cuff pathology. With the development of the NanoScope (Arthrex, Naples, FL), we have the opportunity to view through a small cannula without making a standard viewing portal. This technique combines this small viewing portal with standard repair techniques through only a single lateral incision to provide a less-invasive rotator cuff repair technique.
Rotator cuff tears have a high prevalence in the adult population, with incidence increasing as we age.1 Initially, open and mini-open repair techniques were developed using bone tunnels, but as technology has advanced, arthroscopic techniques have been developed. Over time, these techniques have been improved on with advances in knot-tying technique, new anchors, suture development, and visualization. Arthroscopic techniques have shown a clear advantage in terms of better patient outcome scores as well as lower complication rates when compared with mini-open techniques.1, 2, 3, 4 Traditionally, an arthroscopic rotator cuff repair is performed with the camera through a viewing portal in the back of the shoulder and 1 to 3 working portals in the lateral and anterior aspect of the shoulder. We describe a technique using the NanoScope (Arthrex, Naples, FL) to eliminate the posterior viewing portal as well as all but one of the working portals to complete a repair of a full-thickness rotator cuff tear. We feel there are distinct advantages to this technique, including decreased fluid necessary for the repair, which would decrease postoperative pain. This will hopefully lead to improved outcomes after surgery.
Surgical Technique (With Video Illustration)
Fig 1, Fig 2, Fig 3, Fig 4, Fig 5, Fig 6, Fig 7, Fig 8, Fig 9, Fig 10 and Video 1 show the surgical technique.
Fig 1.

Viewing the right shoulder from outside of the joint with a spinal needle inserted from posteriorly.
Fig 2.

Viewing the right shoulder from outside of the joint, a 2.7-mm cannula is inserted from posteriorly and the NanoScope has been placed into the joint.
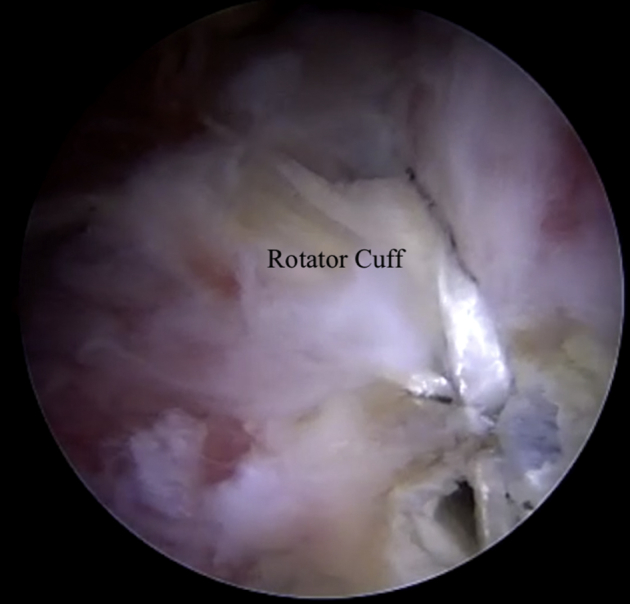
Fig 3.

Viewing the right shoulder glenohumeral joint from posteriorly with the 0° NanoScope, the rotator cuff tear is seen and marked with a spinal needle.
Fig 4.

Viewing the right shoulder with 2 separate views. The view on the left is from outside of the joint showing the NanoScope posteriorly and the shaver coming in from laterally. The view on the right is viewing from posteriorly with the from posteriorly using the 0° NanoScope showing the shaver coming in from laterally.
Fig 5.

Viewing the right shoulder from laterally with the 30° arthroscope, the NanoScope can be seen coming in from posteriorly.
Fig 6.

Viewing the right shoulder subacromial joint from posteriorly with the 0° NanoScope, the FiberLink (Arthrex) can be seen placed into the rotator cuff tear.
Fig 7.
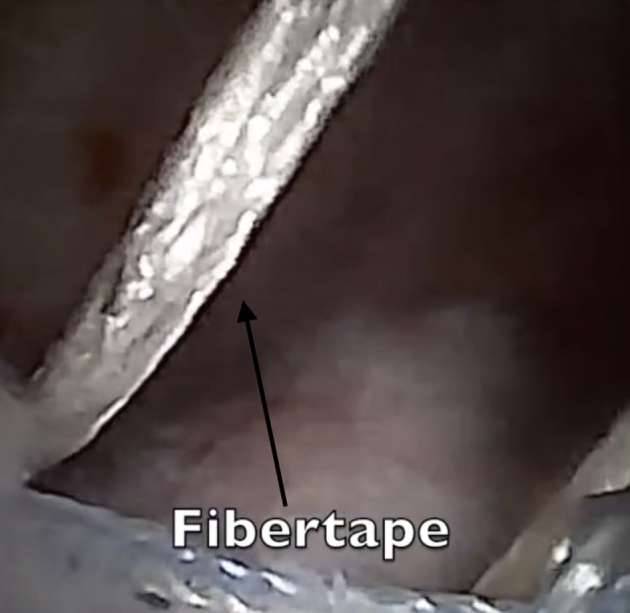
Viewing the right shoulder subacromial joint from posteriorly using the 0° NanoScope, the FiberLink suture (Arthrex) can be seen placed into the rotator cuff.
Fig 8.

Viewing the right shoulder subacromial joint from posteriorly using the 0° NanoScope, the 4.75 swivel lock anchor (Arthrex) can be seen being inserted into the humerus.
Fig 9.
Viewing the right shoulder from laterally using, the 30° arthroscope the final rotator cuff repair can be seen.
Fig 10.
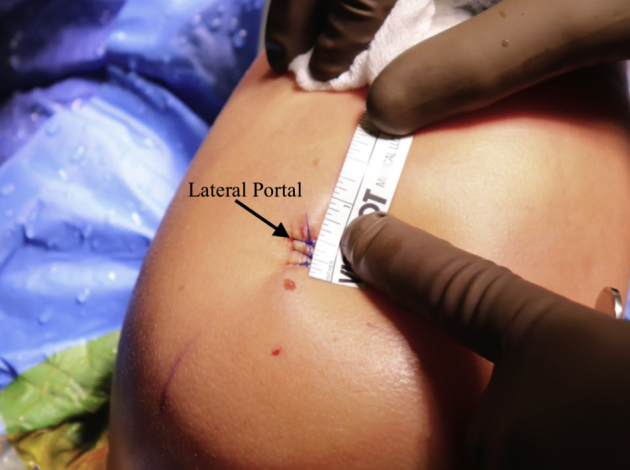
View of the right shoulder from outside the joint in the lateral position seeing there is only a single lateral incision.
Patient Setup
The patient is placed in the lateral decubitus position with the operative extremity placed in a standard lateral arm positioner. An axillary roll is placed under the nonoperative extremity, and all bony prominences are well padded. The operative shoulder landmarks are marked out including the scapular spine, acromion, coracoid, clavicle, and acromioclavicular joint.
Needle Arthroscope Insertion
A spinal needle is inserted into the glenohumeral joint from posteriorly. Thirty milliliters of normal saline is loaded into the joint to help with initial visualization. The trocar is removed from the spinal needle, and a nitinol wire is inserted into the needle. The needle is removed. A 2.7-mm cannula is then inserted over the wire, and the wire is removed (Video 1). Inflow is then placed onto the cannula and the needle arthroscope is inserted for visualization of the joint. A standard diagnostic arthroscopy is then performed identifying the small full-thickness rotator cuff tear. The tear is then marked with a spinal needle so that it can be easily identified in the subacromial space.
Lateral Subacromial Portal
The camera is withdrawn and the trocar is inserted into the spinal needle, which is then inserted into the subacromial space via a posterior approach. The trocar is removed, and a nitinol wire is again inserted through the needle. The cannula is inserted over the nitinol wire, and the camera is inserted into the cannula. A spinal needle is used from a lateral approach to localize the lateral working portal. A small incision is then made and a standard 6-mm cannula (Arthrex) is inserted for working purposes. The inflow is then switched to this lateral portal to allow better inflow.
Rotator Cuff Repair
A 4.5-mm shaver (Arthrex) is then used through the lateral portal to perform a minimal bursectomy and rotator cuff debridement at the site of the tear. The rotator cuff tear is identified by finding the previously placed spinal needle. Once adequate visualization has been achieved with the shaver, a looped FiberLink suture (Arthrex) is then placed into the rotator cuff tear using a scorpion device (Arthrex) through the lateral portal. Next, suture tape (Arthrex) is placed into the anterior limb of the rotator cuff tear. The inferior limb is then retrieved through the lateral portal, and using the scorpion (Arthrex), it is placed through the posterior portion of the tear. This gives an inverted mattress stitch. All 3 suture tails are brought out laterally and placed into a 4.75 swivel lock anchor (Arthrex). A punch is then used to prepare the bone, and the anchor is placed with standard tension. The repair is the reviewed from the both the posterior portal as well as the lateral portal to ensure adequate repair has been achieved. The instruments are withdrawn, and the portals are closed in a standard fashion.
Discussion
Although shoulder arthroscopy has led to improvements in patient-related outcomes in rotator cuff repair, many patients continue having shoulder pain and swelling for some time after arthroscopy. Multiple portals into the shoulder allow for fluid extravasation, causing significant swelling in the shoulder, which irritates soft tissues. In addition, repeated insertion of instruments through the muscle and fascia can cause trauma to the area, leading to more pain postoperatively. The technique described here uses needle arthroscopy to minimize the trauma to the posterior joint capsule and infraspinatus for initial diagnostic arthroscopy. A minimal bursectomy in the subacromial space allows for retention of a major blood and stem cell supply to the rotator cuff.5 A single lateral incision is then used with a cannula to minimize damage to the lateral shoulder, and when properly placed, allows for a complete repair of the damaged tendon to the bone.
Patient selection is critical when attempting to use this technique, as indications are limited. Current indications are listed in Table 1. This technique is difficult until the surgeon is comfortable using the instruments and the 0-degree scope. Pearls and pitfalls associated with the technique are described in Table 2. The technique is limited by the size, shape, and location of the tear. The small cannula limits the amount of fluid inflow into the shoulder, which can be an advantage due to less swelling and potentially less pain immediately postoperatively. Less inflow also decreases visualization due to less pressure in the shoulder and subacromial space during the procedure. This can lead to increased propensity for bleeding during the procedure. Performing a small bursectomy has shown to help with the propensity for bleeding, and allows for minimal trauma to the tissue. A larger or retracted tear would be very difficult to repair using the technique described above as more exposure is needed. The 0-degree design of the arthroscope provides a 120° field of view but does limit the surgeon’s ability to change viewing angles without changing the viewing site. Adding portal sites can improve the access into the subacromial space for larger tears, and with more experience using these instruments, repair of a larger tear would be feasible. Isolated repair of a rotator cuff tear is possible using the technique described above, but if other procedures were needed during arthroscopy such as a subscapularis repair, arthroscopic biceps tenodesis, or distal clavicle excision for acromioclavicular arthritis, a standard arthroscope would most likely be required. Increased surgeon experience with the technique and experience will also yield improved efficiency with the procedure as well as increased indications for the technique.
Table 1.
Current Indications and Relative Contraindications for Needle Arthroscopy of the Shoulder
| Indications |
| Partial-thickness, isolated bursal-sided, or articular-sided rotator cuff tears |
| Small, nonretracted isolated full-thickness rotator cuff tears |
| Anterior labral tears |
| Posterior labral tears |
| Relative contraindications |
| Larger or retracted rotator cuff tears |
| Rotator cuff or labral surgery requiring concomitant procedures such as arthroscopic biceps tenodesis, distal clavicle excision, subscapularis repair |
Table 2.
Pearls and Pitfalls of the Single Incision Rotator Cuff Repair
| Pearls |
| Inflow should be switched to the lateral portal to allow more flow |
| Limited bursectomy creates decreased bleeding which improves visualization |
| The 30° arthroscope can be switched to the lateral portal to get a direct view of the tear |
| Pitfalls |
| Improper placement of the posterior spinal needle can cause difficult visualization |
Advantages and disadvantages of using this technique are outlined in Table 3. These include minimal damage to the surrounding tissue. There is less inflow of arthroscopic fluid, leading to less swelling and potentially less pain in the immediate postoperative period. This, in turn, should allow for easier and faster gains in range of motion. Visualization and arthroscope placement can be technically demanding, but when placed properly, adequate visualization can be achieved. Although this technique can be difficult and has limitations, we feel it has a role in the future of arthroscopy and as we gain experience with needle arthroscopy the indications for its use will increase.
Table 3.
Advantages and Disadvantages of the Single-Incision Rotator Cuff Repair
| Advantages |
| Decreased loss and need for fluid |
| Less swelling and pain |
| Possible increase in early motion |
| Disadvantages |
| Additional cost of NanoScope |
| Difficult viewing angles |
| Decreased and/or difficult visualization |
Footnotes
The authors report the following potential conflict of interest or source of funding: C.L reports personal fees from Arthrex, outside the submitted work. Full ICMJE author disclosure forms are available for this article online, as supplementary material.
Supplementary Data
The patient is seen placed in the lateral position with the operative extremity placed in a standard lateral arm positioner. An axillary roll is placed under the nonoperative extremity. The operative shoulder landmarks are marked out, including the scapula, coracoid, and acromioclavicular joint. A spinal needle is inserted into the glenohumeral joint from posteriorly. A nitinol wire is seen inserted into the needle and the needle is then removed. A small 2.7-mm cannula is then inserted over the wire and the wire is removed. Inflow is then placed onto the cannula and the NanoScope (Arthrex, Naples, FL) is inserted for visualization of the joint. A standard diagnostic arthroscopy is then performed, identifying the small full-thickness rotator cuff tear. The rotator cuff tear is then seen from the joint and is marked with a spinal needle. The NanoScope is then inserted into the subacromial space from posteriorly and a spinal needle is used to locate the lateral portal. The lateral portal is seen being established. A small incision is then made and a standard 6-mm cannula (Arthrex) is inserted for working purposes. The inflow is then switched to this lateral portal. A 4.5-mm shaver (Arthrex) is then used through the lateral portal to debride the rotator cuff tear. A looped FiberLink suture (Arthrex) is then placed into the rotator cuff tear using a scorpion device (Arthrex). Next, suture tape (Arthrex) is seen placed into the anterior limb of the rotator cuff tear. The inferior limb is then retrieved through the lateral portal and using the scorpion (Arthrex) it is placed through the posterior portion of the tear. This gives an inverted mattress stitch. All 3 suture tails are brought out laterally and placed into a 4.75 swivel lock anchor (Arthrex). A punch is then used to prepare the bone and the anchor is placed with standard tension. The shoulder is then pictured with a small lateral portal and no posterior incision.
References
- 1.Tashjian R.Z. Epidemiology, natural history, and indications for treatment of rotator cuff tears. Clin Sports Med. 2012;31:589–604. doi: 10.1016/j.csm.2012.07.001. [DOI] [PubMed] [Google Scholar]
- 2.Liu J., Fan L., Zhu Y., Yu H., Xu T., Li G. Comparison of clinical outcomes in all-arthroscopic versus mini-open repair of rotator cuff tears: A randomized clinical trial. Medicine (Baltimore) 2017;96:e6322. doi: 10.1097/MD.0000000000006322. [DOI] [PMC free article] [PubMed] [Google Scholar]
- 3.Osti L., Papalia R., Paganelli M., Denaro E., Maffulli N. Arthroscopic vs mini-open rotator cuff repair. A quality of life impairment study. Int Orthop. 2010;34:389–394. doi: 10.1007/s00264-009-0796-z. [DOI] [PMC free article] [PubMed] [Google Scholar]
- 4.Day M., Westermann R., Duchman K. Comparison of short-term complications after rotator cuff repair: Open versus arthroscopic. Arthroscopy. 2018;34:1130–1136. doi: 10.1016/j.arthro.2017.10.027. [DOI] [PubMed] [Google Scholar]
- 5.Freislederer F., Dittrich M., Scheibel M. Biological augmentation with subacromial bursa in arthroscopic rotator cuff repair. Arthrosc Tech. 2019;8:e741–e747. doi: 10.1016/j.eats.2019.03.010. [DOI] [PMC free article] [PubMed] [Google Scholar]
Associated Data
This section collects any data citations, data availability statements, or supplementary materials included in this article.
Supplementary Materials
The patient is seen placed in the lateral position with the operative extremity placed in a standard lateral arm positioner. An axillary roll is placed under the nonoperative extremity. The operative shoulder landmarks are marked out, including the scapula, coracoid, and acromioclavicular joint. A spinal needle is inserted into the glenohumeral joint from posteriorly. A nitinol wire is seen inserted into the needle and the needle is then removed. A small 2.7-mm cannula is then inserted over the wire and the wire is removed. Inflow is then placed onto the cannula and the NanoScope (Arthrex, Naples, FL) is inserted for visualization of the joint. A standard diagnostic arthroscopy is then performed, identifying the small full-thickness rotator cuff tear. The rotator cuff tear is then seen from the joint and is marked with a spinal needle. The NanoScope is then inserted into the subacromial space from posteriorly and a spinal needle is used to locate the lateral portal. The lateral portal is seen being established. A small incision is then made and a standard 6-mm cannula (Arthrex) is inserted for working purposes. The inflow is then switched to this lateral portal. A 4.5-mm shaver (Arthrex) is then used through the lateral portal to debride the rotator cuff tear. A looped FiberLink suture (Arthrex) is then placed into the rotator cuff tear using a scorpion device (Arthrex). Next, suture tape (Arthrex) is seen placed into the anterior limb of the rotator cuff tear. The inferior limb is then retrieved through the lateral portal and using the scorpion (Arthrex) it is placed through the posterior portion of the tear. This gives an inverted mattress stitch. All 3 suture tails are brought out laterally and placed into a 4.75 swivel lock anchor (Arthrex). A punch is then used to prepare the bone and the anchor is placed with standard tension. The shoulder is then pictured with a small lateral portal and no posterior incision.