The coronavirus disease 2019 (COVID-19) is a pandemic.1 COVID-19 concentrates in the upper airway mucosa2; thus, procedures involving this location are considered high risk. The COVID-19 pandemic has resulted in a significant shortage of personal protective equipment (PPE) worldwide. Professional additive manufacturing providers, makers, and designers in the 3-dimensional (3D) printing community have posted free COVID-19–related 3D printer designs on their websites.1 , 3 Most oral and maxillofacial surgeons (OMSs) are familiar with 3D printing technology.
We describe our method of using a 3D printer to print face shields to protect OMSs during the COVID-19 pandemic.
Technique
Materials
The operator should gather the equipment and materials before starting the process. We used specific 3D printing materials consisting of a 3D printer (MK3S; Prusa Research, Prague, Czech Republic) and polylactic acid filaments. We used general crafts materials, including Velcro strips (Velcro, ULINE, Pleasant Prairie, WI), adhesive foam (Frost King, Thermwell Products, Co, Inc, Mahwah, NJ), and transparency film, and general office supplies, including a hole punch and scissors (Table 1 ).
Table 1.
Equipment, Materials, and Cost
| Equipment and Materials | Preparation | Cost ($) |
|---|---|---|
| 3D printer | NA | 1100.00 |
| Polylactic acid filaments | NA | 18.89 |
| Velcro strip | Cut 2 × 10-in. long and 75-in. wide | 6.00 |
| Adhesive foam (Frost King) | Cut 12-in. long and 75-in. wide | 4.00 |
| Transparency film (100/pack) | 3 Holes punched 4 in. apart on wide side of film | 39.00 |
| Hole punch | NA | 50.00 |
Total cost for 200 frames, $1462.45; cost per frame, $7.30.
Abbreviations: 3D, 3-dimensional; NA, not applicable.
Workflow
Creating a face shield has 4 phases: design, digital preparation, printing, and assembly (Table 2 ). These phases have been previously described in detail elsewhere, and the details are beyond the scope of our report.4 , 5 In brief, we retrieved the file previously designed by engineer and made publicly available for free download. The file was saved in standard tessellation language (STL) from Airwolf 3-D (available at: https://airwolf3d.com/2020/03/27/covid-19-face-shield-3d-printable-file/). Next, we digitally prepared (ie, converted) the STL to a G-code file using PrusaSlicer, version 2.0 (Prusa Research). G-code is the language used by the computer to communicate with the printer. The G-code file contains specific information regarding the 1) printer setting (ie, nozzle diameter and position, height limit), 2) print setting (ie, 3D printed layer height, horizontal and vertical dimensions), and 3) filament setting (ie, type, color, diameter, density). This step is important because it controls the quality of the printed product and the printer's speed (production time). The G-code file should be saved on a secure digital (SD) card. We then transferred the G-code from the computer to the printer using the SD card.
Table 2.
Workflow for Face Shield
| Design |
| Shield is digitally created |
| Design is saved as STL |
| STL is publicly available |
| Digital preparation |
| Convert STL to G-code file |
| G-code file saved on secure digital card |
| Secure digital card is inserted into printer |
| Printing |
| Polymer is loaded onto printer |
| Printer is activated |
| Assembly |
| Adhesive foam is attached to inner side of frame |
| Velcro is attached to frame |
| 3 Holes are punched in transparency film |
Abbreviation: STL, standard tessellation language.
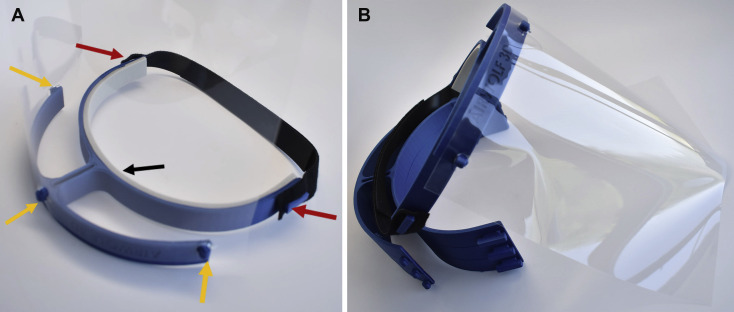
We prepared our printer (MK3S; Prusa Research), which is a fused deposited modeling printer with additive manufacturing technology and a nozzle (ie, an extruder). This process consists of polymer (ie, filament) that processes through a heated nozzle with rapid cooling. This step allows for deposition of individual layers, which creates the 3D structure. We placed the filament into the extruder and turned on the printing function. Once the procedure was complete, we had the frame for the shield (Fig 1 ).
Figure 1.
A, Superior and B, frontal views of 3-dimensionally printed frame of the face shield. Note inner circumference (black arrow), lateral projections (red arrows), and rounded projections (yellow arrows).
Finally, we assembled the shield using the crafts materials and office supplies. The Velcro was cut into 2- to 10-in.-long strips. Each strip received a 2-cm-long slit at each end. Each 10-in. Velcro strip was hooked on the lateral projections at each end of frame (Fig 2 ). This Velcro strip secures the frame to the head. Next, the adhesive foam was cut into a 12-in.-long strip. We attached the sticky side to the inner circumference of the frame (Fig 2). The foam acts as a cushion and prevents abrasions to the user's forehead with extended wear. Using a hole punch, we punched 3 holes, 4 in. apart, on the wide side of the transparency films. Finally, each hole was fit snugly into 1 of the 3 rounded projections along the frame (Fig 2).
Figure 2.
A, Inferior and B, lateral views of the assembled face shield. Note position of Velcro on the lateral projections (red arrows), foam at the inner circumference to improve comfort (black arrow), and transparency film on the rounded projections (yellow arrows).
Time Required
The time required for production depends on the printer's default speed, size of the nozzle, extruded layer height, and size of the object being printed. Maintaining a good balance between the printing time and quality is important. Thus, adjusting these parameters should be performed with caution to maintain the quality of the final 3D object. Increasing the extruded layer height or using a larger nozzle will decrease the printing time. Our printer's speed was 80 to 100 mm/s. To print multiple frames during same interval (ie, decrease the production time), we stacked the frames on top of each other and then individually separated them (Fig 3 ). In our project, the required production time was 5 hours. The production time for other designs varied from 3.5 to 9.5 hours, depending on the size of the original design.
Figure 3.
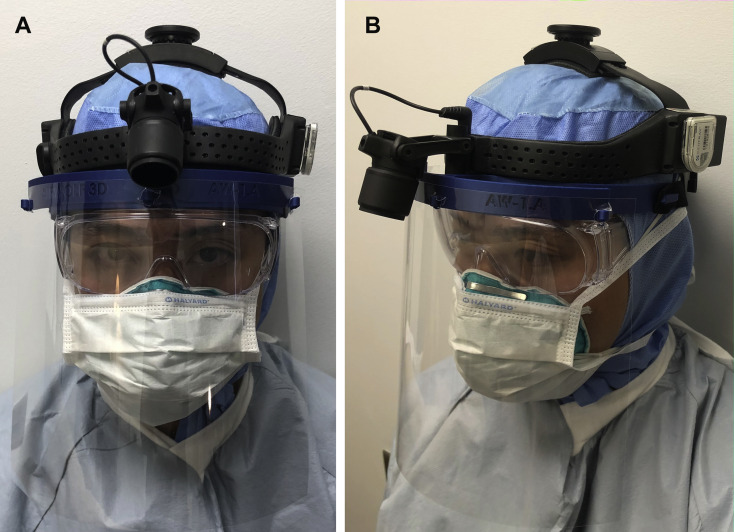
A, Frontal and B, lateral views of surgeon wearing face shield and full personal protective equipment.
Cost
The cost of the face shield depends on the materials used and the durability of the face shield. The cost has ranged from $10 to $177. We recommend printing multiple face shields together (eg, 200 shields) to reduce the overall cost per shield. Our average cost for printing 1 face shield was $7.30 (Table 1).
Maintenance
All parts of the 3D printed face shield should be cleaned and disinfected using Super Sani-Cloth Germicidal Disposable Wipes (PDI Health, Woodcliff Lake, NJ). The cleaning process should be performed between procedures and between patients. Once disinfected, the shield can be stored on the frame with the transparency film positioned superiorly such that it does not distort until the next patient encounter. In the case of damage or wear, the parts can easily be removed and replaced.
Discussion
Despite the knowledge that has accumulated during the weeks of the COVID-19 pandemic, the guidelines for diagnosis and treatment have been constantly changing.6 During this COVID-19 pandemic, various PPE devices can be 3D printed (eg, N95 masks,4 goggles). However, not all of these PPE devices will provide the same fluid barrier and air filtration protection as Food and Drug Administration–cleared PPE. Nevertheless, we have been comfortable using our face shield simply as a physical barrier to respiratory droplets, with the caveat that it is used with the mandated PPE, in accordance with institutional guidelines (Fig 3).
Using our method, we were able to print 100 face shields, which we have distributed to various groups: OMSs, the surgical intensive care unit, otolaryngology (ear, nose, and throat), and anesthesia. We will continue printing face shields to be distributed to the emergency department and plastic and reconstructive surgery service, among others.
In conclusion, our method of 3D printing face shields is straightforward and cost-effective. We hope that the present report will allow OMSs to use the available technology to protect themselves and their support staff.
Footnotes
Conflict of Interest Disclosures: None of the authors have any relevant financial relationship(s) with a commercial interest.
References
- 1.Parikh S.R., Bly R.A., Bonilla-Velez J. Pediatric otolaryngology divisional and institutional preparatory response at Seattle Children's Hospital after COVID-19 regional exposure. doi:1177/0194599820919748 [e-pub ahead of print]. Otolaryngol Head Neck Surg. Accessed April 14, 2020. [DOI] [PubMed]
- 2.Zou L., Ruan F., Huang M. SARS-CoV-2 viral load in upper respiratory specimens of infected patients. N Engl J Med. 2020;382:1177. doi: 10.1056/NEJMc2001737. [DOI] [PMC free article] [PubMed] [Google Scholar]
- 3.Prusa Research Prusa face shields. https://www.prusaprinters.org/social/16-prusa-research/collections/17041#_ga=2.246154820.11839994.1586876887-1170217961.1573580802&_gac=1.225652200.1585930697.CjwKCAjwvZv0BRA8EiwAD9T2Vf6Qvbv4XTyL3FOyAU4BP83jNoCiHTCkRvlNHuEy-OiudnDefnE9VhoCQDsQAvD_BwE Available at: Accessed March 4, 2020.
- 4.Swennen G.R.J., Pottel L., Haers P.E. Custom-made 3D-printed face masks in case of pandemic crisis situations with a lack of commercially available FFP2/3 masks. https://doi.org/10.1016/j.ijom.2020.03.015 [e-pub ahead of print]. Int J Oral Maxillofac Surg. Accessed April 2, 2020. [DOI] [PMC free article] [PubMed]
- 5.Marschall J.S., Dutra V., Flint R.L. In-house digital workflow for the management of acute mandible fractures. J Oral Maxillofac Surg. 2019;77:2084.e1. doi: 10.1016/j.joms.2019.05.027. [DOI] [PubMed] [Google Scholar]
- 6.American Hospital Association Safely resuming elective surgery as COVID-19 curve flattens: ACS, ASA, AORN and AHA develop roadmap for readiness. https://www.aha.org/press-releases/2020-04-17-safely-resuming-elective-surgery-covid-19-curve-flattens-acs-asa-aorn-and Available at: Accessed April 17, 2020.


