Abstract
Aim
To examine the application of Statistical Process Control (SPC) and Ishikawa diagrams for retrospective evaluation of machine Quality Assurance (QA) performance in radiotherapy
Background
SPC is a popular method for supplementing the performance of QA techniques in healthcare. This work investigates the applicability of SPC techniques and Ishikawa charts in machine QA.
Materials and Methods
SPC has been applied to recommend QA limits on the particular beam parameters using the QUICKCHECKwebline QA portable constancy check device for 6 MV and 10 MV flattened photon beams from the Elekta Versa HD linear accelerator (Linac). Four machine QA parameters – beam flatness, beam symmetry along gun target direction and left-right direction, and beam quality factor (BQF) – were selected for retrospective analysis. Shewhart charts, Exponentially Weighted Moving Average (EWMA) charts and Cumulative Sum (CUSUM) charts were obtained for each parameter. The root causes for a failure in machine QA were broken down into an Ishikawa diagram enabling the user to identify the root cause of error and rectify the problem subsequently.
Results
Shewhart charts and EWMA charts applied could detect loss in control in one variable in the 6 MV beams and in all four variables in 10 MV beams. CUSUM charts detected offsets in the readings. The Ishikawa chart exhaustively included the possible errors that lead to loss of control.
Conclusion
SPC is proven to be effective for detection of loss in control in machine QA. The Ishikawa chart provides the set of probable root causes of machine error useful while troubleshooting.
Keywords: Radiotherapy, Quality assurance, Statistical process control, Shewhart chart, Ishikawa diagram
1. Introduction
In the process of radiotherapy, it is essential to evaluate the performance of the equipment delivering radiation to the patient. Quality Assurance (QA) is done to ensure that the machine characteristics do not deviate significantly from the baselines acquired at the time of commissioning. For performing machine QA, the baseline values are fed into the treatment planning system (TPS) for the purpose of characterizing the treatment machine. Deviation from the baselines can cause incorrect treatment of patients on that system and, therefore, such deviations must necessarily be detected by the process of QA. Relevant parameters of the photon beam are measured in the process, and the machine is deemed fit for treatment only if the parameters fall within certain pre-specified ranges (unilateral or bilateral as the case may demand).
The conventional approach to QA used traditionally in radiotherapy advocates the use of the “goalpost principle” used commonly in statistics. Following this principle, a parameter falling within an allowable and predetermined range is deemed acceptable, without further investigation into the exact value of the parameter. A considerable amount of research has been carried out to improve QA procedures based on this approach. A. Van Esch et al. have developed a novel approach towards developing QA standards through statistical analysis and its incorporation into the treatment preparation chain.1 S. L. Mahan et al. have measured output and energy fluctuations of daily QA checks on a helical tomotherapy system.2 While this approach may be sufficient to prevent incorrect delivery of radiation, by adopting the goalpost approach a medical physicist misses the possibility of analysing the actual data obtained during QA. This data could allow the physicist to observe in real-time the trends in variation, identify possible systematic errors within the machine, comment on the accuracy of dose delivery and, subsequently, take corrective measures as may be required. Unlike the classical approach of using the mean and standard deviation of the sampled data to characterise a process, Statistical Process Control (SPC) permits a more robust monitoring of the stability of process variability in time.
Out of the seven basic tools of quality, control charts are of premium importance while performing SPC in the field of radiotherapy. For a process occurring periodically over time, a control chart is a means used to detect departures from a state of ideal statistical control in spite of being within the clinical action limits. It is a statistical tool used to determine process stability and to improve process performance by reducing variation. According to Diana Binny et al., the fundamental concept of SPC is to compare current statistics in a process with its previous corresponding statistics for a given period.3
According to Pawlicki and Whitaker,4 the goal of modern QA in medical treatment is not only to ensure that a process is on target, but also to verify that it also operates with minimal variation. Control charts have been used in industrial manufacturing for many decades and have also recently been used in healthcare. Specifically in the domain of radiotherapy, SPC has of late been commonly used for evaluating patient QA parameters in prostate,5, 6, 7, 8 head-and-neck9, 10, 11 and breast cancer patients,12 and also for comparing results obtained from different dose delivery techniques in radiotherapy including Intensity Modulated Radiotherapy (IMRT) and Volumetric Modulated Arc Therapy (VMAT).13 Output and energy variations in helical tomotherapy treatment systems have been investigated using SPC methodology.14 On the investigation of machine QA results on Linear Accelerators (Linac) using SPC techniques,15, 16, 17 a smaller body of research exists, like the one Todd Pawlicki et al. have performed using RBA-5 dose constancy check software on their Varian Linac 2100C machine.18 Sanghangthum et al. have performed constancy checks on photon beams and electron beams delivered by Varian Clinac 21EX Linac using RBA-3 dose constancy check software.19 After drawing qualitative conclusions regarding the process through control charts, it is possible to quantify the performance using process capability indices.
Multi-detector daily-checking devices which are being used by most contemporary radiotherapy facilities are effective tools for performing quick and convenient quality assurance tests to determine several useful quantities, e.g., central-axis radiation dose, penetrative quality, and beam flatness and symmetry. In clinical radiotherapy using flattened photon beams, it is important for beam intensity to be as homogeneous as possible to reduce the probability of treatment failure. Beam energy also affects beam penetration and, thus, dose to the target; therefore its monitoring is important.
It is important to note that SPC in radiotherapy is not considered as a QA procedure in itself. Researchers in the past have used SPC methodology to examine the suitability of different measurement tools for constancy checks.20,21 SPC is, therefore, a tool to evaluate the overall quality of the QA protocols followed at the treatment facility and help professionals decide when correction is needed before the actual limits are breached.
The Ishikawa diagram, also known as a fishbone diagram or cause-and-effect diagram, has very limited mention in existing literature in oncology and radiotherapy journals. Papakostidi et al.22 and Pawlicki and Mundt23 have briefly mentioned the potential of fishbone diagrams in radiotherapy. The technique has occasionally been used in developing applications of lean-six-sigma methodology in breast cancer treatment.24 Developed by Kaoru Ishikawa, a Japanese analyst, the Ishikawa chart is a method for ascertaining causes for a specific event. It is not sufficient only to detect a loss of control in the QA process, but the possibilities of root causes need also to be identified for easy rectification of the system error. A fishbone diagram is developed for this purpose which breaks down the major error identified in the QA process into smaller distinguishable and assignable causes. Root cause analysis is performed, and possible causes thus obtained provide additional insights into the process behaviour.
This work uses two approaches for retrospective analysis of the machine performance data obtained from the constancy check device through QA analysis. Firstly, SPC tools including control charts have been used for retrospective analysis and identification of systematic and random errors in the system. Three types of control charts – Shewhart charts, Exponentially Weighted Moving Average (EWMA) charts and Cumulative Sum (CUSUM) charts, are used in conjunction for this purpose – a novelty in itself. Secondly, identified errors have been further analysed and broken down by creating an Ishikawa chart to obtain identifiable causes responsible for the errors in Linac performance.
2. Materials and methods
2.1. QA procedure and protocol
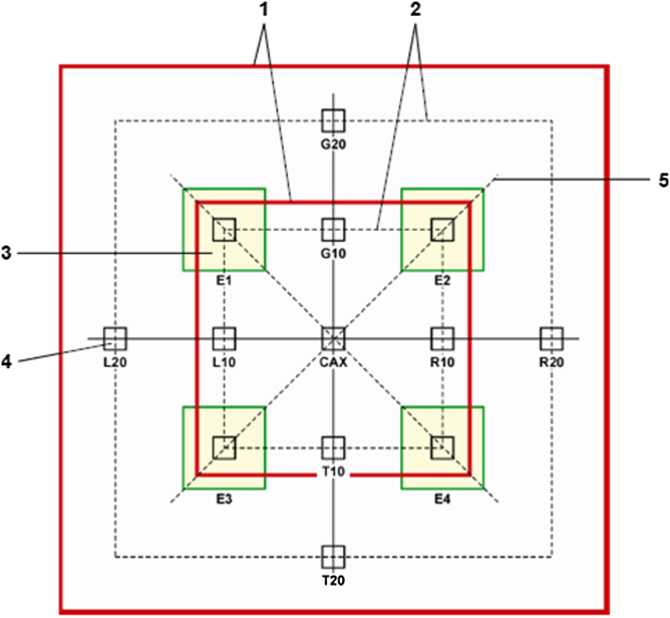
This work is one of the first attempts at analysing the Linac QA process using a constancy check device, viz. QUICKCHECKwebline (QCw) QA tool (PTW, Freiburg) on an Elekta HD Versa Linac. We have collected the data generated during QA checks on 6 MV and 10 MV photon beams, which are the two most frequently used beam energies in patient treatment. On every working day, a routine QA procedure is performed on the machine as a part of our institutional protocol using the QCw device. QCw uses 13 vented ionization chambers which are air density compensated, each having the volume of 0.1cc. The schematic design is shown in Fig. 1. The device performs measurements using predefined worklists which store all basic Linac test-specific settings (Linac type, protocol, energy, accepted tolerances, etc). During the initial set-up, these are uploaded into the device externally and are available for selection prior to each measurement.
Fig. 1.
Schematic representation of the detector and absorber design (reproduced with permission from QUICKCHECKwebline Technical Manual). (1) Field size; (2) 80% of the field size; (3) Energy chambers with absorbers (E1, E2, E3, E4); (4) Measuring chambers (CAX, L10, R10, G10, T10; L20, R20; G20, T20); (5) Diagonal of the measuring field.
All QCw baseline and daily measurements are performed at a field size of 10 × 10 cm2 at a 100 SSD (Source to Surface Distance) for 100 MU (Monitor Unit). The energies monitored here are 6 MV and 10 MV flattened photon beams (though unflattened beams are also available with this Linac model, they were not included in this analysis; nor were electron beams).
At our facility, we follow the updated guidelines set by the American Association of Physicists in Medicine (AAPM)’s Task Group 14225 for setting our action limits. Our QCw constancy check device is programmed in accordance with these guidelines which ensure that the deviations of critical parameters from their target values stay within acceptable tolerances and do not result in clinical distress to the patient. Whenever the constancy check values go beyond the tolerances mentioned in the guidelines, we reset the system, rectify and recheck the machine output, and then allow the system to be used for treatment.
Consistency of beam profile, along with beam energy, is an important parameter while measuring accuracy and precision of dose delivery, which is reflected in flatness and symmetry parameters. The parameters of flatness and beam quality need to be within ±2% (Task Group 4026) or ±1% (Task Group 14225) of commissioning base values of the system, as per different AAPM guidelines. In photon beams, QA focuses on checking the beam profile consistency in the form of flatness and symmetry to verify the beam steering accuracy, and on the percentage depth dose (PDD) or tissue maximum ratio (TMR) to verify the delivered photon beam energy. Tissue phantom ratio (TPR) can also be used for checking beam constancy in the case of PDD, and is a commonly used process.
Considering the AAPM recommendations and the importance of different parameters upon dose delivery, four variables are selected for this work. The variables are the flatness of the beam, the symmetry of the beam over gun-target (GT) and left-right (LR) directions, and the penetrative quality of the beam (represented by BQF or Beam Quality Factor, which is a surrogate for beam energy).
2.2. Calculation of evaluation values
QCw uses different algorithms for calculating the different QA parameters and the choice of algorithm is the choice of the end user. They involve the use of a normalization factor for each parameter which is automatically calculated by the software using a normalization function and multiplied to each subsequent measurement.
The algorithms used in our process are mathematically expressed below in Eqs. 1–4.
2.2.1. Flatness
For this work, the central chamber and the ionization chambers CAX, T10, L10, G10 and R10 are used for the calculation of flatness in a field of 10 cm × 10 cm size. From the doses measured at these ionization chambers, maximum dose value and minimum dose value will be determined.
Flatness (F) is then calculated as:
| (1) |
where is the normalization factor for flatness.
2.2.2. Symmetry
The symmetry of dose delivery is analyzed separately for gun-target (GT) direction and left-right (LR) direction. For this work, the ionization chambers T10 and G10, or L10 and R10 are used for the calculation of flatness in a field of 10 cm × 10 cm size.
Symmetry (GT) and Symmetry (LR) are calculated as:
| (2) |
| (3) |
where and are the normalization factor for symmetry in gun-target direction and left-right direction, respectively.
2.2.3. BQF
For determining the radiation quality through the Beam Quality Factor, an open field must be used. For calculating BQF, the central chamber and one out of the four ionization chambers for radiation quality (Fig. 1) are used for calculating the BQF index.
BQF is calculated as:
| (4) |
where is the normalization factor for the BQF index, is the dose at the particular ionization chamber used , and is the dose at the central chamber as calculated. The final calculation is made based on a polynomial expression developed and copyrighted by the manufacturer, and not documented in detail in the technical manual.
2.3. Reproducibility of results
To comment on the precision of measurement of the device used for this work, short term reproducibility15 of QCw was first assessed to ensure the capability of the device of providing precise measurements in Flatness, Symmetry and Beam Quality Factor. Since both Flatness and Symmetry are derived from Dmax and Dmin readings from specified chambers in the device, their reproducibility was also checked. We conducted ten consecutive test runs on the device upon the same setup after exposing the QCw device to 6 MV beams, and recorded the relevant parameters discussed above. We have then calculated the coefficient of variation of the recorded values which indicate if the precision of the device is acceptable or not. The coefficient of variation, also known as the relative standard deviation, is expressed as the percentage ratio of the standard deviation and the mean of the sample (σ/μ*100%).
The individual readings of the detectors used to calculate BQF are not available from the QCw device; therefore, we have only checked the reproducibility of BQF itself, though it is a derived quantity. These values were derived from the same exposures as used for checking Flatness and Symmetry.
2.4. Control charts
A control chart is a two-dimensional graph with time on the X-axis and the measured parameter on the Y-axis. It contains a Centre Line (CL), which refers to the mean value of the Y-axis variable over time, and two Control Limits, the Upper Control Limit (UCL) and the Lower Control Limit (LCL). Statistically speaking, at any point of time on the chart as long as the process variable lies within the range of the UCL and LCL, the process is under control. According to Sanghangthum et al.,19 the tolerance limits should serve as warning limits such that when these are exceeded it indicates that the process is changing. These control limits are independent of the clinical action limits and they reflect only the performance of the process. While detecting loss in control, a control chart can also distinguish between systematic errors and random errors over time.
Implementation of SPC in a work field typically occurs in two phases. In the first phase, the major losses in control going above a certain range of magnitude with immediate and major consequences are identified and rectified. In the second phase, smaller deviations from process control with less severe consequences are identified and corrected. Different SPC techniques are necessary for implementation of each stage, as discussed later.
In this work we use three types of control charts within SPC – the Shewhart chart, the EWMA chart and the CUSUM chart. The Shewhart chart, first made use of by Walter A. Shewhart at the Bell Laboratories in the 1920s, is the first discovered control chart, and was frequently used for detection of large changes in process control. In order to detect smaller changes, time-weighted charts viz Exponentially Weighted Moving Average (EMWA) charts and Cumulative Sum (CUSUM) charts were created. This study makes simultaneous use of these three types of control charts and reports the results of the combined usage. The control charts reported in this work have been developed on Minitab 18 software.
2.4.1. Shewhart chart
A Shewhart chart-based analysis consists of two separate graphs plotted over time. Based on the type of variable, Shewhart charts are predominantly of three major types: Average/Range (Xbar-R), Average/Standard deviation (Xbar-S) and Individual/Moving Range (I-MR). We have chosen Xbar-R charts for our investigation.
In an Xbar chart, the obtained data is grouped together into small subgroups of equal size and the means of each subgroup are plotted against the subgroup number, which can alternatively be expressed as time. It has been shown that the Average (Xbar) performs better than Individual (I) charts in quick identification of data trends and loss of control.27 With 132 data points for each variable, we select the most commonly used subgroup size of 6.
In an R chart, the difference between the maximum and the minimum value in each subgroup is plotted against the subgroup number. For subgroup sizes of less than 8, Range (R) charts are preferred over Standard Deviation (S) charts since, for a small subgroup size, the variance in a sample is not a very accurate measure of variation.
The manner of creating the subgroups in an Xbar-R chart deserves consideration. If statistical control has been compromised over a period of time, we would want the R chart to remain undisturbed while the Xbar chart should indicate the change. This would accurately reflect the state of control without internal disagreement of data within the subgroup. With this end in mind, we form subgroups out of consecutive chronologically selected measurements. It is expected that any systematic error will remain in the machine for some duration and consequently affect several readings taken chronologically, thereby reducing intra-subgroup variability and increasing inter-subgroup differences and making it easier for the physicist to spot the error.
In a Shewhart chart, UCL, CL and LCL are calculated as follows:
| (5) |
| (6) |
| (7) |
In these equations is the mean of the subgroup means (), is the mean of the subgroup ranges (), is the subgroup size and is an unbiasing constant based upon . For our selected subgroup size of , .27 The first seven subgroups are used for calculating the control limits, which is slightly less than a third of the total number of subgroups.
2.4.2. Time weighted control charts
Shewhart charts are highly effective for Phase I implementation of SPC where there are possibilities of major losses in control, and they also give an indication of the solution which will address the problem. But for Phase II implementation, it is necessary to spot and redress losses in control of smaller magnitude. For this application, the Shewhart Charts are limited in the sense that they use only the information about the process contained in a particular sample observation and it ignores any information given by the entire sequence of points which appeared before the present point.27
To address this problem of detecting smaller shifts in process control over longer periods, Time Weighted control charts are used. They are typically used for detecting changes less than 1.5σ magnitude. In these charts, the entire process up to a point is monitored by considering every subgroup statistic that has appeared before the current subgroup.
2.4.3. Exponentially weighted moving average (EWMA)
In an EWMA chart, the most recent subgroup is given the highest weight and the remaining subgroups are exponentially weighted based on their chronological proximity to the present subgroup. The EWMA chart is capable of detecting smaller changes in the process with reference to the immediately adjacent data.28 Since the EWMA can be viewed as a weighted average of all past and current observations, it is insensitive to the normality assumption where we assume all the data points to be distributed normally over the mean. Also considering its easy implementation, it is a very useful tool for detection of small changes. While the EWMA chart is not as effective in detecting sudden large shifts in the process and the Xbar-chart is relatively slow in responding to gradual shift process shifts, using these two charts together might be the best approach for online process monitoring, as indicated by Woodall and Mahmoud.28
Mathematically, EWMA at any point is given as:
| (8) |
Where is the EWMA value of the i-th subgroup, is the mean of the i-th subgroup, and is the EWMA value of the immediately preceding subgroup which includes contributions from each of the preceding subgroups. is a parameter which determines how much weight is to be given to the group mean of the current subgroup, and is subsequently the weight placed on the immediately preceding subgroup. The choice of is usually made between 0.15 and 0.3.8,19 For this work we have selected a value of 0.2.
The mathematical expressions for calculating the control limits are given as follows:
| (9) |
| (10) |
| (11) |
In these equations is the process mean of variable, is the process standard deviation, and refers to the subgroup number for which the control limits are being calculated. Similar to previous case, subgroup size , and the first seven subgroups are used for calculating control limits.
2.4.4. Cumulated sum (CUSUM)
A CUSUM chart plots the cumulative sum of the deviations of all the subgroup averages from the set target value. It detects shifts by comparing them with the previously occurred statistics. In an ideal case where process variation is only random, the CUSUM plot varies randomly in the vicinity of zero. A CUSUM plot not only shows the degree of control established over the process, but also clearly shows when the actual values are away from the set target value of the parameter. This is an object which Shewhart charts and EWMA charts fail to attain since they calculate the statistics based on the sample observations and not on the target values.
A tabular CUSUM chart accumulates deviations above and below the target value in two separate variables, C+ and C−, respectively. The two variable plots are known as Upper CUSUM and Lower CUSUM, respectively. While calculating the deviation, a reference value or allowance is considered, conventionally assumed to be half the standard deviation of the samples.
| (12) |
| (13) |
where T is the target value, K is the slack value or allowance to be permitted, depending upon the magnitude of change which is needed to be identified by the CUSUM chart. Time-varying control charts are generally used to detect changes above one standard deviation.
Upper and Lower Control Limits determined for CUSUM charts are decided beforehand. When the upper or lower CUSUM line crosses these limits, the process is considered to have gone out of control similar to the previously used Shewhart charts. Subgroup size is selected as identical to the Shewhart charts. Control limits for CUSUM charts serve as a limit beyond which the CUSUM chart will be considered out of limits. Here, they are set at ±5σ, based on the standard deviation among the first seven subgroups.
2.5. Ishikawa diagrams
It is the function of the process control tools to identify the instances where control is lost beyond a certain limit. These techniques filter out the variation caused by random error in the QA process. Once an error in the system regarding process control has been identified as crucial using control charts, it is important for a physicist to ascertain the causes which can lead to such an error. According to Ekaette et al.,29 the process contains many uncertainties and potential causes for incidents that could lead to inappropriate administration of radiation to patients, sometimes with catastrophic consequences, such as premature death or appreciably impaired quality of life. Using an Ishikawa diagram, it is possible to break up the error into ascertainable root causes.
A fault tree is a deductive logic model in which a system failure is postulated, and reverse paths are developed to link the system failure with all subsystems, components, software errors, human actions, etc. While performing Cause-and-Effect (C&E) analysis, the machine QA failures over the past one year were considered and, through discussions and brainstorming, four major sources of error were shortlisted. From these sessions, these four factors were further broken down to create the Ishikawa diagram.
3. Results
3.1. Reproducibility tests
Maximum dose value Dmax, minimum dose value Dmin, Flatness, Symmetry GT, Symmetry LR and BQF parameters were subjected to reproducibility tests. The coefficients of variation are shown in Table 1.
Table 1.
Reproducibility test results for measured variables.
| Parameter | Dmax | Dmin | Flatness | Symmetry GT | Symmetry LR | BQF |
|---|---|---|---|---|---|---|
| Coefficient of variation | 0.033% | 0.033% | 0.029% | 0.043% | 0.015% | 0.055% |
3.2. Control charts
Statistical Process Control methods were applied on each of the four parameters measured by the QCw setup for 6 MV and 10 MV photons, using methods described in the previous section. In the initial stage, Shewhart Charts were applied for identifying major deviations. Following that, EWMA charts were applied on the same data to confirm the results from the previous test. Two sets of control charts for each parameter are obtained initially (Fig. 2, Fig. 3, Fig. 4, Fig. 5, Fig. 6, Fig. 7, Fig. 8, Fig. 9), and an analysis is performed to examine the usefulness of SPC in our treatment setup, and to examine our QA performance.
Fig. 2.
(a) Xbar-R and (b) EWMA charts for Flatness (6 MV).
Fig. 3.
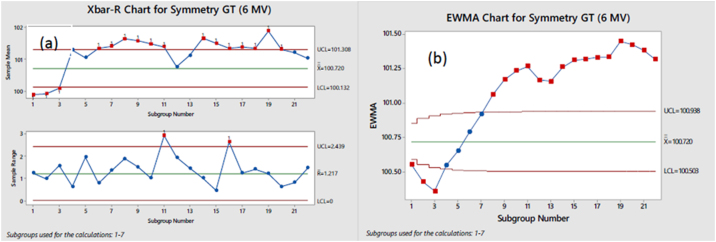
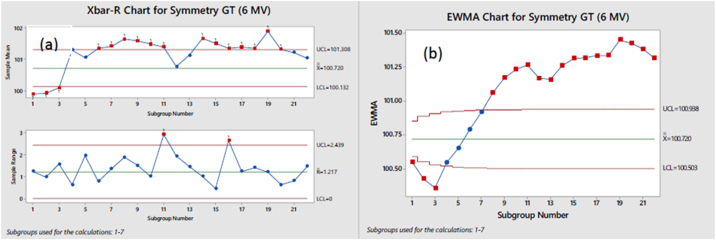
(a) Xbar-R and (b) EWMA charts for Symmetry GT (6 MV).
Fig. 4.
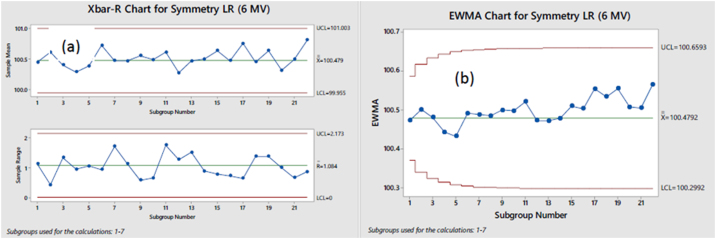
(a) Xbar-R and (b) EWMA charts for Symmetry LR (6 MV).
Fig. 5.
(a) Xbar-R and (b) EWMA charts for BQF (6 MV).
Fig. 6.
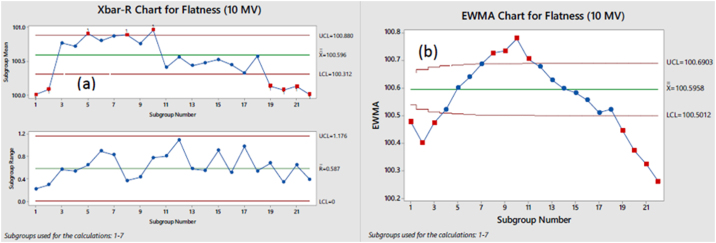
(a) Xbar-R and (b) EWMA charts for Flatness (10 MV).
Fig. 7.
(a) Xbar-R and (b) EWMA charts for Symmetry GT (10 MV).
Fig. 8.
(a) Xbar-R and (b) EWMA charts for Symmetry LR (10 MV).
Fig. 9.
(a) Xbar-R and (b) EWMA charts for BQF (10 MV).
Each chart features a centre line in blue and upper and lower control limits in red. Points lying within the control limits are shown in blue and those outside are shown in red.
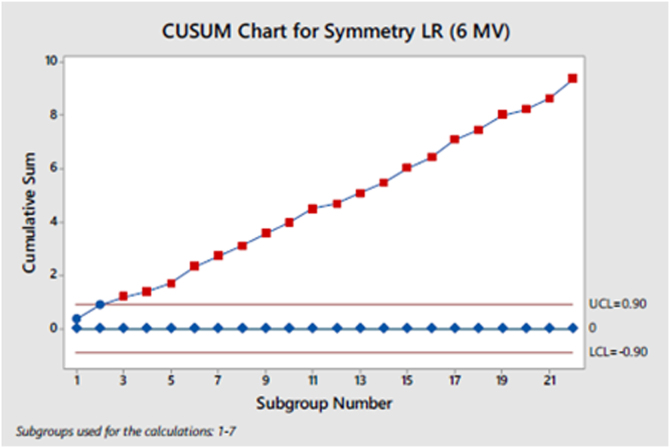
The CUSUM chart is similarly plotted for all parameters. In most of them there has been a significant shift in the process mean from the target value as can be observed by the fact that the CUSUM chart crosses the specification limit in the initial few data points and continues progressing with a steady slope over time. To demonstrate this factor, we have provided the CUSUM chart for the Symmetry LR parameter in 6 MV beams (Fig. 10).
Fig. 10.
CUSUM Chart for Symmetry LR (6 MV).
3.3. Ishikawa diagram
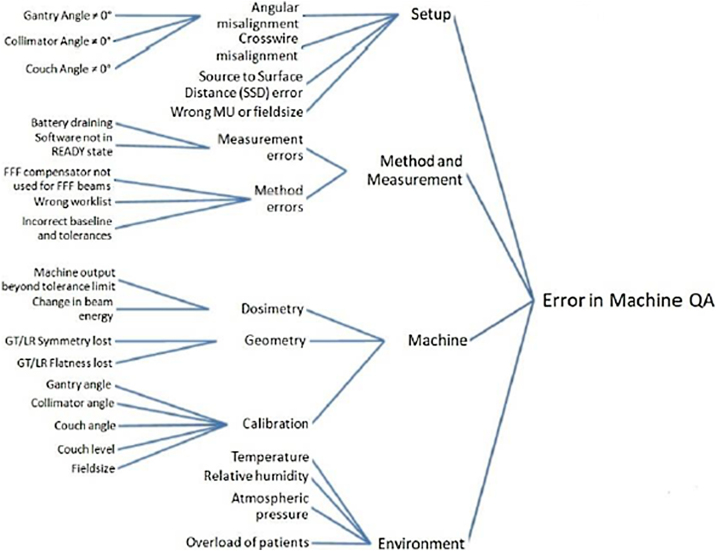
After a treatment-based error has been identified to occur in the Quality Assurance process performed by the QCw software, four possible causes for error were identified with respect to the parameters being investigated in this work. These four broad divisions are Setup errors, Method and Measurement errors, Machine errors, and Environmental errors. Considering the four parameters which are the subject of this study, a root-cause analysis was performed and represented in the form of an Ishikawa diagram. The diagram is provided below (Fig. 11).
Fig. 11.
Ishikawa diagram for loss in control.
4. Discussions
4.1. Control charts
From preliminary observation of the SPC results obtained from the Shewhart charts, the Flatness, Symmetry LR and the BQF parameters (Figs. 2a, 4a, and 5a) are observed to be within the specification limits. For all three parameters, EWMA plot is not found to be beyond control for any of the variables. But upon further observation, the Flatness parameter is observed to have an upward trend for the entire duration of the collected data (Fig. 2b), implying that some internal process parameter is causing loss of control in flatness over time. This observation cannot be concluded from only Shewhart chart analysis since it is insensitive to small magnitudes of loss in control.
For the Symmetry GT parameter, both the Shewhart chart (Fig. 3a) and the EWMA chart (Fig. 3b) results confirm the hypothesis of a significant loss in control that has already taken place. Corrective measures are needed to be taken based upon these results.
In the Shewhart charts, the 11th subgroup range is found to be beyond the limits for both Symmetry GT (Fig. 3a) and BQF (Fig. 5a) parameters. Upon investigation, it was found that the 11th subgroup coincides with a break in recording of observations over a period of two months (October and November 2017) due to logistical issues at the treatment facility. The discontinuity in chronology is ascertained as the cause for intra-group disagreement resulting in high R value. The 16th subgroup range for Symmetry GT (Fig. 3a) is also beyond limits and can be put down to overall loss in control as already established by the Xbar chart.
The process is observed to be at a significantly lower level of control for 10 MV dose deliveries. Flatness, Symmetry LR and BQF parameters are found to go beyond the limits of the Shewhart chart (Figs. 6a, 8a, and 9a), indicating a major loss in control. The Symmetry GT parameter has only one minor deviation from control in the Shewhart chart (Fig. 7a) but after using EWMA analysis (Fig. 7b), a continuing trend in loss of control can be identified.
The CUSUM charts for Symmetry (LR) for 6 MV beam (Fig. 10) highlights one major area of loss in control which remained undetected by the Shewhart charts and the EWMA charts. The corresponding Shewhart chart (Fig. 4a) and the EWMA (Fig. 4b) chart show a considerably high level of control for this variable but the CUSUM chart for the parameter shows a nearly constant deviation in process value from the target value.
Since the individual detector readings which derive BQF values in the QCw software are not available to the medical physicist and we depend on a mathematical function to perform its QA, this parameter merits some special discussion. While the variation in actual PDD values is translated into suitable energy indices like BQF, it cannot be categorically stated with certainty that a specific percentage of deviation noted in the energy index is equivalent to that same percentage of deviation in actual beam energy or in dose delivery at the point of application.30 We assume in this work the BQF quality index in the QCw device to be an accurate representation of PDD and actual beam energy, but this requires more attention and research and serves as a possibility for future investigation.
4.2. Control limits and action limits
It is to be noted that following the TG 142 QA protocol used at our facility as mentioned in the introduction, all of the data points used in this work were within the allowable tolerance range, which indicates that the machine had never compromised the treatment quality and would produce no clinical consequences. The tolerances set by the protocol fix the action limits which determine if a particular data point is acceptable for treatment application or not. But the goal of SPC in machine QA is not limited to analyzing the fitness of individual data points, but it concerns the overall health of the dose delivery mechanism in general.
Our objective, therefore, is to create a set of control limits, smaller than the action limits, which reliably demarcate the region beyond which the excursion of a process parameter would indicate loss in process control due to some systematic error. Since the analysis being carried out here is retrospective in nature, it brings forth the question if anomalous data points now known to and identified by the physicist should be included in the data set while calculating control limits. As pointed out by Sanghangthum et al.,19 known excursions beyond control should be omitted from the data set only when the reason for the error is clearly known and its recurrence has been prevented. Finally, the justification of the use of SPC in machine QA lies in the fact that upon retrospective analysis we are now capable of identifying over the treatment time scale exactly when loss in process control started, investigate the possible causes, and find a method of correcting the system error.
4.3. Ishikawa diagram
For creating the Ishikawa diagram, each of the broad errors identified are further escalated and broken down into discrete and identifiable sources of error. The purpose of doing this exercise is two-pronged. Firstly, it provides any user of this QA software with an exhaustive list of root causes behind loss of process control in their QA procedure, and thereby assists the medical physicist in easy identification of the cause relevant to him/her. Secondly, by breaking down each cause into very specific and discrete elements, it becomes easier for the physicist to decide upon the rectification measures necessary since the elements in the diagram themselves do not overlap and all require very distinct and different methods of redressal.
5. Conclusions
The aim of this study was to examine the validity of using statistical process control techniques to maintain process stability during machine QA of a linear accelerator. The precision of the QA readings was initially verified using reproducibility tests. The degree of process control for each measured variable of different beam intensities was then investigated using Shewhart charts, EWMA charts and CUSUM curves. For the 6 MV beams, three out of the four parameters investigated were found to exhibit moderate to high process control. For the 10 MV beams, process control was found to be at a considerably lower level. The EWMA charts allowed the user to separate major losses in control from minor ones. The CUSUM charts pointed out some deviation from the target value in most of the cases for both 6 MV and 10 MV beams. Retrospective analysis of the data therefore indicated instances of loss in process control in spite of the machine QA data being within allowable action limits. In conclusion, the use of SPC charts has assisted the physicist in identifying loss in control during machine QA. When implemented on a real-time basis with daily QA data being fed into the SPC calculation, the SPC methodology is therefore expected to assist the user in early recognition of trends that are likely to culminate in a total loss of control.
The Ishikawa diagram highlighted four major sources of error in this process – Setup, Method and Measurement, Machine, and Environment. Each of these sources were further classified and broken down into discrete and easily identifiable root causes for error identified by QCw device. The Ishikawa chart will be of assistance in the future to any medical physicist in the process of troubleshooting for abnormality observed in machine QA results.
Conflict of interest
None.
Financial disclosure
There is nothing to declare.
References
- 1.Van Esch A., Bogaerts R., Kutcher G.J., Huyskens D. Quality assurance in radiotherapy by identifying standards and monitoring treatment preparation. Radiother Oncol. 2000;56(1):109–115. doi: 10.1016/s0167-8140(00)00190-0. [DOI] [PubMed] [Google Scholar]
- 2.Mahan S.L., Chase D.J., Ramsey C.R. Technical note: output and energy fluctuations of the tomotherapy Hi-Art helical tomotherapy system. Med Phys. 2004;31(7):2119–2120. doi: 10.1118/1.1763007. [DOI] [PubMed] [Google Scholar]
- 3.Binny D., Lancaster C.M., Kairn T., Trapp J.V., Crowe S.B. Radiotherapy quality assurance using statistical process control. In: Lhotska L., Sukupova L., Lacković I., Ibbott G.S., editors. World congress on medical physics and biomedical engineering. Springer Singapore; Singapore: 2018. pp. 437–442. [Google Scholar]
- 4.Pawlicki T., Whitaker M. Variation and control of process behavior. Int J Radiat Oncol Biol Phys. 2008;71(1):S210–S214. doi: 10.1016/j.ijrobp.2007.05.096. [DOI] [PubMed] [Google Scholar]
- 5.Gerard K., Grandhaye J.P., Marchesi V. Feasibility study of using statistical process control to optimize quality assurance in radiotherapy. J Qual Maint Eng. 2009;15(4):331–343. [Google Scholar]
- 6.Sanghangthum T., Suriyapee S., Srisatit S., Pawlicki T. Statistical process control analysis for patient-specific IMRT and VMAT QA. J Radiat Res. 2013;54(3):546–552. doi: 10.1093/jrr/rrs112. [DOI] [PMC free article] [PubMed] [Google Scholar]
- 7.Breen S.L., Moseley D.J., Zhang B.B., Sharpe M.B. Statistical process control for IMRT dosimetric verification. Med Phys. 2008;35(10):4417–4425. doi: 10.1118/1.2975144. [DOI] [PubMed] [Google Scholar]
- 8.Jassal K., Sarkar B., Munshi A. Consistency analysis for the performance of planar detector systems used in advanced radiotherapy. Int J Cancer Ther Oncol. 2015;3(1):1–9. [Google Scholar]
- 9.van Etmpt W., Nijsten S., Mijnheer B., Dekker A., Lambin P. The next step in patient-specific QA: 3D dose verification of conformal and intensity-modulated RT based on EPID dosimetry and Monte Carlo dose calculations. Radiother Oncol. 2008;86(1):86–92. doi: 10.1016/j.radonc.2007.11.007. [DOI] [PubMed] [Google Scholar]
- 10.Moore S.J., Herst P.M., Louwe R.J.W. Review of the patient positioning reproducibility in head-and-neck radiotherapy using statistical process control. Radiother Oncol. 2018;127(2):183–189. doi: 10.1016/j.radonc.2018.01.006. [DOI] [PubMed] [Google Scholar]
- 11.Lowther N.J., Hamilton D.A., Kim H., Evans J.M., Marsh S.H., Louwe R.J.W. Monitoring anatomical changes of individual patients using statistical process control during head-and-neck radiotherapy. Phys Imaging Radiat Oncol. 2019;9(1):21–27. doi: 10.1016/j.phro.2018.12.004. [DOI] [PMC free article] [PubMed] [Google Scholar]
- 12.Ravindran B.P., Fairclough L., Jaywant S.M. Phantom dosimetry for conformal stereotactic radiotherapy with a head and neck localizer frame. Phys Med Biol. 2001;46(7):1975–1984. doi: 10.1088/0031-9155/46/7/317. [DOI] [PubMed] [Google Scholar]
- 13.Gerard K., Grandhaye J.P., Marchesi V., Kafrouni H., Husson F., Aletti P. A comprehensive analysis of the IMRT dose delivery process using statistical process control (SPC) Med Phys. 2009;36(4):1275–1285. doi: 10.1118/1.3089793. [DOI] [PubMed] [Google Scholar]
- 14.Binny D., Mezzenga E., Lancaster C.M., Trapp J.V., Kairn T., Crowe S.B. Investigating output and energy variations and their relationship to delivery QA results using statistical process control for helical tomotherapy. Phys Medica. 2017;38:105–110. doi: 10.1016/j.ejmp.2017.05.052. [DOI] [PubMed] [Google Scholar]
- 15.Binny D., Lancaster C.M., Kairn T., Trapp J.V., Crowe S.B. Monitoring daily QA 3 constancy for routine quality assurance on linear accelerators. Phys Medica. 2016;32(11):1479–1487. doi: 10.1016/j.ejmp.2016.10.021. [DOI] [PubMed] [Google Scholar]
- 16.Nguyen C.M., Baydush A.H., Ververs J.D., Isom S., Able C.M., Munley M.T. Operational consistency of medical linear accelerators manufactured and commissioned in series. tipsRO. 2018;7:6–10. doi: 10.1016/j.tipsro.2018.05.001. [DOI] [PMC free article] [PubMed] [Google Scholar]
- 17.Sanghangthum T., Suriyapee S., Kim G.Y., Pawlicki T. A method of setting limits for the purpose of quality assurance. Phys Med Biol. 2013;58(19):7025–7037. doi: 10.1088/0031-9155/58/19/7025. [DOI] [PubMed] [Google Scholar]
- 18.Pawlicki T., Whitaker M., Boyer A.L. Statistical process control for radiotherapy quality assurance. Med Phys. 2005;32(9):2777–2786. doi: 10.1118/1.2001209. [DOI] [PubMed] [Google Scholar]
- 19.Sanghangthum T., Suriyapee S., Srisatit S., Pawlicki T. Retrospective analysis of linear accelerator output constancy checks using process control techniques. J Appl Clin Med Phys. 2013;14(1):147–160. doi: 10.1120/jacmp.v14i1.4032. [DOI] [PMC free article] [PubMed] [Google Scholar]
- 20.Binny D., Aland T., Archibald-Heeren B.R., Trapp J.V., Kairn T., Crowe S.B. A multi-institutional evaluation of machine performance check system on treatment beam output and symmetry using statistical process control. J Appl Clin Med Phys. 2019;20(3):71–80. doi: 10.1002/acm2.12547. [DOI] [PMC free article] [PubMed] [Google Scholar]
- 21.Carver A., Rowbottom C. Varian MPC as a statistical process control tool. Med Phys. 2016;43(6):3753. [Google Scholar]
- 22.Papakostidi A., Tolia M., Tsoukalas N. Quality assurance in health services: the paradigm of radiotherapy. J BUON. 2014;19(1):47–52. [PubMed] [Google Scholar]
- 23.Pawlicki T., Mundt A.J. Quality in radiation oncology. Med Phys. 2007;34(5):1529–1534. doi: 10.1118/1.2727748. [DOI] [PubMed] [Google Scholar]
- 24.Mancosu P., Nicolini G., Goretti G. Applying Lean-Six-Sigma methodology in radiotherapy: lessons learned by the breast daily repositioning case. Radiother Oncol. 2018;127(2):326–331. doi: 10.1016/j.radonc.2018.02.019. [DOI] [PubMed] [Google Scholar]
- 25.Klein E.E., Hanley J., Bayouth J. Task group 142 report: quality assurance of medical accelerators. Med Phys. 2009;36(9):4197–4212. doi: 10.1118/1.3190392. [DOI] [PubMed] [Google Scholar]
- 26.Kutcher G.J., Coia L., Gillin M. Comprehensive QA for radiation oncology - Report Of AAPM radiation-therapy committee task-group-40. Med Phys. 1994;21(4):581–618. doi: 10.1118/1.597316. [DOI] [PubMed] [Google Scholar]
- 27.Montgomery D.C. John Wiley & Sons, Inc.; Hoboken, New Jersey: 2005. Introduction to statistical quality control. [Google Scholar]
- 28.Woodall W.H., Mahmoud M.A. The inertial properties of quality control charts. Technometrics. 2005;47(4):425–436. [Google Scholar]
- 29.Ekaette E., Lee R.C., Cooke D.L., Iftody S., Craighead P. Probabilistic fault tree analysis of a radiation treatment system. Risk Anal. 2007;27(6):1395. doi: 10.1111/j.1539-6924.2007.00976.x. [DOI] [PubMed] [Google Scholar]


