Abstract
Several welds and associated heat-affected zones (HAZs) on two API X70 and two API X52 pipes were tested to determine the fatigue crack growth rate (FCGR) in pressurized hydrogen gas and assess the area of the pipe that was most susceptible to fatigue when subjected to hydrogen gas. The relationship between FCGRs for welds and HAZs compared to base metal is discussed relative to local residual stresses, differences in the actual path of the crack, and hydrogen pressure effects.
Keywords: fatigue crack growth rate, high-pressure hydrogen, hydrogen embrittlement, pipe steels, residual stress
1. Introduction
Ferritic steels are known to exhibit a loss of tensile ductility in the presence of hydrogen [1–5]. However, when evaluating ferritic steels for transporting hydrogen gas, the response of the material to cyclic loading is far more important than evaluating ductility loss when determining fitness-for-service and designing for safety. This is because pipelines operate at a safety margin well below the yield strength, and virtually all of the loss in ductility for pipeline steels is encountered after the ultimate tensile strength is achieved, as observed in the stress-strain curves of Refs. [6, 7]. With cyclic loading, however, a crack can initiate and grow, for example, at weld stress concentrations, when global stresses are well below the yield strength. Furthermore, pipelines experience periodic pressurization for gas storage and depressurization as the gas is consumed. Two to three pressurization cycles are expected per day, which can provide the driving force needed for fatigue crack growth (FCG).
A comprehensive testing program was conducted at the National Institute of Standards and Technology (NIST) over the course of three years on the base metal from four pipelines [8, 9]. Two API-5L X52 steels and two API-5L X70 steels were tested in air and in hydrogen gas pressurized to 5.5 MPa and 34 MPa, and at three cyclic loading rates, 1 Hz, 0.1 Hz, and 0.01 Hz, with a loading ratio of R = 0.5 (where R is the ratio of minimum to maximum applied force). The results of the test program demonstrated that there is no correlation between material strength and the fatigue crack growth rate (FCGR) [10], unlike results observed with monotonically increasing loading such as tensile strength testing and measurement of fracture toughness [2, 11, 12]. The effect of gas pressure is significant, the effect of cyclic loading rate in these three decades is minor, and it appears that microstructure may play a large role in the FCGR. Based on this information, a model was developed at NIST to characterize the effects of pressure and loading rate on steels encompassing these grades [13]. This model is under consideration for incorporation into the American Society of Mechanical Engineers (ASME) B31.12 code for Hydrogen Piping and Pipelines [14], and it is intended to expand the choice of steel grades used in the design of future hydrogen pipelines.
Aside from damage that is inflicted from a third party, the most likely source of a flaw that can initiate into a crack is in the weld. For this reason, the fatigue properties of the welds, as well as those of the base metal, must be characterized. There is relatively little known about the FCGR of pipeline weld materials [15] and their associated heat-affected zones (HAZs) in the presence of hydrogen [16–20], and even less is known about their FCGRs under conditions of pressurized hydrogen gas [16, 18]. All studies indicate that the FCGR of the weld fusion zone and/or HAZ is at least an order of magnitude higher in the presence of hydrogen than in air at values of the stress intensity range (ΔK) greater than 15 MPa·m½.
Differences among base metal, weld metal, and HAZs tested in the presence of hydrogen are more subtle. Wang et al. [20] concluded that the X70 base metal exhibited a lower FCGR than the HAZ from a submerged arc weld of two plates for the same conditions, where the specimens were subjected to saturated H2S in solution. Thodla et al. [19] concluded that the girth weld exhibited more fatigue resistance than either the base metal or the HAZ acquired from X65 welded pipe when tested in an H2S-saturated solution. Somerday [21] showed that at low values of ΔK (< 12 MPa·m½), the HAZ for the X65 material had the lowest FCGR, whereas at higher values of ΔK, the FCGR for the base metal, weld, and HAZ were within the uncertainty of the measurement when tested at a hydrogen gas pressure of 21 MPa. The data of Moro et al. [16] failed to show any obvious differences among the base metal, girth weld metal, and the HAZ from the girth weld of an X80 pipe tested in hydrogen gas pressurized to 10 MPa.
This confusion demonstrates the need for more data and a systematic approach to the problem. Are the observed differences the result of the different strengths of the materials tested, their microstructures, the test conditions, the welding technique used, or some other variable? Has the susceptibility been overstated, and all differences are within the variability of the measurement?
In an effort to elucidate the comparative FCGRs of base metal, weld metal, and HAZ, we report here studies conducted at NIST on cyclic-loading tests from these regions on different pipeline steels, welded with different techniques, and at two hydrogen gas pressures. Particularly desirable are data at values of ΔK between 8 MPa·m½ and 15 MPa·m½, as hydrogen pipelines are expected to operate in this regime.
2. Materials
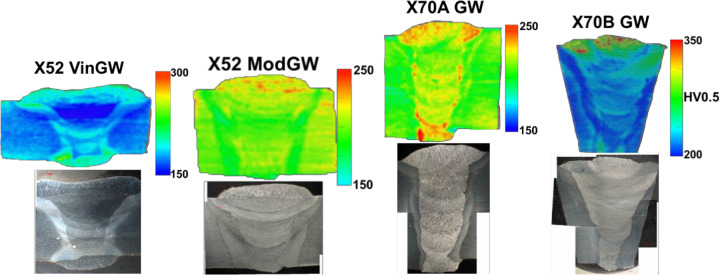
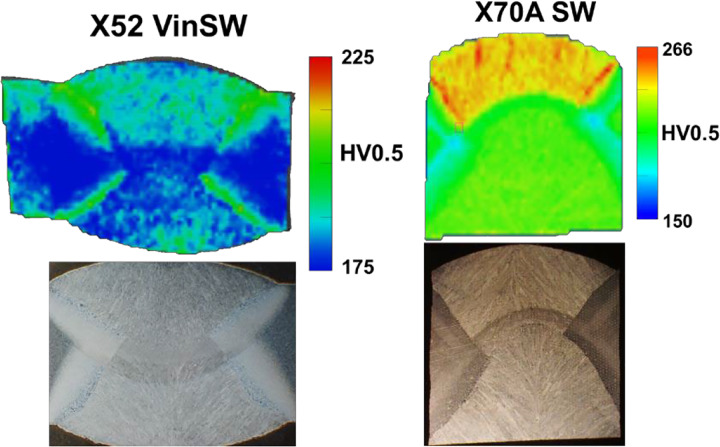
Sections from four different pipes were used to investigate the FCGRs of base metal, weld metal, and the HAZ associated with the weld. Two of the pipes were API 5L X52, one produced in 1964 (referred subsequently as “X52 vintage”) and the other produced in 2011 (referred subsequently as “X52 modern”). The other two pipes were API 5L X70 (referred to subsequently as “X70A,” and “X70B”), both of which were manufactured about 2005. Table 1 provides the dimensions of each of the four pipes. The seam and girth welds, and their associated HAZs, were tested from the X52 vintage pipe and the X70A pipe. Only the girth welds and their associated HAZs were tested from the X52 modern pipe and the X70B pipe. This information is shown in Table 2, along with the techniques used to construct the weld (SMAW= shielded metal arc welding, GMAW = gas metal arc welding, and SAW = submerged arc welding). Figure 1 shows composite images of the girth welds, which were joined with multipass welding procedures, and their corresponding microhardness maps; Fig. 2 shows the same for the two seam welds. Detailed welding parameters used for pipe fabrication are unknown, but pipe construction conformed with American Petroleum Institute (API) standards. The hardest area encountered was in the cap pass of the X70B girth weld. The softest weld region was in the heart of the X52 vintage girth weld. Furthermore, softening was observed in the HAZ of the modern girth weld, and in that of the X70B girth weld. Areas of increased hardness were observed at the base of each pass of the various welds, where more rapid cooling near the interface between weld passes allowed finer grains to form.
Table 1.
Pipe dimensions.
| Material | Pipe Diameter, mm (in) | Wall Thickness, mm |
|---|---|---|
| X52 vintage | 914 (36) | 10.6 |
| X52 modern | 508(20) | 10.6 |
| X70A | 914 (36) | 18 |
| X70B | 914 (36) | 22 |
Table 2.
Materials tested for this investigation.
| Pipe | Base Metal | Girth Weld | Girth Weld HAZ | Seam Weld | Seam Weld HAZ |
|---|---|---|---|---|---|
| X52 Vintage | X | X (SMAW) | X | X (SAW) | X |
| X52 Modern | X | X (GMAW) | X | ||
| X70A | X | X (GMAW) | X | X (SAW) | X |
| X70B | X | X (GMAW) | X |
Fig. 1.
Microhardness maps and images of the four girth welds tested for FCGR. From left to right: vintage X52; modern X52; X70A; and X70B. Not to scale; see Table 1 for wall thicknesses to reference image sizes. Microhardness maps show accompanying scales of Vickers hardness.
Fig. 2.
Microhardness maps and images of the two seam welds tested for FCGR. From left to right: vintage X52 and X70A. Not to scale; see Table 1 for wall thicknesses to reference image sizes Microhardness maps show accompanying scales of Vickers hardness.
The chemical composition of the base metals can be found in Table 3, and that of the girth welds can be found in Table 4 (GW for girth weld and SW for seam weld). Composition was determined with atom emissions spectroscopy. The main differences between the base metal and the corresponding weld filler material are: For the X52 vintage material, the weld has less C and more Mo; there is more S, Ni, Cr, and Mo in the weld of the modern X52 than in its base metal; there is more C and Si, and less Ni, Cr, and Ti in the weld metal of X70A than in its base metal; and there is more C, Ni, and Mo, and less Cu, Cr, and Nb in the weld metal of, X70B than in its base metal. The high C (and S) content in the base metal from the vintage X52 pipe is indicative of its age, as modern metallurgy lowers the C content in order to improve weldability. Also, the vintage X52 pipe does not contain Nb as a microalloying element, since thermo-mechanical rolling processes were not used until more recently.
Table 3.
Bulk chemical compositions of the base metals (in mass fraction).
| Element | C | Mn | P | S | Si | Cu |
|---|---|---|---|---|---|---|
| X52 Vintage | 0.00238 | 0.0096 | 0.00011 | 0.00021 | 0.00064 | 0.00085 |
| X52 Modern | 0.00071 | 0.0106 | 0.00012 | 0.00004 | 0.0024 | 0.00016 |
| X70A | 0.00048 | 0.0143 | 0.00009 | 0.00001 | 0.0017 | 0.0022 |
| X70B | 0.00053 | 0.0153 | 0.0001 | 0.00001 | 0.0016 | 0.0025 |
| Ni | Cr | Mo | V | Nb | Ti | Al | |
|---|---|---|---|---|---|---|---|
| X52_vintage | 0.0005 | 0.00014 | 0.00004 | 0.00002 | 0.00001 | 0.00002 | 0.00002 |
| X52_modern | 0.00016 | 0.00033 | 0.00003 | 0.00004 | 0.00026 | 0.00038 | 0.00017 |
| X70A | 0.0014 | 0.0024 | 0.00005 | 0.00004 | 0.00054 | 0.00027 | 0.00015 |
| X70B | 0.0014 | 0.0023 | 0.00003 | 0.00004 | 0.00054 | 0.00024 | 0.00012 |
Table 4.
Bulk chemical compositions of the girth and seam weld metals (in mass fraction).
| Element | C | Mn | P | S | Si | Cu |
|---|---|---|---|---|---|---|
| X52 Vintage GW | 0.00110 | 0.00350 | 0.00009 | 0.00025 | 0.00100 | 0.00024 |
| X52 Modern GW | 0.00130 | 0.00780 | 0.00010 | 0.00130 | 0.00150 | 0.00026 |
| X70A GW | 0.00087 | 0.01360 | 0.00010 | 0.00009 | 0.00730 | 0.00200 |
| X70B GW | 0.00190 | 0.00860 | 0.00010 | 0.00014 | 0.00120 | 0.00047 |
| X52 Vintage SW | 0.00240 | 0.01020 | 0.00012 | 0.00019 | 0.00069 | 0.00087 |
| X70A SW | 0.00087 | 0.01460 | 0.00011 | 0.00009 | 0.00240 | 0.00170 |
| Element | Ni | Cr | Mo | V | Nb | Ti | Al |
|---|---|---|---|---|---|---|---|
| X52 Vintage GW | 0.00046 | 0.00018 | 0.00430 | 0.00006 | 0.00001 | 0.00005 | 0.00010 |
| X52 Modern GW | 0.00610 | 0.00110 | 0.00093 | 0.00003 | <0.00001 | 0.00009 | 0.00006 |
| X70A GW | 0.00059 | 0.00043 | 0.00002 | 0.00003 | 0.00010 | 0.00002 | 0.00012 |
| X70B GW | 0.00760 | 0.00088 | 0.00130 | 0.00004 | <0.00001 | 0.00011 | 0.00006 |
| X52 Vintage SW | NA | 0.00015 | 0.00001 | 0.00002 | <0.00001 | 0.00001 | 0.00006 |
| X70A SW | NA | 0.00180 | 0.00048 | 0.00004 | 0.00051 | 0.00007 | 0.00029 |
The differences in the weld chemistry were probably because welds are typically designed to slightly overmatch the grade of the base metal. However, exceptions were found among these materials. Table 5 contains the tensile properties acquired in air for the base metal (BM), weld metal (GW for girth weld and SW for seam weld), and the HAZ associated with that weld (GH or SH, respectively). Round tensile specimens from the BM were circumferentially oriented, and the GW, SW, GH, and SH specimens were aligned with the weld and the HAZ; the round all-weld specimens had a diameter = 6.4 mm, and the HAZ specimens had a diameter = 3.2 mm. Tests were conducted according to ASTM E-8 [22]. As can be seen, the modern X52 qualifies for an X70 grade, so the strength of the GW is actually slightly undermatched to the BM. The GW from the X70B pipe was also slightly undermatched, but both the GW and SW from the vintage X52 pipe exhibited a much higher yield strength than that of its base metal, which was not actually sufficient to qualify for the X52 grade.
Table 5.
Tensile properties of the base metal (BM), girth weld (GW), seam weld (SW), girth weld HAZ (GH), and seam weld HAZ (SH) acquired in air at room temperature [YS = yield strength, YP = upper yield point, UTS = ultimate tensile strength, eu = uniform elongation, ef = elongation to failure, and E = elastic modulus].
| X52 Vin BM Avg | X52 Vin GW Avg | X52 Vin GH Avg | X52 Vin SW Avg | X52 Vin SH Avg | X52 Mod BM Avg | X52 Mod GW Avg | X52 Mod GH Avg | |
|---|---|---|---|---|---|---|---|---|
| 0.2% offset YS, MPa | 325 | 428 | 372 | 425 | 462 | 488 | 463 | 463 |
| YP, MPa | 443 | 371 | 425 | 455 | 489 | 469 | ||
| UTS, MPa | 526 | 520 | 531 | 549 | 551 | 588 | 567 | 526 |
| eu | 0.120 | 0.134 | 0.129 | 0.105 | 0.080 | 0.095 | 0.117 | 0.074 |
| ef | 0.150 | 0.312 | 0.247 | 0.229 | 0.196 | 0.209 | 0.261 | 0.203 |
| E, GPa | 223 | 193 | 207 | 199 | 209 | 215 | 210 | 198 |
| X70A BM Avg | X70A GW Avg | X70A GH1 | X70A SW Avg | X70A SH Avg | X70B BM Avg | X70B GW AVG | X70B GH Avg | |
| 0.2% offset YS, MPa | 509 | 563 | 516 | 507 | 496 | 553 | 532 | 521 |
| YP, MPa | 575 | 527 | 516 | 493 | 570 | 512 | ||
| UTS, MPa | 609 | 627 | 603 | 594 | 603 | 640 | 616 | 596 |
| eu | 0.120 | 0.088 | 0.068 | 0.114 | 0.056 | 0.090 | 0.095 | 0.057 |
| ef | 0.297 | 0.263 | 0.233 | 0.294 | 0.205 | 0.274 | 0.260 | 0.187 |
| E, GPa | 221 | 204 | 194 | 194 | 212 | 211 | 208 | 207 |
In general, the HAZ materials exhibited less uniform elongation and elongation to failure than either the BM or the weld metal (WM), except for the GH from the vintage X52 pipe. Note that there was only one successful test of the X70A GH. All other reported values are the mean of two tests.
The microstructures of the BM from the modern X52 and the X70A pipes appear to be very similar, as can be seen in Fig. 3, which shows the through-thickness microstructure of all four BMs. The X52 vintage pipe has a ferrite-pearlite composition, and the others were determined to be polygonal and acicular ferrite from optical microscopy. There may be other constituents that are not resolvable without employing more advanced analytical techniques. Microstructure images of the welds and their HAZs are shown in Fig. 4.
Fig. 3.
Microstructure images of the four base metals, from left to right: vintage X52; modern X52; X70A; and X70B. All images are shown with the rolling direction horizontal.
Fig. 4.
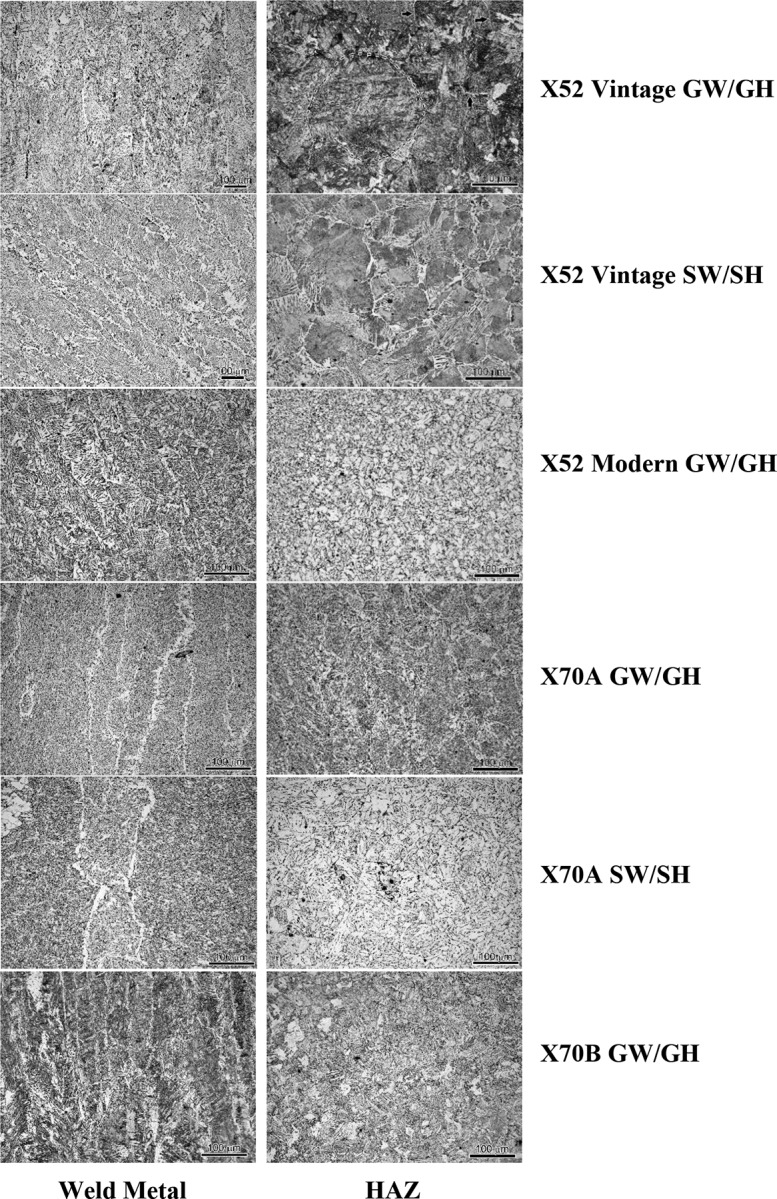
Microstructure images of the welds (left) and their HAZs (right). The scale bars are 100 μm long.
The girth weld from the vintage X52 pipe exhibits a solidification structure consisting of elongated prior austenite grains that are highly variable in size. It has 9 % allotriomorphic ferrite (the white features outlining prior austenite grain boundaries), with some Widmanstätten side plates also along prior austenite boundaries, and the remainder appears to be acicular ferrite. There is some evidence of rutile inclusions. The HAZ associated with the girth weld is highly variable; some areas show coarse- and fine-grained zones, and others have only fine grains. The largest grains near the weld are ~200 μm, whereas in other areas of the HAZ, the largest grains are 75 μm. The grains appear to contain microconstituents including martensite (most of the dark features in the HAZ) with allotriomorphic ferrite (shown with arrows) around the prior austenite grain boundaries (dotted line). The fine grains appear to be primarily ferrite (light areas), and are finer (3 μm) than the original grain size (~10 μm).
The dual-pass seam weld from the vintage X52 pipe has elongated prior austenite grains, also highly variable in size. It is 16 % allotriomorphic ferrite (with Widmanstätten plates) along prior austenite boundaries, and the remainder is Widmanstätten ferrite (finer plates), with ~40 % of what appears to be pearlite. In the associated HAZ, areas show coarse- and fine-grained zones. The largest grains near the weld average 132 μm, and the grains appear to contain microconstituents of martensite with allotriomorphic ferrite around the prior austenite grain boundaries. The fine grains appear to be primarily ferrite, and they are finer (4 μm) than the original grain size (~10 μm).
Within the girth weld from the modern X52 pipe, the microstructure varies between beads. The top (final bead) is composed of Widmanstätten ferrite (with local allotriomorphic ferrite). Some prior austenite grains can be discerned. The beads nearest the top bead (less postweld heating) show pearlite grains mixed in with the ferrite, which indicate the solidification direction, whereas those beads heat-affected by later passes are primarily fine ferrite. Lower beads show equiaxed microstructure. The average coarse-grain size is ~6 μm, whereas the largest grains can be up to 30–40 μm. The fine grains have a similar grain size to base metal (4.3 versus 4.4 μm, respectively).
The girth weld from the X70A pipe has elongated prior austenite grains that are highly variable in size. It is 9 % allotriomorphic ferrite (with some Widmanstätten side plates) along prior austenite boundaries, which are more equiaxed. The remaining larger grains appear to be acicular ferrite. The largest grains within the HAZ are ~43 μm in diameter, and there appears to be some transformation to lath martensite.
The dual-pass seam weld from the X70A pipe has elongated prior austenite grains that are highly variable in size. It is composed of 10 % allotriomorphic ferrite (with some Widmanstätten side plates) along prior austenite boundaries; the remaining constituent appears to be acicular ferrite. Prior austenite boundaries are less visible, and the allotriomorphic ferrite is not always distinguishable at higher magnification. There is, however, growth of acicular ferrite grains. In the HAZ associated with the seam weld, the largest grains are ~50 μm in diameter.
The girth weld from the X70B pipe is composed of multiple beads, and there are two areas of microstructure: the original solidification microstructure and the heat-affected weld metal. The solidification structure is allotriomorphic ferrite (with some Widmanstätten side plates) along prior austenite boundaries. The top bead has clear elongated solidification, with the elongation along the path of cooling from most rapid at the bead edges to least rapid at the bead center. Other microconstituents are allotriomorphic ferrite along prior austenite boundaries, and Widmanstätten side plates extending through grains. The amount of allotriomorphic ferrite is highly dependent on location. The lower beads have solidification microstructure with highly variable prior austenite grain size; the remainder of the grain is composed primarily of acicular ferrite with localized extensive Widmanstätten plates through the grain. The root bead has a solidification macrostructure with directionality consisting of curved elongated structures that are primarily composed of acicular ferrite of varying grain size. Some areas of the highly variable HAZ show coarse- and fine-grained zones, and others are only fine grained. The largest grains near the weld can range from 50 to 90 μm in diameter, depending upon the location, and they appear to contain martensite. In the fine-grained zones, fine grains appear to be primarily ferrite.
3. Methods
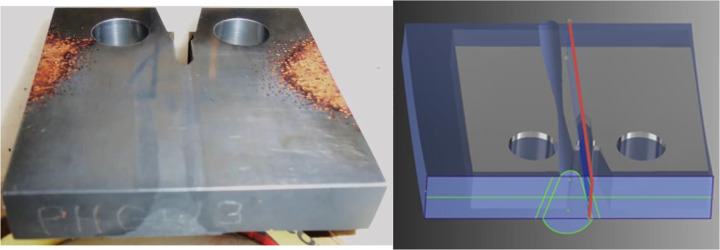
Compact-tension (CT) specimens were machined according to the ASTM 647–11 standard [23] with a nominal W = 44.5 mm, where W is the specimen width, in the C-L orientation for the BM, SW, and SH, and in the L-C orientation for the GW and GH specimens (Fig. 5). To test the HAZ from the vintage X52, modern X52, and X70A pipes, the machined notch was aligned such that the midpoint of the through- thickness was at the center of the HAZ (Fig. 6); therefore, the cracks for most specimens traversed mostly through the HAZ with small volumes of weld and base metals. The X70B material was sufficiently thick that a specimen could be machined at an angle in the through-thickness to obtain an all-HAZ notch in the specimen. Each specimen was machined with a chevron notch to facilitate initiation of the fatigue precrack and a straight crack front. The precracking was conducted at R = 0.1 in air at room temperature and at a cyclic-loading frequency of 15 Hz. A sinusoidal waveform was used. Most of the GW specimens were preloaded in compression at the chevron notch tip to 80 % of yield prior to precracking to promote fatigue crack initiation.
Fig. 5.
Schematic of the location and orientation of the weld and HAZ specimens with respect to the pipe.
Fig. 6.
Machined specimen (left) and drawing of specimen (right) that show how the machined notch was aligned to test the HAZ.
Specimens were tested according to ASTM E647–11 [23] at R = 0.5 and a cyclic-loading frequency of 1 Hz in air or hydrogen gas that was pressurized to either 5.5 MPa or 34 MPa. Either a triangular or sinusoidal waveform was used. There should be no measurable difference in FCGR, either in air or in hydrogen gas, because both of these waveforms provide short time durations at the peaks [24]. Two test chambers were available for conducting cyclic-loading tests; one allowed single specimens to be tested, and the second allowed up to 10 specimens to be tested simultaneously [25]. Nearly all of these tests were performed in the large chamber for multiple-specimen testing. Internal load cells were employed to ensure that the forces exerted on the specimen(s) were those that were specified and were not influenced by the friction of the high-pressure seals surrounding the actuating pull rod. Where material permitted, duplicate tests were conducted at the same condition to check the repeatability of the data. The purging procedure and a description of the pressure-maintenance protocol can be found in Ref. [8]. Samples of each lot of the test gas were acquired and analyzed to ensure that contaminants were not present.
Fatigue tests typically ran continuously for weeks because the frequency was low (1 Hz) and low levels of ΔK were desired. Each specimen was cyclically loaded at a constant force range (rising ΔK) until a crack length (a) of 0.75 W was reached. A clip gauge was attached at the load line, and the crack length was calculated from compliance. Data on cycle count, crack mouth opening displacement (CMOD), external force, and internal force were collected for 5 cycles out of every 200 cycles, and these values were used to calculate ΔK and a to generate graphs of FCGR (da/dN versus ΔK, where N is the number of cycles). An important goal of the test program was to obtain data at values of ΔK, when possible, between 8 MPa·m½ and 15 MPa·m½, because hydrogen pipelines are expected to operate in this regime.
The base metal data are shown with a single line that was visually fit to represent the data with one or more steady-state crack growth (i.e., Paris law) regions, as appropriate. Most of these data sets include multiple tests that, if shown individually, would mask the trends observed for the welds and HAZs. For a detailed account of the uncertainty of the FCGR measurements presented here, see Ref. [25].
4. Results
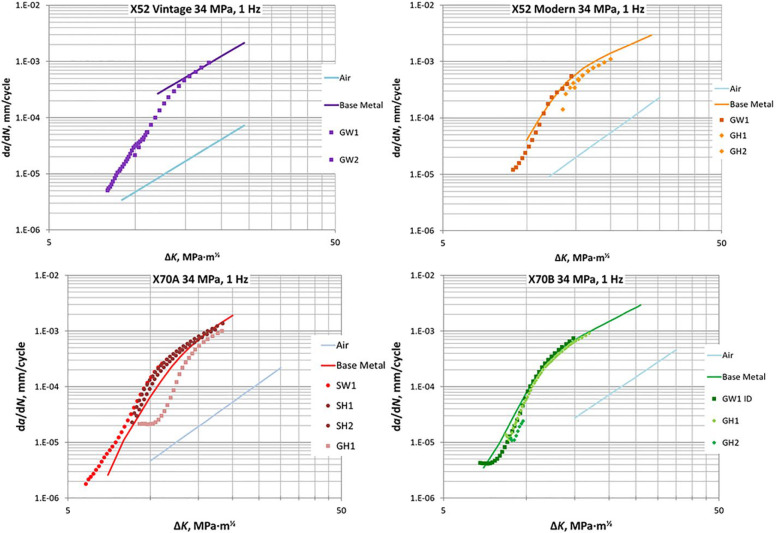
The results for FCGR in hydrogen gas at a pressure of 34 MPa for the weld fusion zone, associated HAZ, and base metal from the four pipeline materials studied are shown in Fig. 7. Not every material has tests completed for every condition. All the specimens tested show the expected considerable effect of hydrogen in elevating the FCGR over the rate in air in the important range between 10 MPa·m½ and 15 MPa·m½. This effect is about a factor of 20 in the X52 steels, and it ranges up to a factor of 30 in the X70 steels.
Fig. 7.
Data for the FCGRs from tests conducted in hydrogen gas pressurized to 34 MPa and at a cyclic loading frequency of 1 Hz for each pipe material: (A) vintage X52, (B) modern X52, (C) X70A, and (D) X70B.
The relationship of the FCGRs of the welds and the HAZs to that of the base metal is not consistent from pipe to pipe. The girth weld from the vintage X52 pipe exhibits a similar FCGR to the BM. The girth weld HAZ from the modern X52 pipe exhibits a lower FCGR than the BM, and the girth weld appears to behave similarly to the BM. However, the girth weld HAZ, the girth weld, and the base metal all have the same FCGR, within the uncertainty of the measurement. For the X70A material, the seam weld and its HAZ have a FCGR that is comparable to the BM; the girth weld HAZ, however, behaves very differently, because it exhibits significantly inhibited FCGR compared with other weld regions, except at high ΔK. Finally, the FCGR of the girth weld and its HAZ for the X70B pipe are both similar to that of the BM, in that they are within the uncertainty of the measurements.
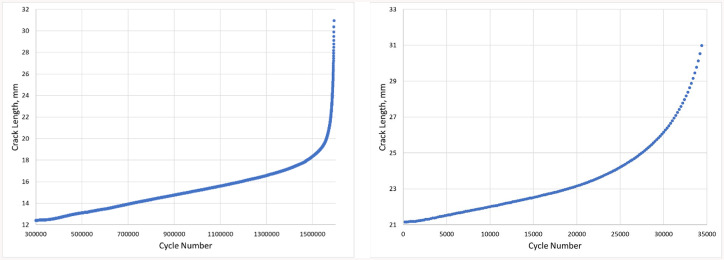
Several of the GW and GH specimens exhibited an unusual region at very low values of ΔK, where the value of ΔK increased without an increase in the value of da/dN. The plot of crack length with respect to number of cycles (a versus N) from these tests shows a very long linear increase, such as that shown in Fig. 8, followed by a rapid increase in the FCGR over a short span of ΔK.
Fig. 8.
Crack length vs. cycles for girth weld specimens, where one has a flat FCGR at the start of the test on X70B inner diameter of weld (left) and one has a typical FCGR from the X70B outer diameter of weld (right).
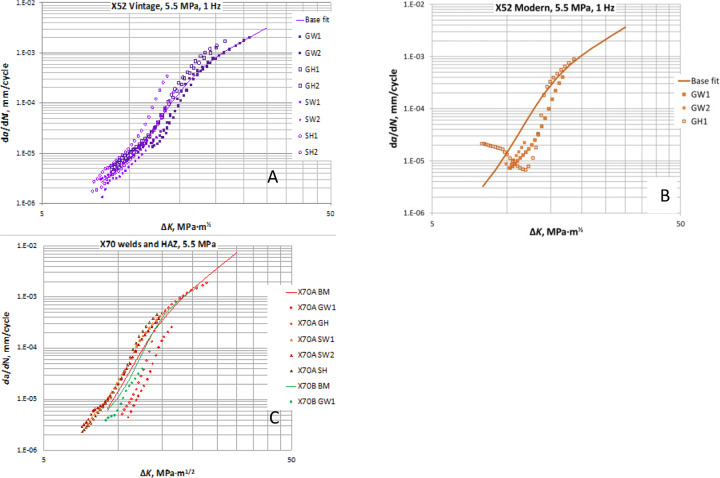
Figure 9A shows the data for the FCGR tests on the vintage X52 material tested in hydrogen gas pressurized to 5.5 MPa. The FCGR data from the HAZ from both the seam weld and the girth weld are slightly higher than those of the associated BM. The data from the girth weld fall slightly lower than those of the BM at values of ΔK below 15 MPa·m½ and the same as the BM data above that value of ΔK. The FCGR for the weld and HAZ from the modern X52 pipe (Fig. 9B) fall below the BM data, although the behavior of the HAZ is unusual, and more tests are needed. Both of the X70 girth welds and HAZs exhibit a reduced FCGR as compared with the BM, whereas the X70A seam welds and HAZ are slightly above the BM data (Fig. 9C).
Fig. 9.
FCGR data from the base metal, girth weld, and HAZs associated with the seam and girth welds from the vintage X52 pipe (A), the modern X52 pipe (B), and the two X70 pipes (C) tested at a hydrogen gas pressure of 5.5 MPa and cyclic loading frequency of 1 Hz.
5. Discussion
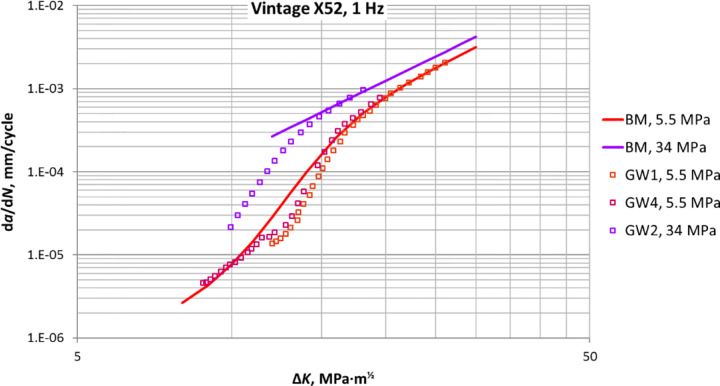
Results from this work show that welds and their HAZs from ferritic pipelines experience hydrogen- assisted fatigue cracking similar to that of the ferritic base metal. The FCGRs for all three locations in the pipe are at least an order of magnitude greater in hydrogen than those tested in air. As was observed for the base metal [26, 27], there was a pressure effect on the FCGR, such that the FCGR of specimens tested in hydrogen gas pressurized to 34 MPa was greater than that for specimens tested in hydrogen gas pressurized to 5.5 MPa. See Fig. 10 for an example with the vintage girth welds.
Fig. 10.
Example of the effect of hydrogen gas pressure on the FCGR of girth welds from the vintage pipe.
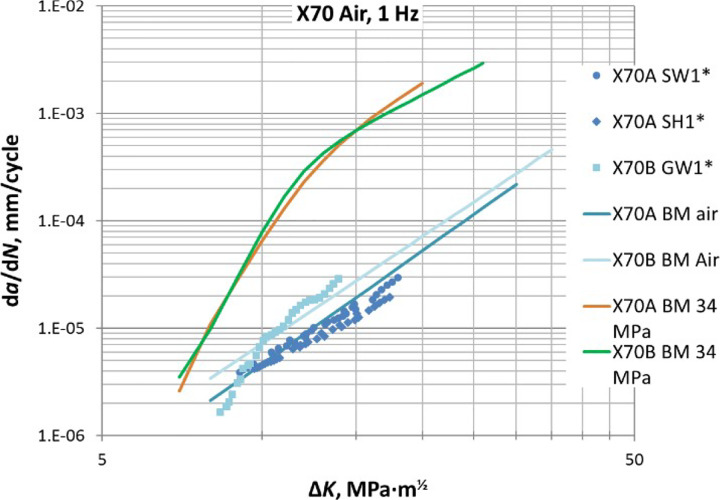
Figure 11 shows data from the SW and SH of the X70A pipe and the GW from the X70B pipe tested in air. The individual data sets for SW, SH, and GW all have asterisks, indicating that they did not fully comply with ASME E647. They are provided as a comparison to other, fully compliant data, but they should be regarded as suspect, because they had curved crack fronts, perhaps due to residual stresses, and in this case, ΔK can have considerable uncertainty. With no environmental effect, the FCGRs of welds, HAZs, and BM in air are expected to be similar. The fits to the BM data tested in air and in hydrogen gas pressurized to 34 MPa are shown for comparison. Recall that the weld and HAZ tests in pressurized hydrogen were very similar to those of the BM in the same environment, so this figure offers a good representation of the detrimental effect of hydrogen on the FCGRs. Similar behaviors were observed whether testing was conducted at a hydrogen gas pressure of 34 MPa or 5.5 MPa.
Fig. 11.
FCGR data in air for the seam weld (SW) and its HAZ from the X70A pipe, and the girth weld (GW) from the X70B pipe. Data fits for the base metal (BM) tested in air and at a hydrogen pressure of 34 MPa are shown for comparison.
Whether welds or HAZs exhibit greater FCGRs than the BM can depend on a number of factors: (1) the microstructure; (2) the welding technique employed; or (3) the overmatching or undermatching of the weld strength relative to that of the BM. This strength relationship of the weld to the BM would have a large effect on the residual stresses in the welds and HAZs, which has been shown to have a significant effect on FCGR in a previous study by Ronevich et al. [15]. These items are interrelated, as the ferrite-pearlite microstructure of the vintage X52 material provided readily available carbon to form martensite upon heating during the welding process. The SMAW technique was used for the girth weld in the vintage pipe, which probably introduced higher temperatures, whereas GMAW was used on the girth weld of the modern pipe. The combination of available carbon and high heat allows for formation of martensite in the HAZs of the X52 vintage steel. Slifka et al. [28] have shown that untempered martensite was present in the HAZ of the girth weld from the vintage pipe, but not in the modern pipe. San Marchi et al. [29] found that martensite was more susceptible to hydrogen embrittlement than ferrite, the dominant constituent in the girth weld HAZ from the modern X52 pipe, according to Slifka et al. [28]. The modern X52 girth weld HAZ is softer than the weld metal or the BM. The HAZ contained polygonal and acicular ferrite, according to Slifka et al. [28], similar to the BM, but with grain refinement. Likewise, the SH from the vintage X52 pipe generates a slightly higher FCGR, is harder than the BM, and contains martensite. The SH for the X70A pipe exhibited similar hardness and FCGR as the BM, and a very similar FCGR to the BM. Despite being softer than the BM and having a lower yield strength, the HAZ from the X70B girth weld tracked the BM FCGR very well for one specimen. At a hydrogen test pressure of 5.5 MPa, the FCGR for the GH and SH for the vintage X52 pipe again was slightly higher than for the BM, as was the SH for the X70A pipe.
In general, the FCGRs of the girth welds were either at or below the FCGR of the respective base metal for a given condition. The increased fatigue resistance is probably attributable to the multiple passes in the girth welds generating regions of harder and softer material within the fusion zone. The FCGR of the seam weld of the vintage X52 pipe behaved similarly to the BM, whereas that of the X70A pipe exhibited slightly less fatigue resistance, especially at low values of ΔK (< 15 MPa·m1/2). The girth and seam welds of the vintage X52 pipe had very similar yield strengths, approximately 100 MPa larger than that of the BM. The hardness map for the X70B seam weld shows that the first pass is harder than the second pass. This is not observed in the seam weld from the vintage X52 pipe, and it could account for less fatigue resistance in the seam weld of the X70A pipe.
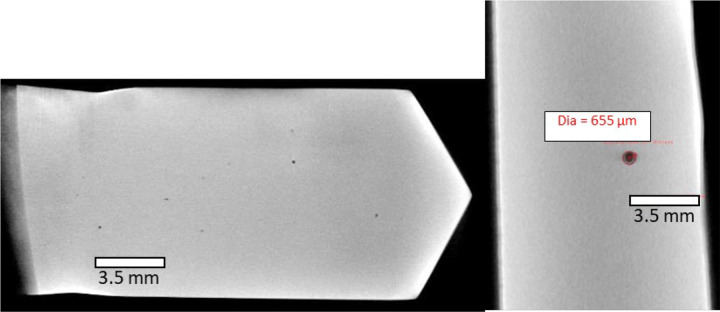
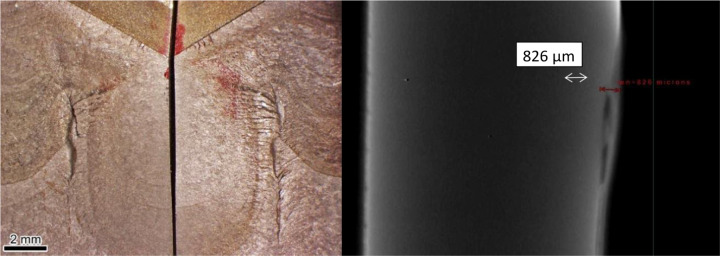
When testing welds, residual stresses are often targeted as being responsible for anomalous behavior. However, it would be expected that when specimens of this size are cut out of the pipe, residual stresses would be relieved in large part. However, residual stresses of a magnitude that can affect FCGR have been measured in welds and HAZs of X100 pipeline steel [15]. In that work, residual stresses tended to reduce the FCGR from the original values. It is possible that residual stresses affected the FCGR from tests conducted in air, as shown in Fig. 11. If sufficiently large residual stresses are left in the weld or HAZ samples following machining into C(T) specimens, then that could result in a shift of the air FCGR curve. Connolly et al. [30] found that, in general, the residual stresses of girth welds in these specimens were small (≤ |50| MPa) at a location 7 to 8 mm ahead of the precrack tip. Residual stress measurements were not conducted in the through-thickness direction of the girth welds. Other researchers have reported residual compressive stresses at the weld center and tensile stresses at the faces of a butt weld [31, 32]. Another issue that can be common in weld specimens is flaws that can pin a crack. X-ray tomography images of a post-tested girth weld specimen from the X70A pipe show that numerous flaws are distributed throughout the weld. Figure 12 (left) shows 10 flaws visible at one particular depth, and Fig. 12 (right) shows one large flaw with a diameter = 655 μm. These types of inhomogeneities could contribute to uneven crack fronts. Also, Fig. 13 shows that fissures formed on the fracture surface of several specimens cyclically loaded in pressurized hydrogen gas from what appears to be a pinned crack. Uneven and pinned crack fronts have the following effects. (1) Observed graphs of force versus CMOD exhibit a boomerang shape until the restrained area releases and the entire crack front evens out. (2) Because of this, the compliance is affected, which leads to suspect crack-length values. That is, use of the compliance method may calculate the shortest extent of the crack, rather than the average length of the crack. (3) If the pinning should start during the precrack phase, it is not possible to get an accurate measurement of the precrack length with the compliance method, which means that the effective modulus often is invalid. (4) This type of behavior can greatly retard or underrepresent the crack growth rate until the pinned location releases.
Fig. 12.
X-ray tomographic images of flaws found in the fusion zone of the girth weld from the X70A pipe.
Fig. 13.
Macrograph of fissure and pinning observed on the fracture surface of a cyclically loaded girth weld specimen (left), and an X-ray tomographic image showing the depth of the fissure reached 826 μm.
The flat crack growth per cycle at the start of some of the girth weld tests is the final anomaly that merits discussion. It should be noted that this phenomenon occurs only in tests of the girth weld and the girth weld HAZ. Furthermore, it was not observed in the tests from the vintage pipe. It can only be speculated that the overmatched weld provided a constraint that prevented this from occurring. Other possible causes were considered but have been disproven:
This phenomenon occurs in specimens with and without an uneven precrack, so uneven precracking can be excluded as a cause.
It occurs in both GW and GH specimens, so it is not attributable to a tougher weld material at the edge of an HAZ specimen, which could inhibit crack growth.
Crack closure is unlikely with an R = 0.5, as the specimen experiences a substantial tensile force at all times.
Some specimens experienced uneven crack growth during the test, which was recognized by a boomerang-shaped curve of force versus CMOD (one edge of the CMOD gauge was opening more than the other), but this behavior did not correlate to those specimens with the stagnant rate of crack growth per cycle.
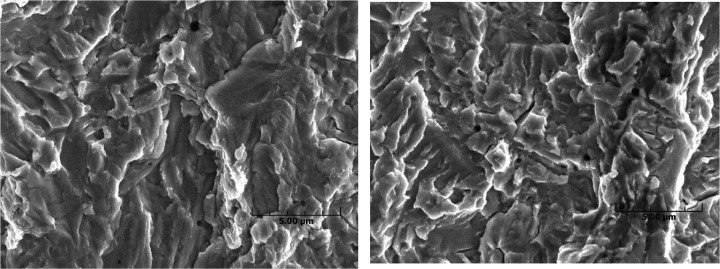
No obvious differences in the fracture surface were observed in the stagnant region and the rapid regions of crack growth (see Fig. 14). El-Soudani and Pelloux [31] reported on a similar flat crack-growth rate in an HAZ specimen associated with a butt weld of two aluminum plates. In their case, they were able to attribute the behavior to substantial out-of-plane deviations in the fracture surface, which they attributed to residual shear stresses at the midthickness. Similar fracture behavior was not observed in these specimens.
Fig. 14.
Fracture surfaces from the region of constant crack growth (flat FCGR, left) and rapid crack growth (right). Scale bar indicates 5 μm.
It is hypothesized that residual stresses could contribute on a local scale to this region of flat crack growth. From the neutron beam experiments used to measure the residual stresses in the CT weld specimens [30], it was found that immediately ahead of the precrack tip (~1 mm), there was a compressive residual stress parallel to the direction of crack growth in the 70A girth weld; there was no such compressive stress in the vintage X52 girth weld (Fig. 15). We further explored whether this unusual flat crack growth response may have resulted from compressive residual stresses within the weld zone. Similar to the way in which a tensile overload tends to retard crack growth by setting up a net compressive process zone in front of the crack tip [33], the compressive residual stresses resulting from the welding process may be retarding crack growth. Studies have shown that the net residual stress state in pipe girth welds can be either positive at the outer diameter of the pipe, or negative when within 25 % of the inner diameter [34]. The magnitudes of these net residual stresses range from on the order of the yield strength of the material to approximately one half of the yield strength of the material. Recent work on the residual stresses found in weld CT specimens for these pipes [30] confirmed that the net residual stress state in the weld may be either positive or negative, depending on specimen and location. Although neither study provided sufficient data to recreate the state of residual stress in the entire volume of interest, both studies offer insight into the possibility of a net compressive residual stress state at a crack tip as it grows in the weld. In order to elucidate the potential effects of residual stresses, the phenomenological model of Amaro et al. [35] was modified to account for residual stresses using the methodology proposed in Ref. [36], which is based on the effective load ratio. The modified model predicted constant flat crack growth for increasing ΔK when the magnitude of the compressive residual stress increased as a function of crack growth for the initial 30 % of crack extension. The model also indicated that the magnitude of the compressive residual stress required to retard crack growth to this extent was on the order of the yield strength of the pipe base metal. The recent work [30] on samples of these welds in CT specimens did not indicate residual stresses of this magnitude, however, nor did these particular specimens exhibit constant crack growth when tested. The model demonstrates that it is possible to generate data for fatigue crack growth that behaves similarly to the experimental data discussed here. However, more work is necessary on the residual stresses within a CT weld specimen and on the model before this behavior can definitively be attributed to residual stresses. Furthermore, although the specimens that exhibited constant crack growth required more cycles to precrack than average (an indication of possible compressive residual stresses), they were not the specimens that required the most cycles to precrack.
Fig. 15.
Residual stresses measured near the precrack tip in CT specimens of girth welds from (left) the vintage X52 pipe and (right) the X70A pipe. Note that σxx is parallel to the crack-growth direction, σyy is perpendicular to the crack-growth direction, and σzz is in the through-thickness direction (TD).
6. Conclusions
The welds and HAZs from the four pipes tested exhibited hydrogen-assisted fatigue crack growth of the same order of magnitude as the hydrogen-assisted rates in base metal at both hydrogen gas pressures; the effect is to elevate the FCGR over that in air by a factor of ten or more over a significant range of stress intensity factors. None of the data indicated that the weld metal or their HAZs are substantially more vulnerable than the base metal to fatigue crack growth in hydrogen. The small variations that were observed in the relative FCGRs of the HAZs to BM were most often attributable to the microstructure through which the crack propagated. The microstructure has a strong influence on the susceptibility of the metal to fatigue crack growth. For example, the HAZ from the vintage X52 consistently exhibited a higher FCGR than the weld or base metal. The high carbon content resulted in the formation of martensite at the fusion line in the HAZ, and it is well documented that untempered martensite can cause increases in hydrogen embrittlement [1, 29, 37, 38]. Care must be taken when designing hydrogen pipelines such that the microstructural changes in the HAZ caused by welding can be controlled and constrained to avoid generating martensite. The local presence of martensite could increase the FCGR in the HAZ well above that of a polygonal ferrite-pearlite microstructure in the unaffected base metal of the pipe. Further studies are needed to determine the microconstituents, grain sizes, and orientations through which the crack traveled in the other materials to determine the role of the microstructure in propagating those FCGRs.
Acknowledgments
The authors thank Jim Merritt and the U.S. Department of Transportation for supporting this work through agreements DTPH56-13-X-000019 and DTPH56-15-X-00004. We also thank Lou Hayden and the members of the ASME B31.12 Committee on Hydrogen Piping and Pipelines for their guidance. We express our appreciation to Terran Winter-Fox, Chris McCowan, and Nik Hrabe for their aid with figures and microscopy.
Nomenclature
- API
American Petroleum Institute
- ASME
American Society of Mechanical Engineers
- ASTM
American Society for Testing and Materials
- a
crack length
- C(T)
compact tension
- da/dN
fatigue crack growth rate
- ΔK
stress intensity factor range
- FCGR
fatigue crack growth rate
- HAZ
heat-affected zone
- HA-FCG
hydrogen-assisted fatigue crack growth
- GH
girth heat-affected zone
- GW
girth weld
- N
number of cycles
- SH
seam heat-affected zone
- SW
seam weld
- w
width of the specimen
About the authors:
Elizabeth S. Drexler is a retired materials research engineer in the Applied Chemicals and Materials Division at NIST. She worked on mechanical testing of steels for over 20 years.
Andrew J. Slifka is a materials research engineer in the Applied Chemicals and Materials Division at NIST. He has worked on hydrogen effects in steels for over 10 years.
Robert L. Amaro did a postdoctoral fellowship in the Applied Chemicals and Materials Division at NIST. He is now at the University of Alabama, where he continues to research models and test methods on hydrogen effects in steels and mechanical properties of additively manufactured parts and materials.
Jeffrey W. Sowards did a postdoctoral fellowship in the Applied Chemicals and Materials Division at NIST. He is now at the Marshall Space Flight Center, NASA, where he continues to research novel welding techniques and welding of novel materials.
Matthew J. Connolly is a physicist in the Applied Chemicals and Materials Division at NIST. He has used neutron and synchrotron radiation techniques to probe mechanical and mass-transport properties of steels.
May L. Martin is a materials scientist with a dual appointment in the Department of Physics at the University of Colorado and in the Applied Chemicals and Materials Division at NIST. She researches hydrogen damage mechanisms in steels by use of metallurgical and microscopy techniques.
Damian S. Lauria is a computer scientist in the Applications Systems Division at NIST. He is an expert in control systems, automated data analysis, and software engineering.
The National Institute of Standards and Technology is an agency of the U.S. Department of Commerce.
7. References
- [1].Walter R, Chandler WT (1973) Influence of Gaseous Hydrogen on Metals—Final Report (Rocketdyne, Canoga Park, CA: ), National Aeronautics and Space Administration Report NASA-CR124410. [Google Scholar]
- [2].Cialone HJ, Holbrook JH (1988) Sensitivity of steels to degradation in gaseous hydrogen. ASTM STP 962—Hydrogen Embrittlement: Prevention and Control (ASTM International, West Conshohocken, PA: ). 10.1520/STP45297S [DOI] [Google Scholar]
- [3].Hardie D, Charles EA, Lopez AH (2006) Hydrogen embrittlement of high strength pipeline steels. Corrosion Science 48(12):4378–4385. 10.1016/j.corsci.2006.02.011 [DOI] [Google Scholar]
- [4].Duncan A (2007) Tensile testing of carbon steel in high pressure hydrogen. 2007 ASME Pressure Vessels and Piping/CREEPS Conference, (ASME, San Antonio, TX), pp 519–525. 10.1115/PVP2007-26736 [DOI] [Google Scholar]
- [5].San Marchi C, Somerday BP, Nibur KA, Stalheim DG, Boggess T, Jansto S (2010) Fracture and fatigue of commercial grade API pipeline steels in gaseous hydrogen. ASME Pressure Vessels & Piping Division/K-PVP 2010 Conference, (ASME, Bellevue, WA), p 10 10.1115/PVP2010-25825 [DOI] [Google Scholar]
- [6].Moro I, Briottet L, Lemoine P, Andrieu E, Blanc C, Odemer G (2010) Hydrogen embrittlement susceptibility of a high strength steel X80. Materials Science and Engineering: A 527(27–28):7252–7260. 10.1016/j.msea.2010.07.027 [DOI] [Google Scholar]
- [7].Nanninga NE, Levy YS, Drexler ES, Condon RT, Stevenson AE, Slifka AJ (2012) Comparison of hydrogen embrittlement in three pipeline steels in high pressure gaseous hydrogen environments. Corrosion Science 59:1–9. 10.1016/j.corsci.2012.01.028 [DOI] [Google Scholar]
- [8].Chen Y, Liu M, Wang Y-Y, Slifka AJ, Drexler ES, Amaro RL, McColskey JD, Hayden LE (2009) Performance Evaluation of High-Strength Steel Pipelines for High-Pressure Gaseous Hydrogen Transportation (U.S. Dept. of Transportation-PHMSA, Washington, D.C.), DOT Project DTHP56-07-0001. https://rosap.ntl.bts.gov/view/dot/26758 [Google Scholar]
- [9].Slifka AJ, Drexler ES, Amaro RL, Hayden LE, Stalheim DG, Lauria DS, Hrabe NW (2017) Fatigue measurement of pipeline steels for the application of transporting gaseous hydrogen. Journal of Pressure Vessel Technology 140:011407–1–011407–12. 10.1115/1.4038594 [DOI] [Google Scholar]
- [10].Slifka AJ, Drexler ES, Amaro RL, Lauria DS, Hayden LE, Stalheim DG, Chen Y (2014) Summary of an ASME/DOT project on measurements of fatigue crack growth rate of pipeline steels—PVP2014–2893. ASME 2014 Pressure Vessels & Piping Conference, (ASME, Anaheim, CA), pp V06BT06A026 10.1115/PVP2014-28938 [DOI] [Google Scholar]
- [11].Walter RJ, Chandler WT (1969) R-7780–1: Effects of High-Pressure Hydrogen on Metals at Ambient Temperature- Final Report (Rocketdyne, Canoga Park, CA: ), NASA report R-7780–1. http://hdl.handle.net/2060/19700009332 [Google Scholar]
- [12].Gangloff RP (2008) Science-based prognosis to manage structural alloy performance in hydrogen. Effects of Hydrogen on Materials: Proceedings of the 2008 International Hydrogen Conference, (ASM International, Jackson, WY), pp 1–21. [Google Scholar]
- [13].Amaro RL, Findley KO, Rustagi N, Drexler ES, Slifka AJ (2014) Modeling the fatigue crack growth of X100 pipeline steel in gaseous hydrogen. International Journal of Fatigue 59: 262–271. 10.1016/j.ijfatigue.2013.08.010 [DOI] [Google Scholar]
- [14].American Society of Mechanical Engineers (2012) ASME B31.12–2011—Hydrogen Piping and Pipelines (American Society of Mechanical Engineers, New York, NY: ), pp 258. [Google Scholar]
- [15].Ronevich DR, D’Elia CR, Hill MR (May 2018) Fatigue crack growth rates of X100 steel welds in high pressure hydrogen gas considering residual stress effects. Engineering Fracture Mechanics 194:42–51. 10.1016/j.engfracmech.2018.02.030 [DOI] [Google Scholar]
- [16].Moro I, Briottet L, Lemoine P, Doyen O, de Dinechin G (2012) Fatigue crack growth of a C-Mn steel and associated weld under hydrogen pressure 2012 International Hydrogen Conference, Hydrogen-Materials Interactions, eds Somerday BP, Sofronis P (ASME Press, Moran, WY: ), pp 309–317. 10.1115/PVP2017-66273 [DOI] [Google Scholar]
- [17].Holtam CM, Baxter DP (2011) Fatigue performance of sour deepwater riser welds: Crack growth vs. endurance. ASME 2011 30th International Conference on Ocean, Offshore and Arctic Engineering (ASME, Rotterdam, Netherlands), pp 317–326. 10.1115/OMAE2011-49581 [DOI] [Google Scholar]
- [18].Ronevich JS, Somerday BP (2014) Measurement of fatigue crack growth relationships for steel pipeline welds in high-pressure hydrogen gas Steely Hydrogen 2014, ed Duprez L (OCAS, Ghent, Belgium: ), Session 12, Paper G09. [Google Scholar]
- [19].Thodla R, Gordon JR, Gui F (2015) Effect of reeling on sour service fatigue crack growth behavior of welded API5L X65 line pipe. Journal of Pressure Vessel Technology 138(2):021405 10.1115/1.4031165 [DOI] [Google Scholar]
- [20].Wang J, Li XY, Zhang YL, Miao W, Li SR (2015) Corrosion fatigue crack growth rates of X70 base metal and heat affected zone in H2S corrosive environment. Corrosion Engineering, Science and Technology 50:18–25. 10.1179/1743278214Y.0000000171 [DOI] [Google Scholar]
- [21].Somerday BP (2014) III.5 Hydrogen Embrittlement of Structural Steels (Sandia National Laboratories, Livermore, CA: ), Report SAND2014–16478R. Available at http://prod.sandia.gov/techlib/access-control.cgi/2014/1416478r.pdf [Google Scholar]
- [22].American Society for Testing and Materials (2009) ASTM Standard E8/E8M-09—Standard Test Method for Tension testing of Metallic Materials (ASTM, West Conshohocken, PA: ). 10.1520/E0008_E0008M-09 [DOI] [Google Scholar]
- [23].American Society for Testing and Materials (2011) ASTM Standard E 647–11—Standard Test Method for Measurement of Fatigue Crack Growth Rates (ASTM International, West Conshohocken, PA: ), pp 46 10.1520/E0647-11 [DOI] [Google Scholar]
- [24].Wei RP, Simmons GW (1973) Environment enhanced fatigue crack growth in high-strength steels Stress Corrosion Cracking and Hydrogen Embrittlement of Iron Based Alloys (Unieux-Firminy, France: ), pp 751–765. [Google Scholar]
- [25].Drexler ES, McColskey JD, Dvorak M, Rustagi N, Lauria DS, Slifka AJ (2016) Apparatus for accelerating measurements of environmentally assisted fatigue crack growth at low frequency. Experimental Techniques 40(1):429–439. 10.1007/s40799-016-0045-5 [DOI] [Google Scholar]
- [26].Drexler ES, Slifka AJ, Amaro RL, Lauria DS (2014) FCGR of pipeline steels in pressurized hydrogen gas: A comparison of cyclic loading rates Steely Hydrogen: 2nd International Conference on Metals and Hydrogen, ed Duprez L (OCAS, Ghent, Belgium: ), pp 403–416. [Google Scholar]
- [27].Slifka AJ, Drexler ES, Rustagi N, Lauria DS, McColskey JD, Amaro RL, Stalheim DG, Hayden L (2012) Fatigue crack growth of two X52 pipeline steels in a pressurized hydrogen environment. 2012 International Hydrogen Conference, (ASME, Moran, WY). [Google Scholar]
- [28].Slifka AJ, Drexler ES, Amaro RL, Lauria DS, Hayden LE, McCowan CN, Sowards JW (2015) Measurements of fatigue crack growth rates of the heat-affected zones of welds of pipeline steels. ASME 2015 Pressure Vessels and Piping Conference, (ASME, Boston, MA), pp V06BT06A009 10.1115/PVP2015-45242 [DOI] [Google Scholar]
- [29].San Marchi C, Somerday BP (2010) Technical reference on hydrogen compatibility of materials: Plain carbon ferritic steels: C-Mn alloys (code 1100). Available at http://www.sandia.gov/matlsTechRef/ [Google Scholar]
- [30].Connolly MJ, private communication 15 November 2019. [Google Scholar]
- [31].El-Soudani SM, Pelloux RM (May 1975) Anisotropy of fatigue crack propagation in aluminum alloy butt welded joints. Welding Research Supplement 54:144s–152s. [Google Scholar]
- [32].Carlsson J (1984) Fracture mechanics for cracks in weldments. Proceedings of the 6th International Conference on Fracture (ICF6), (New Delhi, India), pp 751–762. 10.1016/B978-1-4832-8440-8.50051-X [DOI] [Google Scholar]
- [33].Suresh S (1998) Fatigue of Materials (Cambridge University Press, Cambridge, U.K.). 10.1017/CBO9780511806575 [DOI] [Google Scholar]
- [34].Neeraj T, Gnäupel-Herold T, Prask H, Ayer R (2011) Residual stresses in girth welds of carbon steel pipes: Neutron diffraction analysis. Science and Technology of Welding and Joining 16(3):249–253. 10.1179/1362171810Y.0000000028 [DOI] [Google Scholar]
- [35].Amaro RL, Rustagi N, Findley KO, Drexler ES, Slifka AJ (2014) Modeling the fatigue crack growth of X100 pipeline steel in gaseous hydrogen. International Journal of Fatigue 59:262–271. 10.1016/j.ijfatigue.2013.08.010 [DOI] [Google Scholar]
- [36].Barsoum Z, Barsoum I (2009) Residual stress effects on fatigue life of welded structures using LEFM. Engineering Failure Analysis 16(1):449–467. 10.1016/j.engfailanal.2008.06.017 [DOI] [Google Scholar]
- [37].Gangloff R, Wei R (1977) Gaseous hydrogen embrittlement of high strength steels. Metallurgical and Materials Transactions: A 8(7):1043–1053. 10.1007/BF02667388 [DOI] [Google Scholar]
- [38].Michler T, Naumann J (2010) Microstructural aspects upon hydrogen environment embrittlement of various bcc steels. International Journal of Hydrogen Energy 35(2):821–832. 10.1016/j.ijhydene.2009.10.092 [DOI] [Google Scholar]


