Abstract
Board Certified Behavior Analysts (BCBAs) may encounter situations, such as the current COVID-19 pandemic, that preclude them from providing traditional in-person applied behavior-analytic services to clients. When conditions prevent BCBAs and behavior technicians from working directly with clients, digital instructional activities designed by BCBAs and delivered via a computer or tablet may be a viable substitute. Google applications, including Google Slides, Google Forms, and Google Classroom, can be particularly useful for creating and sharing digital instructional activities. In the current article, we provide task analyses for utilizing basic Google Slides functions, developing independent instructional activities, developing caregiver-supported instructional activities, and sharing activities with clients and caregivers. We also provide practical recommendations for implementing digital instructional activities with clients and caregivers.
Keywords: Autism, Technology-based learning, Telehealth
Applied behavior-analytic (ABA) skill acquisition services are typically delivered in person, through clinic- and home-based models. Regardless of setting, a trained behavior therapist, under the supervision of a Board Certified Behavior Analyst (BCBA), typically interacts directly with clients to implement skill acquisition programming using a variety of evidence-based instructional strategies, such as discrete-trial teaching (DTT; Lovaas, 1981) or naturalistic instruction techniques (e.g., Charlop-Christy, LeBlanc, & Carpenter, 1999). These instructional strategies have been demonstrated to be effective, but some situations, such as the current COVID-19 global pandemic, may cause service disruptions. Unfortunately, many individuals who receive ABA services may struggle to maintain skills when long gaps without services occur (Lotfizadeh, Kazemi, Pompa-Craven, & Eldevik, 2020). Given that ABA-based treatments have been deemed medically necessary, it will be important for service providers to work with clients and families to provide appropriate alternative instructional activities when it is not feasible to conduct traditional in-person treatment.
Recently, researchers have investigated the efficacy of using telehealth to provide behavior-analytic services from a distance. Previously, telehealth models of service delivery have been used in situations where there are geographic barriers to conducting in-person treatment (Eid et al., 2017; Fisher et al., 2014; Suess et al., 2014). Prior researchers have demonstrated the efficacy of using telecommunication technology to train caregivers to assess and treat problem behavior (Suess et al., 2014) and implement skill acquisition programming using DTT (Eid et al., 2017).
Although research indicates that caregivers can be effective implementers, it may be challenging for them to develop materials that can be utilized during instructional programming. Moreover, digital instructional activities can have embedded schedules to provide structure for how and when instructional material is presented to the learner. One alternative may be to develop and disseminate digital instructional activities that parents can implement with their children. Digital instructional activities are commonly used across a variety of instructional settings, and researchers have created tutorials for using accessible technology platforms to create these activities (e.g., Blair & Shawler, 2019; Cummings & Saunders, 2019). There are several advantages to creating and sharing digital instructional content, particularly during the COVID-19 global pandemic. First, digital content can be easily developed, edited, and rearranged by the BCBA. This may alleviate some of the burden on caregivers to locate, organize, and arrange instructional materials and activities. Second, digital platforms provide BCBAs with the unique opportunity to program feedback into instructional activities. This digital feedback may allow clients to engage with the instructional programming with less prompting and support, which may be particularly valuable during the current crisis, as caregivers may be balancing work and homeschooling responsibilities for other children in the home. Finally, caregivers may be able to use digital instructional content even beyond the current COVID-19 crisis to supplement traditional instruction and mitigate in-person service interruptions that may occur due to unforeseen circumstances such as changes in geographic location, illness, or injury.
In traditional in-person intervention, common instructional programs for children with autism spectrum disorder (ASD) and related disorders are created to increase both listener and speaker responding through instructor-led learning trials in the home or clinic. We have found that Google applications, such as Google Slides (Google LLC, 2006) and Google Forms (Google LLC, 2008), can be particularly useful for creating digital versions of these types of instructional programs with which learners can interact, either independently or with the support of a caregiver, given their universal availability and functionality across multiple devices and operating systems. BCBAs can use Google Slides to create a variety of activities in which a learner receptively identifies stimuli from an array (e.g., colors, shapes, numbers, letters, objects) or identifies parts of a single image (e.g., body parts, prepositions). Using the Google Slides application, BCBAs can make interactive programs that learners can complete independently by incorporating praise, prompting, and error correction into the digital instructional content that are delivered automatically as the learner interacts with the activity. It may also be useful to provide clients and families with caregiver-supported digital instructional content, which can be implemented by a caregiver with remote support from a BCBA. BCBAs can use Google Slides and Google Forms to create and organize many different caregiver-supported instructional activities, such as imitation, letter matching, sequencing, and expressive identification activities (e.g., identifying objects, answering personal information questions, answering wh– questions).
After creating instructional content, BCBAs will also need an easy way to organize and share learning activities with clients and families. Google Drive and Google Classroom applications are potential solutions, as they allow users to conveniently organize and share content with other users. BCBAs can use Google Drive as a simple application to organize and share specific files, folders, and activities. Google Classroom—albeit a more complex solution to information and activity sharing—is another promising application that has a number of additional features that make it an attractive option for organizing behavior-analytic instructional activities and sharing them with clients and caregivers. Google Classroom, introduced in the Google Apps for Education in 2014 (Shaharanee, Jamil, & Rodzi, 2016), allows teachers and clinicians to provide instruction, create assignments, and communicate with students through a digital platform (DiCicco, 2016). Although research on the effects of Google Classroom instruction is limited, there have been some early positive results. DiCicco found that seventh-grade social studies students with learning disabilities increased vocabulary scores after using direct instruction through Google Classroom. Students also reported high levels of satisfaction related to using the Google Classroom platform (DiCicco, 2016).
There are several practical advantages to using Google applications to create and share instructional activities. First, all Google applications, including Google Slides and Google Forms, can be seamlessly integrated into a Google Classroom. Second, Google applications are free and available on virtually all digital devices, making them a convenient technology platform for clients and families to access. Third, Google applications are used across many schools and workplaces, so it is possible that some clients and caregivers have experience using similar programs.
In this article, we aim to provide a practical tutorial for using Google applications to develop and disseminate behavior-analytic digital instructional activities. We will discuss and provide task analyses for the following: (a) utilizing basic functions within Google Slides (e.g., adding shapes, inserting images, linking stimuli, and protecting slides) to create interactive instructional materials, (b) developing independent instructional activities that learners can complete with minimal caregiver support, (c) developing caregiver-supported instructional activities where the caregiver provides instruction using digital learning materials, and (d) organizing materials and sharing activities with clients and caregivers using Google Classroom.
Basic Google Slides Functions
BCBAs can create a variety of instructional activities using Google Slides, such as color identification, object identification, and activities that teach prepositions. One distinct advantage of using Google Slides is the ability to link learner responses to praise and error correction slides so that the learner automatically receives feedback appropriate to the response emitted. For example, consider a learner who is working on a color identification activity. The BCBA who develops the activity can arrange the slides so that if the instruction is “Touch red” and the learner touches red, the Google Slides presentation will automatically navigate the learner to a praise slide. If the learner touches green, the Google Slides presentation will automatically navigate the learner to an error correction slide. These types of activities are valuable for caregivers because they reduce some of the burden of prompting and error correction.
In order to create the interactive digital content described previously, developers need to use several Google Slides functions. The following section includes task analyses that review the basic Google Slides component skills that BCBAs will use to create instructional activities using the task analyses in subsequent sections. These component skills include (a) building a Google Slides presentation, (b) adding visual stimuli (e.g., shapes, images, and text boxes), (c) adding auditory stimuli, (d) adding links to stimuli, (e) adding navigation arrows, and (f) protecting the slide.
Building a Google Slides Presentation
Open a web browser and sign in to a Google account.
Navigate to http://docs.google.com/presentation.
Create a new blank presentation by clicking the multicolored plus sign in the navigation bar near the top of the page.
Create a title slide with the name of the instructional activity.
Create a new blank page by clicking on the last page in the left column and pressing the “Enter” key.
Add desired content.
Preview slides by selecting “Present” at the top right of the screen (Fig. 1).
Fig. 1.
Google Slides “Present” view
Adding Visual Stimuli
BCBAs can create instructional stimuli by adding visual stimuli (e.g., shapes, images, and text boxes) to a Google Slides presentation.
Adding shapes
Fig. 2.
Shape menu
Fig. 3.
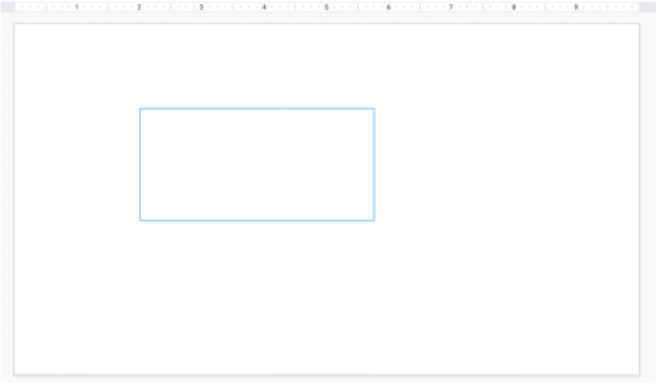
Sizing the shape
Fig. 4.
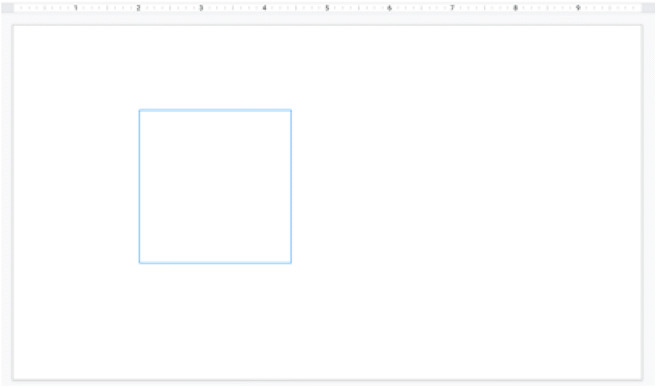
Sizing the shape using the “Shift” key
Fig. 5.
Fill Color icon
Fig. 6.
Border Color icon
Inserting images
- As shown in Fig. 7, select the Insert Image icon on the toolbar and select an option for inserting the image.
- To insert an image using the “Upload from computer” option, navigate the menu to where the image is saved, select the image, and select “open.”
- To insert an image using the “Search the web” option, enter an image type into the search box, select an image, and click “INSERT” (Fig. 8).
- To insert an image using the “Drive” or “Photos” options, select an image from Google Drive or Google Photos and select “INSERT.”
Fig. 7.
Insert Image icon
Fig. 8.
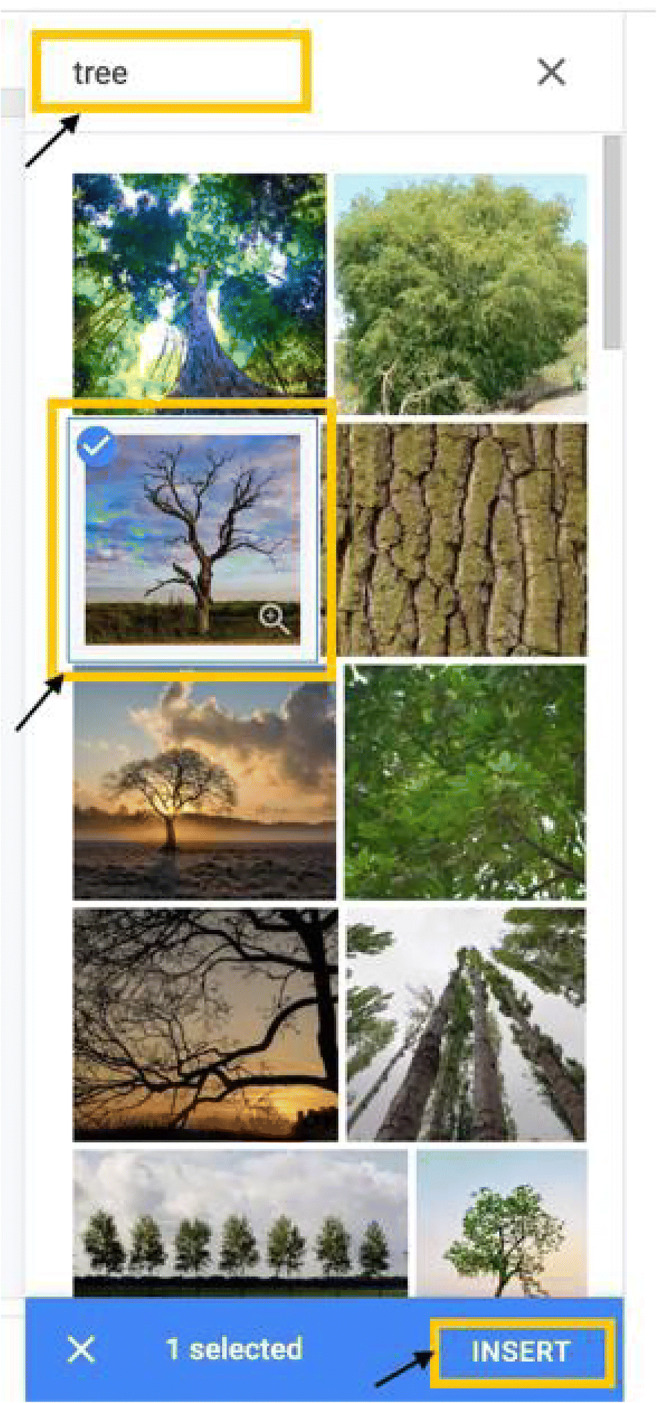
Inserting an image using the “Search the web” option
Fig. 9.
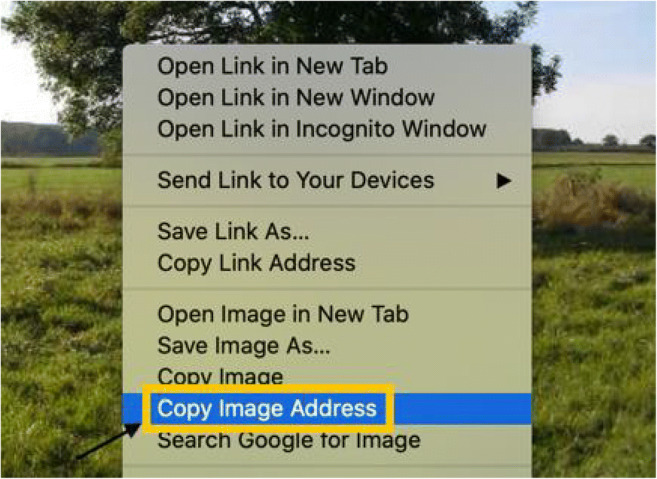
Copying the image address
Fig. 10.
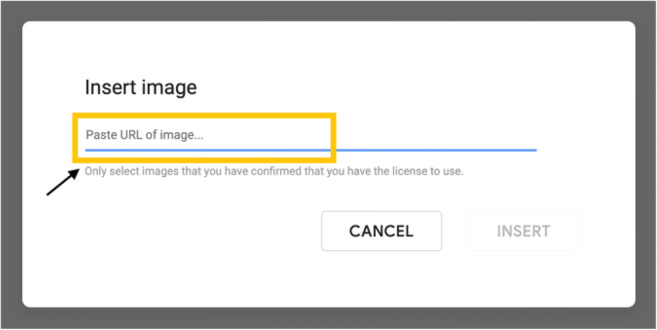
Pasting the image URL
Adding text boxes
As shown in Fig. 11, select the Text Box icon on the toolbar.
Add the text box to the slide by clicking a specific location. Drag with the cursor until the text box is the desired size.
Fig. 11.
Text Box icon
Adding Auditory Stimuli
Google Slides allows users to add audio file content to slides. With this feature, BCBAs can add vocal instructions, praise, and other vocalizations. Adding auditory stimuli to slides can make activities more accessible to clients who cannot read. There are a variety of tools for recording audio, including QuickTime Player (Apple, 2016), Voice Recorder (Microsoft Corporation, 2013), and Online Voice Recorder (https://online-voice-recorder.com/; 123apps LLC, 2012). Audio files need to be saved as .mp3 files in a folder in Google Drive (see the section “Creating and Sharing a Folder”).
Inserting audio files
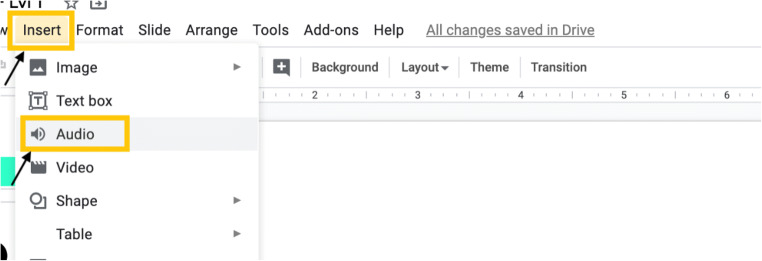
As shown in Fig. 12, select “Insert” on the title bar and select “Audio.”
Navigate the menu to find the audio file in Google Drive.
Select the audio file (Fig. 13) and click “Select.”
Move the audio file to the upper right corner of the slide (Fig. 14)
- Select “Present” (Fig. 1) to verify that the audio plays automatically and that the icon is hidden on each slide.
- If a slide does not play the audio automatically, return to Step 5a.
- If the icon is still visible, return to Step 5b.
Fig. 12.
Inserting audio
Fig. 13.
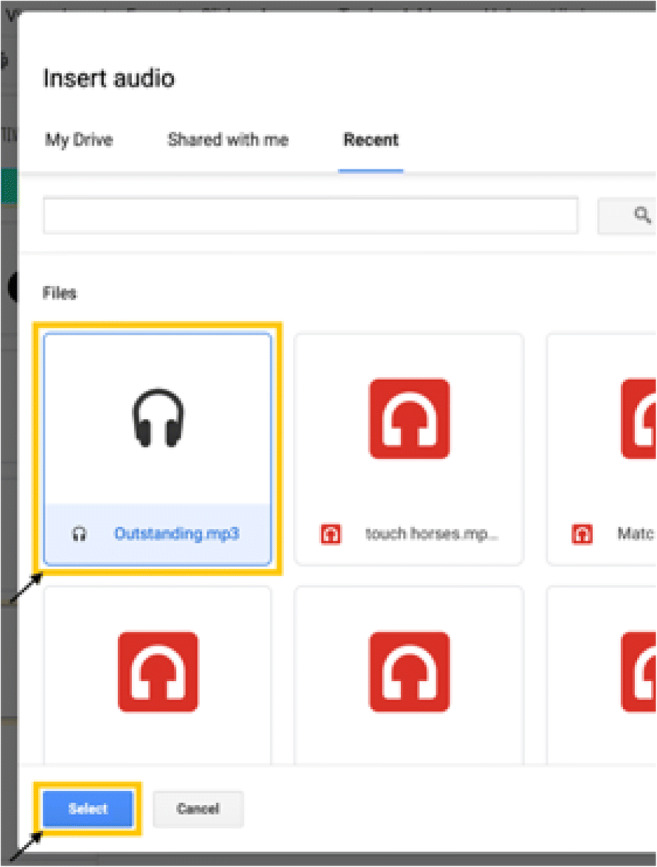
Selecting an audio file
Fig. 14.
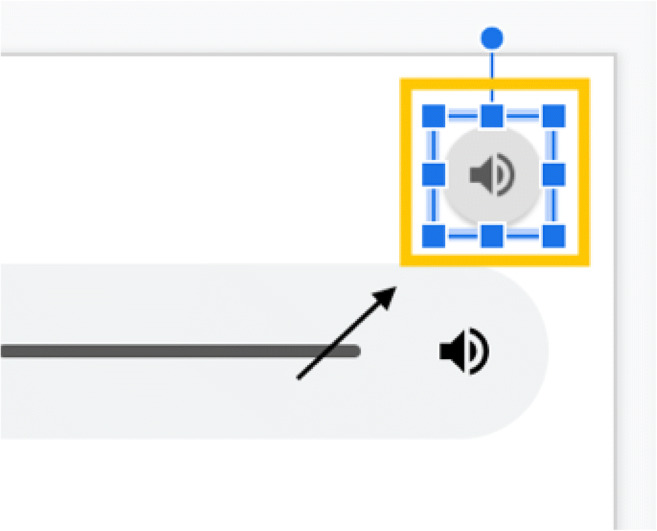
Placing the audio file on the slide
Fig. 15.
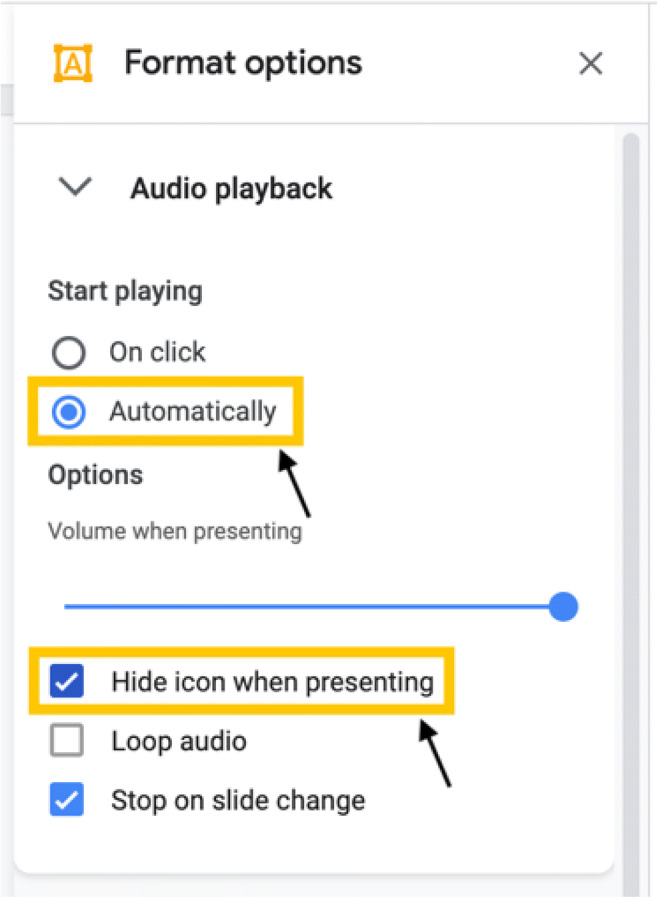
Changing audio file settings
Adding Links to Stimuli
BCBAs can create an interactive experience for the learner by adding links to stimuli. Linked stimuli can automatically navigate learners to a praise slide or error correction slide, back to the original instruction slide, or to subsequent instruction slides within the activity, depending on the learner’s response.
Adding links
Select the shape or image on the slide to add a link to.
As shown in Fig. 16, click the Insert Link icon on the toolbar. If the Insert Link icon is not visible, try closing the side bars.
Select the “Slides in this presentation” option (Fig. 17).
Select which slide the shape/image should navigate to (i.e., praise slide or error correction slide).
Select “Apply” so the shape/image will navigate to the correct slide (Fig. 18).
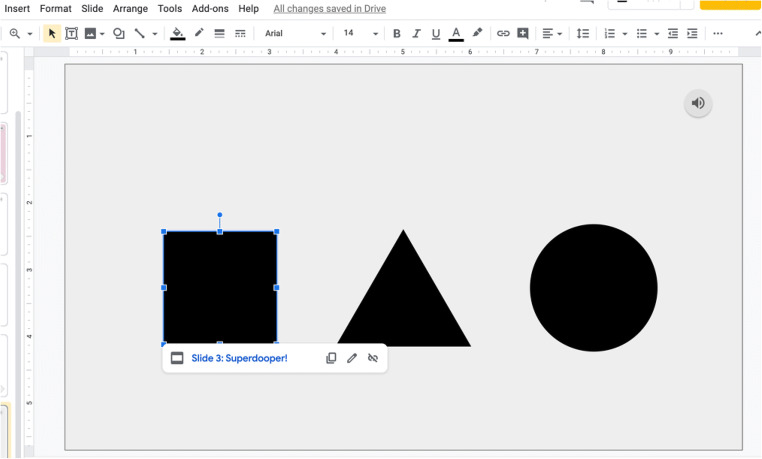
To ensure that the shape/image is connected to a link, select the shape/image and check for the white link bar below the shape/image (Fig. 19). If the shape/image is not linked or linked to the wrong slide, select “Remove link” and return to Steps 1–5.
Fig. 16.
Insert Link icon
Fig. 17.
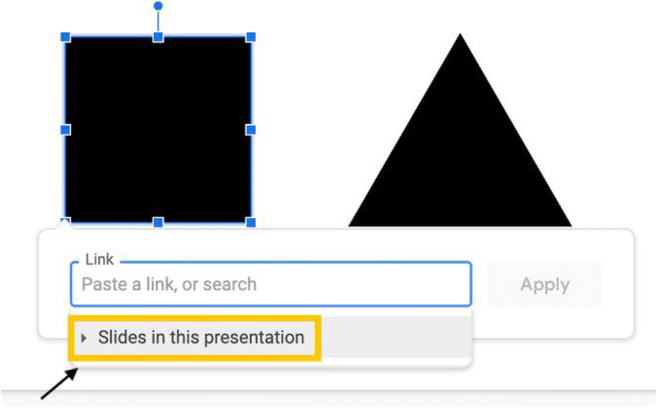
Insert Link menu
Fig. 18.
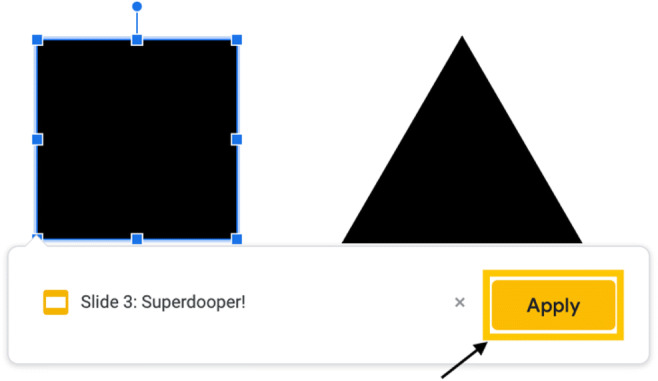
Inserting the link
Fig. 19.
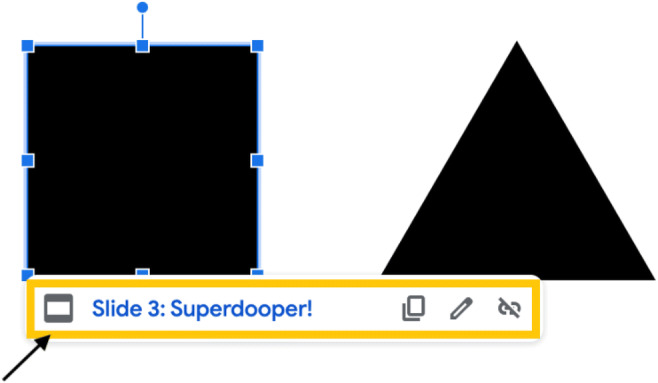
Verifying that the shape/image is linked
Navigation Arrows
Navigation arrows allow the learner to easily navigate across the different slides within the instructional activity.
Adding navigation arrows
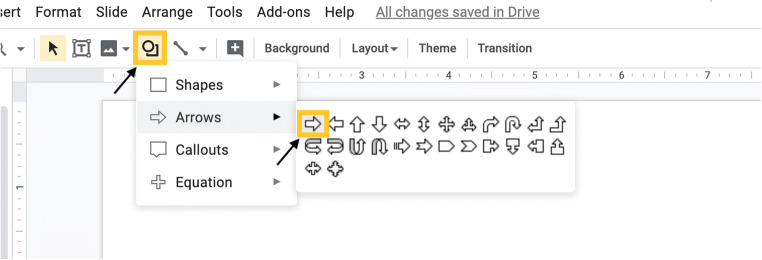
Select the Shape icon and select the Right Arrow (Fig. 20). Draw in the bottom-right corner of the page.
Double-click on the arrow and type “NEXT” in the center of the arrow. Resize and center as shown in Fig. 21.
Repeat Steps 1–2 to create a left arrow that says “GO BACK.”
Place the “NEXT” arrow in the bottom-right corner and “GO BACK” in the bottom-left corner (Fig. 22).
As shown in Fig. 23, link the arrows to navigate the learner to the appropriate slide (see the “Adding Links” section). Select the shape and not the font when creating the link.
- Select “Present” (Fig. 1) and use the navigation arrows to progress through the slides.
- If a navigation arrow does not work correctly, check the link for that arrow by selecting the arrow and checking the white link bar below it (Fig. 23).
-
i.If the arrow is not linked or linked to the wrong slide, select “Remove link” and follow Steps 1–5 of “Adding Links.”
-
i.
Fig. 20.
Shape tool menu
Fig. 21.

Navigation arrow
Fig. 22.
Navigation arrows
Fig. 23.
Linked navigation arrows
Protecting the Slide
Once all stimuli and links have been added, the BCBA needs to add a final protective film to the slide to prevent the learner from moving to the next slide without clicking on a linked stimulus.
Adding a protective film
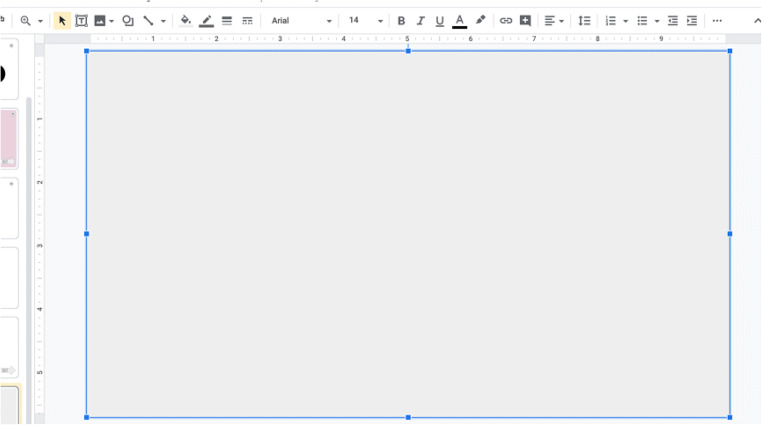
As shown in Fig. 24, insert a rectangle that covers the entire slide (see the “Adding Shapes” section). Typically, the rectangle will have a fill color. It is fine to leave the fill color for now. It will be adjusted later. This rectangle will be the protective film.
Select the protective film and link it to the current slide (see “Adding Links”). This will prevent any clicks from transitioning to another slide.
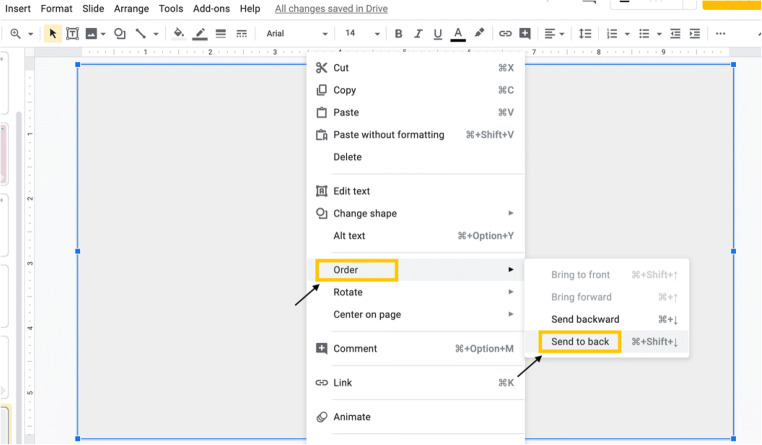
As shown in Fig. 25, right-click the protective film, navigate to “Order,” and select “Send to back.”
Select any nonlinked stimuli (e.g., instruction text box) and “Send to back” as well so the only stimuli in front of the protective film are linked stimuli (Fig. 26; e.g., instructional stimuli, arrows). This will disable all clicks or presses anywhere on the page other than clicking or touching the stimuli.
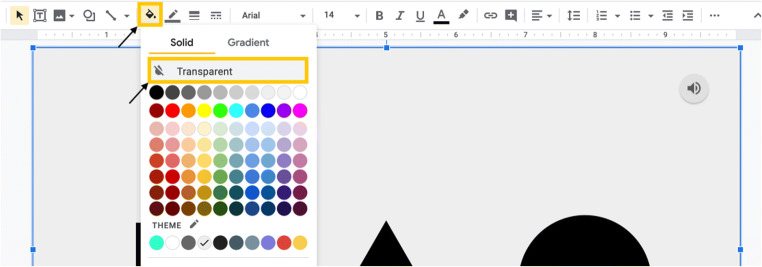
For finishing touches, select the protective film and click the Fill Color icon (Fig. 27) and Border Color icon (Fig. 28) to change both colors to “Transparent.”
- Now the only selection options on the instructional slides should be the target response and distractor responses that will navigate the learner to the corresponding feedback. For praise and error correction slides (depending on the prompting strategy used), the navigation arrows should be the only selection options. To ensure that everything works as it should, use the “Present” feature (see Fig. 1) and attempt to click on areas of the slide that are not the linked stimuli or navigation arrows.
- If the slide progresses to the next slide without the user selecting linked stimuli or a navigation arrow, ensure that the protective film is correctly linked by checking the white link bar below it.
-
i.If the protective film is not linked or linked to a slide other than the current slide, select “Remove link” and follow Steps 1–5 of the “Adding Links” section to link the protective film to the current slide.
-
i.
Fig. 24.
Inserting the protective film shape
Fig. 25.
“Order” menu
Fig. 26.
Only linked stimuli in front of protective film
Fig. 27.
Fill Color tool menu with the “Transparent” option selected
Fig. 28.
Border Color tool menu with the “Transparent” option selected
Creating Independent Instructional Activities
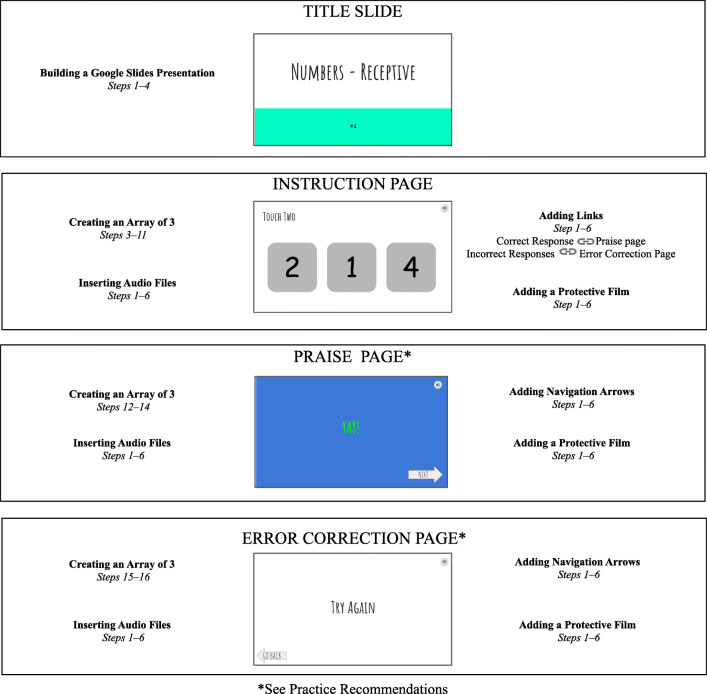
To develop independent activities, BCBAs can program praise, prompting, and error correction into the digital instructional activity (see Fig. 65 in the Appendix). Digital activities that are designed to be completed by learners with minimal caregiver support could involve the learner either selecting a correct target response from an array of stimuli or selecting parts of a stationary picture. In the following sections, we have provided task analyses for both types of activities.
Fig. 65.
Creating Independent Instructional Activities
Selecting From an Array
In this type of activity, the learner selects one picture from an array. Specific examples of instructional activities in which the learner responds by selecting from an array include receptive color, shape, object, and letter identification activities.
Creating an array of three
Open a new presentation in Google Slides.
Create a title slide.
Create three blank slides for the first target response (instruction, praise, and error correction slides). When adding the links (in a future step), it may be helpful to title these three slides accordingly (1, instruction; 2, praise, and 3, error correction).
Add the instruction for the target to the first instruction slide in the slide title area or by adding a text box (see the “Adding Text Boxes” section).
Delete extra text boxes on the slide.
Insert the target stimulus and two distractor stimuli (see “Adding Shapes” and “Inserting Images”).
As shown in Fig. 29, use the guide bars to line up the three stimuli in a row.
Add a link for the correct stimulus to navigate the learner to a praise slide (see “Adding Links”).
Add links for the distractor stimuli to navigate the learner to the error correction slide (see “Adding Links”).
Add a vocal instruction to the slide (see “Inserting Audio Files”).
Add the protective film to the slide (see “Adding a Protective Film”).
- Navigate to the praise slide and add content (see “Practice Recommendations,” later in the article). A few options include:
- Textual praise statements (see “Adding Text Boxes”).
- Auditory praise statements (see “Inserting Audio Files”).
- Pictures (see “Inserting Images”).
Add a navigation arrow to advance to the next instructional slide (see “Adding Navigation Arrows”).
Add the protective film to the praise slide (see “Adding a Protective Film”).
- Navigate to the error correction slide and add content (see “Practice Recommendations,” later in the article). A few options include:
- Textual error correction statements (see “Adding Text Boxes”).
- Auditory error correction statements (see “Inserting Audio Files”).
- Pictures (see “Inserting Images”).
- Prompts (see “Practice Recommendations”).
- Add navigation arrow to either go back to the previous instructional slide or link the stimulus (see “Adding Navigation Arrows”).
Add the protective film to the error correction slide (see “Adding a Protective Film”).
Repeat Steps 2–15 to build the remainder of the instructional activity.
- Double-check that everything is working as it should by using the “Present” feature (Fig. 1).
- If audio does not begin playing automatically or the icon is visible, refer to the troubleshooting tips in Step 6 of the “Inserting Audio Files” section.
- If stimuli are not navigating to the correct slides, refer to the troubleshooting tips in Step 6 of “Adding Links.”
- If navigation arrows are not navigating to the correct slides, refer to the troubleshooting tips in Step 6 of “Adding Navigation Arrows.”
- If slides are progressing by clicking anywhere on the slide that is not a linked stimulus or navigation arrow, refer to the troubleshooting tips in Step 6 of “Adding a Protective Film.”
Fig. 29.
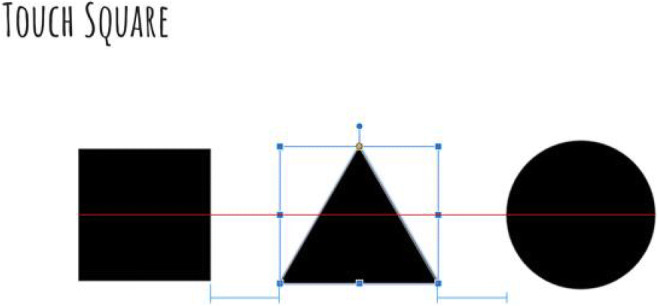
Lining up visual stimuli
Selecting Parts of a Picture
In this type of activity, the learner selects part of a stationary picture. Specific examples of instructional activities in which the learner responds by selecting part of a stationary picture include receptive body-part identification and preposition activities.
Creating a stationary background
Open a new presentation in Google Slides.
Create a title slide.
Create three blank slides for the first target response (instruction, praise, and error correction slides). When adding the links (in a future step), it may be helpful to title these three slides accordingly (1, instruction; 2, praise; and 3, error correction).
Paste or insert the image to the instruction slide (see “Inserting Images”).
Adjust the placement and size of the picture to the desired fit on the slide.
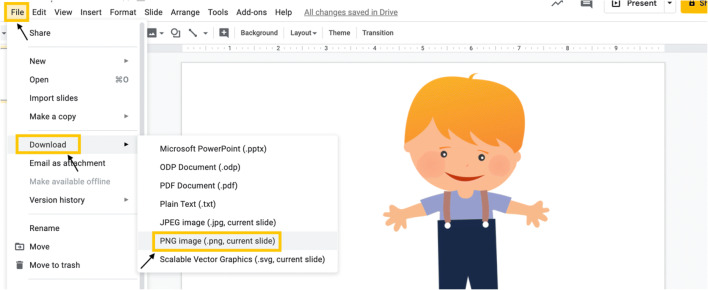
Select “File” from the title menu, select “Download,” and select “PNG image (.png, current slide).” This will create a downloaded picture of the slide (Fig. 30).
- A “Save” page may appear, or the image may automatically download.
- If given the option to save, title the .png file, select the desired location, and click “Save.”
Delete the slide and create a blank slide in its place. Select the “Background” option from the toolbar (Fig. 31).
As shown in Fig. 32, select “Choose image” from the “Background” menu.
Select the image for the background by navigating the “BROWSE” menu or dragging the downloaded .png image file to the “drag a file here” location.
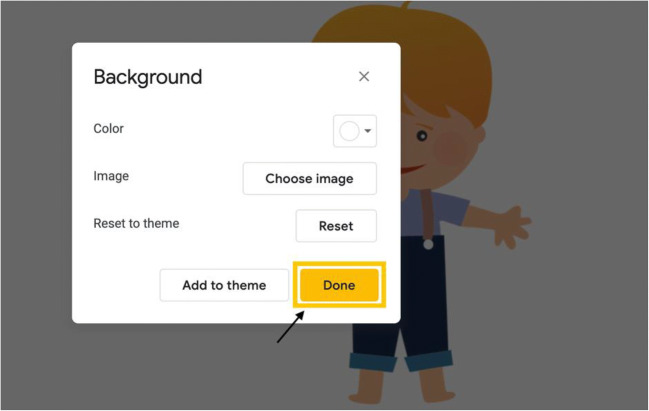
As seen in Fig. 33, the image should now appear on the slide. Select “Done” on the background menu.
The image should now be a part of the slide background.
Fig. 30.
Saving the current slide as an image
Fig. 31.
“Background” option
Fig. 32.
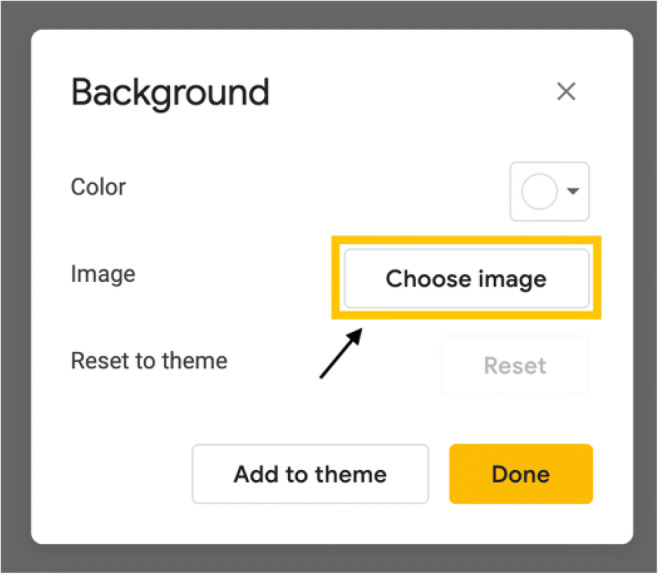
“Background” menu
Fig. 33.
New stationary background
Once the stationary background is created, it can be turned into an interactive activity by adding shapes that are linked to praise and/or error correction slides.
Creating interactive activities with a stationary background
Add a textual stimulus for the current target (e.g., “Touch Head”; see “Adding Text Boxes”).
Add an auditory stimulus for the current target (e.g., “Touch Head”; see “Inserting Audio Files”).
Insert a shape that is appropriate for the section of the stationary image that is considered the correct response (see “Adding Shapes”).
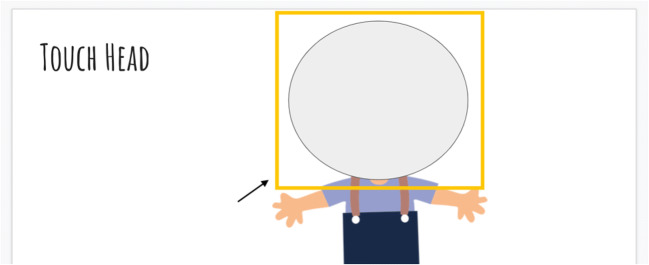
As shown in Fig. 34, place the shape on top of the area of the stationary picture that is the target response. For this example, a circle was added around the “head” portion of the stationary background.
Add a link to the shape that will navigate the learner to the praise slide (see “Adding Links”).
Add the protective film to the slide, leaving only the target response shape above the film (see “Adding a Protective Film”). Please note that the protective film in this activity/program should be linked to the error correction page. Thus, in this example, any selection outside of “head” will be considered an incorrect response.
Make the fill color (Fig. 27) and border color (Fig. 28) of the shape covering the target response transparent.
Add in praise and error correction slides.
- Double-check that everything is working as it should by using the “Present” feature (Fig. 1).
- If audio does not begin playing automatically or the icon is visible, refer to the troubleshooting tips in Step 6 of “Inserting Audio Files.”
- If stimuli are not navigating to the correct slides, refer to the troubleshooting tips in Step 6 of “Adding Links.”
- If navigation arrows are not navigating to the correct slides, refer to the troubleshooting tips in Step 6 of “Adding Navigation Arrows.”
- If slides are progressing by clicking anywhere on the slide that is not linked stimuli or a navigation arrow, refer to the troubleshooting tips in Step 6 of “Adding a Protective Film.”
Fig. 34.
Shape covering the target response
Creating Caregiver-Supported Instructional Activities
In order to complete caregiver-supported instructional activities, the learner will need support from a caregiver who will facilitate the instructional activity and provide praise and error correction (if necessary) following learner responses. There are multiple ways to develop caregiver-supported instructional activities. BCBAs can (a) use basic Google Slides functions to arrange instructional content into a Google Slides presentation (see the previous section “Basic Google Slides Functions”), (b) use Google Slides to develop activities where learners drag and drop stimuli on a slide (approximating activities in which learners manipulate stimuli such as sorting, matching, patterning, or sequencing activities), or (c) arrange instructional content into a Google Form. In the following sections, we have included task analyses for developing drag-and-drop activities and arranging instructional content into a Google Form.
Dragging and Dropping Stimuli
In this type of activity, the learner drags items to a specific location on the slide and a caregiver provides feedback on responses. Specific examples of drag-and-drop instructional activities include letter matching, sequencing, patterning, and sorting activities.
Creating drag-and-drop activities.
Open a new presentation in Google Slides.
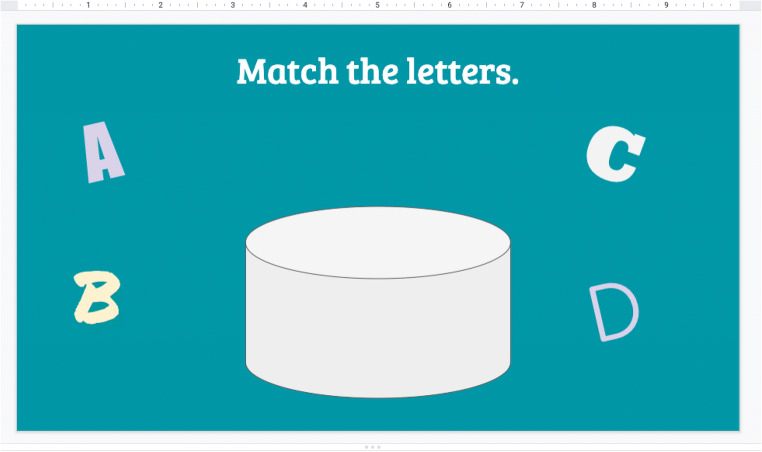
- Create the stationary components for the drag-and-drop activity. The following example will provide instructions for creating a letter matching activity. These steps can be used to create a variety of drag-and-drop activities.
Create a stationary background (see “Creating a Stationary Background”).
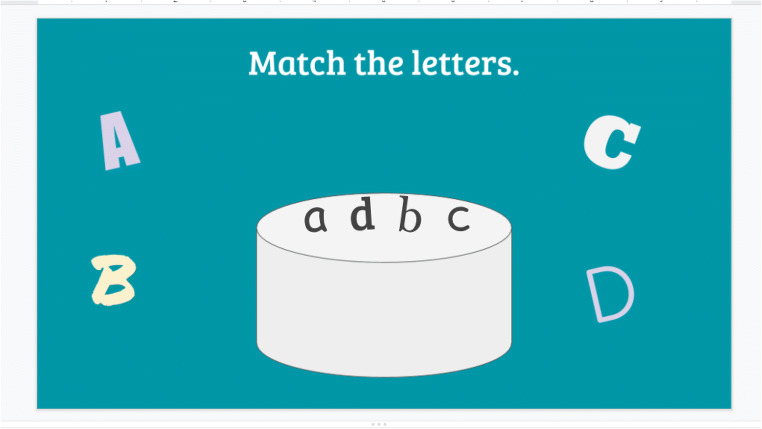
As shown in Fig. 38, insert mobile objects with individual text boxes (see “Adding Text Boxes”) and/or shapes (see “Adding Shapes”). Do not add letters in the text boxes. Mobile objects need to be text boxes with shapes or pictures.
Share the activity with clients by selecting the “Share” button and entering the client’s e-mail (Fig. 39). Clients can interact with the activity in the slide, and the caregiver can provide feedback. Please note that slides are not mobile in “Present” mode.
Fig. 35.
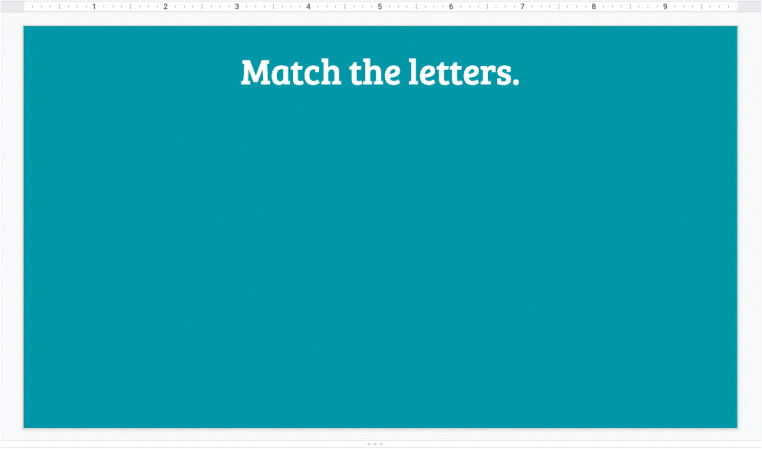
Instructions on a blank slide
Fig. 36.
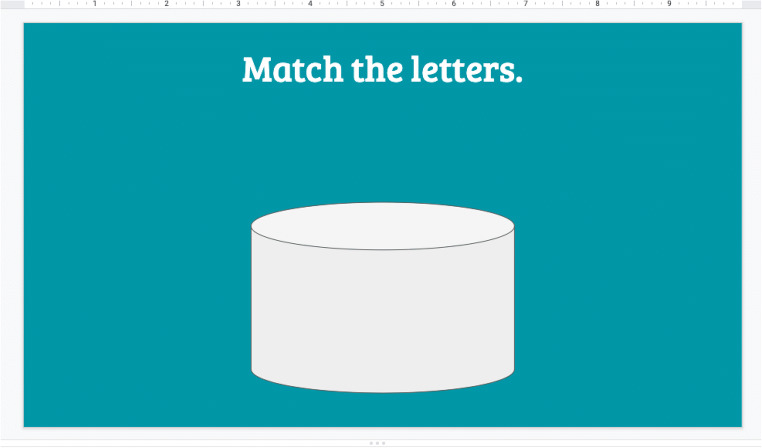
Inserting the shape
Fig. 37.
Adding additional stimuli
Fig. 38.
Adding mobile objects
Fig. 39.

Sharing the drag-and-drop activity
Google Forms
In this type of activity, the caregiver presents the question listed in the Google Form, the learner responds, and the caregiver provides feedback and marks whether the learner answered correctly or incorrectly. Specific examples of instructional activities BCBAs can arrange in a Google Form include nonverbal imitation, speaker responding (e.g., shapes, colors, objects, letters), and personal information question activities.
Creating a Google Form
Navigate to Google Forms by entering https://www.google.com/forms/about/ into a web browser.
Click on “Go to Google Forms” (see Fig. 40).
Click the “Blank” form with the multicolored plus sign as shown in Fig. 41
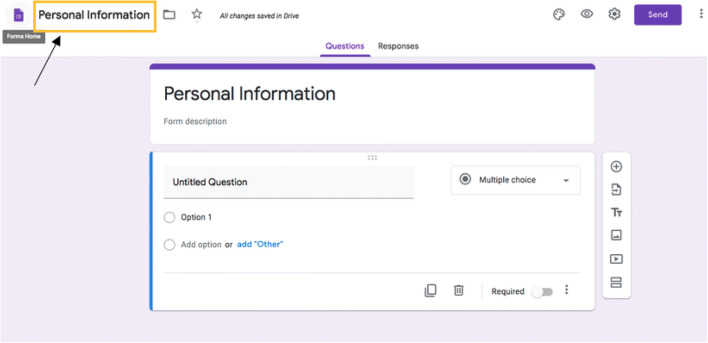
As shown in Fig. 42, click on “Untitled form” in the upper left corner of the screen and type the title (e.g., “Personal Information”) of the instructional activity.
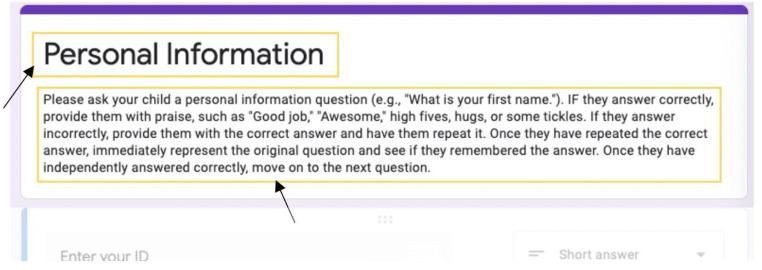
Click the description box and enter the instructions for conducting the instructional activity (Fig. 43).
Navigate to “Untitled Question” below the form’s “Title” box.
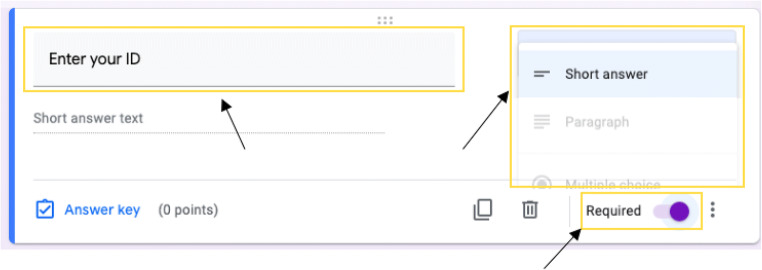
Create a form identifier by instructing users to identify who is conducting the session (e.g., “Enter your ID”) and selecting “Short answer” from the drop-down menu (Fig. 44). Creating a form identifier will allow those viewing the responses to easily organize form responses (see “Viewing Form Responses” later in the article).
Click the “Required” button on the bottom of the screen (Fig. 44).
Click the Add Question icon (Fig. 45).
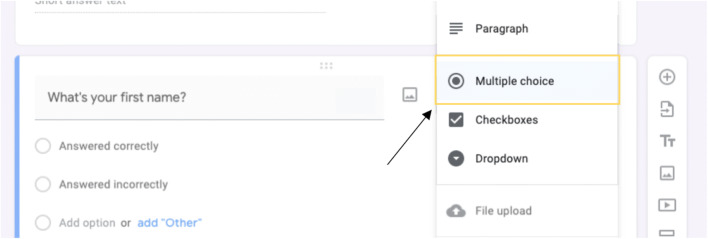
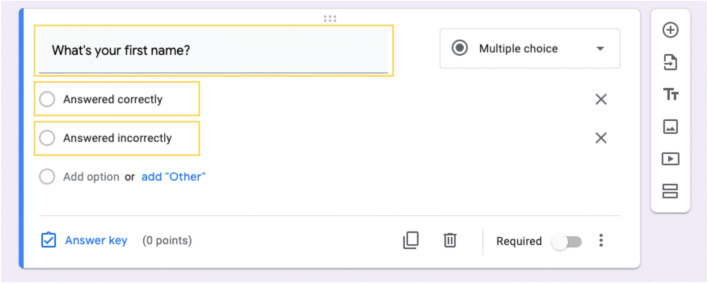
Select the “Question” box and enter a question into the box (e.g., “What’s your first name?”).
From the drop-down menu, select “Multiple choice” (Fig. 46).
Click “Option 1” and type “Answered correctly” (Fig. 47).
Click “Add option” and type “Answered incorrectly” (Fig. 47).
Click the Add Question icon (Fig. 45) and repeat Steps 10–13.
Fig. 40.
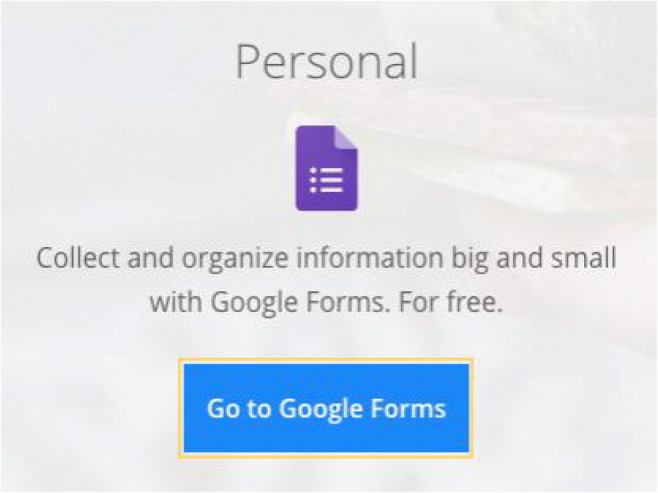
Navigate to Google Forms
Fig. 41.
Start a new blank quiz
Fig. 42.
Adding the form title
Fig. 43.
Adding the activity description
Fig. 44.
Creating a form identifier
Fig. 45.
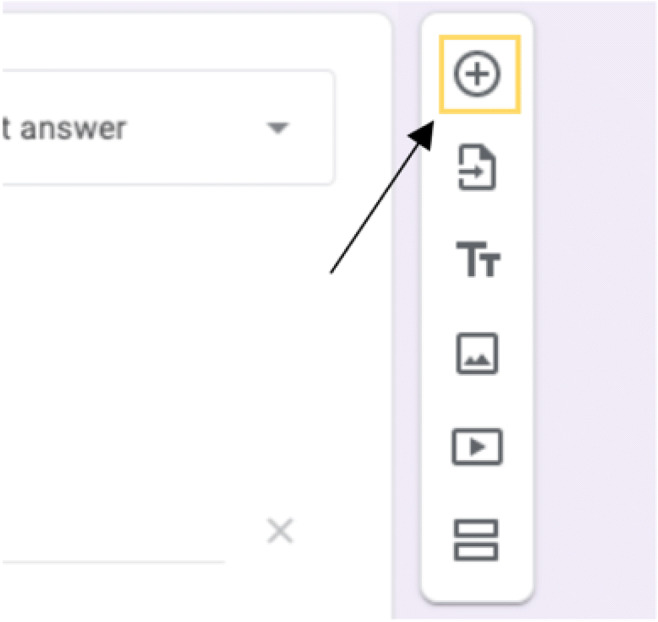
Adding questions
Fig. 46.
Creating a multiple-choice question
Fig. 47.
Inserting question and answer options
Viewing form responses
Navigate to Google Forms by entering https://www.google.com/forms/about/ into a web browser.
Click on “Go to Google Forms” to view quizzes (see Fig. 40).
Select a quiz.
Along the top of the selected quiz, click on the “Responses” button (Fig. 48).
- The response page will allow the reader to view the following:
- To view a summary of all responses, click on the “Summary” button (Fig. 49).
- To view a summary of each question, click on the “Question” button (Fig. 49).
- To view a summary of each individual quiz, click on the “Individual” button (Fig. 49).
- To view a breakdown of each session in Google Sheets, click on the Google Sheets icon.
Fig. 48.
Navigating to form responses
Fig. 49.
Options for viewing form responses
Sharing Materials and Instructional Activities
There are several options for sharing instructional materials with clients and families using the Google Drive and Google Classroom applications. BCBAs can create and share a link to an individual Google Drive file, create and share a Google Drive folder, or build a Google Classroom to organize and store multiple activities. It is important to note the following:
BCBAs should publish any Google Slides instructional activities that have linked slides (e.g., selecting colors, numbers, or letters from an array; identifying body parts from a stationary background).
Drag-and-drop activities should be shared as an individual file or as part of a Google Drive folder because the interactive features will not work in published slides.
For independent activities, BCBAs should direct clients and families to use the linked stimuli and navigation arrows to navigate the Google Slides presentation instead of the standard Google navigation bar.
Sharing an Individual File
Navigate to https://drive.google.com.
Open the file to share.
Select the yellow “Share” button in the top-right corner.
Click on “Get shareable link.”
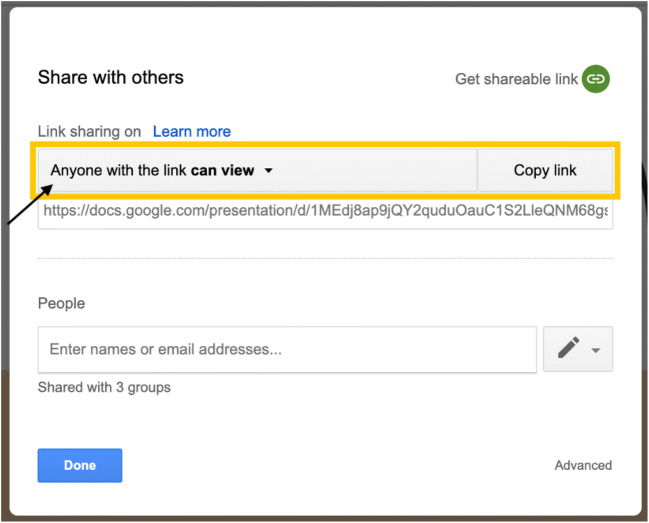
- A pop-up menu will appear that provides sharing options (Fig. 50):
- Select “Anyone with the link can view” or “Anyone with the link can edit.”
- Select “Copy link.”
Share the link with the family/client by pasting it into a message.
Fig. 50.
Pop-up menu with sharing options
Creating and Sharing a Folder
Navigate to https://drive.google.com.
\Select the multicolored plus sign on the top-left side of the page.
Select “Folder” in the drop-down menu.
Name the new folder.
Add items/documents to the folder by dragging and dropping files or clicking the “New” button.
Right-click on the folder and select the “Share” option (Fig. 51).
A pop-up menu will appear (Fig. 50) that provides sharing options, including view-only or editable access. Repeat Steps 3 and 4 from “Sharing an Individual File.”
Fig. 51.
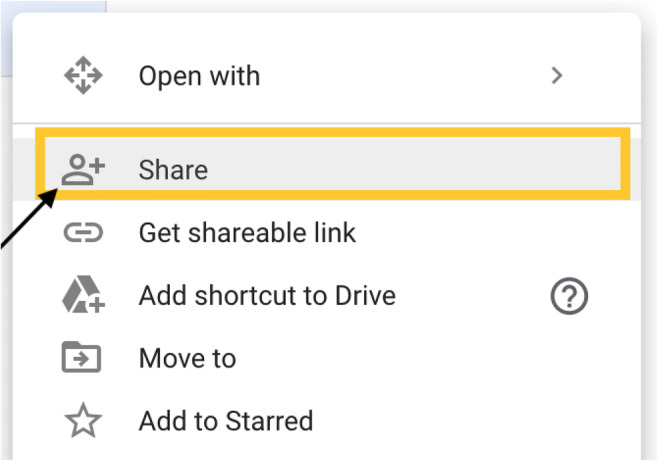
“Share” option
Publishing Slides
Open a completed Google Slides presentation.
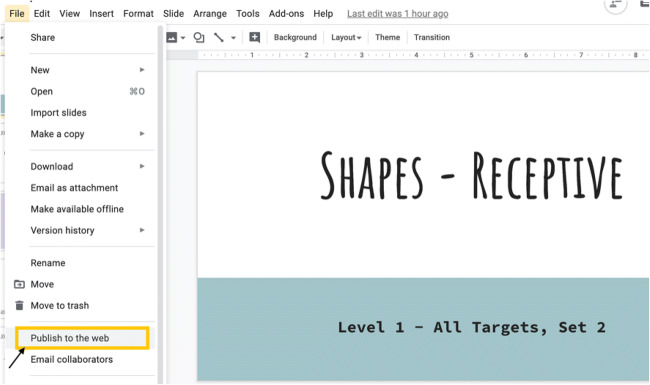
Navigate to “File” located on the toolbar.
From the drop-down menu, select “Publish to the web” (Fig. 52).
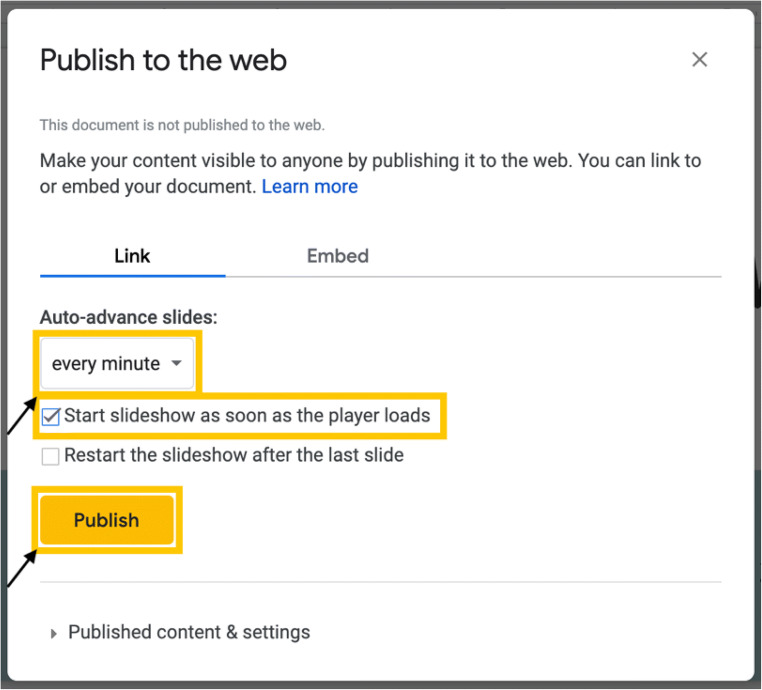
- A “Publish to the web” pop-up menu will appear (Fig. 53).
- In the “Auto-advance slides” drop-down menu, choose “every minute.”
- Check the box next to “Start slideshow as soon as the player loads.”
- Click “Publish.”
Right-click on the link. Copy and share the link with the family/client by pasting it into a message.
Fig. 52.
File drop-down menu with “Publish to the web” option
Fig. 53.
“Publish to the web” pop-up menu
Google Classroom
To set up a Google Classroom, BCBAs will need a Gmail account. For privacy purposes, we recommend creating an individual classroom for each client. It is important to note that only individuals with Gmail accounts can join and interact with the classroom.
Creating a Google Classroom
Navigate to https://classroom.google.com/h.
Select the “+” in the top-right corner to create a new classroom (see Fig. 54).
Select “Create class” from the drop-down menu.
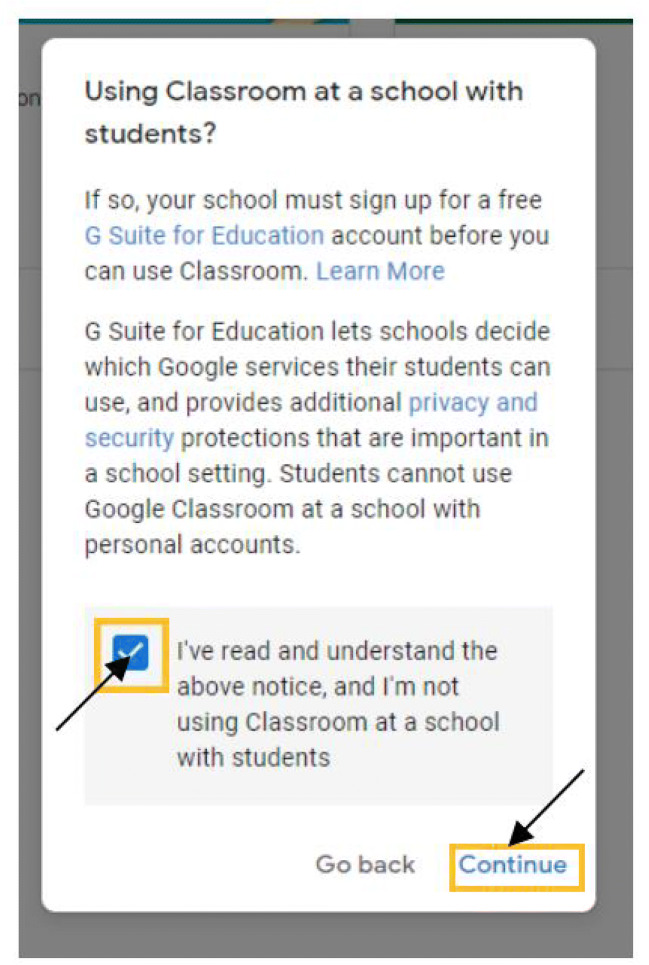
A dialogue box will appear inquiring as to whether or not the classroom will be utilized for a school. If you are using Google Classroom as a private agency, check the box and click continue (see Fig. 55).
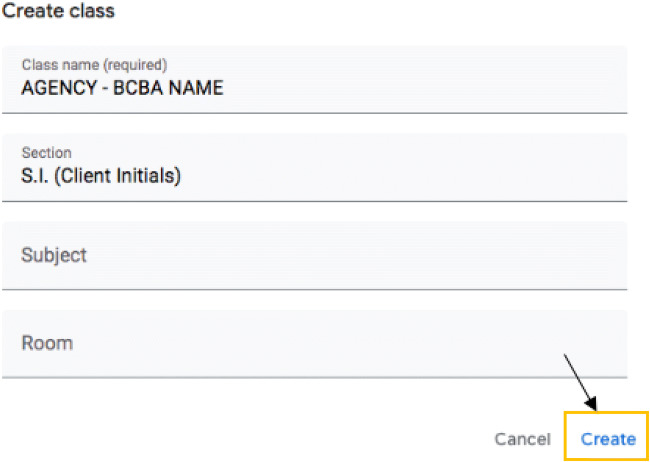
Type the class name into the dialogue box (Fig. 56).
Type a section name (e.g., client’s initials) in the following tab (Fig. 56).
Select “Create” (see Fig. 56).
The classroom will now appear in the Google Classroom homepage (see Fig. 57).
Fig. 54.

New classroom creation button
Fig. 55.
Google Classroom terms of use policy
Fig. 56.
Class specifications
Fig. 57.
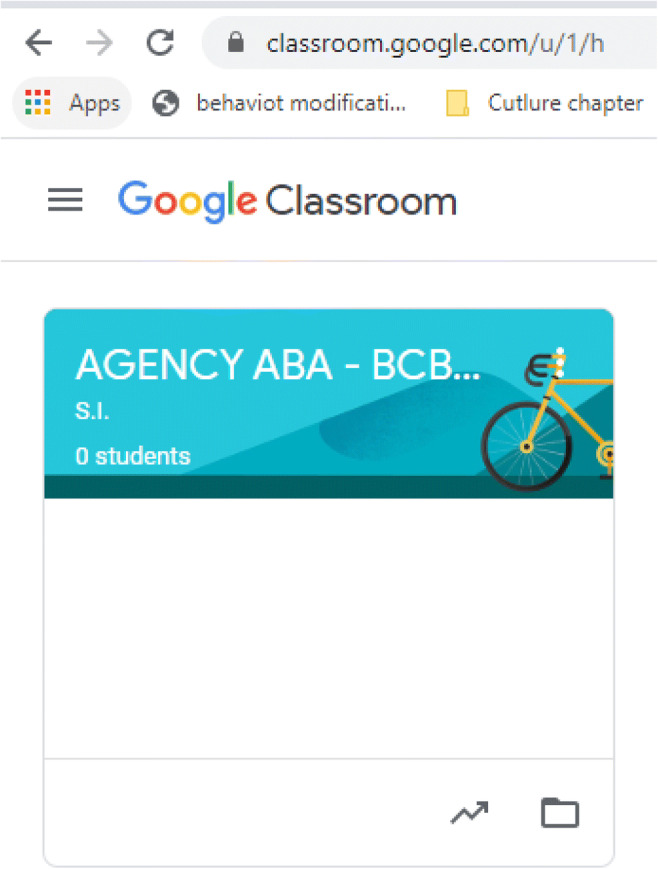
Google Classroom homepage
Adding clients and caregivers to a Google Classroom
Provide clients and/or caregivers with the Google Classroom code (see Fig. 58).
Direct clients and/or caregivers to navigate to https://classroom.google.com/h.
Clients and caregivers will need to select the “+” in the top-right corner (Fig. 54), click “Join class,” enter the class code, and click "Join.” (see Fig. 59).
Fig. 58.
Google Classroom code
Fig. 59.
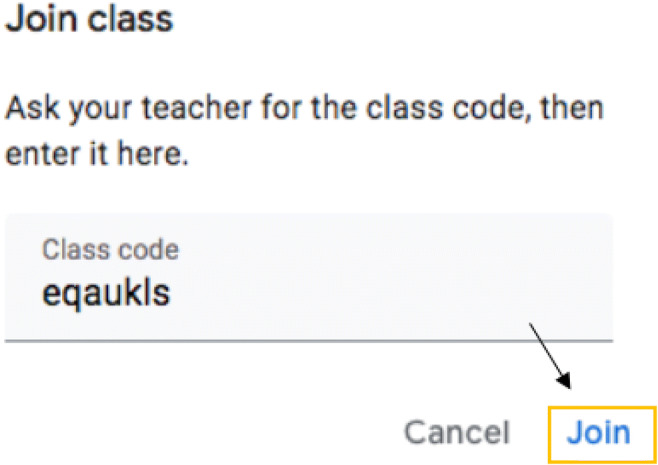
“Join class” screen
Google Classroom Features
Google Classroom is a digital teaching platform that allows instructors to organize instructional content by topic, add assignments, and post announcements. By following the process in the next sections, BCBAs can add any digital content developed using Google Slides or Google Forms into a Google Classroom assignment.
Creating topics
Navigate to the “Classwork” tab.
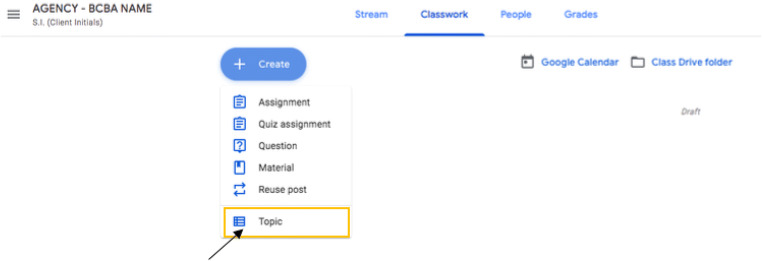
Click “Create” and select “Topic” from the drop-down menu (see Fig. 60).
As shown in Fig. 61, type a topic name (e.g., “Independent Activities”) into the box, and click “Add.” Drag and drop instructional content into the topic area from the assignment list above or assign a topic while creating an assignment (see the next section, “Creating Assignments”).
Fig. 60.
Creating topics
Fig. 61.
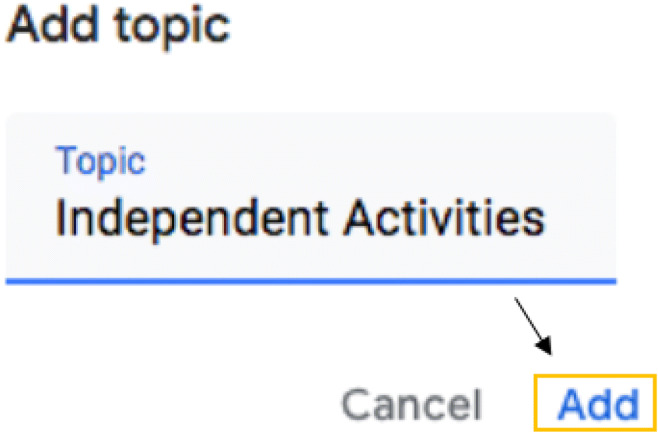
Naming and adding topics
Creating assignments
Navigate to the “Classwork” tab.
Click “Create” and select “Assignment” from the drop-down menu (see Fig. 62).
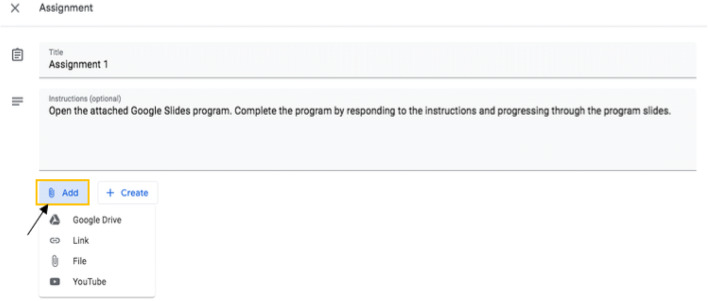
Type an assignment title in the “Title” text box and provide instructions for clients/parents in the “Instructions” field, if necessary (Fig. 63).
- Attach a Google Slides activity, Google Form, or other materials by clicking the “Add” button (Fig. 63).
- To insert instructional content from Google Drive, select “Google Drive,” navigate to the relevant file, and click “Add.”
- To insert a link, select “Link,” copy and paste the link into the box, and click “Add link.”
- To insert a computer file, select “File,” drag the file into the box or select it from a device, and click “Upload.”
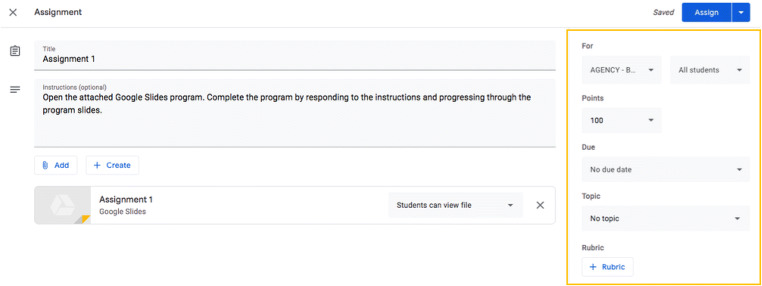
Adjust points, due date, topic, and rubric as necessary by clicking on the respective drop-down menus, as shown in Fig. 64.
Navigate to the top-right corner of the screen and click the arrow next to the blue “Assign” button. Select “Assign,” “Schedule,” or “Save as Draft.”
Repeat Steps 2–6 to develop additional assignments.
Fig. 62.
Creating an assignment
Fig. 63.
Adding content to an assignment
Fig. 64.
Assignment-specific adjustments
Practice Recommendations
Although the Google applications described previously provide an online platform for creating and sharing digital instructional activities, it is important to note that BCBAs will still need to assess clients’ and caregivers’ prerequisite skills, train caregivers to conduct the activity, structure the instructional trial arrangement, program feedback, and develop a data collection system.
Prerequisite Skills
BCBAs should assess clients’ and caregivers’ prerequisite skills prior to implementing digital instructional activities. In order to effectively interact with independent instructional content, clients need basic computer skills (e.g., ability to navigate a keyboard or touch screen), attending and discrimination skills (e.g., ability to attend to, scan, and select stimuli on a screen), and basic independent work skills (e.g., ability to engage with the instructional content for the duration of the activity with minimal caregiver support). Before assigning caregiver-supported instructional activities, BCBAs should consider the prerequisite skills clients need to successfully participate in each activity. BCBAs should also assess caregivers’ prerequisite skills (e.g., stimulus/instructional control) and provide appropriate training, perhaps via telehealth, to ensure that the caregiver can facilitate client interaction with digital instructional activities effectively.
Caregiver Training
There are many ways to provide telehealth support using videoconferencing platforms such as Zoom (Zoom Video Communications, Inc., 2011), VSee (VSee Lab, Inc, 2008), or GoToMeeting (LogMeIn, 2004). An in-depth guide to parent training is beyond the scope of this article. However, there are several behavior-analytic training strategies that may be useful, including behavioral skills training (Sarakoff & Sturmey, 2004) and remote in vivo coaching (Bowles & Nelson, 1976).
Instructional Trial Arrangement
BCBAs should also be aware that there are many ways to arrange trials within instructional activities. Common options include massed-trial teaching (MTT) and interspersed-trial teaching (ITT). During traditional MTT, an instructor presents the same acquisition target several times consecutively within a session (Henrickson, Rapp, & Ashbeck, 2015). During ITT, an instructor incorporates mastered and/or nonmastered targets within a session (Henrickson et al., 2015). The Google Slides and Google Forms applications allow BCBAs to design an instructional sequence in many different ways. Thus, when creating digital instructional activities, BCBAs should continue to customize and individualize client programming.
Providing Feedback
Praise
Research has demonstrated that praise may function as a reinforcer for some children with ASD and other related disorders (Joachim & Carroll, 2018; Paden & Kodak, 2015). BCBAs can use Google Slides’ functions to incorporate praise into independent instructional activities by creating praise slides and linking them to the “correct answer” stimuli. BCBAs should customize praise slides to an individual learner’s preferences. For example, praise slides may include prerecorded auditory praise-statement stimuli (e.g., “Good job!”) or sound clips (e.g., bells, dings, favorite songs). Praise slides can also include visual stimuli such as cartoon images (e.g., favorite characters, balloons, or flowers), moving images (e.g., .gif files), or videos (e.g., YouTube links). BCBAs will also need to train caregivers to provide praise and reinforcement during caregiver-supported instructional activities.
Prompting and error correction
When completing instructional activities, clients are likely to make errors. Therefore, BCBAs need to consider the types of error correction procedures that will be most appropriate for their clients (Leaf et al., 2016). Common components of an error correction procedure include (a) demonstration of the correct response, (b) an active client response (requiring a student response after the prompt), (c) repeated re-presentation of the instruction, and (d) differential reinforcement of the correct response (Cariveau, La Cruz Montilla, Ball, & Gonzalez, 2019). There are multiple ways to build error correction into independent instructional activities using Google Slides. For example, BCBAs can provide prompts on “error correction” slides. Prompts may include the addition of pictures that point to the correct answer (e.g., a finger or an arrow), animations of the correct answer (e.g., making the correct answer spin or zoom in and out), or the addition of an auditory prompt that includes the correct response (e.g., “This is the square.”). The error correction slide can include a simple visual/auditory prompt, or the BCBA can elect to include a link among the possible responses to require an active student response. BCBAs will also need to consider prompting strategies for caregiver-supported activities (e.g., providing a vocal prompt of the correct response, or requiring an independent response before continuing) and provide caregivers with the proper training to correct errors.
Data Collection
Data collection is an important part of any ABA program (Baer, Wolf, & Risley, 1968), and it is particularly important during interruptions to in-person services. It may be possible for the BCBA to record instructional sessions (provided that he or she has consent from the caregiver) and collect data from the recording. If this type of data collection is not possible, it is important to design systems that caregivers can easily manage in the home. Existing literature suggests that estimation (Ferguson et al., 2019; Taubman, Leaf, McEachin, Papovich, & Leaf, 2013) and probe (Ferguson et al., 2019; Lerman, Dittlinger, Fentress, & Lanagan, 2011) data collection systems can provide a reasonable estimate of skill acquisition performance. Caregivers can also use Google Forms to collect data on instructional activities. As demonstrated previously (see “Creating a Google Form”), BCBAs can arrange Google Forms so that the caregiver or family member running the activity can quickly indicate whether the client answered correctly or incorrectly. Once the Google Form is submitted, these data can be organized and analyzed easily.
Discussion
During service disruptions such as those caused by the current COVID-19 global pandemic, BCBAs may need to consider alternative ways to provide clients with appropriate instructional activities. In today’s society, there are many technology-based options for creating digital activities to mitigate service gaps in situations where in-person treatment is not feasible. Google applications, such as Google Slides, Google Forms, and Google Classroom, provide BCBAs with an easy and accessible way to create and share these digital materials.
Although there are many potential benefits of creating digital instructional activities using Google applications and planning for their use with clients, there are some potential limitations worth mentioning. First, recipients need to have a Gmail address to access and use the materials. Second, BCBAs may need to carefully check and troubleshoot issues with linking stimuli, audio files, navigation arrows, and protecting the slide. We have incorporated troubleshooting suggestions into the task analyses for these particular functions. Finally, creating high-quality digital instructional content can be a time-consuming process. Given that clients and families will likely have immediate service needs, BCBAs will need to find other ways to continue treatment, perhaps by conducting standard instructional programming via telehealth, while simultaneously preparing digital instructional activities to supplement these telehealth-based services.
We hope that this article will provide BCBAs with some useful tools for creating digital content to share with clients and caregivers. Although there is no question that direct intervention by trained behavior technicians, under the supervision of a behavior analyst, would likely produce significantly more beneficial impacts than interacting with the activities proposed in this article, it is possible that interaction with these instructional activities may mitigate some of the skill loss that could occur due to a disruption in direct service provision. Future researchers may address this question. In addition to potentially reducing the impact of service disruptions during the current crisis, BCBAs may be able to provide digital content to support clients when there are geographic barriers to in-person treatment or when unforeseen circumstances (e.g., illness or injury to a family member) arise. When standard ABA services resume, BCBAs may also incorporate digital instructional activities to supplement in-person services. As such, we hope that the processes described previously will be useful both during and beyond the COVID-19 pandemic.
Appendix
Compliance with Ethical Standards
Conflict of Interest
The authors have no known conflicts of interest to disclose.
Informed Consent
As this is a technical article, no human participants were involved in the project. Thus, no informed consent was necessary.
Footnotes
Publisher’s Note
Springer Nature remains neutral with regard to jurisdictional claims in published maps and institutional affiliations.
References
- 123apps LLC. (2012). Online Voice Recorder (Version 1.1) [Web software]. Retrieved from https://online-voice-recorder.com/
- Apple. (2016). QuickTime (Version 7.7.9) [Computer software]. Retrieved from http://apple.com>quicktime
- Baer DM, Wolf MM, Risley TR. Some current dimensions of applied behavior analysis. Journal of Applied Behavior Analysis. 1968;1(1):91–97. doi: 10.1901/jaba/1968.1-91. [DOI] [PMC free article] [PubMed] [Google Scholar]
- Blair, B. J., & Shawler, L. A. (2019). Developing and implementing emergent responding training systems with available and low-cost computer-based learning tools: Some best practices and a tutorial. Behavior Analysis in Practice. 10.1007/s40617-019-00405-x. [DOI] [PMC free article] [PubMed]
- Bowles PE, Nelson RO. Training teachers as mediators: Efficacy of a workshop versus the bug-in-the-ear technique. Journal of School Psychology. 1976;14(1):15–26. doi: 10.1016/0022-4405(76)90058-3. [DOI] [Google Scholar]
- Cariveau, T., La Cruz Montilla, A., Ball, S., & Gonzalez, E. (2019). A preliminary analysis of equivalence-based instruction to train instructors to implement discrete trial teaching. Journal of Behavioral Education. 10.1007/s10864-019-09348-3.
- Charlop-Christy, M., LeBlanc, L., & Carpenter, M. (1999). Naturalistic teaching strategies (NATS) to teach speech to children with autism: Historical perspective, development, and current practice. The California School Psychologist, 4(1), 30–46. 10.1007/BF03340868.
- Cummings C, Saunders KJ. Using PowerPoint 2016 to create individualized matching to sample sessions. Behavior Analysis in Practice. 2019;12(2):483–490. doi: 10.1007/s40617-018-0223-2. [DOI] [PMC free article] [PubMed] [Google Scholar]
- DiCicco, K. M. (2016). The effects of Google Classroom on teaching social studies for students with learning disabilities. [Unpublished master's thesis]. Rowan University.
- Eid AM, Aljaser SM, AlSaud AN, Asfahani SM, Alhaqbani OA, Mohtasib RS, et al. Training parents in Saudi Arabia to implement discrete trial teaching with their children with autism spectrum disorder. Behavior Analysis in Practice. 2017;10(4):402–406. doi: 10.1007/s40617-016-0167-3. [DOI] [PMC free article] [PubMed] [Google Scholar]
- Ferguson JL, Milne CM, Cihon JH, Dotson A, Leaf JB, McEachin J, Leaf R. An evaluation of estimation data collection to trial-by-trial data collection during discrete trial teaching. Behavioral Interventions. 2019;35(1):178–191. doi: 10.1002/bin.1705. [DOI] [Google Scholar]
- Fisher WW, Luczynski KC, Hood SA, Lesser AD, Machado MA, Piazza CC. Preliminary findings of randomized clinical trial of a virtual training program for applied behavior analysis technicians. Research in Autism Spectrum Disorders. 2014;8(9):1044–1054. doi: 10.1016/j.rasd.2014.05.002. [DOI] [Google Scholar]
- Google LLC. (2006). Google Slides [Web application]. Retrieved from https://google.com/slides/about/
- Google LLC. (2008). Google Forms [Web application]. Retrieved from https://google.com/forms/about/
- Henrickson ML, Rapp JT, Ashbeck HA. Teaching with massed versus interspersed trials: Effects on acquisition, maintenance, and problem behavior. Behavioral Interventions. 2015;30(1):36–50. doi: 10.1002/bin.1396. [DOI] [Google Scholar]
- Joachim BT, Carroll RA. A comparison of consequences for correct responses during discrete-trial instruction. Learning and Motivation. 2018;62:15–28. doi: 10.1016/j.lmot.2017.01.002. [DOI] [Google Scholar]
- Leaf JB, Cihon JH, Townley-Cochran D, Miller K, Leaf R, McEachin J, Taubman M. An evaluation of positional prompts for teaching receptive identification to individuals diagnosed with autism spectrum disorder. Behavior Analysis in Practice. 2016;9(4):349–363. doi: 10.1007/s40617-016-0146-8. [DOI] [PMC free article] [PubMed] [Google Scholar]
- Lerman DC, Dittlinger LH, Fentress G, Lanagan T. A comparison of methods for collecting data on performance during discrete trial teaching. Behavior Analysis in Practice. 2011;4(1):53–62. doi: 10.1007/BF03391775. [DOI] [PMC free article] [PubMed] [Google Scholar]
- LogMeIn. (2004). GoToMeeting [Web software]. Retrieved from http://gotomeeting.com
- Lotfizadeh AD, Kazemi E, Pompa-Craven P, Eldevik S. Moderate effects of low-intensity behavioral intervention. Behavior Modification. 2020;44(1):92–113. doi: 10.1177/0145445518796204. [DOI] [PubMed] [Google Scholar]
- Lovaas OI. Teaching developmentally disabled children: The me book. Baltimore, MD: University Park; 1981. [Google Scholar]
- Microsoft Corporation. (2013). Voice Recorder [Computer software].
- Paden A, Kodak T. The effect of reinforcement magnitude on skill acquisition with children with autism. Journal of Applied Behavior Analysis. 2015;48:924–929. doi: 10.1002/jaba.239. [DOI] [PubMed] [Google Scholar]
- Sarakoff RA, Sturmey P. The effects of behavioral skills training on staff implementation of discrete-trial teaching. Journal of Applied Behavior Analysis. 2004;37(4):535–538. doi: 10.1901/jaba.2004.37-535. [DOI] [PMC free article] [PubMed] [Google Scholar]
- Shaharanee INM, Jamil JM, Rodzi SSM. Google Classroom as a tool for active learning. AIP Conference Proceedings. 2016;1761(1):020069. doi: 10.1063/1.4960909. [DOI] [Google Scholar]
- Suess AN, Romani PW, Wacker DP, Dyson SM, Kuhle JL, Lee JF, et al. Evaluating the treatment fidelity of parents who conduct in-home functional communication training with coaching via telehealth. Journal of Behavioral Education. 2014;23:1–26. doi: 10.1007/s10864-013-9183-3. [DOI] [Google Scholar]
- Taubman MT, Leaf RB, McEachin JJ, Papovich S, Leaf JB. A comparison of data collection techniques used with discrete trial teaching. Research in Autism Spectrum Disorders. 2013;7:1026–1034. doi: 10.1016/j.rasd.2013.05.002. [DOI] [Google Scholar]
- VSee Lab, Inc. (2008). VSee Clinic (Version 4.0) [Computer Software]. Retrieved from http://vsee.com
- Zoom Video Communications, Inc. (2011). Zoom: Video Conferencing [Web application]. Retrieved from https://zoom.us


