

Abstract
Telemedicine uses modern telecommunication technology to exchange medical information and provide clinical care to individuals at a distance. Initially intended to improve health care for patients in remote settings, telemedicine now has a broad clinical scope with the general purpose of providing convenient, safe, and time- and cost-efficient care. The coronavirus disease 2019 pandemic has created marked nationwide changes in health care access and delivery. Elective appointments and procedures have been canceled or delayed, and multiple states still have some degree of shelter-in-place orders. Many institutions are now relying more heavily on telehealth services to continue to provide medical care to individuals while also preserving the safety of health care professionals and patients. Telemedicine can also help reduce the surge in health care needs and visits as restrictions are lifted. In recent weeks, there has been a significant amount of information and advice on how to best approach telemedicine visits. Given the frequent presentation of individuals with musculoskeletal complaints to the medical practitioner, it is important to have a framework for the virtual musculoskeletal physical examination. This will be of importance as telemedicine continues to evolve, even after coronavirus disease 2019 restrictions are lifted. This article will provide the medical practitioner performing a virtual musculoskeletal examination with a specific set of guidelines, both written and visual, to enhance the information obtained when evaluating the shoulder, hip, knee, ankle, and cervical and lumbar spine. In addition to photographs, accompanying videos are included to facilitate and demonstrate specific physical examination techniques that the patient can self-perform.
Abbreviations and Acronyms: COVID-19, coronavirus disease 2019; FABER, flexion abduction external rotation; PSIS, posterior superior iliac spine; SLR, straight leg raise
Telemedicine is the use of modern telecommunication technology to exchange medical information and provide clinical care to individuals at a distance.1 , 2 Telehealth, which refers to the broader scope of remote health care services, was first introduced in the 1960s and gained popularity in the 1990s as technology improved and associated costs declined.1 , 3 Initially intended to improve health care for patients in remote settings, telemedicine now has a broad clinical scope with the general purpose of providing more convenient, safe, and time- and cost-efficient care.3 Telemedicine is currently applied in multiple settings including, but not limited to, stroke evaluation with large national telestroke networks, cardiology consultations including myocardial infarction evaluation, surgical consultations, psychiatric evaluations and remote mental health monitoring, dermatology consultations, newborn resuscitations, and trauma and emergency medicine care especially in rural or resource-poor areas.1 , 3, 4, 5 Telemedicine has also been found to be useful in the outpatient and inpatient physical medicine and rehabilitation setting.6
The coronavirus disease 2019 (COVID-19) pandemic has created significant nationwide changes in health care access and delivery. Elective appointments and procedures have been delayed or canceled, and multiple states have shelter-in-place orders. Many institutions now rely on telehealth services to continue to provide medical care to individuals while also preserving the safety of health care professionals and patients. Furthermore, telemedicine can help reduce the surge in health care needs and visits once restrictions are lifted and reduce the financial strain on medical practices.
The medical literature has exploded with information and advice on how to best approach telemedicine visits. This includes a recent article that provides a general approach to the outpatient rehabilitation visit.7 Another recent publication provides recommendations for the virtual orthopedic examination, including the knee, hip, shoulder, and elbow examinations.8 Musculoskeletal conditions are extremely common. A recent report suggests that 1 in 2 adult Americans lives with a musculoskeletal condition. This is the same number as those with cardiovascular or chronic respiratory disease combined.9 Given the frequent presentation of individuals with musculoskeletal complaints to the health care provider, it is important to have a framework for the virtual musculoskeletal physical examination. This will be of importance as telemedicine continues to evolve even after COVID-19 restrictions are lifted.
This article will provide the medical practitioner performing a virtual musculoskeletal examination with a specific set of guidelines, both written and visual, to enhance the information obtained when evaluating the shoulder, hip, knee, ankle, and cervical and lumbar spine. Accompanying videos are included to facilitate and demonstrate specific physical examination techniques that the patient can self-perform. Most of these tests are based on validated physical examination maneuvers performed during face-to-face patient encounters, but have been modified to enable the patient to self-perform the maneuvers. We acknowledge that the sensitivity and specificity for these self-performed and modified tests have yet to be documented, but we have tried to maintain the essential components of the original tests as much as possible.
General Considerations (Supplemental Video 1, available online at http://www.mayoclinicproceedings.org)
-
•
The examiner will look at the video image of the patient, but also should occasionally look directly at the camera as that is the equivalent of looking the patient in the eyes.
-
•
The examiner should tell the patient that at times the examiner may need to look away to take notes or view various computer screens.
-
•
There may be an audio lag, so try to give the patient 2 seconds or so after he or she stops speaking before talking.10
-
•
The uniform history taking and examination sequence promotes efficiency and avoids errors of omission.
-
•
The patient is requested to use 1 finger to point to the maximal area of pain and to delineate any radiating pain.
-
•
Consider demonstrating the examination maneuver for the patient, as appropriate.
Telemusculoskeletal Examination
Patient Considerations
-
•
Adequate room to perform full range of motion of the joints in all planes, gait, and sit to stand transitions.
-
•
The room should be as free of distractions as possible, with uncluttered background and adequate lighting.
-
•
If possible, an additional person can be used to adjust the camera to accommodate different patient positions (ie, standing, lying, full-body view, etc).
-
•
If this is an examination of a small child, toys that the child will reach for and manipulate and/or hold for comfort should be used.
Shoulder (Supplemental Video 2, available online at http://www.mayoclinicproceedings.org)
Inspection/Observation
-
•
The patient should be a wearing tank top or halter top or sports bra to permit visual assessment of the shoulders, chest, and upper back as well as the shoulder blade region.
-
•
Examination can be started with the patient standing comfortably but able to transition from the standing to seated position; the patient should also be able to fully move arms in all directions, and the examiner should be fully able to assess upper back and shoulders as well as front.
-
•
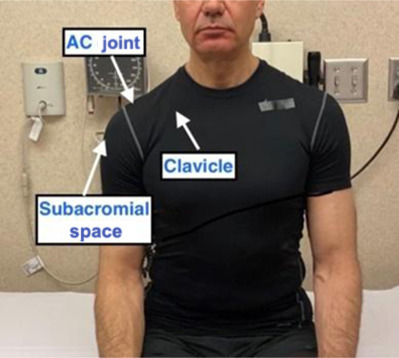
Assess from the front: Symmetry (ie, “dominant shoulder effect,” in which the shoulder on the dominant side is a bit lower), contours, swelling, step-off, atrophy, or other deformity.
-
•
Assessment from the posterior aspect: Assess scapular winging and scapular dyskinesia, including hands on hips, arms at 90° shoulder abduction, and full forward shoulder flexion; assess painful arc of shoulder abduction between 60° and 120°.
Palpation
-
•
Self-palpation of the clavicle, acromioclavicular (AC) joint, and subacromial space.
Range of Motion
-
•
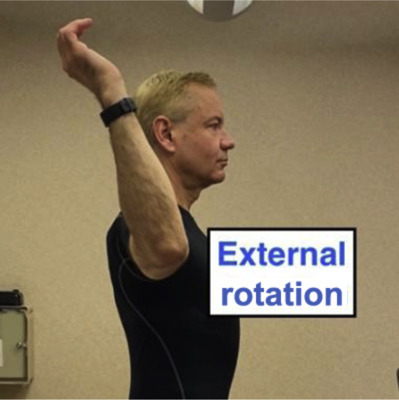
Shoulder range of motion in cardinal planes of forward flexion, abduction, and internal and external rotation.
-
•
External rotation to be assessed with the shoulder abducted to 90°, elbow flexed to 90°, and forearm positioned in the neutral plane (0°).
-
•
For a young child, you may need to ask them to reach for a toy in each plane or ask the caregiver to assist with passive range of motion.
Muscle Strength Testing
-
•
External rotation and internal rotation tested with the arm adducted at patient’s side and elbow flexed to 90°; can use the doorframe to provide resistance or an additional person, if present; assess subscapularis by performing a belly press test (elbows should not lag behind the front of the body); assess supraspinatus by having the patient abduct the extended arm to 90°, position limb forward about 10°, and challenge strength either by holding with the weight of the limb providing resistance or by applying self-resistance with the other arm.
-
•
After each resistance maneuver, ask the patient if the maneuver is painful or if the patient feels weaker than usual performing that movement.

-
•
For a young child, if the caregiver is able, assess for asymmetry of strength (position arms as when performing “chicken wings” to assess deltoid, “arms like boxer” to assess biceps, push-away to assess triceps, etc). Perform each for 5 seconds, and evaluate for pain provocation.
Special Tests
Rotator Cuff
-
•
Self-perform the Neer test of impingement consisting of 180° of forward flexion at the shoulder.
-
•
Self-perform the Hawkins test of impingement; shoulder flexed to 90°, elbow flexed to 90°, and internal rotation of forearm.
Acromioclavicular Joint
-
•
Scarf sign: Cross-body arm adduction for AC joint abnormality.
Shoulder Anterior Instability
-
•
Anterior apprehension: Self-perform shoulder abduction to 90° combined with shoulder external rotation to 90°.
Labral Provocative Test
-
•
O’Brien’s test: Self-performed with shoulder flexion to 90° with full elbow extension, combined with 10° to 15° of shoulder adduction and internal rotation; self-resistance applied with downward force to the tested arm (position 1) with the maneuver repeated with full forearm supination (position 2). If the patient is unable to apply self-resistance with the opposite arm, a weight or other object (preferably 5 to 10 lb) can be lifted and held in both positions.
Bicipital Tendon Tests

-
•
Self-performed Speed’s test and/or Yergason’s test: The Speed’s test can use resistance provided by pushing upward on the table/desk or applied with the opposite arm.
-
•
The Yergason’s test will use patient-provided resistance to external rotation and supination with the elbow in 90° flexion close to the patient’s side; the patient then externally rotates the shoulder while supinating the forearm.
-
•
If the patient is unable to apply self-resistance with the opposite arm, a weight or other object (preferably 5-10 lb) can be used to provide resistance.

Spine (Supplemental Video 3, available online at http://www.mayoclinicproceedings.org)
General Considerations
-
•
The main goals of the neck or low back pain assessment are to rule out serious underlying diseases (“red flags”), to gauge the level of disability for pain, to develop a list of differential diagnoses, and to provide counsel to the patient.
-
•
A thorough history guides the subsequent physical examination. The neck or low back assessment relies most heavily on the history.
-
•
In the telemedicine paradigm, the patient can be guided by videos to facilitate specific spine examination techniques.
-
•
Consider examination of adjacent areas: Shoulder, hip, and so on, as clinically appropriate.
-
•The preferred examination framework:
-
○The patient is dressed in shorts and a T-shirt or a similar loose-fitting shirt.
-
○Inquire about the type of electronic device. If a laptop, tablet, or smartphone is used, it is easier to move the device to complete parts of the examination.
-
○A family member or friend:
-
▪To assist with a portion of the examination that requires moving; to assist with safety and special tests and camera control.
-
▪
-
○
Low Back
Inspection
-
•
An assistant may help in raising the shirt to permit viewing of the lumbar spine region.
-
•Pain location:
-
○Does the pain localize to the base of the spine near the posterior superior iliac spine (PSIS) (dimples of Venus) and above? Or mainly below the PSIS? If above, this is typical for most low back pain. If mainly below, consider pelvic pathology.
-
○If there is back and leg pain, document whether the back or the leg component dominates (radicular pain is typically leg dominant).
-
○Document the location of leg pain looking for a radicular distribution. Also document paresthesia location.
-
▪L2 → Anterior thigh to mid-distal thigh
-
▪L3 → Anterior thigh to knee
-
▪L4 → Anterior thigh, anterior or medial shin to medial malleolus
-
▪L5 → Later or posterolateral thigh, lateral calf, top of foot and great toe
-
▪S1 → Posterior thigh, posterior calf, planter or lateral foot, small toes
-
▪
-
○
-
•Posture: Check while standing in both the coronal and sagittal planes.
-
○Coronal plane: General symmetry; comment on scoliosis, pelvic, and shoulder symmetry.
-
○Sagittal plane: Lumbar lordosis, thoracic kyphosis that can be associated with posterior pelvic tilt (which results in “flat back”) or anterior pelvic tilt (which results in “sway back”).
-
○Ideally a view of the entire profile is preferred to assess overall spinal posture, recalling that a plumb line normally falls from the external auditory meatus through the acromion and travels behind the hip and in front of the knee and ankle.
-
○Inspection of the spine and the entire lower extremities is particularly important in a growing child. Look for spinal curvature, thoracic-lumbar prominence, asymmetry of limb length, and asymmetry or abnormality of the foot/ankle that might suggest a neurological problem. In addition, skin inspection for skin fold asymmetry and skin lesions is necessary.
-
○Left convex curves in a child are more commonly associated with neurological or worrisome etiology.
-
○
Palpation
-
•
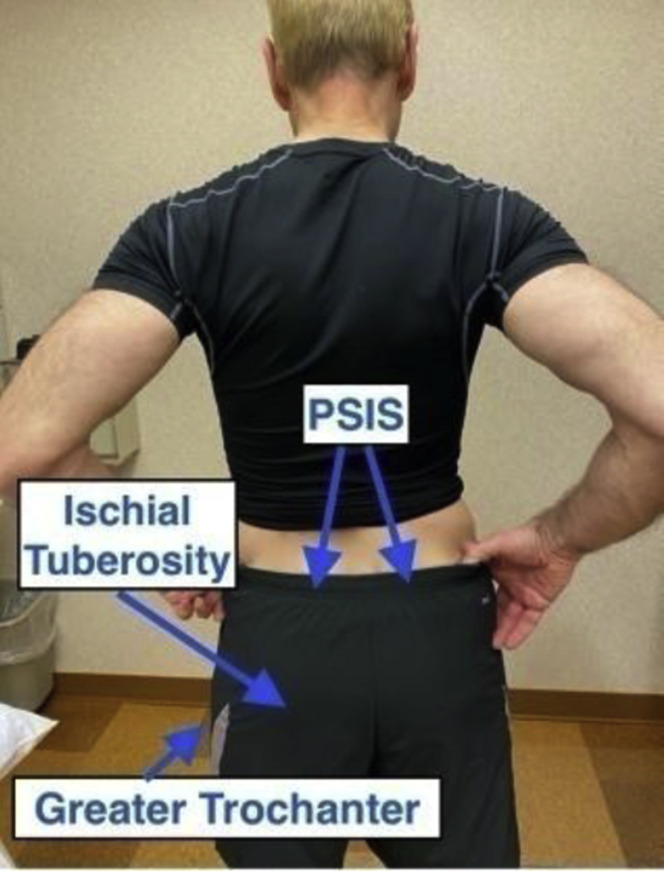
Palpate with 1 finger to locate low back tenderness. Guide the patient to other landmarks (PSIS, ischial tuberosities, greater trochanter, paraspinal musculature, and spinous processes).
Lumbar Range of Motion
-
•
Assess while standing. The patient moves to end range of flexion, extension, lateral flexion, and rotation. Objective measures of lumbar spine flexion can be performed using the estimated or measured distance from the tip of the third digit to the floor.
-
•
Alternatively, an assistant can measure the modified Schober’s test. Draw a line 5 cm below and 10 cm above the PSISs (also known as dimples of Venus). In an erect posture, there will then be 15 cm between the lines. Ask the patient to bend forward maximally and measure the distance between the lines again. Normally, an additional 5 cm of length is observed, or a total of 20 cm or more between the lines.
-
•
In a growing child, assess for thoracic prominence (rib hump).
Neurological Examination
Inspection
-
•
Inspect muscle bulk; look for atrophy and fasciculations throughout the spine and the lower extremities.
-
•Gait assessment
-
○There should be enough room to permit a full-body view of walking both toward and away from the camera. A second person to control camera placement and view is recommended.
-
○Assess normal gait, heel walking, toe walking, and, if able, tandem gait.
-
○
-
•
An assistant may be present for this part of the examination if there are concerns about significant unsteadiness.
-
•
If tandem gait is abnormal, consider the Romberg test if an assistant is present. The Romberg test is performed with the subject standing with feet together, eyes open, and hands by his or her sides. The subject closes his or her eyes, while the examiner observes for a full minute. Because the examiner is trying to assess whether the patient is a fall risk, an assistant needs to stand close to catch the patient if he or she starts to fall. Falling with eyes open suggests cerebellar disease, while falling only with eyes closed suggests impaired proprioception such as that found with diseases that affect posterior column function (ie, cervical spinal stenosis or peripheral neuropathy).8, 9, 11
Muscle Strength Lower Extremities
-
•
Check lower extremity active range of motion for joint motion/asymmetries and muscle activation against gravity.
-
•
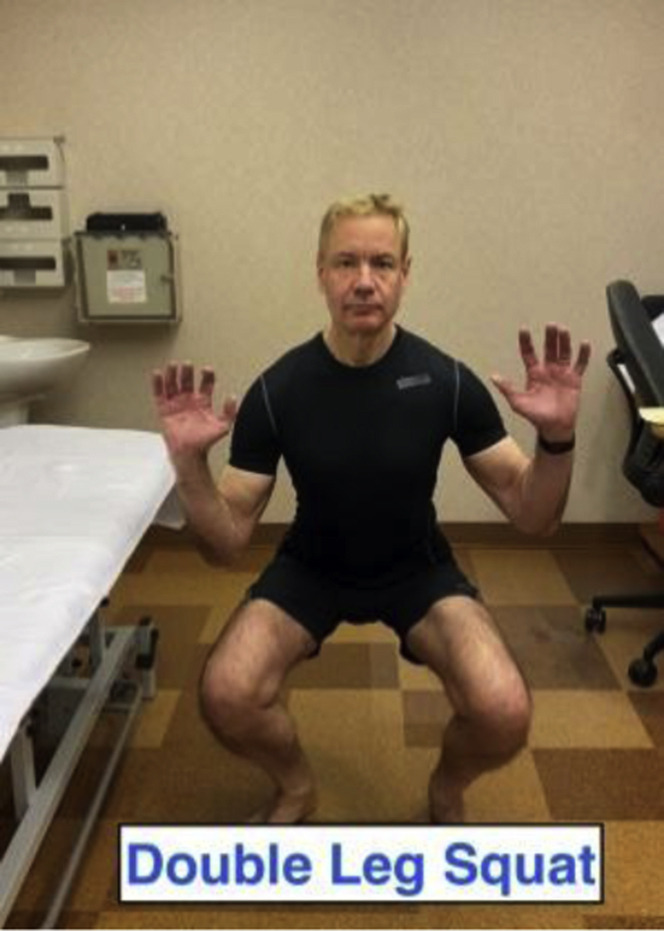
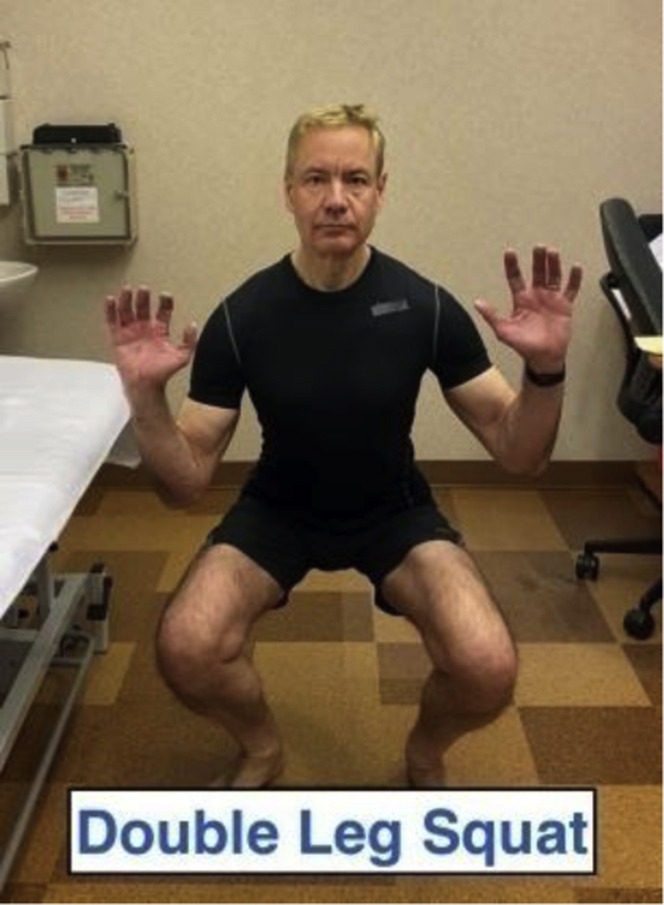
Double leg squat and rise: Good general screen of quadriceps and lower extremity strength.
-
•
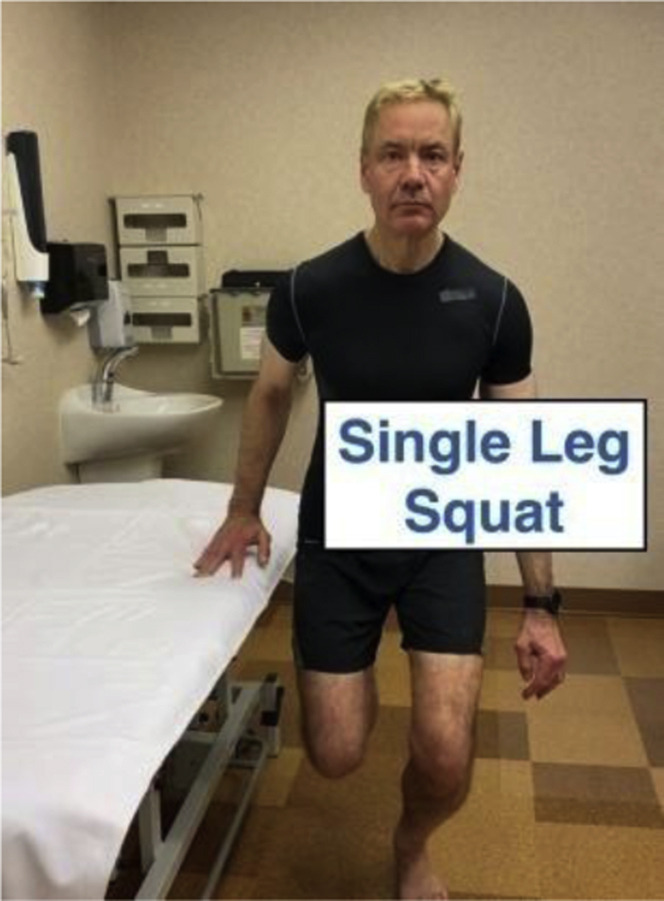
The single leg sit to stand test to assess for subtle quad weakness in suspected L3 or L4 radiculopathy.
-
•
Heel and toe walking to screen for L5 and S1 radiculopathy–related weakness, respectively.
-
•
Repetitive toe raises for subtle S1 radiculopathy–related weakness. Assess the normal leg and then the painful leg.
-
•
For an ambulatory child, try frog jumping (the patient assumes a squatting position with hips and knees externally rotated and fingers/hands to the floor and then proceeding to jumping up, repeating movements to assess for lower extremity strength, ROM, and coordination), single leg hopping (assessing strength, Trendelenburg, knee valgus, and balance), and rise to stand from sitting on the floor (assessing strength and use of hands and arms to assist in rising from a squatting position, as in Gower sign).
Sensory Examination
-
•
This portion of the video evaluation can be challenging, but the examiner can ask the patient to show where he or she feels numbness or paresthesias. An ice pack and cotton ball can be used to assess small and large fiber modalities.10
-
•
An assistant can help screen for touch sensation of dermatomes: L1 just below inguinal crease anteriorly, L2 mid-anterior thigh, L3 medial femoral condyle, L4 medial malleolus, L5 third metatarsal head, and S1 lateral heel.
Muscle Stretch Reflexes
-
•
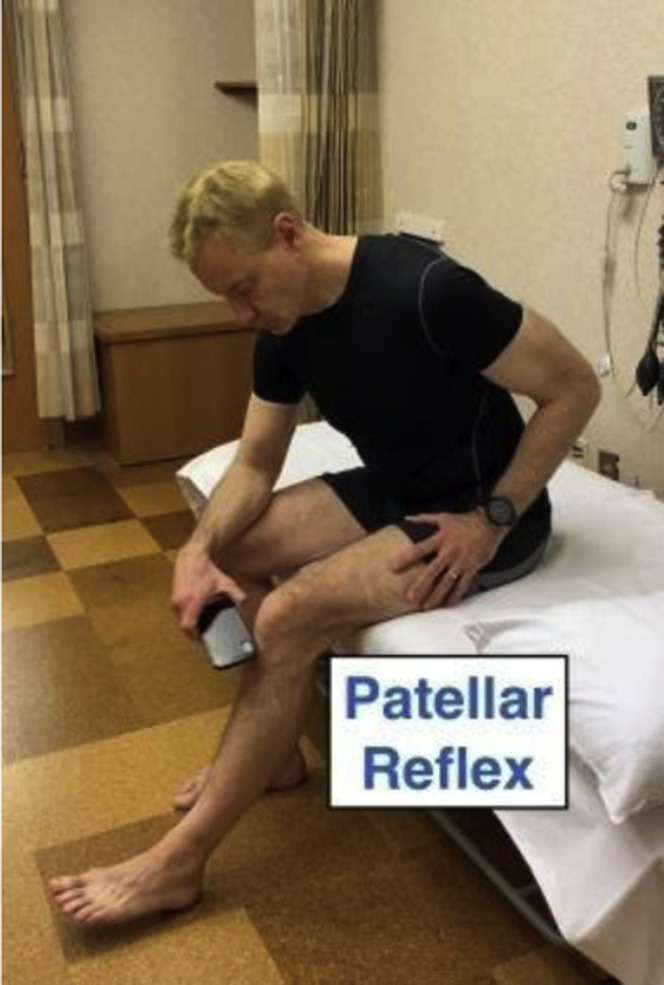
The patient can use the side of his or her hand, a long-handled, rubber-headed spatula, or the edge of a smartphone to check his or her knee jerk reflexes. Demonstration of the maneuver can be helpful. The knee jerk is easiest to elicit if the knee is extended past 90° with the heel on the floor as shown. The patient can try to elicit own knee jerks and ankle jerks with the feet on the ground or legs crossed. If using a spatula, hold the spatula at the end of the handle, and strike below the patella with the edge/side of the spatula.10
-
•
In a young child, the caregiver can try ends of fingers or knuckles to elicit reflexes.
-
•
Interpret reflex findings with caution. Inadequate relaxation may prevent a reflex from being manifested. Anticipation or a predisposition toward exaggerated startle may result in the mistaken impression of a brisk reflex.10
Neural Tension Tests
-
•
The straight leg raise (SLR) test is performed in patients with suspected L4 to L5 or L5 to S1 disc herniation. The initial test may be performed as a seated SLR test. A positive test reproduces the patient’s usual leg pain below the knee. If positive in a seated position, a formal SLR test in a lying position need not be performed.

-
•
The slump test can also be performed without an assistant. The patient slumps forward in a seated position, flexing the thoracic spine and rounding the shoulders while keeping the head erect. If no reproduction of radicular leg pain is noticed, then the patient should maximally flex the neck. If still no reproduction of radicular leg pain, the symptomatic leg is extended.
-
•
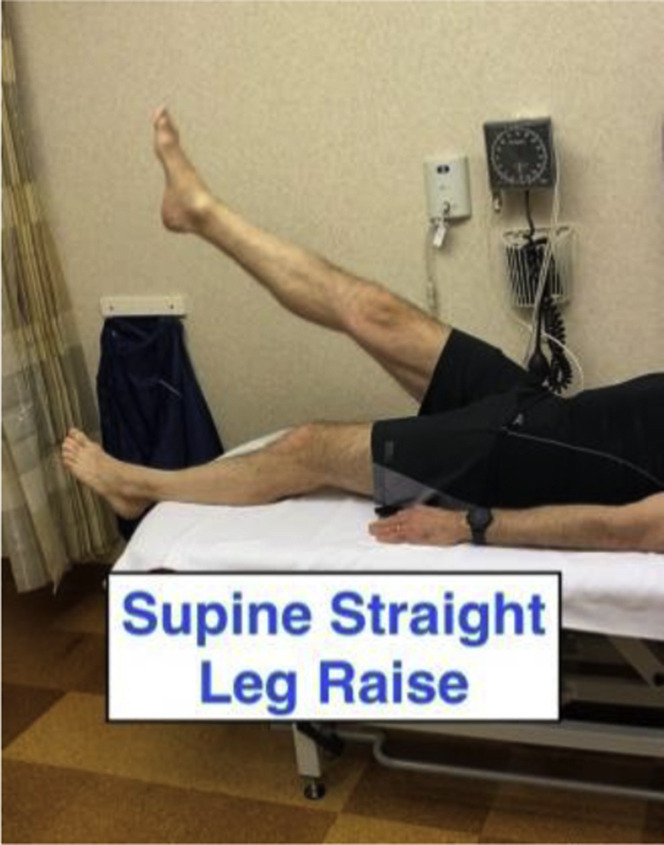
Standard supine SLR test: This test is performed in a lying position on a couch/floor/bed/yoga mat. An assistant can be guided in the performance of the test by the examiner. The leg is raised in a progressive fashion monitoring for reproduction of leg pain. Instruct the assistant to ensure the leg remains relaxed/straight. Any hip group muscle activation could promote hip region musculoskeletal pain and confuse the interpretation of the test. A positive test reproduces radicular pain in a nerve root distribution below the knee at 30° to 70° of passive hip flexion. Also, various SLR sensitization tests, such as adding passive ankle dorsiflexion or performing the SLR test in an adducted and internally rotated position, can bring out more subtle symptoms.12 , 13
-
•
Crossed SLR test: This test is performed by simply performing the standard SLR test as described above on the asymptomatic leg. If raising the asymptomatic leg reproduces radicular pain in the involved leg, the test is considered positive and suggests a central disc herniation as the cause.
-
•Reverse SLR test for upper lumbar radicular syndromes: This test is intended to stretch the femoral nerve and screens for nerve irritation of L1 to L4 nerves, typically from disc disease above the L4 to L5 level. It is performed by asking the patient to lie prone and lift the involved leg off the table in a bent knee position.
-
○An alternative method is performed with the patient lying on his or her side. The painful leg is on top. The assistant stabilizes the lateral pelvis with 1 hand while pulling the bent knee leg backward. A positive test reproduces the usual anterior thigh radicular pain. The often tight rectus femoris muscle is stretched in this position as well; bilateral testing may help distinguish between reproduction of nerve pain and the discomfort from stretching a tight muscle.
-
○
Stork Test for Facet/Posterior Element Pain
-
•
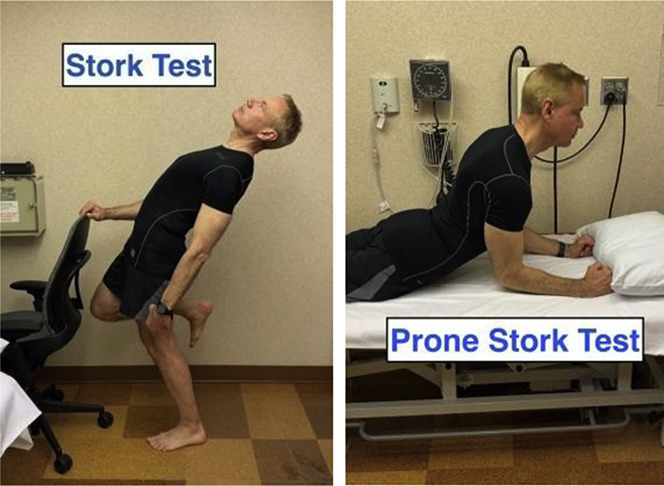
Formal test: The patient stands on 1 leg while holding on to a stable object, such as a stationary chair, for balance. The patient then attempts to extend the spine. A positive test reproduces the patient’s usual back pain on the symptomatic side. This finding may be especially helpful in young athletic patients in whom spondylolysis is suspected.
-
•
Variation: For those unable to extend or balance on 1 leg, this maneuver can be done lying prone. Ask the patient to initially lie resting on elbows. If no change in back pain, attempt to extend further by rising up on the outstretched hands.
Sacroiliac Joint Tests
-
•
Flexion abduction external rotation (FABER) test: With the symptomatic leg bent at the hip and knee as shown, the patient or assistant stabilizes the opposite side pelvis with 1 hand while applying downward pressure to the medial knee. If performed in a seated position, make sure the person remains squarely seated on the chair avoiding 1 buttock from lifting off the chair.
-
•
Gaenslen test: While lying on the edge of the bed or couch, lower 1 leg off the side to apply stress to the sacroiliac joint. As able, the patient will try to pull the opposite knee to the chest attempting to increase shearing at the sacroiliac joint. If assessing right buttock pain, lower the right leg off the bed. With an assistant, apply pressure on the lowered leg and the opposite leg at the knee.
-
•
Compression test: Pressure is applied to the lateral iliac crest while side lying.
-
•
The provocation tests discussed above attempt to reproduce pain from the sacroiliac (buttock) area. These tests are most helpful when interpreted in combination as no single test has high sensitivity or specificity. Reproduction of groin pain with FABER maneuver suggests hip, not sacroiliac, pain.

Hip Examination
-
•
Hip disease is a common spine pain mimicker; therefore, the hip examination should always be part of a low back examination. Refer to the hip examination below.
Neck
Inspection
-
•Posture: Check in both the coronal and sagittal planes while standing.
-
○Coronal plane: Assess general postural symmetry and head tilt.
-
○Sagittal plane: Cervical lordosis, forward head posture, rounded shoulders, and so on.
-
○
-
•Range of motion:
-
○Include flexion, extension, lateral flexion, and rotation taking into account which movements worsen or alleviate pain; document the location of any pain changes (neck vs arm, etc).
-
○
Gait Assessment
-
•
There should be enough room to permit a full-body view of walking both toward and away from the camera. A second person to control camera placement and view is recommended.
-
•
Assess normal gait, heel walking, toe walking, and, as able, tandem gait.
-
•
An assistant to be present for this part of the examination if there are concerns about significant gait unsteadiness.
-
•
If tandem gait is abnormal, consider the Romberg test as above.
Palpation
-
•
Ask the patient to palpate the areas of neck tenderness with 1 finger. Guide the patient to other landmarks, such as the spinous processes, occiput, paraspinal musculature, upper traps, levator, and sternocleidomastoid origins.
Cervical Spine Range of Motion
-
•
The examiner assesses cervical spine movements to end range and observes for pain or range of motion limitations in flexion, extension, lateral flexion, or rotation.
-
•
Shoulder range of motion to check for pain reproduction/alternative pain sources.
Neurological Examination
Inspection
-
•
Assess for symmetry of muscle bulk and fasciculations throughout the spine and the extremities.
Muscle Strength Testing

-
•
Active range of motion of all major upper extremity joints to assess strength against gravity.
-
•Consider triceps chair push-up to assess the triceps. This can also be done by rising up in a chair with armrests.
-
○If the patient has a dumbbell or heavy book, gallon of milk, and so on, check the number of repetitions of bicep curls; a lighter weight can be used to assess wrist flexion and extension.
-
○If a tennis ball is available, repetitive squeeze can assess grip strength and symmetry.
-
○
-
•
For a young child, if the caregiver is able, assess for asymmetry of strength (position arms as when performing “chicken wings” to assess deltoid, “arms like boxer” to assess biceps, push-away to assess triceps, etc). Perform each for 5 seconds, and evaluate for pain provocation.
Sensory Examination
-
•
Challenging, but the examiner can ask the patient to show where he or she feels numbness or sensory symptoms and then use an ice pack and cotton ball to check small and large fiber modalities.10
-
•
An assistant can screen for touch sensation of dermatomes: C5: lateral elbow; C6: thumb; C7: middle finger; C8: lateral hand; and T1: medial elbow area.
Muscle Stretch Reflexes
-
•
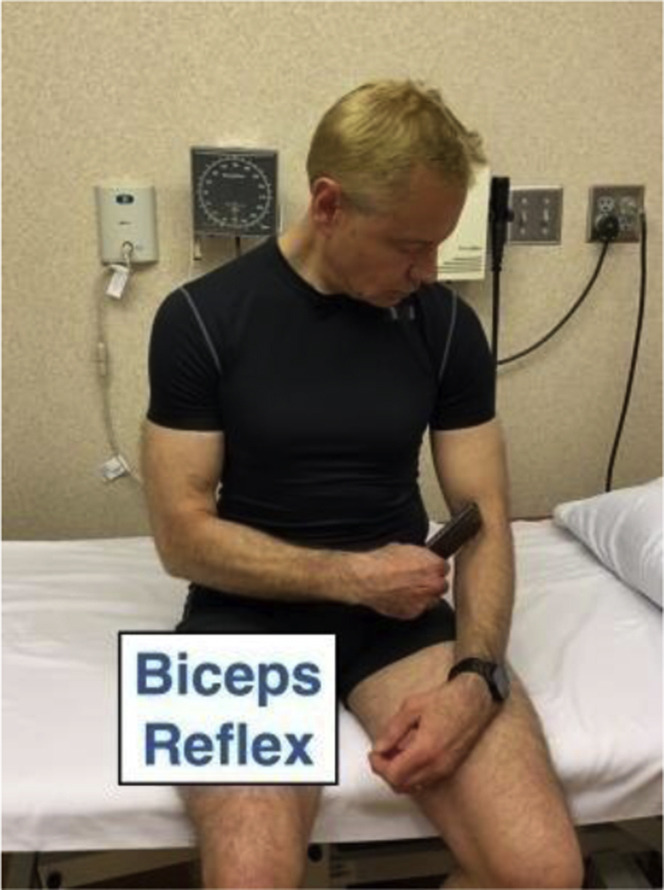
Attempt to strike the opposite elbow with the flat side of your hand, edge of a smartphone, or a plastic spatula on the outside aspect of the arm just above the elbow to assess the triceps reflex. Demonstrate for the patient. Position the arm with the elbow bent to 90° and hand lying on the front of the abdomen. The biceps reflex can also be assessed by striking biceps tendon at the elbow.
Tests for Possible Cervical Spondylotic Myelopathy
-
•
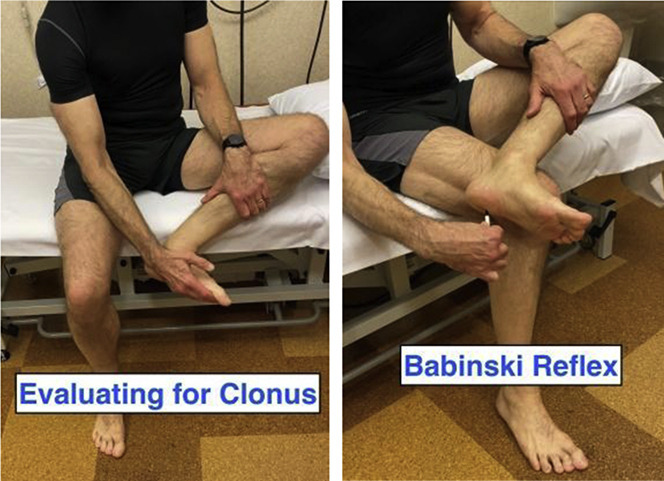
Clonus: If the clonus is severe, the patient might be able to elicit when seated by raising the knee, reaching down, grabbing bottom of the foot, and pulling up briskly (personal communication, Christopher J. Boes, 2020).
-
•
Babinski sign: The patient can check his or her own plantar response (Babinski sign) with a pen or a toothpick. Have the patient place the foot on the opposite knee. The patient should hold the pen or toothpick between his or her thumb and index finger and scrape in the usual “J” shape to try to elicit the Babinski sign, starting at the lateral heel. Patients do not often have withdrawal when checking their own plantar responses.10
-
•
Hyperreflexia: See reflex examination above.
-
•
Rapid alternating movements: Hold hands up, with palms facing the camera and instruct the patient to quickly open and close the hands into a fist. For lower extremity rapid alternating movements, foot tapping and toe tapping movements can be performed by the patient.
-
•
Strength testing: As discussed above.
-
•
Grip and release test: The patient is asked to grip (make a fist) and release repeatedly, with the palm facing downward. Most healthy adults can perform more than 20 repetitions in 10 seconds. Patients with myelopathy will exhibit a slower rate and may exhibit exaggerated wrist flexion with attempted finger extension and exaggerated wrist extension with attempted finger flexion.14
Special Tests
-
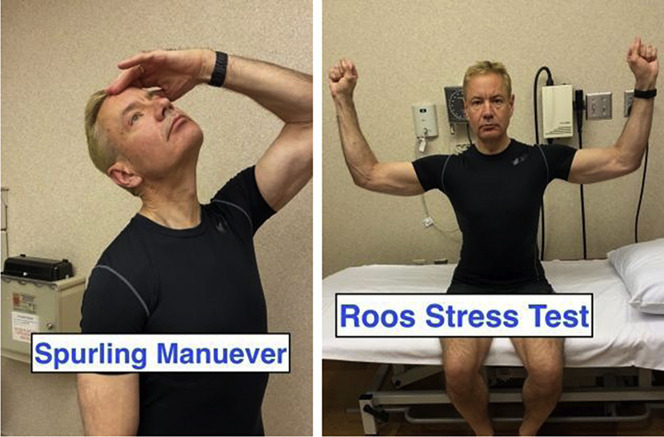
•The Spurling maneuver is performed by laterally flexing the neck to the symptomatic side. A positive test reproduces the patient’s arm pain/paresthesias in a nerve root distribution. Pain with this maneuver in the posterior neck and cervical paraspinal region only without radicular pain may be seen with facet degenerative changes and myofascial pain.
-
○A common variation is shown with neck extension and rotation to assess for the reproduction of radicular arm symptoms. If pain is not elicited spontaneously, an assistant can apply gentle pressure to the top of the head. These maneuvers should be held for about 5 to 15 seconds if not immediately positive.15
-
○For safety purposes, have the patient perform this test in the seated position.
-
○
-
•
Thoracic outlet test: The Roos stress test involves repeated opening and closing of the hands for 1 to 3 minutes. A positive test reproduces the patient’s arm pain symptoms.
Hip (Supplemental Video 4, available online at http://www.mayoclinicproceedings.org)
Patient Considerations
-
•
The patient should be wearing shorts to permit full and unhindered range of motion of the hips as possible. A T-shirt or other similar shirt that will permit examination of the hip and lower back region from the front and behind is also recommended. The examination is performed after the removal of shoes and shocks.
-
•
There should be enough room to permit a full-body view of walking both toward and away from the camera. A second person to control camera placement and view is recommended.
-
•
A bath towel or similar long length towel can be used to provide assistance for some of the stretches and range of motion assessments during the hip examination.
-
•
If this is an examination of a small child, a flat surface where the child can lie down, such as the floor, table, couch, or bed, will be needed.
Inspection/Observation
-
•
The examiner should observe normal gait in a straight line both away from and toward the camera. Gait should preferably be addressed without a gait aid as balance permits, but if a gait aid is used, gait can be assessed with the gait aid.
-
•
Gait should be observed for signs such as Trendelenburg sign (hip abductor weakness manifesting as dropping of the pelvis away from the weak side) and for limb alignment issues including knee varus or valgus and pes planus.
-
•
Toe and heel walking should be performed to assess L5 and S1 nerve root competency.
-
•
While standing, a double leg squat and, if possible, single leg squat should be performed to assess for dynamic medial knee valgus or inward/medial movement of the knee during the squat. It should also be noted if this movement pattern reproduces lateral hip pain or gluteal region pain.
-
•
If stress injury is suspected, the “Hop test” can be performed in appropriate patients, which consists of single leg hopping, to assess for possible hip stress injury.
-
•
Frontal plane should be observed while standing to examine for pelvic shift or inequality of the iliac crests.
-
•
Sagittal plane/side view should be observed to evaluate for either anterior or posterior pelvic tilt.
-
•
Posterior view should be examined to address iliac crest imbalance or imbalance of the PSIS.
-
•
In an ambulatory child, in addition to the above, observe running, jumping, hopping on 1 foot, single leg stance, and rising to stand from sitting on the floor.
-
•
In an infant or a very young child, observe for asymmetry of skin folds/creases at gluts, thighs, knees, and so on.
Palpation
-
•
Trochanteric palpation can be performed with the patient lying on his or her side, symptomatic leg facing upward, hips flexed to 60°, and knees together, after which the patient feels the lateral hip for tenderness.
Supine Examination
If the patient is able to lie flat either on a mat on the floor, a sturdy table, or a bed, the following can be examined:
-
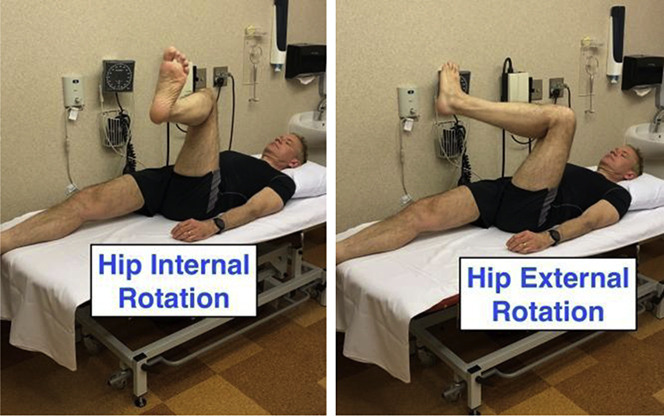
•
Hip range of motion: Hip flexion and hip internal and external rotation in a position of 90° of hip flexion. The patient should be encouraged to attempt to move the limb as far as he or she can to the farthest position, which does not cause any discomfort. Evaluate the asymptomatic side for asymmetry.
-
•Special tests
-
○Intra-articular hip pathology:
-
▪FABER test, or figure-4 position, to address intra-articular hip pathology as well as provoke possible sacroiliac joint–generated pain.
-
▪Active SLR test: Patient-applied resistance to SLR can also be added to create a modified form of the Stinchfield test, which is a provocative test for intra-articular hip pathology.
-
▪Modified flexion adduction internal rotation (FADIR) test/labral scour: The patient pulls tested hip into flexion and rotates toward the opposite iliac crest. This is also a provocative test for intra-articular hip pathology.
-
▪Modified logroll test: The patient externally and internally rotates foot to rotate the femoral head.
-
▪
-
○Hip flexor flexibility:
-
▪Modified Thomas test: Patients can perform this test on themselves; the test consists of pulling the femur on the tested side into full flexion and observing whether hip remains in the neutral/flat position on the opposite side.
-
▪
-
○Hamstring flexibility:
-
▪Popliteal angle: While lying flat with the hip flexed to 90°, a towel can be used to provide maximum stretch to the hamstring toward full extension and the residual popliteal angle (measured from 0°) can be assessed.
-
▪
-
○Sacroiliac joint:
-
▪Modified Gaenslen test: If able, the patient can hang the symptomatic leg off the bed or table, and if able, the patient can pull the opposite knee to the chest to increase shear stress on the sacroiliac joint. This test may indicate sacroiliac joint pathology if pain is reproduced.
-
▪
-
○

Seated Hip Examination
If the patient is unable to lie flat, a seated examination of the hip may be performed:
-
•
Hip range of motion: Hip flexion can be performed actively with the patient’s help to provide optimal stretch/range of motion. A FABER test in the seated position, or figure-4 position, can be used to address hip external rotation. A towel wrapped around the ankle can assist in pulling the lower leg out to the outside as an assessment of hip internal rotation. The thigh should be held as stable as possible and perpendicular to the pelvis during this assessment.

-
•Special tests:
-
○A FABER test in the seated position can also be used to address intra-articular hip pathology.
-
○A seated SLR test can be used to assess hamstring flexibility (seated popliteal angle) as well as to provide dural provocation in the assessment of lumbosacral radiculopathy.
-
○In the seated position, a modified hip FADIR/labral scour test can be performed by holding the knee to be tested and pulling the knee into flexion and rotation toward the opposite hip.
-
○In the seated position, hip flexor strength/pain provocation for 5 seconds can be assessed by flexing the hip upward against a stationary object, such as the underside of a desk and opposite hand.
-
○

Prone Hip Examination of a Young Child
-
•
Range of motion: A caregiver will need to assist with range of motion. The child lies prone with shoulders symmetrically relaxed on the surface. With thighs together and knees flexed to 90°, rotate the feet outward toward the bed and inward such that feet are crossed to estimate hip range of motion. Also measure hip extension by extending the thigh and abduction by moving the leg away from the body as far as possible. A comparison of symmetry is important when considering the possibility of hip dysplasia.
-
•
While the patient is lying prone, also estimate thigh-foot angle. With foot and ankle relaxed and assuming no foot deformity, estimate the difference in angle between the axis of the foot and the line of the femur.
-
•
While prone and knees flexed to 90° with foot and ankle relaxed, it is also easy to estimate ankle dorsiflexion range of motion by flexing into dorsiflexion (heel cord stretch).
-
•
Ask the parent to perform the Ely test (see the Knee section). Flip to supine, and estimate popliteal angles.
-
•
While the patient is lying supine, perform the Galeazzi test by having the child flex hips to about 45° and knees to about 90°. Line up feet so that the back of the heels are even and close to the buttocks. Observe the level of the knees. If they are uneven, consider limb length difference or hip subluxation/dislocation.
Knee (Supplemental Video 5, available online at http://www.mayoclinicproceedings.org)
Patient Considerations
-
•
The patient should be dressed in shorts to expose the knees and lower legs.
-
•
Shoes and socks should be removed.
-
•
The patient should be in an area large enough to permit full-body view of both knees and to permit walking with a full-body view toward and away from the camera.
-
•
For the child, consider hip examination as knee pain can be indicative of hip pathology.
Inspection/Observation
-
•
Frontal plane: Assess for genu valgus or varus, swelling, or deformity.
-
•
Sagittal plane: Assess for genu recurvatum or posterior swelling.
-
•
Posterior plane: Assess for popliteal swelling or calf swelling.
-
•
Double leg squat (can hold onto a sturdy object for support) or single leg squat, as able: Assess the control of the lower limb during the squat, including assessment of dynamic medial knee valgus/inward movement of the knee.
-
•
Gait: Assess mechanics (including degree of varus and valgus, control of limb, and movement patterns such as lateral whip) and antalgic gait, and assess for feelings of instability or mechanical block.
-
•
In an ambulatory child, in addition to the above, observe running, jumping, hopping on 1 foot, single leg stance, and so on.
Standing Evaluation
-
•
Range of motion: Have the patient pull his or her foot up to the ipsilateral buttock to assess the degree of knee flexion.
-
•
Thessaly test to assess for meniscal pathology: Stand on 1 leg using support as needed; bend knee slightly (5°), and rotate femur and torso medial and laterally 3 times; assess for pain with either medial or lateral rotation. Repeat 20° of knee flexion.
-
•
As appropriate and as able, a single leg hop test could be performed and assessed for pain provocation, including at the patellar tendon as well as other specific knee region.
Supine Evaluation
-
•
Range of motion: Assess the ability to fully extend and flex the knee, evaluating for any extension or flexion lag, which may be associated with swelling or mechanical meniscal involvement.
-
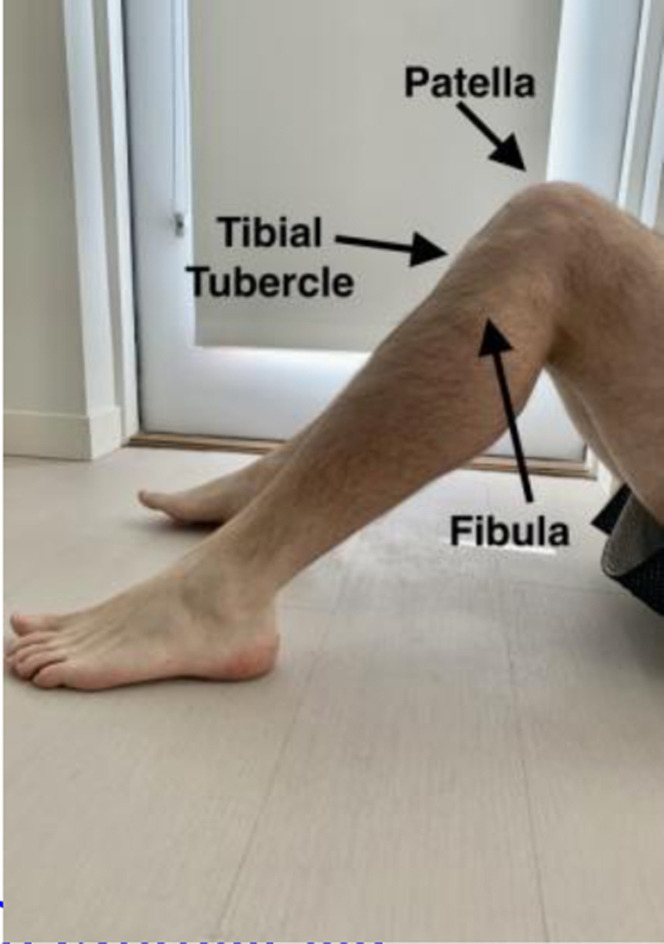
•
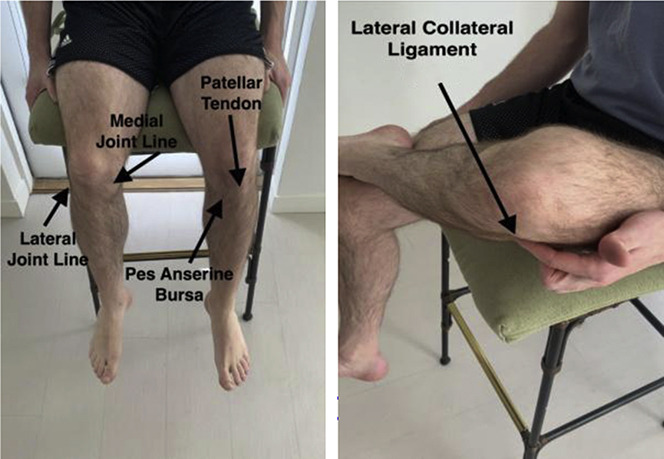
If able to lie flat with knee at 90° of flexion, the patient can self-palpate areas of the knee to assess for tenderness, including medial and lateral joint lines, patellar tendon, distal quadriceps, pes anserine bursa region, and tibial tubercle (including assessment of swelling indicative of Osgood-Schlatter disease).
-
•
Also in 90° of knee flexion, the patients can assess for posterior sag sign indicative of posterior cruciate ligament insufficiency and can perform the quadriceps active test, involving active contraction of the quadriceps to see if sag reduces and if the tibia translates anteriorly.
-
•
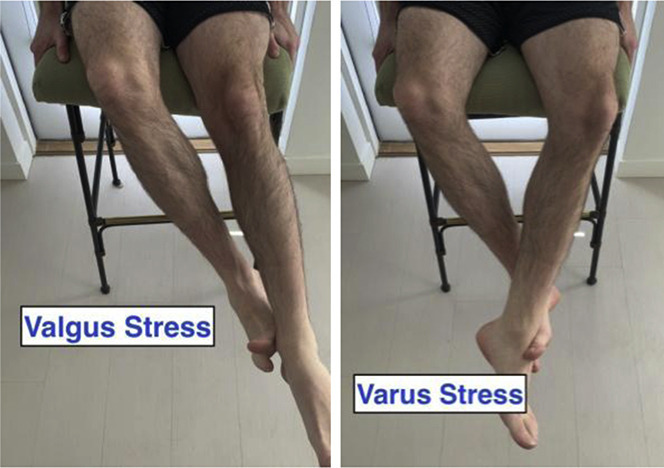
If able to apply varus or valgus stress with the opposite limb or stationary object, the patient can further assess the degree of medial collateral ligament or lateral collateral ligament sprain; assess for pain and opening.
-
•
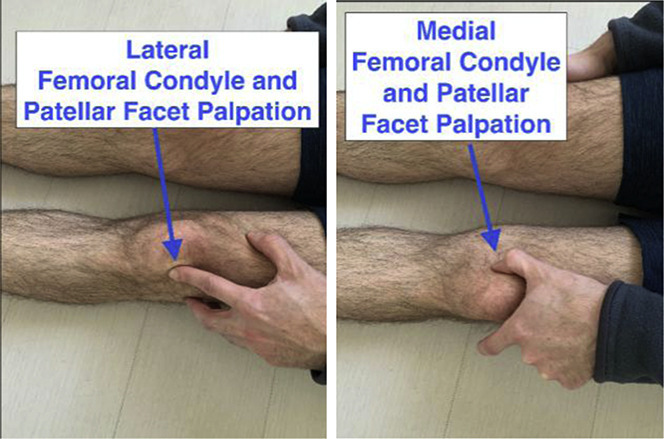
The patellofemoral joint can be assessed while lying with the knee extended and quadriceps relaxed. The patient can gently push the kneecap medially and laterally to assess for femoral condyle or patellar facet tenderness.
Seated Knee Evaluation
-
•
Range of motion: Seated range of motion can be assessed via ability to fully straighten the knee and also fully flex the knee toward the chest.
-
•
In the seated position, the patient can self-palpate the tibial tubercle, patellar tendon, and medial and lateral joint lines. If able to relax the quadriceps in knee extension, the patient can palpate patellar facets and medial and lateral femoral condyles.
-
•
The figure-4 position could be used to better delineate the lateral collateral ligament and assess for lateral collateral ligament tenderness.
-
•
As able, varus and valgus stress to the distal limb could be applied in a seated position via pushing on a stable stationary object, such as a table or chair leg. Assess for reproduction of pain and opening.
Ankle (Supplemental Video 6, available online at http://www.mayoclinicproceedings.org)
Patient Considerations
-
•
The patient should be wearing shorts to expose lower legs and ankles.
-
•
Shoes and socks should be removed.
-
•
The patient should be in an area large enough to permit full-body view and for walking toward and away from the camera.
Inspection/Observation
-
•
Frontal plane: Assess for medial or lateral swelling, pes planus or cavus, and bunion or other foot deformity such as hammertoes.
-
•
Sagittal plane: Assess for swelling, including Achilles, retrocalcaneal space, and posterior ankle; assess fibula.
-
•
Posterior plane: Assess Achilles tendon (including evaluation for any observable defect), calf/Achilles complex; evaluate for pes planus, including “too many toes” sign indicative of pes planus or possible posterior tibialis tendon dysfunction.
-
•
Assess active ankle range of motion: Dorsiflexion, plantar flexion, inversion, and eversion; assess for reproduction of pain during any of these movements.
-
•
Gait: Assess gait mechanics and antalgic gait; toe walking, including repetitive toe raises, to assess Achilles, posterior tibialis, and plantar flexion strength; heel walking to assess anterior tibialis.
-
•
In an ambulatory child, in addition to the above, observe running, jumping, hopping on 1 foot, single leg stance, and so on.
Special Tests
-
•
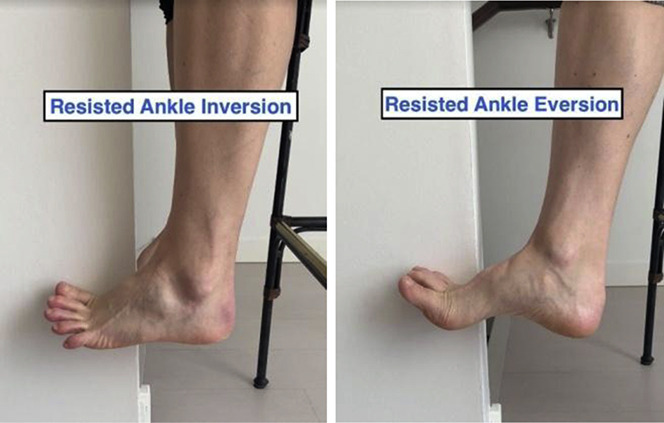
Strength: As able, the patient can assess ankle inversion and eversion strength against a stable immobilized object, such as a table or chair leg.
-
•
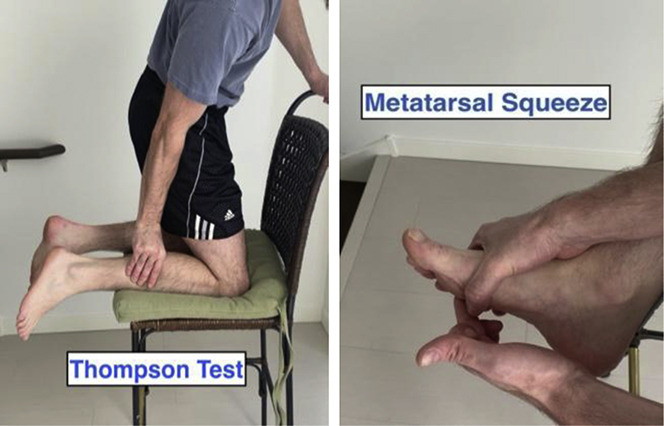
Thompson test in the kneeling position on the chair: the patient squeezes calf, and the examiner and patient observe for ankle plantar flexion.
-
•
Self-applied metatarsal squeeze: The patient squeezes the foot from both sides while pressing on the bottom of the foot between the third and fourth metatarsals to assess for pain reproduction or a clicking sound indicative of Mulder’s sign.
-
•
In select patients, a hop test can be performed to assess for location of pain provocation.
Conclusion
The COVID-19 pandemic and the need for social distancing has created challenges in health care access. Telemedicine has played an important role in the delivery of medical services and is likely to be of continued importance and use even after the current pandemic. This article provides the medical practitioner performing a virtual musculoskeletal examination with a specific set of guidelines to enhance the information obtained when evaluating the shoulder, hip, knee, ankle, and cervical and lumbar spine, which can be refined according to the capabilities of the patient and examiner.
Footnotes
Potential Competing Interests: The authors report no competing interests.
Supplemental Online Material
Supplemental material can be found online at: http://www.mayoclinicproceedings.org. Supplemental material attached to journal articles has not been edited, and the authors take responsibility for the accuracy of all data.
References
- 1.Institute of Medicine . The National Academies Press; Washington, DC: 2012. The Role of Telehealth in an Evolving Health Care Environment: Workshop Summary. [PubMed] [Google Scholar]
- 2.Perednia D.A., Allen A. Telemedicine technology and clinical applications. JAMA. 1995;273(6):483–488. [PubMed] [Google Scholar]
- 3.Kelton D.K., Szulewski A., Howes D. Real-time video telemedicine applications in the emergency department: a scoping review of literature. CJEM. 2018;20(6):920–928. doi: 10.1017/cem.2017.382. [DOI] [PubMed] [Google Scholar]
- 4.Lindsay J.A., Day S.C., Amspoker A.B. Personalized implementation of video telehealth. Psychiatr Clin North Am. 2019;42(4):563–574. doi: 10.1016/j.psc.2019.08.001. [DOI] [PubMed] [Google Scholar]
- 5.Ward M.M., Jaana M., Natafgi N. Systematic review of telemedicine applications in emergency rooms. Int J Med Inform. 2015;84(9):601–616. doi: 10.1016/j.ijmedinf.2015.05.009. [DOI] [PubMed] [Google Scholar]
- 6.Tenforde A.S., Hefner J.E., Kodish-Wachs J.E., Iaccarino M.A., Paganoni S. Telehealth in physical medicine and rehabilitation: a narrative review. PMR. 2017;9(5S):S51–S58. doi: 10.1016/j.pmrj.2017.02.013. [DOI] [PubMed] [Google Scholar]
- 7.Verduzco-Gutierrez M., Bean A.C., Tenforde A.S., Tapia R.N., Silver J.K. How to conduct an outpatient telemedicine rehabilitation or prehabilitation visit [published online ahead of print April 15, 2020]. PM R. https://doi.org/10.1002/pmrj.12380 [DOI] [PubMed]
- 8.Tanaka M.J., Oh L.S., Martin S.D., Berkson E.M. Telemedicine in the era of COVID-19: the virtual orthopaedic examination [published online ahead of print April 24, 2020]. J Bone Joint Surg Am. https://doi.org/10.2106/JBJS.20.00609 [DOI] [PMC free article] [PubMed]
- 9.Lezin N., Watkins-Castillo S. The Burden of Musculoskeletal Diseases in the United States: Prevalence, Societal, and Economic Cost. 3rd ed. United States Bone and Joint Initiative; Rosemont, IL: 2016. The impact of musculoskeletal disorders on Americans—opportunities for action. [Google Scholar]
- 10.Boes C.J., Leep Hunderfund A.N., Martinez-Thompson J.M. Primer on the in-home teleneurologic examination: A COVID-19 pandemic imperative [published online ahead of print May 21, 2020] Neurol Clin Pract. [DOI] [PMC free article] [PubMed]
- 11.Russell T., Truter P., Blumke R., Richardson B. The diagnostic accuracy of telerehabilitation for nonarticular lower-limb musculoskeletal disorders. Telemed J E Health. 2010;16(5):585–594. doi: 10.1089/tmj.2009.0163. [DOI] [PubMed] [Google Scholar]
- 12.Truter P., Russell T., Fary R. The validity of physical therapy assessment of low back pain via telerehabilitation in a clinical setting. Telemed J E Health. 2014;20(2):161–167. doi: 10.1089/tmj.2013.0088. [DOI] [PubMed] [Google Scholar]
- 13.Peterson S., Kuntz C., Roush J. Use of a modified treatment-based classification system for subgrouping patients with low back pain: agreement between telerehabilitation and face-to-face assessments. Physiother Theory Pract. 2019;35(11):1078–1086. doi: 10.1080/09593985.2018.1470210. [DOI] [PubMed] [Google Scholar]
- 14.Micev A.J., Ivy A.D., Aggarwal S.K., Hsu W.K., Kalainov D.M. Cervical radiculopathy and myelopathy: presentations in the hand. J Hand Surg Am. 2013;38(12):2478–2481. doi: 10.1016/j.jhsa.2013.07.020. quiz 2481. [DOI] [PubMed] [Google Scholar]
- 15.Rubinstein S.M., Pool J.J., van Tulder M.W., Riphagen, de Vet H.C.W. A systematic review of the diagnostic accuracy of provocative tests of the neck for diagnosing cervical radiculopathy. Eur Spine J. 2007;16(3):307–319. doi: 10.1007/s00586-006-0225-6. [DOI] [PMC free article] [PubMed] [Google Scholar]
Associated Data
This section collects any data citations, data availability statements, or supplementary materials included in this article.