

Abstract
The Drosophila system has been invaluable in providing important insights into mesoderm specification, muscle specification, myoblast fusion, muscle differentiation, and myofibril assembly. Here, we present a series of Drosophila protocols that enable the researcher to visualize muscle precursors and differentiated muscles, at all stages of development. In doing so, we also highlight the variety of techniques that are used to create these findings. These protocols are directly used for the Drosophila system, and are provided with explanatory detail to enable the researcher to apply them to other systems.
Keywords: Drosophila, Muscle, Embryo, Larva, Pupa, Adult, Founder cell, Myoblast, Development, Myogenesis, Method, Protocol, Staining, Hybridization
1. Introduction
The mechanisms involved in invertebrate muscle development are similar to those for vertebrate muscle formation, making the animal model Drosophila melanogaster well suited for studies of myogenesis (1). In flies, the basic patterning and specification of the somatic, or skeletal, musculature is similar for all muscles. Moreover, early embryonic myogenesis in Drosophila is completed within a few hours (2). These facts, alongside the utility of Drosophila to apply a genetical approach to the study of biological processes, make this system highly amenable to uncovering basic and broadly relevant aspects of muscle development.
The mechanisms of Drosophila muscle development can be considered as a series of consecutive events, and the outcome of these steps are usually the measures through which the investigator assesses the extent of myogenesis in wild-type and mutant combinations. Embryonic skeletal muscle development initiates upon specification of a unique founder cell (FC) for each skeletal muscle fiber, and upon the genetical segregation of that cell from unspecified fusion-competent myoblasts (FCMs) within the mesoderm (2). FCs are specified by the Ras signaling pathway (3, 4) and are differentiated from FCMs by expression of specific genetic markers, such as Kin of Irre/Dumbfounded, Roughest/Irregular Chiasm, and Rolling Pebbles/Antisocial. The FCs then attract the unspecified FCMs to the site of muscle formation, for fusion to generate precursors of the individual muscles of the somatic musculature (reviewed in ref. (5)). The FCs are critical determinants of muscle fate, since it is widely thought that the FC is responsible for conferring upon the resulting muscle many of the characteristics unique to that muscle: sites of muscle attachment to the cuticle, orientation of the muscle in the embryo, and muscle size (6).
Importantly for the investigator, the specification of all FCs can be inferred by using transgenic lines, such as rP298-lacZ, a lacZ enhancer trap of the dumbfounded gene described by (7). The transgenic line rP298-lacZ is expressed in all skeletal muscle FCs in the embryo (see Fig. 1a). Specific subsets of FCs can alternatively be visualized based upon the accumulation of a number of different markers, many of them are transcription factors that are thought to participate in the specification of individual muscle fiber characteristics (8).
Fig. 1.
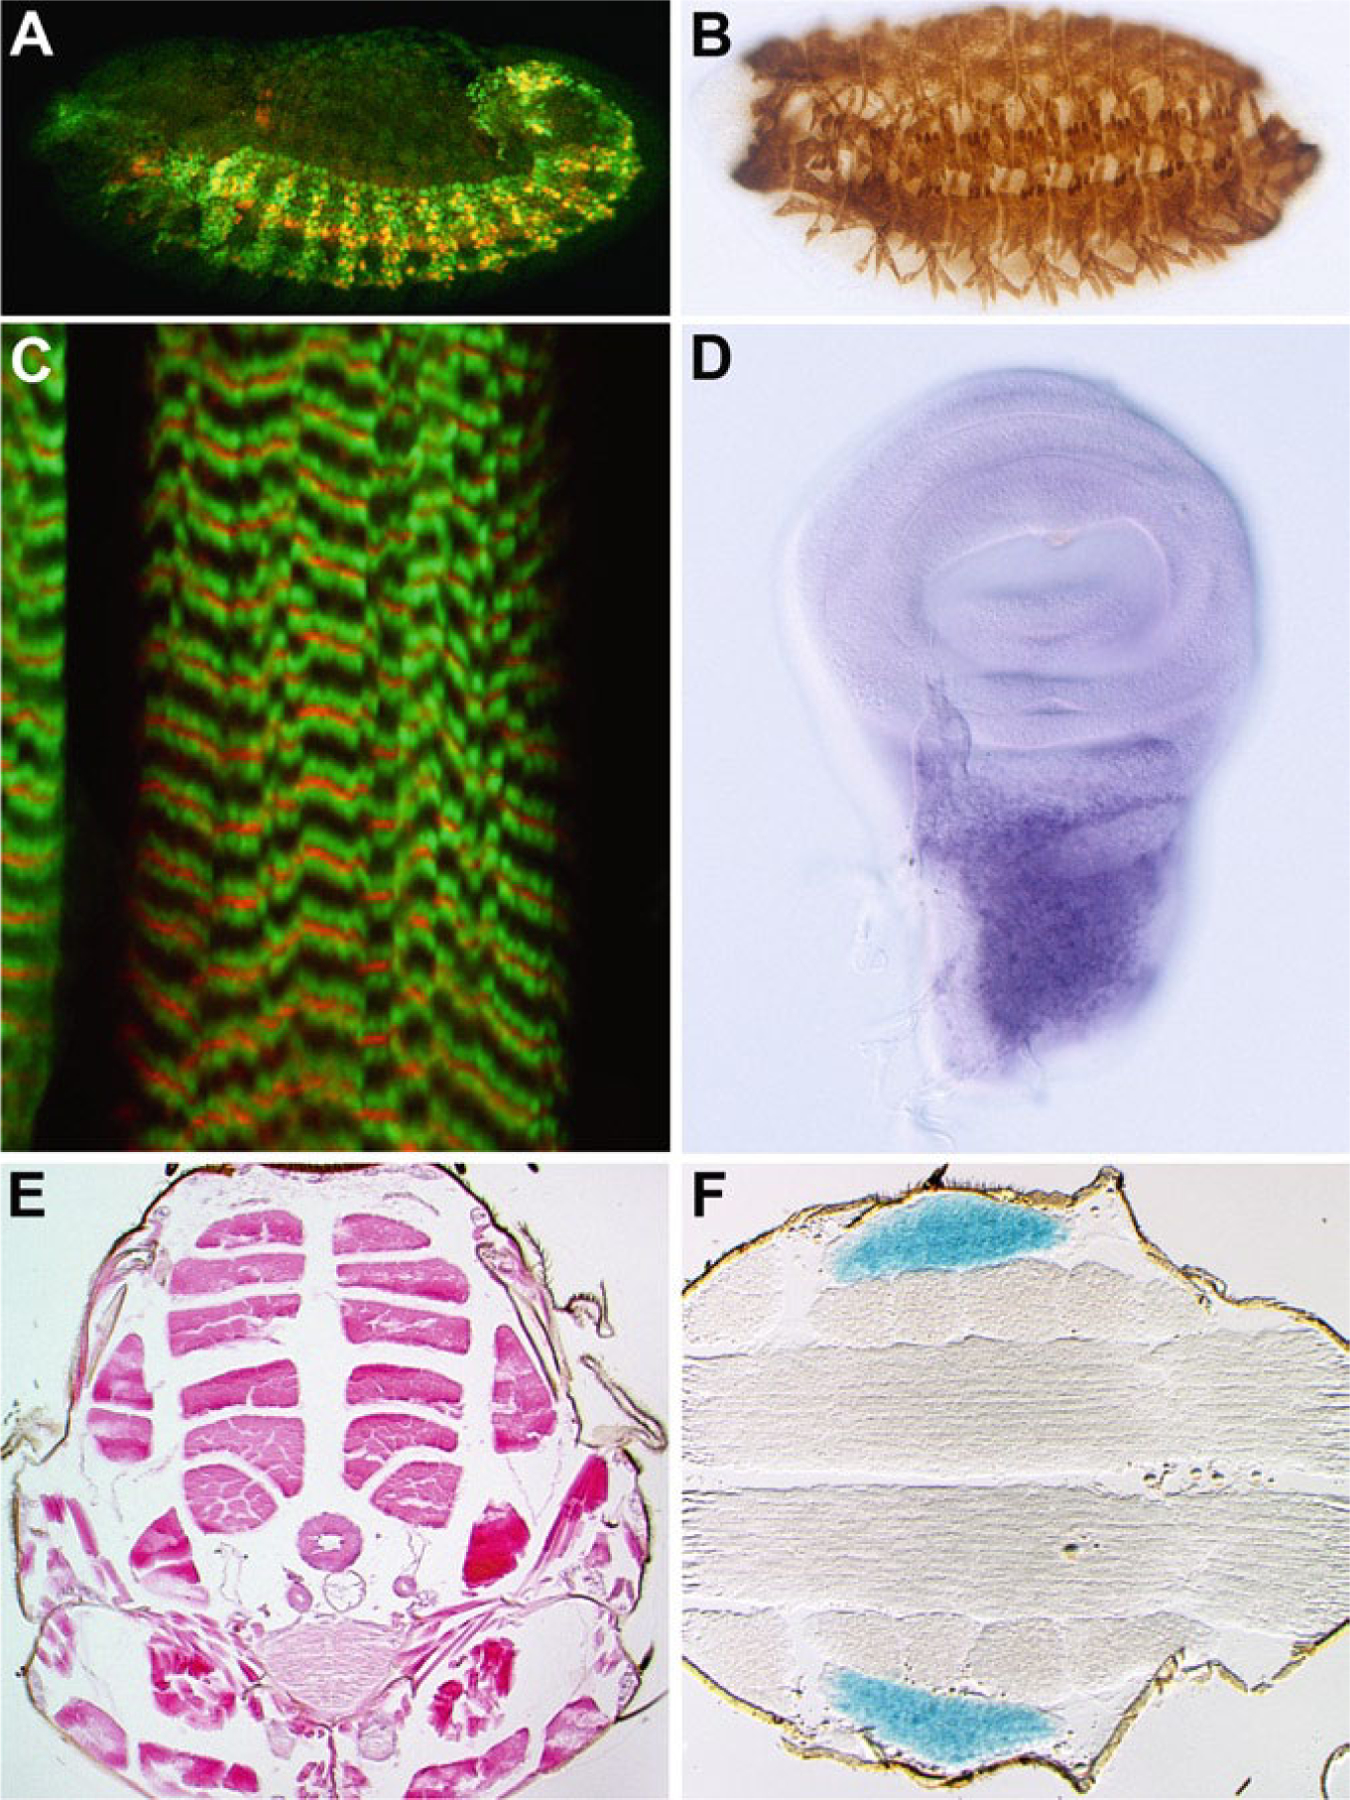
Examples of how muscle development can be visualized during the Drosophila life cycle. (a) At stage 12, skeletal muscle founder cells expressing rP298-lacZ (red) are distinguished amongst all other myoblasts expressing MEF2 (green), using fluorescently labeled antibodies and confocal microscopy of whole-mount embryos. (b) The mature skeletal muscle pattern of a stage 16 embryo, visualized using immunohistochemistry with an anti-Myosin heavy chain antibody in whole-mount embryos. (c) Ultrastructure of a single muscle fiber in the late larval stage, observed using double-label immunofluorescence of whole animal fillets and confocal microscopy. Red: F-actin visualized using a fluorescent conjugate of phalloidin; Green: Tropomyosin visualized by a monoclonal antibody (AbCam Inc.) and fluorescently-labeled secondary antibody (Molecular Probes, Inc.). (d) The adult muscle precursor myoblasts visualized in whole-mount preparations of dissected imaginal discs, detected using in situ hybridization to a myoblast-specific gene. (e) The adult muscle pattern observed in transverse paraffin sections, stained with Hemotoxylin and Eosin. Note the six pairs of dorsal longitudinal muscle fibers in the medial region of the thorax. (f) Muscle diversity within a horizontal section of the adult thorax, visualized by activity of a tubular muscle-specific enhancer controlling lacZ expression, and stained with X-gal. The tubular jump muscle is visualized here.
Following specification of FCs and FCMs, myoblast fusion is mediated by genetic factors governing orientation, adhesion, and eventually fusion of the cells to form myotubes (reviewed in ref. (9)). The fusion process includes the previously-mentioned FC-specific markers, as well as FCM-specific markers, such as Sticks and Stones, Hibris, and Lame Duck (3). Other markers expressed during myoblast fusion are molecules of the Rac GTPase signaling pathway and the Ras activator myoblast city (10), Loner, kette (11), and blown fuse (12). Multiple rounds of fusion between FCs and FCMs are required for growth of muscles in the embryo (2, 11). The progression of fusion is analyzed by similar methods as founder specification, using genetic markers expressed during this process. Ectodermal cues are also necessary for specification of cell type, myoblast fusion, and differentiation (2, 6, 13, 14).
The success of the fusion process can be assessed by the investigator, by analyzing the expression of muscle terminal differentiation markers. Specific muscle gene sets are selectively activated in the individual myoblasts and myotubes by myogenic regulatory proteins such as MEF2 (15), including the contractile proteins myosin heavy chain, Troponins I, T, and C, and muscle-specific actins (16–18). Accumulation of these contractile proteins, or their mRNA transcripts, is indicative of terminal muscle differentiation (see Fig. 1b).
During the larval stage, muscles specified in the embryo undergo a profound degree of hypertrophy, without overt addition of new myoblasts, or of nuclear division within the muscle syncitium (19). Myofibrillar organization, muscle growth, and muscle degeneration can be readily assessed during the larval stage in whole-mount preparations where the animal is filleted and immobilized for fixation and antibody staining (see Fig. 1c).
By contrast, the pattern of adult muscles bears little resemblance to the pattern of larval muscles. Do adult muscles form by restructuring of larval muscles, or are adult muscles formed de novo during metamorphosis? Studies have shown that precursors for adult muscles are specified in the embryonic mesoderm, and can be detected in whole-mount embryos at stage 13 or later by persistent expression of the mesodermal determinant twist (20). These precursors for adult muscles postpone differentiation, and for those muscles that are formed in the adult head and thorax, the myoblasts are stored in the imaginal discs until the muscles are formed during pupal development (20, 21). During the larval stage, the myoblasts proliferate extensively, and can be readily observed in whole-mount preparations of larval imaginal discs (see Fig. 1d).
To form the adult muscles, at metamorphosis most larval muscles histolyze and adult muscles are formed de novo by migration and fusion of adult muscle precursor cells (13, 22). Within these migrating populations, the new adult muscles develop in much the same manner as is observed for embryonic/larval muscles: founder cells are specified early during the pupal stage, and myoblast fusion occurs, presumably through a mechanism similar to that defined for the embryo (21, 23, 24).
The final pattern of adult muscles is far more complex than that of the embryo (reviewed in ref. (25)). Being significantly larger, the adult is not amenable to whole-mount preparations, thus much of adult muscle development and patterning is assessed through analysis of sections. These sections might be generated from paraffin embedded samples (see, e.g. (26); Fig. 1e). The adult is also characterized by a vast diversity in adult muscle types, which differ from each other ultrastructurally, physiologically, and at the level of gene expression. Patterns of gene expression in the adult muscles are most easily visualized on sections from frozen animals (see Fig. 1f).
On the basis of the findings described earlier, we present protocols that will enable the researcher to assess each of the stages of muscle development in the Drosophila system: analysis of muscle founder specification and of muscle differentiation in the embryo; analysis of muscle structure and patterning in the larva; analysis of adult muscle precursors, and of developing adult muscles, in the larval and pupal stages, respectively; and analysis of the pattern and differentiation of adult muscles in mature pupae or adults. The protocols that we describe include antibody staining with fluorescent or colorimetric detection, detection of transcripts by in situ hybridization of a labeled riboprobe, and histochemical methods for evaluation of sectioned material.
2. Materials
Grape juice agar plates: Combine in a 1-L beaker 9 g Bacto Agar, 150 mL of red grape juice, and 450 mL of dH2O. Bring to a boil in the microwave, stirring regularly. Allow to cool until hand-hot, then pour into Petri dishes.
NaCl/Triton: 0.7% NaCl, 0.02% Triton ×−100.
50% bleach.
4% formaldehyde/PBS solution: 3.960 mL of dH2O, 540 μL of 37% formaldehyde, 500 μL of 10× PBS.
Paraformaldehyde solution: To prepare 10% stock, dissolve 25 g paraformaldehyde in 200 mL of dH2O, add 15 μL of 10 N NaOH, add 25 mL of 10× PBS, and heat to 65°C with stirring, until dissolved (solution may remain partly cloudy); do not overheat; work under a fume hood; bring volume to 250 mL with dH2O; store at −20°C. To make working 4% solution, take 4 mL of 10% paraformaldehyde, add 1 mL of 10× PBS and 5 mL of dH2O (see Note 1).
PEM: 100 mM Pipes pH 6.95, 2 mM EGTA, 1 mM MgSO4.
Heptane.
Methanol.
PBTx: 1× PBS, 0.2% Triton ×−100, 0.2% w/v Blocking Reagent (Roche11096176001). Autoclave, mix thoroughly while hot, and allow to cool. The solution will remain slightly cloudy.
PBTxN: 1 mL of PBTx, 50 μL of normal goat serum.
PBTw: 1× PBS containing 0.1% Tween-20.
Sylgard plates: Sylgard is a polymer available from Dow Corning Inc., which is prepared as a liquid, poured into 50 mm Petri dishes, and allowed to cure overnight at 37°C into a rubber-like substrate.
X-gal staining solution (prepared fresh immediately use before from stock solutions): 1× PBS, 100 mM K4[Fe(CN)6], 100 mM K3[Fe(CN6)], 5 M NaCl, 1 M MgCl2, 0.2% X-Gal (see Note 2).
Hybridization solution for in situ hybridization: 50% formamide, 5× SSC, 0.1% Tween-20, 0.1 mg/mL sonicated salmon sperm DNA, 0.1 mg/mL heparin. Filter sterilize through a 0.2 μm filter, and store at −20°C.
Alkaline phosphatase buffer: 100 mM NaCl, 50 mM MgCl2, 100 mM Tris–HCl pH 9.5, 0.1% Tween.
Mowiol mounting medium: Add 4.8 g Mowiol 4–88 (Sigma) and 12 g glycerol to a 50-mL Falcon tube. Mix well using a glass rod. Add 12 mL of ddH2O and continue stirring occasionally for several hours at room temperature. Add 24 mL of 0.2 M Tris–HCl (pH 8.5). Continue stirring. Heat by microwaving or using a waterbath to approximately 50°C; continue stirring until most of the Mowiol is dissolved. Once dissolved, add DABCO (1,4-diazabicyclooctane) to the final concentration of 100 mg/mL, and centrifuge the solution at 500 × g for 15 min to clarify from persistently undissolved particles. Carefully remove the supernatant; store aliquots at −20°C.
QIAquick PCR Purification Kit (Qiagen).
DIG RNA Labeling Kit (SP6/T7) (Roche).
Vectastain Elite ABC kit (Vector Laboratories).
Alkaline Phosphatase Substrate Kit IV BCIP/NBT (Vector Laboratories).
DAB substrate kit (Vector Laboratories).
Glycerol solution: 80% (v/v) glycerol in 1× PBS.
DEPC ddH2O.
4 M LiCl.
20 mg/mL tRNA.
70 and 100% ethanol.
5 μg/mL and 12.5 μg/mL proteinase K in PBTw.
2 mg/mL glycine in PBTw.
50% ethanol/50% xylenes.
OCT freezing medium.
1% BSA in PBTx.
3. Methods
In this chapter, we provide techniques that enable the researcher to visualize all major aspects of muscle development in Drosophila, throughout its life cycle. These aspects of development are specification of embryonic muscles, including visualizing founder cells; patterning and differentiation of muscles in the embryo; analysis of muscle integrity in the larva; identification of adult muscle precursors in larval imaginal discs; development of adult muscles during the pupal stage; and patterning of imaginal muscles as visualized in the adult.
Many of the techniques that we present can be applied to different stages of the life cycle, with relatively minor modifications. Therefore, as we describe methods to visualize and analyze muscles and myoblasts at different stages of development, we do so through the depiction of different methods that can be applied. We also provide alternate protocols that enable the researcher to adapt a method description from one stage of the life cycle to other applications or stages of development.
Representative images from some of the procedures described are presented in Fig. 1.
3.1. Immunohistochemical Staining of Drosophila Embryos
This is the standard protocol, adapted from (27), that is used to visualize the distribution of specific epitopes during embryonic development. Detection of the signal is via enzyme-linked colorimetric detection. A representative image is shown in Fig. 1. Fluorescent secondary antibodies can also be used for detection, for which a representative image is shown in Fig. 1.
3.1.1. Collection and Fixation of Embryos
Set up fly cages for egg collection. Cages are plastic beakers, over the opening of which is attached a grape-juice agar plate. The plate is either 50 or 90 mm diameter, depending upon the beaker used. Flies added to the cage lay eggs next to a smear of yeast paste that is placed on the plate. Ventilation holes are drilled into the sides of the beaker.
Collect embryos. Allow flies to lay eggs on the plate for the desired period of time (typically an overnight collection of 18 h at 25°C), then replace the plate with a fresh one. The removed plate will contain eggs that are 0–18 h old if the collection period was 18 h.
Remove yeast and dead flies from the plate. Scrape the debris from the plate using the blunt end of a paintbrush, being careful not to gouge the agar.
Gently remove embryos from grape juice agar plate. Add ~1–3 mL of NaCl/Triton to plate and gently loosen embryos into solution by rubbing the surface of the plate with finger, without breaking or gouging the agar. Pour solution and embryos through a microfilter sieve, and set the filter on clean paper towel to drain. Microfilters can be made using a cut-off 50 or 15 mL Falcon tube and mesh sieve.
Dechorionate with 50% bleach for 3 min. To remove the chorion (eggshell), fill a Petri dish with a 50% bleach solution. Place the microfilter(s) in the solution and mix to disperse the embryos. Wait for 3 min, and then rinse with dH2O.
Rinse well. Remove the microfilter(s) from the bleach solution and gently rinse with dH2O for at least 1 min. Be sure to rinse all embryos onto the sieve. At this point, the embryos will have lost their egg shells, but will still be surrounded by the hydrophobic vitelline membrane.
Fix embryos. Using a paintbrush, transfer embryos into glass scintillation vial containing 4.5 mL of PEM, 0.5 mL of 37% formaldehyde, and 5 mL of heptane. Close cap tightly.
Shake embryos for 20–30 min on rotator. Vigorous shaking is required (500 rpm for 20 min, see Note 3).
Remove the aqueous layer containing PEM and formaldehyde (bottom) with a pipette. Remove as much fixative as you can, as well as embryos that have fallen into the aqueous phase. These embryos either did not get fully dechorionated, or had already hatched from the egg. In either case, they are not suitable for subsequent steps and should be excluded. Most of the bottom layer can be removed without losing any embryos from the interface (see Note 4).
Add 5 mL of methanol (MeOH) and vigorously shake for 1 min. This step will fracture the vitelline membranes, so embryos should pop out and fall to the bottom of the MeOH. Perform this step in the fume hood. Remove the top (heptane) layer and much of the bottom layer without disturbing the fallen embryos. Allow a tiny amount of solution to remain, to protect the embryos from drying out (see Note 5).
Wash embryos three times with MeOH to remove residual heptane. Remove as much of the MeOH as possible, leaving a tiny amount of solution to protect the embryos from drying out (see Note 6).
3.1.2. Treatment of Embryos with Antibodies, and Detection
Transfer embryos to 1.5 mL microcentrifuge tube and remove MeOH from embryos. Ideally, there will be 50–100 μL of settled embryos for each staining reaction (see Note 7).
Wash quickly with 800 μL of PBTx.
Wash 5 min with 800 μl of PBTx.
Wash 30 min in 800 μL of PBTx.
Incubate 30 min in 100 μL of PBTxN at room temperature on rotator.
Remove PBTxN and add 200 μL of primary antibody diluted in PBTxN. Incubate on the rotator 2 h to overnight. If there are not a lot of embryos, make 100 μL of a primary antibody dilution at 2× the desired final concentration, and add this straight to the embryos already immersed in 100 μL of PBTxN. This will dilute the antibody to the desired final concentration (see Note 8).
Remove primary antibody and wash quickly 5 min with 800 μL of PBTx.
Wash four times at 30 min each in 800 μL of PBTx on the rotator.
Incubate 30 min in 100 μL of PBTxN on the rotator. Make sure there is enough PBTxN for embryos to move around.
Remove PBTxN and add 200 μL of secondary antibody diluted with PBTxN. Incubate for 2 h to overnight. If there are not a lot of embryos, make secondary antibody dilution 2× the desired final concentration and add this straight to the embryos already immersed in 100 μL of PBTxN reagent of the same volume. This will dilute the antibody to the final desired concentration (see Note 9).
Remove and discard secondary antibody, and wash quickly 5 min with 800 μL of PBTx.
Wash four times at 30 min each in 800 μL of PBTx on the rotator.
During the last wash, mix up a batch of Vectastain ABC reagent (0.5 mL PBTx, 10 μL reagent A, 10 μL reagent B). Mix (but do not vortex) after addition of each component, and let stand 30 min at room temperature.
Remove all PBTx and add 500 μL ABC reagent to each tube of embryos. Rotate 15 min.
Remove ABC reagent, and wash five times over 1 h with PBTx. Remove as much PBTx as possible after last wash.
Wash 2× 5 min with 1× PBS to remove traces of PBTx.
Mix DAB staining solution from DAB staining kit: combine 2.5 mL dH2O, 2 drops DAB (supplied), 1 drop buffer (supplied), and 1 drop H2O2 (supplied). Mix well after addition of each reagent (see Note 10).
Remove 1× PBS from the embryos and add 500 μL of Vectastain DAB staining solution to embryos. Allow the reaction to occur in the dark (usually 2–3 min) at room temperature. Do not overstain. The investigator can closely monitor the development of the reaction under a microscope using a small representative sample of embryos to determine when the reaction should be stopped.
Stop reaction by removing stain and washing with PBTx (see Note 11).
If double-DAB staining, wash embryos 30 min in PBTx to remove any residual stain, and repeat process starting at step 6 for second stain.
Store embryos in PBTx at 4°C. In preparation for mounting, remove PBTx, and add 800 μL of glycerol solution (80% (v/v) glycerol, 1× PBS). Allow glycerol to infiltrate embryos for 2 h at room temperature, or overnight at 4°C.
3.1.3. Mounting Embryos for Photomicroscopy
Select a single representative stained sample and put on a microscope slide.
Add 2 drops of 80% glycerol/1× PBS to slide. Be careful with amount of glycerol, as having too much will allow the sample to roll, and too little will cause the coverslip to crush the sample.
Gently put a coverslip over the sample and use fingers to gently push the coverslip around, maneuvering the tissue into the appropriate orientation. The sample is now ready for photodocumentation using DIC optics.
3.2. Immunofluorescent Analysis of Larval and Pupal Whole-Mount Samples
This protocol is used for dissected preparations of larvae and pupae, and can be adapted for adults. Given the need to dissect the samples to expose the developing muscle tissue, and then keep that area exposed during subsequent staining steps, we have developed a procedure where animals are dissected in a Sylgard-coated dish, and all incubations are carried out in that same dish (28). At the end of the procedure, the samples are removed from the dish and mounted for photodocumentation. A representative image is shown in Fig. 1c.
3.2.1. Preparation and Fixation of Larval and Pupal Samples
Some photographs of specific dissection steps are included here to guide the researcher in this process (see Fig. 2).
Fig. 2.
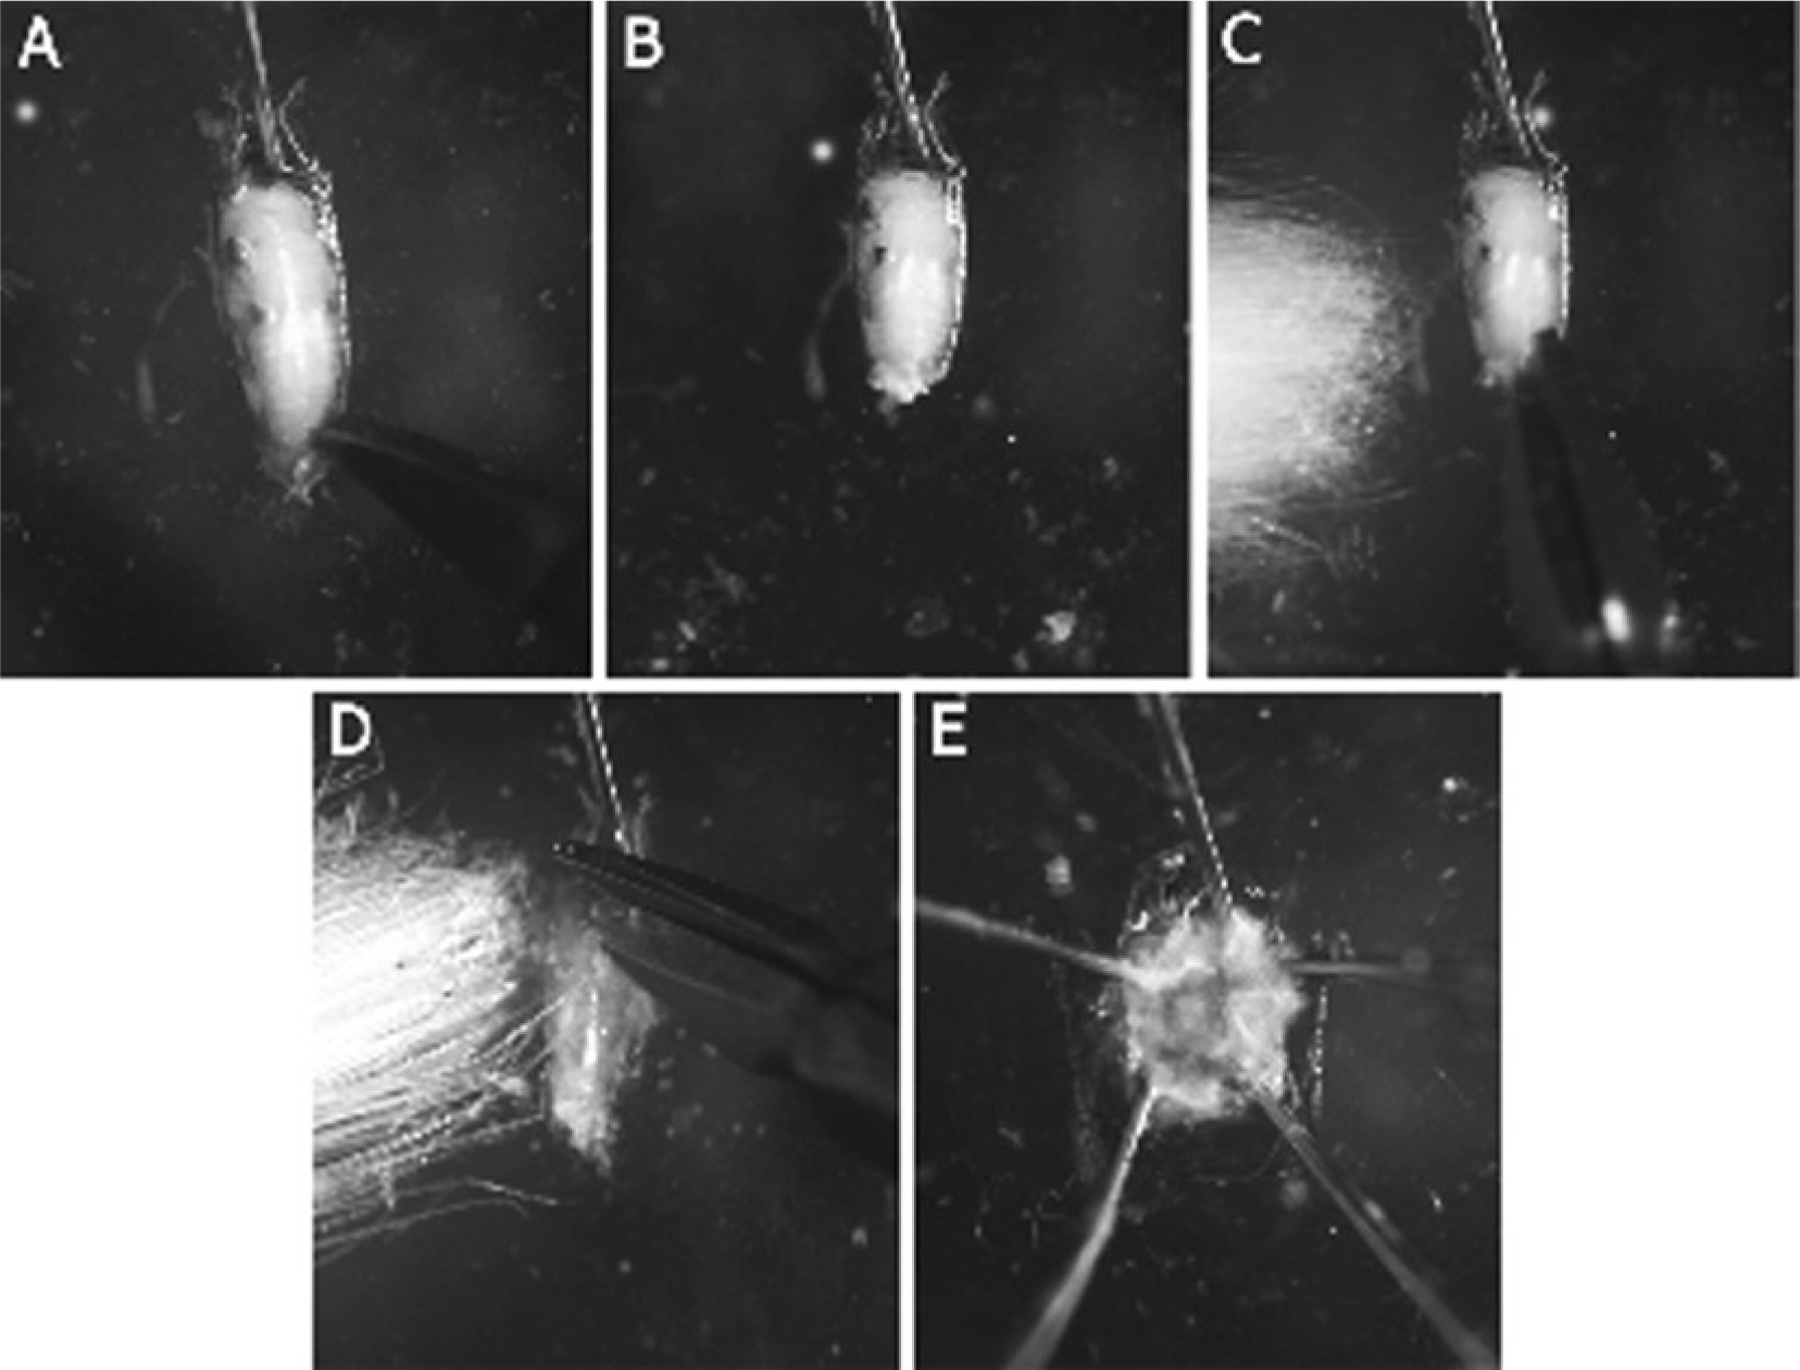
Steps for fillet preparation of larval or pupal samples. A pupal dissection is depicted in this image, but similar steps are used for larval dissections. (a) Immobilize the larva at the anterior end with a dissecting pin, facing ventral side down. (b) With a pair of fine scissors, puncture the posterior tip in order to relieve hemolymph pressure. (c) Remove the posterior tip of the abdomen, including cuticle and tissue of the animal. Then, insert the lower prong of the scissors into the orifice produced, and cut anteriorly along the dorsal side of the animal. (d) Once you reach the head, turn the scissors and cut at an angle to either side of the pin (this step aids in opening up the fillet). Not shown: once the cuts have been completed, place a pin through the posterior and ventral side of the animal, to allow it to be immobilized at both ends. (e) Using pins and forceps, carefully open up the sides of the cuticle and pin laterally to generate a flat fillet. Not shown: usually, the posterior pin is removed once this is complete. Internal organs and tissues can be carefully removed to enable the researcher to visualize the tissue of interest.
Select desired larvae/pupae at correct stage of development. Larvae are generally dissected at the third instar stage. Pupae are generally selected at the onset of pupariation (0 h; white prepupal stage) and dissected at the appropriate stage after puparium formation (APF).
For larvae only: Heat kill. Place larva on a small cheese cloth or microfilter, and dip into 60°C water bath for 20–30 s. Immediately cool by placing filter directly on ice for 2–3 min (see Note 12).
Place larva/pupa on dissecting dish (Petri dish with Sylgard on bottom) containing 1× PBS. Using dissecting pins, pin sample at anterior end. Pin dorsal side up for pupae, dorsal or ventral side up for larvae, depending on what structures will be viewed.
Cut off posterior end of animal with dissecting scissors (see Note 13).
Make straight cut from posterior to anterior end of larva/pupa using short snips and never removing scissors, stopping short of the anterior pin. If working with pupa, make sure scissors are cutting into the underlying animal cuticle, and not just the pupal case. Be careful not to cut too deep into the sample.
From the anterior end of the long cut, make an incision at a 45° angle, toward each side of the sample, angling anteriorly and laterally.
Using forceps to hold the dissecting pins, pin the body (and pupal case) open at all four corners, exposing regions to be stained.
Gently pull out fat body (milky white in appearance) from the larva, leaving muscles exposed. If working with pupa, use a Pasteur pipette to clear away any debris from around the sample.
Remove 1× PBS and fix tissues in 4% formaldehyde/1× PBS solution on ice for 30 min.
3.2.2. Treatment of Larval and Pupal Samples with Primary Antibodies and Fluorescently-Linked Secondary Antibodies
The steps for primary and secondary antibodies are essentially similar to those for immunohistochemical staining of embryos. We modify the protocol here to provide details of how to do it in the dishes, and to illustrate the use of fluorescent secondary antibodies.
Remove fixative to appropriate waste container.
Wash quickly with 5 mL of PBTx.
Wash 5 min with 5 mL of PBTx. This and all subsequent steps should be carried out on a flat-bed shaker, at a low setting (~30 rpm). Overnight steps should be carried out on a shaker at 4°C; shorter steps (up to 2 h) can be at room temperature on the shaker.
Wash 30 min in 5 mL of PBTx.
Incubate 30 min in 5 mL of PBTxN.
Remove PBTxN and add 5 mL of primary antibody diluted in PBTxN. Incubate 2 h to overnight (see Note 14).
Remove primary antibody and wash 5 min with 5 mL of PBTx.
Wash four times at 30 min each in 5 mL of PBTx.
Incubate for 30 min in 5 mL of PBTxN.
Remove PBTxN and add 5 mL of secondary antibody diluted with PBTxN. Incubate for 2 h to overnight in a darkened environment (usually we place the lid of a cardboard freezer box over the dish, see Note 15).
Remove and discard secondary antibody and wash 5 min with 5 mL of PBTx.
Wash four times at 30 min each in 5 mL of PBTx in a darkened environment. Your samples are now ready for viewing.
3.2.3. Mounting Larval/Pupal Samples for Photomicroscopy
Put a small amount of 80% glycerol on a slide so the fillet can be sufficiently covered.
Remove pins from the larval/pupal fillet. For pupae, reinsert pins so that pupal case is still pinned down but carcass can be moved. Under the dissecting fluorescent microscope, additional dissection can be carried out to fully remove unnecessary tissue.
Gently move fillet to microscope slide and orient.
Place one coverslip on each side of fillet, creating a platform. (This can be done prior to adding glycerol).
Cover, but do not smash, the fillet by setting a third coverslip on top of platform created with other coverslips. The sample can now be viewed and documented using a fluorescence or confocal microscope.
3.3. In Situ Hybridization Analysis of Imaginal Discs
Imaginal myoblasts, those giving rise to the adult skeletal muscles, are segregated in the larva. Those in the thorax are associated with the imaginal discs, and the most prominent example of this is the myoblasts associated with the wing imaginal disc (20). These cells give rise to the indirect flight muscles, as well as to some direct flight muscles associated with the base of the wing.
The wing discs are located in the anterior portion of the larvae. They are usually attached to the trachea, unless dislodged during the initial opening of the larvae. One wing disc lies on either side of the brain. A series of images during larval dissection is provided for guidance (see Fig. 3).
Fig. 3.
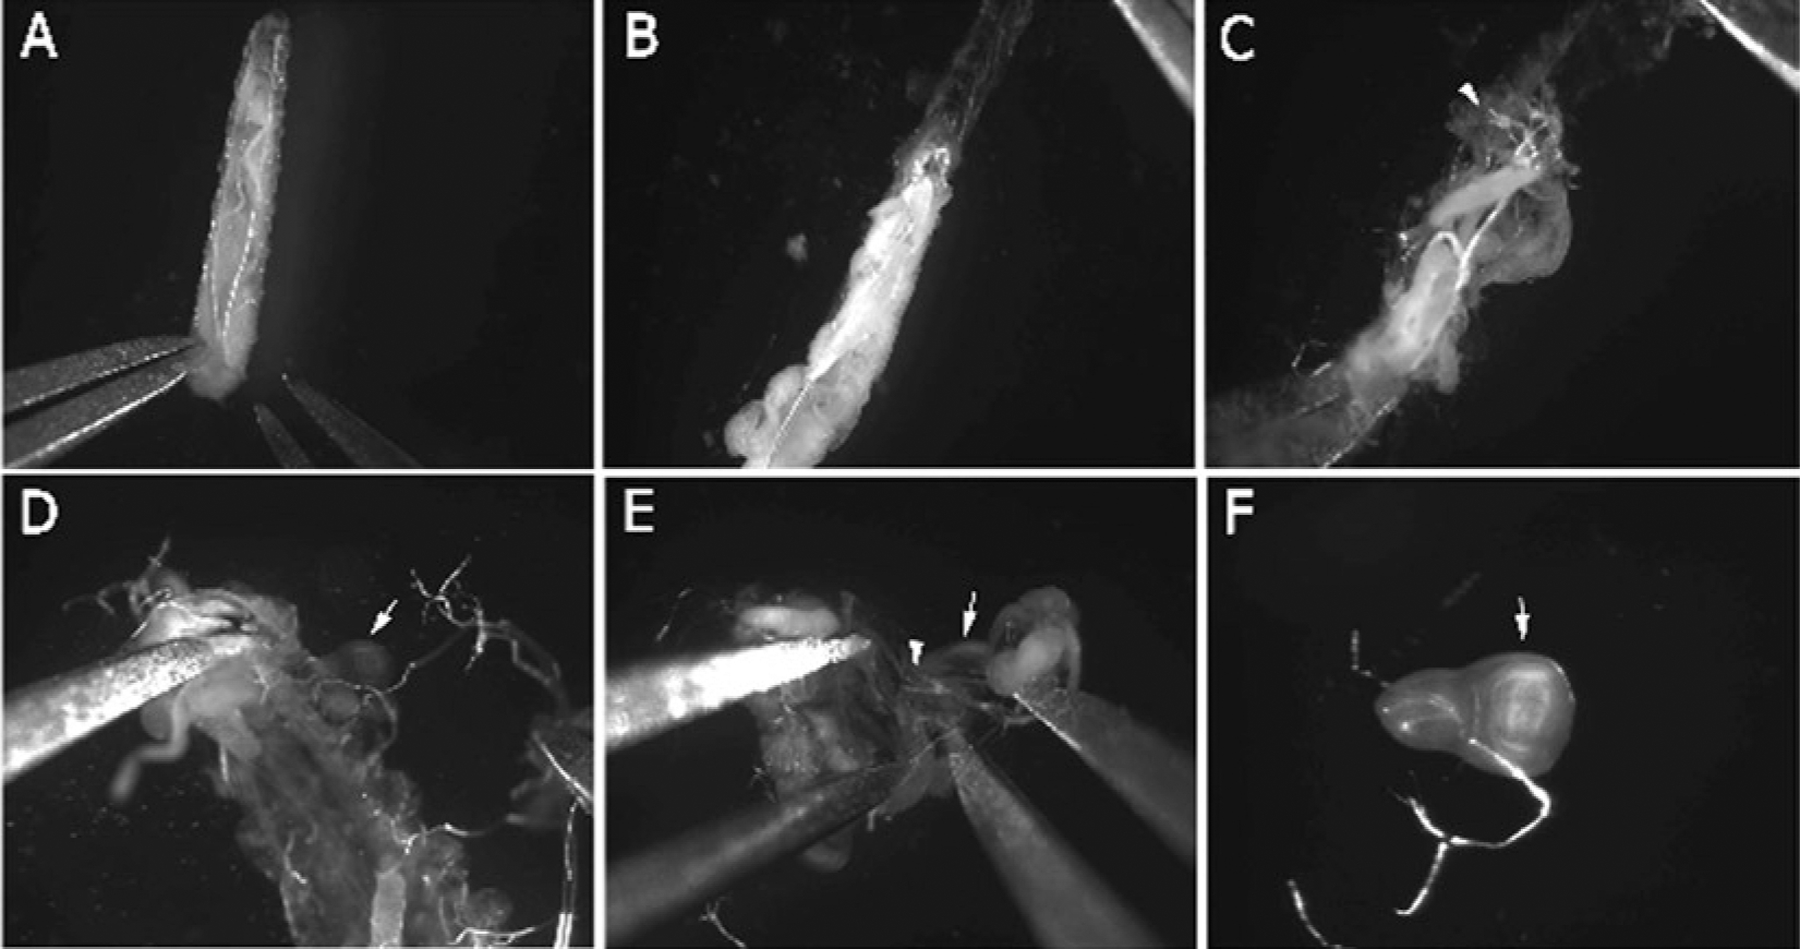
Steps for isolation of imaginal discs from larvae. (a) Immobilize the larva at the posterior end using a pair of forceps. (b) Once immobilized, grasp cuticle at the posterior end with a second pair of forceps, and peel in an anterior direction. (c) Locate finger-like projections on tracheal ends (arrowhead) near the head, in order to roughly locate the imaginal discs. (d) Clear fat and gut debris away from carcass; discs should now be visible (arrow indicates wing disc). (e) Follow trachea (arrowhead) to locate disc of interest (arrow); they will be posterior to the tracheal finger projections, and located close to the brain. (f) Clean away remaining debris from disc. The disc can now be gently pipetted into a tube containing fixative.
Here, we present a procedure to visualize gene expression in the wing imaginal discs using in situ hybridization of a labeled riboprobe to mRNA targets. The protocol follows that of (29) for embryos, as modified by (30) for imaginal discs. Gene expression is visualized in whole-mount discs that have been dissected from the larva. A representative image is shown in Fig. 1d.
3.3.1. Dissection of Discs from the Larva
Prepare 1 mL of fixative solution (3.7% formaldehyde, in 1× PBS) in a 1.5 mL microcentrifuge tube, and place on ice.
Fill Sylgard-coated dissecting dish with 1× PBS. Place larvae into PBS.
Under the dissecting microscope, immobilize the larva at its posterior end with forceps. With the other set of forceps, take hold of the cuticle adjacent to the immobilizing forceps, and peel the tissue anteriorly in a single motion. Remove fat body and debris, utilizing trachea and brain as markers for the discs’ approximate location. Separate the discs from surrounding tissue. The wing disc frequently is associated with the haltere and T3 leg discs. At this stage, we do not seek to separate them from this association, as the larger complex of discs is more easily visible and easier to handle during the subsequent steps.
Carefully pipette cleaned discs into the formaldehyde solution. Once you have dissected the last pair of discs, allow fixation for an additional 30 min. It is wise to obtain at least ten discs for antibody stains and at least 20 for in situ hybridization, as many are lost during the subsequent steps (see Note 16).
3.3.2. RNA Probe Synthesis
Labeled RNA probes are synthesized in vitro by transcription of a plasmid containing a cDNA of the gene of interest. The plasmid should contain promoter regions for RNA-polymerases (T7, T3, or SP6) on either side of the Multiple Cloning Site, to permit RNA synthesis from both DNA strains.
Linearize 10 μg of plasmid DNA with an appropriate enzyme. Two parallel reactions should be set up. The first reaction should cut the plasmid containing an insert at the 5′ end of the insert, for generation of the antisense probe. The second reactions should cut the plasmid on the 3′ end of the insert for generation of the control sense probe.
Analyze 1 μL of digests on a 0.8% agarose gel to ensure linearization.
Clean-up the reactions by processing them through the QIAquick PCR Purification Kit (Qiagen). Alternatively, the digests can be phenol/chloroform extracted and then precipitated.
Use 0.5–1 μg of linearized template DNA for the DIG RNA labeling reaction (per the Roche DIG RNA labeling kit). Incubate at 37°C for 2 h.
Precipitate probe by adding the following per 10 μL synthesis reaction: 15 μL of DEPC ddH2O, 4 μL of 4 M LiCl, 5 μL of 20 mg/mL tRNA, 100 μL of 100% ethanol. Mix well after addition of each reagent.
Incubate at −80°C for 20 min.
Spin at 4°C for 15 min at maximum speed in a benchtop centrifuge.
Remove supernatant, and wash pellet with 100 mL of 70% ethanol.
Spin at 4°C for 5 min at maximum speed.
Resuspend pellet in 75 μL of hybridization solution.
3.3.3. Imaginal Disc In Situ Hybridization
Remove fixative from dissected imaginal discs, and wash with PBTw.
Add 500 μL of 12.5 μg/mL proteinase K in PBTw, and incubate on rotator for 2 min (see Note 17).
Remove proteinase K solution and quench in 1 mL of 2 mg/mL glycine in PBTw by mixing on the rotator for 2 min.
Fix again with 800 μL of 4% formaldehyde in PBTw on rotator for 20 min.
Remove fixative and wash several times with 800 μL of PBTw.
Wash with 800 μL of 50% PBTw/50% hybridization solution for 10 min at room temperature on the rotator.
Wash 3× with 800 μL of hybridization solution.
Add 800 μL of hybridization solution, and prehybridize at 55°C for 30–60 min. Samples do not need to be on the rotator for steps at 55°C, and these steps are carried out in heating blocks.
Dilute probe to approximately 50 ng per 100 μL of hybridization solution. This concentration may have to be adjusted, depending on the abundance of the transcripts being investigated.
Remove prehybridization solution from embryos, and add 100 μL of diluted probe. Incubate overnight at 55°C.
Remove probe/hybridization solution and wash with hybridization solution 3× over the course of an hour at 55°C.
Wash with 50% hybridization solution and 50% PBTw for 10 min on room temperature rotator (the remaining steps are all carried out at room temperature).
Wash 4× with PBTw over the course of an hour.
Remove last wash and add 200 μL of PBTwN (1:20 Normal Goat Serum: PBTw). Incubate on rotator for 30 min.
Add 200 μL of Anti-Digoxigenin-AP (Roche) diluted to a final concentration of 1:1,000 in PBTwN, and incubate on rotator for 2 h. Alternatively, this incubation can be carried out overnight on a rotator at 4°C.
Remove antibody and wash four times with PBTw over the course of an hour on rotator.
Wash three times in Alkaline Phosphatase Buffer for 15 min.
Remove last APB wash and add BCIP stain.
Monitor reaction (staining may come up as soon as 10 min or take as long as overnight).
Stop reaction by washing samples with 100% ethanol, and then PBTw. Store in PBTw at 4°C.
For viewing, stained discs should be placed on a slide, add two drops of 80% glycerol/1× PBS, and mount under a coverslip. We do not recommend clearing discs in glycerol prior to mounting (as is performed for stained embryos), since the discs become highly transparent and difficult to orient.
3.3.4. Alternate Protocol: In Situ Hybridization to Drosophila Embryos
This is also a common procedure, whose main steps correspond to those described already for in situ hybridization to imaginal discs. Here, we describe the early steps of the embryo procedure, to the point where the embryo and imaginal disc protocols converge.
Place approximately 75 μL of fixed embryos (see Subheading 3.1.1) into a microcentrifuge tube.
Remove methanol and wash with 1 mL of 100% ethanol.
Add 1 mL of 50% ethanol/50% xylenes. Incubate on rotator for 30 min.
Wash 5 times with 1 mL of 100% ethanol.
Wash 5 times with 1 mL of PBTw.
Add 5 μg/mL Proteinase K in PBTw, incubate on rotator for 8 min.
Wash with 1 mL of 2 mg/mL glycine in PBTw.
Wash four times with 1 mL of PBTw.
Fix in 1 mL of 4% formaldehyde in PBTw on rotator or 25 min.
Wash 5× with 1 mL of PBTw.
Next, follow the same steps as for in situ hybridization to imaginal discs, starting at Subheading 3.3.3, step 6. Stained embryos should be cleared in glycerol prior to photodocumentation, as described for immunohistochemistry of embryos.
3.4. Analysis of Reporter Gene Expression in Adult Cryosections
This protocol describes how cryosections of pupae or adults can be generated, and then analyzed for expression of a lacZ reporter gene using X-gal staining. A representative image is shown in Fig. 1f. Simple modifications, allowing for cryosections to be subjected to immunofluorescent staining or in situ hybridization, are described in Subheading 3.4.3.
3.4.1. Mounting and Sectioning Samples
Anesthetize adult flies with CO2, submerge into a large drop of OCT freezing medium, and gently toss about in the media to remove air pockets and bubbles.
Put a piece of double-sided sticky tape (Scotch) onto the flat tongue of a metal spatula; attach a paper strip with sample’s description to one side of the tape.
After removing excess freezing medium, spread a fly on its dorsal side on the sticky tape piece, spread wings and legs along both sides to acquire perfect central positioning and prevent rolling over; allow sample to dry slightly (see Note 18).
Cover the fly with fresh layer of freezing media, and submerge into liquid nitrogen. Once the sample is fully frozen (about 20 s), detach the frozen block with the sticky tape from the spatula (see Note 19).
Mount the frozen block containing the specimen onto sample holder of a cryotome, so the sticky tape is facing up; peel the sticky tape off and trim the block into a truncated pyramid shape using a razor blade (see Note 20).
Align the cryotome blade with the plane of the block’s top surface. Begin sectioning 10–12 μm thick sections.
Collect sections individually onto a slide, and air-dry for at least 15 min. Sections can be stored in a dry box at 4°C for a few days before processing (see Note 21).
3.4.2. Histochemical Staining of Cryosections for b-Galactosidase Activity
Wash sections by immersing the slide in 1× PBS solution for 10 s (see Note 22).
Fixation: You can either immerse slide into 4% formaldehyde solution, or add 200 μL of fixative per slide and cover with 18 × 60 mm coverslip. We use both methods with no visible difference. Incubate for 5 min at room temperature (see Note 23).
Wash fixed sections three times, 5 min each, by immersing the slide into 1× PBS solution.
Add 200 μL of X-gal staining solution to the slide and carefully cover with coverslip. Incubate at 37°C in a humid box until a blue stain is developed (see Notes 24 and 25).
Wash the slide three times by 5 min with 1× PBS; rinse with PBTx.
Add 100 μL of Mowiol mounting medium to the slide and carefully cover with coverslip, avoiding bubbles. Observe and document using a compound microscope.
3.4.3. Alternate Protocol: Immunofluorescent Staining of Cryosections
Since diffusion of reagents into cryosections occurs rapidly, antibody staining of these sections can be readily achieved in a single day.
Wash dried sections by immersing slide into 1× PBS solution for 10 s (see Note 26).
Fixation: immerse microscope slide with sections into 4% formaldehyde solution in 1× PBS for 10 min (see Note 27).
Wash sections three times, 5 min each, by immersing the slide into PBTx solution.
Add 200 μL of blocking solution (1% BSA in PBTx) to each slide, and cover with a cover slip. Incubate in a humid box for 30 min.
Dilute primary antibody in 200 μL PBTx containing 1% BSA. BSA blocks antibody binding to nonspecific epitopes (see Note 28).
Add 200 μL of antibody solution to the slide and gently cover with a coverslip. Incubate for 1 h at 37°C or overnight at 4°C (see Note 29).
Wash sections three times, 5 min each, by immersing slide into PBTx solution.
Dilute secondary antibody in PBTx containing 1% BSA; include fluorochrome-labeled phalloidin (1:500) and DAPI (1:1,000) to counter-stain muscles and nuclei, respectively (see Note 30).
Add 200 μL of secondary antibody solution to a slide and carefully cover with a coverslip. Incubate for 1–2 h at room temperature, protect from light.
Remove coverslip, and wash sections three times, 5 min each, by immersing slide into PBTx solution.
Add 100 μL of Mowiol mounting medium to slide, and carefully add a coverslip avoiding bubbles. Dry at room temperature for 1–2 h, and visualize stain via fluorescence or confocal microscopy.
3.5. Analysis of Adult Muscle Patterning via Hematoxylin and Eosin-Stained Paraffin Sections
This procedure is from (30), as modified from (31). This allows for the generation of sections with particularly good preservation of structures, and is used to assess the overall arrangement and patterning of adult muscles. A representative image is shown in Fig. 1e. Given the extensive fixation and embedding steps that are required, paraffin sections are not ideal for antibody staining, although a method to achieve immunostaining of paraffin sections is included in the next section.
3.5.1. Fixation and Embedding of Samples in Paraffin
Anesthetize adult flies with CO2 on a sleeping pad; prepare thorax specimens by chopping off heads, abdomens, legs, and wings with fine scissors or razor blade.
Fix specimens with 4% paraformaldehyde in 1× PBS at 4°C overnight in a scintillation vial (see Note 31).
Remove fixative and dispose using appropriate means. Wash embryos with 1× PBS at 4°C for at least 30 min.
Embed specimens in agarose: pour warm (but not hot) 1% agarose prepared in 1× PBS into a Petri dish. Add the thoraces, and quickly orient with forceps. Allow the agarose to solidify. Next, cut agarose blocks containing thoraces in the shape of isosceles triangles making the base of the triangle align with the dorsal side of thoraces (see Note 32).
In a scintillation vial, dehydrate agarose-embedded specimens through the following sequential washes: 0.85% saline, 25 min; saline/ethanol (1:1), 25 min; 70% ethanol, 25 min, twice; 85% ethanol, 25 min; 95% ethanol, 25 min; absolute (100%) ethanol, 30 min, twice (see Note 33).
Displace ethanol with xylene and, subsequently, with paraffin, as follows: Xylene, 30 min, twice; xylene/paraffin (1:1) at 63°C, 45 min; paraffin at 63°C, 30 min, twice (see Note 34).
After the second paraffin incubation, place specimens into embedding base moulds, orient the base of the agarose triangle against the side of the mould, and let solidify overnight at 4°C (see Note 35).
Remove solidified, specimen-containing paraffin block from the mould. Trim the paraffin into the shape of a pyramid and mount on the microtome holder, so that the base of the agarose triangle is now on top and facing the microtome blade.
Cut sections from the block at 8–10 μm thickness. If the block has been trimmed so that the top and bottom sides of the pyramid are parallel to each other, straight ribbons of sections should be generated.
Transfer the ribbons to a prewarmed water bath set at 40°C, to remove folds and jams, put onto a slide, and let dry overnight on warming plate. Dried sections can be stored indefinitely.
For hematoxylin and eosin staining, sections need to be deparaffinized and rehydrated through the following series of solvents (2 min each step): Xylene, twice; absolute ethanol, twice; 90% ethanol; 80% ethanol; 70% ethanol; 50% ethanol; 30% ethanol; ddH2O.
3.5.2. Staining Paraffin Sections with Hematoxylin and Eosin
Once sections have been rehydrated to ddH2O, stain sections by immersion in hematoxylin stain; time of staining to be determined empirically. Stop staining by washing several times in ddH2O.
Dehydrate sections with 30, 50, and 70% ethanol, incubating for 2 min at each step.
Stain sections with eosin, times to be determined empirically. Wash away excess eosin using 70% ethanol.
Finish dehydration with 2-min incubations in 70, 80, 90%, and absolute ethanol (twice).
Rinse slides with sections in two changes of xylene, and mount a coverslip over sections using Cytoseal-XYL (VWR). Gently push the coverslip down over the samples, and allow mountant to dry overnight in the fume hood.
3.5.3. Antibody Staining of Paraffin Sections
Although this procedure is not always successful (depending upon the activity of the antibody being used), it can often be necessary to obtain immunohistochemical data from paraffin sections.
The basic protocol is to deparaffinize the sections, then to reverse the fixation crosslinks through a procedure known as “antigen retrieval,” and then to follow the antibody staining procedure described above for cryosections, but adapted to achieve detection using the ABC reagent and immunohistochemistry. Stained samples are then usually partially dehydrated, counterstained with eosin, and permanently mounted in Cytoseal-XYL.
Paraffin sections, which have been dried overnight, are deparaffinized as described for hematoxylin and eosin staining of sections (Subheading 3.5.1, step 10). Once the sections are in diH2O, the researcher should immediately proceed to the steps described below.
Place slides in a glass slide bath, containing 250 mL of working strength Antigen Retrieval Citra (Biogenex Inc.).
Fill the base of a microwaveable pressure cooker with 600 mL of dH2O. Place the slide bath in the water and ensure that the water does not over-flow into the slide bath. Apply the lid of the pressure cooker and tighten. Some models also have a pressure regulator weight, which should also be applied.
Microwave at 800–850 W for 15 min. During this time, the pressure indicator button on the oven should rise.
Reduce the power level to 300–350 W, and heat for a further 15 min.
After this time, remove the pressure cooker from the microwave, and allow to cool until the pressure indicator drops. If there is a pressure regulator weight, remove that and determine whether any steam is still escaping through that aperture. If there is, then there is still pressure inside the cooker, and it should be allowed to cool for longer. If no steam escapes, then you can proceed with the next step (see Note 36).
Once the pressure has reduced, use oven mitts to carefully open the cooker (and avoid burns from escaping steam). Carefully lift the slide bath from the cooker (recall that the slide bath will be sitting in 600 mL of water), and set on the bench to dry.
Allow the immersed slides to cool to approximately room temperature, and then proceed with the antibody staining as described in the next section.
Once the samples have cooled, the slides can be washed in 1× PBS. Antibody stains can proceed, through a combination of the cryosectioning protocol, starting at Subheading 3.4.2, step 3 (to include incubations with primary and secondary antibodies, and the associated washes); and the embryo immunohistochemistry protocol, starting at 3.1.2, step 13 (to include the ABC reagent steps) and detection using DAB. For the latter protocol, adapt the volumes from those indicated for embryos to those used for slide staining.
DAB-stained sections should be washed with PBTx, 1× PBS, 0.85% saline (2 min each), before immersion in dH2O. At this point, samples can be partially dehydrated to 70% ethanol, stained with eosin, and then fully dehydrated for mounting in Cytoseal-XYL.
4. Notes
(Para)formaldehyde is a known irritant and carcinogenic compound; use caution working with its powder and solution. Use gloves and fume hood for protection. Collect and utilize formaldehyde waste in accordance with institute’s policy.
10% (w/v) X-gal stock solution is made in formamide and stored liquid at −20°C, protected from light; ferro- and ferricyanides are stored at 4°C as 500 mM aqueous stocks.
The PEM/Formaldehyde/Heptane solution will separate into an aqueous and an organic phase. The embryos will collect at the interface and remain suspended. The formaldehyde will act as a fixative on the cellular structures in the embryo, and the heptane facilitates entry of the fixative into the embryo through the vitelline membrane.
Discard PEM/formaldehyde waste according to the appropriate guidelines.
A significant number of embryos do not pop out of their vitelline membranes, and therefore do not fall into the methanol. These cannot be retrieved and should be discarded. Methanol and heptane waste can be discarded together but must be separated from PEM/formaldehyde waste.
After removal of heptane, embryos can be stored in MeOH in a vial at −20°C indefinitely.
All washes and incubations should be carried out using a rotator to keep the embryos suspended in the solutions. Steps are carried out at room temperature, unless they are overnight steps, which are carried out at 4°C on the rotator. For each change of solution, simply remove the tube of embryos from the rotator, allow them to settle for about 1 min, then remove as much of the solution as possible using a glass Pasteur pipette. During all of these steps, it is important that the samples are not allowed to dry out.
For low affinity antibodies, use final dilutions in the range between 1:5 and 1:200. For high affinity antibodies, use final dilutions in the range between 1:1,000 and 1:5,000. If double-fluorescent antibody staining, both primary antibodies can be used at the same time. If double-staining with DAB colorimetric detection, use only one primary antibody at a time. Primary antibodies raised in closely related animals may cross-react when adding secondary antibodies (step 11). Used primary antibody can be saved after incubation, and stored at 4°C with 2 μL of 3% sodium azide solution.
Secondary antibodies are typically manufactured and can be used in dilution ranges of 1:1,000–1:5,000. Use secondary antibodies appropriate for the animal in which primary antibodies were raised.
If double-DAB staining, use also 1 drop of NiCl2 with the first primary antibody, do not use it with the second primary antibody. Wear gloves when handling DAB, which is highly toxic.
DAB is toxic, discard in an appropriate waste container.
Heat killing of larvae is recommended since it prevents the larva from squirming during the dissection process. However, heat-killing is not compatible with staining for endogenous (or introduced) enzyme activity, such as X-gal staining to assess transgenic expression of a lacZ reporter. In the latter instance, larvae can be temporarily immobilized by placing on ice.
For pupae, it is important to first make a small snip at the posterior end of animal prior to cutting off the entire end. This will allow some hemolymph to leak out, thus relieving pressure from the pupal case. After pressure is released, end may be cut off.
When double-fluorescent antibody staining, both primary antibodies can be used at the same time. Primary antibodies are raised in a specific host animal, if staining multiple targets, make sure antibodies raised in different hosts are used. Closely related host species used for primary antibody generation may cross react when adding secondary antibodies (step 10). If primary antibody is to be saved after incubation, remove from embryos/larvae/pupae and store at 4°C with 35 μL of 3% sodium azide solution. Caution: sodium azide is highly toxic.
Secondary antibodies are typically purchased from commercial sources and can be used in ranges of 1:1,000–1:5,000. Use secondary antibodies appropriate for the animal in which primary antibodies were raised.
This same dissection and fixation procedure can be used for immunostaining of imaginal discs. After fixation, immunostaining will commence at the first PBTx wash step and continue as described for embryos.
The proteinase K solution, if too concentrated, can disrupt the samples. Some titration of different batches of proteinase K may be necessary.
Drying the freezing media around the fly will ensure better adhesion to the sticky tape and prevent displacement of the fly during freezing.
Samples can be indefinitely stored at −80°C in a plastic zip bag or tightly closed container. Before sectioning, the samples should be removed from the −80°C freezer, and equilibrated to the temperature of the cryomicrotome. Typically, we set this to −18°C.
Before starting to section, transfer the information from sample label to the slide that is used for section collection.
Avoid storing sections that need to be stained with X-gal, as this may adversely affect beta-galactosidase activity and ruin reproducibility. Moisture negatively affects the quality of the section; to avoid condensation on slides, prewarm the storage box to ambient temperature before opening.
Once you have started the staining procedure, do not allow sections to dry out. Always keep the slide in solution until you are ready to move it to the next solution.
Longer fixation times can interfere with beta-galactosidase enzymatic activity, so avoid keeping your slide in formaldehyde solution for more than 10 min.
For high levels of ß-galactosidase expression, we observe staining in 5 min; for low expression levels, it can take 1 h or more. If blue stain is not visible after 1 h of incubation, the reaction can be left at room temperature overnight. Overnight incubation may lead to significant nonspecific staining and thereby should be interpreted with caution.
To create a humid box, lay filter paper at the bottom of a 150-mm Petri dish, soak with dH2O, and place into the dish two halves of a 2-mL disposable serological pipette. The pipette halves serve as rails on which slides sit in the chamber up above the filter paper.
Once you immerse sections in solution, do not let them dry out. Always keep your slide in solution until you are ready to move to a fresh solution.
For some epitopes, these parameters should be shortened to 2% formaldelyde for 5 min.
The final dilution of antibody depends on its affinity. If you are using antibody for the first time, it is better to titer it in the range between 1:100 and 1:1,000 and in the following experiments use the dilution that came out the best (i.e., strongest staining signal to lowest background signal). The researcher can stain different targets with different antibodies at the same time. In this case, make sure that primary antibodies were raised in different animal hosts, and use proper secondary antibodies with different fluorochromes in step 8.
The cover slip from the blocking step (step 4) can be removed by immersing the slide in a beaker containing PBTx, at which point the coverslip should simply slide off the sections.
Secondary antibodies are sold by different manufacturers. Follow the manufacturer’s suggestions for working dilution, or titer the antibody as described earlier. Phalloidin binds to and highlights polymerized actin, serving as a general muscle marker; DAPI is useful as a counter-stain for nuclear antigens.
Samples can be placed on a rotator or any other agitating device to keep a constant fluid movement around specimens. Thoraces generally do not sink in the fixative, but this does not hamper fixation.
Although this step is optional, agarose embedding will substantially help to properly orient samples when sectioning. The base of the agarose triangle may be aligned to any part of the thorax, depending on what sectioning plane the investigator would like to achieve.
During the dehydration steps, specimens can be stored for several days in 70% ethanol. For complete dehydration, the quality of absolute ethanol is important: traces of water will cause white precipitation during paraffin embedding and artifacts on sections (e.g., specimen crumbling). To prevent absolute ethanol from absorbing water from the air, make sure all lids on ethanol containers are always tightly closed. Before the absolute ethanol wash, change the cap on the scintillation vial for a new one.
Specimens first float near the surface of the xylene, but then sink down as the xylene penetrates. Paraffin can be kept liquid in an incubator set to 63°C. Watch for white precipitation in xylene washes. If they appear, repeat the last dehydration steps using fresh absolute ethanol. Paraffin can be obtained from a number of sources, e.g., Paraplast Plus (Sigma).
To avoid bubbles, orient specimens after 20 min, keeping the mould on warming plate.
Pressure cookers generate high temperatures, steam, and high pressures. Use due caution when handling, and observe all safety guidelines included with the cooker.
Acknowledgments
Research in the Cripps laboratory is funded by grants from the National Institutes of Health, the American Heart Association, the March of Dimes Birth Defects Foundation, and the Muscular Dystrophy Association. GRM and EML were supported by the NIGMS/IMSD award GM060201. EML is supported by a predoctoral fellowship from the AHA.
References
- 1.Baylies MK and Michelson AM (2001) Invertebrate myogenesis: looking back to the future of muscle development. Curr Opin Gen Dev 11:431–439 [DOI] [PubMed] [Google Scholar]
- 2.Bate M. (1990) The embryonic development of larval muscles in Drosophila. Development 110:791–804 [DOI] [PubMed] [Google Scholar]
- 3.Artero R, Furlong EE, Beckett K, Scott MP, and Baylies M. (2004) Notch and Ras signaling pathway effector genes expressed in fusion competent and founder cells during Drosophila myogenesis. Development 130:6257–6272 [DOI] [PubMed] [Google Scholar]
- 4.Stute C, Schimmelpfeng K, Renkawitz-Pohl R, Palmer RH, and Holz A (2004) Myoblast determination in the somatic and visceral mesoderm depends on Notch signaling as well as on milliways (milliAlk) as receptor for Jeb signaling. Development 131:743–754 [DOI] [PubMed] [Google Scholar]
- 5.Chen EH and Olson EN (2004) Towards a molecular pathway for myoblast fusion in Drosophila. Trends Cell Biol 14:452–460 [DOI] [PubMed] [Google Scholar]
- 6.Rushton E, Drysdale R, Abmayr SM, Michelson AM, and Bate M (1995) Mutations in a novel gene, myoblast city, provide evidence in support of the founder cell hypothesis for Drosophila muscle development. Development 121:1979–1988 [DOI] [PubMed] [Google Scholar]
- 7.Ruiz-Gomez M, Coutts N, Price A, Taylor MV, and Bate M (2000) Drosophila dumbfounded: a myoblast attractant essential for fusion. Cell 102:189–198 [DOI] [PubMed] [Google Scholar]
- 8.Tixier V, Bataillé L, and Jagla K (2010) Diversification of muscle types: recent insights from Drosophila. Exp Cell Res 316:3019–3027 [DOI] [PubMed] [Google Scholar]
- 9.Haralalka S, and Abmayr SM (2010) Myoblast fusion in Drosophila. Exp Cell Res 316:3007–3013 [DOI] [PMC free article] [PubMed] [Google Scholar]
- 10.Laurin M, Fradet N, Blangy A, Hall A, Vuori K, and Cote J (2008) The atypical Rac activator Dock180 (Dock1) regulates myoblast fusion in vivo. Proc Natl Acad Sci 105:15446–15451 [DOI] [PMC free article] [PubMed] [Google Scholar]
- 11.Menon SD, Osman Z, Chenchill K, and Chia W (2005) A positive feedback loop between Dumbfounded and Rolling pebbles leads to myotube enlargement in Drosophila. J Cell Biol 169:909–920 [DOI] [PMC free article] [PubMed] [Google Scholar]
- 12.Schroter RH, Lier S, Holz A, Bogden S, Klambt C, Beck L, and Renkawitz-Pohl R (2004) kette and blown fuse interact genetically during the second fusion step of myogenesis in Drosophila. Development 131:4501–4509 [DOI] [PubMed] [Google Scholar]
- 13.Currie DA and Bate M (1991) The development of adult abdominal muscles in Drosophila: myoblasts express twist and are associated with nerves. Development 113:91–102 [DOI] [PubMed] [Google Scholar]
- 14.Baylies MK, Martinez Arias A, and Bate M (1995) wingless is required for the formation of a subset of muscle founder cells during Drosophila embryogenesis. Development 121:3829–3837 [DOI] [PubMed] [Google Scholar]
- 15.Sandmann T, Jensen LJ, Jakobsen JS, Karzynski MM, Eichenlaub MP, Bork P, and Furlong EE (2006) A temporal map of transcription factor activity: mef2 directly regulates target genes at all stages of muscle development. Dev Cell 10:797–807 [DOI] [PubMed] [Google Scholar]
- 16.Lin M-H, Nguyen HT, Dybala D, Stroti RV (1996) Myocyte-specific enhancer factor 2 acts co-operatively with a muscle activator region to regulate Drosophila tropomyosin gene muscle expression. Proc Natl Acad Sci USA 93:4623–4628 [DOI] [PMC free article] [PubMed] [Google Scholar]
- 17.Kelly KK, Meadows SM and Cripps RM (2002) Drosophila MEF2 is a direct regulator of Actin57B transcription in cardiac, skeletal and visceral muscle lineages. Mech Dev 110: 39–50 [DOI] [PubMed] [Google Scholar]
- 18.Kelly Tanaka KK, Bryantsev AL and Cripps RM (2008) Myocyte enhancer factor-2 and Chorion factor-2 collaborate in activation of the myogenic program in Drosophila. Mol Cell Biol 28:1616–1629 [DOI] [PMC free article] [PubMed] [Google Scholar]
- 19.Demontis F and Perrimon N (2009) Integration of Insulin receptor/Foxo signaling and dMyc activity during muscle growth regulates body size in Drosophila. Development 136:983–993 [DOI] [PMC free article] [PubMed] [Google Scholar]
- 20.Bate ME, Rushton E and Currie DA (1991) Cells with persistent twist expression are the embryonic precursors of adult muscles in Drosophila. Development 113:79–89 [DOI] [PubMed] [Google Scholar]
- 21.Rivlin PK, Schneiderman AM, and Booker R (2000) Imaginal pioneers prefigure the formation of the adult thoracic muscles in Drosophila melanogaster. Dev Biol 222:450–459 [DOI] [PubMed] [Google Scholar]
- 22.Fernandes J, Bate M, and VijayRaghavan K (1991) Development of the indirect flight muscles of Drosophila. Development 113: 67–77 [DOI] [PubMed] [Google Scholar]
- 23.Dutta D, Anant S, Ruiz-Gomez M, Bate M, and VijayRaghavan K (2004) Founder myoblasts and fibre number during adult myogenesis in Drosophila. Development 131:3761–3772 [DOI] [PubMed] [Google Scholar]
- 24.Atreya KB and Fernandes JJ (2008) Founder cells regulate founder number but not fiber formation during adult myogenesis in Drosophila. Dev Biol 321:123–140 [DOI] [PubMed] [Google Scholar]
- 25.Bernstein SI, O’Donnell PT, and Cripps RM (1993) Molecular genetic analysis of muscle development, structure, and function in Drosophila., pp. 63–152 in International Review of Cytology. Academic Press, Inc. [DOI] [PubMed] [Google Scholar]
- 26.Cripps RM and Olson EN (1998) Twist is required for muscle template splitting during adult Drosophila myogenesis. Dev Biol 203:105–116 [DOI] [PubMed] [Google Scholar]
- 27.Patel NH (1994) Imaging neuronal subsets and other cell types in wholemount Drosophila embryos and larvae using antibody probes. Methods Cell Biol. 44:445–487 [DOI] [PubMed] [Google Scholar]
- 28.Molina MR and Cripps RM (2001) Ostia, the inflow tracts of the Drosophila heart, develop from a genetically distinct subset of cardial cells. Mech Dev 109:51–59 [DOI] [PubMed] [Google Scholar]
- 29.O’Neill JV and Bier E (1994) Double-label in situ hybridization using biotin and digoxigenin-tagged RNA probes. BioTechniques 17: 874–875 [PubMed] [Google Scholar]
- 30.Cripps RM, Black BL, Zhao B, Lien C-L, Schulz RA, and Olson EN (1998) The myogenic regulatory gene Mef2 is a direct target for transcriptional activation by Twist during Drosophila myogenesis. Genes Dev 12: 422–434 [DOI] [PMC free article] [PubMed] [Google Scholar]
- 31.Lyons GE, Schiaffino S, Barton P, Sassoon D, and Buckingham M. (1990) Developmental regulation of myosin gene expression in mouse cardiac muscle. J Cell Biol 111:2427–2436 [DOI] [PMC free article] [PubMed] [Google Scholar]