

Abstract
Somatic Liver Knockout (SLiK) is a method developed to rapidly generate a liver-specific knockout of one or several genes. This technique combines the strengths of CRISPR/Cas9 gene editing and hydrodynamic tail vein injection, a simple in vivo method for transfection of hepatocytes, to harness the powerful selection pressure of tyrosinemic livers to replace host hepatocytes with any desired gene deletion. In this protocol, we will describe sgRNA design and cloning, hydrodynamic tail vein injection of targeting constructs, as well as screening and validation methods for efficient in vivo gene editing.
Support Protocol 1. sgRNA Design
Support Protocol 2: sgRNA Construction; Daisy chaining multiple sgRNA
Basic Protocol. Delivery of DNA by hydrodynamic tail vein injection & liver repopulation of edited hepatocytes
Support Protocol 3: Validation of CRISPR/Cas9 cutting in vivo
Introduction
Despite advances in genetic engineering, the generation of tissue-specific knockout mice has remained a time-consuming and expensive endeavor. In recent years, CRISPR (clustered regularly interspaced short palindromic repeats), the latest generation of designer nucleases originating from bacterial defense mechanisms against bacteriophages, has allowed for quick and efficient modification of virtually any target sequence within the genome. CRISPR utilizes a nuclease, Cas9, and a target-specific singe guide RNA (sgRNA), which together form a ribonucleoprotein with unprecedented cutting efficiency. Designing sgRNA is relatively easy, particularly in contrast to techniques required for previous generations of designer nucleases, such as zinc finger nucleases (ZFNs) and transcription activator-like effector nucleases (TALENs).
CRISPR/Cas9 gene editing has given rise to mouse models of various liver diseases, such as non-alcoholic fatty liver disease (NAFLD) (Wang et al., 2015; Xue et al., 2014), familial hypercholesterolemia (FH) (Jarrett et al., 2017) and liver cancer (Weber et al., 2015; Xue et al., 2014). Full body knockout animals can be generated by zygote injections of CRISPR, a technique that requires specialized expertise and is laborious due to the generation of animals with a variety of different genotypes. Moreover, CRISPR can inadvertently introduce unwanted deletions and insertions into the genome (off-target mutations), potentially necessitating additional and time-consuming mouse crossing to eliminate those alterations. An alternative option, however, for generating tissue-specific CRISPR knockout models is to utilize somatic gene editing. Using our newly developed technique, somatic liver knockout (SLiK)(Pankowicz et al., 2018), large numbers of liver-specific knockout mice can be produced bypassing the need for gene therapy vectors and specialized technical expertise such as zygote injection. This protocol will provide the background and all necessary technical details for successful execution of SLiK.
SLiK takes advantage of the strong tyrosinemic selection pressure to repopulate the liver with CRISPR-edited hepatocytes in order to introduce mutations into any gene of interest. Deficiency of the fumarylacetoacetate hydrolase (Fah) gene in mice and humans leads to hereditary tyrosinemia type I (HT-I). This condition promotes the accumulation of toxic tyrosine catabolites within hepatocytes, metabolic crisis in the liver due to hepatocyte apoptosis, and ultimately death. However, this lethal phenotype can be rescued through administration of the small-molecule drug nitisinone (NTBC), an inhibitor of hydroxyphenylpyruvate dioxygenase (HPD); this effect was shown first in humans (Lindstedt, Holme, Lock, Hjalmarson, & Strandvik, 1992) and then also in a mouse model of HT-I (Grompe et al., 1995). Whereas FAH is the final enzyme in the five-step tyrosine catabolism pathway, HPD works further upstream in the pathway (Fig. 1). By inhibiting the function of HPD, tyrosine catabolism is essentially blocked, preventing production of toxic catabolites. However, as with most small molecule inhibitors, treatment with NTBC does not result in complete inhibition of HPD. We have previously shown that, as an alternative to NTBC treatment, the Hpd gene can be efficiently deleted by CRISPR when targeting the locus and introducing mutations and insertions (indels) through the non-homologous end joining (NHEJ) repair mechanism. This leads to a complete and irreversible block of the tyrosine catabolism and, in the context of Fah deficiency and without NTBC, results in a strong selective advantage for CRISPR-edited hepatocytes harboring Hpd deletion (Fig. 1D, Fig. 2) (Pankowicz et al., 2016). Hence, HPD-deficient hepatocytes (Hpd−/−/Fah−/−) expand and eventually completely replace the non-edited hepatocytes (Fah−/−). SLiK leverages this efficient repopulation with double mutated hepatocytes (Hpd−/−/Fah−/−) to simultaneously introduce additional mutations into any gene of interest (GOI, Fig. 1E).
Figure 1: Tyrosine catabolism – disease, therapy and SLiK.
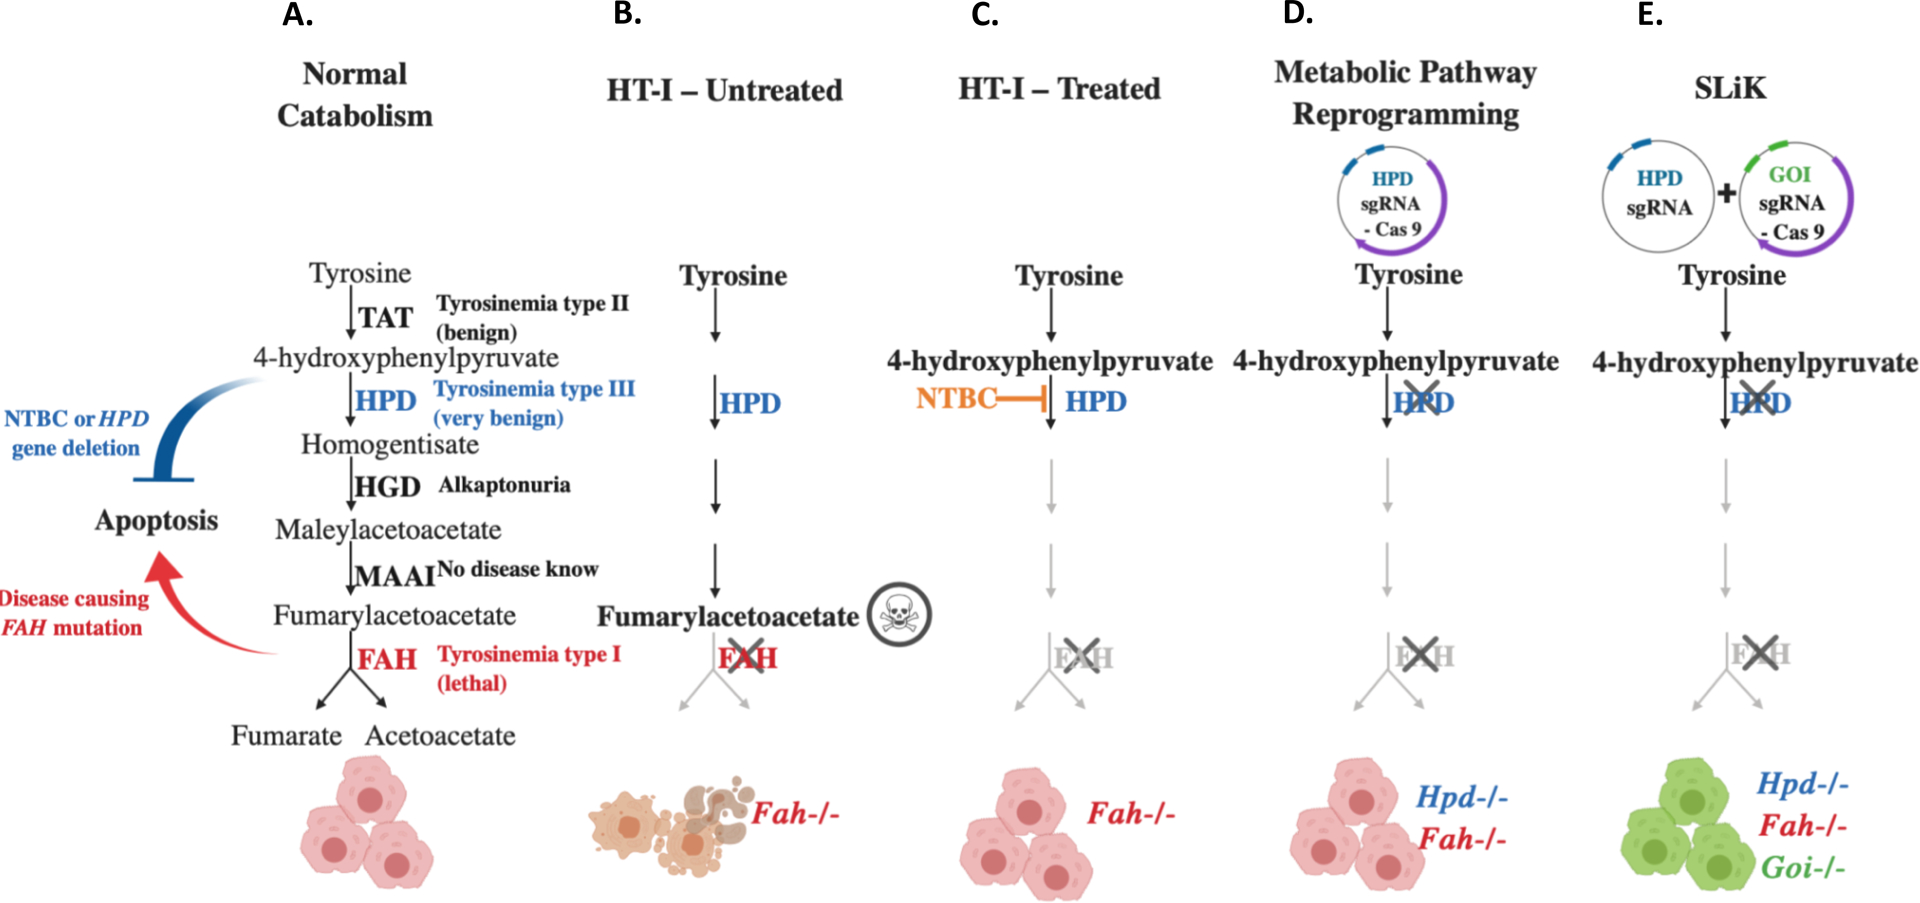
Hereditary tyrosinaemia type I (HT-I) is a lethal inborn error of metabolism caused by a deficiency in fumarylacetoacetate hydrolase (FAH), which catalyzes the fifth and final step of tyrosine catabolism. (A) Normal catabolism and disorders associated with tyrosine catabolism. (B) Untreated HT-I: Accumulation of toxic catabolites with deleted or non-functional FAH enzyme. Fah−/− mice die as neonates due to hepatotoxicity. (C) Treated HT-I: The lethal phenotype of HT-1 is rescued by the small molecule inhibitor nitisinone (NTBC), which blocks hydroxyphenylpyruvate dioxygenase (HPD), an upstream enzyme in the tyrosine pathway. (D) Metabolic pathway reprogramming: Rescue of HT-1 by CRISPR-mediated deletion of HPD. (E) Somatic liver knockout (SLiK): Using CRISPR to excise critical exons of the HPD gene confers resistance to hepatotoxicity in Fah−/− mice, resulting in a positive selection advantage for HPD-edited cells. By simultaneously targeting HPD and a separate GOI, edited cells are able to repopulate the whole liver after only a few weeks.
Figure 2: Basic Protocol for SLiK.

Schematic step-by-step illustration including all protocols for detailed explanation.
To introduce CRISPR-mediated deletions into the liver, hydrodynamic tail vein injection (HTVI) is used. HTVI is a simple injection technique used to deliver “naked” DNA plasmids directly to the liver, offering the ability to transfect hepatocytes of mice and rats (Liu, Song, & Liu, 1999; Zhang, Budker, & Wolff, 1999). While HTVI has proven to be an efficient technique to achieve uptake and expression of transgenic genes in targeted cells, it is limited by maximally targeting only 40% of all hepatocytes residing in the liver (Liu et al., 1999). Therefore, we developed SLiK, which combines HTVI with the selection advantage of tyrosinemia to fully repopulate the liver with any desired knockout(s).
This protocol provides step-by-step instructions including all experimental considerations for the SLiK technique (Fig. 2). SLiK offers the ability to “piggyback” other desirable gene knockouts, besides HPD, into FAH-deficient hepatocytes. This specialized method is only possible when using the tyrosinemic FAH−/− mouse due to the unique positive selection pressure of HPD deletion in this setting. When doing SLiK FAH−/− mice undergo HTVI with two plasmids simultaneously, one containing two sgRNAs targeting HPD and the other containing two sgRNAs targeting the gene of interest (GOI) and a Cas9 expression cassette. There are three important design features to assure that every HPD −/− cell is also GOI−/− (Fig. 3). 1) Due to the construction of the two plasmids, HPD can only be deleted if both plasmids are in the same cell, since HPD deletion requires both the sgRNA against HPD and the Cas9. Conversely, the GOI can be deleted with only one plasmid—the one containing the Cas9 expression cassette and the two sgRNA targeting the GOI (Fig. 2). 2) To favor the GOI deletion over HPD deletion, the sgRNAs are targeting exons for the GOI and introns for HPD. Hence, HPD will only be deleted if the two intronic cutting sites undergo NHEJ and delete the intervening two exons. In contrast, the GOI will be deleted more readily by introducing indels into the exons and does not require the much less frequent event of NHEJ of two adjacent DNA cuts. 3) We introduce greater quantities of GOI plasmid than the HPD plasmid, again favoring the GOI cutting.
Figure 3: Design features of SLiK.

The HPD gene is rendered nonfunctional by two sgRNAs targeted to introns flanking critical exons—this approach is called exon deletion. The GOI is also rendered non-functional, but the sgRNAs have been designed to target within critical or early exons, which can result in multiple outcomes: 1) only one of the sgRNAs will cut efficiently, leading to exon mutation, most likely a frameshift mutation, to render the protein non-functional. Alternatively, both sgRNAs could cut, and the entire region between the guides will be deleted, similarly resulting in deletion of the gene. The importance of targeting within the exon with the GOI-targeting sgRNAs is that, since exon mutations are more efficiently generated than exon deletion, it increases the likelihood that every cell that gains a growth advantage from HPD excision is also deficient in the GOI (A). In addition, the Cas9 (purple) is only expressed from the plasmids containing the sgRNAs targeting the GOI, but not from the plasmids coding the sgRNA targeting HPD. Hence, in order to gain a growth advantage through HPD deletion, the hepatocytes need to get both plasmids (B). Finally, the GOI-targeting plasmid is added in a 3-times greater molar excess (C).
Gene deletions will occur within the first two days after HTVI, and then the edited hepatocytes are enriched over the next few weeks to repopulate the whole liver and generate a liver-specific knockout model (Fig. 2). Positive selection for edited hepatocytes (HPD−/−/GOI−/−) within FAH−/− mice is promoted by withdrawal of nitisinone. This will lead to apoptosis of non-edited hepatocytes (FAH−/−) and regenerative expansion of edited hepatocytes (HPD−/−/GOI−/−/FAH−/−).
SLiK is a long-term procedure with multiple intermediate stages. Here, the overall SLiK procedure is divided into a Basic Protocol for HTVI and liver repopulation plus 3 Support Protocols for choosing the gRNAs for the GOI, daisy chaining the targeting plasmid for multiple sgRNAs and checking to confirm CRISPR/Cas9 cutting in vivo.
Support Protocol 1. sgRNA Design
The first step of any CRISPR approach is the design of the sgRNA to target the gene of interest. The sgRNA design is critical for SLiK and will determine the efficiency of the liver knockout. The method described here uses the Streptococcus pyogenes Cas9 (SpCas9) system since it has been established as the most efficient and best characterized system at present. Alternative systems for CRISPR/Cas9 could be used, but we recommend S. pyogenes CRISPR for optimal results (see Critical Parameters & Troubleshooting).
Several web-based resources and tools are available for sgRNA design. Below we provide a list of resources, which have been useful to us, but this list is neither complete nor static – we constantly evaluate new resources, and design algorithms for sgRNAs are constantly evolving.
Materials:
Resources for sgRNA Design and Construction
Bioinformatic software, gene design program (recommend SnapGene or Gene Construction Kit)
Benchling (CRISPR designs and ranks for sgRNA sites)
NCBI Gene Website (National Center for Biotechnology Information)
MGI Website (Mouse Genome Informatics)
KOMP Website (Knockout Mouse Project Repository)
Before designing the sgRNA targeting your GOI
Knowing the Gene:
-
1
Determine if any known phenotypes are associated with mutations in the gene or if the gene is expressed in the liver in order to determine the best genomic sites to target for gene editing.
Most scientists using SLiK probably know the GOI well and are even experts on the gene. However, some applications might evolve for which that is not the case; for example, the desire to knock out a gene that emerged in a screen and that is unfamiliar to the scientist. In this case, researching the GOI and any associated disease context prior to beginning the design of the sgRNA is critical. It is important to determine if any known phenotypes are associated with mutations in the gene or if the gene is expressed in the liver. Resources such as such as UniProt, MGI, or KOMP databases can provide information on alternative splicing, isoforms, and common transcripts of the gene. This compiled information will help determine the best genomic sites to target for gene editing.
Best practice varies depending on whether you are targeting a well-known gene or one that remains relatively unknown. For known genes with established research, the best approach is to remove a highly conserved region or a region that has been shown to lead to protein knockout in an already established knockout mouse model. If the gene is unknown, we recommend targeting an early exon(s) in order to avoid potential hypomorphic proteins with residual function. For genes with multiple known isoforms it is important to target common exons that are present in all expressed isoforms.
Obtaining the Gene information:
-
2
To retrieve the gene’s entire nucleotide sequence, we recommend first visiting the Gene NCBI website. After making certain the dropdown menu next to the search box has the “Gene” option selected, search for the GOI. When the results compile, select the target species (mouse). On the right side in the “Genomic Regions, Transcripts & Products” tab is a hyperlink for FASTA; click here to open a new page displaying the entire gene locus. Export the entire sequence (copy/paste) into the bioinformatic software gene design program (e.g. SnapGene or Gene Construction Kit).
Targeting the Gene:
-
3
To specifically view the known coding nucleotide sequences, open the Ensembl website. After selecting the target species (mouse) and searching for the GOI, several related options will appear. Select the link without numbers in the name—this will be displayed as “[gene name] (Mouse Gene, Strain: reference (CL57BL6)).” Most of the alternative options on this page with numbers in the name will lead directly to specific isoforms; the general link will bring you to a page that includes a table of all isoforms. If the table is not visible by default, there will be an option to “Show Transcript Table.”
-
4Select the wild type Transcript ID using the following guidelines:
- In the table, the furthest right column labeled “Flags” displays information regarding the Transcript Support Level (TSL) ranking. TSL1 is used to define a transcript that has been observed experimentally, and therefore its existence is supported; TSL5 defines a transcript as only existing in computational theory. The wild type transcript is always TSL1 and usually is in one of the first rows in the table. A second notation in the “Flags” column is APPRIS. This module uses the annotation APPRIS P to denote the principle form, meaning the transcript that is expected to code for the main functional isoform. This identifier can also be followed by a numerical ranking to define a hierarchy if the module is unable to choose a clear principal variant from several candidates. Any alternative splicing isoforms are denoted by the identifier APPRIS ALT, and these candidate isoforms can be ranked numerically according to the number of species the form is conserved in. The wild type transcript is always the principal form.
- Below the transcript table will be a section titled “Summary” where the gene exon and intron regions will be schematically displayed. Protein coding direction is denoted by a small arrow (< or >) to the right of the gene name. The 5’ end (and, therefore, exon 1) is at the side opposite the arrow’s point. If the gene is unknown to the scientist, it is critical to review this information thoroughly to determine the best target region against which to design sgRNAs. As mentioned above, the most highly conserved region between all displayed isoforms is ideal for targeting.
-
5
To view the cDNA and exon sequences for the chosen transcript, click the consensus coding sequence set (CCDS) link under the transcript table within the “Summary”. The coding sequence in the CCDS is consistently annotated between Ensembl, MGI, and Gene NCBI databases and is the standard used gene annotation. At the bottom of the new page is a section titled “Nucleotide Sequence.” The coding exons are listed out in alternating Black and Blue colored text. Copy each exon individually and search for the exact nucleotide sequence within the full gene locus you previously copied into the gene design program. Be sure to annotate the sequences within the program (different color, added region bars, etc.) for easy reference.
Designing sgRNA targeting the GOI using the Benchling software (Benchling.edu)
- If you are a first-time visitor to Benchling, create an account (free for academics). When starting on a new gene file, create the file through the “CRISPR Guides” option, which will provide options for the identification and selection of the GOI for targeting, the appropriate CCDS, and initialize the search parameters for the sgRNA. If working on an existing gene file, open the file and skip straight to the “Design and Analyze Guides” option. We use the following parameters when designing sgRNA for SLiK:
- Genome: GRCm38 (mm10 Mus musculus).
- Location: Should be imported in sense orientation.
- Transcript: Options are imported from Ensembl. Choose the transcript matching the Transcript ID of the WT transcript you previously identified.
- Once each parameter is defined, the genome will be imported into a new tab. Select the CRISPR option for “Design and Analyze Guides” now. The design parameters should follow the below guidelines:
- Design Type: single guide.
- Guide Length: 20–21 (specific to the NGG PAM sequence)
- Genome: GRCm38 (must be the same genome choice from the previous step).
- PAM: for SpCas9 the sequence is NGG.
- Select the desired target region and click “Create.” The program will populate the screen with the resulting guides defined by the input parameters. If the genome regions are not set by default, this option must be selected manually to search for and exclude genomic matches. Benchling uses the genome region to locate the target region and ignore potential off-target sites within that part of the genome to provide a more accurate off-target score for those listed sgRNAs. Below are several criteria, which will help to select the best sgRNA:
- Sequences with high off-target scores – closer to 100 points means fewer off-target effects.
- “G” nucleotide in the initial position – improves U6 promoter site recognition for beginning transcription.
- No nucleotide repeats greater than three in a row. Most importantly, avoid four or more “T” nucleotides in a row (“TTTT”). This sequence is the U6 terminator sequence; therefore, having it within the sgRNA will lead to early termination.
Once the sgRNA(s) is selected, save both the sgRNA sequence and the reverse complement sequence – both are required when placing an oligonucleotide order. It is critical to always define the sgRNA targeting sequence as the forward primer oligo when ordering the sgRNA since it will define the orientation of the target sequence within the plasmid. Importantly, to clone into the pShuttle plasmid (see supporting protocol 2), the forward oligonucleotide must include 5’cacc- before the sequence and the reverse oligonucleotide must include 5’aaac- in order to promote the necessary homology for DNA ligation to occur.
Annotate the sgRNA sequence and its orientation into the gene design program file. Positive (sense) strand sgRNAs will read in the left-to-right orientation. Here, the top strand is the sgRNA. Minus (antisense) strand sgRNAs will read right-to-left, and the bottom strand is the sgRNA.
Support Protocol 2: sgRNA Construction; Daisy chaining multiple sgRNA
Once specific sgRNAs have been designed and the targeting oligonucleotides obtained, these must be inserted into the backbone of the pShuttle plasmid to generate the desired single construct for injection into mice. The critical components of the pShuttle backbone include an SpCas9 under a TBG promoter (liver-specific, RNA polymerase II) and the sgRNA region (to be inserted) under a U6 promoter (RNA polymerase III). For applications requiring only one sgRNA, standardized procedures for subcloning of DNA fragments are all that are required. In brief, this includes 1) digestion and purification of the plasmid backbone to create an open vector; 2) annealing the forward and reverse sgRNA targeting oligonucleotide; 3) ligation of the sgRNA oligonucleotides into the open vector plasmid, 3) bacterial transformation followed by minipreps to isolate the DNA in quantity; 5) validation that the plasmid contains the sgRNA through sequencing.
However, introducing two or more sgRNAs - daisy chaining - does not follow the same oligonucleotide hybridization technique. Instead, the cloning strategy requires restriction enzyme digestion and compatible end ligation. The resulting “daisy chain” of sgRNA uses the restriction enzyme recognition site of XbaI within the pShuttle plasmid acting as the vector to effectively destroy the 5’end and regenerate a new XbaI site on the 3’end of the plasmid, thus allowing for multiple rounds of sgRNA additions to a single pShuttle-SLiK plasmid backbone (Fig. 4).
Figure 4: The scheme of daisy chaining.

The process of daisy chaining can be broken down into the 3 reactions shown here. (1) Perform a PCR amplification with a specific set of primers. This PCR is only performed with one of the plasmids and will define the 566 base pair insert that will be added—or daisy chained—into the other plasmid. (2) Perform two separate restriction enzyme digestions, one with XbaI (vector) and the other one with XbaI and NheI (insert from PCR). (3) DNA ligation reaction of the linearized whole plasmid (vector) and the cut PCR product (insert). The compatible end ligation of the XbaI and NheI restriction site will destroy the XbaI site, while on the ligation of the other side of the insert will preserve the XbaI site so that multiple sequential daisy chaining can be performed.
Materials:
100μM oligonucleotide forward primer (Sigma-Aldrich custom order; store at −20⁰C)
100μM oligonucleotide reverse primer (Sigma-Aldrich custom order; store at −20⁰C)
pShuttle-SLiK vector (Addgene – Bissig lab) (diluted to 20ng/μl)
-
Restriction Enzymes: BbsI-HF (NEB, Cat# R3539S)
NheI-HF (NEB, Cat#R3131S)
XbaI (NEB, Cat#R0145S)
10x CutSmart Buffer Solution (NEB, Cat# B7204S)
10x NEBuffer 2.1 (NEB, Cat# B7202S)
T4 DNA Ligase (NEB, Cat# M0202SB)
10x T4 DNA Ligase Buffer Solution (NEB; Cat# B0202S)
Phusion High-Fidelity DNA Polymerase (NEB, Cat# M0530S)
Chemically Competent E.coli One Shot Stbl3 (ThermoFisher, Cat# C737303) or Top10 (Cat# C404003)
LB Agar, Miller (Fisher BioReagents, BP1425–2)
LB Broth, Miller (Fisher BioReagents, BP1426–2)
Kanamycin (VWR, Cat# 97062–956)
GeneClean Turbo column purification kit (MP Biomedicals, Cat# 111102–400)
DNA MiniPrep Kit (Zymo Research, Cat# D4015)
DNA MaxiPrep kit (Thermo Fisher, Cat# K210016
Vector Preparation – Linearize the First Plasmid
-
1
Perform a restriction enzyme digestion on the first sgRNA plasmid using the XbaI-HF restriction enzyme. In a 1.5ml Eppendorf tube at room temperature, combine the reagents in Table 1 in the exact order presented:
-
2
Once the reaction mixture is prepared, incubate for at least 2 hours at 37°C (overnight incubation is recommended).
-
3
Next, purify the DNA using the GeneClean Turbo kit and elute the plasmid in exactly 44μl of molecular grade water.
-
4
Dephosphorylate the DNA in the mixture to prevent self-ligation of the plasmid. Combine the reagents in Table 2 in the exact order presented and incubate the mixture for 30 minutes at 37°C.
-
5
Perform a second purification of the DNA sample using the GeneClean Turbo kit and elute the plasmid in 50μl of molecular grade water.
Table 1:
XbaI-HF restriction enzyme digestion plasmid 1
| Component | Amount |
|---|---|
| Nuclease-free dH2O | Up to 50μl |
| Plasmid | 3–6μg |
| 10x CutSmart Buffer | 5μl |
| Xbal-HF | 2μl |
Table 2:
Ligation Mix
| Component | Amount |
|---|---|
| Digested plasmid | 44μl |
| 10x Antarctic Phosphatase Buffer | 5μl |
| Antarctic Phosphatase | 1μl |
Insert Preparation – PCR Amplify the Second Plasmid’s sgRNA Sequence
-
6
With the second sgRNA plasmid, perform a PCR with the primers shown below in Table 3 to prepare the insert piece of DNA.
The resulting 566 base pair PCR product is designed such that it includes the U6 promoter, sgRNA and the XbaI site between the forward and reverse primer binding sites. The forward primer is designed to incorporate a NheI restriction enzyme site, which is compatible with the existing XbaI overhangs in the now linearized plasmid (Fig. 4).
-
7
Performa PCR with the components shown in Table 4 using the following thermocycler conditions:

-
8
Purify the PCR product with the GeneClean Turbo kit and elute in 43μl of molecular grade water.
-
9
Digest the 43μl of PCR product by adding 5μl of 10X CutSmart buffer and 1μl of both XbaI and NheI restriction enzymes. Incubate the reaction for 2 hours at 37°C. Once the eaction is complete, perform a second purification with the GeneClean Turbo kit, eluting in 50μl of molecular grade water.
Table 3:
Primers for amplification of plasmid 2
| Primer ID | Len | Pur | Scale | MW | Tm⁰ | Sequence |
|---|---|---|---|---|---|---|
| NheI_pS_For | 32 | DST | 0.025 | 9869 | 74.7 | AAAAATGCTAGCAGCTACAACAAGGCAAGGCT |
| pS_sgRNA_Rev | 22 | DST | 0.025 | 6701 | 61.9 | CTCGAGTCTAGAGCCATTTGTC |
Table 4:
PCR Mix to amplify and sgRNA 2
| Component | Amount |
|---|---|
| Nuclease-free dH2O | Up to 50μl |
| 5x Phusion HF Buffer | 10μl |
| 10mM dNTPs | 1μl |
| DMSO (optional) | 1.5μl |
| 10uM Forward Primer | 2.5μl |
| 10uM Reverse Primer | 2.5μl |
| Template DNA (in H2O) | 100ng |
| Phusion DNA Polymerase | 0.5μl |
Ligate the PCR Insert and the Linearized Vector
-
10
Perform a DNA ligation reaction with the insert (digested PCR product) at a molar excess four times greater than that of the linearized vector.
The result should be one mole of insert having four times as many molecules as 1 mole of the vector. The calculations will be dependent on the concentrations of both the insert and vector, which will vary with every preparation. However, the size of both will remain constant, with the PCR insert being 566 base pairs and the whole vector being 8580 base pairs. Therefore, there is a 15 times greater excess of vector.
-
11
Combine the reagents in Table 5 in a PCR tube on ice in the exact order presented and incubate at 4°C overnight.
-
12
The next day, continue the experiment by performing the bacterial transformation according to standardized DNA cloning procedures.
We recommend adding 2.5μl of the ligation reaction to 50μl of Stbl3 and heat shocking the mixture. As stated in the introduction, the pShuttle plasmid has a Kanamycin resistant cassette, so plate appropriately.
-
13
Perform a DNA miniprep and elute the plasmid DNA in 50μl of molecular grade water. Then use DNA sequencing to confirm that both sgRNAs are contained within the plasmid.
We recommend sequencing using the reverse primer defined above and using BLAST to align the results to the whole plasmid sequence. The program may display disjointed results because of the duplicate sequence, so you need to look carefully at the sequence numbers.
Table 5:
Ligation Mix
| Component | Amount |
|---|---|
| Nuclease-free dH2O | Up to 20μl |
| 10x T4 DNA Ligase Buffer | 5μl |
| PCR insert | Calculated |
| Linear vector | Calculated |
| T4 DNA Ligase | 1μl |
Repeat the daisy chain protocol for each additional sgRNA integrated on the plasmid. When you validate your final sgRNA plasmid construct, perform a new bacterial transformation and use a DNA MaxiPrep kit to obtain larger quantities of the plasmid for experimental use in vivo (see Basic Protocol).
Basic Protocol. Delivery of DNA by hydrodynamic tail vein injection & liver repopulation of edited hepatocytes
SLiK is an attractive new tool to rapidly generate a liver specific knockout. The beauty of the system lies in the ability to multiplex specifically designed target CRISPR sgRNA (see Support Protocol 1) either on multiple plasmids or by daisy chaining sgRNA on the same plasmid (see Support Protocol 2). We prefer the former since it can be done in parallel, while daisy chaining has to be performed sequentially and is more time-consuming. As discussed in the supporting protocols and shown in Table 6, we recommend injecting higher amounts of the GOI plasmid(s) to assure that every cell that is HPD deleted is also GOI deleted. We have successfully used up to 10 different GOI plasmids simultaneously, but it is our experience that efficiencies drop with more than 6 GOI plasmids. Despite lower efficiencies, even when multiplexing with 5 GOI, the HPD-deleted cells are also GOI-deleted (Fig. 5).
Table 6:
DNA input when multiplexing SLiK (μg/mouse)
| Number of GOI plasmids | HPD plasmid [μg] | GOI plasmid [μg] |
|---|---|---|
| 1 | 7.5 | 1 × 12.5 |
| 2 | 6 | 2 × 8 |
| 3 | 5 | 3 × 5 |
| 4 | 4 | 4 ×4.5 |
| 5 | 3 | 5 ×4 |
| 6 | 2 | 6 × 3 |
Figure 5: Multiplex SLiK – simultaneous deletion of several genes of interests (GOI).

We performed proof-of-concept studies for SLiK targeting, and successfully deleting, up to five genes in addition to HPD by simultaneously injecting 6 plasmids together. Immunostaining for HPD and GOI 3 weeks and 8 months after NTBC removal are shown. Note, that after 3 weeks cell clusters negative for HPD do not stain for GOI either.
Any type of Fah-deficient mice (Aponte et al., 2001; Gluecksohn-Waelsch, 1979) can be used for SLiK, even immune deficient variants to reduce Cas9 related immune response (Bissig, Le, Woods, & Verma, 2007). FAH−/− mice are neonatal lethal as described first forty years ago (Gluecksohn-Waelsch, 1979), but mice can be kept alive with the HPD inhibitor NTBC in the drinking water. When withdrawing the drug, FAH−/− hepatocytes undergo apoptosis. However, when HPD is deleted by CRISPR the double mutated (FAH−/− /HPD−/−) hepatocytes expand in the liver through the tyrosinemic selection pressure (Pankowicz et al., 2016) (Fig. 1 & 2). Therefore, CRISPR constructs deleting HPD are always included when doing SLiK in FAH−/− mice.
Here in the basic protocol, we will describe the delivery of CRISPR DNA into hepatocytes and the expansion of edited hepatocytes (FAH−/− /HPD−/−). The design of a sgRNA to target a specific GOI is found in Support Protocol 1. and the cloning in Support Protocol 2. The validation of sgRNA cutting efficiencies is described in Support Protocol 3.
Hydrodynamic tail vein injection (HTVI) is an in vivo transfection method for murine hepatocytes. The method is relatively simple but requires some technical skill and practice. Plasmid DNA is quickly injected (in 5–7 seconds) via the tail vein in a large volume corresponding to 8–12% of the body weight (Liu et al., 1999; Zhang et al., 1999). The massively increased intravascular volume then leads to temporary congestive right-heart failure, which in turn causes a reversion of the blood flow from the heart through the hepatic veins into the liver (Fig. 6). Hence the injected DNA ends up in the liver, where it is transfected into hepatocytes (Crespo et al., 2005; Kobayashi et al., 2010; Suda, Gao, Stolz, & Liu, 2007). We usually inject 20–23 μg of total plasmid DNA (table 6). Efficient gene expression in up to 40% of the murine liver (hepatocytes) is possible using this method, and to a much lesser extent, transfection of the kidneys, spleen, lung, and heart have also been observed (Herweijer & Wolff, 2007; Liu et al., 1999). Any age of mice >4 weeks and body weight >15 g is suitable for HTVI.
Figure 6: Hydrodynamic tail vein injection.

Schematic of hydrodynamic tail vein injection (HTVI): (A) The large volume equivalent to 8–10% of the body weight is injected within a 5–7 second interval through the tail vein. The large volume reaches the right ventricle of the heart via the inferior vena cava. (B) The increased intracardial pressure causes a right heart failure with congestion. (C) A reversal of blood flow (retrograde flow) drives the DNA solution into the hepatic vein and the liver begins to expand. (D) DNA transfection of hepatocytes.
Materials:
-
21μg DNA plasmid total (see Table 6 for multiple GOI)
sgRNA-HPD
sgRNA-GOI & Cas9 – the product of Support Protocols 1–2
Fah−/− mice
Tail-first Mouse Restrainer (Braintree Scientific, Cat# TV-150 STD)
Heat lamp, 60W bulb (Chewy, Fluker’s Ceramic Repta-Clamp Lamp with Switch, 5.5-in)
3-mL Syringe, Luer-Lok Tip (BD, Cat# 309657)
26G × ½” Hypodermic Needle (Exelint, Cat# 26402) – for performing IV injection
22G × 1” Hypodermic Needle (Exelint, Cat# 26411) – for saline uptake and mixture
Argyle Sterile Saline, 0.9% (Cavidien, Cat# 1020)
NTBC stock solution, 500X (see recipe)
1. Weigh & prepare the mouse
-
1
The most important consideration for this technique is that the volume depends on the body weight of the mouse. Inject 1mL per 10g, up to a maximum of 2.1mL – in mice over 21g, all additional mass is typically due to fat accumulation and is not relevant for HTVI. To prepare the mouse, apply heat to the tail in order to cause vasodilatation of the tail vein, which aids in visualizing and accessing the vasculature.
Importantly, closely monitor the mouse for heat distress (e.g. mice that are erratically digging or jumping are actively trying to escape the heat) and keep the heat lamp at a safe distance from the mouse (>10 cm while exposing only the tail). Alternatively, a water bath (water < 45°C) or heat pad can be used.
Aliquot appropriate volume & prepare the syringe
-
2
Use a 3mL syringe fitted with a 22G needle to aseptically draw up the volume of saline appropriate for the measured body weight. Add the saline to the tube with the plasmid(s) and mix thoroughly by drawing the entire solution into the syringe and expelling it back into the tube 3 times.
-
3
Once mixed, draw up the entire volume into the syringe. Remove any liquid from the needle portion of the syringe and replace the 22G needle with the 26–28G needle. Remove all air bubbles by flicking the syringe, then depress the plunger to the appropriate volume and expel a tiny amount of volume from the needle tip.
It is important to avoid any air bubbles in the syringe and the needle.
Restrain the mouse within the tail-first restrainer
-
4
Grasp the mouse by the base of the tail and place it on top of the securing device – this will help orient the body to be parallel to the tube. Using the upper slot as a guide, pull back on the tail to slide the mouse’s hindquarters into the restrainer. Continue pulling back until the mouse is fully confined.
-
5
Check that the paws are not gripping the restrainer’s edge and then insert the securing plunger. Gently maneuver the mouse until its nose is pointed up and out the top slot, then restrain the animal properly.
Mice are nose-breathers, and you must ensure that they can breathe throughout the restrained period. Monitor the breathing rate and color of the ears and nose for the duration of the restraint. Loosen the securing device immediately should there be any signs of gasping or change in color from pink to blue.
Intra-venous Injection
-
6
Locate the two lateral tail veins, which run parallel to the dorsal vein and vertebra – pull the tail taut and determine the location of the dorsal vein (black line directly on top of tail when looking down) and carefully rotate the tail approximately 90⁰ to the left or right. Give the mouse sufficient time to turn the body while turning the tail.
-
7
Insert the needle by laying it flat on top of the tail directly above the vein with the bevel of the needle facing upward. Then, direct the tip forward and slightly down, just enough to nick the skin. Once the tip is under the skin, immediately angle the needle flat again and gently guide it forward along the vein’s outline until a quarter of the needle is entered. Inject the entire contents of the syringe within 5–7 seconds by applying constant and steady pressure to the plunger.
-
8
Once done, remove immediately the animal from the restrainer and place on a clean surface (not the cage) for 2 minutes.
If the technique was successful, the mouse will become noticeably subdued. It is possible that some mice will react more dramatically and attempt to jump within the first 2 minutes after HTVI.
-
9
After the mouse has recovered from the injection, place the mouse back into its cage and continue to monitor for up to 6 hours post-injection.
Expansion of edited hepatocytes
After injecting Fah−/− mice with the CRISPR plasmids via HTVI, wean the animals off the drug NTBC immediately. This weaning should occur over a one-week period, from 100% to 25% on day 0, 12% on day 2, 6% on day 4, and 0% (no drug) on day 6. No further supplementation with NTBC should be required for these animals.
Three days post-injection, euthanize 1–3 injected mice and harvest the liver for validation of sgRNA cutting efficiency – see Support Protocol 3.
Weigh all injected animals twice weekly and screen for health problems according to the Animal Welfare Act and the PHS Policy on Humane Care and Use of Laboratory Animals. Critically, ~3 weeks after removing the drug, any animals with poor HTVI and insufficient levels of hepatocyte transfection will begin to appear moribund and somnolent. In this case, we recommend euthanasia and starting again with HTVI (see also troubleshooting in step 5.).
At eight weeks after NTBC removal, approximately 80% of the liver will be repopulated by edited hepatocytes.
Support Protocol 3: Validation of CRISPR/Cas9 cutting in vivo
CRISPR/Cas9 cutting efficiency can be validated as quickly as 72 hours post-HTVI since the expression of the transfected plasmids as well as the cutting of the target site is a rapid process. At this early stage, less than 40% of hepatocytes will be edited since no expansion and repopulation could take place. Nevertheless, it’s worth validating in a few mice the cutting efficiency particularly when deleting with a newly designed sgRNA. In this section, we will describe the steps to detect and validate genomic deletions.
Materials:
Blood and Tissue DNeasy (Qiagen, Cat# 69504)
Phusion High-Fidelity DNA Polymerase (NEB, Cat# M0530S)
HiQ Standard Agarose (GenDEPOT; Cat # A0222–050
ZymoClean Gel DNA Recovery Kit (Zymo Research, Cat# D4001)
Collect liver and isolate the genomic DNA
-
Euthanize the mouse and harvest the liver 72 hours post-HTVI.
It does not matter which piece of the liver is used for DNA extraction and it is not necessary to perfuse the liver in order to clear the blood. However, we rinse the freshly harvested piece of liver before we snap freeze it for further steps.
Isolate the genomic DNA from 20 mg of frozen liver tissue using a standard DNA extraction kit
Amplify the target sequences by PCR
-
Amplify the isolated DNA for the target region by PCR and appropriate primers with the following thermocycler conditions:

We recommend not only validating the GOI, but also the HPD gene using the HPD primers provided in Table 7, which generate a sgRNA wild-type band of 967 base pairs and a deletion band of 434 base pairs (Fig. 7).
Prepare a 2% agarose gel, load at least 25 ul of the PCR product onto the gel (including a DNA molecular weight standard), and perform gel electrophoresis.
Confirm the expected band size of the DNA fragments in the agarose gel by imaging, then extract the fragments and recover the DNA using gel extraction kit.
Perform Sanger Sequencing of the extracted DNA using both PCR primers.
Table 7:
Primers for validation of SLiK
| Primer ID | Len | Pur | Scale | MW | Tm⁰ | Sequence |
|---|---|---|---|---|---|---|
| mHPD_I1_For | 24 | DST | 0.025 | 7307 | 73.4 | CACCGCCCCTTGAAGGATCAGAAT |
| mHPD_I1_Rev | 24 | DST | 0.025 | 7337 | 68.8 | AAACATTCTGATCCTTCAAGGGGC |
| mHPD_I3_For | 24 | DST | 0.025 | 7211 | 66.2 | CACCGCACCACCTATAGAAACTCT |
| mHPD_I3_Rev | 24 | DST | 0.025 | 7432 | 61.3 | AAACAGAGTTTCTATAGGTGGTGC |
Figure 7: PCR validations of CRISPR/Cas9 cutting efficiency in vivo.

Typical validation of CRISPR/Cas9 cutting efficiency three days (72 hours) after HTVI. The right scheme displays the HPD gene, with sgRNAs (blue arrows) flanking the intronic regions upstream of exon 2 and after exon 4, resulting in the removal of 686 base pairs and deletion of exons 3 and 4. The left scheme displays the gene of interest (GOI), with sgRNAs (green arrows) targeting exons 3 and 5. This leads to a deletion of 533 base pairs, including complete removal of exon 4 and partial deletion of exons 3 and 5. The gel electrophoresis of a PCR (middle panel of figure) displays the wildtype and SLiK amplicons with corresponding, deleted genes. Primers targeting either GOI or HPD were used and are notated as black arrows.
Reagents and Solutions
NTBC stock solution, 500X
Powdered NTBC (Lab Network, Cat# BD61457–100g)
10% sodium bicarbonate (BDH (VWR), Cat# BDH8011–500G)
We make NTBC as 500x stock solution (2.5 mg/ml = 500x stock) and keep it stored at −20°C aliquoted in 50ml falcon tubes. Appropriate amount of powder and drinking water for mice is added to a slightly heated magnetic stirrer. Dropwise add 10% bicarbonate until the solution turns yellow and no NTBC crystals are visible. A working 500x NTBC stock solution can be kept at 4°C and added to the drinking water for our Fah−/− mouse colony to dilute it.
COMMENTARY
Background information
In contrast to many organ systems, the liver can readily be transfected in vivo with plasmid DNA by hydrodynamic tail vein injections (HTVI). This technology was developed 20 years ago and is widely used in the field of hepatology. The only drawback of HTVI is that transfection is limited to maximally 40% of hepatocytes, mainly centrilobular cells, and on average is probably nearer 20–30%. Hence HTVI per se cannot generate a liver knockout model since the majority of cells will not be edited when providing CRISPR knockout plasmids. Therefore, we combined HTVI with the selection pressure of tyrosinemia.
FAH−/− mice are a well-characterized and popular research model, and we have recently shown that the tyrosinemic selection pressure can be used to generate a nearly complete expansion of edited hepatocytes (FAH−/−/HPD−/−) (Pankowicz et al., 2018; Pankowicz et al., 2016). Hence when centrilobular hepatocytes are transfected by HTVI and edited by CRISPR-mediated deletion of the HPD gene, the cells can be expanded throughout the liver and eventually replace non-edited cells in FAH−/− mice (Fig. 1 & 2). SLiK combines CRISPR, HTVI and tyrosinemia and provides a powerful tool for the generation of a liver-specific knockout model. Importantly, SliK can be multiplexed and whole pathways or gene groups can be deleted at the same time.
Critical parameters & troubleshooting
Design of sgRNA targeting site
Before starting with the sgRNA design, it is important to first consider the downstream application of the SLiK model. Introducing exon mutations by two sgRNA targeting the GOI is certainly a very efficient gene targeting method but will also lead to clonal expansion of different mutations within the liver. Depending on the application, a less efficient but more uniform exon deletion approach (instead of exon mutation) might be preferable. Theoretically, there is also no need to design two sgRNA for SLiK – one sgRNA might work just fine. However, we found it more efficient to design two sgRNA since the deletion band will give a semi-quantitative measurement for efficiency via PCR when comparing multiple sgRNA in the same experiment. Sanger sequencing might be more convenient than validation by PCR, but sequencing will not allow comparison of the efficiency levels of the different constructs.
Critical parameters and pitfalls for sgRNA design include defining the proper genome (i.e. GRCm38 – mm10 Mus musculus), knowing the background strain of the mouse line being injected, importing the sense orientation of the sgRNA, and identifying the most expressed and most relevant gene isoform in the liver.
When designing sgRNA to target within an exon, it is helpful to include a small – approximately 25 base pairs long - overlap of introns in the search field to either side of the exon. Inclusion of these additional nucleotides can offer additional guide options that might otherwise be excluded from the search. This is especially useful if the exon is short. The SpCas9 cuts between the third and fourth nucleotide before the PAM site; this cutting site should be located within the exon for optimal efficiency.
Reagents in this protocol are based on the S. pyogenes CRISPR/Cas9 system. As mentioned above, this system is very efficient in introducing double strand breaks, and the PAM sequence (NGG) is also very prevalent. Other bacteria have a somewhat less efficient CRISPR/Cas9 system (S. aureus) or insufficient information is available about their cutting efficiencies. Therefore, we recommend using the S. pyogenes CRISPR system for SLiK. Also, some CRISPR systems have a more restrictive PAM sequence (for instance NNGRRT for S. aureus) limiting the possible targeting sequences within the gene.
Daisy Chaining & Cloning
In our experience daisy chaining can be a challenging cloning step. The most critical step in this procedure is the ligation, which must be optimized by calculating a good insert-to-vector molar ratio when setting up the reaction. Since the insert is so much smaller in size than the vector, this ratio provides the optimal conditions to increase the chance of the insert meeting the vector, thereby improving the likelihood of proper ligations for single insertions. It is advisable to perform multiple ligations with varying ratios. The dephosphorylation of the nicked plasmid is another critical step. This step ensures that the base pair overhangs created by the XbaI restriction enzyme do not religate to themselves prior to incubation with the PCR insert of the second sgRNA. Alternatively, the DNA can be heat inactivated prior to dephosphorylation. Another issue of note pertains to the T4 DNA ligase buffer. This buffer needs to be thawed carefully at room temperature (not in a water bath or heating block >37°C) in order to prevent the breakdown of ATP. Once thawed, the buffer should be kept on ice and immediately refrozen after usage.
Daisy chaining is more difficult for cloning purposes, and the size of the new plasmid with repeating regions can quickly lead to a reduced transformation efficiency in competent cells. As an alternative to daisy chaining, multiple plasmids each with a single sgRNA could be co-injected by HTVI, which leads to similar results. However, due to the decreased ratio of sgRNA : total DNA delivered by HTVI, transfection efficiency of primary hepatocytes in vivo will be reduced. This needs to be considered, particularly when doing multiplex SLiK (>2 GOI).
HTVI
The combination of a high injection speed and a large injection volume is fundamental to hydrodynamic delivery. Both need to be present to achieve high transfection efficiency of hepatocytes. Experimental skill and practice, particularly with the tail vein injection, are required for good results. It is also critical to use the 26–28G needle for best results. To test if the needle is in the vein, depress the plunger of the syringe. The needle is in the vein only if there is no resistance. Similarly, when pulling back slightly on the plunger there should not be any resistance.
When restraining the animal, it is critical that the mouse can breathe throughout the procedure. Since the large injection volume will lead to cardiac congestion, if the mouse has difficulty breathing, this will complicate the outcome and may severely affect the mouse. Immediately after injection, the mouse may remain in a subdued state, typically hunching in a corner of the cage, for up to 2 hours – this is normal for recovery after HTVI. Although severe right heart congestion is induced, mortality is below 5% if the technique is properly performed. However, we have also observed variation in sensitivity towards HTVI, e.g. NSG mice seem to have a higher mortality associated with HTVI.
Validation of CRISPR/Cas9 cutting in vivo
Typical PCR troubleshooting applies; this includes but is not limited to adjusting the annealing temperatures, reducing the number of cycles, decreasing the extension time, or optimizing the Mg2+ concentration. We recommend consulting the NEB published troubleshooting guide for specifics related to optimizing a PCR reaction.
For specific SLiK applications, the two sgRNAs targeting HPD are separated by 686 base pairs. Similarly, we recommend designing sgRNAs targeting the GOI within 250 to 2000 base pairs distance of each other. The efficiency of NHEJ (deletion of intervening DNA) between two adjacent DNA breaks decreases with increased distance from each other (Canver et al., 2014). Each of the forward and reverse primers will be in the range of 100–250 base pairs flanking either side of this region. This defines the size of both the wildtype and deletion bands expected to be present on the agarose gel after PCR confirmation. Depending on the expected size, altering the percentage of agarose within the gel can improve separation and definition of the DNA bands.
Expansion of edited hepatocytes
We recommend weighing animals every two days. If the body weight of a mouse drops more than 2g over two days, they should be put back on NTBC (remove selection pressure) to improve their health. However, in our experience it is not necessary to put the animals back on NTBC since the edited hepatocytes should have already expanded in the liver and rescued the liver injury induced by NTBC withdrawal. If the animal must be put back on NTBC, we would recommend validating efficiency of SLiK in that mouse or starting again with the experiment.
Understanding the Results
SLiK is a relatively robust technique, and knockout models can be generated very efficiently within a few weeks. Nevertheless, every SLiK mouse needs to be generated individually, and there can be some variation in CRISPR cutting efficiencies and repopulation of edited hepatocytes. Usually 80% of hepatocytes are edited in 8 weeks, and after one year it will be difficult to find non-edited hepatocytes by immunostaining (>99%). Hence the liver undergoes different degrees of chimerism with edited and non-edited cells. Depending on the gene, this can be very useful since many metabolic deletions in the liver have been shown to be neonatally lethal. The repopulation and therefore the degree of chimerism can be halted at any level during the repopulation by simply putting the mice back on NTBC. This will remove the tyrosinemic selection pressure and abolish repopulation of edited, HPD-deleted hepatocytes.
When doing multiplex SLiK, the efficiency of knockout drops slightly. As shown in Figure 5, a multiplex SLiK of five genes can be achieved. However, we observed a drop in efficiency when doing SLiK with more than six genes.
Time considerations
The most crucial way to avoid delays in a SLiK project is to ensure your initial sgRNA is well-designed and properly cloned. Validation of the cutting efficiency remains critical, although in our lab only about one in ten sgRNA cut poorly or not at all. Daisy chaining has the highest failure rate of all of the cloning steps described, and it is advisable to consider the transfection of multiple plasmids instead of doing the more elegant daisy chaining if time is an important factor.
Initial transfection rate by HTVI is another crucial step. It obviously takes more time to expand 5% than 30% of edited hepatocytes. Moreover, there are also some anatomical restrictions when transfection rates fall under ~10% so that not every corner of the liver can be replaced. Therefore, we strongly recommend restarting the experiment if HTVI was not perfect, as in the case of reduction of injected volume or failure to inject within 7 seconds.
Acknowledgements
We thank Katherine Misuraca and Katherine Barrett for critical comments on the manuscript. K.D.B. is supported by the National Heart Lung and Blood Institute (NHLBI) grant HL134510 and HL132840 and National Institute of Diabetes and Digestive and Kidney Disease (NIDDK) grant DK115461. K.D.B. is supported by the Duke Cancer Institute (P30 CA014236).
Literature cited
- Aponte JL, Sega GA, Hauser LJ, Dhar MS, Withrow CM, Carpenter DA, … Johnson DK (2001). Point mutations in the murine fumarylacetoacetate hydrolase gene: Animal models for the human genetic disorder hereditary tyrosinemia type 1. Proc Natl Acad Sci U S A, 98(2), 641–645. doi: 10.1073/pnas.98.2.641 [DOI] [PMC free article] [PubMed] [Google Scholar]
- Bissig KD, Le TT, Woods NB, & Verma IM (2007). Repopulation of adult and neonatal mice with human hepatocytes: a chimeric animal model. Proc Natl Acad Sci U S A, 104(51), 20507–20511. doi: 10.1073/pnas.0710528105 [DOI] [PMC free article] [PubMed] [Google Scholar]
- Canver MC, Bauer DE, Dass A, Yien YY, Chung J, Masuda T, … Orkin SH (2014). Characterization of genomic deletion efficiency mediated by clustered regularly interspaced palindromic repeats (CRISPR)/Cas9 nuclease system in mammalian cells. J Biol Chem, 289(31), 21312–21324. doi: 10.1074/jbc.M114.564625 [DOI] [PMC free article] [PubMed] [Google Scholar]
- Crespo A, Peydro A, Dasi F, Benet M, Calvete JJ, Revert F, & Alino SF (2005). Hydrodynamic liver gene transfer mechanism involves transient sinusoidal blood stasis and massive hepatocyte endocytic vesicles. Gene Ther, 12(11), 927–935. doi: 10.1038/sj.gt.3302469 [DOI] [PubMed] [Google Scholar]
- Gluecksohn-Waelsch S (1979). Genetic control of morphogenetic and biochemical differentiation: lethal albino deletions in the mouse. Cell, 16(2), 225–237. Retrieved from https://www.ncbi.nlm.nih.gov/pubmed/36985 [DOI] [PubMed] [Google Scholar]
- Grompe M, Lindstedt S, al-Dhalimy M, Kennaway NG, Papaconstantinou J, Torres-Ramos CA, … Finegold M (1995). Pharmacological correction of neonatal lethal hepatic dysfunction in a murine model of hereditary tyrosinaemia type I. Nat Genet, 10(4), 453–460. Retrieved from http://www.ncbi.nlm.nih.gov/entrez/query.fcgi?cmd=Retrieve&db=PubMed&dopt=Citation&list_uids=7545495 [DOI] [PubMed] [Google Scholar]
- Herweijer H, & Wolff JA (2007). Gene therapy progress and prospects: hydrodynamic gene delivery. Gene Ther, 14(2), 99–107. doi: 10.1038/sj.gt.3302891 [DOI] [PubMed] [Google Scholar]
- Jarrett KE, Lee CM, Yeh YH, Hsu RH, Gupta R, Zhang M, … Lagor WR (2017). Somatic genome editing with CRISPR/Cas9 generates and corrects a metabolic disease. Sci Rep, 7, 44624. doi: 10.1038/srep44624 [DOI] [PMC free article] [PubMed] [Google Scholar]
- Kobayashi T, Yamaguchi T, Hamanaka S, Kato-Itoh M, Yamazaki Y, Ibata M, … Nakauchi H (2010). Generation of rat pancreas in mouse by interspecific blastocyst injection of pluripotent stem cells. Cell, 142(5), 787–799. doi: 10.1016/j.cell.2010.07.039 [DOI] [PubMed] [Google Scholar]
- Lindstedt S, Holme E, Lock EA, Hjalmarson O, & Strandvik B (1992). Treatment of hereditary tyrosinaemia type I by inhibition of 4-hydroxyphenylpyruvate dioxygenase. Lancet, 340(8823), 813–817. Retrieved from http://www.ncbi.nlm.nih.gov/pubmed/1383656 [DOI] [PubMed] [Google Scholar]
- Liu F, Song Y, & Liu D (1999). Hydrodynamics-based transfection in animals by systemic administration of plasmid DNA. Gene Ther, 6(7), 1258–1266. doi: 10.1038/sj.gt.3300947 [DOI] [PubMed] [Google Scholar]
- Pankowicz FP, Barzi M, Kim KH, Legras X, Martins CS, Wooton-Kee CR, … Bissig KD (2018). Rapid Disruption of Genes Specifically in Livers of Mice Using Multiplex CRISPR/Cas9 Editing. Gastroenterology. doi: 10.1053/j.gastro.2018.08.037 [DOI] [PMC free article] [PubMed] [Google Scholar]
- Pankowicz FP, Barzi M, Legras X, Hubert L, Mi T, Tomolonis JA, … Bissig KD (2016). Reprogramming metabolic pathways in vivo with CRISPR/Cas9 genome editing to treat hereditary tyrosinaemia. Nat Commun, 7, 12642. doi: 10.1038/ncomms12642 [DOI] [PMC free article] [PubMed] [Google Scholar]
- Suda T, Gao X, Stolz DB, & Liu D (2007). Structural impact of hydrodynamic injection on mouse liver. Gene Ther, 14(2), 129–137. doi: 10.1038/sj.gt.3302865 [DOI] [PubMed] [Google Scholar]
- Wang D, Mou H, Li S, Li Y, Hough S, Tran K, … Xue W (2015). Adenovirus-Mediated Somatic Genome Editing of Pten by CRISPR/Cas9 in Mouse Liver in Spite of Cas9-Specific Immune Responses. Hum Gene Ther, 26(7), 432–442. doi: 10.1089/hum.2015.087 [DOI] [PMC free article] [PubMed] [Google Scholar]
- Weber J, Ollinger R, Friedrich M, Ehmer U, Barenboim M, Steiger K, … Rad R (2015). CRISPR/Cas9 somatic multiplex-mutagenesis for high-throughput functional cancer genomics in mice. Proc Natl Acad Sci U S A, 112(45), 13982–13987. doi: 10.1073/pnas.1512392112 [DOI] [PMC free article] [PubMed] [Google Scholar]
- Xue W, Chen S, Yin H, Tammela T, Papagiannakopoulos T, Joshi NS, … Jacks T (2014). CRISPR-mediated direct mutation of cancer genes in the mouse liver. Nature, 514(7522), 380–384. doi: 10.1038/nature13589 [DOI] [PMC free article] [PubMed] [Google Scholar]
- Zhang G, Budker V, & Wolff JA (1999). High levels of foreign gene expression in hepatocytes after tail vein injections of naked plasmid DNA. Hum Gene Ther, 10(10), 1735–1737. doi: 10.1089/10430349950017734 [DOI] [PubMed] [Google Scholar]