Abstract
The Latarjet technique is a widely used technique for anterior shoulder instability with glenoid bone defects, irreparable capsuloligamentous lesion, or in patients at greater risk of recurrence. The use of this technique has been reported to obtain satisfactory clinical and biomechanical results. Although other methods exist, the coracoid process is typically fixed with 2 metal screws. Complications related to metal fixation are very frequently reported. In an attempt to avoid these complications, we developed this arthroscopically assisted metal-free Latarjet technique in which we fix a coracoid graft using four cerclage tapes to achieve a strong, stable fixation, thus mimicking a plate.
First described in 1954,1 the Latarjet technique is a widely used technique for the surgical treatment of anterior shoulder instability with glenoid bone defects, irreparable capsuloligamentous lesions, or in patients at high risk of recurrence.2,3 Multiple authors have reported satisfactory clinical and biomechanical results with this procedure.4, 5, 6, 7 In 2007, Lafosse et al.8 described the arthroscopic technique obtaining good published functional results, which have been subsequently reproduced and published in various studies.9, 10, 11 In this procedure, the coracoid process is usually fixed with 2 metal screws, although other fixation methods, such as metal buttons, have recently been used. The most frequent complications of these procedures are related to metal-fixation methods.6,12,13 We present a minimally invasive arthroscopic metal-free Latarjet technique in which the graft is fixed using cerclage tapes, avoiding likely complications related to metal implants. The advantages and disadvantages of this technique are described in Table 1.
Table 1.
Advantages and Disadvantages of the Technique
Advantages
|
Disadvantages
|
Surgical Technique (With Video Illustration)
The surgical technique is demonstrated in Video 1.
Step 1. Identification and Preparation of the Coracoid Process
With the patient placed under general anesthesia and in an oblique position, a mini-open direct approach is performed through a 3-cm skin incision made over the coracoid process (Fig 1A). The coracoacromial ligament and the pectoralis minor muscle are released circumferentially until we reach the conjoint tendon insertion (Fig 1B). An osteotomy is then performed with an angled motorized saw at the base of the coracoid process. To complete coracoid preparation, we perform an osteotomy at the inferior face using a straight saw to obtain a flat surface of cancellous bone and to achieve a greater contact area with the anterior face of the glenoid defect (Fig 2A). Following that, a longitudinal measurement of the coracoid process is taken (Fig 2B).
Fig 1.
Left shoulder, lateral decubitus position, anterior view. (A) Direct mini-open skin incision of 3 cm over the coracoid process (not seen on image). (B) Mini-open approach; the coracoacromial ligament and the pectoralis minor muscle attachments are released from the coracoid process. (Ca, caudal; CP, coracoid process; Cr, cranial; L, lateral; M, medial.)
Fig 2.
Left shoulder, lateral decubitus position, anterior view. (A) The Inferior part of the coracoid process is flattened with a motorized saw, while the graft is immobilized with a grabber tool. (B) Through the mini-open approach, the coracoid process is externalized and measured. Notice the conjoint tendon attached to the coracoid’s process base. (CP, coracoid process; CT, conjoint tendon; GT, grabber tool; MS, motorized saw.)
Step 2. Glenoid Exposure and Preparation
Through the usual portals, a diagnostic arthroscopy of the glenohumeral joint is performed (Fig 3 A and B), and the injured capsulolabral complex is detached from 1 to 6 o’clock until the muscle fibers of the subscapularis are seen. Using a percutaneous portal passing through the upper tendon of the subscapularis and with the help of an indirect SutureLasso (Arthrex, Naples, FL) suture passer, a polyester polydioxanone suture is passed through the capsulolabral complex—including the middle glenohumeral ligament—to separate it from the anterior glenoid rim (Fig 4). This permits an optimal view of the glenoid defect and leaves a wide space for a smoother passage of the coracoid process. Next, the anterior glenoid defect is debrided with a shaver, dissector, and curette (Fig 5 A and B). Here, it is necessary to expose the bone of the glenoid rim for the posterior reinsertion of the articular capsulolabral complex. The anterior glenoid defect is then marked with an arthroscopic radiofrequency ablator at the midpoint of the length of the coracoid, starting from the lower edge of the defect (Fig 6 A and B).
Fig 3.
(A) Left shoulder, lateral decubitus position, posterior portal, posterolateral humeral head - Hill Sachs lesion engaging on anterior glenoid rim. (B) Arthroscopic view, anterosuperior portal. Anterior glenoid rim with an anterior labroligamentous periosteal sleeve avulsion lesion. (A, anterior labroligamentous periosteal sleeve avulsion lesion; CL, capsulolabral complex; G, anterior glenoid rim; HS, Hill–Sachs lesion.)
Fig 4.

Left shoulder, lateral decubitus position, arthroscopic view, anterosuperior portal. A polydioxanone suture is passed through anterior capsulolabral complex to pull it anteriorly and obtain a wide view of the anterior glenoid rim. (CL, capsulolabral complex; G, anterior glenoid rim; H, humeral head; P, polydioxanone suture.)
Fig 5.
Left shoulder, lateral decubitus position, arthroscopic view, anterosuperior portal. (A) The anterior capsulolabral complex is detached from the anterior glenoid rim with a dissector. (B) The anterior glenoid rim is prepared with a curette for biological healing of the re-attached capsulolabral complex. (C, curette; CL, capsulolabral complex; D, dissector; G, anterior glenoid rim; H, humeral head; SS, subscapularis muscle.)
Fig 6.
Left shoulder, lateral decubitus position, arthroscopic view, anterosuperior portal. (A) The anterior glenoid defect is measured with a ruler starting from the lower edge of the defect. The anterior traction of the capsulolabral complex, done with a polydioxanone suture (not on image), can also be seen. (B) The anterior glenoid defect (G) is marked with an arthroscopic radiofrequency at the midpoint of the length of the coracoid process (not on image). (AR, arthroscopic radiofrequency; CL, capsulolabral complex; G, anterior glenoid rim; R, ruler; SS, subscapularis muscle.)
Step 3. Subscapular Split
A Wissinger rod is passed from the posterior portal through the subscapularis muscle to determine the level of the horizontal split of the lower portion of this muscle (Fig 7A). Through the previous coracoid skin incision, scissors are passed for muscular opening after digitally locating the metal rod. After digital and scissor dilation, the opening for the passage of the coracoids is completed (Fig 7B). An 8.25-mm cannula (Arthrex) is then placed in this same direction for the passage and exchange of sutures and tapes.
Fig 7.
Left shoulder, lateral decubitus position, arthroscopic view, anterosuperior portal. (A) A Wissinger rod is passed from the posterior portal to mark the level of the subscapularis muscle split (lower part). (B) Arthroscopic view, anterosuperior portal. The subscapularis muscle split is made using scissors. (CL, capsulolabral complex; G, glenoid; H, humeral head; S, scissors; SS, subscapularis muscle; W, Wissinger rod.)
Step 4. Tunnel Drilling
At the mark made in the glenoid defect, a specially designed metal hook is passed through the standard posterior portal with the specific drilling guide (Arthrex) and placed on the anterior glenoid rim (Fig 8A). The guided drill is passed through another medial portal and placed against the posterior glenoid. Two tunnels are then drilled through the glenoid using 2.4-mm cannulated drill bits (Fig 8B), the drilling guide is then removed. Two nitinol wires are passed through the drills, which are removed (Fig 9A). To avoid breakage of the nitinol wires during traction of the cerclage system, these are switched with 2 high-strength FiberLink (Arthrex) sutures with loops at their ends (Fig 9B). These sutures are colored differently, and one has its loop directed anteriorly and the other posteriorly. Again, the distance of the most distal tunnel to the lowest margin of the glenoid is measured (Fig 10A). The distance between the tunnels and the glenoid surface is also measured (Fig 10B). This first distance serves as a reference for drilling the tunnel located closer to the conjoint tendon in the coracoid process and then drill the second tunnel at 10 mm away. The second distance serves as a marker of the distance from the tunnels to the lateral border of the coracoid process. Once marked, 2 tunnels are drilled in the coracoid process (Fig 11 A and B).
Fig 8.
Left shoulder, lateral decubitus position, arthroscopic view, anterosuperior portal. (A) A metal hook guide is introduced posteriorly and positioned over the mark on the anterior glenoid rim. (B) Using the hook guide, 2 tunnels are made with 2 cannulated 2.4-mm drills. (CL, capsulolabral complex; D, drill; G, anterior glenoid rim; H, humeral head; HG, metal hook guide; SS, subscapularis muscle.)
Fig 9.
Left shoulder, lateral decubitus position, arthroscopic view, anterosuperior portal. (A) The cannulated drills have been removed; nitinol wires are used to transport the FiberLink sutures. The Wissinger rod marking the level of the subscapularis split where the cannula is positioned can be noted. (B) Nitinol wires are replaced with FiberLink sutures. The FiberLink sutures are of different colors to avoid mistakes in handling. ∗Nitinol wire (C, cannula; CL, capsulolabral complex; F, FiberLink sutures; G, glenoid; SS, subscapularis muscle; W, wissinger rod.)
Fig 10.
Left shoulder, lateral decubitus position, arthroscopic view, anterosuperior portal. (A) The distance from the inferior tunnel to the most distal limit of the anterior glenoid defect is measured. (B) The distance from the glenoid surface to the tunnels is measured with a ruler. (F, FiberLink sutures; Gd, glenoid defect; Gs, glenoid surface; H, humeral head; R, ruler; SS, subscapularis muscle; W, Wissinger rod.)
Fig 11.
Left shoulder, lateral decubitus position, anterior view. Externalized coracoid process through mini-open approach. (A) The positions of the tunnels are marked on the coracoid process while it is manipulated with a grabber tool. (B) Two tunnels are drilled over the marks. (CP, coracoid process; CT, conjoint tendon; D, drill; GT, grabber tool; R, ruler.)
Step 5. Coracoid Placement and Fixation
We proceed to pull the FiberLink (Arthrex) sutures to transport 2 preconfigured FiberTape Cerclage tapes (Arthrex), from the posterior end to the anterior end through the inferior tunnel in the glenoid, using the anterior cannula (Fig 12). The cannula is then retrieved after the FiberTape passage (Fig 13). Both tapes are passed through the coracoid process from the flattened cancellous side and passed again in the opposite direction, through the superior tunnel (the one further from the conjoint tendon) (Fig 14 A-C). Next, the tapes—carrying the coracoid process with them—are passed back through the glenoid in the opposite direction through the superior glenoid tunnel. This step completes a circular configuration (Fig 15 A and B).
Fig 12.

Left shoulder, lateral decubitus position, arthroscopic view, anterosuperior portal. The FiberLink sutures (not on image) are pulled through the cannula to transport the FiberTape cerclage tapes. (C, cannula; CL, capsulolabral complex; FT, FiberTape cerclage tapes; G, glenoid; W, Wissinger rod.)
Fig 13.
Left shoulder, lateral decubitus position, anterior view. An 8.25-mm cannula is inserted through the mini-open direct incision for suture handling. The blue FiberTape Cerclage system can be seen being pulled as well. The white FiberLink suture used to transport the FiberTape system can also be noted. The polydioxanone suture used for capsulolabral complex tractioning can be noted. The camera in the anterosuperior portal can be alsso seen. (AS, anterosuperior portal; C, cannula; FL, FiberLink suture; FT, FiberTape cerclage tapes; P, polydioxanone suture; W, Wissinger rod.)
Fig 14.
Left shoulder, lateral decubitus position, anterior view of mini-open direct approach without cannula. (A) The FiberTape cerclage sutures are passed through the articular surface of the coracoid process. The clamp used for conjoint tendon handling can be noted. (B) The FiberTape cerclage sutures are passed through the nonarticular surface of the coracoid process. (C) The coracoid process viewed from the back, after FiberTape cerclage suture passage. (Cl, clamp for conjoint tendon handling; CP, coracoid process; FT, FiberTape cerclage sutures.)
Fig 15.
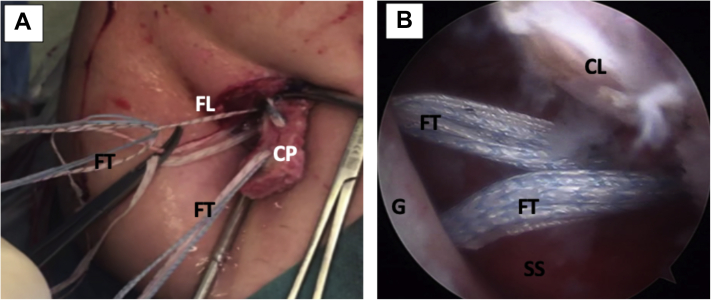
Left shoulder, lateral decubitus position. (A) External anterior view. FiberLink sutures are used to shuttle the FiberTape cerclage tapes through the coracoid process and the glenoid tunnels (not on image). (B) Arthroscopic view, anterosuperior portal. The FiberTape cerclage tapes, carrying the coracoid process (not on image) with them, are transported through the glenoid tunnels in the anterior glenoid rim, going back to the posterior portal. (CL, capsulolabral complex; CP, coracoid process; FL, FiberLink sutures; FT, FiberTape; cerclage tapes; G, anterior glenoid rim; SS, subscapularis muscle.)
Following that, the tapes are pulled symmetrically from the posterior side to tighten them and avoid slack on the loops. The cerclage tapes are then interconnected to each other using the preconfigured racking hitch knots in the FiberTape Cerclage system (Arthrex). Manually, the knots are slipped against the posterior glenoid in an alternating and symmetrical manner. The correct position and fixation of the coracoid process is checked under direct viewing (Fig 16). With a tensioner (FiberTape Cerclage Tensioner; Arthrex), each suture is pulled separately until a strong (up to 90N) fixation is reached (Fig 17). Finally, the system is locked with 3 alternating knots.
Fig 16.
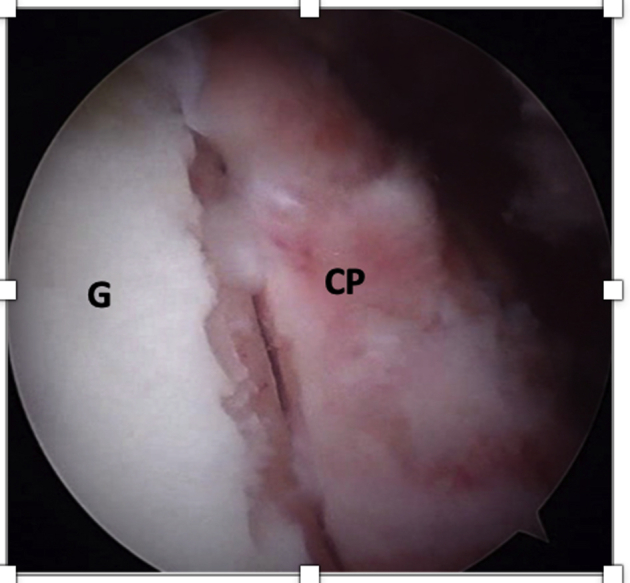
Left shoulder, lateral decubitus position, arthroscopic view, anterosuperior portal. The coracoid process (CP) is fixed flush with anterior glenoid rim (G).
Fig 17.
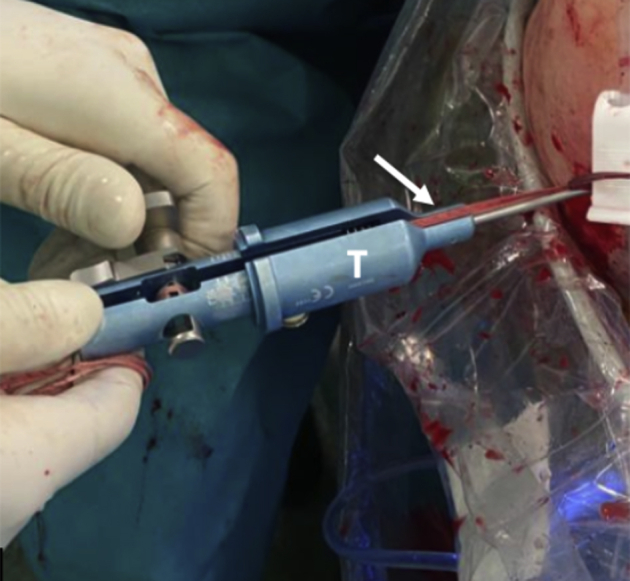
Left shoulder, lateral decubitus position, posterior view. A tensioner (T) is used to give up to 90 N of compression on each strand of the FiberTape cerclage tapes (white arrow).
Step 6. Reconstruction of the Capsulolabral Complex
Reconstruction of the capsulolabral complex on the native anterior glenoid rim is done using knotless implants of 1.8-mm Knotless FiberTak (Arthrex), leaving the coracoid in an extra-articular position (Fig 18 A and B). Finally, the wounds are sutured (Fig 19), no drainage is used, and the arm is placed in a sling.
Fig 18.
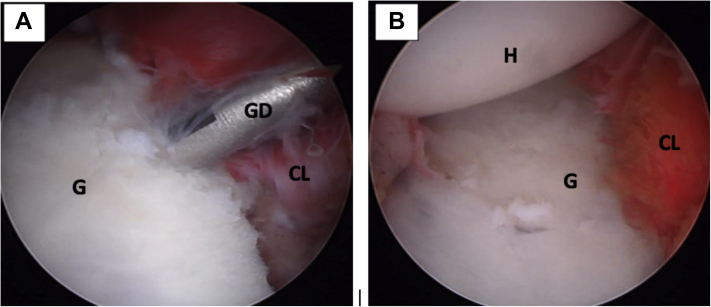
Left shoulder, lateral decubitus position, arthroscopic view, anterosuperior portal. (A) The capsulolabral complex is reconstructed using 1.8-mm FiberTak implants. (B) View of the full reconstructed capsulolabral complex on the anterior glenoid rim. The coracoid process (not seen on image) has been left in an extraarticular position. (CL, capsulolabral complex; G, anterior glenoid rim; GD, guide drill; H, humeral head.)
Fig 19.
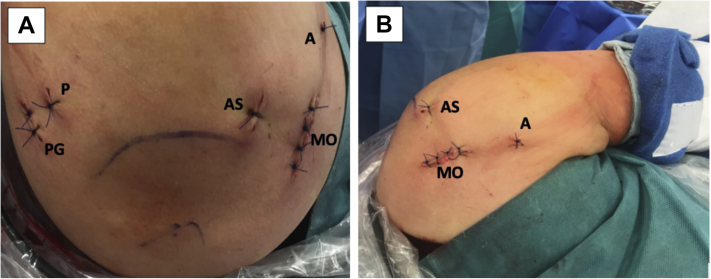
(A) Left shoulder, lateral decubitus position, superior view of all the portals used in this technique. (B) Left shoulder, lateral decubitus position, anterior view. The anterior 3cm skin incision for mini-open approach can be seen. (A, accessory anterior percutaneous portal for capsulolabral complex traction with polydioxanone suture and FiberTak guide drill; AS, anterosuperior portal; MO, anterior mini-open approach; P, posterior portal; PG, accessory posterior portal for guide.)
The tips and pitfalls of this technique are discussed in (Table 2).
Table 2.
Tips and Pitfalls of the Technique
Tips
|
Pitfalls
|
Postoperative Care
During the postoperative period, the shoulder is immobilized with a sling in a neutral position for 3 weeks. Pendulum and passive assisted flexion exercises, as well as isometric strengthening of the deltoid and the scapular stabilizing musculature, are prescribed. Mobility exercises of the elbow and hand are encouraged. External rotation less than 20° in adduction is permitted (elbow to the side of the body).
At 3 weeks’ postoperatively, the neutral sling is removed, and active assisted mobilization exercises are initiated. Progressive stretches in external rotation are started at 4 to 6 weeks’ postoperatively to achieve a complete arc of movement. Muscle-strengthening exercises are further increased at 6 weeks’ postoperatively. Return-to-sports activities are allowed at 4 months’ postoperatively. Radiographic postoperative controls are performed early, at 3 and 6 weeks of follow-up, with neutral anteroposterior and Bernageau views. The position of the coracoid process is assessed with an early postoperative CT scan.
Discussion
The Latarjet technique, modified by Patte et al.14 and popularized by Walch and Boileau,15 is a widely used surgical treatment. It is commonly considered to be the gold standard intervention for recurrent anterior shoulder instabilities with bone defects in the glenoid, humeral head, or both, with several reported good long-term results.16,17 Traditionally, it is performed with an open technique, although there is currently an ongoing interest to perform it arthroscopically. The latter, however, still has a steep learning curve that deems it “not reproducible” for many surgeons. Despite the excellent clinical results available in the literature, up to 30% complication rates have been reported in both open and arthroscopic approaches, with up to 7% reoperation rates.6,12 A significant percentage, between 6% and 46% of reoperations, were related to fixation with metallic screws, either due to symptomatic hardware or malpositioned screws.4,18, 19, 20
Achieving a correct positioning of the coracoid flush with the glenoid surface and screw fixation is technically challenging, whether by an open or arthroscopic approach, because when drilling from anterior, it places the brachial plexus at risk if we aim to be parallel to the joint line.21
Some screw-related complications may involve screw avulsion, twisting or breakage, and impingement of the humeral head, which can lead to early degenerative changes.4,6 Other reported screw-related complications include capsular and subscapular muscle irritation or iatrogenic nerve injury—involving the suprascapular, musculocutaneous, or cubital nerves.9,22, 23, 24, 25 Even though clinically relevant neurologic injury is not common, fixation with screws also may lead to graft osteolysis, cut out, and symptomatic hardware, as previously mentioned.26 These problems may require the removal of the screws by an open or arthroscopic approach.23 In addition, failure of screw fixation may result from fractures through one or both drill holes, overtightening of the screws at the coracoid bone block or even from screw breakage in bone graft resorption or pseudarthrosis.9,19,27,28
Apart from the most widely used metal screws, other devices have been used in coracoid process fixation such as metallic buttress plates, bioabsorbable screws, and cortical buttons. Boileau et al.20 introduced the fixation with a suspensory cortical button —single or double—as an alternative to avoid the complications related to screw fixation in this procedure. Metallic buttress plates have been found to cause soft-tissue irritation.29,30 Fixation with bioabsorbable screws has been recommended against because of a 67% osteolysis rate, which is far more than the 33% reported with metal screws.31 Fixation with cortical buttons, in spite of good preliminary results, has been recently associated with higher rates of recurrent dislocation.32,33 Also, the all-arthroscopic technique may have a steep learning curve for surgeons.34
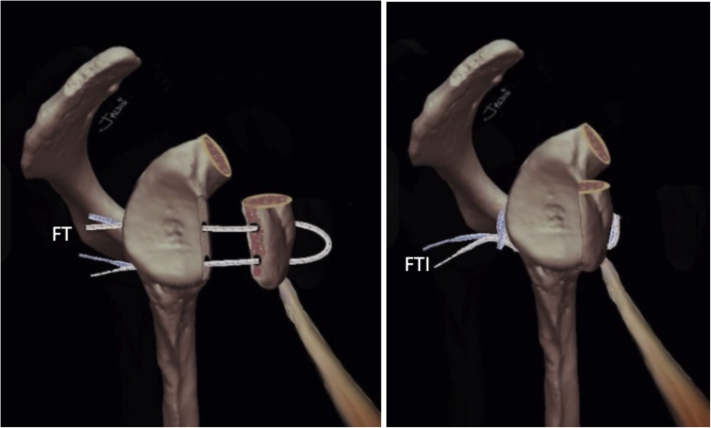
Using this “Latarjet Cerclage” technique (Fig 20), we achieve a strong fixation, mimicking a compression plate between the coracoid process and the glenoid. This is due to the usage of 4 high-resistance 2-mm tapes in a 2.4-mm tunnel and configuring them in a circle, connecting both tunnels with the same tapes. Because of the usage of smaller diameter tunnels, both in the glenoid and the coracoid, we have the theorical advantage of minimal bone loss. Consequently, this increases glenoid-to-graft contact surface and decreases the risk of graft fracture. In addition, the designed metallic hook and drilling guide make this technique reproducible and may potentially decrease the risk of malpositioning of the tunnels, resulting in accurate placement of the coracoid graft. In addition, in this technique, we advocate the repair of the capsulolabral complex to increase articular stability and preserve proprioception. This could possibly reduce subjective patient apprehension.35, 36, 37 It has also been proposed that elastic fixation, leads to healing and remodeling that cannot be achieved when using more rigid fixation methods.38
Fig 20.
(A and B) Graphical representation of the final construct of the Latarjet Cerclage. The circle -like configuration of the fixation can be noted. (FT, FiberTape cerclage sutures; FTI, FiberTape interconnected.)
The new fixation technique we present is an alternative to the traditional use of metal implants in the Latarjet procedure. With this technique, we are able to eliminate the problems related to screw removal, image scattering, and soft-tissue impingement. Obtaining the coracoid graft arthroscopically is considered to be a time-consuming and technically challenging step in the all-arthroscopic approach; therefore, we believe that our technique renders this intervention more reproducible and less technically demanding by using the mini-open approach. In addition, we refrain from using the dangerous supra-mammary portal required to achieve the ideal direction of the coracoid-fixing screw by using the FiberTape cerclage system. The limitations and risks of this technique are discussed in (Table 3).
Table 3.
Limitations and Risks of the Technique
Limitations
|
Risks
|
In conclusion, the arthroscopically assisted metal-free Latarjet cerclage technique we present is a less-complex and more-reproducible intervention for the treatment of anterior shoulder instability when compared with the more commonly employed techniques.
Acknowledgments
Thanks to Dr. Gilles Walch for encouraging us to develop this technique.
Footnotes
The authors report the following potential conflicts of interest or sources of funding: A.-I.H.H. reports personal fees from Arthrex, outside the submitted work. In addition, he has a patent bone block cerclage pending. R.B. reports grants from Acumed, personal fees from Smith & Nephew, personal fees from Exactech, and personal fees from Conmed, outside the submitted work. Full ICMJE author disclosure forms are available for this article online, as supplementary material.
Supplementary Data
We present our Latarjet cerclage technique, an arthroscopically assisted metal-free fixation procedure for anterior shoulder instability. Our patient was a 29-year-old male who had a well-controlled epileptic disease. His first dislocation event was at 16 years of age. Since then, he had complained of multiple episodes of left shoulder dislocation during activities of daily living. During physical examination, the patient showed a positive apprehension and relocation test as well as a positive Gagey test. An 18% anterior glenoid defect and an “off-track” Hill–Sachs lesion were seen on computed tomography scan. The total preoperative Western Ontario Shoulder Instability Index score was 46.7%. We decided to perform an arthroscopically assisted Latarjet procedure with FiberTape cerclage system fixation. The patient was placed in a lateral oblique decubitus position with the arm in a 3-point shoulder distraction system. A 3-cm mini-open approach was performed over the coracoid process. The coracoacromial ligament and pectoralis minor tendon were released and the inferior aspect of the coracoid was flattened. We began diagnostic arthroscopy by assessing the engaging lesion. Then, we debrided and released the capsulolabral complex looking through an anterosuperior portal. Retraction of the capsule-labral complex with a polydioxanone allows one to have a perfect view of the anterior edge of the glenoid. The split level of the subscapularis tendon was determined using a Wissinger rod, and the split was performed with scissors and then completed with digital dilation. We proceeded to measure the dimensions of the defect from inferior to superior and we marked the coracoid at the midpoint of the length of the coracoid process. We used an arthroscopic fixed off-set anterior guide hook placed on the mark—parallel to the glenoid surface—and two 2.4-mm cannulated drills were inserted through the guide. Then, we measured the distance from the distal tunnel to the inferior glenoid border and the distance from the articular surface to the tunnels. An 8.25-mm cannula was inserted through the subscapular split. The core of the drills was replaced with nitinol loops, with one loop facing posteriorly and the other loop facing anteriorly. The 2 nitinol loops were then replaced through the cannula with FiberLink sutures with the loops placed in the same way. The distal FiberLink was replaced with 2 FiberTape cerclage sutures and retrieved outside the joint. The canula was then removed. The drills holes on the coracoid were done according to intra-articular measurements. The 2 FiberTape sutures were passed through the distal then the proximal coracoid holes. The free end of the FiberTape cerclage was connected to the superior FiberLink loop and shuttled through the subscapular split and the glenoid tunnels from anterior to posterior. The coracoid was inserted manually into the glenohumeral joint, through the subscapular split and placed on the defect. The FiberTape cerclage suture ends were interconnected through the racking hitch knot and tensioned. Then, with a tensioner, we tightened the sutures, reaching up to 90 Newtons. Three alternated half hitch knots were then made for each strand. Finally, capsulolabral reconstruction was achieved using 4 Arthrex 1.8-mm curved Knotless FiberTak Soft Anchors. Immediate postoperative radiograph and computed tomography scan results are presented.
References
- 1.Latarjet M. Treatment of recurrent dislocation of the shoulder. Lyon Chir. 1954;49:994–997. [PubMed] [Google Scholar]
- 2.Provencher M.T., Bhatia S., Ghodadra N.S. Recurrent shoulder instability: Current concepts for evaluation and management of glenoid bone loss. J Bone Joint Surg A. 2010;92(suppl 2):133–151. doi: 10.2106/JBJS.J.00906. [DOI] [PubMed] [Google Scholar]
- 3.Burkhart S.S., De Beer J.F., Barth J.R.H., Criswell T., Roberts C., Richards D.P. Results of modified Latarjet reconstruction in patients with anteroinferior instability and significant bone loss. Arthroscopy. 2007;23:1033–1041. doi: 10.1016/j.arthro.2007.08.009. [DOI] [PubMed] [Google Scholar]
- 4.Butt U., Charalambous C.P. Complications associated with open coracoid transfer procedures for shoulder instability. J Shoulder Elbow Surg. 2012;21:1110–1119. doi: 10.1016/j.jse.2012.02.008. [DOI] [PubMed] [Google Scholar]
- 5.Giles J.W., Boons H.W., Elkinson I. Does the dynamic sling effect of the Latarjet procedure improve shoulder stability? A biomechanical evaluation. J Shoulder Elbow Surg. 2013;22:821–827. doi: 10.1016/j.jse.2012.08.002. [DOI] [PubMed] [Google Scholar]
- 6.Griesser M.J., Harris J.D., McCoy B.W. Complications and re-operations after Bristow-Latarjet shoulder stabilization: A systematic review. J Shoulder Elbow Surg. 2013;22:286–292. doi: 10.1016/j.jse.2012.09.009. [DOI] [PubMed] [Google Scholar]
- 7.Hovelius L., Sandström B., Olofsson A., Svensson O., Rahme H. The effect of capsular repair, bone block healing, and position on the results of the Bristow-Latarjet procedure (study III): Long-term follow-up in 319 shoulders. J Shoulder Elbow Surg. 2012;21:647–660. doi: 10.1016/j.jse.2011.03.020. [DOI] [PubMed] [Google Scholar]
- 8.Lafosse L., Lejeune E., Bouchard A., Kakuda C., Gobezie R., Kochhar T. The arthroscopic Latarjet procedure for the treatment of anterior shoulder instability. Arthroscopy. 2007;23:1242.e1–1242.e5. doi: 10.1016/j.arthro.2007.06.008. [DOI] [PubMed] [Google Scholar]
- 9.Hurley E.T., Lim Fat D., Farrington S.K., Mullett H. Open versus arthroscopic Latarjet procedure for anterior shoulder instability: A systematic review and meta-analysis. Am J Sports Med. 2019;47:1248–1253. doi: 10.1177/0363546518759540. [DOI] [PubMed] [Google Scholar]
- 10.Kordasiewicz B., Małachowski K., Kicinski M., Chaberek S., Pomianowski S. Comparative study of open and arthroscopic coracoid transfer for shoulder anterior instability (Latarjet)—clinical results at short term follow-up. Int Orthop. 2017;41:1023–1033. doi: 10.1007/s00264-016-3372-3. [DOI] [PubMed] [Google Scholar]
- 11.Meraner D., Smolen D., Sternberg C., Thallinger C., Hahne J., Leuzinger J. 10 years of arthroscopic Latarjet procedure: Outcome and complications. Indian J Orthop. 2019;53:102–110. doi: 10.4103/ortho.IJOrtho_273_17. [DOI] [PMC free article] [PubMed] [Google Scholar]
- 12.Gupta A., Delaney R., Petkin K., Lafosse L. Complications of the Latarjet procedure. Curr Rev Musculoskelet Med. 2015;8:59–66. doi: 10.1007/s12178-015-9258-y. [DOI] [PMC free article] [PubMed] [Google Scholar]
- 13.Shah A.A., Butler R.B., Romanowski J., Goel D., Karadagli D., Warner J.J.P. Short-term complications of the Latarjet procedure. J Bone Joint Surg A. 2012;94:495–501. doi: 10.2106/JBJS.J.01830. [DOI] [PubMed] [Google Scholar]
- 14.Patte D., Bernageau J., Rodineau J., Gardes Jc. Unstable painful shoulders. Rev Chir Orthop Reparatrice Appar Mot. 1980;66:157–165. (author’s transl) [PubMed] [Google Scholar]
- 15.Walch G., Boileau P. Latarjet-Bristow procedure for recurrent anterior instability. Tech Shoulder Elbow Surg. 2000;1:256–261. [Google Scholar]
- 16.Young A.A., Maia R., Berhouet J., Walch G. Open Latarjet procedure for management of bone loss in anterior instability of the glenohumeral joint. J Shoulder Elbow Surg. 2011;20:S61–S69. doi: 10.1016/j.jse.2010.07.022. [DOI] [PubMed] [Google Scholar]
- 17.Yang J.S., Mazzocca A.D., Cote M.P., Edgar C.M., Arciero R.A. Recurrent anterior shoulder instability with combined bone loss. Am J Sports Med. 2015;44:922–932. doi: 10.1177/0363546515623929. [DOI] [PubMed] [Google Scholar]
- 18.Kleiner M.T., Payne W.B., McGarry M.H., Tibone J.E., Lee T.Q. Biomechanical comparison of the Latarjet procedure with and without capsular repair. CiOS Clin Orthop Surg. 2016;8:84–91. doi: 10.4055/cios.2016.8.1.84. [DOI] [PMC free article] [PubMed] [Google Scholar]
- 19.Zuckerman J.D., Matsen F.A. Complications about the glenohumeral joint related to the use of screws and staples. J Bone Joint Surg. 1984;66:175–180. [PubMed] [Google Scholar]
- 20.Boileau P., Gendre P., Baba M. A guided surgical approach and novel fixation method for arthroscopic Latarjet. J Shoulder Elbow Surg. 2016;25:78–89. doi: 10.1016/j.jse.2015.06.001. [DOI] [PubMed] [Google Scholar]
- 21.Gendre P., Thélu C.E., d’Ollonne T., Trojani C., Gonzalez J.F., Boileau P. Coracoid bone block fixation with cortical buttons: An alternative to screw fixation? Orthop Traumatol Surg Res. 2016;102:983–987. doi: 10.1016/j.otsr.2016.06.016. [DOI] [PubMed] [Google Scholar]
- 22.Lädermann A., Denard P.J., Burkhart S.S. Injury of the suprascapular nerve during latarjet procedure: An anatomic study. Arthroscopy. 2012;28:316–321. doi: 10.1016/j.arthro.2011.08.307. [DOI] [PubMed] [Google Scholar]
- 23.Lafosse T., Amsallem L., Delgrande D., Gerometta A., Lafosse L. Arthroscopic screw removal after arthroscopic Latarjet procedure. Arthrosc Tech. 2017;6:e559–e566. doi: 10.1016/j.eats.2016.12.002. [DOI] [PMC free article] [PubMed] [Google Scholar]
- 24.Shishido H., Kikuchi S. Injury of the suprascapular nerve in shoulder surgery: An anatomic study. J Shoulder Elbow Surg. 2001;10:372–376. doi: 10.1067/mse.2001.115988. [DOI] [PubMed] [Google Scholar]
- 25.Bach B.R., Jr., O’Brien S.J., Warren R.F., Leighton M. An unusual neurological complication of the Bristow procedure. A case report. J Bone Joint Surg. 1988;70:458–460. [PubMed] [Google Scholar]
- 26.Hassebrock J.D., Starkweather J.R., Tokish J.M. Arthroscopic technique for bone augmentation with suture button fixation for anterior shoulder instability. Arthrosc Tech. 2020;9:e97–e102. doi: 10.1016/j.eats.2019.09.016. [DOI] [PMC free article] [PubMed] [Google Scholar]
- 27.Montgomery S.R., Katthagen J.C., Mikula J.D. Anatomic and biomechanical comparison of the classic and congruent-arc techniques of the Latarjet procedure. Am J Sports Med. 2017;45:1252–1260. doi: 10.1177/0363546516685318. [DOI] [PubMed] [Google Scholar]
- 28.Weppe F., Magnussen R.A., Lustig S., Demey G., Neyret P., Servien E. A biomechanical evaluation of bicortical metal screw fixation versus absorbable interference screw fixation after coracoid transfer for anterior shoulder instability. Arthroscopy. 2011;27:1358–1363. doi: 10.1016/j.arthro.2011.03.074. [DOI] [PubMed] [Google Scholar]
- 29.Chaudhary D., Goyal A., Joshi D., Jain V., Mohindra M., Mehta N. Clinical and radiological outcome after mini-open Latarjet technique with fixation of coracoid with Arthrex wedge mini-plate. J Clin Orthop Trauma. 2016;7:23–29. doi: 10.1016/j.jcot.2015.09.002. [DOI] [PMC free article] [PubMed] [Google Scholar]
- 30.Di Giacomo G., Costantini A., De Gasperis N. Coracoid bone graft osteolysis after Latarjet procedure: A comparison study between two screws standard technique vs mini-plate fixation. Int J Shoulder Surg. 2013;7:1–6. doi: 10.4103/0973-6042.109877. [DOI] [PMC free article] [PubMed] [Google Scholar]
- 31.Balestro J.C., Young A., Maccioni C., Walch G. Graft osteolysis and recurrent instability after the Latarjet procedure performed with bioabsorbable screw fixation. J Shoulder Elbow Surg. 2015;24:711–718. doi: 10.1016/j.jse.2014.07.014. [DOI] [PubMed] [Google Scholar]
- 32.Metais P., Clavert P., Barth J. Preliminary clinical outcomes of Latarjet-Patte coracoid transfer by arthroscopy vs. open surgery: Prospective multicentre study of 390 cases. Orthop Traumatol Surg Res. 2016;102:S271–S276. doi: 10.1016/j.otsr.2016.08.003. [DOI] [PubMed] [Google Scholar]
- 33.Hardy A., Sabatier V., Schoch B. Latarjet with cortical button fixation is associated with an increase of the risk of recurrent dislocation compared to screw fixation [published online December 17, 2019]. Knee Surg Sport Traumatol Arthrosc. https://doi.org/10.1007/s00167-019-05815-6 [DOI] [PMC free article] [PubMed]
- 34.Valsamis E.M., Kany J., Bonnevialle N. The arthroscopic Latarjet: A multisurgeon learning curve analysis. J Shoulder Elbow Surg. 2020;29:681–688. doi: 10.1016/j.jse.2019.10.022. [DOI] [PubMed] [Google Scholar]
- 35.Wellmann M., De Ferrari H., Smith T. Biomechanical investigation of the stabilization principle of the Latarjet procedure. Arch Orthop Trauma Surg. 2012;132:377–386. doi: 10.1007/s00402-011-1425-z. [DOI] [PubMed] [Google Scholar]
- 36.Pinkas D., Wiater J.M. Vol. 1. Elsevier Ltd.; St. Louis: 2015. (The Floating Shoulder). [Google Scholar]
- 37.Gohlke F., Eulert J., Leidel J., Heppelmann B., Eulert J. Histopathological findings in the proprioception of the shoulder joint. Orthopade. 1998;27:510–517. doi: 10.1007/s001320050263. [DOI] [PubMed] [Google Scholar]
- 38.Xu J., Liu H., Lu W. Modified arthroscopic Latarjet procedure: Suture-button fixation achieves excellent remodeling at 3-year follow-up. Am J Sports Med. 2020;48:39–47. doi: 10.1177/0363546519887959. [DOI] [PubMed] [Google Scholar]
Associated Data
This section collects any data citations, data availability statements, or supplementary materials included in this article.
Supplementary Materials
We present our Latarjet cerclage technique, an arthroscopically assisted metal-free fixation procedure for anterior shoulder instability. Our patient was a 29-year-old male who had a well-controlled epileptic disease. His first dislocation event was at 16 years of age. Since then, he had complained of multiple episodes of left shoulder dislocation during activities of daily living. During physical examination, the patient showed a positive apprehension and relocation test as well as a positive Gagey test. An 18% anterior glenoid defect and an “off-track” Hill–Sachs lesion were seen on computed tomography scan. The total preoperative Western Ontario Shoulder Instability Index score was 46.7%. We decided to perform an arthroscopically assisted Latarjet procedure with FiberTape cerclage system fixation. The patient was placed in a lateral oblique decubitus position with the arm in a 3-point shoulder distraction system. A 3-cm mini-open approach was performed over the coracoid process. The coracoacromial ligament and pectoralis minor tendon were released and the inferior aspect of the coracoid was flattened. We began diagnostic arthroscopy by assessing the engaging lesion. Then, we debrided and released the capsulolabral complex looking through an anterosuperior portal. Retraction of the capsule-labral complex with a polydioxanone allows one to have a perfect view of the anterior edge of the glenoid. The split level of the subscapularis tendon was determined using a Wissinger rod, and the split was performed with scissors and then completed with digital dilation. We proceeded to measure the dimensions of the defect from inferior to superior and we marked the coracoid at the midpoint of the length of the coracoid process. We used an arthroscopic fixed off-set anterior guide hook placed on the mark—parallel to the glenoid surface—and two 2.4-mm cannulated drills were inserted through the guide. Then, we measured the distance from the distal tunnel to the inferior glenoid border and the distance from the articular surface to the tunnels. An 8.25-mm cannula was inserted through the subscapular split. The core of the drills was replaced with nitinol loops, with one loop facing posteriorly and the other loop facing anteriorly. The 2 nitinol loops were then replaced through the cannula with FiberLink sutures with the loops placed in the same way. The distal FiberLink was replaced with 2 FiberTape cerclage sutures and retrieved outside the joint. The canula was then removed. The drills holes on the coracoid were done according to intra-articular measurements. The 2 FiberTape sutures were passed through the distal then the proximal coracoid holes. The free end of the FiberTape cerclage was connected to the superior FiberLink loop and shuttled through the subscapular split and the glenoid tunnels from anterior to posterior. The coracoid was inserted manually into the glenohumeral joint, through the subscapular split and placed on the defect. The FiberTape cerclage suture ends were interconnected through the racking hitch knot and tensioned. Then, with a tensioner, we tightened the sutures, reaching up to 90 Newtons. Three alternated half hitch knots were then made for each strand. Finally, capsulolabral reconstruction was achieved using 4 Arthrex 1.8-mm curved Knotless FiberTak Soft Anchors. Immediate postoperative radiograph and computed tomography scan results are presented.


