Background:
Any face/neck lift operation has a natural flow of slower and speedier portions; slower when dissecting under the superficial musculoaponeurotic system and around nerves while faster during opening, undermining, defatting, and closing. Surgeons can maximize efficiency with these simple maneuvers.
Methods:
We introduce and demonstrate ten reproducible surgical techniques based on anatomy, which span aspects of the entire face and neck lift procedure including markings, skin flap elevation, sub-superficial musculoaponeurotic system manipulation, preplatysmal fat management, skin re-draping, and post-operative dressings.
Results:
As examples, altered scissors facilitate “push” undermining, scoops reduce time for fat removal in the neck, a non-inset method for lobule creation, and digital measurements for certain technical maneuvers are discussed. Moreover, a block and tackle method of facial nerve blocks is reviewed which permits local-only face and neck lifting as well as hematoma drainage without patient intolerance.
Conclusions:
Implementation of these surgical techniques in face and neck lift procedures allows the surgeon to potentially decrease operative time and work towards minimizing post-operative edema while attaining aesthetic and natural results.
INTRODUCTION
Myriad techniques for management of the skin, subcutaneous, and fascial components of the face and neck have been described in the literature.1–6 Concern for injury to facial motor or sensory nerve branches often leads to inefficiency and increased operative time.6 Prolonged surgical time creates more swelling, leading to delayed healing and a longer recovery time.7 We, thus, present simple surgical techniques that can potentially improve efficiency while delivering an esthetic result1,8–10:
Incision Technique: Preoperative markings including a superior, transverse, 4-cm “cross-bar” located exactly 2 cm above the superior tragus, a step-cut to preserve the tragal incisura, and a varied, wavy postauricular incision to avoid dog-ear formation.
Scissor Push Technique: Modified scissors to cut while pushing for skin undermining.
Sub-superficial Musculoaponeurotic System (SMAS) Spreading Technique: Oblique sub-SMAS blunt scissor spreading to elevate the SMAS flap without nerve injury as the nerves stay on the downside.
Digital Measuring Stick Technique: “Digital measuring sticks” to guide incision positions and anatomic dissection including safe sub-SMAS release and placement of SMAS flap suspension sutures.
Scoop Technique: Modified scoops (small, sharpened measuring devices) for rapid preplatysmal fat removal.
Quick Skin Split and Trim Technique: Using the lowest point of the antitragus as a guide for initial splitting and insetting of the skin flap followed by skin flap trimming using the skin trim technique.
Tragus Preserving Technique: Pretragal divot to prevent tragal distortion with flap thinning, hair reduction, and a single suture.
Anti-Pixie Ear Technique: “No-inset” method for the lobule to save time and prevent pixie ear deformity.
Dressing Technique: One-minute dressing with a silicone pad prevents fluid accumulation.
Block and Tackle Technique: Block and tackle the face for local-only face and neck lifts or for painless hematoma drainage.
These techniques represent general guidelines and techniques that can be adapted to each patient’s individualized needs and goals in facial rejuvenation.
DIGITAL MEASURING STICKS
The surgeon would do well to acknowledge his or her own “digital measuring sticks.” By knowing the distance of key areas on the surgeon’s hand, he can measure critical distances, saving time. The use of these digital measuring sticks during a face and neck lift operation will be discussed throughout, but a few key measurements are noted as follows:
- The width of the surgeon’s index finger = ≈2 cm (Fig. 1)
- The length from the tip of the thumb to the interphalangeal joint = ≈3.5 cm
- The length from the tip of the thumb to the metacarpophalangeal joint = ≈6.5 cm
Fig. 1.
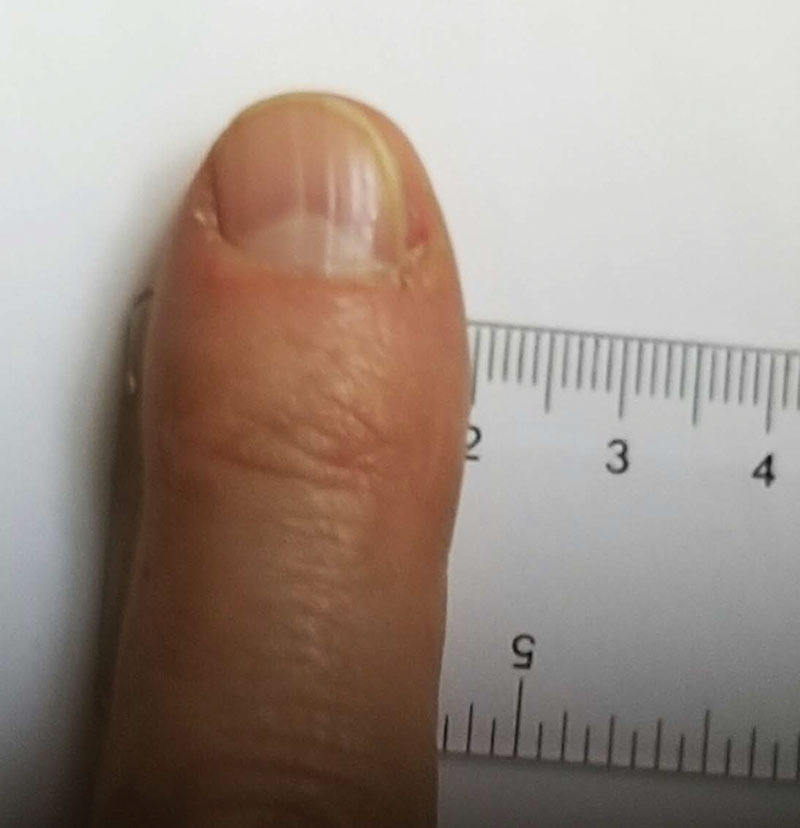
The width of the surgeon’s index finger is typically 2 cm. This can be used as a digital measuring stick in determining surgical landmarks during the procedure.
Each surgeon should check these distances on his or her hand to know exactly what each landmark represents.
INCISIONS TO REDUCE TIME AND MAINTAIN ANATOMY/KNOWLEDGE OF BLEEDING ZONES
The skin incisions are designed to allow more rapid, nonsegmental skin removal without dog-ears. A retrotragal approach is routinely made with a small transverse step component just below the tragus to preserve the incisura and to prevent a noticeable band from forming from the tragus to the cheek. This step-cut is important as the incision in this area traverses a concavity; a straight line cut will efface this concavity as the incision heals and contracts. The step-cut allows the tragus to heal as an anatomic unit, while suturing anteriorly into a deep preauricular divot, as will later be discussed, prevents tragal pull and distortion. Temporal incisions are avoided unless the hairline is very anterior. An approximately 4-cm, transverse, “cross-bar” extension is drawn within the sideburn at the superior helical attachment (2 cm above the superior tragus), connecting with the superior extent of the preauricular incision. This exact 2 cm distance can easily be approximated using the width of the surgeon’s index finger as discussed above (Fig. 2). The length of this cross-bar depends on sideburn position and skin excess; however, it is always at least 3.5 cm to assist in delineating a safe zone for cutting ligaments and securing the SMAS flap as will be later discussed. The preauricular incision continues around the lobule releasing it up to the conchal fascia extending above the auriculocephalic crease and into the hairline in a wavy pattern (Fig. 3). The length of the wave depends on the amount of skin likely to be removed. When bringing excess skin up and back behind the ear, the excess is on the lower flap. The wave’s length accommodates this difference in excess instead of chasing a dog-ear posteriorly. Notably, swimmer’s earplugs are placed in the ears (Fig. 4). After markings are made, a dilute tumescent solution of lidocaine and epinephrine is infiltrated into each side of the face.11
Fig. 2.
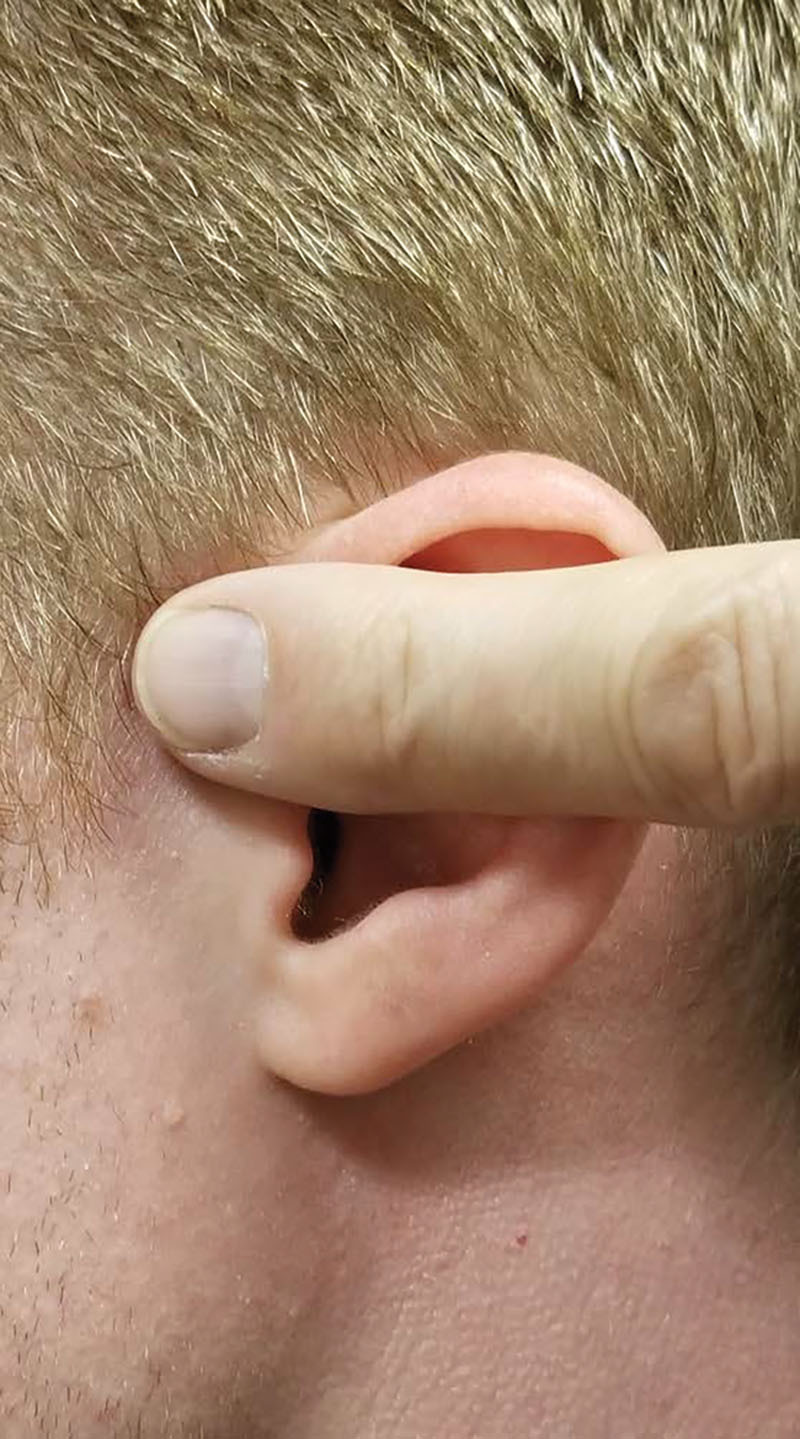
The transverse cross-bar generally used in the facelift incision begins approximately 2 cm above the superior tragus. Shown here is an estimation of this level using the width of the surgeon’s index finger as a digital measuring stick.
Fig. 3.

The preauricular incision continues around the lobule and extends onto the ear and into the hairline in a wavy pattern. The length of the wave depends on the amount of skin to be removed. When bringing excess skin up and back behind the ear, the excess is on the flap. The wave’s length accommodates this difference in excess instead of chasing a dog-ear posteriorly.
Fig. 4.
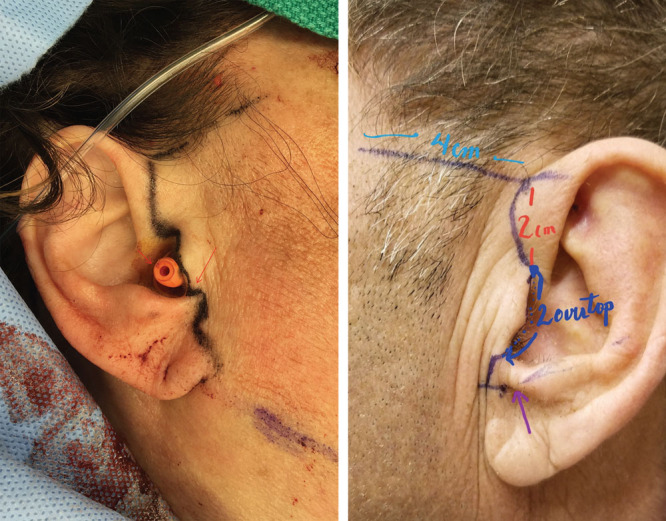
Incision design. A and B, Skin incisions are designed including a small transverse component [long red arrow in (A)] to the otherwise vertical preauricular incision below the tragus. A transverse, “cross-bar” extension is drawn under or within the sideburn approximately 2 cm above and connecting with the superior extent of the preauricular incision. Note that a swimmer’s plug [short red arrow in (A)] has been placed in the ear. The purple arrow in (B) shows the point at which the skin flap will first be secured underneath the lobule before trimming and insetting the skin flap.
To review, the most common points of bleeding in the face/neck lift dissection being postauricular veins (usually 1 or 2 such veins are present); a superior thyroid perforator located ≈1 cm medial to the mid-sternocleidomastoid muscle; a central, submental neck vein in the deep fat compartment below the muscle; and a perforator within McGregor’s patch along the anterior zygoma.12
SKIN FLAP ELEVATION
In the postauricular area, the skin flap is elevated at a level just over the fascia using only a 10-blade only. Using a thumb hook with digital palpation for retraction permits quick and efficient elevation of the postauricular “fast zone” until reaching the zone extending underneath the antitragus. This zone is approximated by 2 parallel lines dropped down on either side of the antihelix and represents an area in which the lobular branch of the great auricular nerve can be injured.13 The area where the main great auricular nerve resides is approximately 6.5 cm below the lower external acoustic meatus ear in the mid-sternocleidomastoid muscle, approximately 1 cm behind the external jugular vein. This distance is approximated by the distance from the tip of the surgeon’s thumb to the metacarpophalangeal joint. Scissors are used in a spread and cut fashion in the subdermal plane just below the lobule to ensure correct flap thickness and avoid injury to the lobular branch. (See Video 1 [online], which displays the postauricular area. The skin flap is raised sharply using a 10-blade. The knife is oriented parallel to the mid-subcutaneous plane, elevating the full extent of the postauricular flap efficiently and precisely above the level of the sternocleidomastoid fascia.)
Video 1. Post-auricular area. Video 1 from “Ten Surgical Tips Based on Anatomy and Design to Refine Your Face and Neck Lift Operation”.
Anterior skin flap undermining extending into the neck is performed using this “push” technique. This is another “safe” portion of the procedure that can proceed as far as required by the individual patient’s anatomy (Fig. 5). The tips of the scissors used for flap elevation should be adjusted at the tip with a 45-degree bevel to facilitate efficient dissection. With the pointed ends of the scissors down and opened approximately 4 mm, the flap is quickly dissected by pushing medially with counter tension. In male patients, more cutting may be required as a adjunct to this push undermining. Persistent ligaments may be snipped as needed. (See Video 2 [online], which details that the face and neck skin flaps may be expeditiously elevated using a pair of curved dissecting scissors, the tips of which are sharpened with a 45-degree bevel to facilitate efficient dissection.) The skin flaps are elevated in this fashion medially and inferiorly into the neck. (See Video 3 [online], which details the correct, anatomic plane. The face and neck skin flap is quickly dissected by pushing the sharpened scissors medially with the scissors’ tips opened at only approximately 4 mm using gentle forward pressure with manual retraction on the skin flap to provide counter tension.)
Fig. 5.
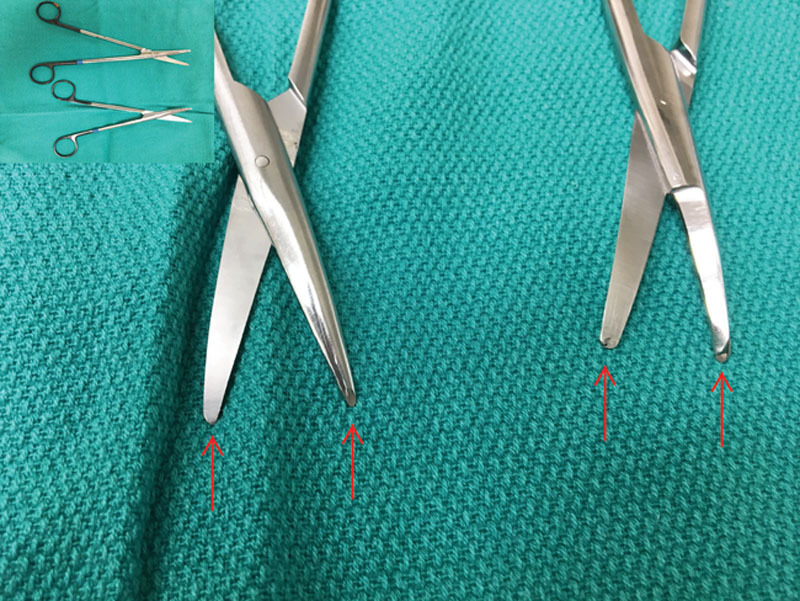
The tips of these scissors should be sharpened with a 45-degree bevel (red arrows) to facilitate efficient dissection by pushing the sharpened scissors medially with the scissor’s tips opened approximately 4 mm using gentle forward pressure with manual countertraction.
Video 2. Face and neck skin flaps : Part 2. Video 2 from “Ten Surgical Tips Based on Anatomy and Design to Refine Your Face and Neck Lift Operation”.
Video 3. Face and neck skin flaps: Dissection. Video 3 from “Ten Surgical Tips Based on Anatomy and Design to Refine Your Face and Neck Lift Operation”.
SMAS DISSECTION AND MANIPULATION
With the skin flap elevated, an “L-shaped” SMAS flap is designed. The SMAS is infiltrated with 10–15 mL of plain saline or local anesthesia to thicken the substance of the SMAS and assist with sub-SMAS hydrodissection before elevation. The flap is started with a small Stevens scissors or Colorado tip cautery over the parotid. It is then further dissected using blunt tip Mayo scissors, spreading in an oblique orientation toward the anterior aspect of the masseter. (See Video 4 [online], which details oblique spreads using blunt tip scissors; the SMAS is elevated while any facial nerve branches are invariably preserved deep on the parotid–masseteric fascia. After wide elevation of the SMAS flap using this technique, only the facial retaining ligaments will remain connecting the SMAS to the deeper structures, which may then be safely divided. The distance from the surgeon’s thumb interphalangeal joint to the thumb tip (≈3.5 cm) is measured from the anterior external acoustic meatus to the zygomatic arch. Ligaments snipped or sutures placed in front of to this landmark may be done without the risk of injury to the frontal branch of the facial nerve, which crosses the zygomatic posterior to this level.)
Video 4. Oblique spreads. Video 4 from “Ten Surgical Tips Based on Anatomy and Design to Refine Your Face and Neck Lift Operation”.
Facial nerve branches stay on the downside with this maneuver. After elevation of the SMAS flap using this technique, any remaining facial retaining ligaments connecting the SMAS to the deeper structures may be divided. By placing your thumb along the zygomatic arch with the interphalangeal joint at the external acoustic meatus, the surgeon measures 3.5 cm. Any ligaments anterior to the tip of the surgeon’s thumb may be transected as the frontal nerve branches follow an oblique path and a safe zone exists at the anterior zygomatic arch. The SMAS flap dissection can be made confluent with lateral subplatysmal dissection as the flap is elevated more caudally as desired based on the surgeon’s planned management of the platysma.
The transverse extent of the “L” flap is then trimmed and sutured to the periosteum on the underside of the anterior zygomatic arch. As facial nerve branches cross the arch obliquely, the underside of the arch represents a safer zone for placing suspension sutures compared with the topside. (See Video 5 [online], which details the transverse extent of the SMAS flap. This flap is sutured to the periosteum of the inferior zygomatic eminence/zygomatic arch anteriorly. The surgeon places his or her thumb along a line from the tragus to the zygomatic arch, quickly estimating the level at which anchoring sutures can be safely placed from the SMAS flap into the periosteum of the inferior border of zygomatic eminence/arch for the appropriate and desired vector of lifting.) The safe anteroposterior level of placing these sutures is also measured using the surgeon’s thumb as discussed above with sutures placed anterior to the thumb tip being safe.6 The 4-cm, cross-bar extension of the face lift incision also helps to denote this safe distance for cutting ligaments and placing the suture to the zygoma. The remainder of the vertical component of the SMAS “L” flap is sutured according to surgeon preference; however, the vertical vector of the SMAS elevation will already be strongly secured by this suture to the zygoma.
Video 5. Transverse extent of the SMAS flap. Video 5 from “Ten Surgical Tips Based on Anatomy and Design to Refine Your Face and Neck Lift Operation”.
MANAGEMENT OF THE NECK
The platysma is managed centrally or laterally according to patient requirements.2 If fat reduction and central plication are required, central submental access is needed. In general, the submental incision placement depends on whether submandibular gland or digastric muscle work, subplatysmal fat removal, hyoidpexy, or chin work is required. After making this incision, a narrow 4-prong retractor lifts the chin up and the scissor push method is employed, leaving an even fat surface on the skin flap. The preplatysmal fat is then managed. This is performed using a large, slightly sharpened scoop in primary cases (Fig. 6). The edges of this “scoop” instrument can be adjusted and sharpened similar to a melon baller. This instrument is then used to remove preplatysmal fat as the surgeon desires. (See Video 6 [online], which details the “scoop” instrument. The instrument with sharpened edges is used to expedite even removal of preplatysmal fat with a rasping motion along the muscle. Shown here through a submental incision.) (See Video 7 [online], which details the sharpened “scoop” instrument. It is again shown here through a lateral incision expeditiously removing preplatysmal fat.) Once this is performed, the platysma and subplatysmal structures can be addressed according to surgeon’s preference.
Fig. 6.
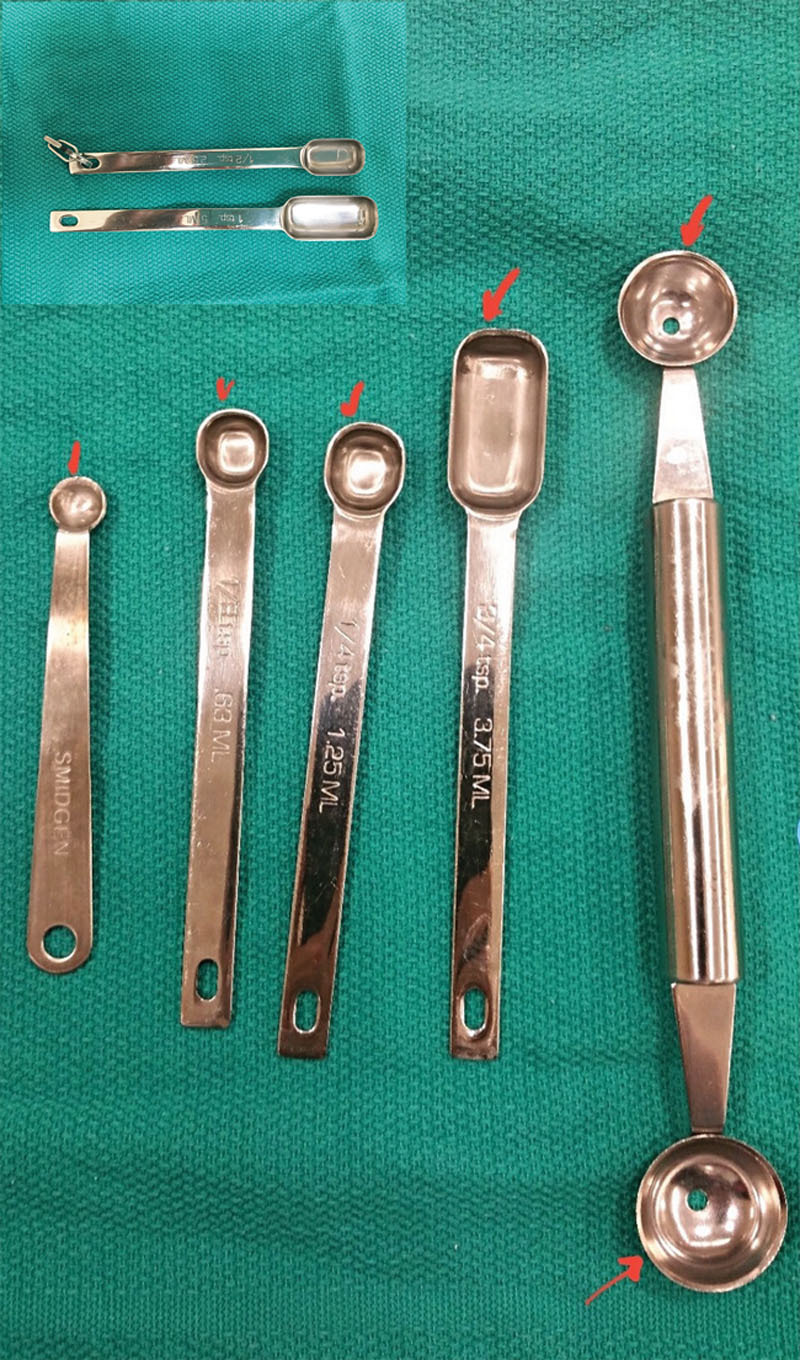
For management of preplatysmal fat, the edges of various “scoop” instruments should be sharpened (red arrows) and used similar to a melon baller, rasping along the platysma to extract the preplatysmal fat in an expeditious and even fashion.
Video 6. Scoop instrument. Video 6 from “Ten Surgical Tips Based on Anatomy and Design to Refine Your Face and Neck Lift Operation”.
Video 7. Scoop instrument removing preplatysmal fat. Video 7 from “Ten Surgical Tips Based on Anatomy and Design to Refine Your Face and Neck Lift Operation”.
LOBULE CUT AND CLOSURE
Skin redraping and trimming can be expedient. The surgeon redrapes the skin upward and laterally. The first skin cut is made with skin flap redraped and the scissors along the usually oblique line of the antitragus. (See Video 8 [online], which details the first place at which the skin flap is incised and inset is along the antitragus. Scissors are directed along this line in the direction of the antitragus with the skin flap redraped and a cut is made for a distance of approximately 2 cm. The lobule is next flipped out from under the skin flap, and the dermis of the skin flap at the distal edge of this cut is sutured to the inferior conchal fascia.) The line of the antitragus in patients may vary somewhat with some more vertical or horizontal than that of the others; however, an oblique cut line along this vector to the incisura is made. However, the end point of the cut always terminates exactly at the lowest point of the antitragus at its junction with the lobule because the split skin flap will be sutured to the conchal fascia underneath the lobule at that point. Of note, the angle of the initial skin flap split and the vector of redraping of the skin flap can be adjusted according to the patients’ individualized needs. In this way, a tailored result can be achieved using these basic principles. Performing the initial skin split and securing in this manner leave the lobule with a raw edge that is maintained and will “auto-tube” over the course of 1.5–3 weeks, preventing pixie ear deformity and maintaining lobule position and shape. The lobule is next flipped out from under the skin flap (Fig. 7). The dermis of the skin flap at the distal edge of this cut is then sutured at the inferior conchal fascia. If the lobule is very large, it should be reduced.
Fig. 7.

Initial skin flap cut. A, The first cut in the skin flap is along the ideal oblique vector of the antitragus. The skin flap is incised along the line of the antitragus to the lowermost point of the antitragus (red arrow). B, The first place at which the skin flap is incised and inset after redraping is along the antitragus. The scissors are directed along the ideal vector of the antitragus, and the skin flap is cut. C, A suture is then placed securing the skin flap at this level to the tissue deep to the lobule. The remainder of the skin flap to be resected is then estimated, marked, and excised based on this first critical point.
Video 8. Skin flap incision. Video 8 from “Ten Surgical Tips Based on Anatomy and Design to Refine Your Face and Neck Lift Operation”.
Next, preauricular and postauricular skin excess is removed using our skin trim technique. Trimming the skin flap can be performed fluidly in one motion rather than splitting and insetting the skin flap segmentally. First, the skin flap is secured to the conchal fascia with the first suture as described above. From the skin incision design, we know that a 3.5- to 4-cm, transverse cross-bar will allow up to 2 cm of skin removal without dog-ear formation. If a dog-ear does form, it is excised with a limited anterior extension of the incision. A Pitanguy clamp is placed on the superior skin flap with gentle traction, and up to 2 cm of skin flap excess is trimmed with a horizontal cut. Next, proceeding inferiorly, excess skin is trimmed in a vertical vector for a distance of 2 cm corresponding to the distance from the transverse step-cut to the superior tragus of the initial incisions. Next, a convex curved trim is made corresponding to the tragus. A step-cut for the incisura and a short vertical cut to the previously placed conchal suture can be made at this point or may be the first cut made after the initial split along the antitragus. As noted earlier, it is important that the skin flap should be under no tension, especially along the portion to be inset to the tragus. (See Video 9 [online], which details the quick split and trim technique for the preauricular skin flap. The anterior skin flap is precisely cut to mirror and fit into the initial skin incisions in an efficient manner without requiring multiple splits of the skin flap.)
Video 9. Quick split and trim technique. Video 9 from “Ten Surgical Tips Based on Anatomy and Design to Refine Your Face and Neck Lift Operation”.
The postauricular skin flap is then trimmed. Immediately behind the ear, the skin flap to be trimmed tends to be minimal, approximately 3–4 mm in width. The postauricular excess is trimmed and will be sutured to the superior, wavy incision as designed earlier. The length of this wavy line is determined by the suspected amount of postauricular skin excess with becomes easy to determine with experience. This can usually be trimmed all in one motion.
In closure, the tragus must not be effaced, which is another facelift “giveaway.” By excising a deep pretragal trough or divot that is approximately 2 cm long and at least 1 cm deep, blunting is avoided and the flap can be easily set without tension (Fig. 8). The area of the skin flap that will reside in this newly created pretragal trough is then thinned. In men, the hair follicles in this area are cauterized with cautery on a 4–5 setting using loupes to prevent a hairy tragus. A 4-0 braided, absorbable suture is then placed deep from the thinned skin into the lower pretragal trough. The skin flap is now sutured along the full length of the incision. As stated, the postauricular skin incision is closed using a running 4-0 plain gut suture while grabbing deep bites of the conchal fascia/perichondrium to prevent drift and mastoid migration of the final scar.14
Fig. 8.
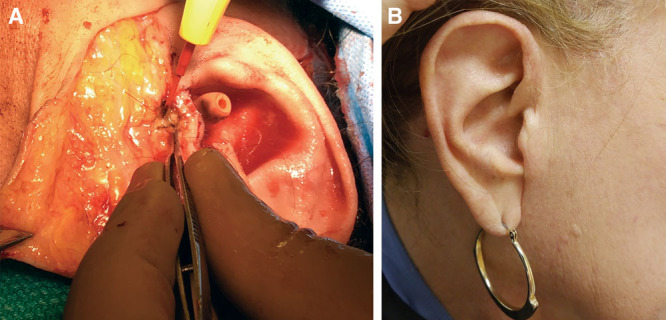
Tragal divot to prevent blunting. A, A pretragal trough or divot is created by excising a 2 × 1 cm piece of pre-parotid fascia adjacent to the tragus (red arrow). The area of the skin flap that will now reside in the preauricular area is thinned and sutured to the depth of the newly created trough. B, Four-year postoperative result in patient who underwent facelift with this technique without tragal blunting. However, note the lack of definition of the tragal incisura due to an inadequate step-cut designed into the initial skin incisions.
The lobule is not primarily closed. The open dermal slit of the skin flap, after the initial cut along the antitragus, is sutured to the conchal fascia below the lobule. The lobule can be shortened to a length of approximately 1 cm if necessary. With this technique, a natural lobule is recreated without risk of a pixie ear deformity.15–17 Further, the surgeon need not worry about lobule’s angle, being too forward, too far back, or pixied, during closure because it will invariably sit correctly (Fig. 9). This method is effective in achieving a detached lobule postoperatively. This should be discussed with patients preoperatively, and alternative techniques are used if an attached postoperative lobule is desired.
Fig. 9.
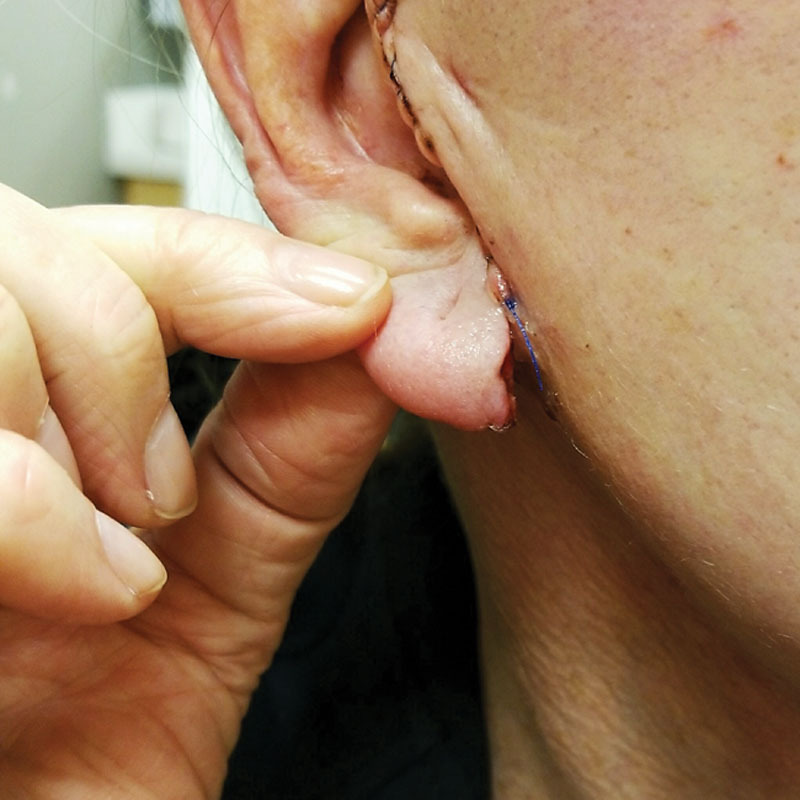
The ear lobule need not be primarily closed during a facelift procedure. In this manner, the lobule will tube as it heals secondarily, recreating the natural lobule contour without the risk of a pixie ear deformity.
The dressing is then placed. No gauze rolls or Kerlix head wraps are used. Ointment is applied to the incisions while a Silicone Disc (Silipos, Niagara Falls, N.Y.) is placed below the surgical JawBra (Canfield Inc., Helena, Mont.) that is then applied. Small pieces of nonadherent gauze are used over the incisions. The silicone pad must be washed daily; otherwise a skin reaction will occur. A 3-strap facial and neck support compression garment (Canfield Inc., Helena, Mont.) is then applied. This compressive dressing is quick to place, which, most importantly, evenly distributes pressure to mitigate risk of fluid collection with drainage. Bulky dressings with excessive gauze and net stocking lose compression shortly after being placed, whereas this dressing takes less than a minute to apply.
BLOCK AND TACKLE THE FACE
Patients with medical comorbidities, such as chronic obstructive pulmonary disease, can be operated on using a blocking method. In otherwise appropriate candidates, minimal oral medication and this local blocking method can be used. Simple patient monitoring may be used during the procedure with administration of a preoperative oral anxiolytics and analgesics in conjunction with a block and tackle approach. The oral doses of medications will depend on patient’s age and tolerance. However, in men, 2 mg of oral lorazepam and 10–20 mg of oral diazepam have been used compared with 2–3 mg of oral alprazolam and 10–20 milligrams of oral diazepam in women. Local anesthesia-only face/neck lifts can eliminate the need for an intravenous catheter, an anesthesiologist, and intensive postoperative anesthesia monitoring, increasing the efficiency of your operating or procedure room. Further, for the rare patient who experiences a postoperative hematoma, this block method along with an oral medication will permit hematoma drainage in the clinic or emergency room setting without the usual patient intolerance.
The senior author’s (B.M.Z.) technique for regional blocking techniques of the face has been well described.18 With this “block and tackle” technique, full face and neck anesthesia can be achieved. The surgeon is limited only by the patient’s tolerance and ability to sit without moving, which is effectively managed with oral anxiolytics. In the preoperative holding area, topical local anesthetic is placed and consents are obtained before any premedication. The patient is then injected using a set of blocks including infraorbital, zygomaticotemporal, zygomaticofacial, great auricular, V3, occipital, and transverse cervical blocks for full facial anesthesia.18 Although the supraorbital/supratrochlear/infratrochlear and dorsal nasal blocks are described in this initial article, they are only necessary when forehead or nasal surgery, respectively, is to be concurrently performed with the face/neck lift. Notably, a V3 block will cover the inferior alveolar, mental, and long buccal nerves; however, the surgeon may block these end nerves separately if not comfortable performing a V3 block. A 22-gauge spinal needle is used.
As noted, the senior author has added a ninth block: the transverse cervical nerve block for the neck.19,20 This block is performed immediately following the great auricular block using the same puncture because both nerves emanate from Erb’s point posterior to the upper one-third of the mid-sternocleidomastoid muscle and below the platysma. After a bolus of local anesthetic is injected on below the platysma and on top of the sternocleidomastoid to anesthetize the great auricular nerve, the needle is placed along the anterior sternocleidomastoid at the same subplatysmal level and a bolus is injected upon withdrawal of the needle for the transverse cervical nerves.
Approximately 20 mL of local anesthetic (1% lidocaine with epinephrine ± bupivacaine) is all that is needed to block the bilateral face before face and neck lift. Using this “quick block” technique in the preoperative holding area, full facial anesthesia is achieved in approximately 5–10 minutes before the patient is taken to the operating or procedure room.
With a pure block and tackle local anesthesia technique, the patient often can alight from the operating room table and walk out of the office under his or her own power in a matter of minutes.
CONCLUSIONS
Face and neck lift surgery mandates the marriage of anatomical knowledge and surgical economy of skills and instruments. Using simple and reproducible surgical techniques, including instrument modifications, technical adjustments, and block methods, we have observed improved efficacy and efficiency with face and neck lifting, as we work toward improving patients’ ultimate recovery and outcomes. Further directions of research will focus on a comparative investigation of these techniques versus others with regard to surgical time and outcomes.
Footnotes
Published online 14 May 2020.
Disclosure: The authors have no financial interest to declare in relation to the content of this article.
Related Digital Media are available in the full-text version of the article on www.PRSGlobalOpen.com.
REFERENCES
- 1.Rohrich RJ, Narasimhan K.Long-term results in face lifting: observational results and evolution of technique. Plast Reconstr Surg. 2016;138:97–108. [DOI] [PubMed] [Google Scholar]
- 2.Narasimhan K, Stuzin JM, Rohrich RJ.Five-step neck lift: integrating anatomy with clinical practice to optimize results. Plast Reconstr Surg. 2013;132:339–350. [DOI] [PubMed] [Google Scholar]
- 3.Rohrich RJ, Ghavami A, Constantine FC, et al. Lift-and-fill face lift: integrating the fat compartments. Plast Reconstr Surg. 2014;133:756e–767e. [DOI] [PubMed] [Google Scholar]
- 4.Sinno S, Mehta K, Reavey PL, et al. Current trends in facial rejuvenation: an assessment of ASPS members’ use of fat grafting during face lifting. Plast Reconstr Surg. 2015;136:20e–30e. [DOI] [PubMed] [Google Scholar]
- 5.Sinno S, Schwitzer J, Anzai L, et al. Face-lift satisfaction using the FACE-Q. Plast Reconstr Surg. 2015;136:239–242. [DOI] [PubMed] [Google Scholar]
- 6.Roostaeian J, Rohrich RJ, Stuzin JM.Anatomical considerations to prevent facial nerve injury. Plast Reconstr Surg. 2015;135:1318–1327. [DOI] [PubMed] [Google Scholar]
- 7.Jones BM, Grover R, Southwell-Keely JP.Post-operative hilotherapy in SMAS-based facelift surgery: a prospective, randomised, controlled trial. J Plast Reconstr Aesthet Surg. 2011;64:1132–1137. [DOI] [PubMed] [Google Scholar]
- 8.Gassman AA, Pezeshk R, Scheuer JF, III, et al. Anatomical and clinical implications of the deep and superficial fat compartments of the neck. Plast Reconstr Surg. 2017;140:405e–414e. [DOI] [PubMed] [Google Scholar]
- 9.Derby BM, Codner MA.Evidence-based medicine: face lift. Plast Reconstr Surg. 2017;139:151e–167e. [DOI] [PubMed] [Google Scholar]
- 10.Wan D, Small KH, Barton FE.Face lift. Plast Reconstr Surg. 2015;136:676e–689e. [DOI] [PubMed] [Google Scholar]
- 11.Costa CR, Ramanadham SR, O’Reilly E, et al. The role of the superwet technique in face lift: an analysis of 1089 patients over 23 years. Plast Reconstr Surg. 2015;135:1566–1572. [DOI] [PubMed] [Google Scholar]
- 12.Ross RJ, Wilson JL, Ashton MW.The microvascular basis of the superior thyroid artery perforator flap. Plast Reconstr Surg. 2015;136:849–854. [DOI] [PubMed] [Google Scholar]
- 13.Sharma VS, Stephens RE, Wright BW, et al. What is the lobular branch of the great auricular nerve? Anatomical description and significance in rhytidectomy. Plast Reconstr Surg. 2017;139:371e–378e. [DOI] [PubMed] [Google Scholar]
- 14.Zide BM.Seven more tips for the operating room. Plast Reconstr Surg. 2005;115:973–975. [DOI] [PubMed] [Google Scholar]
- 15.Mowlavi A, Meldrum DG, Wilhelmi BJ, et al. The “pixie” ear deformity following face lift surgery revisited. Plast Reconstr Surg. 2005;115:1165–1171. [DOI] [PubMed] [Google Scholar]
- 16.Coscia J, Huang A, Stevenson TR.Prevention of earlobe deformity in face-lifting. Ann Plast Surg. 2013;70:389–391. [DOI] [PubMed] [Google Scholar]
- 17.Tepper OM, Zide BM.The “youtube” method of correcting pixie ear and poor alar base inset. J Craniofac Surg. 2012;23:1137–1139. [DOI] [PubMed] [Google Scholar]
- 18.Zide BM, Swift R.How to block and tackle the face. Plast Reconstr Surg. 1998;101:840–851. [DOI] [PubMed] [Google Scholar]
- 19.Kim S, Feldman DU, Yang J.A systematic review of the cervical plexus accessory innervation and its role in dental anesthesia. J Anesth Hist. 2016;2:79–84. [DOI] [PubMed] [Google Scholar]
- 20.Lin K, Uzbelger Feldman D, Barbe MF.Transverse cervical nerve: implications for dental anesthesia. Clin Anat. 2013;26:688–692. [DOI] [PubMed] [Google Scholar]


