

Summary
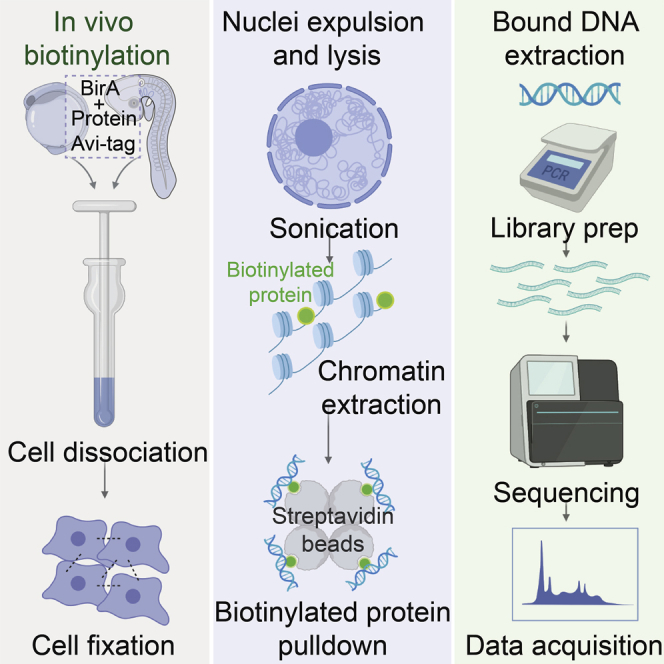
Chromatin immunoprecipitation with sequencing (ChIP-seq) has been instrumental in understanding transcription factor (TF) binding during gene regulation. ChIP-seq requires specific antibodies against desired TFs, which are not available for numerous species. Here, we describe a tissue-specific biotin ChIP-seq protocol for zebrafish and chicken embryos which utilizes AVI tagging of TFs, permitting their biotinylation by a co-expressed nuclear biotin ligase. Subsequently, biotinylated factors can be precipitated with streptavidin beads, enabling the user to construct TF genome-wide binding landscapes like conventional ChIP-seq methods.
For complete details on the use and execution of this protocol, please see Lukoseviciute et al. (2018) and Ling and Sauka-Spengler (2019).
Graphical Abstract
Highlights
-
•
Tissue-specific in vivo ChIP for biotinylated DNA-binding proteins of interest
-
•
Protocol generates genome-wide binding maps in chicken or zebrafish
-
•
ChIP-seq can be performed without antibody usage and cell sorting
-
•
Protocol requires a relatively low number of cells as input (100,000–150,000)
Chromatin immunoprecipitation with sequencing (ChIP-seq) has been instrumental in understanding transcription factor (TF) binding during gene regulation. ChIP-seq requires specific antibodies against desired TFs, which are not available for numerous species. Here, we describe a tissue-specific biotin ChIP-seq protocol for zebrafish and chicken embryos which utilizes AVI tagging of TFs, permitting their biotinylation by a co-expressed nuclear biotin ligase. Subsequently, biotinylated factors can be precipitated with streptavidin beads, enabling the user to construct TF genome-wide binding landscapes like conventional ChIP-seq methods.
BEFORE YOU BEGIN
There are several advantages of using the presented biotin ChIP-seq method over traditional immunoprecipitation methods. In addition to not relying on specific antibodies against the protein of interest (POI), which can be a significant obstacle when working with some of the model or non-model organisms, omitting antibody use reduces the number of animals used for immunization and antibody production, aligning with the principles of the 3Rs (Replacement, Reduction and Refinement). Similarly, the method offers a high reproducibility by employing streptavidin beads instead of highly variable antibodies. Next, the biotin-streptavidin interaction is one of the strongest known non-covalent interactions in nature, thus offering high specificity and signal-to-noise ratio. Furthermore, since biotin ChIP-seq employs a genetic tissue-specific binary system allowing the biotinylation of proteins of interest only in desired cell types, cell sorting prior to the method can be omitted. Of note, having non-specific cells when homogenizing tissue provides intrinsic non-specific “carrier-DNA” that helps to minimize the loss of ChIP-ed DNA. This allows a significant reduction of cells of interest needed for the assay in comparison to conventional ChIP-seq methods, which usually require millions of cells. Our method requires as little as 100,000–150,000 cells of interest to generate low background ChIP-seq data.
Experimental Design Considerations
The biotin ChIP-seq method is based on the in vivo biotinylation of POI. This is achieved by tagging a POI with a short AVI-tag that is specifically recognized by the E.coli biotin ligase, BirA, (Barker and Campbell, 1981). The lysine residue within the AVI-tag is specifically biotinylated by BirA in the presence of biotin and ATP (Schatz, 1993). In vivo biotinylation has previously been successfully applied in various biological contexts (de Boer et al., 2003; Fairhead and Howarth, 2015; Trinh et al., 2017; Zhou et al., 2017). The identity of very few naturally biotinylated proteins that might contribute to the background biotinylation within cells is known (most of them are not nuclear), making this an attractive approach for isolation of biotinylated targets and their interacting molecular components using streptavidin affinity precipitation. The addition of a biotin moiety is just MW = 244.31 g/mol, hence the risk of interference with normal protein function of AVI-tagged POI is minimal (Cull and Schatz, 2000).
This biotin ChIP-seq method has been developed for use in both zebrafish and chicken embryos. It requires two different approaches for AVI tagging of POI and BirA co-expression. In zebrafish, stable transgenic lines expressing the constructs are generated, whereas in chicken embryos AVI-tagged POI and BirA constructs are delivered by co-electroporation and transiently expressed. Specific notes for zebrafish or chicken will be stated throughout the protocol. See BirA and AVI-tag DNA sequences in the Materials and Equipment section.
To assess the success of the biotin ChIP-seq method in a new system, we suggest tagging an abundant and a well-characterized POI. It is also important to include negative controls. For this, the user should always include the input control (extracted but not streptavidin bead-precipitated DNA from the same samples). During optimization, BirA-only (negative control) samples should be collected and processed alongside samples also containing AVI-tagged transcription factor (TF), in order to assess non-specific and intrinsic biotinylation. To further validate the specificity of the method, user should examine whether TF binding motifs for the biotinylated TF are uncovered within the biotin ChIP-seq peaks. If possible, we recommend confirming that the putative TF binding sites revealed by biotin ChIP occur within regions of open chromatin or known enhancer sites.
CRITICAL: The position of the AVI-tag on the POI should be carefully designed, such that the AVI-tag is not likely to disrupt DNA interaction, protein-protein interaction, enzymatic and other domains within the POI, that may influence the endogenous binding and overall activity of the POI. The POIs can be analyzed for their domain composition using protein/nucleotide databases, such as the protein family database, Pfam (https://pfam.xfam.org/).
Zebrafish Approach
We have used Tol2-mediated plasmid/bacterial artificial chromosome (BAC) integration for zebrafish transgenesis methods to generate lines expressing nuclear-targeted BirA harboring nuclear localization signal (NLS) or factors tagged/fused to the AVI-tag. When employing BAC transgenesis, we ensure that the selected BAC clone harbors the full open reading frame (ORF) of the selected POI gene and the upstream/downstream regions (>200 kb), thus encompassing not only the gene promoter but also associated cis-regulatory elements. This way the tagged POI can be expressed in a native spatial-temporal manner. We also incorporate fluorescent reporters in our final constructs for positive transgenic fish embryo selection. We then cross these transgenic lines to acquire embryos co-expressing BirA and AVI-tagged proteins of interest (see Figures 1A and 1B). Notably, this tissue-specific binary in vivo biotinylation system (Trinh et al., 2017) allows (1) tissue-specific TF biotinylation (see Figure 1A), and (2) ubiquitous factor biotinylation in a tissue-specific manner (see Figure 1B). The former is achieved by using ubiquitously expressed BirA and endogenous-like tissue-specific AVI-tagged TFs, while the latter is achieved by using a tissue-specific BirA to biotinylate ubiquitously expressed AVI-tagged proteins only in that tissue.
Figure 1.

Embryo Generation Strategies for Protein of Interest (POI) Biotinylation in a Tissue-Specific Manner in Zebrafish and Chicken
(A) Approach to biotinylate tissue-specific transcription factor. Transgenic fish expressing AVI-tagged POI is crossed with another transgenic fish expressing biotin ligase targeted to nucleus (NLS-BirA). Resulting offspring will harbour biotinylated POI.
(B) Method to biotinylate ubiquitously expressed POI in a tissue-specific manner. Transgenic fish expressing ubiquitous AVI-tagged POI is crossed with another transgenic fish expressing tissue-specific biotin ligase targeted to nucleus (NLS-BirA). Resulting offspring will harbour biotinylated POI only in a desired tissue.
(C) Strategy to bilaterally co-electroporate in ovo either a C-term or N-term AVI-tagged POI construct with a plasmid ubiquitously expressing the biotin ligase targeted to nucleus (NLS-BirA). Embryos are incubated in ovo until desired stage of analysis.
Chicken Approach
Plasmids harboring AVI-tagged POI and BirA are co-electroporated in or ex ovo, embryos are reared to desired stages and harvested. To facilitate in vivo biotinylation of POIs in the chicken model, we have designed two recipient vectors, one for C-terminal and the other for N-terminal AVI tagging of POI (Addgene plasmids #110205 and #110204, respectively) (Figure 1C). Each backbone vector contains two multiple cloning sites (MCS); one for cloning the POI in-frame with the AVI-tag cassette, and the other, upstream of the minimal promoter, for cloning of the appropriate enhancer for endogenous-like expression of the AVI-tagged POI. In the absence of a specific enhancer, AVI-tagged POI can be expressed ubiquitously, but this could lead to ectopic expression/overexpression artifacts.
The ORF of each POI should be amplified using gene-specific primers containing flanking vector-specific homology arms (Primer table 1) that enable inclusion (or reconstitution) of the Kozak sequence upstream and in-frame fusion to the AVI-tag. The recipient vector for C-terminal AVI-tag, (pTK-BsmBI-LacZ-MCS-Avi, Addgene plasmid #110205), should be linearized with NcoI and SnaBI, and recipient plasmid for N-terminal AVI-tag (pTK-BsmBI-LacZ-Avi-MCS-2A-Citrine, Addgene plasmid #110204) with EcoRV. Amplified ORFs should be cloned into the linearized corresponding recipient vector by homology-based seamless cloning. Enhancers should be cloned using BsmBI as described in an upcoming STAR protocol (R.M.W. and T.S-S., unpublished data). The order in which POI and enhancer sequences are cloned is determined by the presence of restriction enzyme sites in the PCR amplicons. If there is no such constraint, we recommend performing BsmBI enhancer cloning first.
Primer Table
| Plasmid | Addgene | AVI-tag | Primer | Direction | Primer Sequence |
|---|---|---|---|---|---|
| pTK-BsmBI-LacZ-MCS-Avi | #110205 | C-term | Forward | 5′–3′ | GCTAGCTTGCCGCCACCATGnnnnnnnnnnnnnnnn |
| pTK-BsmBI-LacZ-MCS-Avi | #110205 | C-term | Reverse | 5′–3′ | TCCTTGTAGTCACCTCCTACTnnnnnnnnnnnnnnn |
| pTK-BsmBI-LacZ-Avi-MCS-2A-Citrine | #110204 | N-term | Forward | 5′–3′ | AGGACGACGACGACAAGnnnnnnnnnnnnnnnnnn |
| pTK-BsmBI-LacZ-Avi-MCS-2A-Citrine | #110204 | N-term | Reverse | 5′–3′ | CTGCCCTCTCCTGATCCnnnnnnnnnnnnnnnnnnnn |
Primer tail sequences required for cloning amplified ORF of POI into the C- or N-term AVI recipient vectors.
Endotoxin-free prepped constructs should be electroporated and embryo inspected for fluorescence where possible (e.g., plasmids #110204, #127776 and #127781) to indirectly test for the expression of the POI in vivo. POI expression from constructs without fluorescent reporters (e.g., #110205, #127775) can be checked by immunostaining against the AVI or FLAG tags. We recommend titration of the AVI-tagged construct followed by RT-qPCR for a panel of specific markers expressed by a given tissue/cell type to identify concentrations that closely reproduce the endogenous levels of expression of the POI and do not alter normal development. As a proof of principle, we co-electroporated AVI-tagged TF constructs (for Sox10 and TFAP2B under control of neural crest-specific Ednrb E2 enhancer) (1.0 μg/μL; Addgene #127775 or #127776) with pCI-NLS-BirA-2A-mCherry (0.5 μg/μL; Addgene #127781) into the neural tube of HH8/9 embryos (Hamburger and Hamilton, 1992), to allow biotinylation of AVI-tagged TFs in pre-delaminating vagal neural crest (see (Ling and Sauka-Spengler, 2019) for in ovo electroporation details). This protocol can also be applied to ex ovo experiments where AVI-tagged proteins and BirA constructs are co-electroporated at gastrulation stages (HH4-HH5) and incubated until the desired stage (R.M.W. and T.S-S., unpublished data). The number of embryos used should be adjusted accordingly to achieve at least 100,000–150,000 cells of interest.
Key Resources Table
| REAGENT or RESOURCE | SOURCE | IDENTIFIER |
|---|---|---|
| Chemicals, Peptides, and Recombinant Proteins | ||
| Ethyl 3-aminobenzoate methanesulfonate salt (MS-222) | Sigma-Aldrich | Cat#A5040 CAS: 886-86-2 |
| Sodium Chloride (NaCl) powder | Suprapur® | Cat#1064060500 CAS: 7647-14-5 |
| Potassium Chloride (KCl) powder | Fisher BioReagents® | Cat#10735874 CAS: 7447-40-7 |
| Magnesium chloride hexahydrate (MgCl2·6H2O) | Millipore | Cat#442611 CAS: 7791-18-6 |
| Sodium monohydrogen phosphate heptahydrate (NaHPO4·7H2O) | Sigma-Aldrich | Cat#9390 CAS: 7782-85-6 |
| Potassium dihydrogen phosphate (KH2PO4) | Sigma-Aldrich | Cat#P5655 CAS: 7778-77-0 |
| 37% Formaldehyde | Sigma-Aldrich | Cat#252549 CAS: 50-00-0 |
| Glycine powder | Sigma-Aldrich | Cat#50046 CAS: 56-40-6 |
| IGEPAL® CA-630 (viscous liquid) (NP40) (Chemically indistinguishable from Nonidet P-40) |
Sigma-Aldrich | Cat#I3021 CAS: 9002-93-1 |
| Triton™ X-100, laboratory grade | Sigma-Aldrich | Cat#X100 CAS: 9002-93-1 |
| UltraPure™ 1 M Tris-HCI Buffer, pH 7.5 | Invitrogen™ | Cat#15567027 |
| Calcium chloride dihydrate (CaCl2·2H2O) powder | Merck | Cat#102382 CAS: 10035-04-8 |
| UltraPure™ Sucrose | Invitrogen™ | Cat#15503022 |
| DL-Dithiothreitol (DTT), 1 M, freeze (−20°C) in aliquots | Thermo Scientific™ | Cat#P2325 CAS: 3483-12-3 |
| Phenylmethanesulfonyl fluoride (PMSF) Protease Inhibitor | Thermo Scientific™ | Cat#36978 CAS: 329-98-6 |
| cOmplete™ Protease Inhibitor Cocktail | Roche | Cat#11836145001 |
| Phosphate Buffered Saline (1× PBS), pH 7.4 | Gibco™ | Cat#10010015 |
| Bovine Serum Albumin (BSA) | Sigma-Aldrich | Cat# A3059 CAS: 9048-46-8 |
| N-2-hydroxyethylpiperazine-N-2-ethane sulfonic acid (Hepes) powder | Sigma-Aldrich | Cat#H3375 CAS: 7365-45-9 |
| Lithium Chloride (LiCl) powder | Sigma-Aldrich | Cat#L9650 CAS: 7447-41-8 |
| UltraPure™ 0.5 M EDTA, pH 8.0 | Invitrogen™ | Cat#15575020 |
| Sodium deoxycholate powder | Sigma-Aldrich | Cat#D6750 CAS: 302-95-4 |
| Sodium Chloride (NaCl), 5 M, RNase-free | Invitrogen™ | Cat#AM9760G |
| Sodium Dodecyl Sulfate (SDS) powder | Sigma-Aldrich | Cat# L4509 CAS: 151-21-3 |
| High Fidelity (HF) NcoI | NEB | Cat#R3193S |
| SnaBI Restriction endonuclease | NEB | Cat#R0130 |
| High Fidelity (HF) EcoRV | NEB | Cat#R3195 |
| Proteinase K, recombinant, PCR Grade | Roche | Cat#3115836001 |
| RNase A, DNase and protease-free (10 mg/mL), freeze (−20°C) in aliquots | Thermo Scientific™ | Cat#EN0531 |
| UltraPure™ Phenol:Chloroform:Isoamyl Alcohol (25:24:1, v/v) | Invitrogen™ | Cat#15593031 CAS: 108-95-2 |
| Sodium Acetate, 3 M, pH 5.5, RNase-free, freeze (−20°C) in aliquots | Invitrogen™ | Cat#AM9740 |
| Glycogen (20 mg/mL), freeze (−20°C) in aliquots | Roche | Cat#10901393001 |
| Ethanol (EtOH) absolute ≥99.8%, AnalaR NORMAPUR® | VWR Chemicals | Cat#20821.330 CAS: 64-17-5 |
| Invitrogen™ UltraPure™ DNase/RNase-Free Distilled Water | Invitrogen™ | Cat#10977049 |
| Critical Commercial Assays | ||
| Dynabeads Streptavidin M-280 | Invitrogen | Cat#11206D |
| Dynabeads Protein G | Invitrogen | Cat#10007D |
| MicropPlex Library Preparation kit v2 | Diagenode | Cat#05010012 |
| Qubit dsDNA HS Assay Kit | Invitrogen | Cat#Q32854 |
| TapeStation High sensitivity D1000 ScreenTape | Agilent | Cat#5067-5584 |
| TapeStation High Sensitivity D1000 Reagents | Agilent | Cat# 5067-5585 |
| NextSeq ® 500/550 High Output Kit v2 (75 cycles) | Illumina | Cat#FC-404-2005 |
| Endofree Maxi Prep kit | Qiagen | Cat#12362 |
| In-Fusion® HD Cloning Plus | Takara | Cat#638910 |
| Recombinant DNA | ||
| pTK-BsmB1-LacZ-MCS-Avi recipient plasmid | Addgene | Cat#110205 |
| pTK-BsmB1-LacZ-Avi-MCS-2A-Citrine recipient plasmid | Addgene | Cat#110204 |
| pTK-EdnrbE2-Sox10-FLAG-tev-AVI plasmid | Addgene | Cat#127775 |
| pTK-EdnrbE2-AVI-Tfap2B-tev-FLAG-2A-Citrine plasmid | Addgene | Cat#127776 |
| pCI-NLS-BirA-2A-mCherry plasmid | Addgene | Cat#127781 |
| Experimental Models: Organisms/Strains | ||
| TgBAC(foxd3-Avi-2A-Citrine)ox161 | Sauka-Spengler laboratory | ox161 |
| Tg(ubiq:NLS-BirA-2A-Cherry)ox114 | Sauka-Spengler laboratory | ox114 |
| Deposited Data | ||
| foxd3 biotin ChIP-seq | (Lukoseviciute et al., 2018) | GEO: GSE106676 |
| Sox10 and Tfap2B biotin ChIP-seq | (Ling and Sauka-Spengler, 2019) | GEO: GSE125711 |
| Other | ||
| Microcentrifuge Tubes 1.7 mL, Low Binding | Sorenson BioScience | Cat#39640T |
| Screw Cap Vials, Conical 1.6 mL | Thermo Scientific™ | Cat#BC16NA-PS |
| ART® 1000 REACH™ Tips | Thermo Scientific™ | Cat#2079 |
| ART® Barrier 1000 Tips | Thermo Scientific™ | Cat#2079E |
| ART® Barrier 200 Tips | Thermo Scientific™ | Cat# 2069 |
| ART® Barrier 20 Tips | Thermo Scientific™ | Cat# 2149p |
| ART® Barrier 10 Tips | Thermo Scientific™ | Cat# 2140 |
| ART® 1000 Wide Bore Tips | Thermo Scientific™ | Cat#2079G |
| ART® 200 Wide Bore Tips | Thermo Scientific™ | Cat#2069G |
| 2 mL or 7 mL glass Dounce homogenizer set with pestles A and B | Sigma | Cat#D8938 2ml Cat#D9063 7ml |
| Refrigerated microcentrifuge | N/A | N/A |
| Magnetic stand for microfuge tubes | N/A | N/A |
| Sonicator | N/A | N/A |
| Tube thermo-shaker | N/A | N/A |
| Rotisserie tube mixer | N/A | N/A |
| PCR thermal cycler | N/A | N/A |
| Qubit fluorometer | Invitrogen | N/A |
| Agilent 2200 TapeStation system | Agilent | G2965AA |
MATERIALS AND EQUIPMENT
NLS-BirA and AVI-tag Sequences Table
| Nuclear Biotin Ligase (NLS-BirA) (note - no START or STOP codons are annotated here, make sure they are in place for your final construct design) | CCAAAAAAGAAGAGAAAAGTACGATCTATGAAGG ATAACACCGTGCCACTGAAATTGATTGCCCTGTTA GCGAACGGTGAATTTCACTCTGGCGAGCAGTTGG GTGAAACGCTGGGAATGAGCCGGGCGGCTATTAA TAAACACATTCAGACACTGCGTGACTGGGGCGTT GATGTCTTTACCGTTCCGGGTAAAGGATACAGCC TGcCTGAGCCTATCCAGTTACTTAATGCTAAACAG ATATTGGGTCAGCTGGATGGCGGTAGTGTAGCCG TGCTGCCAGTGATTGACTCCACGAATCAGTACCTT CTTGATCGTATCGGAGAGCTTAAATCGGGCGATG CTTGCATTGCAGAATACCAGCAGGCTGGCCGTGG TCGCCGGGGTCGGAAATGGTTTTCGCCTTTTGGC GCAAACTTATATTTGTCGATGTTCTGGCGTCTGGA ACAAGGCCCGGCGGCGGCGATTGGTTTAAGTCTG GTTATCGGTATCGTGATGGCGGAAGTATTACGCA AGCTGGGTGCAGATAAAGTTCGTGTTAAATGGCC TAATGACCTCTATCTGCAGGATCGCAAGCTGGCA GGCATTCTGGTGGAGCTGACTGGCAAAACTGGCG ATGCGGCGCAAATAGTCATTGGAGCCGGGATCAA CATGGCAATGCGCCGTGTTGAAGAGAGTGTCGTT AATCAGGGGTGGATCACGCTGCAGGAAGCGGGG ATCAATCTCGATCGTAATACGTTGGCGGCCATGC TAATACGTGAATTACGTGCTGCGTTGGAACTCTTC GAACAAGAAGGATTGGCACCTTATCTGTCGCGCT GGGAAAAGCTGGATAATTTTATTAATCGCCCAGT GAAACTTATCATTGGTGATAAAGAAATATTTGGCA TTTCACGCGGAATAGACAAACAGGGGGCTTTATT ACTTGAGCAGGATGGAATAATAAAACCCTGGATG GGCGGTGAAATATCCCTGCGTAGTGCAGAAAAA |
| AVI-tag | GGCCTGAATGACATCTTTGAGGCCCAGAAGATCG AGTGGCATGAGGAC |
Stock Solution Preparation
E3 Medium – 60× Stock
| Amount (g) for 2 L | Final Concentration (M) | |
|---|---|---|
| NaCl | 34.8 | 0.3 |
| KCl | 1.6 | 0.01 |
| CaCl2·2H2O | 5.8 | 0.02 |
| MgCl2·6H2O | 9.78 | 0.02 |
| ddH2O | To a final volume of 2 L | N/A |
Adjust the pH to 7.2 with NaOH. Autoclave.
To prepare 1× E3 medium, dilute 16.7 mL of the 60× stock to 1 L. Keep at 20°C–25°C. Final working solution: 5 mM NaCl, 0.17 mM KCl, 0.33 mM CaCl2, 0.33 mM MgCl2.
Ringer’s Solution
40× Stock Solution 1
| Amount (g) for 1 L | Final Concentration (M) | |
|---|---|---|
| NaCl | 144.0 | 2.5 |
| KCl | 14.8 | 0.2 |
| CaCl2·2H2O | 9.0 | 0.06 |
| ddH2O | To a final volume of 1 L | N/A |
40× Stock Solution 2
| Amount (g) for 1 L | Final Concentration (M) | |
|---|---|---|
| NaCl | 144.0 | 2.5 |
| NaHPO4·7H2O | 8.7 | 0.03 |
| KH2PO4 | 0.8 | 0.006 |
| ddH2O | To a final volume of 1 L | N/A |
Adjust pH to 7.4
To prepare 1× Ringer’s working solution, add 100 mL of 40× stock solution 1 and 100 mL of 40× stock solution 2 to 3,800 mL of ddH2O. Do not directly combine stock solutions as they will precipitate. Adjust pH to 7.4, filter-sterilize, store at 20°C–25°C. Final working solution: 125 mM NaCl, 1.5 mM CaCl2, 5 mM KCl, 0.75 mM NaHPO4, 0.15 mM KH2PO4.
10% NP40
| Volume (mL) for 50 mL Final | Final Concentration (%) | |
|---|---|---|
| IGEPAL® CA-630 | 5 | 10 |
| ddH2O | 45 | N/A |
Add water gradually. Vortex/shake. Filter-sterilize. Keep at 4°C.
1 M Glycine
| Amount (g) for 50 mL Final | Final Concentration (M) | |
|---|---|---|
| Glycine | 3.75 | 1 |
| ddH2O | 45 | N/A |
Dissolve powder in water while nutating. Filter-sterilize. Freeze in aliquots at −20°C.
10% Triton X-100
| Volume (mL) for 50 mL Final | Final Concentration (%) | |
|---|---|---|
| TritonX-100 | 5 | 10 |
| ddH2O | 45 | N/A |
Add water gradually. Vortex/shake. Filter-sterilize. Keep at 4°C.
0.1 M CaCl2
| Amount (g) for 200 mL | Final Concentration (M) | |
|---|---|---|
| CaCl2·2H2O | 2.94 | 0.1 |
| ddH2O | To a final volume of 200 mL | N/A |
Filter-sterilize. Keep at 4°C.
1.5 M Sucrose
| Amount (g) for 100 mL | Final Concentration (M) | |
|---|---|---|
| Sucrose | 51.3 | 1.5 |
| ddH2O | To a final volume of 100 mL | N/A |
Add sucrose gradually to ~30 mL of water. Let it start dissolving and then make volume up to 100 mL. Vortex/shake. Filter-sterilize. Keep at 4°C.
0.2 M PMSF
| Amount (g) for 50 mL | Final Concentration (M) | |
|---|---|---|
| PMSF | 1.74 | 0.2 |
| 100% EtOH | To a final volume of 50 mL | N/A |
Warning: PMSF is toxic if swallowed; causes severe skin burns and eye damage. Wear a mask and full personal protective equipment (PPE) when preparing the stock. Freeze in aliquots at −20°C.
25× Protease inhibitor (25× PI)
| Amount (no. of Tablets) for 2 mL | Final Concentration (×) | |
|---|---|---|
| cOmplete™ Protease Inhibitor Tablet | 1 | 25 |
| ddH2O | To a final volume of 2 mL | N/A |
Aliquot. The stock solution is stable for 1–2 weeks stored at 4°C or at least for 12 weeks at −20°C.
35% BSA
| Amount (g) for 20 mL | Final Concentration (%) | |
|---|---|---|
| BSA | 7 | 35 |
| 1× PBS | To a final volume of 20 mL | N/A |
Slowly add the BSA powder into PBS without clumping. Let it completely dissolve while nutating at 20°C–25°C. Filter-sterilize. Freeze in aliquots at −20°C.
1 M Hepes-KOH, pH 8
| Amount (g) for 100 mL | Final Concentration (M) | |
|---|---|---|
| Hepes | 23.83 | 1 |
| ddH2O | To a final volume of 100 mL | N/A |
pH to 8 with 10 M KOH. Filter-sterilize. Keep at 4°C.
5 M LiCl
| Amount (g) for 500 mL | Final Concentration (M) | |
|---|---|---|
| LiCl | 106 | 5 |
| ddH2O | To a final volume of 500 mL | N/A |
Autoclave. Keep at 20°C–25°C.
10× TE
| Volume (mL) for 100 mL | Final Concentration (mM) | |
|---|---|---|
| 1 M Tris | 10 | 100 |
| 0.5 M EDTA | 2 | 10 |
| ddH2O | 88 | N/A |
Autoclave. Keep at 20°C–25°C.
1× TE
| Volume (mL) for 100 mL | Final Concentration | |
|---|---|---|
| 10× TE | 10 | 1× (10 mM Tris, 1 mM EDTA) |
| ddH2O | 90 | N/A |
Keep at 20°C–25°C.
20% SDS
| Amount (g) for 100 mL | Final Concentration (%) | |
|---|---|---|
| SDS | 20 | 20 |
| ddH2O | To a final volume of 100 mL | N/A |
SDS powder is harmful if inhaled – wear a mask while preparing. Add SDS powder into water. Heat to 65°C to dissolve. Filter-sterilize. Keep at 20°C–25°C.
10% SDS
| Amount (g) for 100 mL | Final Concentration (%) | |
|---|---|---|
| SDS | 10 | 10 |
| ddH2O | To a final volume of 100 mL | N/A |
SDS powder is harmful if inhaled – wear a mask during preparation. Add SDS into water. Heat to 65°C to dissolve. Filter-sterilize. Keep at 20°C–25°C.
Proteinase K (20 mg/mL)
| Amount (g) for 1 mL | Final Concentration (mg/mL) | |
|---|---|---|
| Proteinase K | 20 | 20 |
| ddH2O | To a final volume of 1 mL | N/A |
Freeze in aliquots at −20°C.
ChIP Dilution Buffer STOCK without Triton
| Volume (μL) for 10 mL Final | Final Concentration | |
|---|---|---|
| 20% SDS | 5.0 | 0.01% |
| 0.5 M EDTA | 24.0 | 1.2 mM |
| 1 M Tris-Cl (pH 8.0) | 167.0 | 16.7 mM |
| 5 M NaCl | 334.0 | 167 mM |
| ddH2O | 9,070.0 | N/A |
Keep at 4°C.
ChIP Dilution Buffer STOCK with Triton
| Volume (μL) for 8.5 mL Final | Final Concentration | |
|---|---|---|
| 20% SDS | 5.0 | 0.01% |
| 0.5 M EDTA | 24.0 | 1.4 mM |
| 1 M Tris-Cl (pH 8.0) | 167.0 | 19.6 mM |
| 5 M NaCl | 334.0 | 196.5 mM |
| ddH2O | 7,970.0 | N/A |
Keep at 4°C.
SDS Lysis Buffer Stock
| Volume (μL) for 10 mL Final | Final Concentration | |
|---|---|---|
| 20% SDS | 350.0 | 0.7% |
| 0.5 M EDTA | 200.0 | 10 mM |
| 1 M Tris-Cl (pH 8.0) | 500.0 | 50 mM |
| ddH2O | 8,550.0 | N/A |
Keep at 4°C.
SDS Wash Buffer
| Volume (mL) for 15 mL Final | Final Concentration | |
|---|---|---|
| 10× TE | 1.5 | 1× (10 mM Tris, 1 mM EDTA) |
| 20% SDS | 1.5 | 2% |
| ddH2O | 12.0 | N/A |
Keep at 4°C.
SDS ChIP Elution Buffer
| Volume (mL) for 50 mL Final | Final Concentration | |
|---|---|---|
| 1 M Tris-HCl, pH 8.0 | 2.5 | 50 mM |
| 0.5 M EDTA | 1.0 | 10 mM |
| 10% SDS | 5.0 | 1% |
| ddH2O | 41.5 | N/A |
Keep at 4°C.
Working Solution and Reagent Preparation
Day 1
Timing: 10–15 min
Solutions to be prepared on the day 1:
-
•
Nuclei extraction buffer (NEB)
| Volume (μL) for 5 mL Final | Final Concentration | |
|---|---|---|
| ddH2O | 3,381.7 | N/A |
| 10% NP40 | 250.0 | 0.5% |
| 10% TritonX-100 | 125.0 | 0.25% |
| 1 M Tris-HCl, pH 7.5 | 50.0 | 10 mM |
| 0.1 M CaCl2 | 150.0 | 3 mM |
| 1.5 M Sucrose | 833.3 | 0.25 M |
| 1 M DTT | 5.0 | 1 mM |
| 0.2 M PMSF | 5.0 | 0.2 mM |
| 25× Protease inhibitor (PI) | 200.0 | 1× |
Note: PMSF should be added into all buffers the last – just before the solutions need to be used as its half-life in aqueous solutions is 30 min at pH 8.
-
•
1× PBS/PI solution
| Volume (μL) for 10 mL Final | Final Concentration | |
|---|---|---|
| 1× PBS | 9,580.0 | N/A |
| 25× PI | 400.0 | 1× |
| 1 M DTT | 10.0 | 1 mM |
| 0.2 M PMSF | 10.0 | 0.2 mM |
Note: PMSF should be added just before the solutions need to be used as its half-life in aqueous solutions is 30 min at pH 8.
Day 2
Solutions and reagents to be prepared on the day 2:
-
•
Nuclei extraction buffer (NEB) – see day 1 above for details
-
•
1× PBS/PI solution - see day 1 above for details
-
•
Block solution
| Volume (μL) for 15 mL Final | Final Concentration | |
|---|---|---|
| 1× PBS | 14,800.0 | N/A |
| 35% BSA | 200.0 | 0.5% |
Keep on ice.
-
•
ChIP dilution working buffer w/o Triton
| Volume (μL) for 1 mL Final | Final Concentration | |
|---|---|---|
| ChIP dilution buffer STOCK w/o Triton | 957.0 | N/A |
| 25× PI | 40.0 | 1× |
| 1 M DTT | 1.0 | 1 mM |
| 0.2 M PMSF | 2.0 | 0.4 mM |
Keep on ice.
Note: PMSF should be added just before the solutions need to be used as its half-life in aqueous solutions is 30 min at pH 8.
-
•
ChIP dilution working buffer with Triton
| Volume (μL) for 2 mL Final | Final Concentration | |
|---|---|---|
| ChIP dilution buffer STOCK w/o Triton | 1,700.0 | N/A |
| 25× PI | 80.0 | 1× |
| 1 M DTT | 2.0 | 1 mM |
| 0.2 M PMSF | 4.0 | 0.4 mM |
| 10% Triton X-100 | 220.0 | 1.1% |
Keep on ice.
Note: PMSF should be added just before the solutions need to be used as its half-life in aqueous solutions is 30 min at pH 8.
-
•
Remove SDS Lysis buffer stock from 4°C and bring it to 20°C–25°C (SDS precipitates at low temperatures).
-
•
Bead preparation:
-
-
Get Protein G Dynabeads and Streptavidin M-280 Dynabeads from 4°C.
-
-
Vortex both beads extensively (for ~1–2 min) to thoroughly resuspend.
-
-
Add 2× 25 μL of Protein G and 2× 25 μL of Streptavidin M-280 Dynabeads magnetic beads (per IP reaction) to individual microfuge tubes using wide bore P200 tips (this ensures exact volumes).
-
-
Add 1 mL block solution to each tube.
Note: do not pipette up and down to prevent bead loss. Then allow the beads to wash while nutating for 5 min.
-
-
Collect the beads using magnetic stand. Let the beads separate for ~5 min: initially lie the stand on its side for 2 min then 3 min upright. Use a P1000 Reach tip to remove the liquid - do not to disturb the beads.
-
-
Wash beads in 1 mL block solution two more times. Each time manually resuspend the beads in the blocking solution by lifting the clear holder part of the magnetic stand and flick the samples by hand.
-
-
Do not remove the supernatant from the last Protein G bead wash.
-
-
Remove blocking solution from streptavidin beads and resuspend the streptavidin magnetic beads in 750 μL of block solution, transfer into a new 1.7 mL tube (to reduce background) using wide bore tips. Incubate both Protein G and streptavidin beads for at least 1 h on the rotisserie in the cold room (4°C) – speed 10. (This step can be performed while samples are being sonicated).
Note: Keep the remaining blocking solution also for the chromatin immunoprecipitation step.
Day 3
Solutions to be prepared on the day 3:
-
•
10% Na-Deoxycholate:
| Amount (g) for 8 mL Final | Final Concentration | |
|---|---|---|
| Na-Deoxycholate | 0.8 | 10% |
| ddH2O | To a final volume of 8 mL | N/A |
Wear a mask during preparation. Leave it on a nutator to dissolve at 20°C–25°C before adding to the RIPA buffer.
-
•
RIPA (Radio-Immunoprecipitation Assay) Wash Buffer:
| Volume (mL) for 50 mL Final | Final Concentration | |
|---|---|---|
| 1 M Hepes-KOH, pH 8 | 2.5 | 50 mM |
| 5 M LiCl | 2.5 | 500 mM |
| 0.5 M EDTA | 0.1 | 1 mM |
| 10% NP-40 | 5.0 | 1% |
| 10% Na-Deoxycholate | 3.5 | 0.7% |
| ddH2O | 33.9 | N/A |
| cOmplete Protease inhibitor cocktail | 1 tablet | 1× |
Vortex until the protease tablet dissolves completely and keep on ice until and during usage.
-
•
TE/NaCl (STE) Wash:
| Volume (mL) for 10 mL Final | Final Concentration | |
|---|---|---|
| 10× TE | 1.0 | 1× |
| 5 M NaCl | 0.1 | 50 mM |
| ddH2O | 8.9 | N/A |
Keep on ice until and during usage.
-
•
Take SDS Wash Buffer and SDS ChIP Elution Buffer from 4°C and bring it to 20°C–25°C (SDS precipitates at low temperatures).
STEP-BY-STEP METHOD DETAILS
The biotin ChIP-seq protocol steps are reviewed in Figure 2.
Figure 2.

The Biotin ChIP-Seq Protocol Overview
Embryo Preparation (Day 1)
Embryos harboring biotinylated POI in desired cells are collected and processed as required prior to their dissociation into single cell suspension.
-
1.Zebrafish
-
a.Collect transgenic zebrafish embryos/larvae expressing both AVI-tagged DNA-binding factor of interest and nuclear BirA within same embryos in batches of 50 embryos/larvae. Include negative controls expressing BirA only when optimizing your system to determine the background noise of the assay. If using larvae anesthetize them using MS-222. Dechorionate embryos if applicable.
-
b.Transfer to 1.7 mL low binding Eppendorf tubes (50 embryos/larvae per tube).
-
c.Remove as much E3 solution as possible.
-
d.Wash 2× with 1× PBS and remove PBS.
-
e.Add 1 mL of isotonic nuclei extraction buffer (NEB) to each tube of 50 embryos/larvae.
-
a.
-
2.
Chicken
-
a.
At the desired stage, remove embryos from the egg and carefully dissect away the remaining vitelline membrane. In case of ex ovo electroporation, remove the embryo from the filter paper.
-
b.
With micro-dissecting scissors, dissect region(s) of interest and transfer dissected tissue to a 1.7 mL low binding Eppendorf tube (10–15 embryos/tube). If dissecting a large number of embryos, use multiple collection tubes to keep the amount of material crosslinked in each tube consistent and ensure the same fixation penetrance and crosslinking outcome. This approach also allows amassing material over several collection rounds (necessary as chick electroporation experiments are medium throughput), thus reducing batch effects and fluctuations in embryo survival and quality of collected material.
-
c.
Briefly spin the Eppendorf tube and remove as much Ringer’s solution as possible.
-
d.
Wash 2× with 1× PBS, briefly spin and remove PBS.
-
e.
Add 1 mL of isotonic nuclei extraction buffer (NEB) to the tube.
Note for Chicken: multiple tubes of dissected tissue can be pooled at this point by sequentially resuspending samples in 1 mL NEB.
Cell Dissociation and Fixation (Day 1)
Collected embryos/dissected tissue are dissociated into a single cell suspension followed by cell fixation to crosslink the chromatin with all DNA bound proteins, including biotinylated POI.
-
3.
Transfer all embryos in NEB into a pre-chilled Dounce homogenizer tube on ice.
Note: if more than one tube was used, at this point all material is combined into a 7 mL Dounce homogenizer tube (see Figure 3A). If 2 mL Dounce homogenizer tube is used, perform homogenization of each 1 mL sample sequentially.
Figure 3.

Embryo Homogenization and Material Transfer
(A) Collect 50 zebrafish embryos (or if this homogenization method is used, 10–15 chicken embryos) per tube. When PBS is replaced with 1 mL of nuclei extraction buffer in each tube, transfer all the material from the microfuge tubes into a Dounce homogenizer.
(B) Pestle A is used to homogenize embryos.
(C) Once material is homogenized, transfer homogenate into the same number of tubes as started with in (A) – 973 μL of homogenate into each tube.
-
4.
Homogenize embryos with 20 strokes using the large clearance pestle A for initial homogenization (see Figure 3B).
Note for Zebrafish: for 3 days post fertilization (dpf) or older zebrafish larvae use 26 strokes and strain homogenized material with a 100 μm strainer to remove unhomogenized hard structures.
Note for Chicken: For chicken embryos, this step can be skipped since tissues are generally more fragile and can easily be dissociated with gentle pipetting with a low binding 1 mL pipette tip the embryos in the solution on ice to break up the tissue, avoiding cavitation.
-
5.
Pipette 973 μL of homogenate into a fresh 1.7 mL tube.
Note: use P1000 Reach tips for material transfer.
Note: If 7 mL Dounce homogenizer tube was used, at this point sample material is separated into multiple Eppendorf tubes again (e.g. if started with three tubes with 50 embryos per each tube, divide material into three tubes again) (see Figure 3C).
Note for Chicken: This step can be skipped if tissues broken up successfully with the pipette.
-
6.
Add 27 μL of 37% formaldehyde (Final concentration of 1%) to each tube.
-
7.
Thoroughly mix the contents by inverting all tubes and place on the nutator at 20°C–25°C for 10 min.
Note: Time of fixing can also be optimized but generally we optimize the concentration of formaldehyde as opposed to time of crosslinking.
-
8.
Add 143 μL of 1 M glycine (final 125 mM) and immediately mix by inverting the tube a few times. Place on the nutator for 5 min to quench the crosslinker.
-
9.
Centrifuge at 2,000 × g at 4°C for 4 min to pellet the crosslinked cells.
-
10.
After spinning, the crosslinked cells are pelleted. Remove supernatant which contains formaldehyde and safely dispose the waste.
Note: Remove liquid gently as the pellet can be dislodged from the tube wall.
Note: We recommend using Art P1000 Reach tips from this step onwards for this section.
-
11.
Resuspend and wash the cell pellet by gentle slow pipetting with 1 mL of PBS/PIs. Spin at 2,000 × g for 4 min at 4°C and discard supernatant. Repeat three times.
Note: The cell pellet will progressively become more transparent macroscopically as the fixative is washed out.
-
12.
Discard all but ~100 μL of the supernatant then spin at 2,000 × g for 4 min at 4°C, before removing the final 100 μL of supernatant. This helps to minimize sample loss as a significant amount can be spread along the wall of the microcentrifuge tube.
Pause Point: At this point cell pellets can be snap frozen in liquid nitrogen and stored at –80°C for up to 6 months for future use or until all the required material is collected. For high-resolution biotin ChIP-seq, at least 100,000–150,000 cells of interest are required.
Nuclei Expulsion, Lysis and Chromatin Fragmentation: (Day 2)
Nuclei are expulsed from cells and then lysed in order to release chromatin with the crosslinked proteins. Chromatin is then sonicated into 300–800 bp size DNA fragments compatible with the ChIP library preparation and Illumina Next Generation Sequencing (NGS) platforms.
Note: If after the crosslinking step you had more than 3 tubes (reminder: 50 of zebrafish or 10–15 of chicken embryos per each tube) of crosslinked material due to a large number of embryos required to gather 100,000–150,000 cells of interest, combine multiple tube material into maximum of 2–3 tubes (50,000–70,000 cells of interest per tube) at this step. To achieve this, use same 1 mL of NEB to resuspend multiple tube pellets (see Figure 4).
Figure 4.

Combing Material from Multiple Tubes into a Single Tube
Add 1 mL fresh NEB to the first pellet and resuspend thoroughly by pipetting gently. Transfer this NEB containing resuspended material into the next tube and repeat one more time. The final tube contains combined material. Make sure you have only 2 or 3 tubes for the next protocol steps.
-
13.
Thoroughly resuspend pellet in each tube (fresh or frozen) in 1 mL nuclei extraction buffer (NEB) and transfer all material to the pre-chilled Dounce tube on ice (same material transfer strategy as shown in Figure 3A).
-
14.
Expulse nuclei with 20 strokes using pestle B keeping the Dounce tube on ice. This will disrupt the cellular walls and help expulse the nuclei into the solution.
Note for Chicken: pipetting with a 1 mL low binding pipette tip is sufficient.
-
15.
Transfer the eluate into two or three 1.7 mL Eppendorf tube (same material transfer strategy as shown in Figure 3C). Spin for 1 min at maximum speed at 4°C and gently remove the supernatant (pellet is still visible but easily dislodged).
-
16.
Wash the pellet with 1 mL ice cold PBS/PIs, avoiding cavitation. Centrifuge for 1 min at maximum speed at 4°C and discard the supernatant.
-
17.
On ice, resuspend the pellet in 120 μL of 20°C–25°C SDS Lysis Buffer Stock, then add 5 μL of 25× Protease inhibitor stock. Pipet up and down to release the crosslinked chromatin into the solution and allow to lie on ice for 10–15 min.
Note: Lay the tubes horizontally slightly pushed on top of ice (i.e. bottom and upper part of the tube at the same level lightly submerged in ice).
-
18.
Add 300 μL of final ChIP dilution buffer w/o Triton to stop the lysis. The final volume is now 425 μL (~0.2% SDS).
-
19.
For chromatin sonication, we use Misonix Sonicator 4000 with Microtip. The sample should be kept in an ice/water bath throughout the sonication process to avoid overheating and cavitation.
Note: Make sure the tip of the sonicator is in the center of the solution and does not touch the tube to avoid ineffective sonication.
-
20.
Right after sonication of each sample, add 42.5 μL of 10% Triton X-100 to 425 μL of sonicated chromatin. Keep tubes on ice until sonication is completed for all tubes.
-
21.
Centrifuge the sonicated material at 20,000 × g for 10 min at 4°C. Transfer the supernatant (~400 μL) to a fresh new microfuge tube and set aside on ice, leaving ~50 μL at the bottom of the tube (containing mostly SDS non-soluble protein complexes).
Note: if started with three tubes on day 2, divide the third tube content by transferring 200 μL into the new first tube and another 200 μL into the second new tube.
-
22.
Add 400 μL of ChIP dilution buffer w/Triton to each 50 μL pellet that remained in the old tubes and mix the contents to extract leftover chromatin. Re-spin at 20,000 × g for 10 min at 4°C. Transfer and re-unite ~400 μL (all but last 50 μL of the supernatant) to the sonicated chromatin set aside after the first spin.
Note: if started with three tubes, again divide the third tube content by transferring 200 μL into the new first tube and another 200 μL into the second new tube. After this step you should have only two tubes for each ChIP sample (~800 μL in each tube if on day 2 started with 2 tubes or ~1,200 μL in each tube if on day 2 started with 3 tubes).
-
23.
Vortex and briefly spin the blocked Protein G beads (2 tubes for each ChIP sample). Place in the magnetic stand for 3 min, and then completely remove the block using a P10 tip if necessary.
Note: The bead separation and washing steps should be performed using P1000 Reach tips.
-
24.
Add the sonicated chromatin (2× ~800 μL or 2× ~1,200 μL) into 2× tubes containing prepared protein G beads. Incubate the mixture on the rotisserie at 4°C (cold room) for 1 h. This pre-clearing step removes proteins that bind non-specifically to the bead matrix.
Chromatin Precipitation (Day 2)
Biotinylated proteins and their bound DNA fragments are specifically captured onto streptavidin beads by an over-night incubation.
-
25.
Briefly spin the sheared chromatin samples containing Protein G beads (allow the microcentrifuge to reach 2,000 × g at 4°C, then stop), and place on magnetic stand for 1–2 min.
-
26.
Transfer 2× 800 μL or 2× 1,200 μL of supernatant containing the sheared chromatin into two new low binding pre-cooled microcentrifuge tubes.
-
27.
Save an aliquot of cell lysate from each chromatin sample as an input fraction - 1/20 of biotin ChIP-ed chromatin. We recommend to split this fraction into two tubes of equal volumes to ease later handling steps, i.e. 2 × 40 μL if total is 2 × 800 μL or 2 × 60 μL if total is 2 × 1,200 μL. Place input fractions in screw cap tubes (or a snap-lock cap tube if preferred) and keep at −80°C until the un-crosslinking step.
-
28.
Discard the Protein G beads.
-
29.
Vortex and briefly spin the blocked streptavidin beads (2 tubes for each ChIP sample). Place on magnetic stand for 1–2 min. Remove the supernatant and resuspend the beads in 50 μL of blocking solution (1× PBS/0.5% BSA).
-
30.
Add beads to both sheared chromatin sample tubes and incubate for 12–16 h on the rotisserie in the cold room.
Note: make sure the tubes are tightly closed; you can wrap the tubes in parafilm.
Wash, Elution and Crosslink Reversal (Day 3)
Non-biotinylated proteins and non-bound DNA are washed away from the biotinylated proteins crosslinked to their target DNA fragments, which are captured on streptavidin beads. These biotinylated complexes are then eluted from the streptavidin beads and protein-DNA crosslinking is reversed in order to release DNA fragments from the biotinylated POIs.
Note: SDS washes should be performed at 20°C–25°C, otherwise SDS will precipitate. Subsequent RIPA washes should be performed at 4°C in a cold room.
Note: The bead separation and washing steps should be performed using P1000 Reach tips.
-
31.
Briefly centrifuge samples and place on magnetic stand for 1–2 min to collect the beads. Remove and discard as much of the supernatant as possible, using a 10 μL tip if needed.
Note: removing as much supernatant as possible helps to reduce background.
-
32.
Add 1.5 mL of SDS Wash Buffer (2% SDS in TE – 10 mM Tris pH 8.0, 1 mM EDTA). Remove tubes from magnetic stand and tap them gently to resuspend beads. Leave tubes on the nutator for 1 min for a more efficient wash. Place tubes in magnetic stand to collect beads for 2 min. Remove supernatant. Repeat twice.
-
33.
RIPA washes: transfer 1.5 mL RIPA into tubes at 20°C–25°C, put tubes on ice and go to the cold room to perform 4 washes: 2 min on the rotisserie followed by 3 min incubation on the magnetic rack. Each time carefully discard the supernatant.
Note: Prepare new screw cap tubes for the post-washing ChIP sample (2 tubes for each sample), on ice.
-
34.
After RIPA washes, wash samples once with 1.5 mL TE that contains 50 mM NaCl (STE): 3 min on the rotisserie in the cold room.
-
35.
After 3 min wash, spin briefly and transfer the chromatin/bead suspension to a new chilled screw cap tube. Ensure all beads have been transferred. Separate the beads using the magnetic stand and remove the supernatant as previously.
-
36.
Spin tubes at 960 × g for 3 min at 4°C and remove any residual STE buffer.
-
37.
Add 220 μL of SDS ChIP elution buffer to the beads. Also, bring input reactions to 220 μL in each tube by adding SDS ChIP elution buffer.
Note: use wide bore P1000 tips as the SDS ChIP elution buffer is viscous.
-
38.
To reverse crosslinking incubate the bead/input - elution buffer mixture at 70°C, 1,300 rpm in the thermomixer for 12–16 h.
Note: make sure that the tube caps are tightly screwed and the thermomixer lid is well secured. Locking cap tubes can be used if screw caps are unavailable.
Cellular RNA and Protein Digestion (Day 4)
Prior to library preparation, cellular carried over RNA and proteins released from the bound DNA are digested/proteolyzed to remove contaminating RNA and excess proteins that could interfere with subsequent steps.
-
39.
Take the tubes out of the thermomixer and allow to cool to 20°C–25°C.
-
40.
Add 200 μL of 1× TE to each tube of biotin ChIP and input DNA (this will dilute SDS in the elution buffer and enable subsequent RNase and Proteinase K treatments).
-
41.
Add 8 μL of 10 mg/mL RNase A (0.2 mg/mL final concentration).
-
42.
Mix by flicking, spin down and incubate at 37°C for 1 h.
-
43.
Add 4 μL of 20 mg/mL Proteinase K (0.2 mg/mL final concentration).
-
44.
Mix by flicking, spin down and incubate at 55°C for 1 h.
-
45.
Add another 4 μL of Proteinase K (0.4 mg/mL final concentration) after 1 h and incubate for another 1 h.
Note for Chicken: adding 8 μL of Proteinase K and incubating for 2 h works as well.
-
46.
Place the tubes on the magnetic stand for 1–2 min to collect the beads and transfer 400 μL of supernatant to a new screw cap tube.
-
47.
Add 200 μL of 1× TE to each old tube with the beads, vortex vigorously for 10 s and spin beads down at 16,000 × g for 1 min at 20°C–25°C.
-
48.
Remove another 200 μL of supernatant and combine with the first eluate (this will wash any remaining chromatin off the streptavidin beads).
-
49.
Add 200 μL of 1× TE to the tubes containing input DNA to maintain the same volume as for the ChIP-ed samples.
Phenol-Chloroform DNA Precipitation (Day 4)
Input DNA and released ChIP-ed DNA containing genome-wide regions previously bound by biotinylated POI are purified prior to the library preparation.
-
50.
Add 600 μL phenol:chloroform:isoamyl alcohol (toxic if swallowed, inhaled or in contact with skin) to all tubes under the chemical hood, vortex extensively (~30–60 s) and spin tubes at maximum speed for 5 min at 20°C–25°C.
Note: Letting samples rest for 30 s after vortexing can help with an initial separation of the layers before centrifugation.
-
51.
Transfer 250–280 μL of each aqueous layer into two new centrifuge tubes under the chemical hood.
Note: samples are further split into half: 250–280 μL into two tubes. See Figure 5.
Figure 5.

Phenol-Chloroform Purification Step Dividing the Phase-Separated Aqueous Layer into Two for Further Purification Steps
-
52.
Add 32 μL of 3 M Sodium Acetate (11% final volume) and 1.5 μL of 20 μg/μL glycogen (30 μg total glycogen) into all tubes (at this point you should have 8 tubes in total: 4 tubes for the ChIP-ed samples and 4 tubes for the input samples) under the chemical hood.
-
53.
Add 970 μL of 4°C 100% EtOH into all tubes under the chemical hood. Incubate for at least 30 min at −80°C.
-
54.
Spin tubes at maximum speed for 30 min at 4°C to pellet DNA.
-
55.
Prepare 70% EtOH at 4°C.
-
56.
Carefully remove supernatant under the chemical hood, wash pellets with freshly prepared 1 mL of 4°C 70% EtOH and spin at maximum speed for 5 min at 4°C.
-
57.
Remove 70% EtOH and spin tubes at maximum speed for 1 min at 4°C.
-
58.
Remove the remaining EtOH and dry the pellets by leaving the tubes open on the bench for 1–3 min.
Note: do not over-dry the pellets as this will result in a major loss of DNA.
-
59.
Resuspend each ChIP and input sample pellets in a final volume of 11.5 μL nuclease-free water.
Note: At this point, recombine all ChIP and input samples into single ChIP and input tubes (at this point you should have 2 tubes in total) i.e. resuspend first ChIP or input pellet with 11.5 μL nuclease-free water, pipette 10 times up and down and transfer liquid into next tube and resuspend second pellet and so on until recombined ChIP or input samples are in the last tube (see Figure 6). Do not mix input and ChIP samples.
Figure 6.

Combing Material from Multiple Tubes into a Single Tube
Pulling four ChIP or input sample pellets into a single tube containing 11.5 μL nuclease-free water. Add fresh 11.5 μL nuclease-free water into a first pellet and resuspend thoroughly. Then transfer this resuspension into the next tube, resuspend the pellet and repeat two more times. The final tube contains combined material.
Library Preparation and Purification (Day 4)
Precipitated 300–800 bp ChIP-ed and input DNA are first quantified prior to the library preparation. This is followed by ChIP and Input DNA template preparation, adapter ligation, sample indexing and amplification in order to be compatible with Illumina NGS platforms allowing pooled sample multiplexing. Finally, the prepared DNA libraries are purified away from the enzymatic reactions.
-
60.
Quantify precipitated ChIP and Input DNA fragments.
Note: We use Qubit® dsDNA HS Assay Kit for precipitated DNA quantification using their standard protocol (see Qubit® dsDNA HS Assay Kit for precipitated DNA quantification user manual for more information: http://tools.thermofisher.com/content/sfs/manuals/Qubit_dsDNA_HS_Assay_UG.pdf).
Note: Add 1 μL of ChIP/input DNA (since input DNA is highly concentrated, for input measurements use 1:100 or 1:200 dilutions) into prepared sample tubes containing 199 μL Qubit mastermix.
-
61.
Library preparation.
Note: We use Diagenode MicroPlex Library Preparation Kit v2 for the library preparation using the manufacturer’s standard protocol (see https://www.diagenode.com/files/products/kits/MicroPlex-Libary-Prep-Kit-v2-manual.pdf for more information). Of note, we used this Diagenode kit for library preparation, because it worked best in our hands. Newer kits could be utilized at user’s discretion.
We start the library preparation step by transferring remaining 10 μL of ChIP and 10 μL of same concentration input DNA into two PCR tubes (one each).
Note: If ChIP sample could be quantified using Qubit sensitivity threshold, dilute the input sample to the same concentration as the quantified ChIP sample (if not, use 1 ng of input DNA for library preparation).
Note: If ChIP samples could not be quantified using Qubit, select 12 cycles of amplification for the stage 5 library amplification step, extra 2–4 cycles can be added later if 12 amplification cycles are not enough (see below).
After library amplification is finished, we recommend verifying unpurified libraries on the TapeStation station using High Sensitivity TapeStation D1000 reagents and ScreenTape. If amplified library quantity is still too low, unpurified libraries can be further amplified with no extra reagents added. To perform this additional amplification, spin down a PCR tube containing the library, transfer it to a thermal cycler and perform 2–4 PCR cycles as follows:
| Number of Cycles | Temperature (°C) | Time (s) |
|---|---|---|
| 2–4 | 98 | 20 |
| 72 | 50 | |
| 1 | 4 | Hold |
-
62.
Library Purification using AMPure® XP beads:
-
•
Vortex beads thoroughly to resuspend.
-
•
Add 48 μL of beads (in a 1:1 bead to sample ratio) to library prep, pipette up and down 10 times.
-
•
Incubate for 5 min at 20°C–25°C.
-
•
Pulse spin and place in magnetic stand, leave for 5 min for solution to clear.
-
•
Prepare 80% EtOH at 20°C–25°C.
-
•
Remove and discard supernatant, be careful not to remove any beads which now contain your DNA.
-
•
Add 300 μL freshly prepared 80% EtOH while in magnetic stand, leave for 30 s and remove, repeat this wash step once more.
-
•
Air dry beads in magnetic stand with lids open for 3–5 min (right till beads appear matte).
Note: do not over-dry the beads as this will result in a significant loss of eluted DNA!
-
•
Elute DNA with 20 μL of nuclease-free water.
-
•
Pulse spin, place in magnetic stand for 5 min.
-
•
Carefully remove ~18 μL of supernatant and transfer to a new tube, this is your library DNA.
-
•
Verify purified libraries on the TapeStation station using High Sensitivity TapeStation D1000 reagents and ScreenTape.
EXPECTED OUTCOMES
It is important that at the end of this protocol, prior to sequencing, the user evaluates and quantifies prepared ChIP and input sample libraries, for example by TapeStation and Qubit. A good library needs be amplified enough to be sequenced, but it must not be over-amplified as this will result in a high number of PCR duplicates and low library complexity. See Figure 7A as an example of a good TapeStation profile for a transcription factor-bound DNA library. Final libraries can be pooled for a multiplexed sequencing run if desired. Of note, equal concentration of libraries should be pooled for equal sequencing depth. We quantify final pool of libraries prior to sequencing using KAPA Library Quantification Kit. For each sample sequencing depth, we recommend generating 20 million uniquely mapped reads as a minimum. See Figures 7B and 7C for exemplary mapped biotin foxd3 and Sox10 ChIP and input tracks for zebrafish and chicken embryos, respectively.
Figure 7.

Representative ChIP Library Profiles and UCSC Genome Browser Tracks
(A) High Sensitivity TapeStation D1000 profile as a good transcription factor-bound DNA library example.
(B) Representative UCSC genome browser tracks in zebrafish showing foxd3 bound peaks to enhancers (Enh) 1, 4 and 8 proximal to the pax3a gene at 5–6 somite stage (ss). Second track depicts Biotin Ligase (BirA) ChIP control, where no tagged foxd3 was present.
(C) Representative UCSC genome browser tracks in chicken showing Sox10 bound peak to an intergenic element (Enh 1) proximal to Dio3 gene at Hamburger Hamilton (HH) stage 18.
Optimization of the Protocol
For efficient execution of this protocol, two key steps require user-specific optimization: a) defining the concentration of formaldehyde used for cell fixation and b) choosing precise sonication settings for chromatin fragmentation. These parameters (duration of crosslinking and sonication steps) vary between tissue types and depend on the amount of material, and thus can be optimized on 10 chicken or 50 wild-type zebrafish embryos by following the protocol steps 1–21 from Day 1 (see above).
Steps to be optimized:
-
a)
Fixation: We found that decreasing the duration of recommended 10 min for crosslinking while keeping the same final concentration of formaldehyde at 1% in case of small quantities of crosslinking material still generally results in over-crosslinking the samples. By contrast, adjusting the concentration of fixative can provide better control for the crosslinking of cells. We recommend to first fix material with the final concentration of 1% formaldehyde. To evaluate the crosslinking conditions, we recommend running fragmented samples after sonication as described below on 1.5% agarose gel to determine the resulting DNA fragment sizes (desired 200–800 bp, with average ~300 bp fragments, see Figure 8). If fragment sizes are too short, the cells were either under-crosslinked or chromatin was over-sonicated. The opposite is true for larger fragment sizes than desired, where over-crosslinked (and under-sonicated) material appears as a fragment of large size with a smeared “tail.” If chromatin was over-crosslinked, no increase in sonication power or duration is likely to result in appropriate fragment size. The solution, in this case, is to incrementally decrease formaldehyde concentration used, and test/optimize new sonication parameters (duration and number of sonication pulses) until the right size fragments are achieved.
Figure 8.

Agarose Gel Picture Demonstrating the Desired Fragment Size Distribution after Chromatin Sonication
-
b)
Sonication: For chromatin sonication, we use Misonix Sonicator 4000 with Microtip using these parameters: 10 cycles of 12A 10s ON - 30s OFF pulses followed by 4 cycles of 8A 30s ON - 30s OFF pulses. The first 10 cycles break down chromatin into large fragments, which are then further sonicated into smaller fragments during the next 4 cycles. If a sonicated sample still contains very large DNA fragments, the amplitude/number of ON/OFF pulses of the first round of sonication cycles should be increased. If fragment sizes after sonication are slightly too long than desired, the user should try to increase the amplitude/number of ON/OFF pulses of the second round of sonication cycles. If fragment sizes are too short, the amplitude/number of ON/OFF pulses of the first/second round of sonication cycles should be decreased. If a different sonicator is used, the recommended guidelines for the given instrument should be used.
After step 21, the optimization results can be assayed in the following manner:
-
•
Transfer 400 μL of the sonicated material into a screw cap tube.
-
•
Add 21.5 μL of 20% SDS and 8.6 μL of 500 mM EDTA, to bring the final solution up to ~1% SDS and ~10 mM EDTA, to facilitate uncross-linking.
-
•
To reverse crosslink incubate samples at 70°C, 1,300 rpm in the thermomixer for 12–16 h.
-
•
Take the tubes out of the thermomixer and allow to cool to 20°C–25°C.
-
•
Add 400 μL of 1× TE (this will dilute SDS and enable subsequent RNase and Proteinase K treatments).
-
•
Add 16 μL of 10 mg/mL RNase A (0.2 mg/mL final concentration).
-
•
Mix by flicking, spin down and incubate at 37°C for 1 h.
-
•
Add 8 μL of 20 mg/mL Proteinase K (0.2 mg/mL final concentration).
-
•
Mix by flicking, spin down and incubate at 55°C for 1 h.
-
•
Add 800 μL phenol:chloroform:isoamyl alcohol (toxic if swallowed, inhaled or in contact with skin) under the chemical hood, vortex extensively (~30–60 s) and spin at maximum speed for 5 min at 20°C–25°C.
-
•
Transfer 380 μL of each aqueous layer into two new centrifuge tubes containing 42 μL of 3 M Sodium Acetate (300 mM final concentration) and 1.5 μL of 20 μg/μL glycogen (30 μg total) under the chemical hood.
-
•
Add 1,140 μL of 4°C 100% EtOH into all tubes under the chemical hood. Incubate for at least 30 min at −80°C.
-
•
Spin tubes at maximum speed for 30 min at 4°C to pellet DNA.
-
•
Prepare 70% EtOH at 4°C.
-
•
Remove supernatant under the chemical hood, wash pellets with freshly prepared 1 mL of 4°C 70% EtOH and spin at maximum speed for 5 min at 4°C.
-
•
Remove 70% EtOH and spin tubes at maximum speed for 1 min at 4°C.
-
•
Remove the remaining EtOH and dry the pellets by leaving the tubes open on the bench for 1–3 min.
-
•
Resuspend each pellet in 30 μL of 1× TE buffer.
-
•
Run extracted DNA samples on 1.5% agarose gel to evaluate fragment sizes (we recommend running different volumes of extracted DNA, e.g., 10 μL, 15 μL and 20 μL in order to visualize enough DNA sample).
QUANTIFICATION AND STATISTICAL ANALYSIS
Standard and various ChIP-seq analysis pipelines can be followed when employing the biotin ChIP-seq method. Our usual flow for the data pre-processing is: read quality evaluation using FastQC (Andrews, 2010), read trimming for quality using sickle (Joshi and Fass, 2011) or trimgalore (Krueger, 2015) when necessary; read mapping using bowtie aligner (Langmead et al., 2009), PCR duplicate removal using MarkDuplicates via Picard Toolkit (http://broadinstitute.github.io/picard/). We then normalize input read number to the same number of ChIP reads by random down-sampling using samtools (Li et al., 2009). This is followed by Bigwig file generation for track visualization (Kent et al., 2010) and peak calling and annotation using Homer platform scripts (Heinz et al., 2010).
LIMITATIONS
Careful experimental design is essential to avoid the potential limitations and artifacts of the biotin ChIP-seq method that might arise due to AVI tagging and/or overexpression of the POI. As mentioned before, it is critical that the inserted AVI-tag does not significantly interfere with DNA binding, protein-protein interaction and/or enzymatic domains of the POI, which otherwise might affect biological functions of the POI. Similarly, the biotin moiety transferred onto the POI might alter its kinetics and natural interactions with DNA and co-factors. Hence, POI-AVI tagging approach needs to be carefully designed. Additionally, the in vivo biotinylation might only be partial yielding some loss of the biotin ChIP-seq signal. However, given that the method requires more than 100,000 cells, this should not be a severe limitation and the overall TF genome-wide binding landscape would still be recovered in the desired cell population. Note, user can assess an in vivo biotinylation by performing biochemical assays, such as western blot. The biotin ChIP-seq results should always be evaluated in the light of POI being overexpressed in desired tissues. In the zebrafish embryos, we circumvented this problem by injecting the BAC carrying the POI-AVI transgene into the POI heterozygous mutants that overall maintained native gene expression dosage. This could also be achieved by an endogenous gene tagging using methods, such as CRISPR-mediated transgenesis.
A key limitation for the chicken biotin ChIP is that tissue-specific biotinylation is limited to the pre-existing knowledge of active enhancer elements. Of note, a single enhancer-driven TF-AVI expression also poses a risk of ectopic TF expression, which could lead to non-biological TF binding maps and affect overall cellular states. Therefore, user must assess the selected enhancer activity and native TF presence in enhancer positive cells prior to performing the biotin ChIP method. This can be achieved by testing the fluorescent construct harboring the selected enhancer to determine if it marks the cells of interest and performing immunofluorescence/in situ hybridization methods to verify whether a selected TF is natively expressed in the enhancer positive cells. Moreover, the concentration of AVI-tagged construct should be tested by RT-qPCR and titrated, to ensure it does not result in altered expression of known target genes. If targets are not known, analysis of a panel of specific markers expressed by a given tissue/cell type will also provide an insight into whether the normal development is affected. For zebrafish biotin ChIP, one of the largest limitations is the need to generate transgenic zebrafish lines expressing required constructs. Note that it might take a few months to get all the required transgenic lines established.
TROUBLESHOOTING
Problem 1
After performing the whole biotin ChIP-seq method prior to the library prep, the pulled down DNA was too low to be quantified by Qubit.
Potential Solution
This could indicate a random error during the procedure or not enough material used for the method. In the latter case, try increasing a number of cells of interest used for the streptavidin bead pulldown. Of note, the user can also try preparing libraries from ChIP-ed DNA that was too low to be quantified by first choosing 12 cycles of amplification during the library preparation. Check the library profile on the TapeStation and if needed amplify it further 2–4 more cycles. We had instances, when libraries were still generated from extremely low input DNA. However, they will likely contain a high number of PCR duplicates which will need to be removed bioinformatically.
Problem 2
After optimizing the method to acquire right fragment sizes, some prepared libraries still contain larger fragments than desired (see Figure 9 – right side from the upper marker).
Figure 9.

High Sensitivity TapeStation D1000 Profile Indicating Presence of Undesired Long DNA Fragments (Highlighted in Red)
Potential Solution
The presence of large fragments indicates that chromatin was not sonicated enough and hence some of the biological information will be lost since large fragments will not be properly sequenced. Moreover, presence of large fragments during sequencing might interfere with other pooled samples for sequencing. However, for precious samples, the user can try to use AMPure® XP beads to remove large fragments (> 600 bp) and select only smaller fragments for library purification prior to sequencing as follows:
-
1)
Vortex beads thoroughly to resuspend.
-
2)
Add 0.7:1 bead to sample ratio to library prep (e.g. for 20 μL library, add 14 μL of beads), pipette up and down 10 times.
-
3)
Incubate for 5 min at 20°C–25°C.
-
4)
Pulse spin and place in magnetic stand, leave for 5 min for solution to clear and transfer the supernatant to a new tube (take all the supernatant as this contains smaller size DNA fragments). Use a P10 pipette tip if necessary.
-
5)
Add 2:1 volume of beads:sample ratio and incubate for 5 min at 20°C–25°C.
-
6)
Pulse spin and place in magnetic stand, leave for 5 min for solution to clear.
-
7)
Remove and discard the supernatant, be careful not to remove any beads which now contain your DNA.
-
8)
Wash the beads with 300 μL of freshly prepared 80% EtOH at 20°C–25°C while on the magnetic stand. Leave to stand for 30 s and remove the EtOH. Repeat this wash step once more.
-
9)
Air dry beads in magnetic stand with lids open for 3–5 min (until beads appear matte).
Note: do not over-dry the beads (bead pellet will crack) as this will result in a significant eluted DNA loss. However, if this happens, one can rehydrate your beads by adding pre-warmed 37°C water and let to stand for 5–10 min.
-
10)
Elute DNA with appropriate amount of water, mix well by pipetting up and down at least 10 times.
-
11)
Pulse spin, place in magnetic stand for 5 min.
-
12)
Carefully remove the supernatant and transfer to a new tube, this is your library DNA containing only smaller fragments.
Problem 3
After library purification, a presence of a small “bump” (fragments < 150 bp) on the TapeStation indicates existence of carried over primers/primer dimers (see Figure 10).
Figure 10.

High Sensitivity TapeStation D1000 Profile Indicating Presence of Primers (Highlighted in Red)
Potential Solution
It is critical to remove any primers/primer dimers prior to the sequencing run, otherwise the majority of sequenced reads will be of the primer DNA due to short fragment size bias. The user should repeat AMPure® XP bead-based purification or perform column-based PCR reaction purification, which usually solves the issue. Re-run your sample on the TapeStation and if the primer peak persists, perform one further clean up.
RESOURCE AVAILABILITY
Lead Contact
Further information and requests for reagents and protocols may be directed to the lead contact, Tatjana Sauka-Spengler (tatjana.sauka-spengler@imm.ox.ac.uk).
Materials Availability
All plasmids generated and used in this study are readily available from Addgene (https://www.addgene.org/Tatjana_SaukaSpengler/).
Data and Code Availability
The accession numbers for the sequencing data associated with the biotin ChIP-seq protocol that were generated and reported in Lukoseviciute et al. (2018) and Ling and Sauka-Spengler (2019) are GEO: GSE106676 and GSE125711, respectively.
Acknowledgments
This work was supported by MRC (G0902418), Lister Institute prize, Leverhulme Trust grant (RPG-2015-026), March of Dimes Basil O’Connor Award and Wellcome Trust Senior Research Fellowship (215615/Z/19/Z) to T.S.S.; Radcliffe Department of Medicine Scholarship to M.L; Newlife Charity for Disabled Children small research grant and NIHR Academic Clinical Fellowship to I.T.C.L; and the Oxford-Angus McLeod-St. John’s College graduate fellowship and the WIMM prize studentship to I.C.F. Graphical Abstract and Figures 3-6 were created/modified with Biorender.com.
Author Contributions
Methodology, M.L., U.S., I.T.C.L., I.C.F., G.T., R.M.W., and T.S.S.; Investigation, M.L. and I.T.C.L.; Resources, T.S.S.; Writing – Original Draft, M.L., I.T.C.L, and I.C.F.
Declaration of Interests
The authors declare no competing interests.
Contributor Information
Martyna Lukoseviciute, Email: martyna.lukoseviciute@ndcls.ox.ac.uk.
Tatjana Sauka-Spengler, Email: tatjana.sauka-spengler@imm.ox.ac.uk.
References
- Andrews S. FastQC: a quality control tool for high throughput sequence data. 2010. http://wwwbioinformaticsbabrahamacuk/projects/fastqc/
- Barker D.F., Campbell A.M. The birA gene of Escherichia coli encodes a biotin holoenzyme synthetase. J. Mol. Biol. 1981;146:451–467. doi: 10.1016/0022-2836(81)90042-5. [DOI] [PubMed] [Google Scholar]
- Cull M.G., Schatz P.J. Biotinylation of proteins in vivo and in vitro using small peptide tags. Methods Enzymol. 2000;326:430–440. doi: 10.1016/s0076-6879(00)26068-0. [DOI] [PubMed] [Google Scholar]
- de Boer E., Rodriguez P., Bonte E., Krijgsveld J., Katsantoni E., Heck A., Grosveld F., Strouboulis J. Efficient biotinylation and single-step purification of tagged transcription factors in mammalian cells and transgenic mice. Proc. Natl. Acad. Sci. U S A. 2003;100:7480–7485. doi: 10.1073/pnas.1332608100. [DOI] [PMC free article] [PubMed] [Google Scholar]
- Fairhead M., Howarth M. Site-specific biotinylation of purified proteins using BirA. Methods Mol. Biol. 2015;1266:171–184. doi: 10.1007/978-1-4939-2272-7_12. [DOI] [PMC free article] [PubMed] [Google Scholar]
- Hamburger V., Hamilton H.L. A series of normal stages in the development of the chick embryo. 1951. Dev. Dyn. 1992;195:231–272. doi: 10.1002/aja.1001950404. [DOI] [PubMed] [Google Scholar]
- Heinz S., Benner C., Spann N., Bertolino E., Lin Y.C., Laslo P., Cheng J.X., Murre C., Singh H., Glass C.K. Simple combinations of lineage-determining transcription factors prime cis-regulatory elements required for macrophage and B cell identities. Mol. Cell. 2010;38:576–589. doi: 10.1016/j.molcel.2010.05.004. [DOI] [PMC free article] [PubMed] [Google Scholar]
- Joshi N., Fass J. Sickle: A sliding-window, adaptive, quality-based trimming tool for FastQ files. 2011. https://github.com/najoshi/sickle
- Kent W.J., Zweig A.S., Barber G., Hinrichs A.S., Karolchik D. BigWig and BigBed: enabling browsing of large distributed datasets. Bioinformatics. 2010;26:2204–2207. doi: 10.1093/bioinformatics/btq351. [DOI] [PMC free article] [PubMed] [Google Scholar]
- Krueger F. Trim Galore!: a wrapper tool around Cutadapt and FastQC to consistently apply quality and adapter trimming to FastQ files. 2015. http://www.bioinformatics.babraham.ac.uk/projects/trim_galore/
- Langmead B., Trapnell C., Pop M., Salzberg S.L. Ultrafast and memory-efficient alignment of short DNA sequences to the human genome. Genome Biol. 2009;10:R25. doi: 10.1186/gb-2009-10-3-r25. [DOI] [PMC free article] [PubMed] [Google Scholar]
- Li H., Handsaker B., Wysoker A., Fennell T., Ruan J., Homer N., Marth G., Abecasis G., Durbin R. The Sequence Alignment/Map format and SAMtools. Bioinformatics. 2009;25:2078–2079. doi: 10.1093/bioinformatics/btp352. [DOI] [PMC free article] [PubMed] [Google Scholar]
- Ling I.T.C., Sauka-Spengler T. Early chromatin shaping predetermines multipotent vagal neural crest into neural, neuronal and mesenchymal lineages. Nat. Cell Biol. 2019;21:1504–1517. doi: 10.1038/s41556-019-0428-9. [DOI] [PMC free article] [PubMed] [Google Scholar]
- Lukoseviciute M., Gavriouchkina D., Williams R.M., Hochgreb-Hagele T., Senanayake U., Chong-Morrison V., Thongjuea S., Repapi E., Mead A., Sauka-Spengler T. From Pioneer to Repressor: Bimodal foxd3 Activity Dynamically Remodels Neural Crest Regulatory Landscape In Vivo. Dev. Cell. 2018;47:608–628 e606. doi: 10.1016/j.devcel.2018.11.009. [DOI] [PMC free article] [PubMed] [Google Scholar]
- Schatz P.J. Use of peptide libraries to map the substrate specificity of a peptide-modifying enzyme: a 13 residue consensus peptide specifies biotinylation in Escherichia coli. Biotechnology (N Y) 1993;11:1138–1143. doi: 10.1038/nbt1093-1138. [DOI] [PubMed] [Google Scholar]
- Trinh L.A., Chong-Morrison V., Gavriouchkina D., Hochgreb-Hagele T., Senanayake U., Fraser S.E., Sauka-Spengler T. Biotagging of specific cell populations in zebrafish reveals gene regulatory logic encoded in the nuclear transcriptome. Cell Rep. 2017;19:425–440. doi: 10.1016/j.celrep.2017.03.045. [DOI] [PMC free article] [PubMed] [Google Scholar]
- Zhou P., Gu F., Zhang L., Akerberg B.N., Ma Q., Li K., He A., Lin Z., Stevens S.M., Zhou B. Mapping cell type-specific transcriptional enhancers using high affinity, lineage-specific Ep300 bioChIP-seq. Elife. 2017;6:e22039. doi: 10.7554/eLife.22039. [DOI] [PMC free article] [PubMed] [Google Scholar]
Associated Data
This section collects any data citations, data availability statements, or supplementary materials included in this article.
Data Availability Statement
The accession numbers for the sequencing data associated with the biotin ChIP-seq protocol that were generated and reported in Lukoseviciute et al. (2018) and Ling and Sauka-Spengler (2019) are GEO: GSE106676 and GSE125711, respectively.