Summary
The elastic properties of cell membranes, particularly the membrane tension and bending modulus, are known to be key regulators of cellular functions. Here, we present a correlative and integrated tool based on optical tweezers and scanning electron microscopy to accurately determine these properties in a variety of cell types. Although there are intrinsic difficulties associated with correlative experiments, we believe that the methods presented can be considered a suitable protocol for determining the elastic properties of cell membranes.
For complete details on the use and execution of this protocol, please refer to Soares et al. (2020).
Subject areas: Biophysics, Cell biology, Cell membrane, Microscopy
Graphical Abstract

Highlights
-
•
Protocol to obtain the membrane tension and bending modulus of cells
-
•
Detailed procedures to measure the membrane tether force with optical tweezers
-
•
Correlative optical tweezers-scanning electron microscopy to measure the tether radius
The elastic properties of cell membranes, particularly the membrane tension and bending modulus, are known to be key regulators of cellular functions. Here, we present a correlative and integrated tool based on optical tweezers and scanning electron microscopy to accurately determine these properties in a variety of cell types. Although there are intrinsic difficulties associated with correlative experiments, we believe that the methods presented can be considered a suitable protocol for determining the elastic properties of cell membranes.
Before you begin
In this method, a membrane tether is extracted via optical tweezers (OT) and the force required to perform tether extraction is obtained during the experiment, while the tether radius is later measured by scanning electron microscopy (SEM). The most challenging step to successfully obtain the elastic properties of the cells is to perform SEM. The protocol presented here describes in detail the step-by-step procedure to precisely measure the tether force using OT and the tether radius using SEM. Thus, regardless of the difficulties related to accomplish the correlative experiment, this protocol gives precise and reliable values for the elastic properties of cell membranes.
Preparation of coverslips and glass-bottom dishes
Timing: from steps 1b to 1d, 2 h; 1e, 1 h
Timing: from steps 2a to 2e, 2 h; 2f, 1 h
Timing: step 3, 45 min
Timing: step 4, 2–3 h
The following steps describe the preparation of glass-bottom dishes for tether radius measurements using SEM.
Note: Glass-bottom dishes can be either purchased directly from a specific manufacturer or can be prepared following the protocol described below. This is strongly suggested for SEM measurements of tether radius, as coverslip removal is facilitated if this procedure is performed. Coverslip removal is an important step during sample preparation and observation in the electron microscope.
-
1.Procedures for cleaning, marking, and sterilizing the coverslips.
- Coverslips should have the following specifications: dimensions (L × W): 18 × 18 mm or 20 × 20 mm; thickness: 0.13–0.17 mm.
-
a.Using a glass-writing diamond pen, carefully draw a small square (dimensions [L × W], 1 × 1 mm) in the center of the coverslip. Repeat the procedure for several other coverslips (Figure 1).
-
b.Clean the coverslips by incubating them in a container with a 30% nitric acid solution for at least 2 h. This step is crucial in order to remove any type of material (debris) that may be attached to the coverslip surface, such as grease, dust, or even glass remnants.
-
c.Remove the cleaning solution, wash the coverslips three times by incubating them in deionized water and finally incubate them in a second container with 100% ethanol for at least 2 h.
-
d.Remove all the coverslips from the ethanol bath and let them dry completely. Then, place the coverslips in an autoclave-safe container for sterilization.
-
2.Creating a central hole on 35 mm culture dishes (Figure 2)
-
a.A 10 mm diameter hole saw attached to a drill is required to produce the central hole at the bottom surface of 35 mm culture dishes.
-
b.Each dish must be positioned perpendicular to the hole saw, in a way that the dish is oriented vertically, and the hole saw is oriented horizontally.
-
c.Discard all debris from the drilling and repeat the steps for as many dishes as needed.
-
d.Polish the boundaries of the hole at the outer face of the dishes to smoothen the edges. We suggest to use a sharp knife, a scalp, or even a sander for this procedure. This is a crucial step to remove any remaining plastic spiky tips as these can directly influence proper coverslip attachment.
-
e.Immerse the dishes in a container with a 70% ethanol solution for at least 2 h.
-
f.Remove the dishes and let them dry at 20°C–25°C.
-
a.
CRITICAL: Make sure that neither the coverslips nor the dishes contain plastic or glass debris.
CRITICAL: Avoid as much as possible to directly touch the dishes and coverslips with your fingers. Always handle the dishes by touching their outer rim, wear gloves, and use tweezers during the procedure.
CRITICAL: Pay close attention during this procedure to avoid physical injuries to the person who is handling the sharp instruments. Only perform the described steps if you are completely aware of the entire procedure and if you have all the appropriate personal protective equipment (PPEs).
Pause point: We suggest to execute both sessions 1 and 2 on the same day. However, if this is not possible, we suggest steps 1d and/or 2e as stopping points.
-
3.Organizing and preparing the materials to attach the coverslips onto the bottom of the dishes.
-
a.Add a considerable amount of paraffin wax into a glass container. We normally use between 20 g and 100 g of paraffin wax.Note: The amount of paraffin wax used depends on the number of dishes to be prepared. We usually prepare between 20 and 50 dishes with the amount reported above. Paraffin wax can be stored at 20°C–25°C.
-
b.Once ready, place the container onto a hot plate. Make sure that the temperature varies between 58°C and 62°C, the melting point of paraffin. The melted paraffin will then be used to attach the coverslips to the dishes.
-
c.Get an instrument capable of accurately and safely transporting the melted paraffin to the dishes. We use a glass rod.
-
a.
-
4.Attaching the coverslips to the dishes (Figure 3). Troubleshooting 1
-
a.Hold the dish and place the coverslip on the outer side of its bottom (Figure 3A). Then, bring them closer to the melted paraffin container. Hold the dish always at its outer rim.
-
b.Use the instrument described in session 3 (glass stick) to collect the melted paraffin and gently drop it at the four corners of the coverslip (Figure 3B). Repeat the procedure until you have all the glass vertices covered with paraffin and in contact with the outer surface of the dish.
-
c.Collect the melted paraffin again, but now spread it across all the coverslip perimeter, always covering the external surface of the dish. Repeat the procedure until all the coverslip perimeter is covered with paraffin (Figure 3C).
-
d.Note that the coverslip will be fixed to the external part of the bottom of the dish as the paraffin solidifies.
-
e.Repeat all the steps for as many dishes as needed.
-
f.Wait until the paraffin completely solidifies at 20°C–25°C in all the dishes manipulated.
-
g.Bring all the glass-bottom dishes to a biological safety cabinet and turn on the UV light for at least 1 h to sterilize them. After that, the glass-bottom dishes are ready to be used.
-
a.
Note: If properly stored after sterilization (away from humidity and heat), the dishes can be used for up to 2 months. We do not recommend using after this period of time.
Figure 1.

Schematic representation of how the square is drawn on the coverslip
A glass-writing diamond pen is used, as indicated.
Figure 2.
Schematic representation of how to create a central hole in the 35 mm culture dishes
(A–C) Step-by-step procedure to perform the central hole.
(D) Procedure to smoothen the edges of the hole.
Figure 3.
Schematic representation showing how to attach the coverslips to the culture dishes
(A–C) Step-by-step procedure to spread the paraffin wax throughout the contact between the dish and coverslip. Note that here is represented the bottom surface of the dishes with the coverslip on top of it.
Coating glass-bottom dishes
Timing: 1–2 h
For this step, one can use either the commercially available glass-bottom dishes or the glass-bottom dishes prepared following the protocol described above.
-
5.The following steps describe how to treat the glass-bottom dishes immediately before seeding the cells. It is important to notice, however, that this session is mandatory for both tether radius and force measurements.
-
a.Place the glass-bottom dishes inside a biological safety cabinet and add poly-L-lysine, 0.01% (w/v) solution, or a specific adhesive protein to allow for cellular adhesion to the bottom of the dish.Note: The poly-L-lysine solution must be stored at 4°C and following all the manufacturer’s recommendations.
-
b.Close the dishes and move them to the cell incubator for 45 min to 1 h.
-
c.Return the dishes to the safety cabinet and remove the excess of poly-L-lysine or specific adhesive protein.
-
d.Wash the glass-bottom dishes three times with sterile and deionized water.
-
e.Let them dry inside the biological safety cabinet for 5–10 min before plating the cells.
-
f.Dishes are ready for cell culture.
-
a.
Cell culture
Timing: 1–2 h
The following steps describe the procedures used to culture cells for tether radius and force measurements. We have performed this procedure with a variety of cell types, including fibroblasts, astrocytes, neurons, oligodendrocytes, microglia, glioblastoma, macrophages, cardiomyocytes, erythrocytes, and neural precursor cells (Ayala et al., 2017; Hissa et al., 2013, 2017; Pontes et al., 2011; 2013; 2017a; 2017b; Soares et al., 2020; Gomez et al., 2020). Below, we give the minimal requirements to prepare samples.
-
6.
Using the cell type or lineage of your choice, cover the entire well diameter of the glass-bottom dish with approximately 50 μL of a cell suspension in a proper culture medium. Seed enough cells to obtain approximately 50% confluence on the day of the experiment (Figure 4).
CRITICAL: Make sure that there is enough space between the cells to perform the tether extraction experiments.
-
7.
Put the sample in the cell incubator for 15–30 min to allow initial cell attachment.
-
8.
Bring the glass-bottom dishes back to the biological safety cabinet and add 2 mL of cell culture medium.
-
9.
Return the glass-bottom dishes to the cell incubator and keep them there until the day of the experiment.
Note: The culture medium used must be specific for the cell type and must be stored and used following the manufacturer’s recommendations.
Figure 4.
Illustration of the ideal cell confluence for tether extraction experiments
Note that there is enough space between cells to perform the experiments.
Optical tweezers alignment
Timing: 2–4 h
There are some excellent reviews in the literature that visually demonstrate the step-by-step procedures on how to align an OT. We strongly recommend reading (Nicholas et al., 2014), section 3.7, where an elegant description of the procedure has been carefully conducted. With two mirrors a distance apart, the laser beam can be steered to enter a port of an inverted microscope and be reflected by a dichroic mirror (DM) to impinge on the objective lens parallel to its axis (Figure 5). If this procedure is correctly performed, the bright focus spot of the laser and its concentric diffraction rings observed when the laser is reflected in the air-coverslip interface, after passing through the objective lens, will not be laterally displaced while the objective lens moves back and forth.
Figure 5.
Schematic representation of the OT system
Note that the OT laser is directed to the microscope and reaches the back entrance of the objective lens after being reflected by the dichroic mirror (DM). The entire system is coupled to a scientific camera and a computer, allowing real-time measurements, and build upon an anti-vibration table.
OT calibration
Timing: 2–4 h
Among different applications, an optically trapped microsphere can act as a mechanotransducer, where the readout position of the bead (a mechanical probe) will allow force spectroscopy experiments limited by thermal fluctuations (Neuman and Nagy, 2008; Liu et al., 2016; Schnoering et al., 2019). To perform these tasks, it is crucial to obtain the trap stiffness, which converts a displacement of the bead from its equilibrium position into a force according to the relation (Hooke’s law).
There are extensive reviews in the literature describing in detail different OT calibration methods (Gieseler et al., 2020; N.B.V., unpublished data), and the advantages and disadvantages of all methods. Here, we describe one of the simplest calibration procedures based on the Stokes-Faxén law for the viscous drag force acting on a microsphere immersed within a fluid (Nicholas et al., 2014; N.B.V., unpublished data).
The main idea of this calibration procedure is sketched in Figures 6 and 7.
-
10.Positioning the microsphere at a given height
-
a.A dielectric microsphere with a known radius (value provided by the manufacturer) and immersed in a liquid (water) with viscosity should be optically trapped using a tightly focused laser beam by an objective lens.
-
b.Then, the translational stage, to which the objective lens is usually attached, is set to move along the direction until the microsphere gently touches the coverslip (Figure 6A). The stage should then be translated back by a distance until the microsphere reaches a height (Figure 6B), which is given by , where and are, respectively, the refractive indices of the water and glass coverslip.
-
a.
Note: As an example, let us consider a polystyrene microsphere with radius (value provided by the manufacturer) immersed in water at temperature and dynamic viscosity , and optically trapped by a laser with a central wavelength of , power of and focused by a Nikon 100× Plan APO NA 1.4 objective lens. The corresponding refractive indices of water and glass for that wavelength are, respectively, given by and . Choosing , where the estimated uncertainty comes from the positioning of the microscope translational stage, we then have , where the uncertainty is calculated by propagating the usual square root formula for squared error propagation of uncorrelated quantities.
Note: The bead solution must be stored at 4°C and follow all the manufacturer’s recommendations.
-
11.Creating a fluid flow around the microsphere.
-
a.Once the microsphere is properly displaced to a known height , the translational stage should be set to move along the direction to create a fluid flow with a given velocity around the microsphere, which then experiences a drag force along the axis. This force will push the microsphere in the direction of flow. As sketched in Figures 7A and 7B, the OT will then exert a restoring force on the microsphere pulling it back to its initial position. The result of this “tug of war” is a new equilibrium position for the microsphere where , in which represents the difference between the new and the unperturbed equilibrium positions, and is the drag coefficient, given by: . Knowing and measuring enable us to infer the trap stiffness along the direction.Note: Considering the previous example and substituting the values of and in the equation for the drag coefficient, we obtain , where the uncertainty was again calculated by propagating the errors.
-
b.A fluid flow can be created around the microsphere by translating the microscope stage with alternating and increasing known velocities, for example using values ranging from to , where the uncertainty of each velocity is given by . The microsphere will then move from the unperturbed equilibrium position, and a typical plot of that movement is represented in Figure 8A, which shows the measured positions of the optically trapped microsphere’s center of mass as a function of time.
-
c.Each cycle of forward and backward movements with a given velocity allows us to obtain the equilibrium positions and . For example, the cycle for is highlighted with dashed red rectangles in Figure 8A. The displacement of the microsphere is then given by . Calculating the average forward and backward displacements inside each of the dashed rectangles, together with the corresponding standard deviations and , we then have the average displacement , together with the corresponding standard deviation given by . As a result, the measured displacement will be .
-
a.
-
12.Linear Regression of the versus plot.
-
a.Repeating this procedure for all cycles corresponding to different velocities, we can gather the results and draw the plot of for each velocity (Figure 8B). Performing a linear regression on the data , and using the equation above for the equilibrium condition, the angular coefficient will then be equal to , which allows us to obtain the trap stiffness , with the corresponding uncertainty given by , where and are the corresponding uncertainties in and (the latter coming from the linear fit).
-
a.
Note: Again considering the previous example, , and consequently, , being . From the above result, we can observe that the relative uncertainty in the above method of calibration is approximately equal to 7%. To estimate statistical errors, the trap stiffness must be evaluated for at least three complete cycles with all the velocities.
-
13.Trap stiffness as a function of the laser power at the entrance of the objective lens
-
a.For completeness, it is recommended to perform the OT calibration and find the trap stiffness as a function of the laser power measured at the entrance of the objective lens. The plot in Figure 9 shows the expected linear trend, with a linear coefficient compatible with zero value and with angular coefficient given by .
-
a.
CRITICAL: The trap stiffness calibration protocol exemplified above was used to calibrate the OT in all the following procedures of this protocol. However, the experimental conditions used were: a polystyrene microsphere of radius (value provided by the manufacturer) immersed in water at temperature , and optically trapped by a laser of wavelength 1,064 nm focused by a Nikon 100× Plan APO NA 1.4. Positioning the microsphere at the height , and performing all the above steps, the value was obtained.
Figure 6.
Setting the height of a microsphere trapped in the OT
(A) The microsphere is gently moved down by the translation stage of the objective until it touches the coverslip.
(B) Translating back the stage by a distance d enables us to position the microsphere at the height h.
Figure 7.
OT calibration based on hydrodynamics Stokes’ Law
(A) The microsphere is optically trapped at a given height h.
(B) A drag force acting on the microsphere is balanced by the optical restoring force.
Figure 8.
Dynamics of an optically trapped microsphere under the Stokes’ drag force
(A and B) (A) Alternating movement of the microsphere subject to fluid flows of different and increasing velocities; (B) The displacement as a function of the fluid velocity .
Figure 9.
Trap stiffness as a function of the laser power at the entrance of the objective lens
The inset shows the fitted values obtained by linear regression.
Key resources table
| REAGENT or RESOURCE | SOURCE | IDENTIFIER |
|---|---|---|
| Chemicals, peptides, and recombinant proteins | ||
| Nitric acid | Merck KGaA | Cat#1006301000 |
| Ethanol | Merck KGaA | Cat#1117271000 |
| Paraffin wax | Sigma-Aldrich | Cat#327212 |
| Poly-L-lysine | Sigma-Aldrich | Cat#P4707 |
| Culture medium (DMEM-F12) | Thermo Fisher | Cat#12500062 |
| Fetal bovine serum | Thermo Fisher | Cat#12657029 |
| Polystyrene beads | Polysciences | Cat#17134-15 |
| Immersion oil | Nikon | Cat#MXA22165 |
| CO2 gas | Alta Pressão | N/A |
| Glutaraldehyde | Electron Microscopy Sciences | Cat#16000 |
| Sodium cacodylate trihydrate | Sigma-Aldrich | Cat#C0250-10G |
| Sucrose | Sigma-Aldrich | Cat#S7903 |
| Magnesium chloride | Sigma-Aldrich | Cat#M8266 |
| Software and algorithms | ||
| ImageJ | NIH | https://imagej.nih.gov/ij/ |
| KaleidaGraph | Synergy Software | https://www.synergy.com/ |
| Other | ||
| Coverslips | Knittel Glass | Cat#VD12020Y1A.01 |
| Glass-bottom dishes | MatTek Life Sciences | Cat#P35G-0-10-C |
| 35 mm culture dishes | Corning | Cat#430165 |
| Glass-writing diamond pen | Agar Scientific | Cat#AGT5347 |
| Autoclave | Prismatech | Cat#CS18 |
| Drill and hole saw | Beltec | Cat#LB100 |
| Sharp knife (bistoury) | ABC Instrumentos Cirúrgicos | Cat#0015 |
| Tweezers | Electron Microscopy Sciences | Cat#78510-0 |
| Glass stick | Sigma-Aldrich | Cat#S4522-6EA |
| Hot plate | Ika | Cat#C-MAG HS 7 |
| Biological safety cabinet | Esco | Cat#AB2-3S1 |
| Cell incubator | Thermo Fisher | Cat#4110 |
| Micropipette automatic | Gilson | Cat#FA10006M |
| Neubauer chamber | Sigma-Aldrich | Cat#BR717805-1EA |
| OT laser | IPG Photonics | Cat#YLR-5-1064-LP |
| Inverted microscope | Nikon | Cat#EclipseTE300 |
| Stage positioning | PI | Cat#P-545.3R8S |
| CO2 and temperature chamber | Adapted | N/A |
| Optical table | Thorlabs | Cat#T1020CK |
| Objective lens | Nikon | Cat#PLAN APO 100X 1.4 NA DIC H |
| Optical power meter | Newport | Cat#843-R |
| Microscope camera | Hamamatsu | Cat#C2400 |
| Frame grabber | Scion Corporation | Cat#FG7 |
| Fume hood | HQ | Cat#SP80N |
| Critical-point dryer | Bal-tech | Cat#CPD 030 |
| Carbon adhesive tape | Electron Microscopy Sciences | Cat#77825-06 |
| Stubs | Agar Scientific | Cat#AG16144 |
| Gold sputter-coater | Bal-tech | Cat#SCD 050 |
| Scanning electron microscope | FEI | Cat#Quanta 250 |
Step-by-step method details
Membrane tether extraction using optical tweezers
Timing: 30 min for preparation; 30 min to 1 h of total acquisition for each sample
To perform the following steps, it is necessary to ensure that the OT system was aligned and calibrated.
-
1.Equipment preparation: this section describes the steps that precede image acquisition and what should be set before introducing the sample to the system.
-
a.Stabilization of all system components
- The equipment assembly is shown in Figure 10. First, one should turn on all the electronic components: power supply of the OT laser; microscope; positioning stage; computer and all other accessories; temperature control; atmosphere control and any other component that may exist in the assembly. The anti-vibration table should also be activated in this step. Once the computer is initialized, certify that all the required software is loaded correctly. In our system, a joystick is used to better control the stage position. Any such gadget should be started, calibrated, and/or verified at this moment.
-
b.Microscope objective lens inspection
- For tether extraction experiments with OT, an appropriate objective lens with a numerical aperture (NA) between 1.2 and 1.4 must be used. In our system, a PLAN APO 100× 1.4 NA DIC H Nikon objective lens is used. This type of lens requires careful manipulation and storage to avoid any dust accumulation on its surface. At this step, the chosen lens, previously calibrated, should be installed or checked for proper connection (Figure 10).
-
c.Temperature Stabilization
- To extract tethers from living cells, strict control of temperature and other optimal culture conditions is essential. The temperature must be set according to the cell culture of interest, using a temperature control system attached to the microscope. In our setup, an acrylic chamber encloses the sample holder (Figure 10). Since the entire optical system can experience some variation with temperature, it is recommended to wait for temperature stabilization inside the chamber before introducing the sample. In our system, this step can take up to 15–30 min.
-
a.
-
2.Sample preparation and positioning: this sub-step assumes that cells were previously cultured in the aforementioned glass-bottom dishes.
-
a.Dispersing the beads within the sample
- Polystyrene beads are used as probes for the OT. These beads must be dispersed in the medium before tether extraction.Note: The use of a biological safety cabinet and properly sterilized materials is advised to avoid contaminants that might interfere with the results. The optimal number of beads to be added to the sample will depend on the size of the sample dish and the volume of culture medium utilized. For a glass-bottom dish with 8.8 cm2 of bottom surface area and 2 mL of culture medium, 1 μL of a bead solution (number of beads estimated at 1.68 × 10⁶ beads) has worked properly in our setup.
-
b.Adjusting the sample position in the microscope
- Once the beads are dispersed, the glass-bottom dish can be placed into the microscope. The NA of the used objective lens implies that an immersion oil objective lens is used. The lens immersion medium should be applied immediately before sample positioning. In our setup, the sample is positioned inside an atmosphere-controlled acrylic chamber. After the sample is moved to the chamber, the objective lens is approached to the glass-bottom dish until the immersion oil touches the outer bottom face of the coverslip.
-
c.For living cells: adjusting CO2 level
- After proper placement of the sample, the CO2 controlled injection system can be turned on. The setup used is illustrated in Figure 10. For most cell cultures, a CO2 concentration of 5% is used, reproducing the conditions of a cell incubator. Wait for the CO2 stabilization. If atmosphere control is not needed, this step can be skipped. If a different CO2 concentration is needed, adjust accordingly.
-
d.Kohler Illumination
- With both atmosphere and temperature control stabilization, the Kohler Illumination procedure must be employed to ensure that the sample is optimally illuminated.
 CRITICAL: The procedure for tether force measurement relies on image analysis. If the optical system is not properly aligned, the generated image can be less clear, and the tether force values wrongly determined.
-
a.
-
3.
Obtaining the OT equilibrium position for the reference bead
- For this section, the equilibrium position of a trapped bead is determined as a reference for zero force.
-
a.Setting the laser output
- The laser equipment in our setup [an infrared, 1,064 nm, polarized and collimated laser beam model YLR-5-1064-LP (IPG Photonics, NY, USA)] allows output controls in percentage parameters, from 0% to 100% of its emission power capacity. To perform tether extraction experiments, the laser power that reaches the back focal plane of the objective lens should be around 1 W. In our setup, the powermeter is placed above the microscope stage (Figure 11). Ensure that the laser power is checked before and after the tether pulling experiments, to avoid any variation that might affect the tether force measurements.
-
b.Video capture parameters
- In the chosen video acquisition software, one should define the capture parameters. Although the resolution is limited by the available frame grabber, the imaging software usually allows controlling the frames/second (fps) and the total acquisition time. The minimum recommended frame rate for capture is 10 fps. As for the total time, the minimum recommendation is 20 s.
-
c.Video of the reference bead
- Find a region of the sample clean of debris and cells. Turn on the laser in the chosen power intensity and trap a bead with the OT. Start the video capture, at the established parameters. Save the video and tag it accordingly.
-
a.
CRITICAL: During video acquisition, if any type of debris crosses or gets captured by the OT, restart the procedure.
-
4.Membrane tether extraction and video acquisition
-
a.Approaching a cell of interest
- In the sample, search for a cell with enough space around it to allow tether extraction. Turn on the laser emission with the same parameters used previously to obtain the video of the reference bead. Capture a nearby bead and place it near the chosen cell (Figure 12A).
-
b.Adhering the OT-trapped bead to the cell surface
- Approach the OT-trapped bead to the cell surface by pressing it against the cell membrane for 5–10 s (Figures 12B and 12C).Note: To press the bead against the cell surface, first place the OT-trapped bead above a chosen cell, then use the microscope and move the focus toward the coverslip. Consequently, the OT-trapped bead will also move toward the coverslip until it touches the cell surface. As soon as it touches the cell surface, you should be able to identify a visual change in the OT-trapped bead image, caused by a slight displacement in the optical axis direction, indicating the pressure done by the OT.Note: In our experiments, we typically use uncoated polystyrene beads as we have previously demonstrated that bead coating or size do not affect tether pulling (Pontes et al., 2011). The coating only helps to induce a more efficient first contact between the bead and cell surface. The most important caution must be to properly press the OT-trapped bead against the cell surface. The beads are attached to the cell surface by nonspecific adhesions which likely involve Van der Waals forces.
 CRITICAL: This step should be performed as fast as possible, since the contact of the bead with the cell membrane distorts the nearby cytoskeleton, reorienting actin filaments lining from parallel to perpendicular to the membrane surface, and even attempting to phagocyte the bead if allowed enough time, especially in professional phagocytes (Icard-Arcizet et al., 2008).
 -
c.Membrane tether extraction experiment
- After waiting for bead attachment, use the positioning stage to move the entire sample (in the xy direction), trying to separate the bead from the cell. This step can be performed with controlled velocity. In our setup, we typically use velocity of 1.0 μm/s. Other velocities can be used according to the sample (Figure 12D). It should be possible to roughly see the shape of the tether if the optical system is clear enough. Pull until a distance of 3–5 bead diameters is reached, to properly extend the tether. Keep the tether extended for the remaining time of the video acquisition. After video completion, turn the laser emission off and observe the bead recoil (Figure 12E).Note: Bead recoil is an important step for validating the measurement. If the bead is pulled back in the direction of the membrane, this indicates the presence of a membrane tether (Figure 12E). If the bead resumes regular Brownian motion, the tether might have broken or might even not have been formed at all. It is also possible to observe more than one tether attached to the bead at the same time. In this case, the recoil movement of the bead is erratic, oscillating between two or more directions. Some other interferences, such as vibrations or debris, can disturb the experiment, requiring repetition of the measurement.Note: An interesting analogy is to compare the procedure to a tug of war between the OT and the cell, both trying to hold the bead. At a given moment the OT wins by pulling out part of the cell surface in the form of a membrane tube or tether.
-
d.Repeat until conclusion
- After correctly recording a membrane tether extraction, repeat the steps initiating in a. Repetition should be performed for at least 20 different times and from different cells on the dish.
-
a.
Figure 10.
Schematic representation showing the OT microscope with the culture chamber
(A) OT microscope representation.
(B) Zoom showing the culture chamber attached to the OT microscope system.
Note that the infrared laser is directed to the microscope and reaches the back entrance of the objective lens. The culture chamber used in our system controls temperature and CO2 concentration, allowing real-time and living cell experiments.
Figure 11.
Schematic representation of how to measure the OT laser power
Figure 12.

Schematic representation of a typical tether extraction experiment
(A) Trapping a bead with the OT.
(B and C) Pressing the OT-trapped bead against the cell surface to allow bead attachment.
(D) Tether extraction experiment, indicating tether formation. is the variation between the probe’s position during tether extraction and the corresponding position of zero force reference.
(E) Tether recoil after turning off the OT laser.
Measuring the membrane tether force
This section describes the steps and procedures to precisely measure the tether force.
-
5.
Measurement of laser output
As mentioned before, the value of laser power that reaches the sample is used to determine and, therefore, the tether force, . To verify the laser power, a powermeter is used. For the assembly illustrated, it is necessary to remove both the microscope condenser unit and the objective lens. Usually, as cited earlier, the mean value of power should be around 1 W (Figure 11). At least 2 different measurements of power should be performed, before and after the tether pulling experiment, to obtain the mean value of power with its respective error bar.
Note: The value acquired is not the power that reaches the sample, since a large fraction of the power is dispersed when passing through the objective lens system. The transmittance of the lens should be evaluated and accounted for, during calibration.
CRITICAL: If your OT system is calibrated and stable, small variations in power are acceptable (in our setup, 5%–10% variations are considered acceptable). However, if one observes a drastic variation we suggest checking the stability of the system as well as the origin of such variation before redoing all the experiments.
-
6.
Data analysis
- In this step, the videos obtained previously are analyzed to determine the variation between the probe’s position during each tether extraction procedure and the corresponding position of zero force reference. This variation in position can be plotted versus the acquisition time, and, using the parameters defined during calibration, to generate a plot of the force applied to the probe versus the elapsed time. A bead trapped in the OT acts as an object attached to a spring. A radial deviation from the bead’s rest position results in a force in the opposite direction, that can be modeled through Hooke’s Law as: , where was defined in the calibration section and is related to the laser power, the index of refraction of the medium, and other known parameters. Thus, this model allows determination of the force applied to the trapped bead using its position variation relative to a reference position.
-
a.Establishing the probe’s position using an image analysis software
- The image processing exemplified here uses the ImageJ software. However, the principles described should be reproducible using other programs that employ equivalent tools. The same process is used for both the reference position and tether extraction videos.
-
i.Open file
- In the “File” tab, select “Open” and find the video to be analyzed. For the video processing step, it is recommended to analyze each video individually (Figure 13).
-
ii.Threshold
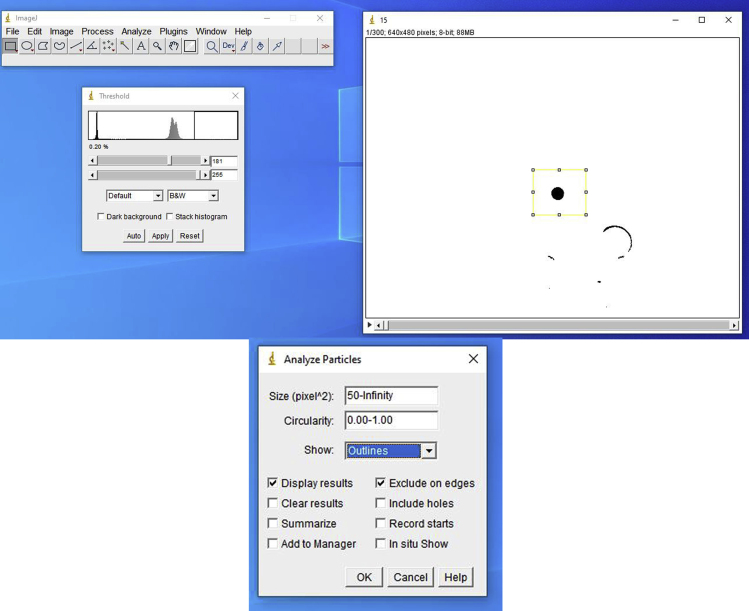
- With the video window selected, click in the “Image” tab, select “Adjust” and then “Threshold.” In the new window, keep the options “Default” and “B&W.” Adjust the parameters to ensure that the centralized bead is in optimal contrast when compared to the background (Figure 14). The lower slider should be dragged to 255. The upper slider should be adjusted until the bead resembles the example shown.
-
iii.Analyzing particle position
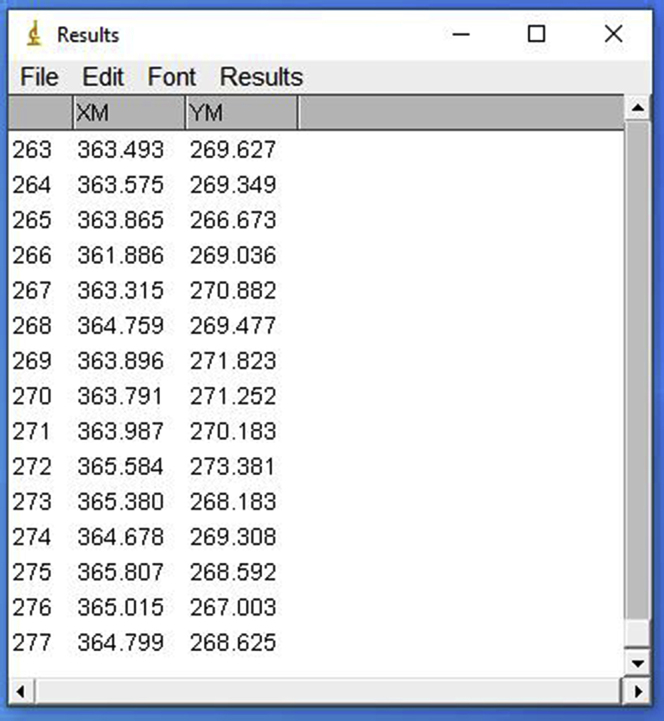
- Using the rectangular selection tool, outline a region around the trapped bead. Each wall of the rectangle should be at about one diameter far from the bead. This ensures that the analysis is made within the selected area, thus saving processing time. In the tab “Analyze,” choose “Analyze particles.” In the “Size” section, determine a minimum size in the range of 50–100 pixels. That keeps the software from calculating the position of smaller and without interest particles. In the “Show” section, select “Outlines.” This option produces outline images of what the software identified as a particle and serves as quality control of this step. Also, select the options “Exclude on edges” and “Display results” (Figure 15). The first removes the frames in which the particle touched or crossed the selection boundaries. The second displays a table of results with the XY position, for each frame of the particle i.e., the probe. With all the proper options selected, process all frames. Examine the produced images of the outlines, assessing if the software computed particle positions other than the ones of the probe. Save the resulting table accordingly. If there are more position points than frames, the software recognized multiple particles at some frame. Repeat the procedure, adjusting the threshold and size filtering. If needed, it is possible to manually remove the positions of other non-desired particles from the table. Repeat this procedure until all videos are processed and all corresponding tables are obtained (Figure 16).Optional: Using ImageJ, it is possible to create a macro that automatically computes a series of predetermined actions. This can be performed intuitively by clicking in the “Plugins” tab, and selecting the option “Record,” under “Macros.” In this mode, the software records every input and creates a correspondent script that will repeat the same processes when loaded again, so that the series of steps previously described can be performed in a faster way. It is important to check the quality of the process in the same ways described before.
-
i.
-
b.Determining the tether force using the data analysis software
- For this step, data analysis software is required. In our system we use the KaleidaGraph software (Version 4.5.3; Synergy Software); however, other software packages with similar capabilities can also be selected accordingly.
-
i.Determining the reference position in terms of an XY coordinate
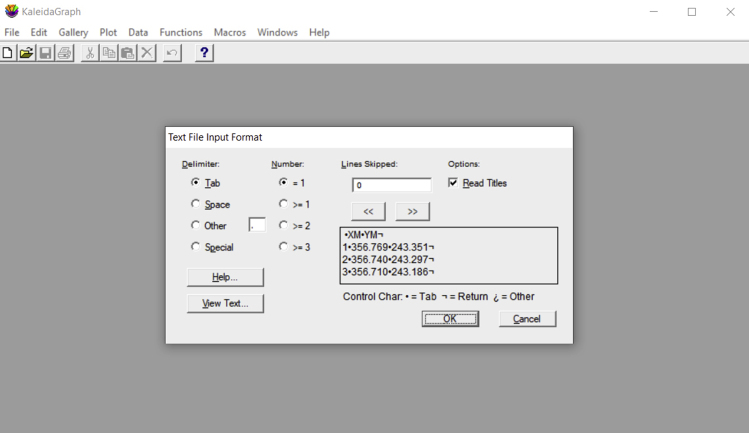
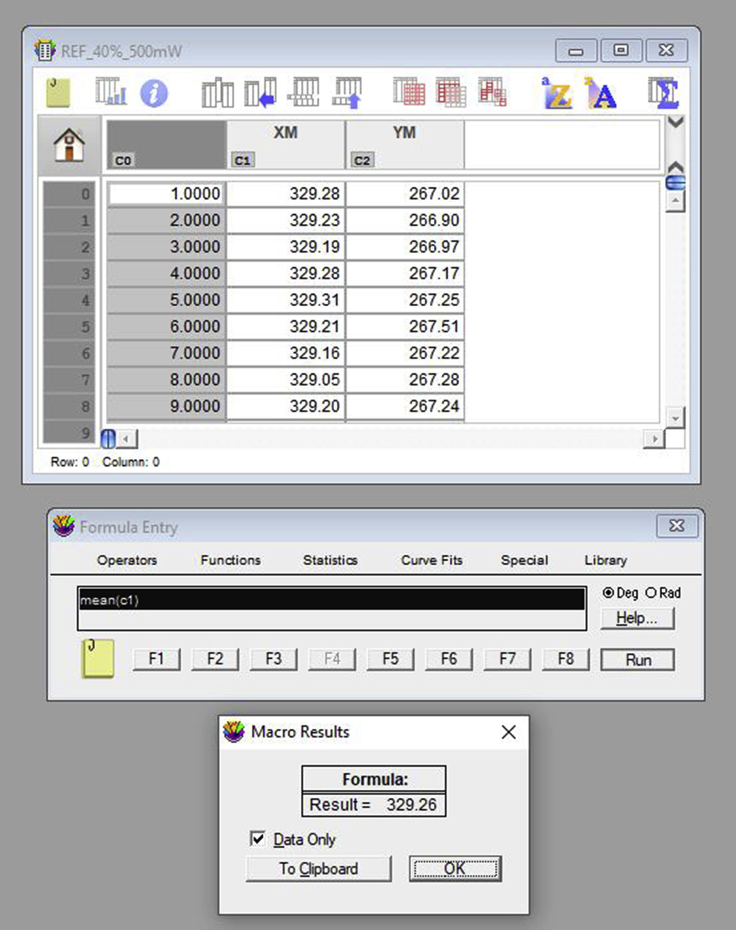
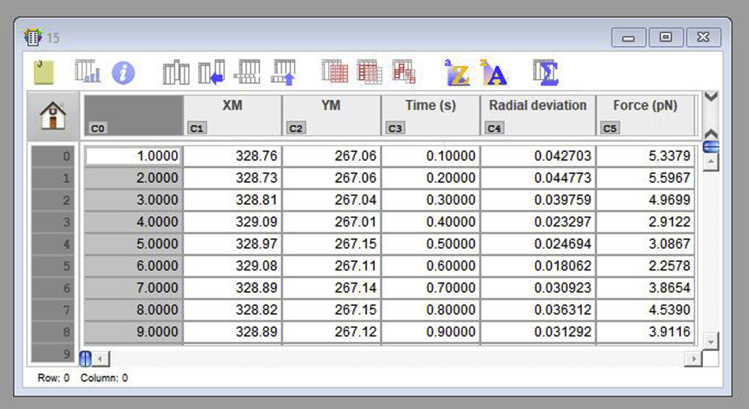
- If using KaleidaGraph, open the XY coordinates corresponding to the reference position video for the sample to be analyzed. When opening a text file, a window appears and allows for the selection of the correct input format. For tables generated using ImageJ, select “Tab” under “Delimiter;” choose “=1” for “Number;” and select “Read Titles.” Then, select “OK” (Figure 17). The opened table should present three columns: video frame number, X positions and Y positions (Figure 18). The values required are the mean values of position for both the X and Y axis. Select the X column by clicking in its title, click in “Summary Statistics” and retrieve the mean position from the generated list. Repeat the same for the Y column. Alternatively, run the command “mean(c#)” in the Formula Entry window, to determine the mean value of a column of # number. Either way, both mean values should be obtained (Figure 18).Note: The table generated by ImageJ (Figure 16) is a text file, presenting three columns. The first column (left to right) refers to the frame number and has no title. The second column, titled YM, presents the vertical positions for the center of mass of the probe, and the last one (XM) has the horizontal positions. If using another software, one should take the input table (from the reference video) and define the reference position. For that, one should retrieve the statistical mean for the numerical values in both YM and XM data columns. Be aware that in ImageJ these columns have tab-separated values, and the decimal separator is a period.
-
ii.Input for equations
- If using another software, go directly to the note of this section.
-
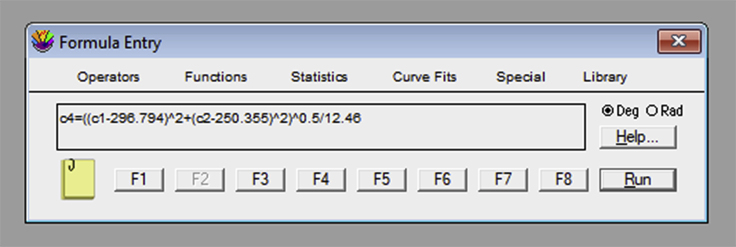
If using KaleidaGraph, open the “Formula Entry” window. It is possible to store equations that can be later applied to the data table. To obtain the tether force, , a sequence of mathematical transformations is required. The frame number column should be converted into an elapsed time column, using the known frame rate. For example, the formula “c3=c0/10” creates a column in the c3 position where each frame (c0 column) is converted to a value in s, since the frame rate used in our example was 10 fps (Figure 19). The next equation is c4 = ((c1-XMref)ˆ2+(c2-YMref)ˆ2)ˆ0.5/12.46. “XMref” and “YMref” are the average XM and YM values of the reference probe. “c1” and “c2” represent the columns with the position values on the X and Y axis, respectively, for the tether extraction procedure. This equation uses the Pythagoras theorem to establish the bead position deviation between the reference position and the measurement in question. It then creates a column with the variation value, for each frame, in the “c4” position. The number 12.46 is a conversion factor of pixels to micrometers, in our camera setup resolution. This value should be previously determined (Figure 20). The third equation is an adaptation from the Hooke’s Law: c5 = c4 × 0.25 × 1,050. In this equation, 1,050 is the value, in mW, of the laser power and 0.25 is the optical tweezers spring constant per unit of power. Both values are acquired through calibration (see calibration section for more details). Thus, “c4” represents the position variation, c5 represents the force applied to the bead and 0.25 × 1,050 is the final result for the OT spring constant (Figure 21).Note: If using another software, make sure that the steps below are applied to all the data tables, previously generated in ImageJ from the tether extraction experiments.Create a new column (4th column) in each table and make sure that it represents the conversion of number of frames (represented in the 1st column) into time (seconds).Create a new column (5th column) in each table and make sure that it represents the variation in the equilibrium position of the bead in relation to the reference position . For such, the following mathematical procedure should be implemented, based on the software used: where and are the values listed in the table, and are the mean values previously obtained for the reference position and represents the pixel/micrometer ratio.Create another column (6th column) in each table and make sure that it represents the force, , in pN. For such, the following mathematical procedure should be implemented, based on the software used: where represents the OT spring constant per unit of power previously calibrated, is the laser power measured for the particular set of experiments, and determined in step 3.
-
iii.Run the sequence of calculations
- If using KaleidaGraph, open the position data tables of the experimental measures. Run the sequence of equations described above, following the same order described. Therefore, there should be three new columns of data, two of them are important: “c3” for the time and “c5” for the force (Figure 22).Note: If using another software, run the sequence of equations, following the same order described. Thus, there should be three new columns of data, two of them are important: 4th column for the time (seconds) and 6th column for the force (pN).
-
iv.Plot the time progression of the observed force
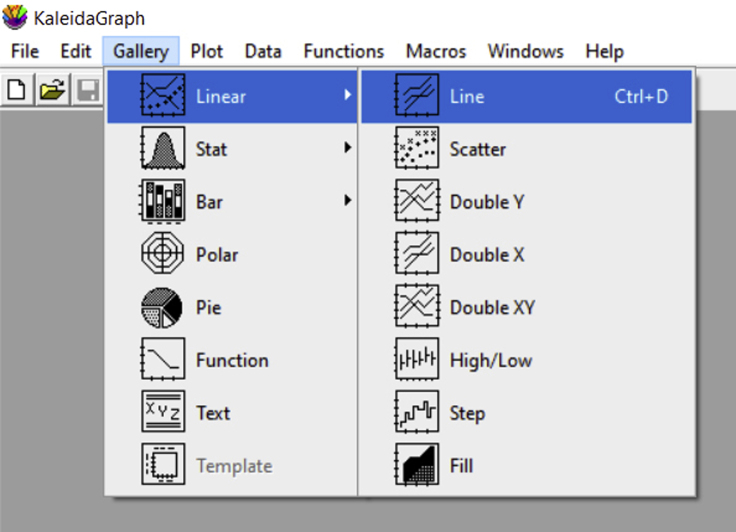
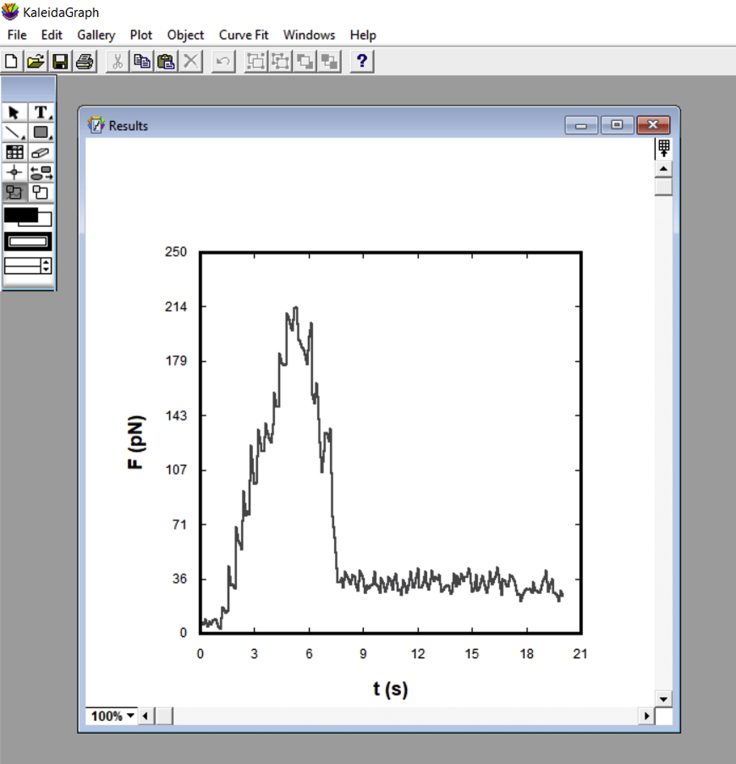
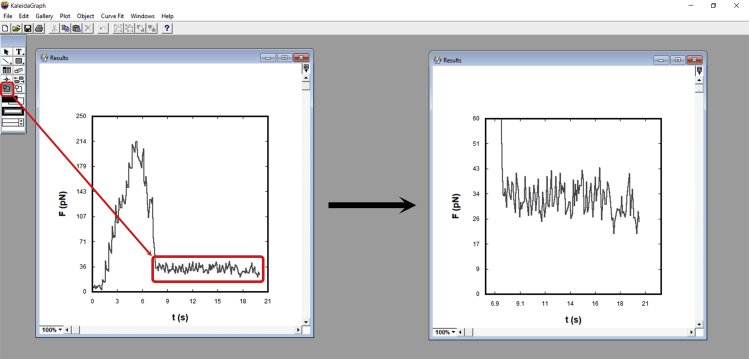
- If using KaleidaGraph, in the “Gallery” tab, select a plot profile of preference. For our example, the style selected was “Line,” located under “Linear.” In the pop-up window, select the X axis with the time column (c3) and the Y axis as the force column (c5). Create a plot (Figure 23).Note: If using another software, adapt it to create a plot of the force (6th column) as a function of time (4th column) for each data table.Note: This is an important step for quality control. A typical tether force curve is shown in Figure 24. When pulling the probe away from the membrane, a force peak is observed. Then, the value decreases and reaches a plateau that represents the tether force, . If no plateau is recognized, eliminate the data.
-
v.Select the plateau region
- The plateau represents the tether force, . If using KaleidaGraph, choose the free selection tool (Figure 25), select the plateau region. Pay attention to the corresponding data table. The force column should be highlighted and values out of the selected regions should be masked.
-
vi.Retrieve the average value for the plateau force
- In KaleidaGraph, select “Summary Statistics” and retrieve the average value for the plateau. Repeat the process, restarting at iii, for the other measured tables. Each force value should be recorded in a new table and then the mean tether force value for that specific experimental condition can be obtained.Note: If using another software, make sure to somehow select the plateau region in order to retrieve an average value for such plateau. We suggest to record each average force value obtained in a new table. Finally, the mean tether force value for that specific experimental condition can be obtained. Make sure to adapt these procedures in your preferred software, as well.
-
i.
-
a.
Figure 13.
Representative screenshot of a typical movie opened in ImageJ
Scale bar, 5 μm.
Figure 14.
Representative screenshot of a typical movie after the threshold processing
Note the threshold parameters (left window) and how the movie looks after processed by the threshold function (right window).
Figure 15.
Representative screenshot of typical parameters to perform the center of mass analysis
Note the yellow selection around the bead and the parameters to allow particle analysis.
Figure 16.
Representative screenshot of a typical bead center of mass position (XM, YM) for each frame of the tether extraction movie
Figure 17.
Representative screenshot showing the necessary inputs to correctly open the table in KaleidaGraph software
Figure 18.
Representative screenshot of how to obtain the mean XM and YM reference values
Figure 19.
Representative image of how to obtain the time column c3
Figure 20.
Representative screenshot of how to obtain the value column c4
Figure 21.
Representative screenshot of how to obtain the force value column c5
Figure 22.
Representative screenshot of a typical KaleidaGraph table of results
Figure 23.
Representative screenshot of how to obtain a typical force (pN) versus time (s) plot
Figure 24.
Representative image of a typical force (pN) versus time (s) plot
Figure 25.
Representative image indicating how to use the selection tool for the plateau region of the tether force curve
Sample preparation for scanning electron microscopy
Timing: 4 h and 30 min
The following steps describe how to prepare the samples for SEM, preserving the membrane tethers for radius measurements.
-
7.Fixing the sample (40 min) Troubleshooting 2
-
a.Prepare the fixing solution: in a fume hood prepare a final solution of 2.5% glutaraldehyde in 0.1 M cacodylate buffer (pH 7.4). The volume of the final solution should consider the number of samples to be fixed. Use an estimated volume of 2 mL of fixing solution per dish.
-
b.Immediately after tether extraction with OT, attach the bead used to extract the tether to the sample coverslip by pressing it against the coverslip for 5–10 s (Figure 26).
-
c.Repeat the procedure and extract several other tethers from the same cell and other surrounding cells.
 CRITICAL: The cells of interest must be within the square previously drawn on the coverslip during the glass-bottom dish preparation process.Note: If possible, try to choose cells that are attached near the border of the square, preferably near one of the vertices, as it becomes easier to find them during SEM imaging.Note: The glutaraldehyde and cacodylate buffer stock solutions must be stored at 4°C.
 -
d.Then, with the sample still in the microscope, open the glass-bottom dish, remove almost all the culture medium, using an automatic micropipette and by collecting the medium from the side of the dish (very carefully to avoid disturbances on the sample).
 CRITICAL: Try to remove as much of the culture medium as possible, leaving only the medium inside the circular region delimited by the coverslip and the hole cut on the dish.
 -
e.Add 2 mL of the fixing solution. Again, gently and from the side of the dish. After 15 min you can carefully remove the sample from the microscope and let the dish fix for the remaining time.
-
f.Repeat the procedure for any other dishes.
-
a.
-
8.Post-fixing the sample (40 min)
-
a.Prepare the post-fixing solution containing 0.2 M sucrose and 2 mM MgCl2 in 0.1 M cacodylate buffer (pH 7.4).
-
b.Gently remove the fixing solution, from the side of the dish, and add 2 mL of the post-fixing solution.
 Pause point: At this stage, it is possible to pause and restart the next day. However, the sample must be stored at 4°C.Note: To prevent the samples from drying out, store them in a plastic (or metal) wet chamber.Note: The post-fixing stock solution must be stored at 4°C.
 -
c.Wait for at least 40 min (or 12–15 h if the pause point was chosen) and then change the post-fixing solution.Note: The changes of sample solution must be performed very slowly and from the sides of the dishes to preserve the tethers.
-
a.
-
9.Sample dehydration (1–2 h)
-
a.Prepare five solutions with different dilutions of ethanol: 30%, 50%, 70%, 90%, and 100% (anhydrous).
-
b.Replace the post-fixing solution with the first ethanol dilution (30%) and incubate for 10 min at 20°C–25°C. Then, rinse with the same solution and leave for another 5 min. Repeat the steps, increasing the concentrations of ethanol until 100% is achieved.
-
a.
Note: Again, all the changes must be performed very gently and from the sides of the dishes to preserve the tethers.
Note: Most of the coverslips will be detached from the culture dish by this point; however, if it does not happen, use a pair of tweezers (or similar object) to remove the paraffin sealing the coverslip and the dish.
Note: The ethanol solutions can be stored at 20°C–25°C.
-
10.Critical-point drying (1 h and 30 min)
-
a.Add the coverslips to a critical-point dryer following the manufacturer’s procedures. Wait until the entire process is complete (1 h and 30 min).
-
a.
CRITICAL: Make sure to remember the correct side of the coverslip where cells were attached.
-
11.Specimen stub mounting (5 min)
-
a.Remove the dried coverslips from the critical-point dryer and attach them to specimen stubs by using an electrically conductive carbon adhesive tape.
-
a.
CRITICAL: Pay attention to the correct side of the coverslip.
-
12.Coating with metallic sputtering (45 min)
-
a.Take the specimen stubs to the sputter-coater and follow the manufacturer’s procedures.
-
b.The samples are then ready for visualization in the scanning electron microscope.
-
a.
Figure 26.
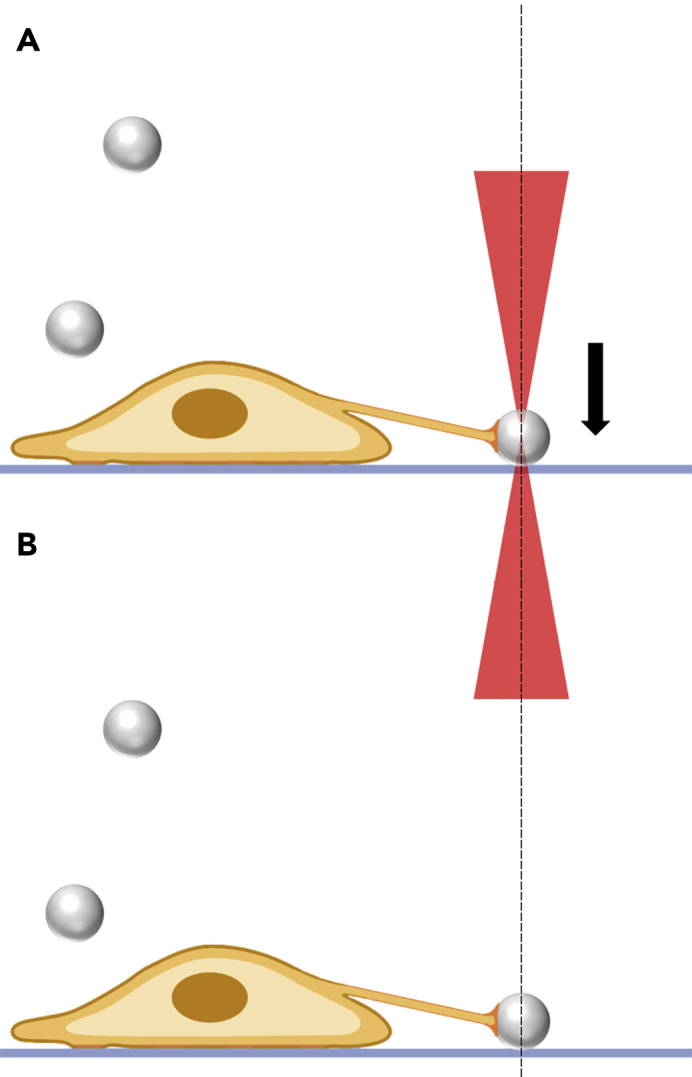
Schematic representation showing the steps to allow bead attachment to the coverslip
(A) Pressing the OT-trapped bead against the coverslip to allow attachment; (B) representation of the bead attached and the tether stabilized. Note that the bead is pressed against the coverslip to allow its attachment. The extracted tether remains stable and the sample can be fixed for SEM.
Observation in a scanning electron microscope
Timing: 2 h
To perform the following tasks, you need the assistance of someone trained on how to use a scanning electron microscope. Since each electron microscope has its particularities, the steps that follow are focused only on describing how to find and recognize the tether images for radius measurements.
-
13.Finding and imaging the cells
-
a.After placing the sample into the microscope and adjusting the parameters, try to find, with the lower magnification mode, the square on the coverslip and the region where the chosen cell is located.
-
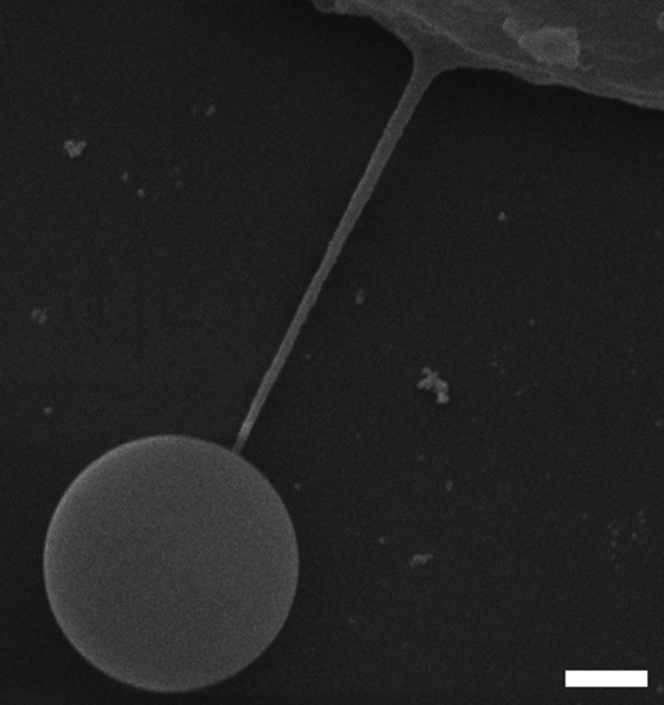
b.After finding the cells of interest, increase the magnification and prepare to take individual images of the tethers (Figure 27).
-
a.
Figure 27.
Representative image showing a membrane tether visualized by SEM
Scale bar, 1 μm.
Measuring the membrane tether radius
Timing: 2 h
The following steps describe how to obtain the tether radius values from the tether SEM images.
-
14.Analyzing images in the ImageJ software (1 h)
-
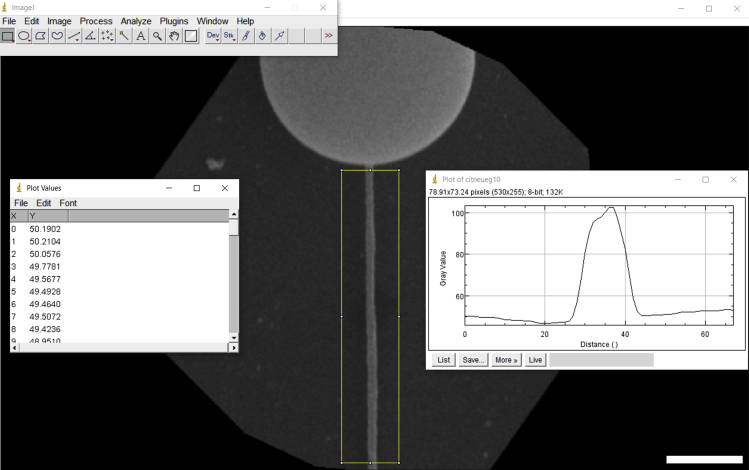
a.Individually open each tether SEM image in ImageJ. Then, align the image so that the tether becomes vertically arranged. To do this, follow the steps: in the ImageJ software, click on the “Image” tab, “Transform,” “Rotate” and select the specific angle for image rotation until the tether is vertically arranged (Figure 28).
-
b.Then, use the rectangle selection tool in ImageJ to draw a rectangular-like shape around the tether (Figure 28).
-
c.Open the “Analyze” tab and select the option “Plot Profile.” A new ImageJ window will open with a plot. Click on the bottom “List” and then save the opened table (Figure 28).
-
d.Repeat the above procedures for all other tether SEM images.
-
a.
-
15.Analyzing plots in the KaleidaGraph software (1 h)
-
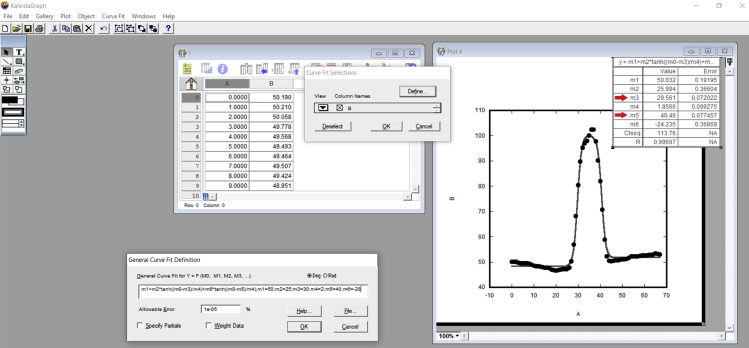
a.Export the saved tables by individually opening them on the KaleidaGraph software. Then, create a new scatter plot of the listed results (Figure 29).
-
b.With the plot window selected, go to the “Curve Fit” tab, “General function” and define a new adjustment, as indicated in the “General curve fit definition” and containing the parameters listed in Figure 29.
-
c.Run the curve fit with the adjustment and check whether it appears in the scatter plot (Figure 29).
-
d.The most important values are “m3” and “m5,” highlighted by red arrows in Figure 29. Retrieve these two values in a new table. The tether diameter, or the tether radius, depends on these two values. The tether diameter corresponds to the difference between these two values (m5 – m3) while tether radius is half that difference. Remember to check whether these values are in pixels. If so, do not forget to convert them to micrometers or nanometers based on the pixel/micrometer ratio of each image.
-
e.Repeat the above-described procedures for all other tether plot profiles. Then, the mean tether radius value for that specific experimental condition can be found.
-
a.
Note: If using another software, make sure to export the saved tables by individually opening them on this software. Then, create a new plot of the listed results and perform a curve fit using the following equation: where and are parameters determined after the curve fitting. Retrieve the values of and . The tether diameter corresponds to the difference between these two values while the tether radius is half that difference. Remember to check whether these values are in pixels. If so, do not forget to convert them to micrometers or nanometers based on the pixel/micrometer ratio of each image. Repeat the above-described procedures for all other tether plot profiles. Then, the mean tether radius value for that specific experimental condition can be found.
Figure 28.
Procedures to obtain the plot profile of a membrane tether SEM image
Scale bar, 1 μm.
Figure 29.
Procedures to determine the tether radius from a membrane tether SEM image
Note that the image was analyzed using ImageJ. The KaleidaGraph software is then used to obtain the parameters m3 and m5 from the curve fit. These two parameters are the ones important to determine the tether diameter or radius.
Expected outcomes
Typical tether force values for cell membranes range from 7 to 145 pN, depending on the cell type and context. A summary table with all these values, together with the experimental conditions in which measurements were obtained can be found in Table 1 of Pontes et al. (2017a).
Typical tether radius values range from 35 to 144 nm, also depending on the cell type and context. This range of values can be found in several publications from our group (Ayala et al., 2017; Hissa et al., 2013, 2017; Pontes et al., 2011, 2013, 2017a, 2017b; Soares et al., 2020).
CMT and CMBM, as well as their changes, have been characterized as important regulators of cellular behaviors, especially those related to shape changes and force production (Pontes et al., 2017b; Sitarska and Diz-Munoz, 2020).
Limitations
The main limitation to execute this protocol is the intrinsic difficulty in performing the method itself, since it is an integration of correlative microscopy-based procedures ranging from videomicroscopy and live-cell imaging to OT and SEM. Access to instruments and facilities to perform all the steps described can also be a major limitation. Finally, the quality of the glass-bottom dishes depends on who prepares them. You can learn to prepare good quality glass-bottom dishes in a few days. We recommend practicing in advance before starting the entire experiment. We suggest using the 35 mm culture dishes indicated in the Key resources table.
Troubleshooting
Problem 1
Glass-bottom dishes leak after sealing.
Potential solution
Try to reinforce the contact between the glass coverslip and the dish by adding another layer of paraffin, particularly for those experiments where cells need to be cultured for several days before the tether extraction.
Problem 2
Ruptured membrane tethers during SEM sample preparation.
Potential solution
To avoid tether rupture, try to change the SEM solutions with great care, always removing from the side of the plate (away from the center, where cells with the extracted tethers are located). Moreover, we observed that by always leaving a remaining amount of liquid in the center (covering the cells), one can significantly reduce the chances of causing tether rupture.
Resource availability
Lead contact
Bruno Pontes; bpontes@icb.ufrj.br.
Materials availability
We did not generate any new materials.
Data and code availability
We did not generate any dataset or code.
Acknowledgments
We acknowledge Dr. Barbara Hissa for critical reading and scientific editing of the manuscript. We also thank the members of CENABIO electron microscopy facility for all-important help. This work was supported by the Brazilian agencies Conselho Nacional de Desenvolvimento Científico e Tecnológico (CNPq), Coordenação de Aperfeiçoamento de Pessoal de Nível Superior (CAPES) – Financial Code 001, Fundação de Amparo à Pesquisa do Estado do Rio de Janeiro (FAPERJ), and Instituto Nacional de Ciência e Tecnologia de Fluidos Complexos (INCT-FCx) together with Fundação de Amparo à Pesquisa do Estado de São Paulo (FAPESP). B.P. was supported by a JCNE grant from FAPERJ. Some of the schematic figures on this protocol, including the graphical abstract, were adapted or created with illustrations from Biorender.com.
Author contributions
B.P. conceived the manuscript. B.P., N.B.V., and H.M.N. arranged funding support for the study. P.P., P.S.L., D.S.E., J.S., J.F., G.M., N.B.V., H.M.N., and B.P. wrote the manuscript.
Declaration of interests
The authors declare no competing interests.
Contributor Information
Nathan B. Viana, Email: nathan@if.ufrj.br.
H. Moysés Nussenzveig, Email: hmoyses@globo.com.
Bruno Pontes, Email: bpontes@icb.ufrj.br.
References
- Ayala Y.A., Pontes B., Hissa B., Monteiro A.C., Farina M., Moura-Neto V., Viana N.B., Nussenzveig H.M. Effects of cytoskeletal drugs on actin cortex elasticity. Exp. Cell Res. 2017;351:173–181. doi: 10.1016/j.yexcr.2016.12.016. [DOI] [PubMed] [Google Scholar]
- Gieseler J., Gomez-Solano J.R., Magazzù A., Castillo I.P.E., GarcÍa L.P.E., Gironella-Torrent M., Viader-Godoy X., Ritort F., Pesce G., Arzola A.V. Optical tweezers: a comprehensive tutorial from calibration to applications. arXiv. 2020 2004.05246v1. [Google Scholar]
- Gomez F., Silva L.S., Araujo G.R.S., Frases S., Pinheiro A.A.S., Agero U., Pontes B., Viana N.B. Effect of cell geometry in the evaluation of erythrocyte viscoelastic properties. Phys. Rev. E. 2020;101:062403. doi: 10.1103/PhysRevE.101.062403. [DOI] [PubMed] [Google Scholar]
- Hissa B., Pontes B., Roma P.M., Alves A.P., Rocha C.D., Valverde T.M., Aguiar P.H., Almeida F.P., Guimaraes A.J., Guatimosim C. Membrane cholesterol removal changes mechanical properties of cells and induces secretion of a specific pool of lysosomes. PLoS One. 2013;8:e82988. doi: 10.1371/journal.pone.0082988. [DOI] [PMC free article] [PubMed] [Google Scholar]
- Hissa B., Oakes P.W., Pontes B., Ramirez-San Juan G., Gardel M.L. Cholesterol depletion impairs contractile machinery in neonatal rat cardiomyocytes. Sci. Rep. 2017;7:43764. doi: 10.1038/srep43764. [DOI] [PMC free article] [PubMed] [Google Scholar]
- Icard-Arcizet D., Cardoso O., Richert A., Henon S. Cell stiffening in response to external stress is correlated to actin recruitment. Biophys. J. 2008;94:2906–2913. doi: 10.1529/biophysj.107.118265. [DOI] [PMC free article] [PubMed] [Google Scholar]
- Liu L., Kheifets S., Ginis V., Capasso F. Subfemtonewton force spectroscopy at the thermal limit in liquids. Phys. Rev. Lett. 2016;116:228001. doi: 10.1103/PhysRevLett.116.228001. [DOI] [PubMed] [Google Scholar]
- Neuman K.C., Nagy A. Single-molecule force spectroscopy: optical tweezers, magnetic tweezers and atomic force microscopy. Nat. Methods. 2008;5:491–505. doi: 10.1038/nmeth.1218. [DOI] [PMC free article] [PubMed] [Google Scholar]
- Nicholas M.P., Rao L., Gennerich A. An improved optical tweezers assay for measuring the force generation of single kinesin molecules. Methods Mol. Biol. 2014;1136:171–246. doi: 10.1007/978-1-4939-0329-0_10. [DOI] [PMC free article] [PubMed] [Google Scholar]
- Pontes B., Ayala Y., Fonseca A.C., Romao L.F., Amaral R.F., Salgado L.T., Lima F.R., Farina M., Viana N.B., Moura-Neto V., Nussenzveig H.M. Membrane elastic properties and cell function. PLoS One. 2013;8:e67708. doi: 10.1371/journal.pone.0067708. [DOI] [PMC free article] [PubMed] [Google Scholar]
- Pontes B., Monzo P., Gauthier N.C. Membrane tension: A challenging but universal physical parameter in cell biology. Semin. Cell Dev. Biol. 2017;71:30–41. doi: 10.1016/j.semcdb.2017.08.030. [DOI] [PubMed] [Google Scholar]
- Pontes B., Monzo P., Gole L., Le Roux A.L., Kosmalska A.J., Tam Z.Y., Luo W., Kan S., Viasnoff V., Roca-Cusachs P., Tucker-Kellogg L., Gauthier N.C. Membrane tension controls adhesion positioning at the leading edge of cells. J. Cell Biol. 2017;216:2959–2977. doi: 10.1083/jcb.201611117. [DOI] [PMC free article] [PubMed] [Google Scholar]
- Pontes B., Viana N.B., Salgado L.T., Farina M., Moura Neto V., Nussenzveig H.M. Cell cytoskeleton and tether extraction. Biophys. J. 2011;101:43–52. doi: 10.1016/j.bpj.2011.05.044. [DOI] [PMC free article] [PubMed] [Google Scholar]
- Schnoering G., Rosales-Cabara Y., Wendehenne H., Canaguier-Durand A., Genet C. Thermally limited force microscopy on optically trapped single metallic nanoparticles. Phys. Rev. Appl. 2019;11:034023. [Google Scholar]
- Sitarska E., Diz-Munoz A. Pay attention to membrane tension: mechanobiology of the cell surface. Curr. Opin. Cell Biol. 2020;66:11–18. doi: 10.1016/j.ceb.2020.04.001. [DOI] [PMC free article] [PubMed] [Google Scholar]
- Soares J., Araujo G.R.S., Santana C., Matias D., Moura-Neto V., Farina M., Frases S., Viana N.B., Romao L., Nussenzveig H.M., Pontes B. Membrane elastic properties during neural precursor cell differentiation. Cells. 2020;9:1323. doi: 10.3390/cells9061323. [DOI] [PMC free article] [PubMed] [Google Scholar]
Associated Data
This section collects any data citations, data availability statements, or supplementary materials included in this article.
Data Availability Statement
We did not generate any dataset or code.


