

Abstract
Bone formation occurs during embryogenesis, skeletal growth and during the process of skeletal renewal throughout life. In the process of bone formation, osteoblasts lay down a collagen-containing matrix, termed osteoid, which is gradually hardened by incorporation of mineral crystals. Although osteoblasts can be induced to differentiate and to deposit mineral in culture, this system does not always provide results that reflect the ability of agents to stimulate bone formation in vivo. This protocol describes a rapid and reliable method for testing local administration of agents on bone formation in vivo. In this method, mice are injected with the agent of question for 5 successive days. Fluorochrome labels are injected prior to, and after agents used for testing, and samples are collected and analysed by undecalcified bone histology and histomorphometry. This provides a robust method for assessing the ability of agents to stimulate bone formation, and if a short-term modification is used, can also be used for testing gene responses in bone to the same stimuli.
Keywords: Osteoblast, Osteocyte, Bone formation, Cytokines, Growth factors
Background
Bone formation is a fundamental process required for the development of the skeleton, for the progression of skeletal growth and to maintain bone structure throughout life as the skeleton is constantly remodeled. Bone formation is a process that occurs by three steps: (1) deposition of collagen-rich osteoid, (2) mineralization of that osteoid which occurs by deposition of bioapatite crystals around the collagen fibres, and (3) maturation of the mineralized bone substance (Blank and Sims, 2019). These three steps are mediated by two cell types derived from a common progenitor. Osteoblasts deposit osteoid and initiate mineralization, and as the osteoid is deposited, some osteoblasts become embedded within the bone matrix and differentiate into osteocytes (Dallas and Bonewald, 2010); these embedded cells also control the extent and nature of mineralization of bone (Vrahnas et al., 2019).
Identifying agents that can stimulate bone formation is critical for understanding the biology of the skeleton, and for developing new agents that can be used to promote bone formation in conditions of bone fragility such as osteoporosis, osteogenesis imperfecta, and osteomalacia, and to develop agents that can promote fracture healing or to stimulate bone formation in surgical interventions. Typically, the simplest system to test such agents is to use primary cultured osteoblasts (Orriss et al., 2014), or to differentiate stromal cell lines such as MC-3T3-E1 (Quarles et al., 1992) and Kusa 4b10 cells (Allan et al., 2003) in osteoblastogenic media. These systems are commonly used to study osteoblast differentiation by assessing effects of various agents on mRNA levels of osteoblast marker genes, alkaline phosphatase enzyme activity, and mineral deposition (Allan et al., 2003; McGregor et al., 2010; Walker et al., 2010). However, these systems do not always reflect the in vivo response. A clear example is the contrast between early in vivo works showing that leukemia inhibitory factor stimulates bone formation (Metcalf and Gearing, 1989; Cornish et al., 1993), and in vitro tests in which leukemia inhibitory factor could both stimulate and inhibit osteoblast differentiation (Malaval et al., 1995; Malaval and Aubin, 2001; Malaval et al., 2005; Falconi and Aubin, 2007).
In this protocol, we describe the use of a calvarial injection model which tests the ability of agents to stimulate bone formation in vivo. This method requires only small amounts of the stimulatory agent, and was first described by Cornish (Cornish et al., 1993) to resolve the controversy of whether leukemia inhibitor factor could promote bone formation. We have adapted the Cornish method to include calcein labelling to allow measurement of bone formation, and we have made use of it to test a range of cytokines including oncostatin M (Walker et al., 2010), cardiotrophin-1 (Walker et al., 2008), and most recently IL-6 acting through its soluble receptor (McGregor et al., 2019). We have also used this method to determine whether responses to cytokines are modified in mice with a cell-specific deletion of gp130, the common receptor used by these cytokines (Johnson et al., 2014). We provide here a full description of how to carry out the in vivo protocol, and how to embed and section tissues using undecalcified histology techniques; micro-computed tomography can also be used for assessment, but this does not allow measurement of bone formation rate using calcein labels. An abbreviated form of this method using single calvarial injections or two days of calvarial injections can also be used to assess gene responses elicited by cytokines in vivo by Western blot (Walker et al., unpublished) and effects on protein expression by immunohistochemistry (Walker et al., 2010).
Materials and Reagents
Plastic flat-bottomed box
Plastic zip-loc bag
Hammer
Thick rubber gloves
Glass bottles for reagents–the methyl-methacrylate will dissolve plastic
Microscope slides (Hurst scientific catalog number: 7107)
Coverslips (Hurst scientific catalog number: CG12450)
Glass Scintillation Vials (PerkinElmer catalog number: 6000097)–methyl-methacrylate will dissolve plastic
Grinding paper (smooth) CarbiMet S SiC P400 (ThermoFisher, catalog number: 16080320)
Grinding paper (rough) CarbiMet S, 60 P60 (ThermoFisher, catalog number: 16080060)
Insulin syringe (29 G BD Ultra-fineTM Clifford Hallam, catalog number: 1323684)
Microfuge tubes 1.5 ml (Pacific labs, Axygen catalog number: MCT175CI)
6-week old C57BL/6 mice (10 mice per group)
Positive Control: Recombinant mouse Oncostatin M (OSM) (R&D Systems catalog number: 495-MO-025) with 2% heat-inactivated mouse serum (made in house)
Your preferred agents/treatments for testing
Phosphate buffered saline (Sigma-Aldrich, catalog number: D8537)
Isoflurane inhalant anaesthetic (FORTHANE®, AbbVie)
Ethanol
Calcein (Sigma-Aldrich, catalog number: C0875-5G)
Sodium Bicarbonate (Sigma-Aldrich, catalog number: S6014)
Sodium hydroxide (NaOH)
Acetone
Paraformaldehyde (Sigma-Aldrich, catalog number: 158127-500 g)
Methyl methacrylate (Sigma-Aldrich, catalog number: M55909-500 ml)
Destabilised methylmethacrylate (dMMA)
Dibutyl Phthalate (Merck, catalog number: 800919)
Granular calcium choride anhydrous (Sigma-Aldrich, catalog number: C-1016)
Chromium (III) potassium sulphate (Sigma-Aldrich, catalog number: 243361)
Gelatin from bovine skin (Sigma-Aldrich, catalog number: G9391)
Butanol (Merck, catalog number: 8222641000)
Toluene (Crown Scientific, catalog number: 2867322)
Depex mountant (Crown Scientific, catalog number: 360294H)
Tris (Astral Scientific, catalog number: BIO3094T)
Xylenol orange (Sigma-Aldrich, catalog number: X3500)
Xylenol Orange Stain (see Recipes)
Equipment
100 ml beaker
2 L glass separating funnel
Fume hood
Incubator
Microwave oven
Grinder/Polisher (Buehler Phoenix beta, or equivalent)
Automated microtome, RM2265 Leica, equipped with tungsten carbide blade, or equivalent microtome
Fluorescence microscope equipped with Osteomeasure image analysis system (or equivalent), (Osteometrics, https://www.osteometrics.com/)
Software
Osteomeasure histomorphometry system (Osteometrics, https://www.osteometrics.com/), or equivalent
Procedure
-
Preparation of cytokines and animals for study
-
Gain ethics approval from your Institutional Review Board before commencing
Order mice and allow them to acclimatize to your facility for 2 weeks prior to the experiment. We use C57BL/6 mice at 6 weeks of age (after acclimatization). We use a minimum of 6 mice per treatment group to detect a difference in calvarial thickness of 10%, based on data from our original publication (Walker et al., 2010).
-
For labelling active bone formation sites, prepare calcein for injections, as follows (see Figure 1 for times at which calcein is injected):
A solution of 0.01 g sodium bicarbonate plus 0.02 g calcein is made in 10 ml of 0.9% sterile saline (final concentration 2 mg/ml). This solution is injected intraperitoneally or subcutaneously using Insulin syringes (29 G needles) at 0.1ml per 10 g body weight (for a dose of 20 mg/kg). Calcein can be stored in frozen aliquots ready for thawing at the time of use.
-
Prepare 25 µl aliquots of agents to be tested by calvarial injection
We recommend making up your agent into 25 µl aliquots (larger and smaller volumes have not been tested). As an example, we use 0.2 µg murine Oncostatin M in a volume of 25 µl for 5 consecutive days as a positive control for all our experiments, including 2% heat-inactivated serum as a carrier. Before commencing we make up sufficient aliquots for the full experiment and freeze 5 aliquots with sufficient for all mice in the treatment group ready for each day of injections.
-
-
Injection protocol
-
Cytokine injections
Figure 1 shows a time course of the injection protocol. On days 1 to 5 (e.g., Monday to Friday), anaesthetise mouse with 2% isoflurane and 1 L/min oxygen (or anaesthetic as approved by your Institutional Review Board). Using an insulin syringe inject 25 µl cytokine subcutaneous over the skull (between the ears) of the animal (see Figure 2). The subcutaneous injection will form a bubble over the left and right parietal bones.
-
Calcein injections
On days 1 and 11, using an insulin syringe inject 0.1 ml per 10 g body weight (i.e., a 20 g mouse will receive 0.2 ml) via intraperitoneal injection. On day 1 this can be done while the animal is still anaesthetized for the calvarial injection.
-
Before tissue collection
Make sufficient paraformaldehyde to fix samples (approximately 10 ml per sample). Heat 500 ml PBS to 55 °C (it is quickest to use a microwave oven). Dissolve 2 g paraformaldehyde in the solution, keeping warm on a heater-stirrer. While stirring, add sufficient NaOH to raise pH to 8.0; this is required for the paraformaldehyde to dissolve. Cool to 4 °C before use. Prepare labelled scintillation vials for each animal to be collected.
-
Collection of tissues for histological analysis
On day 15, cull mice according to the method approved by your institution. Dissect out the calvaria, using the sagittal and lambdoid suture lines as landmarks (Figure 2A). Place the tissue in 4% paraformaldehyde in PBS for 24 h at 4 °C. On the next day, tip off and dispose of the paraformaldehyde solution and store the samples in 70% ethanol until ready to embed the calvarial tissue in methylmethacrylate.
-
Preparation of calvarial samples for histological analysis
When tissue has been fixed, dissect out the back half of the calvariae containing the lambdoid suture to the midpoint of the sagittal suture (see Figure 2B).
-
-
Preparation of reagents for embedding samples in methyl methacrylate
-
Destabilization of methyl-methacrylate (dMMA)
This step is necessary to remove monomethyl hydroquinone, the stabilizing agent in MMA that suppresses polymerisation. Note that all steps using MMA must be conducted in a fume hood, and since MMA will dissolve plastic, all steps need to be conducted using glass vials, funnels, and bottles. All vials, funnels, and bottles must be dry, and MMA should be filtered through granular calcium chloride before use to remove water which will disrupt the embedding process.
Make up 1 L of 0.5% sodium hydroxide (NaOH) by dissolving 0.5 g NaOH in 1 L of distilled water.
Place a large separating funnel into a retort stand in a fume hood.
Pour approximately 500 ml MMA into the large separating funnel.
Add approximately 300 ml 0.5% NaOH to the MMA in the separating funnel.
Shake the separating funnel vigorously for at least 30 sec to mix the NaOH and MMA thoroughly.
Place in retort stand and allow the layers to settle.
When layers have settled, and while the separating funnel is still in the retort stand, use the tap to drain off the lower layer (NaOH) into a beaker. Discard the NaOH according to your Institution’s protocol for waste disposal (we dispose in the sink with ample tap water).
Repeat Steps C1d to C1g twice; this will use up all the 5% NaOH you made.
Then repeat Steps C1d to C1g three times, using 500 ml distilled water each time, instead of NaOH (water will also settle to the bottom layer).
Finally, place about a 100 ml beaker full of calcium chloride into a folded filter paper in large glass funnel on the retort stand. Place a clean bottle for the destabilized MMA (dMMA) under it.
Slowly transfer the dMMA from the separating funnel through the calcium chloride into the clean bottle. The calcium chloride will remove all traces of water.
Add a small amount of calcium chloride to the clean dMMA to absorb excess water. Store dMMA at 4 °C.
-
Make up graded acetones
Make up at least 250 ml each of 70% acetone in water, and 90% acetone in water.
-
Make up infiltrating solution (total of at least 5 ml per sample)
Working in a fume hood, mix 90% dMMA with 10% dibutylphthalate (DBP) and 0.05% benzoyl peroxide (BPO). For example, for 10 samples, make up approximately 70 ml, using 63 ml dMMA, 7ml DBP and 0.35 g BPO. Stir until BPO is dissolved, and filter through filter paper containing calcium chloride in a glass funnel to remove any water. Store at 4 °C indefinitely.
-
Make embedding solution (approximately 20 ml per sample)
Mix 85% dMMA with 15% dibutylphthalate (DBP) and 4% benzoyl peroxide (BPO). For example, for 10 samples, make up 200 ml, using 170 ml dMMA, 30 ml DBP and 8 g BPO. Stir until BPO is dissolved, and filter through filter paper containing calcium chloride in a glass funnel to remove any water. Store at 4 °C maximum of 1 week.
Make bases for embedding samples. In clean glass scintillation vials, add 2.5 ml embedding solution. To reduce waste, you can make this up using previously used infiltration solution for the bases. Place these, spaced apart from each other in a 37 °C incubator until set.
-
-
Infiltrating the calvarial samples in methyl methacrylate:
Note: Samples should be sheltered from light when not being handled.
-
Dehydrate samples through graded acetones
Tip off 70% ethanol from all samples, and replace with 70% acetone, store at 4 °C for at least 1 h (up to overnight)
Tip off 70% acetone from all samples, and replace with 90% acetone, store at 4 °C for at least 1 h (up to overnight)
Tip off 90% acetone from all samples, and replace with 100% acetone, store at 4 °C for at least 1 h (up to overnight)
Tip off 100% acetone from all samples, and replace with fresh 100% acetone, store at 4 °C for at least 1 h (up to overnight)
-
Filter embedding solution
While samples are in 100% acetone, allow embedding solution (made in Step C3) to come to room temperature in a fume hood. When at room temperature, working in the fume hood, filter the solution through filter paper containing calcium chloride in a glass funnel to remove any water.
-
Infiltrate samples
Working in the fume hood, tip 100% acetone off all samples and replace it with approximately 5 ml embedding solution. Store at 4 °C in the dark for at least 3 nights before embedding.
-
-
Embedding the calvarial samples in methyl methacrylate
When bases have set, you can embed the calvarial samples.
Allow samples, embedding solution, and bases to come to room temperature in a fume hood.
In a fume hood, place 15 ml fresh embedding solution on enough bases for all the calvarial samples you need to embed. Allow the bases to soften by leaving them at room temperature for about 20-30 min.
In the fume hood, when base has softened, transfer bone and sample label to vials containing bases and embedding solution. Place the calvaria close to the side of the vial and orient the samples in the base with the superior side of the calvariae up. Used infiltration solution can be stored at 4 °C and used to make bases for future samples (Step C5).
Place vials in a plastic flat-bottomed box with sufficient water to reach the same level as the MMA in the vials to distribute generated heat. Be sure to space vials at least 5 mm apart so that heat can dissipate. Leave at 37 °C overnight or until plastic has set.
When plastic has set, place samples in freezer for 1 h.
To remove glass vials from samples, place each scintillation vial into a sealed plastic bag and hit with a hammer to break the glass. Wearing thick gloves to protect fingers, remove the plastic embedded bone from the broken glass vial.
-
Preparing Fol’s coated slides
In a 500 ml bottle, dissolve 6 g gelatin in 288 ml dH2O at 60 °C; heat the water quickly in a microwave oven.
Make up solution of 4 g chromium potassium sulphate in 20 ml dH2O.
Once gelatin is cool, add 120 ml 95% ethanol.
Then add dissolved chromium potassium sulphate.
To coat rack up slides in a slide holder/rack and dip for 30 sec per rack.
Dry overnight but leave for 2 nights if placing them in boxes for use (otherwise the slides stick together).
Prepare Xylenol Orange Stain (see Recipes)
-
Sectioning calvarial samples
On the grinder-polisher, using P60 grinding paper, grind the sample down until you have reached the surface of the bone to be sectioned. Then smooth it over with the 320 grinder paper. Grind the top and bottom of the sample so that it can be held in your microtome’s sample holder, and grind the edges for sectioning (see Figure 2C).
On the microtome, using the tungsten carbide blade with 70% ethanol to float the samples, take 5-10 micron coronal sections from the midpoint of the sagittal suture and place on Fols coated slides. Once section is on the slide, use a drop of 95% ethanol to make the sample more flexible and gently stretch it along the slide to remove folds. Place a small piece of bagging plastic on top of the section, and a clean dry microscope slide on top of that. Clamp sections together (with a large bulldog clip) and bake overnight at 37 °C.
The next day, remove sections from clamps, stain with xylenol orange, dehydrate, and coverslip with DePex mountant.
-
Staining calvarial samples
While it is possible to analyse the sections without stain, the Xylenol Orange stain provides a good contrast and makes it easier to see the samples.
Deplasticise in two changes of cellosolve acetate for 25 min each.
-
Rehydrate in graded ethanols, as follows:
100% x 3 min
100% x 3 min
80% x 3 min
60% x 3 min
Tap water x 5 min
Stain sections in xylenol orange for 3 min.
Rinse in dH2O.
Blot both sides of samples thoroughly.
-
Pass sections through the following solutions in order:
Butanol x 2
1:1 Butanol/Toluene x 1
Toluene x 2
Coverslip with DePex.
Allow to dry, sheltered from light.
-
Measuring calvarial thickness and bone formation rates, using Osteomeasure or similar image analysis software
Measure coverslipped tissue sections with a 20x objective. Measure the total calvarial thickness and both single and double labelled surface on the superior side of the calvaria (the injected side). Do not measure the central 800 microns containing the sagittal suture. Measure 8-12 fields on both sides of the sagittal suture.
-
Download bone thickness, double labelled surface, bone surface, and single labelled surface, and calculate mineral appositional rate and calvarial thickness. Since the entire surface is usually covered with double label, we usually do not calculate bone formation rate, but if your agent reduces bone formation this may be important. If any samples completely lack double calcein labelling throughout the sample, they should be excluded from analysis as this likely reflects a lack of calcein injection.
Figure 3. Imaging and measurement of calvarial sample.
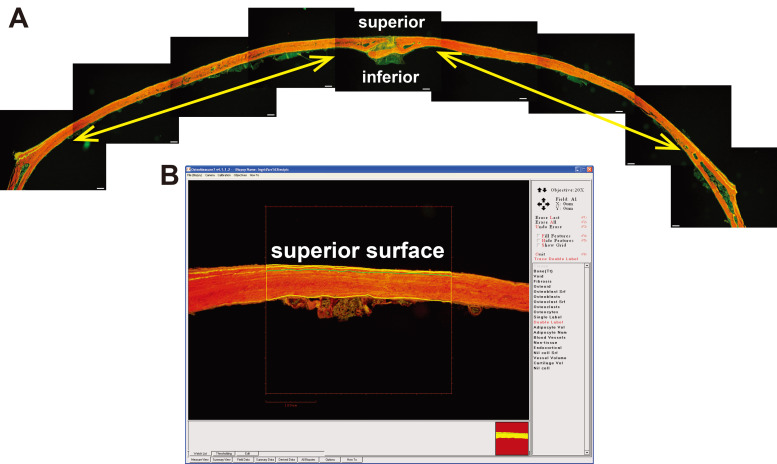 A. Composite image of a single calvarial section stained with Xylenol Orange showing the calcein labels; scale bar = 50 μm. Yellow arrows show approximate region of measurement that would be used for this sample. B. Example of a sample being measured, showing measurement of double labels on the superior surface of a calvarial section.

Figure 1. Example of the treatment protocol, showing days of calcein and cytokine injections and tissue collection (end).

Figure 2. Location of injection site, instructions for dissection and image of the sectioning face of an embedded calvarium.

A. Superimposition of calvarial structure over an image of a mouse head showing injection site; B. diagram of a dissected calvarium showing the cutting lines for dissection. C. A calvarial block ready for sectioning. Although we use C57BL/6 mice, we have used an image of a white mouse for clarity.
Data analysis
Compare calvarial thickness and mineral apposition rate data between groups by one-way ANOVA to compare multiple treatment groups.
Recipes
-
Xylenol Orange Stain
Make up 0.5 M Tris buffer: dissolve 6.06 g Tris in 100 ml distilled water
Add 1 g Xylenol Orange
Adjust pH to 9.0
Store in a sealed bottle at room temperature indefinitely
Acknowledgments
The authors thank the staff of the St. Vincent’s Health Bioresources Centre for excellent animal care and assistance, and Joshua Johnson who helped in developing methods for analysis. This work was supported by NHMRC Grants 1120978 and 1058625. NAS is supported by an NHMRC Senior Research Fellowship. St Vincent’s Institute acknowledges the support of the Victorian State Government OIS program. This protocol was based on an initial study by Cornish et al. (1993).
Competing interests
The authors have no financial or non-financial competing interests.
Ethics
This protocol was approved by the St. Vincent’s Health Melbourne Animal Ethics Committee AEC#005/16 valid May 2016, December 2019.
Citation
Readers should cite both the Bio-protocol article and the original research article where this protocol was used.
References
- 1.Allan E. H., Ho P. W., Umezawa A., Hata J., Makishima F., Gillespie M. T. and Martin T. J.(2003). Differentiation potential of a mouse bone marrow stromal cell line. J Cell Biochem 90(1): 158-169. [DOI] [PubMed] [Google Scholar]
- 2.Blank M. and Sims N. A.(2019). Cellular processes by which osteoblasts and osteocytes control bone mineral deposition and maturation revealed by stage-specific EphrinB2 knockdown. Curr Osteoporos Rep 17(5):270-280. [DOI] [PubMed] [Google Scholar]
- 3.Cornish J., Callon K., King A., Edgar S. and Reid I. R.(1993). The effect of leukemia inhibitory factor on bone in vivo. Endocrinology 132(3): 1359-1366. [DOI] [PubMed] [Google Scholar]
- 4.Dallas S. L. and Bonewald L. F.(2010). Dynamics of the transition from osteoblast to osteocyte. Ann N Y Acad Sci 1192: 437-443. [DOI] [PMC free article] [PubMed] [Google Scholar]
- 5.Falconi D. and Aubin J. E.(2007). LIF inhibits osteoblast differentiation at least in part by regulation of HAS2 and its product hyaluronan. J Bone Miner Res 22(8): 1289-1300. [DOI] [PubMed] [Google Scholar]
- 6.Johnson R. W., Brennan H. J., Vrahnas C., Poulton I. J., McGregor N. E., Standal T., Walker E. C., Koh T. T., Nguyen H., Walsh N. C., Forwood M. R., Martin T. J. and Sims N. A.(2014). The primary function of gp130 signaling in osteoblasts is to maintain bone formation and strength, rather than promote osteoclast formation. J Bone Miner Res 29(6): 1492-1505. [DOI] [PubMed] [Google Scholar]
- 7.Malaval L. and Aubin J. E.(2001). Biphasic effects of leukemia inhibitory factor on osteoblastic differentiation. J Cell Biochem Suppl Suppl 36: 63-70. [DOI] [PubMed] [Google Scholar]
- 8.Malaval L., Gupta A. K. and Aubin J. E.(1995). Leukemia inhibitory factor inhibits osteogenic differentiation in rat calvaria cell cultures. Endocrinology 136(4): 1411-1418. [DOI] [PubMed] [Google Scholar]
- 9.Malaval L., Liu F., Vernallis A. B. and Aubin J. E.(2005). GP130/OSMR is the only LIF/IL-6 family receptor complex to promote osteoblast differentiation of calvaria progenitors. J Cell Physiol 204(2): 585-593. [DOI] [PubMed] [Google Scholar]
- 10.McGregor N. E., Murat M., Elango J., Poulton I. J., Walker E. C., Crimeen-Irwin B., Ho P. W. M., Gooi J. H., Martin T. J. and Sims N. A.(2019). IL-6 exhibits both cis- and trans-signaling in osteocytes and osteoblasts, but only trans-signaling promotes bone formation and osteoclastogenesis. J Biol Chem 294(19): 7850-7863. [DOI] [PMC free article] [PubMed] [Google Scholar]
- 11.McGregor N. E., Poulton I. J., Walker E. C., Pompolo S., Quinn J. M., Martin T. J. and Sims N. A.(2010). Ciliary neurotrophic factor inhibits bone formation and plays a sex-specific role in bone growth and remodeling. Calcif Tissue Int 86(3): 261-270. [DOI] [PubMed] [Google Scholar]
- 12.Metcalf D. and Gearing D. P.(1989). Fatal syndrome in mice engrafted with cells producing high levels of the leukemia inhibitory factor. Proc Natl Acad Sci U S A 86(15): 5948-5952. [DOI] [PMC free article] [PubMed] [Google Scholar]
- 13.Orriss I. R., Hajjawi M. O. R., Huesa C., MacRae V. E. and Arnett T. R.(2014). Optimisation of the differing conditions required for bone formation in vitro by primary osteoblasts from mice and rats. International journal of molecular medicine 34(5): 1201-1208. [DOI] [PMC free article] [PubMed] [Google Scholar]
- 14.Quarles L. D., Yohay D. A., Lever L. W., Caton R. and Wenstrup R. J.(1992). Distinct proliferative and differentiated stages of murine MC3T3-E1 cells in culture: an in vitro model of osteoblast development. J Bone Miner Res 7(6): 683-692. [DOI] [PubMed] [Google Scholar]
- 15.Vrahnas C., Blank M., Dite T. A., Tatarczuch L., Ansari N., Crimeen-Irwin B., Nguyen H., Forwood M. R., Hu Y., Ikegame M., Bambery K. R., Petibois C., Mackie E. J., Tobin M. J., Smyth G. K., Oakhill J. S., Martin T. J. and Sims N. A.(2019). Increased autophagy in EphrinB2-deficient osteocytes is associated with elevated secondary mineralization and brittle bone. Nat Commun 10(1): 3436. [DOI] [PMC free article] [PubMed] [Google Scholar]
- 16.Walker E. C., McGregor N. E., Poulton I. J., Pompolo S., Allan E. H., Quinn J. M., Gillespie M. T., Martin T. J. and Sims N. A.(2008). Cardiotrophin-1 is an osteoclast-derived stimulus of bone formation required for normal bone remodeling. J Bone Miner Res 23(12): 2025-2032. [DOI] [PubMed] [Google Scholar]
- 17.Walker E. C., McGregor N. E., Poulton I. J., Solano M., Pompolo S., Fernandes T. J., Constable M. J., Nicholson G. C., Zhang J. G., Nicola N. A., Gillespie M. T., Martin T. J. and Sims N. A.(2010). Oncostatin M promotes bone formation independently of resorption when signaling through leukemia inhibitory factor receptor in mice. J Clin Invest 120(2): 582-592. [DOI] [PMC free article] [PubMed] [Google Scholar]
- 18. Walker, E. C., Truong, K., McGregor, N. E., Poulton, I. J., Martin, T. J. and Sims, N. A. Cortical bone consolidation requires local suppression of cortical osteoclasts through gp130/STAT3 signalling in osteocytes by SOCS3.(unpublished)