Abstract
The choroid plexus consists of a network of secretory epithelial cells localized throughout the lateral, third and fourth ventricles of the brain. Cerebrospinal fluid (CSF) is generated by the choroid plexus and released into the ventricular environment. This biofluid contains an enriched source of proteins, ions, and other signaling molecules for extracellular support of neurons and glial cells within the central nervous system. Given that other cells in the brain also release factors into the CSF, in vitro investigations of choroid plexus function are necessary to isolate processes selectively occurring within and released from this tissue. Here, we describe a protocol to isolate choroid plexus tissue from each of the ventricular locations, and the cell culture conditions required to support growth and maintenance of these epithelial cells. This technique allows for investigations of the functional significance of the choroid plexus, such as for the examination of stimuli promoting the release of growth factors and extracellular vesicles (e.g., exosomes and microvesicles) from ventricle-specific choroid plexus epithelial cells.
Keywords: Choroid plexus, Primary cell culture, Cerebrospinal fluid, Epithelial cells, Extracellular vesicles, Rat
Background
The choroid plexus produces cerebrospinal fluid (CSF) and maintains chemical homeostasis in the extracellular fluid of the central nervous system. The choroid plexus is comprised of epithelial cells, connective tissue and blood vessels, and this structure is localized in all ventricular regions, including within the lateral, third and fourth ventricles. At each of these sites, the choroid plexus appears to differ relative to structure, function and factors produced and released into the ventricles (Johanson et al., 2005; Lun et al., 2015; Lallai et al., 2019). This tissue actively produces and secretes various signaling molecules, such as growth hormones, transthyretin and transferrin, into the brain and has been implicated in a wide range of functions related to brain development, aging, nutrient transport, endocrine regulation, and pathogenesis of neurodegenerative disorders. As such, dysfunction in the choroid plexus would potentially alter CSF composition and compromise brain health. As the field progresses, the vital function of factors derived from the choroid plexus will certainly continue to emerge, and these advances may then provide a foundation for novel approaches to treat neuropathology in humans.
Previous in vitro approaches to examine choroid plexus function have derived choroidal epithelial cell culture from rat, porcine, human and immortalized murine cells (Zheng and Zhao, 2002; Monnot and Zheng, 2013; Tenenbaum et al., 2013; Delery and MacLean, 2019). However, several considerations have been noted that limit the usefulness of prior techniques. First, immortalized cell lines do not appear to retain the properties of choroid plexus epithelial cells (CPEC) since they become very susceptible to changes in morphology and property in vitro (Angelow et al., 2004). Along these lines, we have found highly variable expression of the choroid plexus specific marker transthyretin across passages in the cell lines Z310 (obtained from Dr. Wei Zheng, Purdue University) and HCPEpiC (commercially available from ScienCell Research Laboratories), suggesting altered protein expression in the immortalized state compared to primary-derived tissues (Lallai and Fowler, unpublished findings). Next, since the location of the epithelial cells used to derive the cell lines may be from one or multiple ventricular locations, and given that different transcript expression and function is found in choroid plexus tissue among the ventricular locations (Lun et al., 2015; Lallai et al., 2019), the immortalized cell lines may not be representative of the specific subregion of the tissue of interest. Indeed, the prior approaches have focused on choroid plexus dissection solely derived from the lateral and/or fourth ventricular locations (e.g., as opposed to the smaller third ventricle), have combined choroid plexus from multiple locations into one sample for analysis, or have focused on species with larger yields of choroid plexus tissue (e.g., primate, porcine and human).
To overcome these challenges, we developed a modified protocol to derive primary culture of choroidal epithelial cells from rodents, which allows one to discern between choroid plexus tissue from third, lateral and fourth ventricles (Lallai et al., 2019). With this approach, we have been able to investigate the release of factors into the cell culture medium, thereby mimicking the physiological release of factors and vesicles into CSF of the brain. Of note, the current protocol also uses exosome-depleted fetal bovine serum (FBS) to allow for examination of extracellular vesicles released from the choroid plexus cells in culture conditions; this condition has been incorporated since non-depleted FBS has been shown to contain a variety of extracellular vesicles containing bovine-derived proteins, RNA and DNA, which may contaminate analyses and conclusions (Wei et al., 2016; Kornilov et al., 2018). Moreover, the cultures obtained from this protocol provide cells with distinct structural characteristics of epithelial cells and express the choroid plexus specific protein transthyretin (Lallai et al., 2019). In the following sections, we describe the methods to discretely dissect choroid plexus tissue from different ventricles and generate primary culture choroidal epithelial cells from rat. Further, recommendations and troubleshooting tips are also provided.
Materials and Reagents
0.22 μm filter (Thermo Scientific, catalog number: 595-4520)
Petri dishes (Fisher Scientific, Diameter 100 mm, catalog number: FB0875712)
Clear plastic lab wrap (VWR, catalog number: 46610-056)
Razor blades, straight or double edge (Electron Microscopy Sciences, catalog number: 72003-01)
1.7 ml Microtubes, sterile (Olympus Plastics, catalog number: 22-281S)
P1000 pipet tip (Fisher Scientific, catalog number: 02-707-124)
Cell culture plates, 96-well (Eppendorf, catalog number: 0030730119)
Adult Rat to derive brain tissue (Wistar, Charles River, catalog number: Crl:WI 003, or another species/vendor is also acceptable)
Superglue (Loctite, catalog number: 1647358)
Laminin (Corning, catalog number: CB-40232)
Collagenase, Type II (Gibco, catalog number: 17101015)
Exosome-depleted FBS (SBI System Biosciences, catalog number: EXO-FBS-250A-1)
1x TrypLE Express (Gibco, catalog number: 12605-010)
Poly-D-Lysine (PDL) (Corning, catalog number: CB-40210)
Isoflurane (Patterson Veterinary, catalog number: 07-893-1389)
1x DMEM (Corning, catalog number: 10-017-CV)
1x DPBS (Gibco, catalog number: 14040-117)
Glucose (Fisher Scientific, catalog number: D16-1)
1x Pen-Strep (Gibco, catalog number: 15140122)
1x HBSS (Corning, catalog number: 21-022-CV)
Calcium Chloride (Acros Organics, catalog number: 206795000)
Trypan Blue (Gibco, catalog number: 15250-061)
Cytosine arabinoside (AraC) (Sigma-Aldrich, catalog number: C1768-1G)
Cell culture grade sterile water (Corning, catalog number: 25055CV)
Dissecting Medium (see Recipes)
5x Collagenase, Type II Stock Solution (see Recipes)
1x Collagenase, Type II Working Solution (see Recipes)
Choroid Plexus epithelial cells (CPEC) medium (see Recipes)
Equipment
Rodent guillotine (Harvard Apparatus, catalog number: 73-1918)
Dissecting brain matrix for rat, coronal plane (Ted Pella, catalog number: 15007)
-
Dissecting tools
Small scissors (Roboz Surgical, catalog number: RS-5840)
Fine tip forceps (Roboz Surgical, catalog number: RS-4960)
Tissue forceps (Roboz Surgical, catalog number: RS-8102)
Microdissection scissors (Roboz Surgical, catalog number: RS-5671)
Micro Bone Rongeur (Roboz Surgical, catalog number: RS-8306)
Hemocytometer (Fisher Scientific, catalog number: 0267151B)
Tally counter (VWR, catalog number: 23609-102)
Anesthesia machine for isoflurane (E-Z Systems, EZ-150C Classic Vaporizer Machine)
Isoflurane chamber for rat (E-Z Systems, EZ-178 Mouse/Rat Sure-Seal Induction Chamber)
Dissecting microscope (Objective for 2-5x magnification, Omano, Stereo Zoom Microscope OM 113-1LP)
Refrigerated centrifuge (To accommodate 1.7 ml microtubes, Eppendorf, model: 5215R)
Bead bath for incubation at 37 °C (Fisher Scientific Isotemp Digital-Control Water Bath, model: 205)
Inverted fluorescent microscope (Objectives for 4x, 10x, and 20x magnification, Life Sciences, Leica DM4000 B LED)
Cell culture CO2 incubator (Thermo Scientific, Series 8000 Water-Jacketed CO2 Incubators)
Biosafety hood (NUAIRE, Biological Safety Cabinet Class II Type A/B3)
Procedure
-
Preparation
Prepare Poly-D-Lysine (PDL) and laminin-coated cell culture plasticware one day prior to dissection:
To prepare cell culture plasticware, thaw the appropriate volumes of PDL and laminin. The amount of PDL and laminin varies according to the size of the well. It’s essential that the liquid film covers the entire surface of the bottom and between 2-4 mm of the side walls. For example, in a 96-well cell culture plate, apply 0.05 to 0.1 ml of solution with a micropipette to fill each well 2-4 mm up the sides of the wells.
Dilute PDL 1:50 with sterile cell culture grade water and dilute laminin 1:50 with DMEM. Sterile water should be filtered, for instance with a Thermo Scientific Barnstead GenPure water purification system.
Use a micropipette to add 0.05 to 0.1 ml of PDL to the cell culture plate and then incubate at 37 °C for at least 4 h to allow the PDL to coat the surface.
After 4 h, aspirate the PDL solution with a vacuum and then rinse the wells 3 times with sterile cell culture grade water.
Add the laminin solution with a micropipette to the plate to coat the surface, wrap in saran wrap and place at 4 °C overnight. Keep the wells filled with laminin until just prior to plating with cell mixture.
-
Choroid plexus tissue collection from rat brain
To facilitate processing, set up the biosafety hood with pipets, TrypLE Express, 1x Collagenase, Type II Working Solution, HBSS, CPEC medium, and tools prior to starting dissections.
Place rat in isoflurane induction chamber preloaded with 3% isoflurane/oxygen mixture to anesthetize the rat. Maintain the level of isoflurane until the animal is fully anesthetized. This can be evidenced by pinching the foot and tail; there should be no reaction from the rat, which will verify that the animal is under full anesthesia prior to proceeding. Thereafter, quickly decapitate the rat with the rodent guillotine. Hold the head in your hand and cut the skin on the top of the head longitudinally along the top of the skull to the tip of the nose. Separate the skin laterally to expose the skull. Use microbone rongeurs to remove the skull from around the brain, starting at the cerebellum and moving anterior toward the olfactory bulbs. The brain removal and subsequent dissection should occur as quickly as possible to prevent tissue degradation. For best results, complete the dissections within 1 h or less. Moreover, ensure that the brain tissue and samples are submerged in dissecting medium (Recipe 1), including when storing in microtubes on ice following dissection.
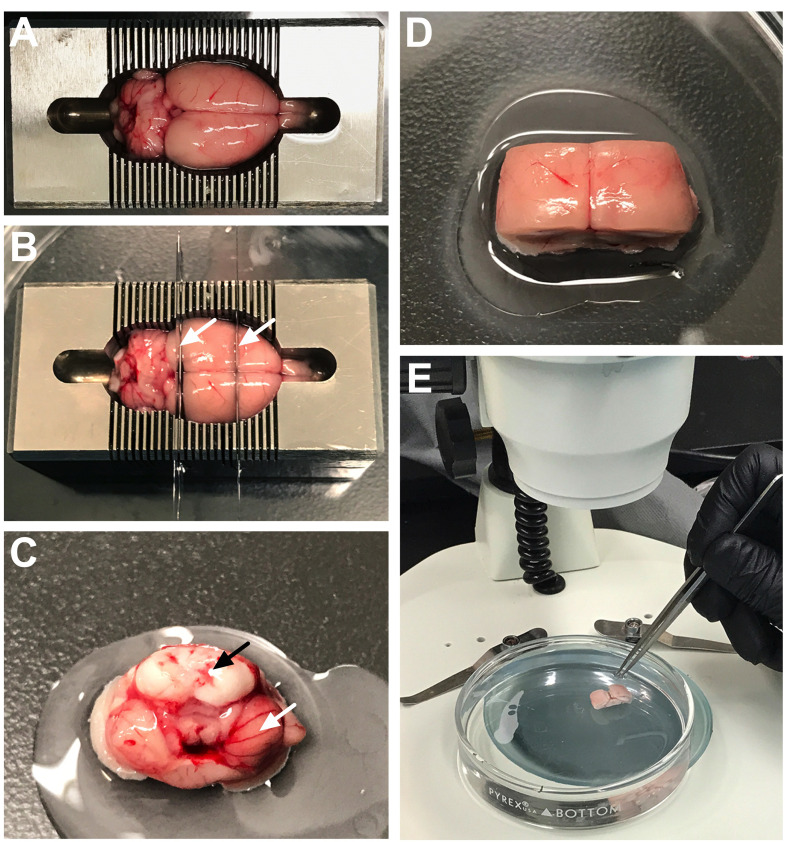
Transfer the brain to the chilled rat brain matrix in a Petri dish (Figure 1A), which has been placed on wet ice for 5 min before proceeding. Rinse brain with chilled dissecting medium. During the subsequent phases the tissue will be continuously wet with chilled dissecting medium to maintain tissue integrity and ensure maximum cell yield.
The brain can now be cut along the coronal plane with a straight edge blade at two separate locations: (1) at the level of the septum (Anterior-Posterior (AP) ~1.00) and (2) at the level of the raphe (~AP -5.5) [see coordinate references in Paxinos and Watson (1997)] (Figure 1B).
Transfer the posterior brain portion, containing the 4th ventricle, to a new, sterile Petri dish containing a small drop of superglue. Orient the brain chunk onto the superglue with the raphe brain side facing downward, and the cerebellum and brain stem pointing upwards (Figure 1C). Add chilled dissecting medium to the Petri dish to completely cover the brain chunk.
Transfer the middle brain portion, containing the lateral and 3rd ventricles, to another sterile Petri dish and superglue the brain chunk on the ventral surface (e.g., with the cortex facing upwards) (Figure 1D). Add chilled dissecting medium to the Petri dish to completely cover the brain chunk.
During the next steps, place the dish under a dissecting microscope to ensure accurate dissection technique (Figure 1E).
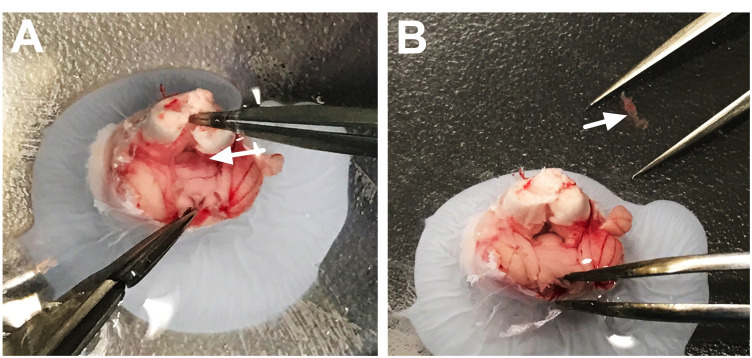
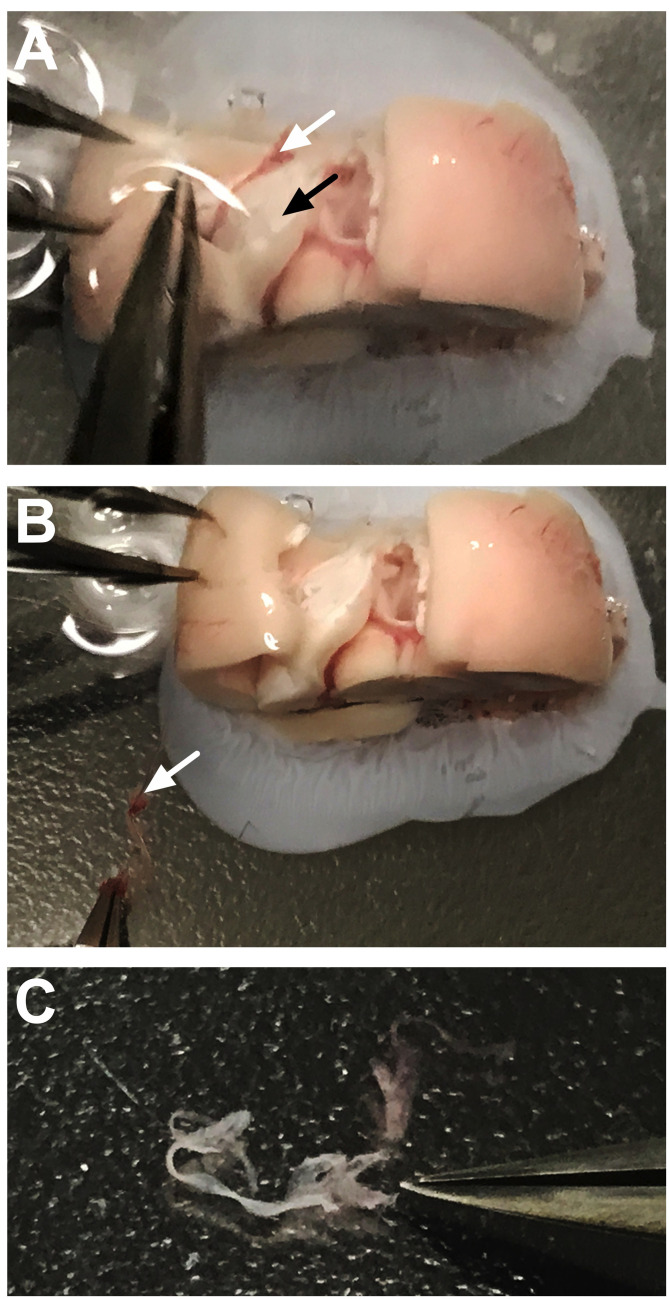
Delicately separated the cerebellum from the brain stem using forceps to allow for visualization of the fourth ventricle. The choroid plexus will be visualized within this opening as a light red/pink string of floating tissue (Figure 2A). Use the forceps to gently remove the choroid plexus. Verify that brain tissue is not attached by microscopic inspection; the visualization of the choroid plexus (e.g., light red/pink string-like appearance) will be distinct from brain tissue (e.g., white/grey tissue) (Figure 2B). If any brain tissue is attached to the choroid plexus, carefully remove the tissue with forceps from the target choroid plexus tissue. It is better to collect less tissue and be sure that the choroid plexus sample is pure, rather than to collect extra tissue areas that may contaminate the cell populations in culture. Place the sample in a 1.7 ml microtube with dissecting medium, close the cap, and store on ice.
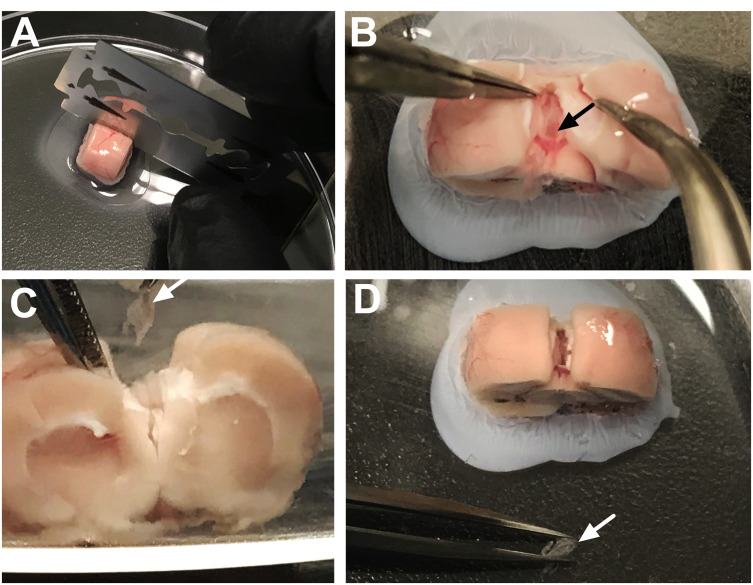
For the dissections of the lateral and third ventricle choroid plexus, use a straight edge blade to gently cut the corpus callosum along the longitudinal fissure (Figure 3A). However, do not make a complete cut all the way down to the bottom of the Petri dish; make a partial cut through the corpus callosum to reveal the 3rd ventricle. If the cut goes too deep, the 3rd ventricle choroid plexus tissue will be difficult to visualize and isolate from the brain tissue.
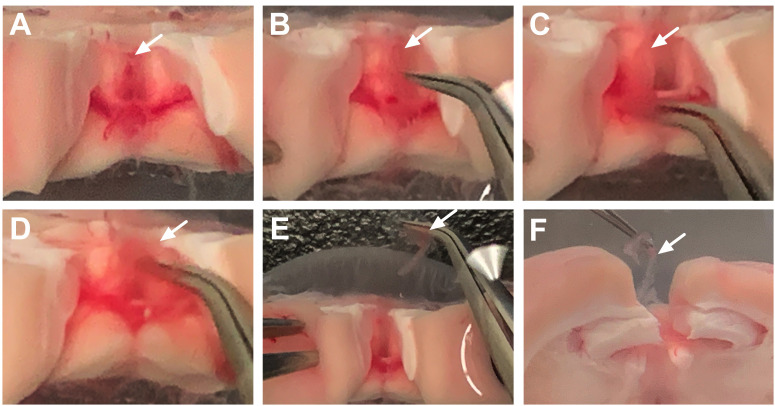
Gently pull the cortex and the hippocampus laterally to either side with forceps to expose the dorsal third ventricle choroid plexus along the midline (Figure 3B), which will appear as a light red/pink floating tissue folded in the center of this area. Remove the choroid plexus tissue by gently pulling it out (Figure 3C), verify that brain tissue is not attached (Figure 3D), place the sample in a 1.7 ml microtube with dissecting medium, and store on ice. When removing the tissue, ensure that you do not pull choroid plexus from other locations by using a precise dissection technique (Figures 4A-4F). Depending on the location of the coronal cut relative to other brain structures, the lateral ventricle choroid plexus may be confused for the dorsal third ventricle choroid plexus tissue. Choroid plexus from the dorsal third ventricle will be the smallest size of tissue collected, since it is only localized on the midline, just above the habenular region. Thus, if a long string of choroid plexus is pulled when isolating from the ventricular region, this is more likely choroid plexus tissue from the lateral ventricles, which would have been exposed if the midline was cut too deeply in Step B9 (see Figures 6A-6B below). Therefore, if it is critical for your studies to maintain the distinction between ventricular locations, the sample may not be used due to ambiguity of localization.
Next, to obtain the choroid plexus of the lateral ventricle, move the hippocampus on each side to reveal the lateral ventricles (Figure 5A) and gently pull on the choroid plexus to remove it from this position (Figure 5B). The lateral choroid plexus will appear as a longer string of tissue (Figure 5C). Verify that brain tissue is not attached and that you have correctly discriminated between the lateral ventricle and dorsal third ventricle choroid plexus tissues (Figures 6A-6B). Thereafter, place samples in microtubes with dissecting medium and store on ice.
Spin samples at 300 × g for 3 min. In a biosafety hood, aspirate medium with a micropipette (do not vacuum to avoid aspirating the sample).
-
Tissue dissociation
Place TrypLE Express in bead bath to warm at 37 °C.
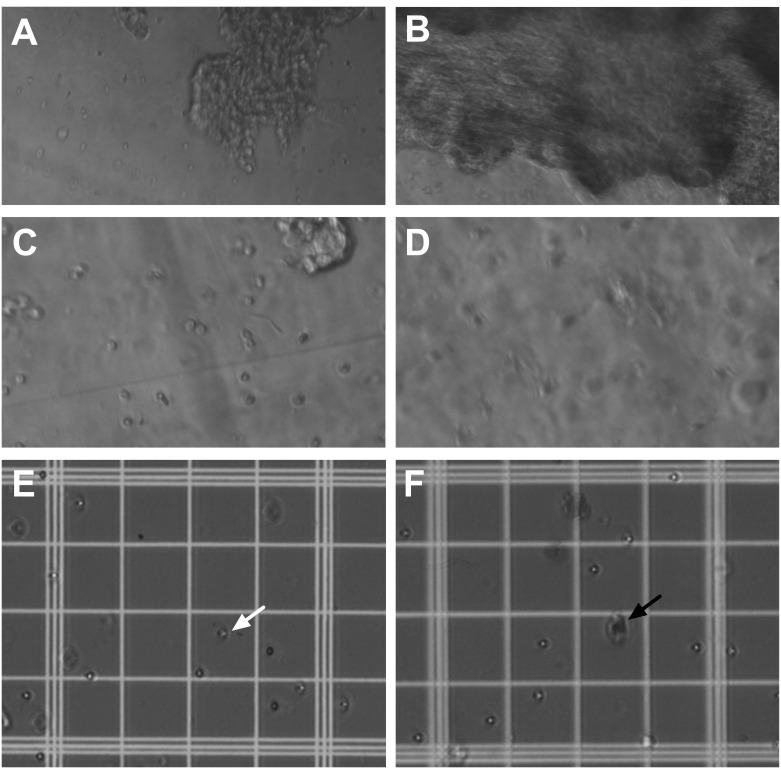
Immediately after aspirating medium in step B12, add 500 μl of 1x Collagenase, Type II with Ca2+ Working Solution (Recipe 3) to each tissue sample and incubate for 15-20 min at 37 °C. Every five minutes tap and flick the tubes hard, about 60 times total to break up the tissue–do NOT vortex. Primary cells are quite sensitive to mechanical stress, and excessive stress will result in increased cell death. You will see the tissue break down and the clear buffer will turn cloudy with small clumps of tissue (Figures 7A-B).
At this stage rinse sample by adding 1 ml of HBSS. Spin tubes at 300 × g for 2-3 min and then aspirate the supernatant with a P1000 pipet tip as follows: first aspirate 200 μl, then an additional 200 μl, and then the final remaining supernatant. Remove as much supernatant as possible, without touching the cell pellet. This approach prevents too much upward draw from the pipet tip and the sample from being aspirated, which may occur with extraction of larger volumes.
To further dissociate the samples, tap the pellet and add 500 μl of TrypLE Express. Incubate the tubes at 37 °C in a bead bath for 10-20 min, tapping the tubes every 5 min. For good viability of the cells, it is important not to over-digest. Therefore, examine the cells in the microtube with an inverted light microscope to verify that the tissue is breaking down into small clumps (Figures 7C-7D).
The process is complete as soon as a suspension with single cells and small clumps (containing less than 10 cells) is achieved.
Next add 500 μl of CPEC medium (Recipe 4). Gently triturate about six times to dissociate the cells using a P1000 pipet tip and pipetting slowly up and quickly down to the first stop on the pipet.
Wait approximately 30 s to allow large clumps of tissue to gravity sediment and then transfer the floating cells in the supernatant to a new microtube. Centrifuge at 300 × g for 3 min. Retain the large clumps of tissue that were previously sedimented at room temperature. If the cell yield is low (see Section D), repeat step C6 by adding CPEC medium and triturating.
After centrifuging, aspirate the supernatant with a P1000 pipet tip and wash the cell pellet with 500 μl of CPEC medium. To prevent over-extraction of the pellet, avoid using the vacuum for fast rinses, but rather use a micropipette, making sure that the end of the tip is on the opposite side of the pellet. Resuspend in fresh 500 μl of CPEC medium and repeat this step twice.
Re-suspend the pellet in a nominal amount of CPEC medium (about 100-200 μl).
-
Cell counting and plating
Count the cells and determine cell viability (described below in Data analysis). Counting cells is essential to guarantee healthy cells with an efficient proliferation rate, which will guarantee experimental reproducibility and accuracy.
Immediately before use, aspirate the laminin solution out of the cell culture wells, and then rinse the wells 3 times with sterile cell culture grade water. Next, rinse once with 1x DPBS or CPEC medium immediately before adding cells. Be sure to not let the wells dry out.
To plate cells, add appropriate volume of cell mixture to cell culture plasticware accordingly (Table 1):
Cap the plate and gently swirl the cell culture dish to make sure the cell mixture is evenly dispersed across the surface of the well. Place dish at 37 °C overnight. After 2 days aspirate the CPEC medium and add fresh medium. Continue to change medium every 3 days. This action will clean the well from dead cell debris that are not attached to the surface of the well.
Confluency will be reached after 3 changes of medium (< 10 days). After confluency, cells are ready for investigating the secretion of factors into the medium.
Cultured cells will be stable for another 7 days for experiments.
Figure 1. Preparation of the brain for dissection.
A. After removing the brain, place into chilled brain matrix. B. Insert two straight edge razor blades into the brain matrix to create three chunks: anterior [containing the olfactory bulbs to the level of the septum (approximately AP–~1.0)], posterior [containing the brainstem, cerebellum and midbrain to the level of the raphe (approximately AP–~5.5)], and (3) central portion. C. Glue the posterior chunk onto the bottom of the Petri dish with the brainstem (black arrow) and cerebellum (white arrow) facing upwards. D. Glue the central chunk onto the bottom of the Petri dish with the cortex facing upwards. E. Pour chilled dissecting medium into the Petri dish to submerge the brain chunks and then place under the dissecting microscope for visualization.
Figure 2. Dissection of the fourth ventricle choroid plexus.
A. Use fine tip forceps to gently separate the brainstem from the cerebellum. This will reveal the fourth ventricle cavity and will expose the internal choroid plexus tissue. B. Gently pull the choroid plexus tissue to remove it from the fourth ventricle. It will appear stringy and red/light pink in color (white arrow).
Figure 3. Dissection of the third ventricle choroid plexus.
A. Use a straight edge razor to gently separate the hemispheres along the sagittal fissure. B. Separate the right and left sides of the hemispheres (containing the cortex and hippocampus) to reveal the dorsal third ventricle choroid plexus, which will appear light pink/red in color (black arrow). C. Coronal view of the brain shows the removal of the dorsal third ventricle choroid plexus. D. The removed choroid plexus (white arrow) will appear structurally characteristic of choroidal tissue.
Figure 4. Step-by-step dissection of the third ventricle choroid plexus.
A. After separating the cortical tissue from each side, the third ventricle choroid plexus can be visualized directly on the midline. The white arrow denotes the location at the top of this choroid plexus tissue, which appears light pink in color. B. The forceps can be gently slid underneath the tissue to dissociate the choroid plexus (arrow) from the surrounding area. C. The choroid plexus tissue should now be movable within the third ventricle area. The white arrow identifies the floating tissue. D. Forceps are used to gently pull the choroid plexus from the ventricular cavity. The white arrow identifies the tissue being gently separated at the top of the brain chunk. E. After removal, the choroid plexus (arrow) should not be attached to any connective tissue. F. Side-view shows the removal of the third ventricle choroid plexus (arrow) from the midline.
Figure 6. Differential characteristics of the lateral and third ventricle choroid plexus allows them to be visually distinguished from one another.
A. After removal, the lateral choroid plexus appears long and string-like (black arrow), whereas the third ventricle choroid plexus is smaller in size (white arrow). B. Visualization of the lateral choroid plexus tissue (black arrow) and third ventricle choroid plexus tissue (white arrow). Note the distinguishable differences in the size and appearance.
Figure 5. Dissection of the lateral ventricle choroid plexus.
A. After removal of the third ventricle choroid plexus, gently separate the cortex from the hippocampus (black arrow identifies the hippocampus). This will reveal the lateral ventricle choroid plexus tissue in between these structures (white arrow denoting light pink/red choroidal tissue). B. Gently pull the choroid plexus tissue to remove it from the ventricular cavity. White arrow indicates removed tissue. C. The lateral ventricle choroid plexus will appear a longer and more string-like than the fourth and third ventricle locations.
Figure 7. Tissue preparation for primary cell culture of the dorsal third ventricle and lateral ventricle choroid plexus.
A-B. Visualization of the dorsal third ventricle (A) and lateral ventricle (B) choroid plexus tissue during the first 2 min in 1x Collagenase, Type II with Ca2+ Working Solution inside the microcentrifuge tubes at 20x magnification. Note the distinguishable differences in size and appearance between the choroid plexus tissue from the two locations. C-D. Visualization of the dorsal third ventricle (C) and lateral ventricle (D) choroid plexus tissue after 15 min in 1x Collagenase, Type II with Ca2+ Working Solution at 40x magnification. Note that small clumps of tissue and single cells are more distinguishable. E-F. Visualization of cells from the dorsal third ventricle (E) and lateral ventricle (F) choroid plexus tissue in Trypan Blue solution on the hemocytometer under 20x magnification. For live cells, the cell membrane is not permeated by the dye, and therefore, the cells appear clear and reflective (e.g., white arrow as one example). In contrast, dead cells acquire the dye and therefore appear darker in color, which is representative of the blue stain (e.g., black arrow as one example).
Table 1. Guideline for volume of cell mixture based on cell culture plate utilized.
| Size of Cell Culture Plate | Volume of Cell Mixture |
| 96-well plate, PDL-Laminin coated | 200 μl/well (10,000 cells/well) |
| 96-well plate | 100 μl/well |
| 24-well plate | 0.5 ml/well |
| -well plate | 1 ml/well |
| 6-well plate | 2 ml/well |
Data analysis
How to count cells:
To count cells, combine the cell mixture from Step D3 with Trypan Blue at a ratio of 1:1 (i.e., 15 μl cell mixture:15 μl Trypan Blue). Use a pipet to apply 25 μl of the Trypan Blue-treated cell suspension to the hemocytometer. If using a glass hemocytometer, gently fill both chambers underneath the coverslip and allow the cell suspension to evenly draw out due to capillary action.
Using a microscope, focus on the grid lines of the hemocytometer with a 10x objective.
Use a handheld Tally Counter to count the live unstained cells (live cells do not take up Trypan Blue) in one set of 16 squares (Figures 7E-7F). Before starting to count, chose two of the boundary lines (left-top or right-bottom) and be consistent while counting. For example, only count cells that are set within the given square and that are on the right-hand and bottom boundary line. Do not count cells on the left-hand or top boundary lines of a square to prevent double-counting cells that lie on the border of 2 squares.
Move the hemocytometer to the next set of 16 corner squares and continue counting until all 4 sets of 16 corners are counted.
Record the yield.
To determine a viability estimate, add the number of live and dead cell counts together to obtain a total cell count (dead cells will be stained with Trypan Blue) (Figures 7E-7F). Next, divide the live cell count by the total cell count value to obtain percent viability.
Notes
Healthy choroid plexus cells are bright, refractile, and clear. The presence of a lot of light blue-colored cells may indicate over-digestion and/or over-trituration.
Expect a yield of about 10,000 cells from the third ventricle choroid plexus and 30,000 cells from both the lateral and the fourth ventricle choroid plexus, per each rat.
Choroid plexus cells from pups are smaller than those of adults, but they dissociate more quickly in 1x Collagenase, Type II Working Solution and need less time in TrypLE Express (much less than 20 min).
To culture primary choroid plexus cells for extended periods of time (> 2 weeks), add 20 μM of AraC to prevent the overgrowth of fibroblasts.
Recipes
-
Dissecting Medium
Combine 1x DPBS with glucose and Pen-Strep to create a solution with a 0.6% glucose and 1x Pen-Strep concentration (for example, to make 1 L of dissecting medium combine 1,000 ml of 1x DPBS, 6 g of glucose, and 10,000 units/ml of Pen-Strep)
Stir until solution is clear
Filter with a 0.22 μm filter by screwing the plastic filter top onto the autoclaved, glass container that the final solution will be stored in. Connect the filter top to a vacuum and turn on the vacuum to filter the solution through. Filtering ensures purity of solutions so that sterility is not compromised
Store at 4 °C
For best results, make fresh dissecting medium within 24 h prior to the dissections
-
5x Collagenase, Type II Stock Solution
Dilute Collagenase, Type II in 1x HBSS supplemented with 3 mM CaCl2 to make a solution with a final concentration of 7.5 mg/ml
Filter through a 0.22 μm filter
Aliquot 2 ml of the stock solution into sterile 2 ml tubes to store at -20 °C
Stock solution can be stored for up to 6 months
-
1x Collagenase, Type II Working Solution
Mix 5x Collagenase, Type II Stock Solution with 1x HBSS supplemented with 3 mM CaCl2 in a 1:5 ratio
-
Choroid Plexus epithelial cells (CPEC) medium
Combine 1x DMEM with FBS and Pen-Strep to achieve a solution with a 10% FBS and 1x Pen-Strep concentration (for example, to make 1 L of CPEC medium combine 900 ml of DMEM with 100 ml of FBS and 10,000 units/ml Pen-Strep)
Filter the solution with a 0.22 μm filter
Store in an autoclaved, glass container at 4 °C
Acknowledgments
This work was supported by the National Institutes of Health (NIH) (NIDA Grant DP1-DA039658) to C.D.F. and the Tobacco-Related Disease Research Program (TRDRP) (Grant T30FT0967) to V.L. Findings derived from this technique have been published by the authors (Lallai et al., 2019) and represent technical modifications of the prior report in mouse tissue (Barkho and Monuki, 2015).
Competing interests
The authors declare no competing interests.
Ethics
All experiments were conducted in strict accordance with the NIH Guide for the Care and Use of Laboratory Animals and were approved in protocol AUP-17-206 (approval period 12/6/2017-12/6/2021) by the Institutional Animal Care and Use Committee at the University of California, Irvine.
Citation
Readers should cite both the Bio-protocol article and the original research article where this protocol was used.
References
- 1.Angelow S., Zeni P. and Galla H. J.(2004). Usefulness and limitation of primary cultured porcine choroid plexus epithelial cells as an in vitro model to study drug transport at the blood-CSF barrier. Adv Drug Deliv Rev 56(12): 1859-1873. [DOI] [PubMed] [Google Scholar]
- 2.Barkho B. Z. and Monuki E. S.(2015). Proliferation of cultured mouse choroid plexus epithelial cells. PLoS One 10(3): e0121738. [DOI] [PMC free article] [PubMed] [Google Scholar]
- 3.Delery E. C. and MacLean A. G.(2019). Culture model for non-human primate choroid plexus. Front Cell Neurosci 13:396. [DOI] [PMC free article] [PubMed] [Google Scholar]
- 4.Johanson C. E., Duncan J. A., Stopa E. G. and Baird A.(2005). Enhanced prospects for drug delivery and brain targeting by the choroid plexus-CSF route. Pharm Res 22(7): 1011-1037. [DOI] [PubMed] [Google Scholar]
- 5.Kornilov R., Puhka M., Mannerström B., Hiidenmaa H., Peltoniemi H., Siljander P., Seppänen-Kaijansinkko R. and Kaur S.(2018). Efficient ultrafiltration-based protocol to deplete extracellular vesicles from fetal bovine serum. J Extracell Vesicles 7(1): 1422674. [DOI] [PMC free article] [PubMed] [Google Scholar]
- 6.Lallai V., Grimes N., Fowler J. P., Sequeira P. A., Cartagena P., Limon A., Coutts M., Monuki E. S., Bunney W., Demuro A. and Fowler C. D.(2019). Nicotine acts on cholinergic signaling mechanisms to directly modulate choroid plexus function. eNeuro 6(2). [DOI] [PMC free article] [PubMed] [Google Scholar]
- 7.Lun M. P., Johnson M. B., Broadbelt K. G., Watanabe M., Kang Y. J., Chau K. F., Springel M. W., Malesz A., Sousa A. M., Pletikos M., Adelita T., Calicchio M. L., Zhang Y., Holtzman M. J., Lidov H. G., Sestan N., Steen H., Monuki E. S. and Lehtinen M. K.(2015). Spatially heterogeneous choroid plexus transcriptomes encode positional identity and contribute to regional CSF production. J Neurosci 35(12): 4903-4916. [DOI] [PMC free article] [PubMed] [Google Scholar]
- 8.Monnot A. D. and Zheng W.(2013). Culture of choroid plexus epithelial cells and in vitro model of blood-CSF barrier. Methods Mol Biol 945: 13-29. [DOI] [PMC free article] [PubMed] [Google Scholar]
- 9.Paxinos G. and Watson C.(1997). The rat brain in stereotaxic coordinates. 3rd edition. San Diego: Academic Press. [Google Scholar]
- 10.Tenenbaum T., Steinmann U., Friedrich C., Berger J., Schwerk C. and Schroten H.(2013). Culture models to study leukocyte trafficking across the choroid plexus. Fluids Barriers CNS 10(1): 1. [DOI] [PMC free article] [PubMed] [Google Scholar]
- 11.Wei Z., Batagov A. O., Carter D. R. and Krichevsky A. M.(2016). Fetal bovine serum RNA interferes with the cell culture derived extracellular RNA. Sci Rep 6: 31175. [DOI] [PMC free article] [PubMed] [Google Scholar]
- 12.Zheng W. and Zhao Q.(2002). The blood-CSF barrier in culture. Development of a primary culture and transepithelial transport model from choroidal epithelial cells. Methods Mol Biol 188: 99-114. [DOI] [PMC free article] [PubMed] [Google Scholar]


