

Abstract
Candida albicans is an opportunistic fungal pathogen responsible for significant disease and mortality. Absent complete mating and other convenient methods, dissection of its virulence factors relies on robust tools to delete, complement, and otherwise modify genes of interest in this diploid organism. Here we describe the design principles and use of Cas9 and sgRNAs transiently expressed from PCR cassettes to modify genes of interest, generating homozygous mutants in a single transformation step.
Keywords: Candida albicans, CRISPR-Cas9, gene editing, gene deletion
Introduction
Techniques for precise genetic manipulation are vital to the study of pathogenic species. Many such systems have been developed for use in Candida albicans, several of which now rely on the power of CRISPR-Cas9 to greatly increase genetic modification efficiency. Prior to these developments, genetic modification in the diploid C. albicans was laborious, as manipulation of a single gene would require two rounds of transformation and the use of two selectable markers. The use of CRISPR-Cas9 has halved the time required as the necessity to repair double stranded breaks introduced by Cas9 in both copies of a gene of interest allows the isolation of a homozygous mutant in a single round of transformation. Critically, transformation of C. albicans is mutagenic, and this reduction of transformation rounds limits unintentional changes to the genome of engineered mutant strains (Marton, Maufrais, D’Enfert, & Legrand, 2020). These mutants may then be analyzed downstream for functional relationships to a given phenotype of interest.
Some CRISPR-Cas9 systems in use with Candida species require Cas9 to be expressed from a construct integrated into the genome (Nguyen, Quail, & Hernday, 2017; Román, Coman, Prieto, Alonso-Monge, & Pla, 2019; Shapiro et al., 2017; Vyas, Barrasa, & Fink, 2015). These methods have proven effective, but require cloning of single-guide RNA (sgRNA) expressing constructs, as well as the use of a selectable marker to ensure integration of the Cas9 and sgRNA expressing construct. Subsequent rounds of genetic modification require the removal of the Cas9:sgRNA construct before a new Cas9:sgRNA construct can be introduced. We previously demonstrated a method for the use of Cas9 and sgRNAs expressed transiently from linear DNA products, which eliminates these issues. Herein we describe the protocols for using these transient expression methods to make genetic modifications in C. albicans. The protocols are separated into the design of necessary PCR primers, the manufacture of PCR products, transformation of C. albicans by a lithium acetate (LiAc) and polyethylene glycol (PEG) heat shock procedure, and the PCR genotyping of transformants for homozygous mutants. Note that all sequences in this protocol are presented in a 5' to 3' orientation.
Strategic Planning
While in principle any 20 bp sequence that is 5’ of an NGG motif may be used as a sgRNA target, several best practices are recommended both to minimize the occurrence of potential Cas9 induced off-target DSBs, as well as to ensure efficient targeting at the locus of interest. In their supplemental data, Vyas and colleagues provide an exhaustive list of likely unique sgRNA targets in the SC5314 genome (Vyas et al., 2015). Alternatively, software such as Cas-Offinder may be used for prediction of off-target binding sites, in which case guide candidates with the least number of off-target sites and/or most mismatched off-target sites should be chosen (Bae, Park, & Kim, 2014). Other software packages such as CHOPCHOP may also be run with custom genome reference files to identify off-target sites, and will also provide scoring metrics for estimated guide performance (Montague, Cruz, Gagnon, Church, & Valen, 2014). Any of the above methods is suitable and at least one should be applied to guide selection.
Beyond minimization of off-target sites, care should be taken with the location of the desired double strand break. The desired mutation should ideally eliminate the sgRNA target, and should therefore be within the sequence between the 80–100 bp sequences targeted by the flanking homology arms. A handy design principle has been to design guides that target positions close (within 100 bp) to the flanking homology. We believe that this may assist in achieving higher genetic modification efficiency, as this strategy reduces the distance required for end resection before homology directed repair may occur. Lastly, we highly advise that guides that target within or between highly repetitive sequences should be avoided, as breaks may be resolved by recombination between those sequences.
Basic Protocol 1: PCR Amplification of CRISPR components
In Candida albicans, transient expression of Cas9 and sgRNA(s) from PCR amplicons (“cassettes”) is sufficient to efficiently introduce a desired mutation (Min, Ichikawa, Woolford, & Mitchell, 2016). In this section, we discuss the PCR amplification of the necessary cassettes. At minimum, three cassettes are required for basic genetic manipulation: a selectable marker containing short homology arms to the locus of interest, a cassette expressing a sgRNA targeting the locus of interest, and a cassette expressing the C. albicans codon-optimized version of Cas9 (CaCas9) (Min et al., 2016; Vyas et al., 2015).
For deletion of a gene of interest (represented as YFG1), a selectable marker is amplified with ultramers containing 80–100 bp of homology to the target locus, and 20–25 bp adapters for the chosen selectable marker. Common selectable markers include the auxotrophic markers HIS1, LEU2, and ARG4, as well as the drug resistance marker NAT1. These are commonly available from the plasmid vectors pSN52 (HIS1), pSN40 (LEU2), pSN69 (ARG4), and pNAT (NAT1), and share a universal set of adapters for primer design (Table 1) (Min et al., 2016; Noble & Johnson, 2005). To design ultramers for the full ORF deletion of YFG1, append the 80–100 bp immediately upstream of the YFG1 start codon to the forward marker adapter, and append the reverse complement of the 80–100 bp immediately downstream of the YFG1 stop codon to the reverse marker adapter (Table 2). For example, to delete ADE2 with a NAT1 marker, we use the following ultramers:
Table 1.
Common Plasmids for Markers
| Plasmid | Marker | Plasmid selection | Forward Adapter | Reverse Adapter | Suggested Concentration |
|---|---|---|---|---|---|
| pSN52 | HIS1 | KanR | TTTCCCAGTCACGACGTT | GTGGAATTGTGAGCGGATA | n/a |
| pSN40 | LEU2 | KanR | TTTCCCAGTCACGACGTT | GTGGAATTGTGAGCGGATA | n/a |
| pSN69 | ARG4 | KanR | TTTCCCAGTCACGACGTT | GTGGAATTGTGAGCGGATA | n/a |
| pNAT | NAT1 | AmpR | TTTCCCAGTCACGACGTT | GTGGAATTGTGAGCGGATA | 400 μg/mL |
Table 2.
Primers for transient CRISPR
| Primer Name | Sequence |
|---|---|
| YFG1_del/F | (80bp upstream)TTTCCCAGTCACGACGTT |
| YFG1_del/R | (80bp downstream)GTGGAATTGTGAGCGGATA |
| CaCas9/F: | ATCTCATTAGATTTGGAACTTGTGGGTT |
| CaCas9/R: | TTCGAGCGTCCCAAAACCTTCT |
| SNR52/F | AAGAAAGAAAGAAAACCAGGAGTGAA |
| sgRNA/R | ACAAATATTTAAACTCGGGACCTGG |
| SNR52/N | GCGGCCGCAAGTGATTAGACT |
| sgRNA/N | GCAGCTCAGTGATTAAGAGTAAAGATGG |
| YFG1_sgRNA/F | (20bp)CAAATTAAAAATAGTTTACGCAAGTC |
| YFG1_sgRNA/R | (20bp)GTTTTAGAGCTAGAAATAGCAAGTTAAA |
-
ADE2_del/F:
caccaaaaagaatcaacttatacattactaatctattcatcttattctcatcacacacgcatatacaagcactacacataTTTCCCAGTCACGACGTT
-
ADE2_del/R:
ttctttttatatattaattataattttattgcaccataacgtttacttgtttaatatgctattgatatctatatttttttGTGGAATTGTGAGCGGATA
Adapter sequences for pNAT (also compatible with the Noble group markers) are represented in bold. Sequences for your gene of interest in the standard laboratory isolate SC5314 may be readily obtained from the Candida Genome Database (Skrzypek et al., 2017).
For this protocol, amplification of the Cas9 cassette is performed from the plasmid pV1093 using the primers CaCas9/F and CaCas9/R (Table 2) (Min et al., 2016; Vyas et al., 2015). At least two different sgRNAs should be designed for a given target locus, in case one or multiple sgRNAs do not give the desired result (for sgRNA selection, see Strategic Design). Once a sgRNA or set of sgRNAs has been selected for your target locus of interest (represented below as YFG1), amplification of the sgRNA cassette(s) is performed by a three-step double-joint PCR reaction. This step requires 6 total primers, 4 of which are constant (SNR52/F, sgRNA/R, SNR52/N, sgRNA/N, See Table 2).
Two primers, YFG1_sgRNA/F and YFG1_SNR52/R, depend on the selected sgRNA sequence. To design these, append the 20 bp sequence upstream of the PAM to the forward adapter, and append the reverse complement of the 20 bp sequence to the reverse adapter (Table 2). For example, given sgRNA target sequence “aaggggttcactgaattctcNGG” within YFG1, the sgRNA/F and SNR52/R sequences would be:
-
YFG1_sgRNA/F:
aaggggttcactgaattctcCAAATTAAAAATAGTTTACGCAAGTC
-
YFG1_SNR52/R:
gagaattcagtgaaccccttGTTTTAGAGCTAGAAATAGCAAGTTAAA
Following amplification, PCR products may be visualized on a 1% agarose gel for quality control. Typical band sizes from amplification of the DNA cassettes described in this protocol are shown in Figure 1.
Figure 1:
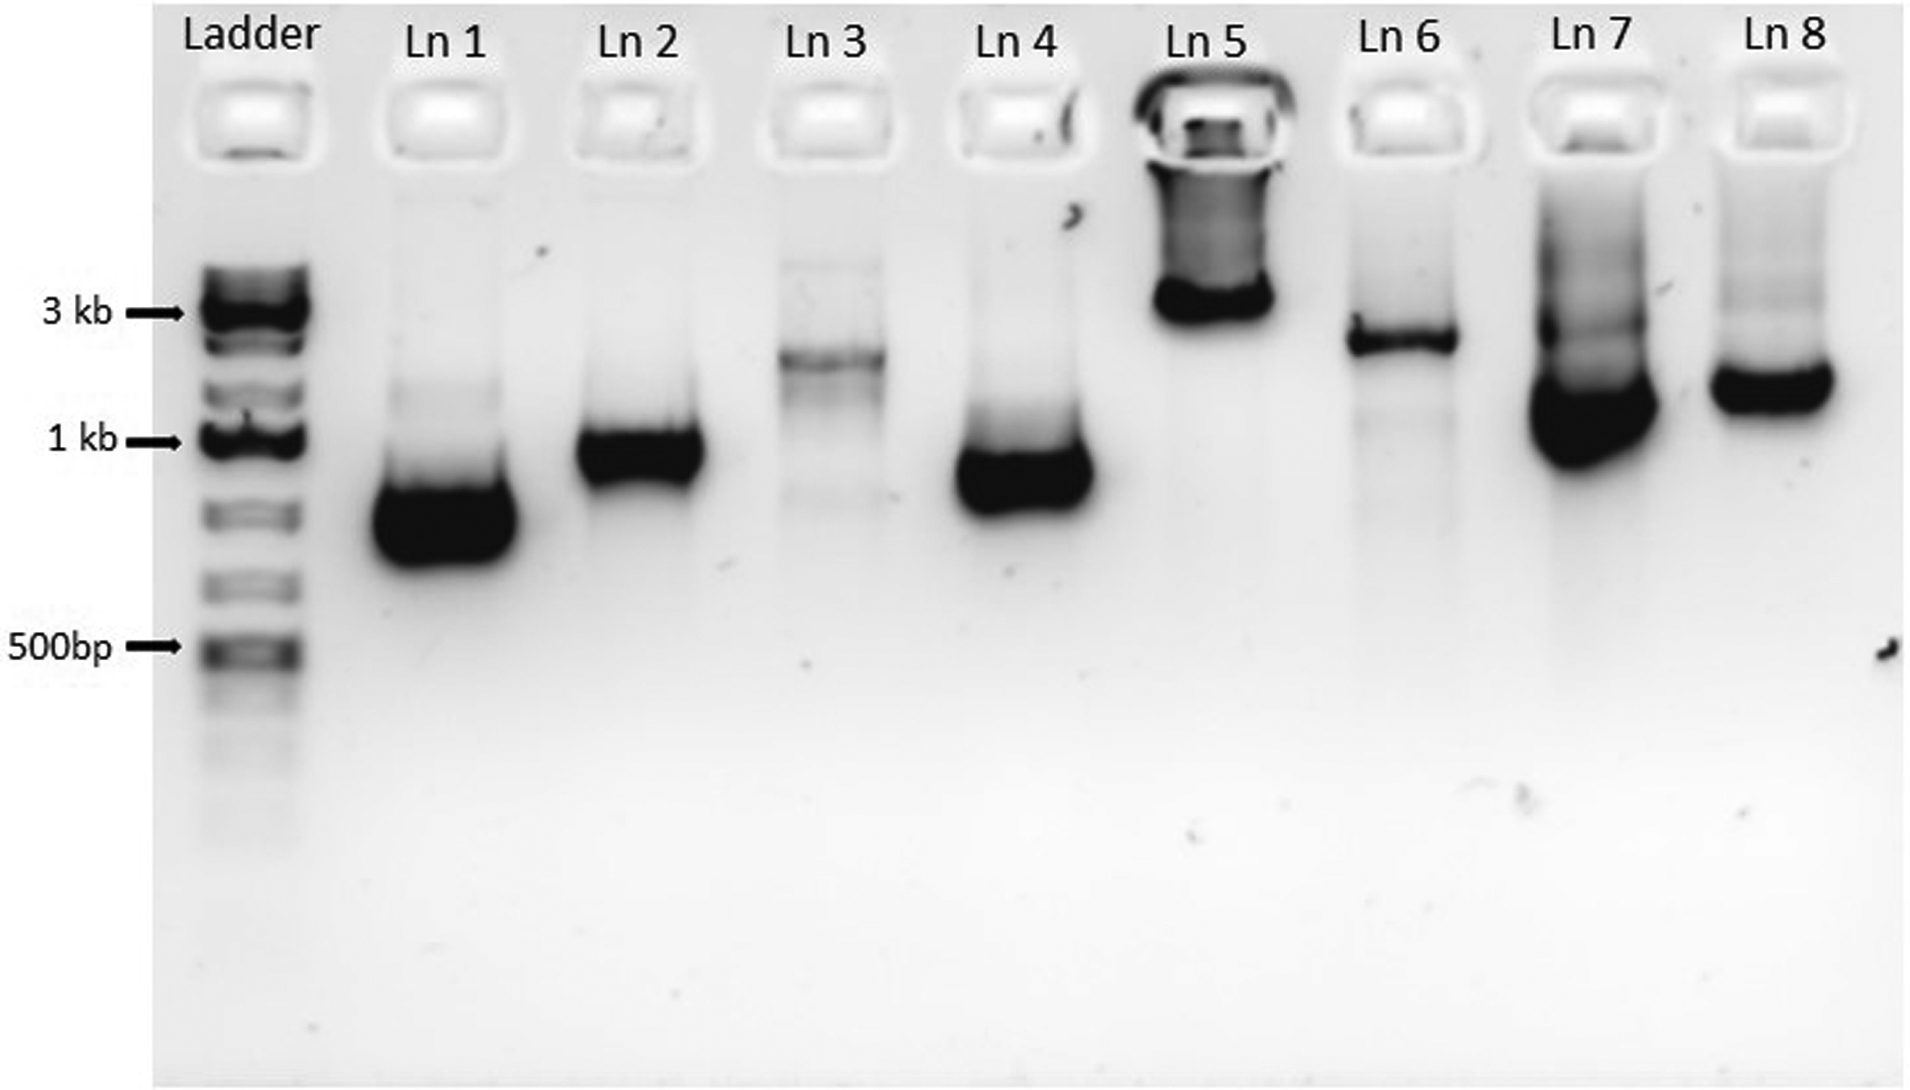
Typical products from CRISPR component PCR reactions (Basic Protocol 1 and Alternate Protocol: Deletion with recyclable markers). Ln 1: sgRNA expression cassette Round 1 product generated from pV1090 with primers YFG1_sgRNA/F and sgRNA/r (1015 bp). Ln 2: sgRNA expression cassette Round 1 product generated from pV1093 with primers SNR52/F and YFG1_SNR52/R (1459 bp). Ln 3: sgRNA expression cassette Round 2 fusion PCR product comprised of both Round 1 products (~2474 bp). Ln 4: sgRNA expression cassette Round 3 product made by amplifying unpurified Round 2 product with sgRNA/N and SNR52/N (1307 bp). Ln 5: CaCas9 expression cassette amplified from pV1093 with primers CaCas9/F and CaCas9/R (5575 bp). Ln 6: Example single piece NAT1 deletion cassette with 80bp flanking homology to YFG1 5` and 3` regions (1603 bp). Ln 7: CRIME HIS1 split marker deletion cassette amplified from pMH01 with Upstream+Adapter/F and HIS1_CRIME/R (1966 bp). Ln 8: CRIME HIS1 split marker deletion cassette amplified from pMH02 with HIS1_CRIME/F and Downstream+Adapter/R (2058 bp). Size of single piece deletion cassettes as well as split marker CRIME deletion cassettes will vary depending upon the marker used and the amount of homology to the target locus included.
Materials
1.5 ml snap cap microcentrifuge tubes
Benchtop microcentrifuge with 50 mL conical tube adapters (e.g. Eppendorf 5810R)
ExTaq kit, Takara (Fisher, cat. # 50443969)
Sterile dH2O
sgRNA Primers (4 + 2 per each unique sgRNA)
Deletion Cassette Primers (2 ultramers)
Cas9 Primers (2)
Marker Plasmids (e.g. pNAT, pSN40, pSN52, pSN69)
Plasmid pV1093
PCR tubes
Themocycler (e.g. Eppendorf Mastercycler® Nexus Gradient)
Nanodrop (e.g. ThermoFisher Scientific cat. # ND-ONEC-W)
- PCR cleanup kit (e.g. Fisher, cat. # FERK0702)
-
1In clean 1.5 mL microcentrifuge tubes, make 10 μM working stocks of all primer solutions in sterile dH2O
-
2Dilute plasmid templates to approximately 1–10 ng/μL
-
1
Deletion Cassette
-
3In a clean 1.5 mL microcentrifuge tube, prepare master mix solution for amplification of deletion cassette and mix thoroughly by pipetting. A 50 μL reaction should contain as follows (scale up as appropriate):
10X Takara ExTaq Buffer 5 μL 2.5 mM dNTP 6 μL YFG1_del/F (10 μM) 2 μL YFG1_del/R (10 μM) 2 μL Sterile dH2O 34 μL ExTaq 0.25 μL Marker Plasmid (e.g. pNAT) (50 ng/μL) 1 μL Note: While 50 μL of PCR product yields enough cleaned deletion cassette for one transformation, it is generally useful to make at least 200 ul of PCR product.
-
4
Briefly spin down the master mix in a benchtop centrifuge to collect. Pipette 50 to 100 μL of master mix to PCR tubes as appropriate for the available thermocycler.
-
5Run PCR in thermocycler with following parameters:
Step 1: 94°C 1 min Step 2: 94°C 30 sec Step 3: 52°C (or as appropriate) 1 min Step 4: 72°C 1 min per kb Go to Step 2, 29x Step 5: 72°C 5 min Step 6: 4°C Hold -
6
Conduct a column cleanup of deletion cassette PCR product using a PCR cleanup kit per manufacturer’s instructions. Elute in 30 μL sterile dH2O per each 50 μL PCR product.
-
7
Using 1 μL of column purified PCR product, measure deletion cassette dsDNA concentration by Nanodrop. Product concentration should be approximately 200–600 ng/μL.
Cas9 Expression Cassette
-
8In a clean 1.5 mL microcentrifuge tube, prepare master mix solution for amplification of Cas9 expression cassette and mix thoroughly by pipetting. A 50 μL reaction should contain as follows (scale up as appropriate):
10X Takara ExTaq Buffer 5 μL 2.5 mM dNTP 6 μL CaCas9/F (10 μM) 2 μL CaCas9/R (10 μM) 2 μL Sterile dH2O 34 μL ExTaq 0.25 μL pV1093 (50 ng/μL) 1 μL Note: Preparation of a large quantity Cas9 cassette in a single reaction is generally useful. In our hands, multiple freeze-thaw cycles of Cas9 expression cassette has not been observed to significantly affect transformation efficiency.
-
9
Briefly spin down the master mix in a benchtop centrifuge to collect. Pipette 50 to 100 μL of master mix to PCR tubes as appropriate for the available thermocycler.
-
10Run PCR in thermocycler with following parameters:
Step 1: 94°C 1 min Step 2: 94°C 30 sec Step 3: 52°C 1 min Step 4: 72°C 4 min Go to Step 2, 29x Step 5: 72°C 5 min Step 6: 4°C Hold -
11
Conduct a column cleanup of deletion cassette PCR product using a PCR cleanup kit per manufacturer’s instructions. Elute in 30 μL sterile dH2O per each 50 μL PCR product.
-
12
Using 1 μL of column purified PCR product, measure Cas9 expression cassette dsDNA concentration by Nanodrop. Product concentration should be approximately 200–600 ng/μL.
sgRNA Expression Cassette, Round One
-
13In round one, two separate PCR reactions will be run for each sgRNA. In a clean 1.5 mL microcentrifuge tube, prepare master mix solution and mix thoroughly by pipetting. For each sgRNA, the master mix solution should contain double the following:
10X Takara ExTaq Buffer 5 μL 2.5 mM dNTP 6 μL Sterile dH2O 34 μL ExTaq 0.25 μL pV1093 (50 ng/μL) 1 μL -
14
Briefly spin down the master mix in a benchtop centrifuge to collect. Pipette 46 μL of master mix into two separate PCR tubes.
-
15
Add 2 μl from each 10 μM working stock of primers YFG1_sgRNA/F and sgRNA/R to the first tube. Mix thoroughly by pipetting.
-
16
Add 2 μl from each 10 μM working stock of primers SNR52/F and YFG1 SNR52/R to the second tube. Mix thoroughly by pipetting.
-
17
Repeat steps 14–16 for each sgRNA.
-
18Run PCR in thermocycler with following parameters:
Step 1: 94°C 1 min Step 2: 94°C 30 sec Step 3: 52°C 1 min Step 4: 72°C 1 min Go to Step 2, 29x Step 5: 72°C 5 min Step 6: 4°C Hold -
19
For each sgRNA, combine both round one PCR products in a single 1.5 mL microcentrifuge tube.
Round Two PCR
-
20In a PCR tube, prepare the round two PCR reaction as follows:
10X Takara Ex Taq Buffer 5 μL 2.5 mM dNTP 6 μL Sterile dH2O 29 μL ExTaq 0.25 μL Combined Round 1 PCR Product 10 μL -
21Mix thoroughly by pipetting and run PCR in thermocycler with following parameters:
Step 1: 94°C 2 min Step 2: 94°C 30 sec Step 3: 52°C 10 min Step 4: 72°C 5 min Go to Step 2, 9x Step 5: 72°C 10 min Step 6: 4°C Hold
Round Three PCR
-
In a clean 1.5 mL microcentrifuge tube, prepare master mix solution for amplification of each sgRNA expression cassette and mix thoroughly by pipetting. A 50 μL reaction should contain as follows (scale up as appropriate):
10X Takara ExTaq Buffer 5 μL 2.5 mM dNTP 6 μL SNR52/N (10 μM) 2 μL sgRNA/N (10 μM) 2 μL Sterile dH2O 34 μL ExTaq 0.25 μL Round 2 PCR Product 1 μL Note: A single 50 μL PCR of sgRNA expression cassette is sufficient for several transformations.
Briefly spin down the master mix in a benchtop centrifuge to collect. Pipette 50 μL of master mix to PCR tubes.
- Run PCR in thermocycler with following parameters:
Step 1: 94°C 1 min Step 2: 94°C 30 sec Step 3: 52°C 1 min Step 4: 72°C 1 min Go to Step 2, 29x Step 5: 72°C 5 min Step 6: 4°C Hold Conduct a column cleanup of deletion cassette PCR product using a PCR cleanup kit per manufacturer’s instructions. Elute in 30 μL sterile dH2O per each 50 μL PCR product.
Using 1 μL of column purified PCR product, measure sgRNA expression cassette dsDNA concentration by Nanodrop. Product concentration should be approximately 100–300 ng/μL.
Check all PCR products by agarose gel electrophoresis. See Figure 1 for expected band sizes.
Basic Protocol 2: Transformation of C. albicans.
Genetic manipulation of C. albicans can be achieved via a lithium acetate-based transformation method coupled with the inclusion of transiently expressed PCR products. Here we outline the steps necessary to induce the uptake of exogenous DNA by log phase yeast cells and the subsequent expression of CaCas9 and sgRNA cassettes followed by the integration of the “deletion cassette” at a target locus, YFG1, as described above. While this method is efficient for use in a wide array of clinical isolate strains of C. albicans, we will use the type strain SC5314 as the background strain for manipulation. We suggest using a freshly plated culture (<96 hours old) for genetic manipulation as the chance of spurious mutations increases with age of the culture. All growth steps will be in the nutrient rich yeast peptone dextrose (YPD) medium until final plating of the transformation reaction on selective media appropriate for the selectable marker (CSM-His, YPD+400 μg/mL nourseothricin, etc.).
Materials:
Yeast peptone dextrose (YPD) solid growth medium (see Reagents and Solutions)
YPD liquid growth medium (see Reagents and Solutions)
dH2O
LATE solution (see Reagents and Solutions)
sgRNA, Cas9, and Deletion Cassette PCR products
Calf thymus DNA (ctDNA) (Sigma, cat. # D8861-5X1ML)
PLATE solution (see Reagents and Solutions)
- Appropriate selective medium plates
- Complete synthetic medium lacking histidine (CSM-His) (See Reagents and Solutions)
- YPD+400μg/mL nourseothricin (YPD+Nat) (See Reagents and Solutions)
15mL culture tubes (e.g. VWR, cat. # 82050–274)
Spectrophotometer (e.g. Nanodrop OneC)
250mL flasks with aluminum foil cover (sterile)
30°C shaking incubator (e.g. Eppendorf cat. # M1324–0000)
50mL conical tubes (sterile)
Benchtop centrifuge
1.5mL microcentrifuge tubes (sterile)
Microcentrifuge
44°C water bath
3mm glass beads (sterile) (e.g. Fisher, cat # 11–312A)
Transformation of C. albicans with a non-Nourseothricin (NAT1) resistance selectable marker
-
1
Streak out C. albicans strain for single colonies on YPD plate. Grow at 30°C for 2 days.
-
2
Inoculate 5mL YPD liquid in a 15mL culture tube using a single colony and grow overnight at 30°C with 60rpm rotation
Day 1
-
3
The following day determine the OD600 of the overnight culture.
-
4Inoculate 50mL YPD liquid media in a glass 250mL Erlenmeyer flask to an OD600 of 0.2 from the overnight culture and incubate at 30°C with 225rpm shaking until OD600 reaches ~0.8 (~3.5–4.5 hours)
- Note: to determine inoculum use the following equation, (50,000μL/X)*0.2 = Y where X = OD600 of the O/N culture and Y = μL to inoculate into 50mL YPD liquid.
-
5
When the 50mL culture has reached an OD600 of 0.8, transfer the entire culture to a 50mL conical tube and spin down for 5 minutes at 1600xg.
-
6Discard supernatant and wash the cell pellet in 5 mL sterile dH2O by gently resuspending
- Note: avoid vortexing as the cells can be delicate due to high osmotic stress induced by dH2O.
-
7
Re-pellet cells by again spinning down for 5 minutes at 1600xg.
-
8
Discard supernatant and gently resuspend cells in 500μL LATE solution (0.1M LiAc in 1xTE pH 7.4) by pipetting.
-
9Boil calf thymus DNA (ctDNA) for 10–15 minutes and immediately transfer to ice.
- Note: we suggest this step be done while spinning and washing cells so that the ctDNA does not re-nature and is sufficiently cool by the time it is added to the transformation mix as to not scorch the cells.
-
10Transfer cells and PCR products, and boiled ctDNA to sterile 1.5mL microcentrifuge tubes as follows:
Tube Contents 1: Negative Control 100 μL LATE cell suspension, 10μL boiled ctDNA 2: CRISPR control 100 μL LATE cell suspension, 10μL boiled ctDNA, 1μg/kb purified deletion cassette 3: CRISPR reaction tube 100 μL LATE cell suspension, 10μL boiled ctDNA, 1μg/kb purified deletion cassette, 1μg CaCas9 purified expression cassette, 1μg purified YFG1 sgRNA expression cassette -
aNote: Total volume of PCR products included in reaction should not exceed 40μL as this may decrease transformation efficiency.
-
bNote: ctDNA should be kept on ice until just before addition to transformation reaction tubes and should also be added last.
-
a
-
11
Mix reaction tubes gently by pipetting.
-
12
Incubate tubes at 30°C for 30 minutes.
-
13
Gently resuspend cells.
-
14
Add 700μL freshly made PLATE solution and mix gently by pipetting.
-
15
Incubate overnight at 30°C.
Day 2
-
3
Gently mix cells and heat shock transformation reaction tubes at 44°C for 15 minutes in a water bath.
-
4
Immediately spin cells down at 1500xg for 30 seconds and aspirate supernatant.
-
5Wash cells by gently resuspending in 1mL of YPD liquid and again spin down at low speed for 30 seconds to pellet cells.
- Note: If the nourseothricin selectable marker, NAT1, is being used, resuspend cells again in an additional 1mL YPD liquid and incubate at 30°C with 225rpm shaking for 2–3 hours to allow cells to build up resistance to the drug selection. Pellet cells by spinning down at 1500xg for 30 seconds proceeding to Step 19.
-
6
Resuspend cells in 100μL YPD liquid and transfer to selective solid media plate.
-
7
Spread cells evenly via beads or another method such as a spreader bar.
-
8Incubate 48 hours at 30°C.
- Note: depending on the marker being used or gene being manipulated, colonies may take up to 72 hours to become visible.
Basic Protocol 3: Selecting and genotyping transformants.
In this protocol we describe the design of PCR primers and steps required to PCR genotype a transformant of interest. While this protocol calls for purified genomic DNA for PCR genotyping, it is useful to perform colony PCR to pre-screen transformant colonies (See Methods (Amberg, Botstein, & Beasley, 1995)). This may be performed either before or during step 2 described below.
Transformant colonies should be visible after incubation at 30°C for 48–72 hours. At this point there should be no colonies on the Negative Control plate, and there will most likely be a few (<50) colonies on the CRISPR Control plate (Figure 2 A). The colonies on this plate are the result of integration of the deletion cassette at the target locus in one allele. These colonies are nearly always heterozygous and not of use for further genotypic assessment in this protocol, although strategies exist that have used heterozygous mutant strains to great effect (Glazier et al., 2018). However, the number of colonies present on the CRISPR control plate should be significantly less than the number of colonies present on the CRISPR plate where the transformation containing the CaCas9 and sgRNA expression cassettes was plated (Figure 2 B). If the number of colonies on the CRISPR control plate and CRISPR plate are the same, then the CaCas9 and/or sgRNA were not effective and the colonies present on the CRISPR plate are likely not homozygous mutants as desired. For example, a typical transformation yields around 5–50 colonies on the CRISPR control plate and more than 100 colonies on the CRISPR plate (Figure 2). If multiple sgRNAs are being compared in an experiment, the ratio of number of colonies on the CRISPR plate vs the CRISPR control plate is a good metric for the efficiency of the chosen sgRNA. The rate of homozygosity among the colonies on the CRISPR plate typically ranges between 40–60% and the number of transformants to be genotyped should be adjusted accordingly. In order to isolate at least 2 homozygous transformants, we recommend the genotyping of at least 8 transformant colonies.
Figure 2.

Typical plates after CRISPR transformation (Basic Protocol 2). This transformation was performed as per Basic Protocol 2 and cells were plated on CSM-His solid media and incubated at 30°C for 48 hours. Panel A is the CRISPR Control Plate where cells have integrated a single copy of the deletion cassette. This can show up to ~50 colonies, but is highly variable. Panel B is the CRISPR plate which contains a mix of heterozygous and homozygous mutants. The increase in colony number relative to the CRISPR control plate is due to the inclusion of the sgRNA and CaCas9 expression cassettes making homozygous integration of the deletion cassette possible. Typically, around 100–300 colonies arise on this plate. Note that the tiny (<0.5mm) colonies are not transformants and most likely were able to grow for a short period before running out of histidine left over from growing in rich media prior to transformation.
In order to ascertain whether transformant colonies have a homozygous or heterozygous deletion of the gene of interest as well as integration of the deletion cassette at the target locus, we employ a 3 primer/2 PCR reaction approach (Figure 3). The primer design should proceed as follows: Primer 1 should be a forward primer ~300bp upstream of the where the deletion cassette will be inserted (including the region of homology) (Figure 3), Primer 2 should be a reverse primer located ~300bp downstream of the 5` end of the integration site within YFG1 (Figure 3 A), and Primer 3 should be a reverse primer which binds ~300bp downstream of the 5` end of the deletion cassette within the marker (Figure 3 B). These primers will then be paired in 2 separate PCR reactions to determine both the integration of the deletion cassette and the lack of the gene of interest. PCR reaction 1 would utilize Primers 1 & 2 to confirm the lack of the gene of interest while reaction 2 would contain Primers 1 & 3 to confirm the integration of the deletion cassette.
Figure 3:

Primer arrangement for genotyping transformant colonies via gDNA PCR and/or colony PCR. Panel A shows the schematic for genotyping PCR reaction 1 where Primer 1 is ~300bp upstream of the YFG1 and Primer 2 is ~300bp downstream of the 5` end of YFG1. This reaction serves to check for the presence of the gene being deleted. Panel B shows the schematic for genotyping PCR reaction 2 which again uses Primer 1, but instead pairs it with Primer 3 which binds ~300bp from the 5` end of the Marker being inserted at the YFG1 locus. This reaction serves to check for the successful integration of the deletion cassette/marker.
Materials
Appropriate selective medium plates (CSM-His, YPD+Nat, etc.)
YPD liquid growth medium
TE pH 8.0 (See Reagents and Solutions)
ExTaq Kit, Takara
10μM working solutions of Primers 1–3
dH2O
15mL culture tubes
Desktop centrifuge
PCR tubes
Thermocycler
Gel electrophoresis apparatus
Selection of colonies with introduction of a single marker
After incubation transformation plates at 30°C for 48–72 hours, count the colonies present on the CRISPR control and CRISPR plates to determine if the sgRNA and Cas9 were effective.
- Select 8–10 colonies to be carried forward from the CRISPR plate and re-streak these colonies onto fresh selective media to isolate single colonies.
- Note: This step is critical in order to avoid false positive results due to background growth especially when using auxotrophic markers because non-transformant cells may not die on the selective media after the initial plating of the transformation.
Inoculate 5mL YPD liquid in a 15mL culture tube from each re-streaked transformant as well as a wild-type (WT) control strain and incubate O/N at 30°C with 60rpm rotation.
Spin down O/N cultures at 1600xg for 5 min, discard supernatant.
- Extract genomic DNA from pelleted cells via phenol:chloroform extraction and resuspend gDNA in 50–250μL TE pH 8.0.
- Note: Protocols for Saccharomyces cerevisiae genomic DNA extraction are applicable in C. albicans (See Protocols in (Hoffman, 2001)).
- Note: Genomic DNA may need to be diluted before use in PCR genotyping. The dilution factor depends heavily on the purity and quantity of isolated DNA. In our hands, a 1:10 dilution of gDNA from a preparation for step 5a has worked well.
-
Set up 2 separate 50μL PCR reactions as follows for each transformant as well as the WT control gDNA
Reaction 1: Check for absence of region to be deleted with Primers 1 and 210X Takara ExTaq Buffer 5 μL 2.5 mM dNTP 6 μL Primer 1 (10 μM) 2 μL Primer 2 (10 μM) 2 μL Sterile dH2O 34 μL ExTaq 0.25 μL Purified Genomic DNA 1 μL Reaction 2: Check for presence of Marker in region of interest with Primers 1 and 310X Takara ExTaq Buffer 5 μL 2.5 mM dNTP 6 μL Primer 1 (10 μM) 2 μL Primer 3 (10 μM) 2 μL Sterile dH2O 34 μL ExTaq 0.25 μL Purified Genomic DNA 1 μL - Run PCR in thermocycler with the following parameters.
- Note: The annealing temperature and extension time may vary depending upon the primer design. We suggest designing primers to have an amplicon size of 500–750bp and a melting temperature of 58–60°C for fast and reliable amplification, and the following thermocycler program is written to accommodate these specifications.
Step 1: 94°C 1 min Step 2: 94°C 30 sec Step 3: 55°C 1 min Step 4: 72°C 1 min Go to Step 2, 29x Step 5: 72°C 5 min Step 6: 4°C Hold - After completion of the PCR program, run samples on a 1% agarose electrophoresis gel to determine amplicon presence and size.
- Note: Transformants with a band from only Reaction 2 are homozygous for the desired mutation. A WT control will yield only a band from Reaction 1 and acts as a negative control for Reaction 2. Transformants with a band resulting from both Reaction 1 and 2 are heterozygous for the desired mutation. Transformants with a band only from reaction 1 are false positives and may have integrated the marker at another locus.
Inoculate an O/N culture in 5 mL YPD liquid for all desired homozygous transformants and incubate at 30°C with 60rpm rotation
Spin down O/N cultures at 1600xg for 5 min, discard supernatant, and resuspend cells with 1mL 15% glycerol in 1:1 dH2O:YPD liquid. Transfer to a 1.5mL cryo-tube and freeze at −80°C for long term storage.
Alternate Protocol 1: Deletion with recyclable markers by CRISPR Induced Marker Excision (CRIME)
If multiple rounds of genetic modification will be conducted (i.e. to knock out multiple genes), marker recycling may be required. This transient CRISPR system protocol is compatible with the SAT1 flipper marker system (Min, Biermann, Hogan, & Konopka, 2018). Alternatively, the CRISPR Induced Marker Excision (CRIME) system set of recyclable markers can also be used, which combine marker integration and marker recycling steps (Huang & Mitchell, 2017). In this section we describe the workflow for multiple rounds of genetic modification with CRIME, as well as primers and PCR required to produce CRIME deletion cassettes. The CRIME method requires the use of transiently expressed Cas9 and sgRNA, and a CRIME deletion cassette can generally be used in place of any selectable marker deletion cassette described in this protocol.
Briefly, CRIME uses CRISPR to introduce a double stranded break between a pair of direct repeats to excise an intervening selectable marker. In the first round of genetic modification, a split marker strategy is used to introduce a repeat flanked marker to modify a target locus. In the second round of genetic modification, while a second locus is modified with a different marker, an additional sgRNA is introduced targeting the repeat flanked marker introduced in the first round. Transformants are then screened by replica plating for loss of the first round’s selectable marker. While this process requires the use of two selectable markers, only one marker needs to be available for the initial insertion/deletion mutation. For example, if a wild-type strain only has the NAT1 marker available, the NAT1 marker is used to delete the HIS1 gene and introduce histidine auxotrophy to allow the subsequent use of the HIS1 marker. The investigator may then toggle between the NAT1 and HIS1 markers in subsequent rounds of genetic modification. This process has been described in detail elsewhere (See Methods in (Huang, Woolford, May, McManus, & Mitchell, 2019)).
As sequences with direct repeats are complicated to amplify by PCR, a split-marker strategy is utilized. Two segments, each of which carry only one of the repeats, are separately amplified from a pair of plasmids. The two plasmids differ only by the position of the marker in the vector. An explanation with figures and design details can be found elsewhere (See Methods in (Huang & Mitchell, 2017)). Briefly, the separate segments are amplified using one primer within the marker (MARKER_CRIME/F or /R), and a second primer outside the marker in the vector backbone. This second primer will be an ultramer and should contain 80–100 bp of homology to the target locus of interest, in the same manner as the deletion cassette primers previously discussed. Consult Tables 3 and 4 for the relevant internal primer pair and adapter sequence:
Table 3.
CRIME plasmids
| Marker | Plasmids | Internal Primer | Homology + Adapter sequence |
|---|---|---|---|
| r1HIS1r1 | pMH01 | HIS1_CRIME/F | Downstream + CCAATACGCAAACCGCC |
| pMH02 | HIS1_CRIME/R | Upstream + CTCGAGGTCGACGGTATCG | |
| r2LEU2r2 | pMH03 | LEU2_CRIME/F | Downstream + CGACTCCTGCATTAGGAAGC |
| pMH04 | LEU2_CRIME/R | Upstream + GACGCATCGTGGCCG | |
| r3NAT1r3 | pMH05 | NAT1_CRIME/R | Upstream + GCTTTAATGCGGTAGTTTATCACAG |
| pMH06 | NAT1_CRIME/F | Downstream + GTGTGGTCGCCATGATCG |
Table 4.
CRIME Primers
| Primer Name | Sequence |
|---|---|
| HIS1_CRIME/F | gcgcaagaagcctcaact |
| HIS1_CRIME/R | gagctacagggcttgacc |
| LEU2_CRIME/F | tcactttatcgacagttcttctcc |
| LEU2_CRIME/R | actaactcctgtaacggcg |
| NAT1_CRIME/R | CACCATGACCTCTATGTTCTGG |
| NAT1_CRIME/F | CAGACGCGTTGAATTGTCC |
Note: The naming convention that has been used to describe CRIME system markers is r#MARKERr#. The differences in repeat numeral denote different sections of pRS424 or YEp24 vector backbones.
The sgRNA sequences in table 5, each 5’ of an NGG PAM site, have been used for subsequent excision of markers.
Table 5.
CRIME sgRNA Targets
| Marker | sgRNA Target |
|---|---|
| r1HIS1r1 | taaccattactccaggtaga |
| r2LEU2r2 | atcagaactgcagatttaag |
| r3NAT1r3 | gaagttgctccagaacatag |
Below we describe an example protocol for two rounds of genetic modification, deleting an initial target gene (YFG1) in the first round, then subsequently deleting a second target gene (YFG2) while excising the first-round marker in the second round. This protocol assumes that r3NAT1r3 and r1HIS1r1 will be used, r3NAT1r3 for YFG1, and r1HIS1r1 for YFG2.
Materials
YFG1, YFG2 Ultramers with CRIME system adapters, 10 μM working stock
Plasmid pairs for CRIME system markers
Internal primers for CRIME system markers
Cas9 expression cassette
YFG1, YFG2 sgRNA expression cassette
1.5 ml microcentrifuge tubes
Benchtop centrifuge
ExTaq kit, Takara
Sterile dH2O
Velvets
Replica Block
YPD + 400μg/mL NAT solid growth medium
CSM -His solid growth medium
In clean 1.5 mL microcentrifuge tubes, prepare 10 μM working stocks of all primers. Dilute plasmid templates to 20–50 ng/μL working concentrations.
If needed, prepare Cas9 expression cassette and sgRNA expression cassettes for YFG1, YFG2, HIS1, and NAT1 per Basic Protocol 1.
-
Prepare PCR Master Mix for amplification of both segments of repeat flanked markers as follows:
Upstream Segment10X Takara ExTaq Buffer 5 μL 2.5 mM dNTP 6 μL Upstream+Adapter/F (10 μM) 2 μL Marker_CRIME/R (10 μM) 2 μL Sterile dH2O 34 μL ExTaq 0.25 μL pMH01 or pMH06 (50 ng/μL) 1 μL Downstream Segment10X Takara ExTaq Buffer 5 μL 2.5 mM dNTP 6 μL Marker_CRIME/F (10 μM) 2 μL Downstream+Adapter/R (10 μM) 2 μL Sterile dH2O 34 μL ExTaq 0.25 μL pMH01 or pMH06 (50 ng/uL) 1 μL Mix thoroughly by pipetting. Briefly spin down the master mix in a benchtop centrifuge to collect. Pipette 50 to 100 μL of master mix to PCR tubes as appropriate for the available thermocycler.
- Run PCR in thermocycler with following parameters:
Step 1: 94°C 1 min Step 2: 94°C 30 sec Step 3: 52°C (or as appropriate) 1 min Step 4: 72°C 2 min Go to Step 2, 29x Step 5: 72°C 5 min Step 6: 4°C Hold Combine Upstream and Downstream segments in a single 1.5 mL microcentrifuge tube.
Column purify deletion cassette PCR product using a PCR cleanup kit per manufacturer’s instructions. Elute in 30 μL sterile dH2O per each 50 μL combined PCR product.
Using 1 μL of column purified PCR product, measure deletion cassette dsDNA concentration by Nanodrop. Product concentration should be approximately 400–600 ng/μL.
-
Per the steps outlined in Basic Protocol 2, transform strain of interest with yfg1Δ::r3NAT1r3 deletion cassette, YFG1 sgRNA expression cassette, Cas9 expression cassette. Plate on appropriate selective media.
Note: The combined segments in the repeat flanked deletion cassette may be treated as a single segment without issue (i.e., use only 2 μg of the combined yfg1Δ::r3NAT1r3 deletion cassette).
-
Genotype transformant candidates per steps outlined in Basic Protocol 3 for the yfg1Δ mutation.
Note: Depending on the efficiency of the YFG1 sgRNA, between 20–80% of candidates are expected to be homozygous yfg1Δ mutants.
-
Once a satisfactory single purified colony with the yfg1Δ mutation has been obtained, transform this strain per the steps outlined in Basic Protocol 2 with the following modifications:
In Step 10, use the following contents in the CRISPR reaction tube:- 100 μL LATE cell suspension
- 10 μL boiled ctDNA
- 2 μg yfg2Δ::r1HIS1r1 deletion cassette
- 1 μg Cas9 expression cassette
- 1 μg YFG2 sgRNA expression cassette
- 1 μg NAT1 sgRNA expression cassette
Plate transformants on CSM-His selective media.
-
Following incubation at 30°C for 48 hours, use velvet and replica block to replica plate transformant colonies first onto a fresh YPD+NAT plate, then onto a fresh CSM -His plate.
Note: In the absence of velvets and replica plates, transformant colonies may be patched onto YPD+NAT and CSM -His plates using toothpicks. This is not recommended due to high volume of colonies.
Incubate replica plates at 30°C overnight.
-
From the CSM -His plate, restreak colonies corresponding to those that failed to grow on YPD+NAT plates.
Note: Between 30–40% of transformant colonies are expected to have lost both copies of the first-round marker.
Genotype transformant candidates per steps outlined in Basic Protocol 3 for yfg2Δ mutation. The resulting yfg2Δ::r1HIS1r1 yfg1Δ::r3 strain may be subsequently transformed using a NAT1 marker.
Alternate Protocol 2: Knock-in and combining multiple cassettes with overlapping homology
While the above protocols describe deletion of a gene of interest, the same principles may be utilized for gene knock-in for complementation or epitope tagging. A DNA cassette(s) will be generally compatible with this protocol as long as it contains 80–100 bp of flanking homology to a target locus, as well as a selectable marker. Figure 4 depicts schematics for knock in of a YFG1 gene with its own promoter and terminator at an ectopic locus, as may be applicable for complementation of a yfg1Δ mutation. Common loci for complementation of a mutation include the RPS1 locus, NEUT5L locus, as well as the arg4Δ::dpl200 locus in the SN152 strain background and derivatives (Gerami-Nejad, Zacchi, McClellan, Matter, & Berman, 2013; Murad, Lee, Broadbent, Barelle, & Brown, 2000; Noble & Johnson, 2005). These loci are commonly used as their disruption does not appear to affect virulence in a mouse model of disseminated candidiasis. While the complementation cassette shown in Panel A is commonly cloned separately beforehand into a convenient plasmid vector, this time-consuming step may be optionally skipped. A cassette may be introduced as multiple constituent pieces as shown in Panel B, as long as 80–160 bp of homology exist between fragments (160 bp is optimal) (Huang, Woolford, & Mitchell, 2018). Care should be taken to ensure that homology arms only allow integration at the desired locus and in the desired arrangement. Panel C describes one such pitfall to be avoided.
Figure 4:

Schematic of homologous recombination events for knock-in of YFG1 at a desired target locus. Black triangles depict a Cas9 induced DSB in the target locus. Panel A. Integration of a cassette containing 80 bp of homology to the target locus (blue). Panel B. Segments to be integrated may be divided as is most convenient. Homologous recombination between segments using 80–160 bp of shared homology (purple) and 80 bp of homology to the target locus (blue) results in the desired construct. Panel C. The presence of additional shared homology (gray) may result in unintended recombinational events and should be avoided.
Reagents and Solutions
Yeast peptone dextrose (YPD) liquid medium (1 L)
1 L deionized H2O (dH2O)
20 g anhydrous dextrose (e.g. Sigma, cat. # D9434–1kg)
20 g peptone (e.g. Fisher, cat. # 211677)
10 g yeast extract (e.g. VWR, cat. # 90000–72)
Sterilize by autoclaving
Store at room temperature (RT) for up to 1 month
YPD solid growth medium (1 L)
1 L deionized H2O (dH2O)
20 g anhydrous dextrose
20 g peptone
10 g yeast extract
20 g agar (e.g. VWR, cat. # 90000–762)
Sterilize by autoclaving
Pour 25 mL per plate into 100 mm × 15 mm petri dish and cool
Store at 4°C for up to 1 month
0.1 M Lithium acetate in 1X Tris-EDTA pH 7.5 (LATE) solution (1 L)
900mL dH2O
0.37 g EDTA disodium salt (e.g. Sigma, cat. # ED2SS-1kg)
1.21 g Tris base (e.g. Sigma, cat # 252859–500g)
10.20 g Lithium acetate (e.g. Sigma, cat. # L6883–1kg)
Adjust pH to 7.5 with 6N HCl
Bring final volume to 1 L with dH2O
Sterilize by autoclaving
Store at RT for up to 1 month
1 M Lithium acetate solution (500 mL)
450 mL dH2O
51.0 g Lithium acetate
Bring final volume to 500mL with dH2O
Sterilize by autoclaving
Store at RT for up to 1 month
1 M Tris solution
121 g Tris base
800 mL dH2O
Adjust pH to 8.0 with 6N HCl
Bring final volume to 1 L with dH2O
Sterilize by autoclaving
Store at RT for up to 1 month
0.25 M EDTA solution (500 mL)
46.5 g EDTA disodium salt
375 mL dH2O
- Adjust pH to 8.0 with 10N NaOH
- Note: all EDTA disodium salt may not dissolve until some 10N NaOH is added
10 X Tris-EDTA (TE) solution (500 mL)
50 mL 1 M Tris solution
20 mL 0.25 M EDTA solution
430 mL dH2O
Sterilize by autoclaving
Store at RT for up to 1 month
50% (w/v) Polyethylene glycol m.w. 3350 (PEG) solution (200 mL)
100 g PEG3350 (e.g. Sigma, cat. # P4338–1kg)
100 mL dH2O
Sterilize by vacuum filtration with 0.22 μm filter (e.g. Sigma, cat # 568–0020)
Store at RT for up to 1 month
PEG 0.1 M Lithium acetate 1 X TE pH 8.0 (PLATE) solution (10 mL)
8 mL 50% PEG solution (sterile)
1 mL 1 M Lithium acetate solution (sterile)
1 mL 10 X TE pH 8.0 solution (sterile)
Store at RT for up to one day
Nourseothricin sulfate (NAT) 400 mg/mL solution (2.5 mL)
1 g NAT (e.g. Gold Biotech, cat. # N-500–1)
2.5 mL dH2O
Filter sterilize with 0.22 μm filter
Store at 4°C for up to 1 month
YPD + 400 μg/mL NAT solid growth medium
L deionized H2O (dH2O)
20 g anhydrous dextrose
20 g peptone
10 g yeast extract
20 g agar
Sterilize by autoclaving
Cool molten medium to <70°C
Add 1 mL NAT 400 mg/mL solution and mix well
Pour 25 mL per plate into 100 mm × 15 mm petri dish and cool
Store at 4°C for up to 1 month
20% (w/v) Glucose solution (1 L)
200 g anhydrous dextrose
800 mL dH2O
Filter sterilize with 0.22 μm filter
Store at RT for up to 1 month
Complete synthetic medium without histidine (CMS-His) solid growth medium (1 L)
900 mL dH2O
6.7 g Yeast nitrogen base without amino acids (e.g. VWR, cat. # 90004–150)
0.77 g CSM-His supplement (e.g. Fisher, cat. # MP114510312)
20 g agar
Sterilize by autoclaving
After autoclaving add 100 mL 20% glucose solution
Pour 25 mL per plate into 100 mm × 15 mm petri dish and cool
Sterile 3 mm glass beads (e.g.
100 mL approx. by volume (e.g. Fisher, cat. # 11–312A)
Add beads to 125 mL glass bottle with lid (or another autoclave safe container)
Sterilize by autoclaving
Store at RT indefinitely
Commentary
Background information:
The fungal pathogen C. albicans is a leading cause of nosocomial infection and is responsible for an estimated yearly 250,000 cases and 50,000 deaths (Kullberg & Arendrup, 2015). Several C. albicans virulence determinants have been described, including the formation of hyphae and biofilms, adherence to abiotic surfaces, as well as the secretion of peptide toxins (Mayer, Wilson, & Hube, 2013; Moyes et al., 2016). The development of useful tools and strategies greatly enabled these investigations, and we expect that further developments will empower discovery of potential drug targets and reveal additional mechanisms underlying virulence determinants.
While many protocols and strategies adapted from use in Saccharomyces cerevisiae have proven useful, the need to disrupt both alleles of a gene of interest has slowed gene function studies. This requirement has been historically addressed by the use of recyclable markers, or laboratory strains harboring multiple auxotrophies. Popular laboratory strain lineages include the BWP17 (Ura- His- Arg-) and SN152 (His- Leu- Arg-) strains (Noble & Johnson, 2005; Wilson, Davis, & Mitchell, 1999). Three auxotrophies are used so that two auxotrophic markers can be used, one for each of the two alleles of a gene of interest, and the last auxotrophic marker can remain available for complementation of the relevant gene. Prior to these strains, initial studies relied on counterselection on 5-Fluoroorotic acid to select for the loss of the URA3 gene, leading to the development and use of the URA-blaster and mini-blaster cassettes in Ura- lab strains (Wilson et al., 1999). Unfortunately, URA3 expression levels were shown to be highly dependent on the position of the URA-blaster cassette and could result in decreased virulence, confounding pathogenicity studies (Lay et al., 1998). Furthermore, dominant selectable markers are extremely limited in C. albicans and only the NAT1/SAT1 marker has proven to be both effective and reliable (Samaranayake & Hanes, 2011). As an alternative to the URA-blaster, the SAT1 flipper has been used as a recyclable marker with success, and is compatible with our transient CRISPR-Cas9 system (Min et al., 2018). However, auxotrophic markers remain an attractive strategy due to the cost of nourseothricin and the potential difficulties in “flipping out” the SAT1 gene.
While having proven to be extremely powerful, transient CRISPR-Cas9 strategies have a few limitations. CRISPR-Cas9 screening strategies in many model organisms rely on small indels arising from error-prone non-homologous end joining to disrupt copies of a gene of interest (Wang, Wei, Sabatini, & Lander, 2014). Transient CRISPR-Cas9 expression is so far not compatible with NHEJ-reliant strategies, as the Cas9 and sgRNA expression cassettes are quickly either turned-over or diluted out by growth (Min et al., 2016). For similar reasons, transient CRISPR-Cas9 approaches are not suitable for use with CRISPRi or other dCas9 based tools.
Critical Parameters:
Basic Protocol 2 step 9: It is critical to transfer the ctDNA to ice immediately after boiling for 10–15 minutes because if it is allowed to cool slowly the ctDNA will re-nature and no longer function as a carrier and the transformation will not work. However, snap-cooling the ctDNA on ice avoids this issue. Once boiled, the ctDNA can stay on ice prior to addition to the transformation reaction mixes for up to 30 minutes without negatively impacting efficiency.
Basic Protocol 2 step 10: In the course of different transformations, varying volumes of PCR products may be used. It is generally important that the total volume of PCR product not exceed 40 μL as this may result in a significant decrease in transformation efficiency.
Basic Protocol 2 step 14: PLATE solution should be made fresh the day of use.
Basic Protocol 2 step 17: Following heat shock, it is critical to remove the PLATE solution from the cells as quickly as possible. The procedure is no longer time sensitive once the 1mL YPD has been added to the cells in step 18. As cells may be kept in this state for several minutes, it is useful to break up large transformations into smaller batches of 6–8 samples for heat shock to ensure swift washing of all samples.
Troubleshooting:
There are several points within this protocol where unexpected results may occur. Here we list some of the most common issues as well as possible mitigation strategies.
Understanding Results:
Basic Protocol 1: sgRNA PCR Round 2
When checking PCR products by gel electrophoresis for this step it is common to see multiple bands and/or a smear between the sizes of the Round 1 products and the fused product Figure 1 Ln 3). This is due to incomplete fusion and/or extension of Round 1 products. However, this is not an issue as during Round 3 amplification of the complete sgRNA, what little successfully fused Round 2 product there is will be amplified (Figure 1 Ln 4).
Basic Protocol 2: Interpreting efficiency/effectiveness of sgRNA’s
As stated above, there should be a significant increase in the number of colonies with the addition of the sgRNA and Cas9 expression cassettes to the CRISPR reaction as opposed to the CRISPR control reaction that contains only the deletion cassette (Figure 2). There is usually some random integration of the deletion cassette at the target locus regardless of the presence of the CRISPR machinery, however, this integration is nearly always heterozygous. If there is no increase in colonies upon inclusion of the sgRNA relative to the CRISPR control, this means that the deletion cassette is only being integrated randomly and either the sgRNA or Cas9 is not functioning. When comparing sgRNA’s for efficiency, the ratio of colonies on the CRISPR plates containing the different sgRNA’s relative to the CRISPR control can be compared to find the most efficient sgRNA.
Basic Protocol 3: Interpreting rate of homozygosity of transformants
In our hands, this method generates anywhere from 20–80% homozygous transformants with most transformations falling in the 40–60% range. Different genes and C. albicans strains react differently to being manipulated in this way. For example, deleting YFG1 in SC5314 may have an efficiency of 60%, but doing so in another strain may only yield 30% even if the same sgRNA is used. The same is true for deleting YFG1 and YFG2 in the same strain and both genes yield differing results. It is for these reasons we suggest designing 2–3 sgRNAs for each gene especially if deleting it in multiple strains to maximize chances of success.
Time Considerations:
Amplification of all PCR products can take from several hours to 2 days depending on the speed and experience of the individual performing the protocol as well as equipment availability. We recommend preparing all PCR products in advance rather than attempting to overlap any of the PCR reactions with the transformation protocol in any way.
Steps 3–15 of Basic Protocol 2 require approximately 5.5–6 hours to complete, including a 4-hour growth period. The overall time required is highly dependent upon the experience of the investigator as well as the number of transformations being performed. We suggest transforming fewer than 4 different strains simultaneously or fewer than 20 total transformation reaction tubes, as this may leave cells to sit while working on other cultures and can decrease transformation efficiency.
Steps 16–21 of Basic Protocol 2 for a single transformation not using the NAT1 marker require about 30 minutes to complete, and 2.5–3.5 hours if using the NAT1 marker. These are the most time sensitive steps in the entire protocol as heat shocking cells for too little time, too much time, or not quickly removing the PLATE solution after heat shock can severely impact the efficiency of the transformation. If multiple transformations are being done in tandem, we suggest staggering the execution of these steps so that one may minimize the amount of time between heat shock and plating of cells.
The transformation protocol itself, from the time the 50mL culture is inoculated to when verified transformants can be frozen for storage, is a minimum of 7 days. This is composed of 2 days for the initial transformation, as well as 2 days for incubation, 2 days for re-streaked colonies to grow, and 1 day for genotyping. However, depending on the marker system being used, additional time may be required. For example, the initial 2 day incubation of the transformation may need to be extended to 3 days to allow colonies to grow large enough to work with, and when using the CRIME system, an extra day is needed prior to re-streaking transformant colonies to accommodate verification of marker recycling.
Table 6.
Troubleshooting guide for manipulating genes in Candida albicans via transient CRISPR system
| Problem | Possible Cause | Solution |
|---|---|---|
| No Round 3 sgRNA PCR product | Round 1 PCR products failed to fuse in Round 2 | Clean and quantify Round 1 products prior to mixing and combine in an equal molar ratio and add a minimum total of 300ng of Round 1 product to Round 2 PCR |
| Same number of colonies on both the CRISPR control plate and the CRISPR plate | sgRNA could be non-functional due to a SNP in target sequence | Redesign sgRNA to target a different place in the target locus |
| Cas9 expression cassette was not functional | Re-check PCR product size, and if necessary, re-make Cas9 expression cassette | |
| Few or no transformant colonies on CRISPR plate when using 2 sgRNA’s | Volume of PCR products added to reaction mix was too high | Ethanol precipitate cleaned PCR products and resuspend in a smaller volume to increase concentration and decrease volume needed to add to transformation reaction |
| Competition between sgRNA’s for access to Cas9 | Increase the amount of Cas9 expression cassette from 1μg to 1.5–2μg | |
| No transformant colonies at all | ctDNA was cooled too slowly | Transfer ctDNA directly to ice immediately after boiling |
| Cells were handled too aggressively during protocol | All steps requiring resuspension of cells after initial 50mL culture must be done gently by pipetting as they are under high osmotic and chemical stress | |
| Mutations in the 80bp regions of homology at either end of the deletion cassette prevented efficient recombination | Using fusion PCR, increase the regions of homology from 80bp to 300bp which is sufficient to drive homology directed repair despite SNPs | |
| Insufficient amount of deletion cassette | Increase amount of deletion cassette by 50% | |
| Cells are hypersensitive to high temperature | Decrease heat shock temperature to 42°C and increase time to 1 hour | |
| No transformant colonies at all when using a drug selectable marker, NAT1 | Grow-out period between Basic Protocol 2 steps 18 and 19 was not long enough | Increase grow-out period to 3–4 hours |
| Cells are hypersensitive to nourseothricin | Decrease drug concentration from 400μg/mL to 300μg/mL | |
| Too many transformant colonies on CRISPR plate to pick individual transformants or growth is impeded due to crowding | Some strains transform very efficiently and yield hundreds of colonies impeding growth and selection | In Basic Protocol 2 step 19, resuspend cells in 200μL YPD and split cells into 2 100μL volumes to spread on 2 separate plates to decrease cell density |
| All transformant colonies are heterozygous | Allelic heterozygosity caused the deletion cassette and/or sgRNA to only target one allele | Check sgRNA and deletion cassette sequence for SNPs in both alleles and redesign as necessary to target both |
| Gene being manipulated could be essential | Use an inducible promoter to control gene function and ascertain essentiality | |
| All transformant colonies show no integration of deletion cassette via gDNA PCR, but grow on selection media | Deletion cassette integrated at a non-target locus | Redesign deletion cassette regions of homology to be unique to the target locus and/or increase homology from 80bp to 300bp via fusion PCR |
Basic Protocol 1:
PCR Amplification of CRISPR components
Basic Protocol 2:
Transformation of Candida albicans
Basic Protocol 3:
Selecting and genotyping transformants.
Support Protocol:
sgRNA design
Alternate Protocol 1:
Deletion with recyclable markers (CRIME)
Alternate Protocol 2:
Knock-in and combining multiple cassettes with overlapping homology
Acknowledgements
Funding for this project was provided by NIH/NIAID 1R01AI146103.
Literature Cited
- Amberg DC, Botstein D, & Beasley EM (1995). Precise gene disruption in Saccharomyces cerevisiae by double fusion polymerase chain reaction. Yeast (Chichester, England), 11(13), 1275–1280. 10.1002/yea.320111307 [DOI] [PubMed] [Google Scholar]
- Bae S, Park J, & Kim JS (2014). Cas-OFFinder: A fast and versatile algorithm that searches for potential off-target sites of Cas9 RNA-guided endonucleases. Bioinformatics, 30(10), 1473–1475. 10.1093/bioinformatics/btu048 [DOI] [PMC free article] [PubMed] [Google Scholar]
- Gerami-Nejad M, Zacchi LF, McClellan M, Matter K, & Berman J (2013). Shuttle vectors for facile gap repair cloning and integration into a neutral locus in Candida albicans. Microbiology (Reading, England), 159(Pt 3), 565–579. 10.1099/mic.0.064097-0 [DOI] [PMC free article] [PubMed] [Google Scholar]
- Glazier VE, Murante T, Koselny K, Murante D, Esqueda M, Wall GA, … Krysan DJ (2018). Systematic Complex Haploinsufficiency-Based Genetic Analysis of Candida albicans Transcription Factors: Tools and Applications to Virulence-Associated Phenotypes. G3 (Bethesda, Md.), 8(4), 1299–1314. 10.1534/g3.117.300515 [DOI] [PMC free article] [PubMed] [Google Scholar]
- Hoffman CS (2001). Preparation of yeast DNA. Current Protocols in Molecular Biology, Chapter 13, Unit13.11. 10.1002/0471142727.mb1311s39 [DOI] [PubMed] [Google Scholar]
- Huang MY, & Mitchell AP (2017). Marker recycling in Candida albicans through CRISPRCas9- induced marker excision. MSphere, 2(2). 10.1128/mSphere.00050-17 [DOI] [PMC free article] [PubMed] [Google Scholar]
- Huang MY, Woolford CA, May G, Joel Mcmanus C, & Mitchell AP (2019). Circuit diversification in a biofilm regulatory network. PLoS Pathogens, 15(5). 10.1371/journal.ppat.1007787 [DOI] [PMC free article] [PubMed] [Google Scholar]
- Huang MY, Woolford CA, & Mitchell AP (2018). Rapid Gene Concatenation for Genetic Rescue of Multigene Mutants in Candida albicans. MSphere, 3(2). 10.1128/mSphere.00169-18 [DOI] [PMC free article] [PubMed] [Google Scholar]
- Kullberg BJ, & Arendrup MC (2015). Invasive Candidiasis. New England Journal of Medicine, 373(15), 1445–1456. 10.1056/NEJMra1315399 [DOI] [PubMed] [Google Scholar]
- Lay J, Henry LK, Clifford J, Koltin Y, Bulawa CE, & Becker JM (1998). Altered Expression of Selectable Marker URA3 in Gene-Disrupted Candida albicans Strains Complicates Interpretation of Virulence Studies. Infection and Immunity, 66(11), 5301–5306. 10.1128/IAI.66.11.5301-5306.1998 [DOI] [PMC free article] [PubMed] [Google Scholar]
- Marton T, Maufrais C, D’Enfert C, & Legrand M (2020). Use of CRISPR-Cas9 To Target Homologous Recombination Limits Transformation-Induced Genomic Changes in Candida albicans. MSphere, 5(5). 10.1128/mSphere.00620-20 [DOI] [PMC free article] [PubMed] [Google Scholar]
- Mayer FL, Wilson D, & Hube B (2013). Candida albicans pathogenicity mechanisms. Virulence, 4(2), 119–128. 10.4161/viru.22913 [DOI] [PMC free article] [PubMed] [Google Scholar]
- Min K, Biermann A, Hogan DA, & Konopka JB (2018). Genetic Analysis of NDT80 Family Transcription Factors in Candida albicans Using New CRISPR-Cas9 Approaches. MSphere, 3(6). 10.1128/mSphere.00545-18 [DOI] [PMC free article] [PubMed] [Google Scholar]
- Min K, Ichikawa Y, Woolford CA, & Mitchell AP (2016). Candida albicans Gene Deletion with a Transient CRISPR-Cas9 System. MSphere, 1(3), 1–9. 10.1128/mSphere.00130-16 [DOI] [PMC free article] [PubMed] [Google Scholar]
- Montague TG, Cruz JM, Gagnon JA, Church GM, & Valen E (2014). CHOPCHOP: a CRISPR/Cas9 and TALEN web tool for genome editing. Nucleic Acids Research, 42(Web Server issue), W401–7. 10.1093/nar/gku410 [DOI] [PMC free article] [PubMed] [Google Scholar]
- Moyes DL, Wilson D, Richardson JP, Mogavero S, Tang SX, Wernecke J, … Naglik JR (2016). Candidalysin is a fungal peptide toxin critical for mucosal infection. Nature, 532(7597), 64–68. 10.1038/nature17625 [DOI] [PMC free article] [PubMed] [Google Scholar]
- Murad AM, Lee PR, Broadbent ID, Barelle CJ, & Brown AJ (2000). CIp10, an efficient and convenient integrating vector for Candida albicans. Yeast (Chichester, England), 16(4), 325–327. 10.1002/1097-0061(20000315)16:4<325::AID-YEA538>3.0.CO;2-# [DOI] [PubMed] [Google Scholar]
- Nguyen N, Quail MMF, & Hernday AD (2017). An Efficient, Rapid, and Recyclable System for CRISPR-Mediated Genome Editing in Candida albicans. MSphere, 2(2), 1–10. 10.1128/mSphereDirect.00149-17 [DOI] [PMC free article] [PubMed] [Google Scholar]
- Noble SM, & Johnson AD (2005). Strains and strategies for large-scale gene deletion studies of the diploid human fungal pathogen Candida albicans. Eukaryotic Cell, 4(2), 298–309. 10.1128/EC.4.2.298-309.2005 [DOI] [PMC free article] [PubMed] [Google Scholar]
- Román E, Coman I, Prieto D, Alonso-Monge R, & Pla J (2019). Implementation of a CRISPR-Based System for Gene Regulation in Candida albicans. MSphere, 4(1). 10.1128/mSphere.00001-19 [DOI] [PMC free article] [PubMed] [Google Scholar]
- Samaranayake DP, & Hanes SD (2011). Milestones in Candida albicans gene manipulation. Fungal Genetics and Biology : FG & B, 48(9), 858–865. 10.1016/j.fgb.2011.04.003 [DOI] [PMC free article] [PubMed] [Google Scholar]
- Shapiro RS, Chavez A, Porter CBM, Hamblin M, Kaas CS, DiCarlo JE, … Collins JJ (2017). A CRISPR-Cas9-based gene drive platform for genetic interaction analysis in Candida albicans. Nature Microbiology, 3(1), 73–82. 10.1038/s41564-017-0043-0 [DOI] [PMC free article] [PubMed] [Google Scholar]
- Skrzypek MS, Binkley J, Binkley G, Miyasato SR, Simison M, & Sherlock G (2017). The Candida Genome Database (CGD): incorporation of Assembly 22, systematic identifiers and visualization of high throughput sequencing data. Nucleic Acids Research, 45(D1), D592–D596. 10.1093/nar/gkw924 [DOI] [PMC free article] [PubMed] [Google Scholar]
- Vyas VK, Barrasa MI, & Fink GR (2015). A Candida albicans CRISPR system permits genetic engineering of essential genes and gene families. Science Advances, 1(3), e1500248 10.1126/sciadv.1500248 [DOI] [PMC free article] [PubMed] [Google Scholar]
- Wang T, Wei JJ, Sabatini DM, & Lander ES (2014). Genetic screens in human cells using the CRISPR-Cas9 system. Science (New York, N.Y.), 343(6166), 80–84. 10.1126/science.1246981 [DOI] [PMC free article] [PubMed] [Google Scholar]
- Wilson RB, Davis D, & Mitchell AP (1999). Rapid hypothesis testing with Candida albicans through gene disruption with short homology regions. Journal of Bacteriology, 181(6), 1868–1874. [DOI] [PMC free article] [PubMed] [Google Scholar]