Abstract
The early embryo of Drosophila melanogaster exists as a rapidly dividing syncytium of nuclei that are transcriptionally silent. Maternally deposited factors are required to awaken the genome and assist in the transition from maternal to zygotic control of development. Because many of these essential factors are maternally deposited and the early nuclear divisions are so rapid, it has been difficult to assess the functional role of transcription factors at discrete points in early embryonic development. To address this issue, we have developed an optogenetic system that can rapidly and reversibly inactivate transcription factors with nuclear-cycle resolution. The temporal precision enabled by this technique will allow a mechanistic understanding of how transcription factors function together to control genome activation and patterning in the early embryo and is likely broadly applicable to factors throughout embryogenesis.
Keywords: Optogenetics, CRY2, Drosophila, Transcription factor, Gene expression, Zygotic genome activation, Embryo, RNA-seq
Background
The early embryo is transcriptionally silent and development is driven by maternally deposited mRNAs and proteins (Hamm and Harrison, 2018; Schulz and Harrison, 2019). In Drosophila, the nuclei exist in a syncytium and undergo rapid nuclear divisions, consisting only of synthesis and mitosis phases (Foe and Alberts, 1983). During the 14th nuclear cycle (NC), the genome of the developing embryo is transcriptionally up-regulated during the major wave of zygotic genome activation (ZGA) (Hamm and Harrison, 2018; Schulz and Harrison, 2019). Prior to widespread ZGA at NC14, a small subset of genes, mostly encoding transcription factors, is transcribed during a minor wave of ZGA ( McDaniel et al., 2019 ). This entire process from egg laying to widespread ZGA takes less than three hours, which has made it technically challenging to dissect the role various transcription factors play in ZGA. Further, while genetic techniques are available to maternally deplete essential transcription factors, this removes these factors from the embryo throughout early development, making it impossible to tease apart their roles during the minor and major waves of ZGA. Other systems have used techniques like Anchor-Away or proteasome targeting to deplete nuclear proteins ( Haruki et al., 2008 ; Caussinus et al., 2011 ), however, these methods take too long to inactivate their targets to work on the timescale necessary to study in the early embryo. Further, these techniques are not reversible on the timescales needed to study transcription-factor activity in the early embryo. To address these limitations, we developed an optogenetic system to rapidly and reversibly inactivate the essential transcription factor Zelda (Zld) in the early embryo of Drosophila with nuclear-cycle resolution.
Optogenetic protocols require the addition of a photo-responsive protein tag to the protein of interest, either at the endogenous locus or via a transgene. We note that both published examples of optogenetic transcription-factor inactivation in Drosophila have used an N-terminal tag, though it remains unclear if tagging at the N-terminus is required for inactivation ( Huang et al., 2017 ; McDaniel et al., 2019 ). Using Cas9-mediated genome engineering, we endogenously tagged the N-terminus of Zld with the blue-light responsive CRY2 tag ( McDaniel et al., 2019 ). CRY2, originally characterized in Arabidopsis, is traditionally part of a two-component system, where CRY2 dimerizes with CIB1 upon exposure to blue light ( Liu et al., 2008 ). Both components are available for use in Drosophila ( Guglielmi et al., 2015 ). However, CRY2 alone has been demonstrated to be sufficient to inactivate transcription factors, albeit through different mechanisms; CRY2-tagged Bicoid remains on chromatin upon blue-light exposure, while CRY2-tagged Zelda dissociates from chromatin ( Huang et al., 2017 ; McDaniel et al., 2019 ). The mechanism of inactivation is likely a conformational change upon blue-light exposure that disrupts the ability of the transcription factor to activate transcription. One benefit of the CRY2 system is its rapidity of inactivation; upon blue-light exposure, the CRY2-tagged protein is inactivated within seconds and, when the light is removed, refolds in ~5 min ( Huang et al., 2017 ).
While we utilized the one component CRY2 system for our experiments, this system depends on conformational changes that may be protein specific. Thus, inactivation must be confirmed experimentally. If the single-component system fails to inactivate protein function, the two-component system is available for long-term protein inactivation via cell-membrane sequestration ( Guglielmi et al., 2015 ). In the two-component system, CRY2 will dimerize with CIB1 within seconds, but takes over an hour to dissociate once the light is removed. In Drosophila, a cell membrane localized, GFP-tagged CIB1 has been developed and could be used to sequester a target protein away from chromatin using blue-light exposure when the nuclear envelope breaks down during mitosis ( Guglielmi et al., 2015 ). This would have a similar sequestration-mediated effect as the recently described Jabba-trap system ( Seller et al., 2019 ). Thus, depending on experimental needs, either the one or two-component system can be used.
Here, we will describe, in detail, how to use this versatile one-component system to reversibly inactivate a protein of choice with precise temporal resolution in the early embryo of Drosophila and harvest single embryos for downstream RNA-seq.
Materials and Reagents
Note: Unless otherwise stated, materials/reagents are stored at room temperature.
-
Fly husbandry and embryo selection
Microscope Slides (25 x 75 x 1 mm) (Fisher, catalog number: 125447)
Miracloth (Fisher, catalog number: 80058-394)
Glass Bottom Microwell Dishes (MatTek, catalog number: P35G-1.5-14-C)
Axygen 1.7 ml clear tubes (VWR, catalog number: 10011-722)
Bottles, 6 oz. bottles (VWR, catalog number: 75813-108)
Bottle plugs (VWR, catalog number: 89168-890)
Plates; 60 x 15 mm Petri dishes (Fisher, catalog number: FB0875713A)
Yeast (Lab Scientific, catalog number: FLY-8040-5F)
Molasses (Lab Scientific, catalog number: FLY-8008-16)
Bacteriological, Grade Agar (US Biological, catalog number: A0930)
Yellow Cornmeal (Lab Scientific, catalog number: FLY-8009-20)
p-hydroxy-benzoic acid methyl ester (Lab Scientific, catalog number: FLY-5501-5)
Bleach (5.25% Sodium Hypochlorite) (Staples, catalog number: COX02489)
Halocarbon oil 700 (Sigma, catalog number: H8898-50ML)
Ethyl Acetate (Fisher, catalog number: E1964)
Tegosept (Genesee Scientific, catalog number: 20-259)
Molasses Food (see Recipes)
Molasses plate (see Recipes)
-
RNA extraction and purification
Parafilm (4 in. x 250 ft.) (VWR, catalog number: 52858-032)
Exel 27 G Hypodermic Disposable Needles (Fisher, catalog number: 148099)
Corning Barrier Tips, 1-20 μl (Fisher, catalog number: 10320725)
Corning Barrier Tips, 1-200 μl (Fisher, catalog number: 10320727)
Corning Barrier Tips, 100-1,000 μl (Fisher, catalog number: 10320729)
RNase Zap (Fisher, catalog number: AM9780)
Trizol (Thermo Scientific, catalog number: 15596026) (store at 4 °C)
Ultra-Pure Glycogen (Fisher, catalog number: 10814-010) (store at -20 °C)
Chloroform (Fisher, ICN19400280)
Isopropanol (VWR, PL323ZA-4)
Ethanol, absolute (200 proof) (Fisher, catalog number: BP2818500)
-
Fly strains
His2AvRFP (II) (Bloomington Drosophila Stock Center (BDSC) #23651) and a CRY2-tagged line with His2Av-RFP in the background. A plasmid with the CRY2 tag can be obtained from Addgene (#26866). This sequence was used to generate a CRY2-containing donor vector that was injected along with a guide RNA into w1118; PBac{y[+mDint2]=vas-Cas9}VK00027 (BDSC#51324) embryos by BestGene Inc. Edited alleles were selected using 3xP3 dsRED, and this cassette was subsequently removed. For details on the Cas9-mediated genome editing techniques used see ( Hamm et al., 2017 ). The RFP-tagged histone was used to visualize nuclear density during each nuclear division. If the gene of interest is on the second chromosome, His2AV-RFP on the third chromosome (Bloomington Drosophila Stock Center (BDSC) #23650) can be used. It is important to independently validate all lines that you generate or receive from outside sources. We fully sequenced the CRY2-ZLD locus to ensure that the repair event happened correctly and experimentally tested two independently derived CRY2-ZLD lines to ensure that they behaved identically in all experiments. All flies were grown on standard molasses food at 25 °C in an incubator on a 12-h light/dark cycle.
Equipment
Pipettes
Embryo collection cage (Genesee Scientific, 59-100)
Dissection microscope (Nikon, SMZ1000)
Nikon ECLIPSE Ti-E epiflurescence microscope with 470 ± 20 nm and 572 ± 35 nm filters
Embryo basket (Cantex, 5140104)
Pellet Pestles (Fisher, catalog number: 12-141-363)
Centrifuge
-20 °C freezer
-80 °C freezer
Procedure
-
Fly husbandry and embryo selection
-
Grow up 2-3 bottles of the His2AvRFP (II) and CRY2; His2AvRFP (II) flies on standard molasses food at 25 °C in incubators with 12-h light/dark cycles.
Note: It is critically important to use the His2AvRFP (II) flies as a control for all optogenetic experiments. We controlled for three features causing non-specific changes in gene-expression: blue-light exposure alone, the presence of the CRY2 tag, and a slight developmental delay caused by extended blue-light exposure. Using His2AvRFP (II) flies exposed to identical blue-light regimens allowed us to identify gene sets that were changing from blue-light exposure rather than CRY2-mediated protein inactivation and exclude them from our downstream analyses.
Empty the flies from 2-3 bottles into a small embryo collection cage with a molasses plate and a small dollop of wet yeast. Allow to recover for 24 h.
Allow the females to pre-lay on a fresh molasses plate for 1 h.
Carry out the appropriate time course to capture the timepoint of interest. For experiments focusing on NC10-14, we allowed the flies to lay for 60 min.
After the desired lay period, collect the embryos into a mesh embryo basket and thoroughly wash with deionized water.
Dechorionate the embryos for 3 min in 50% commercial bleach diluted with deionized water (final = 2.6% sodium hypochlorite solution).
Wash the dechorionated embryos with deionized water for 3 min.
-
Pick the embryos from the mesh basket into a drop of halocarbon oil 700 on a microscope slide using a small paint brush or other similar instrument.
Note: Once dechorionated, the embryos are fragile. Be careful to treat them with care in all subsequent steps.
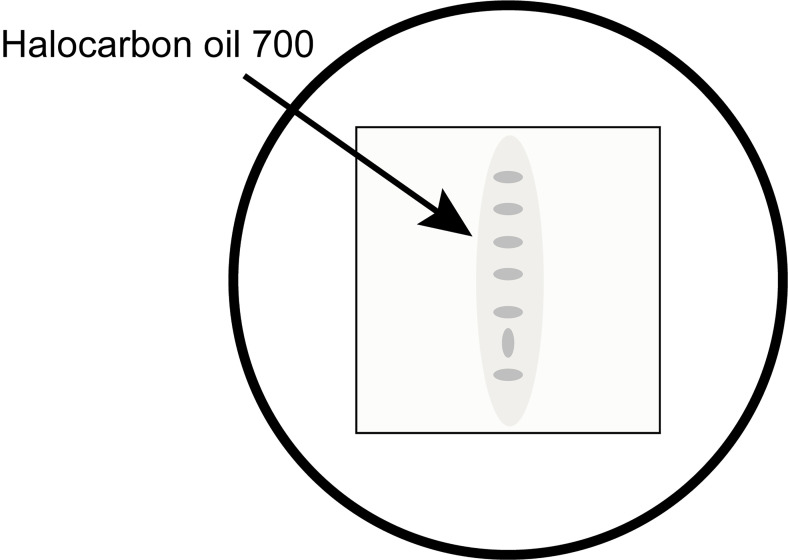
Stage the embryos on a Nikon SMZ1000 (or similar) dissection microscope and select 5-7 embryos that are younger than the desired time points and move them to the coverslip of the glass bottom microwell dish along with a minimal amount of halocarbon oil 700. (We recommend using the Society for Developmental Biology’s “The Interactive Fly” website https://www.sdbonline.org/sites/fly/aimain/2stages.htm as a resource for staging embryos.) Orient all but one embryo in the same orientation to make it easier to eventually pick the targeted embryo after blue-light exposure (Figure 1).
-
-
Optogenetic inactivation
-
Move the mounted embryos to a Nikon ECLIPSE Ti-E (or similar) epifluorescence microscope for optogenetic inactivation. Using the RFP channel on the epifluorescence microscope, identify an embryo that is younger than the desired timepoint by determining the density of nuclei in a 2,500 μm square ( McDaniel et al., 2019 ) (Table 1).
Note: This step only applies to timepoints from NC10 and beyond as prior to NC10 the nuclei are in the interior of the embryo and cannot be easily visualized.
Table 1. Staging Drosophila embryos by nuclear density.
The length and nuclear density/2,500 μm2 for each NC between NC10 and NC14.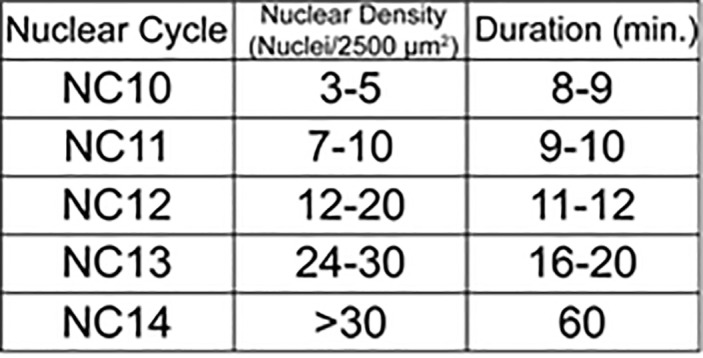
-
Once an embryo has reached the desired nuclear cycle, start exposing the embryo to light filtered through a 470 ± 20 nm filter. Every 30 s, switch to a 572 ± 35 filter for a 30 ms exposure to visualize the His2Av-RFP signal. This method allows you to continually stage the embryo without allowing enough time in non-blue light for the CRY2-tagged protein to refold. Continue exposing the embryo to blue light with brief switches to image RFP until the embryo reaches the desired developmental stage. The length of time embryos are exposed to blue light will vary depending on experimental design.
Note: It is helpful to have a motorized filter wheel to automate this process.
At the completion of the time course, immediately pick the illuminated embryo onto a fresh molasses plate and, working quickly, roll it around briefly to remove any excess halocarbon oil 700 (Figure 2, Video 1).
Once the excess oil is removed, move the embryo into a 5 μl drop of Trizol + 200 μg/μl glycogen on a piece of parafilm.
-
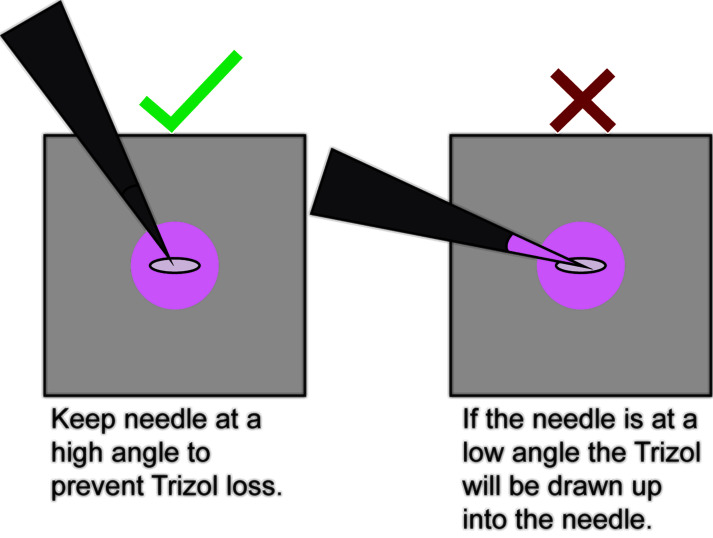
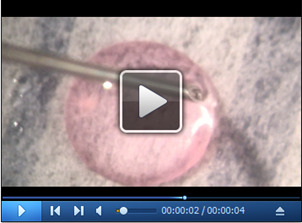
Poke the embryo once or twice with a 27-gauge needle. This is best performed under a microscope to visually ensure that the embryo and/or Trizol is not drawn up into the needle.
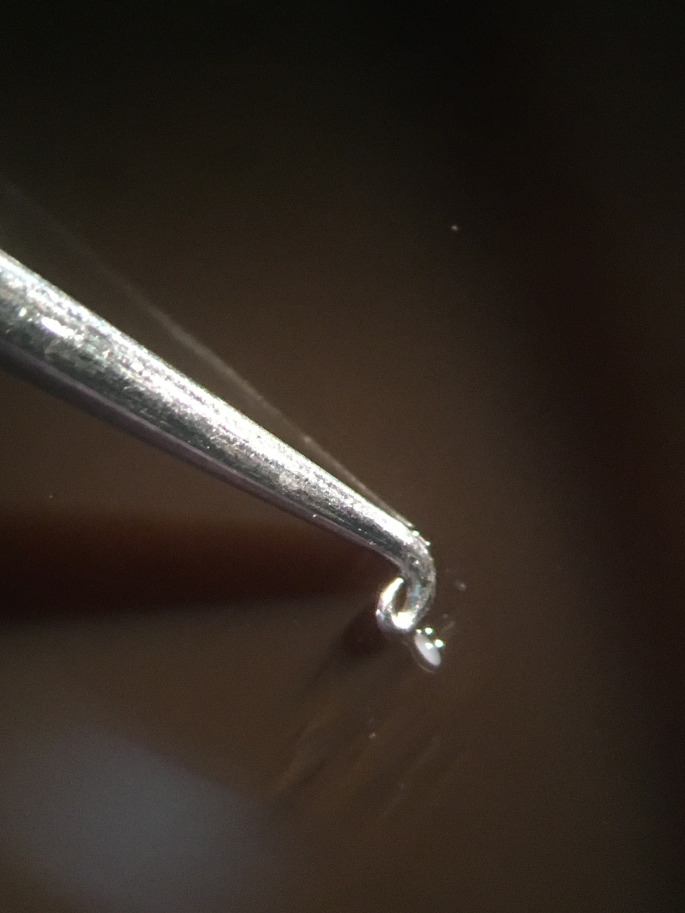
Note: Be very careful here to orient the needle such that the embryo and/or Trizol does not get drawn up into the needle via capillary action (Figure 3, Video 2). Also be careful not to pierce through the parafilm. Any loss of Trizol at this step will reduce the complexity of the sequencing library downstream.
Incubate the embryo for 2-3 min in the Trizol until the embryo is no longer visible.
Add an additional 5 μl of the Trizol/glycogen solution to the parafilm and transfer the 10 μl to a tube with an additional 30 μl of Trizol/glycogen solution (for a total of 40 μl).
Incubate the dissolved embryo in the Trizol/glycogen solution for 10 min at room temperature.
-
Store at -80 °C until all embryos are collected.
Notes:
For our experiments, we collected 4 individual embryos for each condition.
To best control for blue-light mediated changes to gene expression, treat untagged His2AvRFP (II) embryos to the same blue-light exposure time course. This will allow for the identification of off-target gene-expression changes and exclude them from further analysis.
We found it helpful to also carry out a “No Light” control where we collected our CRY2-Zld embryos at the same developmental timepoint without any blue-light exposure. This allowed us to identify a small set of genes that were mis-expressed, likely due to the presence of the CRY2 tag.
Because we were precisely staging our embryos, we wanted to ensure that each embryo was exposed to the same amount of blue light. The epifluorescence microscope used illuminates embryos beyond those being directly visualized. Thus, we extracted RNA from only a single embryo from the 5-7 that were mounted. The only exception was the “No Light” control experiment as developmental stage was the only variable measured.
-
-
RNA extraction and purification
Before beginning, wipe down the pipettes and work surface with RNase Zap to remove all RNase from the work area. Only use barrier tips and RNase free reagents and tubes for this section. Also, pre-chill a tabletop centrifuge to 4 °C. This procedure is adapted from Lott et al. (2011) .
Thaw all embryo samples.
Grind with a disposable pellet pestle to ensure that the embryo is completely homogenized, and the RNA is completely released into solution.
-
Add 960 μl of Trizol + 200 μg/μl glycogen solution to each sample. Incubate at room temperature for 5 min.
Note: Pipette the new Trizol/glycogen solution directly onto the pestle to wash off any residual RNA into the tube.
Add 200 μl of chloroform. Mix vigorously for 15 s and incubate at room temperature for 5 min.
Centrifuge the samples at 12,000 × g at 4 °C for 15 min.
-
While the samples are spinning, prepare a new set of labeled tubes with 500 μl of isopropanol.
Note: After centrifugation, the samples will be separated into three layers. The red bottom layer contains the proteins. There will be a small interphase where the DNA resides and a clear top layer containing the RNA.
Transfer the clear upper layer into the appropriate tube with isopropanol. There should be ~500 μl of liquid in the upper layer. Invert the tubes 8-10 times to mix them thoroughly.
Move the tubes to a -20 °C freezer to precipitate the RNA. Incubate them at -20 °C for at least 30 min, but they can be left there for several hours to overnight if required.
Centrifuge the samples at 12,000 × g at 4 °C for 15 min.
Carefully remove the supernatant. You may not see an RNA pellet, so pipette very slowly to avoid removing any RNA accidentally.
Add 1 ml of 75% ethanol to each tube and invert the samples to mix.
Centrifuge the samples at 12,000 × g at 4 °C for 5 min.
Carefully remove the supernatant and wash again with 1 ml of 75% ethanol.
Centrifuge the samples at 12,000 × g at 4 °C for 5 min.
Carefully remove the supernatant and wash a third time with 1 ml of 75% ethanol.
Briefly centrifuge the tubes again to collect any residual ethanol and carefully remove it.
Allow the samples to dry for 5 min.
-
Add 50 μl of RNase free water to each tube and refrigerate for 30-60 min to allow for the RNA to resuspend. You can then store these samples at -80 °C or proceed directly to library preparation.
Notes:
The amount of water used to resuspend the samples will vary depending on the library preparation kit being used. The desired input for the TruSeq RNA Sample Preparation v2 kit is 50 μl.
For our samples, we went directly from RNA extraction/purification into the first day of library preparation.
Figure 1. An example of how to organize embryos on the coverslip for easy identification of the correct embryo after illumination.
It is important to use a minimal amount of halocarbon oil 700 to mount the embryos.
Figure 2. Removing excess oil from the embryo.
Using your tool of choice, roll the embryo on a molasses plate until the excess Halocarbon 700 oil has been removed before moving the embryo to the Trizol/glycogen solution.
Video 1. Removal of excess Halocarbon 700 oil on a molasses plate.
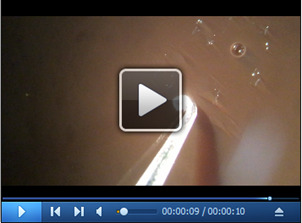
Figure 3. How to orient the needle when poking the embryo to release the RNA.
Orient the needle at a high angle to prevent capillary action from drawing up Trizol or the embryo into the needle.
Video 2. Lysing an embryo in Trizol.
Recipes
Note: Ready made plates and bottles can be purchased if necessary.
-
Molasses Food
-
Ingredients:
Water 2.66 L
Yeast 33 g
Yellow cornmeal 163 g
Agar 16 g
Molasses 200 ml
10% p-Hydroxy benzoic acid methyl ester in 95% ethanol 38 ml
Boil 80% of the water and add the agar and let it dissolve
In the remaining 20% of the water, add the yeast and let it dissolve and then stir in the cornmeal
Add the molasses to the agar solution and then stir in the yeast/cornmeal mixture
Boil the mixture and allow to simmer for 5-10 min
Turn off heat and allow to cool for at least 5 min
Stir in the 10% p-hydroxy-benzoic acid methyl ester
Pour into bottles
-
-
Molasses plate
-
Ingredients:
Bacteriological grade Agar 22 g
Molasses 90 ml
Water 562 ml
Mix and add stir bar, autoclave to sterilize (Liquid cycle; 45 min)
Let the solution cool to 60 °C while stirring on a magnetic stir plate
Add 5 ml Ethyl Acetate
Add 5 ml 10% Tegosept (in Ethanol)
Mix well and pour into plates
-
Acknowledgments
We would like to thank members of the Harrison lab for their critical reading and assistance in the creation of this protocol as well as Elle Grevstad from the UW-Madison Biochemistry Optical Core and Seth Blair for the use of his video capture capable dissection microscope.
Competing interests
The authors declare no competing interests.
Citation
Readers should cite both the Bio-protocol article and the original research article where this protocol was used.
References
- 1. Caussinus E., Kanca O. and Affolter M.(2011). Fluorescent fusion protein knockout mediated by anti-GFP nanobody. Nat Struct Mol Biol 19(1): 117-121. [DOI] [PubMed] [Google Scholar]
- 2. Foe V. E. and Alberts B. M.(1983). Studies of nuclear and cytoplasmic behaviour during the five mitotic cycles that precede gastrulation in Drosophila embryogenesis. J Cell Sci 61: 31-70. [DOI] [PubMed] [Google Scholar]
- 3. Guglielmi G., Barry J. D., Huber W. and De Renzis S.(2015). An optogenetic method to modulate cell contractility during tissue morphogenesis. Dev Cell 35(5): 646-660. [DOI] [PMC free article] [PubMed] [Google Scholar]
- 4. Hamm D. C., Larson E. D., Nevil M., Marshall K. E., Bondra E. R. and Harrison M. M.(2017). A conserved maternal-specific repressive domain in Zelda revealed by Cas9-mediated mutagenesis in Drosophila melanogaster. PLoS Genet 13(12): e1007120. [DOI] [PMC free article] [PubMed] [Google Scholar]
- 5. Hamm D. C. and Harrison M. M.(2018). Regulatory principles governing the maternal-to-zygotic transition: insights from Drosophila melanogaster. Open Biol 8(12): 180183. [DOI] [PMC free article] [PubMed] [Google Scholar]
- 6. Haruki H., Nishikawa J. and Laemmli U. K.(2008). The anchor-away technique: rapid, conditional establishment of yeast mutant phenotypes. Mol Cell 31(6): 925-932. [DOI] [PubMed] [Google Scholar]
- 7. Huang A., Amourda C., Zhang S., Tolwinski N. S. and Saunders T. E.(2017). Decoding temporal interpretation of the morphogen Bicoid in the early Drosophila embryo. Elife 6: e26258. [DOI] [PMC free article] [PubMed] [Google Scholar]
- 8. Liu H., Yu X., Li K., Klejnot J., Yang H., Lisiero D. and Lin C.(2008). Photoexcited CRY2 interacts with CIB1 to regulate transcription and floral initiation in Arabidopsis. Science 322(5907): 1535-1539. [DOI] [PubMed] [Google Scholar]
- 9. Lott S. E., Villalta J. E., Schroth G. P., Luo S., Tonkin L. A. and Eisen M. B.(2011). Noncanonical compensation of zygotic X transcription in early Drosophila melanogaster development revealed through single-embryo RNA-seq. PLoS Biol 9(2): e1000590. [DOI] [PMC free article] [PubMed] [Google Scholar]
- 10. McDaniel S. L., Gibson T. J., Schulz K. N., Fernandez Garcia M., Nevil M., Jain S. U., Lewis P. W., Zaret K. S. and Harrison M. M.(2019). Continued activity of the pioneer factor Zelda is required to drive zygotic genome activation. Mol Cell 74(1): 185-195 e184. [DOI] [PMC free article] [PubMed] [Google Scholar]
- 11. Schulz K. N. and Harrison M. M.(2019). Mechanisms regulating zygotic genome activation. Nat Rev Genet 20(4): 221-234. [DOI] [PMC free article] [PubMed] [Google Scholar]
- 12. Seller C. A., Cho C. Y. and O'Farrell P. H.(2019). Rapid embryonic cell cycles defer the establishment of heterochromatin by Eggless/SetDB1 in Drosophila. Genes Dev 33(7-8): 403-417. [DOI] [PMC free article] [PubMed] [Google Scholar]


