

Summary
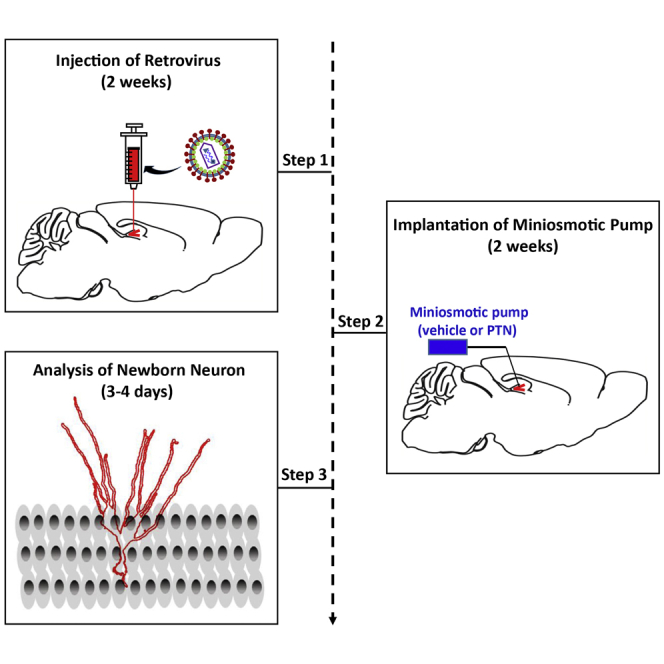
Adult neurogenesis, a process of generating newborn neurons from adult neural stem cells, is required for brain homeostasis, cognition, and affective behaviors. Deciphering the molecular mechanisms underlying adult neurogenesis will provide valuable insights into the functional integrity of the adult brain and the etiology of neurological disorders. Here, we present an optimized protocol combining stereotactic injection of retrovirus expressing red fluorescent protein to label newborn neurons and implantation of a mini-osmotic pump to investigate newborn neuron development in adult mouse hippocampus.
For complete details on the use and execution of this protocol, please refer to Tang et al. (2019).
Subject areas: Cell biology, Model organisms, Neuroscience
Graphical Abstract
Highlights
-
•
A protocol for investigating newborn neuron development in adult mouse hippocampus
-
•
Tips on how to stereotactically inject retroviruses into adult mouse hippocampus
-
•
Tips on how to implant a mini-osmotic pump into adult mouse hippocampus
-
•
Assay for dendritic length and complexity of adult newborn neurons
Adult neurogenesis, a process of generating newborn neurons from adult neural stem cells, is required for brain homeostasis, cognition, and affective behaviors. Deciphering the molecular mechanisms underlying adult neurogenesis will provide valuable insights into the functional integrity of the adult brain and the etiology of neurological disorders. Here, we present an optimized protocol combining stereotactic injection of retrovirus expressing red fluorescent protein to label newborn neurons and implantation of a mini-osmotic pump to investigate newborn neuron development in adult mouse hippocampus.
Before you begin
Preparation for stereotactic injection
Timing: 1–2 days
-
1.
Sterilize all the surgical instruments and experimental site.
-
2.
Prepare 8–12 weeks old C57BL/6 male mice.
Note: Adult C57BL/6 mice (8–12 weeks old) are housed under standard conditions. All procedures are performed according to protocols approved by the Institutional Animal Care and Use Committee at Institute of Genetics and Developmental Biology, Chinese Academy of Sciences.
-
3.Prepare anesthetic solution [avertin (2, 2, 2-tribromoethanol)].
-
a.Make avertin stock solution (1 g/mL):
-
i.Take a dark bottle and add 10 g 2, 2, 2-tribromoethanol.
-
ii.Add 10 mL tert-Amyl Alcohol (2-methyl-2-butanol).
-
iii.Stir until avertin completely dissolved and store at 4°C for 6 months.
-
i.
-
b.Make avertin working solution (20 mg/mL):
-
i.Take a dark bottle and add 10 mL DPBS.
-
ii.Add 200 μL avertin stock solution.
-
iii.Shake vigorously until completely dissolved and store at 4°C for 1 week.
-
i.
-
a.
Note: Generally, intraperitoneal injection of avertin 400 mg/kg to an adult mouse could produce about 30 min of anesthesia (Green, 1975; Papaioannou and Fox, 1993; Reid et al., 1999).
Key resources table
| REAGENT or RESOURCE | SOURCE | IDENTIFIER |
|---|---|---|
| Chemicals, peptides, and recombinant proteins | ||
| Dulbecco’s phosphate-buffered saline (DPBS)∗ | GIBCO | Cat#14190136 |
| Pleiotrophin | Sinobiological Protein | Cat#51000-MNAB |
| Ocular lubricant∗ | Baiyunshan | Cat#212020050 |
| Avertin∗ | Sigma | Cat#T48402 |
| tert-Amyl alcohol∗ | Sigma | Cat#152463 |
| Ketoprofen∗ | Santa Cruz | Cat#SC-363115Rx |
| Betadine∗ | RockTech | Cat#ZH1120087 |
| 4% Paraformaldehyde | Solarbio | Cat#P111O |
| 0.9% Normal saline solution | Procell | Cat#PB180353 |
| Experimental models: organisms/strains | ||
| Mouse: C57BL/6N | Charles River | Strain code: BCG-T00001 |
| Bacterial and virus strains | ||
| MMLV-based retrovirus | This paper | N/A |
| Software and algorithms | ||
| LSM 710 Confocal | Zeiss | N/A |
| ImageJ | National Institute of Health | RRID: SCR_002798; https://www.graphpad.com/ |
| ZEN Digital Imaging for Light Microscopy | Zeiss | http://www.bitplane.com/ |
| Other | ||
| Gloves∗ | Medicom | Cat#1154C |
| Suture∗ | RWD | Cat#F35305-50 |
| Suture needle∗ | RWD | Cat#F35401-50 |
| Masks∗ | Medicom | Cat#2015M |
| Caps∗ | Maydeal | Cat#60014533 |
| Cotton swab∗ | Winner | Cat#601-020764-01 |
| Delicate scissor∗ | RWD | Cat#S12003 |
| Surgical handle∗ | RWD | Cat#S32001 |
| Delicate forceps∗ | RWD | Cat#F12010 |
| Haemostatic forceps∗ | RWD | Cat#F21011 |
| Standard stereotaxic instrument∗∗ | RWD | Cat#68802 |
| Optical fiber cold light source∗∗ | RWD | Cat#76301 |
| Syringe holder∗ | RWD | Cat#68218 |
| Animal platform∗∗ | RWD | Cat#68607 |
| Needle holder∗∗ | RWD | Cat#F31031 |
| ThermoStar temperature maintaining apparatus∗∗ | RWD | Cat#69020 |
| Heating pad∗∗ | RWD | Cat#69023 |
| Temperature probe∗∗ | RWD | Cat#69022 |
| Animal surgical microscope∗∗ | CQOPTEC | Cat#SZ660 |
| A drill bit∗∗ | RWD | Cat#78041 |
| Drill∗∗ | RWD | Cat#78001 |
| Electric razor∗∗ | RWD | Cat#CP-5200 |
| Microsyringe∗∗ | Hamilton | Cat#87943 |
| Microsyrige needle∗∗ | Hamilton | Cat#7762-04 |
| Cyanoacrylate adhesive∗∗∗ | Loctite | Cat#45404 |
| Brain Infusion Kit∗∗∗ | Alzet | Cat#0008851 |
| Mini-osmotic pumps∗∗∗ | Alzet | Cat#1002 |
Note: ∗General supplies also used for mini-osmotic pump implantation.
∗∗Supplies used for both viral grafting and mini-osmotic pump implantation.
∗∗∗Supplies used for mini-osmotic pump implantation.
Step-by-step method details
Animal preparation for surgery
-
1.
Inject the mouse with avertin 400 mg/kg intraperitoneally.
Alternatives: The avertin can be replaced by anesthesia vaporizer with 1% isoflurane (30% O2, 70% N2O).
-
2.
Wait until the mouse is fully anesthetized, then inject ketoprofen 3–5 mg/kg intraperitoneally to relieve pain.
-
3.
Place the mouse on a heating pad to keep the steady body temperature.
Note: When the mouse is anesthetized, it cannot regulate the body temperature. So placing it on the heating pad could avoid the body temperature drop significantly during the surgery process.
-
4.
Apply an ocular lubricant on the eyes of the mouse to prevent the dryness during the surgery.
Alternatives: The ocular lubricant can be replaced by the artificial tears.
-
5.
Use an electric razor to remove hair from the top of the head.
-
6.
Sanitize the head skin with three alternate rounds of betadine and 70% ethanol.
Exposure of the skull and drilling
-
7.
Latch the front teeth of the mouse onto the anterior clamp of the adapter on the stereotactic instrument, then adjust the position of the adapter, so that the ear bars could easily insert into the ear canal to make the head fixed.
Note: Make sure that the mouse head is fixed and firm onto the anterior clamp of the adapter.
-
8.
Make a 1.5 cm anterior-posterior incision using a scalpel.
-
9.
Scrape away the periosteal connective tissue with the blunt edge of the scalpel handle.
-
10.
Take a sterile cotton swab to gently clean the surface of the skull and ensure the bregma and lambda visible (Figure 1A).
-
11.
Place the microinjection syringe on the needle holder, move the needle tip to bregma, and write down the coordinate, which serves as the reference point of the three axes and determine coordinates from this point.
-
12.
Place the needle tip on lambda, level the head by adjust the dorsal/ventral adjustment dial so that the z-coordinate is roughly equal at both bregma and lambda.
-
13.
Place the needle tip to −2.0 mm posterior to the bregma, move the needle tip to ±1.7 mm lateral to the midline, and level the head so that the z-coordinate is roughly equal at both lateral sides (Figure 1A).
CRITICAL: Ensure that the head is level by moving the needle tip on the intersection of bregma and interaural line and adjusting the z-coordinate.
-
14.
Find the coordinates based on the atlas of the mouse brain (Paxinos et al., 2001) and target the dentate gyrus using the coordinates: −2.0 mm posterior to the bregma, ±1.7 mm lateral to the midline, −1.9 mm ventral to the surface of the skull.
-
15.
Move the syringe needle according above lateral coordinates and label two lateral coordinates with the scalpel tip to indicate their positions over the skull, which serve as the target drill sites.
-
16.
Lift the syringe in the vertical axis and move the syringe tip to the security position.
-
17.
Drill two shallow holes by using a fine dental drill at the target drill sites over the skull (Figure 1B).
Figure 1.

Stereotactical injection of retroviruses into the dentate gyrus of adult hippocampus
(A) The cranial structures on the mouse skull and the coordinates used for the injection: 2.0 mm posterior to the bregma (Y axis), ±1.7 mm lateral to the midline (X axis). Scale bar, 5 mm.
(B) Two small holes were drilled for viral injection. Scale bar, 5 mm.
(C) The needle of micro-syringe was placed onto the position before viral injection. Scale bar, 5 mm.
Retroviral injection
-
18.
Clean the needle of microinjection syringe with sterile DPBS and withdraw 1 μL of the concentrated retroviral solution (titer greater than 5 × 10⁸/mL).
-
19.
Lower the needle tip above the target hole until it touches the surface of the skull.
-
20.
Set the depth/vertical coordinate as 0.
-
21.
Lower the syringe to reach the dentate gyrus, set depth/vertical to 1.9 mm (Figure 1C).
-
22.
Inject 1 μL retroviruses at a rate of 0.2 μL/min. After the injection is finished, wait for additional 2 min to ensure retroviruses full absorbed.
-
23.
Slowly remove the syringe out of the brain to prevent fluid backflow.
-
24.
Rinse the external surface of the syringe tip with sterile DPBS and use sterile cotton swabs to remove traces of blood.
-
25.
Repeat steps 18–24 for another hemisphere.
For more detailed protocol of retroviral injection see (Fricano-Kugler et al., 2016; Tang et al., 2019).
Wound suturing and post-operative care
-
26.
Close the skin incision by using absorbable sutures.
-
27.
Gently remove the ear bars and take the mouse from the stereotaxic instruments.
-
28.
Place the mouse in a recovery cage and keep it on a heating pad.
-
29.
Monitor the mouse until it wakes up and moves around on its own.
Preparation of mini-osmotic pump
Mini-osmotic pump is an ideal system for prolonged direct drug delivery into specific brain region at a fixed flow rate (Reitmeir et al., 2011; Wang et al., 2019). Adult neurogenesis can be divided into five phases: proliferation, fate determination, migration, maturation and integration at different time course (Bond et al., 2015). So implantation of mini-osmotic pump could be performed at a desired time after retroviral injection according the experimental purpose. Previously, we had implanted a mini-osmotic pump to study the role of pleiotrophin (PTN) on the development of newborn neurons after 2 weeks retroviral injection (Tang et al., 2019). A video guide providing excellent visual aid for this procedure may also be found at: https://www.jove.com/v/52932/implantation-miniosmotic-pumps-delivery-tract-tracers-to-study-brain (Sanchez-Mendoza et al., 2016).
-
30.
Take a mini-osmotic pump and a flow moderator from Alzet mini-osmotic pump box and a catheter, a brain infusion cannula and a spacer disc from brain infusion kit box in the biosafety cabinet (Figure 2A).
-
31.
Invert the brain infusion cannula with an aseptic forceps, add two drops of cyanoacrylate adhesive, and insert it into a spacer disc.
-
32.
Place the cannula on an upward plane in the biosafety cabinet and wait until the cyanoacrylate is fully dry.
-
33.
Cut a catheter into 3 cm and carefully attach the catheter to the flow moderator (Figure 2B).
-
34.
Connect the filling needle to a 1 mL syringe and withdraw additional remnant solution.
-
35.
Fill the flow moderator and the catheter with the solution containing PTN (10 μg/mL in DPBS) or vehicle alone (Figures 2C and 2D).
-
36.
Slowly fill the pump with the above solution until a drop of liquid out of the pump body (Figure 2E).
-
37.
Carefully insert the flow moderator into the pump (Figures 2E–2G).
-
38.
Place the filled mini-osmotic pump into a 50 mL tube with normal saline solution at 37°C for 24 h (Figure 2H).
-
39.
Check whether there are bubbles in the flow moderator and the catheter before implantation. If bubbles are observed, remove the cannula, refill the catheter, and reconnect the tube.
Figure 2.

Preparation of mini-osmotic pump
(A) Components of the mini-osmotic pump used in this protocol (including spacer disc, cannula and removable tab, catheter, flow moderator, and mini-osmotic pump).
(B) The cannula, catheter, and flow moderator were assembled.
(C and D) The assembly was filled with solution until a drop of solution escapes at the head and tail of the assembly.
(E and F) The mini-osmotic pump was filled with solution until a drop of solution escapes from the pump body.
(G) The flow moderator was connected with the filled osmotic pump.
(H) Incubated the filled assembly with attached osmotic pump in the normal saline solution at 37°C for 24 h.
Implantation of mini-osmotic pump
-
40.
Take the mouse who has been grafted with the retroviruses and inject avertin solution (400 mg/kg) intraperitoneally.
-
41.
Refer to steps 2–10 and fix the mouse onto stereotactic apparatus.
-
42.
Use a scalpel to make a 1.5 cm incision to exposure the original two holes (the same holes with retroviral injection).
-
43.
Use sterile cotton swabs to gently clean the surface of the skull so that the holes are clearly visible.
Note: Make sure that the skull is level before implantation (please refer to the steps 11–13).
-
44.
Select one hole which will be received the cannula, and the other will be considered as a control without treatment of mini-osmotic pump implantation.
-
45.
Use a hemostatic forceps to create a short subcutaneous tunnel from the scalp incision to scapula, which serves as a pocket for the mini-osmotic pump.
Note: The pocket should be large enough to accommodate the pump and permit it move around, but not too large as the pump might slip down onto the flank of the animal.
-
46.
Carefully introduce the pump into the pocket and leave the cannula and the catheter outside (Figures 3A and 3B).
-
47.
Carefully add five drops of cyanoacrylate adhesive next to the needle in the cannula and attach the cannula into the holder.
Note: Make sure that the cyanoacrylate adhesive is not adhered to the needle tip of the cannula and avoid the needle clogged.
-
48.
Carefully lower the cannula needle to reach the dentate gyrus, set depth/vertical to 1.9 mm (please refer to the steps 19–21 of retroviral injection).
-
49.
Hold the cannula in position for 2 min until the cyanoacrylate is fully dry and the cannula is entirely attached in the skull (Figure 3C).
Alternatives: Cyanoacrylate adhesive can be replaced by dental cement. The powdered dental cement can be mixed with its acrylic solvent in a 50 mL centrifuge tube cap and carefully drip the mix into the skull to fix the cannula.
Note: Adhesion of the cannula to the skull can be improve if the skull surface around the cannula site is clean and dry enough.
-
50.
Carefully cut the removable tab with a scissors (Figures 3D and 3E).
-
51.
Close the scalp incision with silk suture (Figure 3F).
-
52.
Gently remove the ear bars and take the mouse from the stereotaxic instruments.
-
53.
Put the mouse in a new cage and keep it on a heating pad.
Note: Do not put the mouse with those have still not been operated.
-
54.
Monitor the mouse until it wakes up and moves around on its own and do not leave the mouse unattended until the sternal recumbent is restored.
-
55.
Return the mouse to the standard housing condition until the desired time stages.
Note: At the desired time after implantation of mini-osmotic pump, the mouse is anesthetized and transcardially perfused with normal saline solution followed by PBS-buffered 4% paraformaldehyde for immunostaining (Tang et al., 2019; Wang et al., 2021).
Figure 3.

Implantation of the mini-osmotic pump
(A) The mouse was placed onto the stereotactic device with the fully constructed mini-osmotic pump next to it.
(B) The pump were introduced into the back of the animal and only the cannula remains on the exterior.
(C) The cannula were grafted into the left hole (−1.9 mm ventral to the surface of the skull).
(D and E) The removable tab of the cannula was moved away.
(F) The wound was stitched.
Expected outcomes
To investigate the effect of PTN on newborn neuron development in adult hippocampus, we stereotactically injected retroviruses expressing red fluorescent protein (RFP) to label newborn neurons (Figures 4A–4C). After two weeks of retroviral injection, we implanted a mini-osmotic pump with PTN into the dentate gyrus of hippocampus (Figure 4D). For the dendritic branching analysis, 100-μm-thick floating brain sections were used. The infected neurons were imaged on an LSM 710 confocal microscope with a 20× oil objective. A 3-dimensional reconstruction of entire dendritic processes of each neuron in the dentate gyrus was made from Z-series stacks of confocal images at 3-μm intervals. The 2D projection images were imported and traced by NIH ImageJ software (NIH, Bethesda, Maryland, USA) with a sholl analysis plugin (https://imagej.net/Sholl). Data from each infected neuron were extracted for sholl analysis and quantification of total dendritic length. Roughly 20–50 neurons with largely intact dendritic trees per mouse were traced, and at least 4 different animals per groups were analyzed. As expected, infusion of PTN significantly increased the dendritic length and complexity of RFP-positive newborn neurons (Figures 4E and 4F) (Tang et al., 2019).
Figure 4.

The newborn neurons were labeled by retroviruses and followed by treatment with PTN via mini-osmotic pump implantation
(A) Schematic diagram of the stereotaxic injection of retroviruses expressing red fluorescent protein (RFP) and infusion of PTN or vehicle via mini-osmotic pump.
(B) Timeline of the experiments for viral injection, PTN infusion, and analyses of RFP-positive newborn neurons.
(C) Representative image of the left brain section with the needle track (dot line). Scale bar, 2.5 mm
(D) Representative images of RFP-positive newborn neurons in vehicle- or PTN-treated mice 4 weeks after retroviral injection. Scale bar, 100 μm.
(E and F) Quantification of the (E) dendritic length (Student’s t test, vehicle versus PTN, p < 0.001) and (F) the dendritic complexity (UNIANOVA, F1,48 = 28.887, vehicle versus PTN, p < 0.001) of RFP-positive newborn neurons in vehicle- or PTN-treated mice 4 weeks after retroviral injection.
Limitations
Since we have used native fluorescence protein to directly detect transgene expression, one possible technical limitation in observing infected cells could have been a presumable low sensitivity of native fluorescence detection. Therefore, the reference protocol for transgene delivery to granule cells and the use of immunohistochemistry and subsequent indirect fluorescence detection is recommended (Tashiro et al., 2006).
The mini-osmotic pumps can carry drugs dissolved in a wide variety of substances, being the limitation to that the solvent is biocompatible. Additionally, given that the volume is small (200 μL) in the mini-osmotic pumps, it must be determined whether the concentration required for the experiment is suitable and will not cause precipitation inside the pump (Sanchez-Mendoza et al., 2016).
Troubleshooting
Problem 1
Failure of mounting the mouse onto stereotactic apparatus (step 7 and step 41)
Potential solution
Make sure that the mouse is fully anesthetized.
Make sure that the mouse front teeth is well latch onto the anterior clamp of the adapter.
Make sure that the ear bars are inserted into the ear canal of the mouse and well fixed.
Problem 2
Failure of retroviral injection (steps 18–25)
Potential solution
Make sure that the head is well fixed in the stereotaxic device.
The skull leveling is necessary due to the small size of the subgranule zone of hippocampus.
Ensure that the bregma and lambda are visible, which is necessary for accuracy of the coordinates.
Quickly withdraw retroviruses and avoid exposure too long at room temperature (20°C–25°C).
Slowly and carefully inject retroviruses to reduce pressure damage.
Use the recommended flat-tipped needle to ensure that retroviruses are evenly distributed at dentate gyrus during retroviral injection.
Problem 3
Failure of mini-osmotic pump preparation (steps 30–39)
Potential solution
Ensure that the vehicle/solvent is compatible with polyvinylchloride tubing.
Filter the insoluble precipitated particles in the solution if necessary.
Make sure to wear gloves during perfusion and implantation of mini-osmotic pump.
Filling solution should be performed at 20°C–25°C
Completely fill the mini-osmotic pump and avoid the formation of bubbles.
Notice the dark shadow in the pump indicating the solution level and stop filling until a bead of solution emerging from the pump body.
Carefully fill the flow moderator and the catheter and avoid the formation of bubbles.
Carefully connect the cannula and the catheter and avoid the formation of bubbles.
Double-check whether there are bubbles in the mini-osmotic pump before implantation.
Check whether too much solution is left inside the pump at the end of the experiment.
Problem 4
Failure of mini-osmotic pump implantation (steps 40–49)
Potential solution
Ensure that the needle of cannula is not clogged.
Make sure that the size of subcutaneous tunnel is sufficient to accommodate the pump and permit it to move around, but cannot slip down onto the flank of the mouse.
Ensure that there is enough cyanoacrylate adhesive next to the needle of the cannula, but not directly touch to the needle tip of the cannula.
Ensure that the skull surface around the cannula is clean and dry enough, which is necessary to make the cannula fully adhered to the skull.
Hold the cannula in position for more than 2 min until the cyanoacrylate adhesive is fully dry and the cannula is entirely attached in the skull
Problem 5
Post-operated recovery time is too long (step 29 and step 54)
Potential solution
A rectal probe can be used to control the heating system by feeding back the temperature and ensure that the temperature of the mice remains stable at 37°C.
Inject ketoprofen to alleviate the pain during surgery.
Provide soft food and treats for the mouse after surgery.
Resource availability
Lead contact
Further information and requests for resources and reagents should be directed to and will be fulfilled by the lead contact, Weixiang Guo (wxguo@genetics.ac.cn).
Materials availability
This study did not generate new unique reagents. The MMLV-based retrovirus used in this protocol is available upon reasonable request.
Data and code availability
This protocol did not generate/need datasets.
Acknowledgments
This research was supported by grants from the National Key Research and Development Program of China (2019YFA080200), the National Science Foundation of China (31921002 and 31771123), and the Chinese Academy of Science Key Research Program of Frontier Sciences (QYZDB-SSW-SMC046).
Author contributions
W.G. and C.T. conceived the experiments. C.T. performed the experiments. W.G. and C.T. wrote the manuscript. Both authors read, revised, and approved the manuscript.
Declaration of interests
The authors declare no competing interests.
Contributor Information
Changyong Tang, Email: tangchy23@mail.sysu.edu.cn.
Weixiang Guo, Email: wxguo@genetics.ac.cn.
References
- Bond A.M., Ming G.L., Song H. Adult mammalian neural stem cells and neurogenesis: five decades later. Cell Stem Cell. 2015;17:385–395. doi: 10.1016/j.stem.2015.09.003. [DOI] [PMC free article] [PubMed] [Google Scholar]
- Fricano-Kugler C.J., Williams M.R., Salinaro J.R., Li M., Luikart B. Designing, Packaging, and delivery of high titer crispr retro and lentiviruses via stereotaxic injection. J. Vis. Exp. 2016;111:e53783. doi: 10.3791/53783. [DOI] [PMC free article] [PubMed] [Google Scholar]
- Green C.J. Neuroleptanalgesic drug combinations in the anaesthetic management of small laboratory animals. Lab. Anim. 1975;9:161–178. doi: 10.1258/002367775780994574. [DOI] [PubMed] [Google Scholar]
- Papaioannou V.E., Fox J.G. Efficacy of tribromoethanol anesthesia in mice. Lab. Anim. Sci. 1993;43:189–192. [PubMed] [Google Scholar]
- Paxinos G., Franklin K.B.J., Franklin K.B.J. Second Edition. Academic Press; 2001. The Mouse Brain in Stereotaxic Coordinates. [Google Scholar]
- Reid W.C., Carmichael K.P., Srinivas S., Bryant J.L. Pathologic changes associated with use of tribromoethanol (avertin) in the Sprague Dawley rat. Lab. Ani. Sci. 1999;49:665–667. [PubMed] [Google Scholar]
- Reitmeir R., Kilic E., Kilic U., Bacigaluppi M., ElAli A., Salani G., Pluchino S., Gassmann M., Hermann D.M. Post-acute delivery of erythropoietin induces stroke recovery by promoting perilesional tissue remodelling and contralesional pyramidal tract plasticity. Brain. 2011;134:84–99. doi: 10.1093/brain/awq344. [DOI] [PubMed] [Google Scholar]
- Sanchez-Mendoza E.H., Carballo J., Longart M., Hermann D.M., Doeppner T.R. Implantation of miniosmotic pumps and delivery of tract tracers to study brain reorganization in pathophysiological conditions. J. Vis. Exp. 2016;107:e52932. doi: 10.3791/52932. [DOI] [PMC free article] [PubMed] [Google Scholar]
- Tang C., Wang M., Wang P., Wang L., Wu Q., Guo W. Neural stem cells behave as a functional niche for the maturation of newborn neurons through the secretion of PTN. Neuron. 2019;101:32–44 e36. doi: 10.1016/j.neuron.2018.10.051. [DOI] [PubMed] [Google Scholar]
- Tashiro A., Zhao C., Gage F.H. Retrovirus-mediated single-cell gene knockout technique in adult newborn neurons in vivo. Nat. Protoc. 2006;1:3049–3055. doi: 10.1038/nprot.2006.473. [DOI] [PubMed] [Google Scholar]
- Wang J., Cui Y., Yu Z., Wang W., Cheng X., Ji W., Guo S., Zhou Q., Wu N., Chen Y. Brain endothelial cells maintain lactate homeostasis and control adult hippocampal neurogenesis. Cell Stem Cell. 2019;25:754–767.e759. doi: 10.1016/j.stem.2019.09.009. [DOI] [PubMed] [Google Scholar]
- Wang M., Tang C., Xing R., Liu X., Han X., Liu Y., Wang L., Yang C., Guo W. WDR81 regulates adult hippocampal neurogenesis through endosomal SARA-TGFβ signaling. Mol. Psychiatry. 2021;26:694–709. doi: 10.1038/s41380-018-0307-y. [DOI] [PMC free article] [PubMed] [Google Scholar]
Associated Data
This section collects any data citations, data availability statements, or supplementary materials included in this article.
Data Availability Statement
This protocol did not generate/need datasets.