Abstract
The need for model systems that more accurately predict patient outcome has led to a renewed interest and a rapid development of orthotopic transplantation models designed to grow, expand, and study patient-derived human breast tumor tissue in mice. After implanting a human breast tumor piece into a mouse mammary fat pad and allowing the tumor to grow in vivo, the tumor tissue can be either harvested and immediately implanted into mice or can be stored as tissue pieces in liquid nitrogen for surgical implantation at a later time. Here, we describe the process of surgically implanting patient-derived breast tumor tissue into the mammary gland of nonobese diabetic-severe combined immunodeficiency (NOD-SCID) mice and harvesting tumor. tissue for long-term storage in liquid nitrogen.
Keywords: Patient-derived tumor xenograft, Breast cancer, Orthotopic transplant
1. Introduction
Patient-derived tumor xenograft (PDX) animal models are established by first transplanting human cancer tissue into a mouse host and by serially transplanting the newly formed tumor. PDX models have seen a resurgence in their use in the preclinical setting since their original development in the 1970s [1]. As increasing numbers of investigational drugs fail to receive FDA approval after costly clinical trials that do not mimic preclinical animal trials [2], researchers are using PDX models as the preferred preclinical animal model in both academic and industrial groups. Human breast cancer patients and mouse PDX models, generated from human breast tumor tissue, responded similarly to identical treatment regimens [3, 4]. In addition, PDX models have been used to conduct chemotherapy preclinical phase II animal studies that demonstrated therapeutic efficacy paralleling that observed on patients in the clinical setting [5].
Despite the significant advantages in using PDX models, these models also have challenges. Generating PDX mouse models requires the use of immune compromised host strains (e.g., NOD-SCID or NOD-SCID gamma) for engraftment and propagation while preventing rejection of the human tissue [6]. Because these mice lack critical elements of their immune system, studies using PDX models to examine immunotherapeutics would be of limited value. In addition, as PDX tumors grow, they substitute the human tumor stroma for murine stroma. The integrated murine stromal components, which consist of the extracellular matrix, cancer-associated fibroblasts, blood vessels, leukocytes, and macrophages, will prevent a full evaluation of any agents that target the human stroma [7]. Also, the engraftment process enriches for more aggressive tumors, such as hormone receptor-negative breast tumors that have a higher take rate compared to hormone-sensitive breast tumors. Therefore, aggressive tumors are overrepresented in current PDX collections [3, 4, 8].
PDX mice currently provide one of the best model systems used to advance cancer drug discovery efforts. Here we demonstrate how to surgically implant patient-derived mammary tumor tissue into NOD-SCID mice. Engrafting ER+ patient-derived tumor tissue into mice also requires an additional surgical procedure to implant estrogen pellets. Because the estrogen pellets can be very expensive when purchased from a manufacturer, we make our own estradiol pellets regularly at a fraction of the cost of the commercial pellets. We describe our method for making these pellets. We also describe how to isolate and prepare patient-derived mammary tumor tissue that can be used for either immediate implant or long-term storage in liquid nitrogen.
2. Materials
2.1. Tissue Prep and Freezing Supplies
Patient-derived tumor tissue for implantation (fresh or frozen). Serum-free DMEM/Fl2 media.
Tissue freezing media (filter sterilized): 95 % (v/v) FBS/ 5 % (v/v) DMSO.
Nalgene freezing container: (Sigma, cat. # C1562).
Eppendorf 5 ml sterile tubes.
70 % (v/v) ethanol: prepare by adding 300 ml of purified double distilled water, or Millipore water, to 700 ml of 100 % reagent grade ethanol.
Large pair of straight blunt end forceps.
Feather disposable scalpels # 10 (Fisher scientific, cat. # NC9999403).
2.2. Surgery Supplies
NOD-SCID or NOD-SCID gamma mice (3–4 weeks of age). Isoflurane.
Betadine.
Hot bead sterilizer (Fine Science Tools, cat. # 18000–45).
Labsan-256CPQ disinfectant spray (Sanitation Strategies).
Surgical platform (foam board).
Bench protector (Fisher cat. # 1420641).
Compressed oxygen tank.
Anesthetic vaporizer.
Charcoal filter.
Anesthesia induction chamber.
Laboratory labeling tape.
Duct tape.
Cotton tip applicators, sterile
27-G × 1 in. needles, sterile
Noyes micro dissecting spring scissors, sterile (Roboz, cat. # RS-5676).
Knapp 4″ scissors, sterile (Roboz, cat. # RS-5960).
Blunt end Graefe micro dissecting forceps, sterile (Roboz, cat. # RS-5135).
Graefe micro dissecting forceps with teeth, sterile (Roboz, cat. # RS-5153).
Dumont #N5 cross action fine forceps (Roboz, cat. # RS-5020).
Dumont #5 fine forceps (Fine Science Tools, cat. # 11254–20).
Bovie low temperature cautery pen with micro fine tip (Fisher Scientific, cat. # NC9030107).
Sterile 9 mm E-Z clip wound closures (Stoelting, cat. # 59027).
Wound clip applicator (Fine Science Tools, cat. # 12031–09).
Wound clip remover (Fine Science Tools, cat. # 12033–00).
Heating pad.
Kendall monoject insulin syringes with 29-G × ½ in. needles, sterile.
Ketofen sterile solution (100 mg/ml) NADA 140–269: Prepare 50 mg/ml working solution in sterile 1× PBS. Store at room temperature.
2.3. Estrogen Pellets
Beeswax.
70 % ethanol.
Estradiol.
Aluminum foil.
Dry ice.
Weigh boats.
Weighing paper.
Hot plate with magnetic stirrer.
250 ml beaker.
Sterile magnetic stir bar.
Glass Pasteur pipettes.
Bunsen burner.
20 ml glass scintillation vial.
2.4. Preparation of Estrogen Pellets
Place aluminum foil on a flat piece of dry ice.
Wipe a large weigh boat with 70 % ethanol and place it on top of the aluminum foil covering the dry ice.
Fill 250 ml beaker with water and begin heating to 60 °C on a hot plate.
Weigh 1.95 g of beeswax directly into a 20 ml glass scintillation vial.
Weigh 50 mg estradiol powder on weighing paper.
Place the glass sample vial that contains the beeswax into the water-filled beaker on the hot plate. Confirm that the water level does not rise above the neck of the glass vial.
As soon as the wax melts, remove the glass vial from the beaker of water and place the glass vial directly onto the hot plate.
Add the 50 mg of estradiol powder to the glass vial.
Add a small, sterile magnetic stir bar to the vial to help dissolve the estradiol. It can take 15 min for the estradiol to get dissolved.
After the estradiol is completely dissolved, the solution will be transparent.
Preheat a glass Pasteur pipette using a Bunsen burner and fill the pipette with the beeswax/estradiol solution.
-
Create estradiol pellets by placing three drops of the wax mixture on the weigh boat to create a single pellet.
Note: Each drop weighs ~10 mg, and each pellet weighs ~30 mg. Each pellet contains ~1 mg estrogen.
Continually flame the Pasteur pipette. to prevent the wax from solidifying during this procedure.
After the pellets completely solidify, use sterile forceps to collect the estradiol pellets in a sterile 1.5 ml microcentrifuge tube. Pellets can be stored up to 6 months at 4 °C.
3. Methods
3.1. Thawing Cryopreserved Patient-Derived Breast Tumor Tissue
Thaw frozen tissue by placing the cryovials in a 37 °C water bath (see Note 1).
Thaw tube until a small ice pellet remains in the cryovial.
Spray the outside of the cryovial with 70 % ethanol and dry the tube thoroughly before transferring into a laminar flow hood.
After the ice in the cryovial is completely melted, allow the tissue pieces to settle to the bottom of the tube and use an aspirator to remove the media.
Use a sterile pipette tip or sterile forceps to transfer the tissue pieces into a new 5 ml tube (see Note 2).
Add 3 ml serum-free DMEM/Fl2.
Invert the 5 ml tube several times to wash the tissue pieces in the media.
Allow the pieces to settle to the bottom of the tube and then aspirate the media.
Repeat steps 6–7 an additional two times to remove any residual DMSO from the tissue-freezing media.
Add 3. ml serum-free DMEM/F12 media to the tissue pieces and store the tube on ice until ready for implanting into mice.
3.2. Surgery Preparation
Place a recovery cage on top of a heating pad and turn heating pad on.
Disinfect the surgery area by cleaning the surface of the laminar flow hood with Labsan-256CPQ.
Secure the bench protector sheet to the foam surgery board using duct tape.
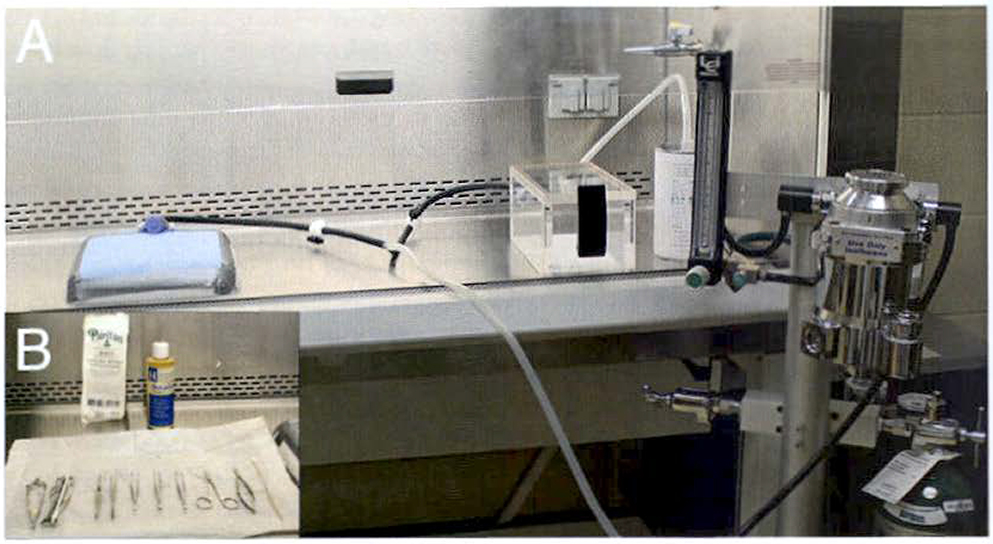
Place the surgery board in the hood and use duct tape to secure the nose cone to the surgery board (Fig. 1a).
All tools should be autoclaved prior to use in surgery and arranged on a sterile surface (Fig. 1b). Tools should also be sterilized between animals using the hot bead sterilizer.
Adjust the vaporizer to deliver 2 % isoflurane and oxygen at the rate of 1–2 L/min in an induction chamber to anesthetize the mice.
Transfer the anesthetized mouse to the surgery board.
Fig. 1.
Aseptic surgery setup inside a laminar flow hood. (a) The oxygen aids delivery of vaporized isoflurane to both the anesthesia chamber and the nose cone via Y-connection. The charcoal filter collects the waste anesthetic gas. A nitrile glove is cut and secured around the nose cone using a rubber band. Then the nose cone is secured to the surgery board using duct tape. (b) Surgery tools are autoclaved prior to use and maintained as sterile when placed in the laminar flow hood by using the packaging from the sterile surgical gloves. Surgery tools are also sterilized in a hot bead sterilizer between animals
3.3. Estrogen Pellet Implantation
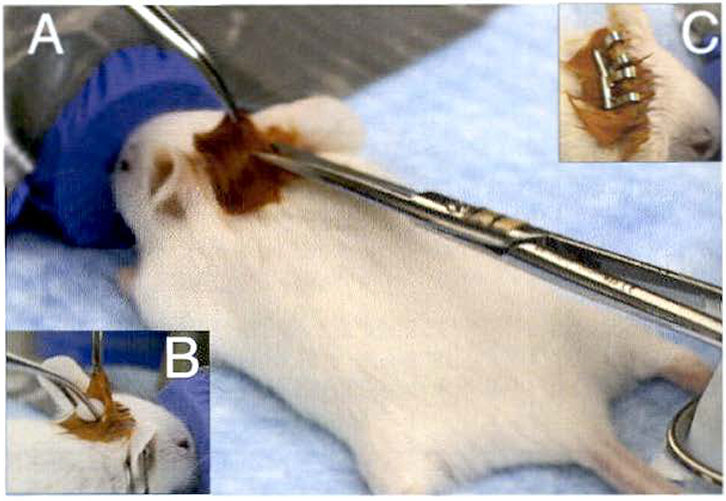
Place anesthetized mouse in a prone position on the surgery board and insert the nose of the mouse securely into the nose cone that delivers 2 % vaporized isoflurane and oxygen at 1–2 L/min (Fig. 2a).
Gently apply labeling tape to secure the hind paws to the board and make sure the nose cone remains securely in place to maintain continual delivery of isoflurane and oxygen to the mouse.
Using cotton tipped applicators, apply betadine between the shoulder blades of the mouse.
Perform toe pinch to confirm mouse is completely anesthetized before making incision.
Using the dissection scissors, make a small incision (~3–5 mm) between the shoulder blades to create a small pocket for the estrogen pellet.
Using the Graefe forceps with teeth, hold open the pocket and insert an estrogen pellet into the pocket using a pair of Graefe blunt end forceps (Fig. 2b).
Close the incision with one or two wound clips, depending on the size of the incision that was made (Fig. 2c) (see Note 3).
Fig. 2.
Estrogen pellet implantation. (a) After applying betadine between the shoulder blades, the skin is lifted and small incision is made. (b) The pocket is opened using Graefe forceps with teeth. and the estrogen pellet is inserted usang blunt-end forceps. (c) The incision is closed using two 9 mm staples to ensure the estrogen pellet cannot fall out of the pocket
3.4. Clearing the Epithelium from the Mammary Fat Pad
Remove the labeling tape from the hind paws and rotate the mouse into the supine position.
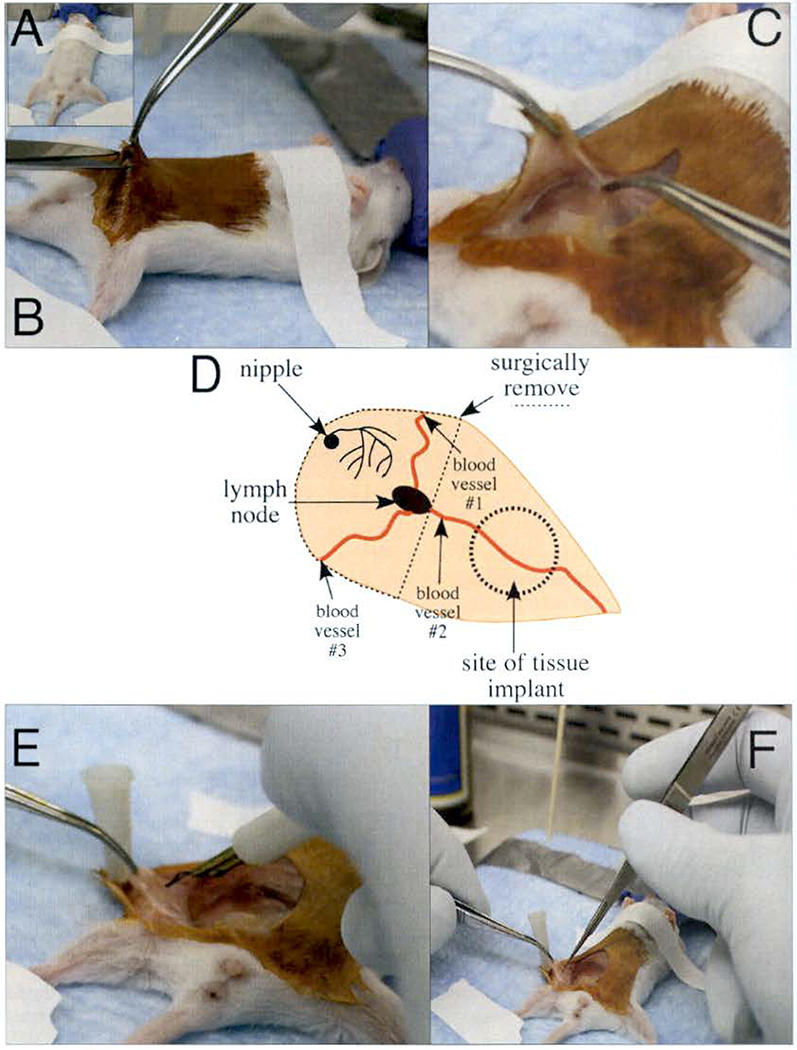
Tape the hind paws to the surgery board and secure the upper body of the mouse to the surgery board by placing a thin piece of labeling tape loosely across the chest (Fig. 3a).
Using cotton tipped applicators, apply betadine to the abdomen of the mouse.
Toe pinch the animal to confirm it is fully anesthetized.
Starting just above the genitals (Fig. 3b), make a ventral midline incision (~1.5 cm), while taking care not to cut the peritoneal membrane (see Note 4).
Make another incision (~1 cm) down the leg of the mouse.
Using the Graefe forceps with teeth, grasp the skin, and using the blunt-end Graefe forceps, grasp the peritoneal membrane (Fig. 3c).
Gently pull the skin away from the peritoneal membrane until you expose the #4 mammary gland. You should be able to see three major blood vessels that connect to each other at the lymph node in the center of the mammary gland (Fig. 3d).
Use a sterile 27 G needle to pin the skin to the surgery board so there is clear view of the entire mammary gland.
Locate the #4 mammary gland by identifying the three blood vessels that converge at the lymph node (Fig. 3d).
Using the Graefe blunt end forceps, grasp the lymph node, lift the tissue gently, and cauterize the #1 and #2 blood vessels (Fig. 3e).
Use the micro dissecting scissors to cut the mammary gland tissue located within the cauterized region (Fig. 3f) (see Note 5).
While gently lifting the tissue, to maintain tension on the mammary fat pad, with the blunt end forceps, cauterize the #3 blood vessel that connects the #4 and #5 mammary glands.
Use micro dissecting scissors to cut the tissue connecting these two glands.
Continue cutting toward the previously made incisions at the #1 and #2 blood vessels and remove the epithelium from the mammary fat pad.
Fig. 3.
Clearing the epithelium from the mammary fat pad. (a) A 3-week-old mouse is secured to the surgery board using labeling tape to maintain continuous delivery of isoflurane via the nosecone. (b) Use Graefe forceps with teeth to lift the skin of abdomen to make first small incision with Knapp 4″ scissors above the genitals, (c) Grasp the skin using Graefe forceps with teeth and secure the peritoneal membrane using the Graefe blunt forceps. Use the Graefe forceps with teeth to pull the skin and peel it away from the peritoneal membrane until the #4 mammary gland is visible. (d) The diagram shows the major features of the #4 mammary gland as viewed from the right side of the mouse. The three blood vessels converge at the lymph node and the dashed line shows the epithelium that is excised. (e) Use a low-temperature cautery pen to cauterize the blood vessels before removing the #4 mammary gland. (f) After cauterizing the blood vessels, excise the gland using micro dissection scissors
3.5. Tissue Implant
Grip the remaining mammary tissue using the blunt forceps and insert the fine-tip cross action forceps to create a small pocket in the remaining mammary tissue (Fig. 4a).
Compress the cross action forceps to open a pocket (Fig. 4b).
Have an assistant pick up a tissue piece from the 5 ml vial using the straight fine-tip forceps and place it in the pocket created with the cross action forceps (Fig. 4c).
After placing the tissue inside the pocket, remove. the cross action forceps to collapse the pocket. While the assistant·removes the fine-tip forceps, use the cross action forceps to keep the tissue inside the pocket (see Note 6).
Fig. 4.
Patient-derived tissue implant. (a) Lift the #4 mammary gland using blunt-end forceps and insert the fine tip cross action forceps into the gland. (b) Compress the cross action forceps to open a small pocket. (c) Have an assistant use the fine tip forceps to grasp a piece of patient-derived tumor tissue and insert the tissue into the pocket you are holding open with the cross action forceps. Remove the cross action forceps first to collapse the pocket and then help the assistant remove the fine tip forceps from the pocket without removing the tissue by placing the cross action forceps between the fine tip forceps
3.6. Closing the Mouse and Recovery
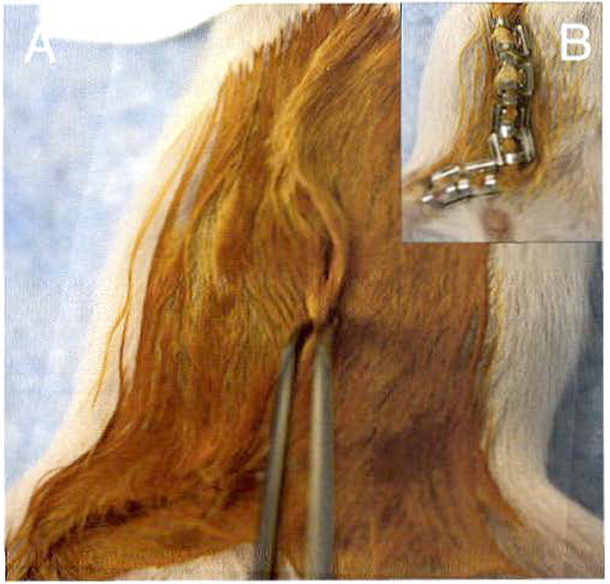
Use the Graefe blunt end forceps to align the skin where the ventral midline incision was made (Fig. 5a).
After confirming correct alignment, lift the skin to avoid stapling the peritoneum and close the incision by using the wound clip applicator and 9 mm E-Z clips (Fig. 5b).
Administer an i.p. injection of 100 μl Ketofen using the 29-G × ½ in. insulin syringe.
Place the mouse in the recovery cage immediately after completing the surgical procedure.
Allow the mouse to remain in the recovery cage until it resumes typical mobility before transferring back to its original cage.
Fig. 5.
Closing the incision. (a) Use Graefe forceps with teeth to align the skin where the incisions were made. (b) Use wound clip applicator and 9 mm wound closures to close the incision. Take care not to place wound closure on genitalia, which would inhibit function
3.7. Harvesting and Preparing Patient-Derived Tumor Tissue for Liquid Nitrogen Storage
Sacrifice the mouse that is growing the patient-derived tumor tissue.
Perform all of the following steps in a laminar flow hood to maintain sterility of the tissue pieces to be prepared.
Place the mouse in a supine position and pin each paw of the mouse to a foam board.
Spray the mouse with 70 % ethanol and wipe down the fur.
Excise the tumor using sterile dissection scissors.
Place the tumor in a sterile petri dish and continue to keep the tissue wet with serum-free DMEM/F12 media.
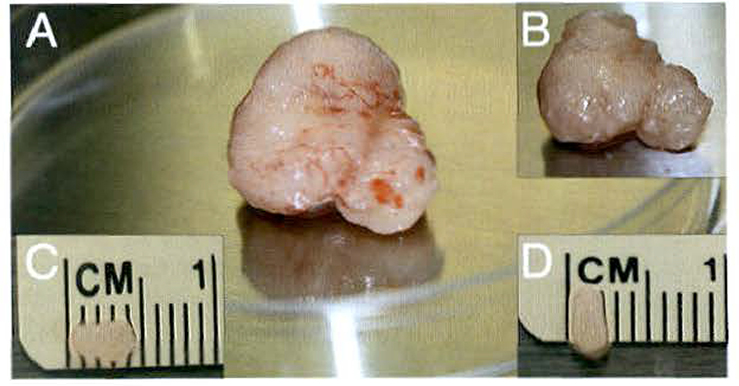
Using micro dissection scissors, trim away the fascia and membranous outer layer (yellow color) surrounding the tumor (Fig. 6a).
The tumor tissue will appear white to pink in color once the outer layer is removed (Fig. 6b).
Use a scalpel to section the tumor into smaller pieces, taking care to remove any necrotic tissue (see Note 7).
Continue to cut the tissue into smaller sections until tissue pieces are (4 ×2) mm in size (Fig. 6c, d) (see Note 8).
While preparing your tissue pieces, divide them into groups of five and distribute them on a new sterile petri dish (see Note 9).
After all tissue is prepared as (4 × 2) mm pieces, place five tissue pieces inside a single cryovial containing 1 ml of tissue freezing media.
Freeze the tissue pieces by slowly decreasing the temperature at 1 °C/min (see Note 10)
Vials will be stored in the −80 °C freezer overnight before they can be stored in a liquid nitrogen cryogen tank.
Fig. 6.
Preparing patient-derived tumor tissue pieces. (a) After the tumor is excised, the membranous outer layer needs to be removed from the outside of the tumor. (b) The tumor tissue appears whiter in color once the outer layer is removed. (c-d) Using a disposable scalpel, the tumor tissue is cut into smaller Pieces that are roughly equivalent in size at (4 × 2) mm. These tumor pieces are implanted into recipient mice immediately or are frozen with five pieces of tissue incubated in tissue freezing media per cryovial
Acknowledgements
This work is supported by funding from the Indiana CTSI Young Investigator Award, the Mary Kay Foundation, the Walther Foundation, and St. Joseph’s Regional Medical Center.
Footnotes
When placing the tubes in the water bath, make sure that the neck of the cryovial is not submerged in the water. Submerging increases the risk of contamination for the tissue pieces because water could leak into the cryovial.
The 5 ml tube is recommended because it makes retrieving the tissue pieces during surgery much easier than using a longer 15 ml conical tube.
Use enough wound clips to prevent the estrogen pellet from escaping out of the neck pocket.
Take care not to make this incision too close to the genitals. Applying wound clips could inhibit function.
When clearing the epithelium from the mammary fat pad, be vigilant to stop any bleeding from incompletely cauterized blood vessels. If bleeding continues, utilize the cautery pen to cauterize the vessel and cotton-tipped applicators to confirm bleeding has completely stopped. Use a low temperature cautery pen and oxygen at 1–2 L/min (rather than a high temperature cautery pen and higher oxygen levels) to decrease fire risk. If you would like to verify that you remove all of the epithelium during the clearing step, then collect the surgically removed tissue for whole mount analysis.
The assistant should have the tissue piece grasped in the fine-tip forceps as the pocket is opened with the cross action forceps. As soon as the pocket is created, the assistant can use fine-tip forceps to place a tissue piece into the pocket.
Necrotic tissue from patient-derived tumors will appear white in color and is much softer than viable tumor tissue.
Keep the tissue moist with serum-free DMEM/F12 during this process.
Five tissue pieces are stored in a single cryovial to be used after thawing for transplantation into five recipient mice. After a tube is thawed, do not attempt to refreeze tissue.
Freeze the tissue in the appropriate freezing media using a Nalgene freezing container that will precisely decrease the temperature at a rate of 1 °C/min.
References
- 1.Shimosato Y, Kameya T, Nagai K et al. (1976) Transplantation of human tumors in nude mice. J Natl Cancer Inst 56:1251–1260 [DOI] [PubMed] [Google Scholar]
- 2.Hay M, Thomas DW, Craighead JL et al. (2014) Clinical development success rates for investigational drugs. Nat Biotechnol 32:40–51. doi: 10.1038/nbt.2786 [DOI] [PubMed] [Google Scholar]
- 3.Marangoni E, Vincent-Salomon A, Auger N et al. (2007) A new model of patient tumor-derived breast cancer xenografts for preclinical assays. Clin Cancer Res 13:3989–3998. doi: 10.1158/1078-0432.CCR-07-0078 [DOI] [PubMed] [Google Scholar]
- 4.Zhang X, Claerhout S, Prat A et al. (2013) A renewable tissue resource of phenotypically stable, biologically and ethnically diverse, patient-derived human breast cancer xenograft models. Cancer Res 73:4885–4897. doi: 10.1158/0008-5472.CAN-12-4081 [DOI] [PMC free article] [PubMed] [Google Scholar]
- 5.Berger DP, Fiebig HH, Winterhalter BR et al. (1990) Preclinical phase II study of ifosfamide in human tumour xenografts in vivo. Cancer Chemother Pharmacol 26:S7–S11. doi: 10.1007/BF00685408 [DOI] [PubMed] [Google Scholar]
- 6.Jin K, Teng L, Shen Y et al. (2010) Patient-derived human tumour tissue xenografts in immunodeficient mice: a systematic review. Clin Transl Oncol 12:473–480. doi: 10.1007/s12094-010-0540-6 [DOI] [PubMed] [Google Scholar]
- 7.Hidalgo M, Amant F, Biankin AV et al. (2014) Patient-derived xenograft models: an emerging platform for translational cancer research. Cancer of Breast Cancer Discov 4:998–1013. doi: 10.1158/2159-8290.CD-14-0001 [DOI] [PMC free article] [PubMed] [Google Scholar]
- 8.DeRose ys, wang G, Lin Y-C et al. (2011) Tumor grafts derived from women with breast cancer authentically reflect tumor pathology, growth, metastasis and disease outcomes. Nat Med 17:1514–1520. doi: 10.1038/nm.2454 [DOI] [PMC free article] [PubMed] [Google Scholar]


