

Abstract
Precise genome engineering has become a commonplace technique for metabolic engineering. Also, insertion, deletion and alteration of genes and other functional DNA sequences are essential for understanding and engineering cells. Several techniques have been developed to this end (e.g., CRISPR/Cas-assisted methods, homologous recombination, or λ Red recombineering), yet most of them rely on the use of auxiliary plasmids, which have to be cured after the editing procedure. Temperature-sensitive replicons, counter-selectable markers or repeated passaging of plasmid-bearing cells have been traditionally employed to circumvent this hurdle. While these protocols work reasonably well in some bacteria, they are not applicable for other species or are time consuming and laborious. Here, we present a fast and versatile protocol of fluorescent marker-assisted genome editing in Pseudomonas putida, followed by clean curing of auxiliary plasmids through user-controlled plasmid replication. One fluorescent marker facilitates identification of genome-edited colonies, while the second reporter enables detection of plasmid-free bacterial clones. Not only is this protocol the fastest available for Pseudomonas species, but it can be easily adapted to any type of genome modifications, including sequence deletions, insertions, and replacements.
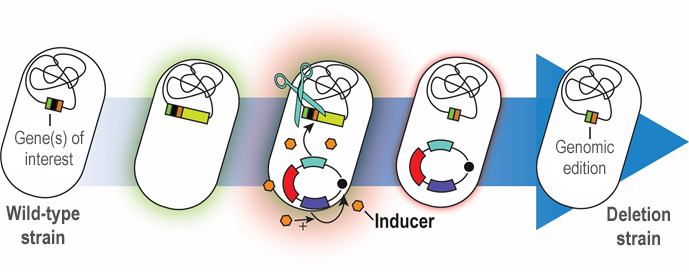
Graphical abstract:
Rapid genome engineering of Pseudomonas with curable plasmids
Keywords: Genome engineering, Synthetic biology, Pseudomonas, Synthetic plasmid replication, Metabolic engineering, Gram-negative bacteria
Background
Targeted, precise genomic manipulation techniques have considerably advanced the field of microbial engineering. Such methods not only allow for assessing genotype-phenotype relationships, but also enable complex engineering of microbial cell factories. In recent years, CRISPR/Cas9 approaches have paved the way for precise genome engineering in eukaryotes. In bacteria, the use of CRISPR/Cas9 is mainly limited to its value as a counter-selection tool, as bacteria lack non-homologous end-joining to repair the double-strand breaks induced by the Cas9 nuclease. Therefore, engineering efforts in many bacteria rely on homologous recombination (HR) to alter the genome. The advantage of HR is that a broad range of alterations can be introduced in the target genome. Furthermore, it is applicable not only to the so-called model organisms, e.g., Escherichia coli and Saccharomyces cerevisiae, but also finds wide spread application in non-traditional hosts, e.g., Pseudomonas species. In this protocol, we provide a workflow for HR-based genome engineering of P. putida – paired with an advanced toolbox that includes several resistance markers – facilitated by the use of fluorescent markers that enable monitoring of every step ( Wirth et al., 2020 ). The presented methodology relies on the co-integration of a suicide plasmid [controlled by the pir-dependent origin of replication ori(R6K)] at the locus of interest. The co-integration locus is determined by two homologous arms (HAs) on the suicide plasmid, which can be freely chosen by the user to mediate HR. A resolving step forces a second HR event that leads to removal of the plasmid backbone from the genome. This step is triggered by the action of the homing endonuclease I-SceI, acting on two recognition sequences that flank the homologous regions within the backbone of the suicide plasmid. The gene encoding I-SceI is supplied in trans from a helper plasmid, introduced into the cells after co-integration of the suicide plasmid. Our recently developed method facilitates rapid curing of this auxiliary plasmid through a synthetic, controllable replication mechanism ( Volke et al., 2020 ) dependent on the presence of 3-methylbenzoic acid (3-mBz). Therefore, plasmid replication can be tightly regulated by the user by merely supplementing or omitting the inducer molecule in the culture medium. Plasmid curing is further aided by the expression of a fluorescent marker from the auxiliary vector, which is compatible with the reporter gene employed in the suicide plasmid. To broaden the use of this method, we developed different versions of the involved plasmids with several antibiotic resistance markers.
Materials and Reagents
Material
Pipette tips (1,000 μl, 200 μl, 10 μl) (Sartorius, catalog numbers: 7902020, 790012, 791002)
Sterile Petri dishes (Ø = 90 mm) (HiMedia Laboratories, catalog number: PW001)
Eppendorf tubes (Tarsons Products, 1.5 ml, 2.0 ml)
50-ml conical tubes (Sarstedt, catalog number: 62.547.205)
Electrocuvettes, 0.1-cm gap for E. coli (Bio-Rad, Gene Pulser, catalog number: 165-2089) and 0.2-cm gap for Pseudomonas (Bio-Rad, Gene Pulser, catalog number: 165-2086)
Sterile 0.2-μm syringe filters (Sigma-Aldrich)
Reagents
3-Methylbenzoic acid (synonym m-toluic acid) (3-mBz; Sigma-Aldrich, ReagentPlus, catalog number: T36609)
Sucrose (Sigma-Aldrich, Milipore, catalog number: 84100)
Lysogeny broth (LB) (Sigma-Aldrich, catalog number: L3522); preparation according to the manufacturer’s instructions, storage for up to three weeks at room temperature
Agarised LB (Sigma-Aldrich, catalog number: L3147); preparation according to the manufacturer’s instruction, storage for up to two months at 4 °C
SOC medium (Sigma-Aldrich, catalog number: S1797)
Kanamycin (TH-Geyer, catalog number: T832.3)
Gentamicin (Sigma-Aldrich, catalog number: G1264)
Streptomycin (Sigma-Aldrich, catalog number: S6501)
Ampicillin (Mitolab, catalog number: K029)
Oligonucleotides (Integrated DNA Technologies, Leuven, Belgium)
Uracil-specific excision reagent (NEB Biolabs, USER enzyme, catalog number: M5505)
DNA polymerase (Thermo Fisher Scientific, Phusion U Hot start, catalog number: F555)
DNA polymerase reaction mix for colony PCRs including (NEB Biolabs, OneTaq® Hot Start Quick-Load® 2× master mix with standard buffer, catalog number: M0488L)
Reagents to prepare chemically competent E. coli cells (Zymoresearch, Mix & Go!; catalog number: T3001)
Escherichia coli DH5α λpir [endA1 hsdR17 glnV44 (supE44) thi-1 recA1 gyrA96 relA1 φ80dlac∆(lacZ)M15 ∆(lacZYA-argF)U169 zdg-232::Tn10 uidA::pir+] ( Platt et al., 2000 )
P. putida KT2440 (strain ATCC 47054/DSM 6125/NCIMB 11950) ( Belda et al., 2016 )
Sequencing kit (Eurofins, Mix2Seq Kit OVERNIGHT, catalog number: 3094-0ONMSK)
Plasmid purification kit (Macherey-Nagel, NucleoSpin Plasmid, catalog number: 740588)
Gel and PCR Clean-up Kit (Macherey-Nagel, NucleoSpin™ Gel and PCR Clean-up Kit, catalog number: 740588)
Optional: DpnI (Thermo Fisher Scientific, FastDigest DpnI, catalog number: FD1703)
Agarose (Bio-Rad, Certified Molecular Biology Agarose, catalog number: 1613102); prepare at 1% (w/v) in 1× TAE buffer for gel electrophoresis (use microwave heating to dissolve). Can be stored at 60 °C to keep molten for immediate use
Fluorescent nucleic acid staining solution (Intronbio, Red safe, catalog number: 21141)
DNA ladder (Thermo Fisher Scientific, GeneRuler 1 kB, catalog number: SM0314)
3-Methylbenzoic acid (3-mBz) solution (500 mM) (see Recipes)
Sucrose solution (300 mM) (see Recipes)
Polymerase chain reaction (PCR) reagents (see Recipes)
Electro-competent Pseudomonas cells (see Recipes)
Antibiotic stock solutions (see Recipes)
Equipment
Electroporator (Bio-Rad, MicroPulser, catalog number: 1652100)
Transilluminator (Thermo Fisher Scientific, Safe Imager 2.0 Blue Light, catalog number: G6600)
Table centrifuge, used for 1.5- and 2-ml reaction tubes (VWR, model: Microstar 17R, catalog number: 521-1647)
Table centrifuge, used for 50-ml reaction tubes (Thermo Fisher Scientific, model: Heraeus Multifuge X1R, catalog number: 75004250) with rotor (Thermo Fisher Scientific, model: TX-400, catalog number: 75003181) and buckets (Thermo Fisher Scientific, catalog number: 75003655) and adaptors (Thermo Fisher Scientific, catalog number: 75003683)
Termoblock (Eppendorf, model: Thermo Mixer C, catalog number: 5382000015)
pH-meter (Thermo Fisher Scientific, model: FE150pH, catalog number: S35924)
Agarose chamber, gelcaster, combs and power supply (Bio-Rad, Mini-sub Cell GT system & Power pack, catalog number: 1645050)
Gel visualization (Bio-Rad, Gel Doc XR+ Gel Documentation System, catalog number: 1708195EDU)
PCR thermocycler (Eppendorf, Mastercycler Nexus X2 Thermocycler, catalog number: 6336000015)
Software
AMUSER [http://www.cbs.dtu.dk/services/AMUSER ( Genee et al., 2015 )]
DNA sequence design tool for example Benchling or Geneious (Biomatter Ltd.)
Procedure
-
Cloning of integration vector
A suicide plasmid for specific genomic manipulations is composed of a universal pSNW plasmid backbone (see Table 1), an upstream homology arm (HA1), if applicable: a DNA sequence to be inserted at the target site, and a downstream homology arm (HA2) (Figure 1). Each of these fragments is PCR-amplified. Thus, three to four pairs of primers are required per construct.
Table 1. Suicide plasmids for co-integration.
Plasmid Antibiotic resistance Fluorescent marker pSNW2 Kanamycin GFP pSNW4 Streptomycin GFP pSNW5 Tetracycline GFP pSNW6 Gentamicin GFP -
Identify the sequence of the two regions flanking the target gene or locus on the chromosome of P. putida.
The upstream homologous arm (HA1, see Figure 1) spans from 500-700 bp upstream of the chromosomal target to the first base of the sequence that is to be deleted or edited, or the integration site. The downstream homologous arm (HA2, see Figure 1) conversely starts after the last base of the chromosomal target and ends 500-700 bp further downstream.
Tip: We recommend leaving the START and STOP codons of the target gene intact and deleting only the interjacent sequence to minimize the chance of polar effects due to gene deletions and to avoid the potential creation of toxic, truncated polypeptides.
-
Design primers for the construction of the application-specific pSNW plasmid
Plasmids from the pSNW series can be linearized for USER cloning using the same pair of primers for every procedure (pSNW-USER_F: 5’-AGT CGA CCU GCA GGC ATG CAA GCT TCT-3’, and pSNW-USER_R: 5’-AGG ATC UAG AGG ATC CCC GGG TAC CG-3’; dU residues highlighted in red in the primer sequences), so that only insert-specific primers need to be designed for every genomic manipulation.
Open the AMUSER online software (http://www.cbs.dtu.dk/services/AMUSER/) and enter the sequence of each fragment comprising the pSNW plasmid insert identified in STEP 1 (HA1, HA2, and, if applicable: integration fragment) in FASTA format (including a header preceded by “>” and a DNA sequence). At STEP 2: Output construct, select linear and click on Submit query. The primer sequences from the AMUSER report can directly be used for the amplification of the fragments. Add the motif 5’-AGA TCC U-3’ as the primer overhang to the forward primer of HA1, and 5’-AGG TCG ACU-3’ as overhang to the reverse primer of HR2. These two overhangs match the ones that have been used to linearize vector pSNW.
Tip: Standard cloning procedures can be also established for Gibson Assembly or Golden Gate cloning to streamline the process.
One standard set of primers can be used to check for the correct insert size after construction of the pSNW derivative in colony PCR, as well as to sequence the insert region. The two primers bind within the pSNW backbone immediately upstream (pSNW_seq_F: 5’-TGT AAA ACG ACG GCC AGT-3’) and downstream (pSNW_seq_R: 5’-CTT TAC ACT TTA TGC TTC CGG-3’) of the insert region, respectively.
-
Design primers for genotyping after the genome manipulation
Design one pair of primers binding within a range of 50 bp upstream of HA1 and 50 bp downstream of HA2 in the genome, respectively. These primers are used to test for the cells’ genotype after the recombination step via integration of vector pSNW. For small insertions or modifications that do not alter the total length of the sequence comprising both HAs, an additional primer that specifically binds within the insertion/modification is helpful to identify the engineered genotype.
-
Amplification of regions by PCR
We recommend using a ‘touchdown’ temperature protocol ( Don et al., 1991 ) for each PCR amplification (see Table 2), as it circumvents the needs for optimizing the annealing temperature and leads to higher yields and specificity (Korbie and Mattick, 2008). Amplify vector pSNW using 5 ng of plasmid, mini-prep isolated to increase template concentration and purity, and primers pSNW-USER_F and pSNW-USER_R using the Phusion U Hot Start DNA polymerase (see Recipe 3). Use the temperature protocol illustrated in Table 2, with an elongation time of 3 min. Adopt the same temperature protocol to amplify each of the fragments constituting the pSNW insert, only adjusting the duration of the extension steps according to the amplicon lengths. Utilise purified genomic Pseudomonas DNA with the appropriate primer pairs to generate the HR1 and HR2 fragments. Perform, if needed, additional PCRs to generate the DNA fragments required for insertions.
Tip: We recommend to gel-purify the linearized pSNW fragment using a gel and PCR clean-up kit according to the manufacturer’s instructions. By using the purified product as template for future PCRs, digestion with DpnI to remove circular plasmids (i.e., template) can be omitted. We further recommend generating a large amount of linearized pSNW vector in several parallel PCRs for repeated usage in USER cloning.
Table 2. Touchdown temperature protocol for Phusion U PCR .
Initial denaturation Touchdown phase Enrichment phase Hold Denaturation Annealing Extension Denaturation Annealing Extension 98 °C 98 °C 68 °C(-1 °C per cycle)72 °C 98 °C 58 °C 72 °C 12 °C 30 s 10 s 15 s 20 s/kb 10 s 15 s 20 s/kb ∞ 10 cycles 27 cycles -
Check PCRs on agarose gel
Analyse a 3-μl aliquot of each PCR by agarose gel electrophoresis [1% (w/v) agarose and 1× fluorescent nucleic acid gel stain in 1× TAE buffer] to verify the correct amplification of the fragments. The relative amplicon concentrations can be semi-quantitatively estimated from the intensities of their bands. If agarose gel electrophoresis reveals the presence of non-specific by-products, the desired bands have to be excised from the gel and purified prior to cloning using a gel and PCR clean-up kit according to the manufacturer’s instructions. If the product appears clean, the PCR reaction can be directly used in the assembly reaction.
-
USER reaction
In a PCR tube, combine equimolar amounts of all fragments (HR regions, insert and backbone) in 10 µl with a total amount of around 50 ng. Add 1 µl of 1 U µl–1 USER enzyme. Set up a thermocycler and run a reaction program as follows: deoxyuracil excision: 30 min at 37 °C; annealing 1: decrease from 28 °C to 18 °C with -2 °C per step of each 3 min; annealing 2: 10 min and hold at 10 °C.
!!! If a plasmid was used as template for the amplification of one of the fragments that contains the same antibiotic resistance as the employed pSNW vector, add 0.5 µl of FastDigest DpnI to the reaction mix prior to incubation at 37 °C !!!
-
Transformation of E. coli DH5α λpir cells
Transform 50 µl (or 100 µl) aliquots of chemically-competent E. coli DH5α λpir cells with 5 µl (or 10 µl) of the assembly reaction from the previous step. To prepare competent cells and transform them with assembled plasmids, we recommend using the Mix & Go! E. coli Transformation Buffer Set (Zymo Research) and the associated protocol. After delivery of the plasmid into the cells (via heat-shock or incubation, see Mix & Go! Instruction manual), add 1 ml of SOC medium and incubate for 1 h at 37 °C with gentle shaking at 200-300 rpm. Pellet the cells at 10,000 × g for 1 min, resuspend in 50-100 µl of SOC medium and plate the suspension onto LB agar plates supplemented with the respective antibiotic for the pSNW plasmid.
!!! Critical: It is essential to use an E. coli strain harboring the λ phage-derived pir gene for replication the of ori(RK6) !!!
Tip: If a circular plasmid was used as template in the PCR for linearization of vector pGNW and if the reaction was directly employed for the assembly reaction (rather than using a gel-purified plasmid), spread the transformed E. coli DH5α λpir cells on agar plates containing 5-bromo-4-chloro-3-indolyl-β-D-galactopyranoside (X-Gal) at 40 µg ml–1. The disruption of the pSNW-borne lacZα sequence then allows for the identification of E. coli colonies harbouring “empty” template plasmids via their blue colour in contrast to white colonies, carrying a pSNW with insert.
-
Check for correct insert size
Perform a colony PCR (using One Taq® 2× Master Mix) on eight to ten colonies that show green fluorescence under blue-light exposure (inspect plate with transformed E. coli DH5α λpir on a blue-light transilluminator) with primers pSNW_seq_F and pSNW_seq_R. To this end, prepare 50 µl of a 1× master mix by mixing 25 µl of OneTaq® 2× Master Mix with 23 µl DNAse-free water and 1 µl of each primer (scale up if necessary). Transfer 6 µl of the 1× master mix into PCR tubes and add a small amount of biomass from the E. coli colonies grown on the culture plate. Run a PCR with the following temperature protocol (Table 3, adjust the elongation time according to the expected insert size).
!!! For E. coli, P. putida and many other bacteria, small amounts of biomass from colonies can be directly transferred with a pipette tip or inoculation loop to the reaction mix (avoid transferring agar from the plate to the reaction mixture, as it will inhibit the amplification). For some bacteria, it might be necessary to boil biomass in water and dilute before colony PCR for good amplification results !!!
Table 3. Touchdown temperature protocol for OneTaq colony PCR.
Initial denaturation Touchdown phase Enrichment phase Hold Denaturation Annealing Extension Denaturation Annealing Extension 94 °C 94 °C 62 °C(–1 °C per cycle)68 °C 94 °C 52 °C 68 °C 12 °C 30 s 20 s 30 s 1 min/kb 20 s 30 s 1 min/kb ∞ 10 cycles 27 cycles -
Check colony PCRs on agarose gel
Analyse a 3-μl aliquot of each PCR by agarose gel electrophoresis [1% (w/v) agarose in 1× TAE buffer] to verify the correct insert size.
-
Verify insert sequence integrity by sequencing
If no band other than that of the expected size is visible in the agarose gel, the reaction sample can directly be sent out for sequencing. For this, mix 0.5 μl of the PCR reaction with 14.5 μl of DNase-free water and 2 μl of the primer pSNW_seq_F or pSNW_seq_R (one sequencing sample for each primer and each E. coli clone) in a barcoded tube from a Mix2Seq kit and send the tubes for sequencing. If non-specific bands appeared in the agarose gel, inoculate 3-5 ml of LB medium (add the corresponding antibiotic) in 50-ml centrifuge tubes with three individual clones that were tested for a correct insert size. Incubate the cultures at 37 °C for 12-18 h in a shaking incubator at 180-250 rpm (depending on the type of incubator). Purify plasmid DNA from the E. coli cultures and send the purified plasmid DNA for sequencing. Use a sequence-verified plasmid for the subsequent procedure in P. putida.
-
-
Integration of suicide plasmid into desired genome locus
-
Transformation of P. putida
Follow the recipe for preparing electro-competent Pseudomonas cells (Recipe 4). Electroporate the cells with 300-500 ng of the previously constructed pSNW plasmid (see Procedure A). Figure 2 presents an overview of the procedure described in this section.
Tip: If the strain has a low competence or the plasmid has a low integration efficiency, triparental conjugation can be used instead of electroporation. See protocols in Martínez-García and de Lorenzo (2011), Sánchez-Pascuala et al. (2017) and Durante-Rodríguez et al. (2018) for further details.
-
Plating
Plate on LB agar with either kanamycin for pSNW2; gentamicin for pSNW6 or streptomycin for pSNW4 and incubate the plates at 30 °C for ~16 h. The growth conditions may have to be adjusted depending on the strain to be edited. Grown colonies should be big enough to identify fluorescence on a blue-light transilluminator and to be easily picked with an inoculation loop.
-
Fluorescence check on transilluminator
Colonies with the suicide plasmid integrated should display green fluorescence (Figure 3A). Mark several fluorescent colonies for the further steps.
Tip: Fluorescence increases significantly over time after plating due to maturation of the fluorophore. Therefore, plates can be incubated for an extended time at room temperature or at a lower temperature (4 °C) to increase the signal. Usually, all antibiotic-resistant colonies should display green fluorescence. The (unlikely) absence of fluorescence may indicate the presence of contaminations.
-
-
Resolving of co-integration
-
Propagation of confirmed co-integrant and transformation with pQURE plasmid
Pick up to six co-integrant colonies, verified by fluorescence, and transfer their biomass together into 10 ml of LB medium in a 50-ml centrifuge tube with the appropriate antibiotic. Incubate at 30 °C for ~16 h with shaking. Prepare the culture for electroporation, and use ~10 ng of pQURE plasmid (Table 4). Add 3-mBz at 2 mM directly to the recovery medium.
!!! Choose a pQURE variant whose antibiotic resistance is compatible with the employed suicide plasmid and organism (i.e., no natural resistance and not the same antibiotic resistance marker as used for pSNW) !!!
!!! Critical: Omit the antibiotic used to select for pSNW co-integration from now on, otherwise mutations within pSNW are selected which rules out its successful resolution !!!
Table 4. Plasmids for resolving of co-integration.
Plasmid Antibiotic resistance Fluorescent marker pQURE·1 Ampicillin RFP pQURE·2 Kanamycin RFP pQURE·6 Gentamicin RFP -
Induce double strand break and homologous recombination event
Continue culturing the cells for 2 h before adding the appropriate antibiotic to select for pQURE. After 1-3 additional hours, either (i) plate a volume of 70 μl onto LB agar supplemented with 2 mM 3-mBz and the appropriate antibiotic to select for pQURE and incubate the plate overnight at 30 °C, and/or (ii) pass the suspension on to 10 ml of selective LB medium with 2 mM 3-mBz and continue incubation at 30 °C with shaking for about 16 h.
Tip: The longer the growth in selective liquid medium, the higher the resolving efficiency and the lower the chance to obtain genetically heterogeneous colonies containing revertants and cells with the desired genetic alteration. The resolving efficiency can vary strongly between different loci.
-
Isolating single mutants
If (ii) was chosen in the previous step, perform a dilution streak of the culture on selective (for pQURE) solid medium with 2 mM 3-mBz.
Tip: You want dozens of isolated colonies. You can perform multiple dilution streaks from once culture on a single plate to increase the numbers of isolated colonies.
-
Check fluorescence on a blue-light transilluminator
Resolved colonies do not display green fluorescence and should appear red under blue-light exposure (from the RFP encoded on pQURE, Figure 3B and 3C). In general, the majority of colonies will be resolved. Mark several colonies without green fluorescence for further analysis.
!!! Critical: 3-mBz in the plates is slowly degraded by some microbes, e.g., P. putida, leading to a brown coloration of the colonies and the surrounding medium. The brown pigment produced conceals the colonies’ fluorescence after prolonged storage (several days to weeks) and therefore, the colonies should be marked immediately !!!
-
Check genome editing in resolved colonies
Check the locus of interest with the genotyping primers designed in A3 via colony PCR (see A8 and Table 3) for at least eight colonies. For genomic deletions or insertions, the amplicon size differs for the two genotypes and thus allows for their identification. For small insertions or sequence replacements, a primer specific for the modified sequence together with the external primer binding on the opposite strand will yield a product only for modified genotypes. The ratio of revertants, i.e., unmodified genotype, and modified genotype can vary greatly, depending on either a fitness advantage for one of the two genotypes or the sequence context of the modified locus.
Tip: An aliquot of the amplified region can be directly used for sequencing. For this, add 0.5 μl of the PCR product to 14.5 μl of DNAse-free water and 2 μl of the respective primer used for its amplification. For genomic manipulations that cause a severe detriment to the bacterium’s growth, the use of CRISPR/Cas9 counter selection can facilitate in obtaining the desired mutant genotype [please refer to Wirth et al. (2020) and Volke et al. (2020) for details].
-
-
Curing of auxiliary plasmid
-
Propagate a colony with the desired genotype
Inoculate 10 ml of LB medium without any additives (neither antibiotics nor 3-mBz) with biomass from a single colony. Incubate the culture at 30 °C until it reaches stationary phase (typically overnight).
Tip: It is advantageous to use as little biomass as possible to allow for a maximum number of replications of the cells in liquid LB medium.
-
Selection of the cured strain
Make a dilution streak of the culture on an LB plate without antibiotic or 3-mBz to obtain isolated colonies. Incubate the plate at 30 °C for ~16 h. Plasmid-cured strains can be identified on a blue-light transilluminator by the absence of red fluorescence.
Tips:
The wavelengths created by the blue-light transilluminator are not optimal for RFP visualization. Thus, high amounts of matured RFP are needed. Since the maturation time of RFP is long, incubation of the plate at 4-8 °C for several hours is helpful to increase the fluorescence intensity. The signal matures during the course of several days and can even be seen with the naked eye after incubating the plate for 2 days at 4 °C.
Use of a light source with a wavelength closer to the excitation maximum of RFP (i.e., 558 nm) increases the fluorescence signal significantly, enabling the selection of colonies with relatively low RFP levels.
-
Storage of cured, engineered strain
Inoculate 10 ml of LB medium with the cured colony. After incubation at 30 °C for ~16 h, you can either store the strain or proceed working with it.
-
Figure 1. Designing integration vectors for genome manipulations.

In this example, we illustrate the construction of a plasmid for deleting gene(s) xyz on the chromosome of P. putida. First, the pSNW plasmid backbone as well as the two homology arms flanking xyz (HA1 and HA2) are amplified with Phusion U DNA polymerase, thereby introducing complementary, homologous overhangs containing a single deoxyuridine nucleoside (dU). The amplicons are combined and digested with the uracil excision reagent (USER), leading to the removal of dU to create single-stranded overhangs. After a subsequent annealing of the fragments, the plasmid is delivered into chemical-competent E. coli DH5α λpir cells.
Figure 2. Overview of the genome editing procedure.

1a) P. putida is transformed with a suicide plasmid from the pSNW series. 1b) Genomic integration of the vector is enforced by plating on selective medium. 1c) The genome integration is confirmed via green fluorescence of antibiotic-resistant colonies. 2a) Confirmed co-integrants are propagated in selective medium and electroporated with an auxiliary plasmid from the pQURE series. 2b) The co-integration is resolved via the expression of I-SceI from pQURE. 2c) Single colonies from suspension are obtained by dilution-streaking and 2d) the resolution of co-integration is confirmed by the absence of GFP-fluorescence. 2e) The genotype of selected colonies is confirmed by colony PCR; colonies can be either revertants or carry the desired genome alteration. 3a) A modified clone is propagated in non-selective medium. 3b) Single colonies are obtained by dilution-streaking and clones that have lost pQURE are identified by the absence of red fluorescence.
Figure 3. Exemplary plates for different steps of the genome engineering process.

A. Colonies of P. putida after co-integration of the suicide plasmid display green fluorescence (marked with green circles) after ~24 h of incubation. B. Resolved culture after ~18 h of incubation. Most colonies display a slightly red colour (marked with green circles). Only a few show green fluorescence (marked with a red circle). The latter still contain the co-integrated plasmid. C. Culture plate with cured colonies after ~24 h of incubation. Several resolved colonies without red fluorescence (highlighted with green circles) are kept for further analysis.
Recipes
-
3-Methylbenzoic acid (3-mBz) solution (500 mM)
Ingredients Per 250 ml
3-Methylbenzoic acid 17 g
Add 3-mBz into 200 ml of distilled water
Stir vigorously with a magnetic stirrer and insert pH-probe
Add drop-wise 5 M NaOH solution until all 3-mBz is dissolved and the pH reaches 7.0
Fill up to 250 ml with distilled water
Sterile-filter the solution with a 0.2-μm filter
Note: Solution can be stored at room temperature for several months. 3-mBz is added in a 1:500-ratio to culture media immediately before use. Let molten agar cool down to ~50 °C before adding 3-mBz and immediately cast plates.
-
Sucrose solution (300 mM)
Ingredients Per 500 ml
Sucrose 52.3 g
Add sucrose into 400 ml of distilled water
Stir vigorously with magnetic stirrer until dissolved
Fill up with distilled water to 500 ml
Sterile-filter with a 0.2-μm filter
Note: Solution can be stored at room temperature for several months. Aliquoting (50 ml) is recommended to prevent contamination.
-
Polymerase chain reaction (PCR)
Ingredients Per 50 μl [μl]
Phusion U 0.5
dNTPs 1
Buffer HF 10
DMSO 1.5
Oligonucleotides 2.5 each
Template 10 ng plasmid (or biomass)
H2O Fill up to 50 μl
-
Electro-competent Pseudomonas cells
Inoculate 10 ml of LB medium with a single colony in a 50-ml tube.
-
Grow the culture for ~16 h at 30 °C in a shaking incubator (200-250 rpm).
Note: All of the following steps are performed at room temperature, if not otherwise stated.
Harvest the cells by centrifugation (4,000 × g; 10 min, room temperature), resuspend in 1 ml of 300 mM sucrose and transfer into a microreaction tube (1.5 ml or 2 ml).
Pellet the cells by centrifugation (10,000 × g, 1 min, room temperature) and resuspend in 1 ml of the sucrose solution.
Repeat the washing step (resuspension and centrifugation) two times. Finally, resuspend the pellet in 400 μl of 300 mM sucrose. The cell suspension can be stored for several hours on ice before use or transformed directly.
Mix 100 μl of cell suspension with 10 ng or >200 ng DNA for replicated or suicide plasmids, respectively. Electroporate (2.5 kV, 25 μF capacitance, 200 Ω resistance), immediately add 1 ml of LB medium and transfer the suspension into a test tube (recommended: 14-ml round bottom test tube). Recover the cells for 2 h at 30 °C with shaking at 200-250 rpm.
Note: In the following steps, you can either plate the culture to obtain single transformants or transfer the suspension into selective liquid medium, if isolated clones are not needed.
-
Antibiotic stock solutions
Kanamycin: Dissolve 0.5 g of kanamycin in 10 ml of MilliQ water.
Gentamicin: Dissolve 0.1 g of gentamicin in 10 ml of MilliQ water.
Streptomycin: Dissolve 0.5 g of streptomycin in 10 ml of MilliQ water.
Note: Sterile-filter the solution and aliquot at volumes of 1 ml. Solutions can be stored at -20 °C for several months. Add antibiotic stock solution to liquid and solid media immediately before use in a 1:1,000 ratio. Let molten agar cool down to ~50 °C before adding antibiotics and immediately cast plates.
Acknowledgments
The authors thank all members of the laboratory for testing the protocol and for useful suggestions for improvement, especially to Laura Friis who was involved in developing the prototype on which this protocol is based. This work was financially supported by the Novo Nordisk Foundation (NNF10CC1016517 and NNF18CC0033664), the Danish Council for Independent Research (SWEET, DFF-Research Project 8021-00039B), and the European Union’s Horizon2020 Research and Innovation Program under grant agreement No. 814418 (SinFonia). This protocol has been adapted from Volke et al. (2020).
Competing interests
The authors declare there are no potential conflicts of interest.
Citation
Readers should cite both the Bio-protocol article and the original research article where this protocol was used.
References
- 1. Belda E., van Heck R. G. A., López-Sánchez M. J., Cruveiller S., Barbe V., Fraser C., Klenk H. P., Petersen J., Morgat A., Nikel P. I., Vallenet D., Rouy Z., Sekowska A., Martins dos Santos V. A. P., de Lorenzo V., Danchin A. and Médigue C.(2016) The revisited genome of Pseudomonas putida KT2440 enlightens its value as a robust metabolic chassis . Environ Microbiol 18(10): 3403-3424. [DOI] [PubMed] [Google Scholar]
- 2. Don R. H., Cox P. T., Wainwright B. J., Baker K. and Mattick J. S.(1991).'Touchdown' PCR to circumvent spurious priming during gene amplification. Nucleic Acids Res 19(14): 4008-4008. [DOI] [PMC free article] [PubMed] [Google Scholar]
- 3. Durante-Rodríguez G., de Lorenzo V. and Nikel P. I.(2018). A post-translational metabolic switch enables complete decoupling of bacterial growth from biopolymer production in engineered Escherichia coli . ACS Synth Biol 7(11): 2686-2697. [DOI] [PubMed] [Google Scholar]
- 4. Genee H. J., Bonde M. T., Bagger F. O., Jespersen J. B., Sommer M. O., Wernersson R. and Olsen L. R.(2015). Software-supported USER cloning strategies for site-directed mutagenesis and DNA assembly. ACS Synthetic Biology 4(3): 342-349. [DOI] [PubMed] [Google Scholar]
- 5. Korbie D. J. and Mattick J. S.(2008). Touchdown PCR for increased specificity and sensitivity in PCR amplification. Nat Protoc 3(9): 1452-1456. [DOI] [PubMed] [Google Scholar]
- 6. Martínez-García E. and de Lorenzo V.(2011). Engineering multiple genomic deletions in Gram-negative bacteria: analysis of the multi-resistant antibiotic profile of Pseudomonas putida KT2440 . Environ Microbiol 13(10): 2702-2716. [DOI] [PubMed] [Google Scholar]
- 7. Platt R., Drescher C., Park S. K. and Phillips G. J.(2000). Genetic system for reversible integration of DNA constructs and lacZ gene fusions into the Escherichia coli chromosome . Plasmid 43(1): 12-23. [DOI] [PubMed] [Google Scholar]
- 8. Sánchez-Pascuala A., de Lorenzo V. and Nikel P. I.(2017). Refactoring the Embden-Meyerhof-Parnas pathway as a whole of portable GlucoBricks for implantation of glycolytic modules in Gram-negative bacteria. ACS Synthetic Biology 6(5): 793-805. [DOI] [PMC free article] [PubMed] [Google Scholar]
- 9. Volke D. C., Friis L., Wirth N. T., Turlin J. and Nikel P. I.(2020). Synthetic control of plasmid replication enables target- and self-curing of vectors and expedites genome engineering of Pseudomonas putida . Metabolic Engineering Communications 10: e00126. [DOI] [PMC free article] [PubMed] [Google Scholar]
- 10. Wirth N. T., Kozaeva E. and Nikel P. I.(2020). Accelerated genome engineering of Pseudomonas putida by I-SceI-mediated recombination and CRISPR-Cas9 counterselection . Microb Biotechnol 13(1): 233-249. [DOI] [PMC free article] [PubMed] [Google Scholar]