Abstract
Transcardiac perfusion with saline followed by 4% paraformaldehyde (PFA) is widely used to clear blood and preserve brain for immunostaining or in situ hybridization. PFA breaks into formaldehyde in solution, which cross-link protein and DNA molecules to preserve tissue and cell structure. Here we provide a step by step guide for performing this procedure in mouse.
Keywords: Mouse, Transcardiac perfusion, Aorta, Paraformaldehyde, Brain
Materials and Reagents
Protective gear (gloves, goggles, masks, lab coat)
Deionized water
Sodium pentobarbital (Sigma, catalog number: P-010)
1.5% sodium pentobarbital (in saline)
NaCl (Sigma-Aldrich, catalog number: S7653)
Saline (0.9% sodium chloride)
NaH2PO4·2H2O (Sigma-Aldrich, catalog number: 71645)
Na2HPO4·12H2O (Sigma-Aldrich, catalog number: 71663)
Paraformaldehyde (PFA) (Sigma-Aldrich, catalog number: P6148)
NaOH (Sigma-Aldrich, catalog number: S8045)
Hydrochloric acid (HCl) (Sigma, catalog number: H1758)
Heparin (Sigma, catalog number: H3149)
Sodium azide (Sigma, catalog number: S2002)
4% paraformaldehyde (PFA, in 0.1 M Phosphate Buffer, pH 7.0-7.4) (see Recipes)
Equipment
Chemical fume hood
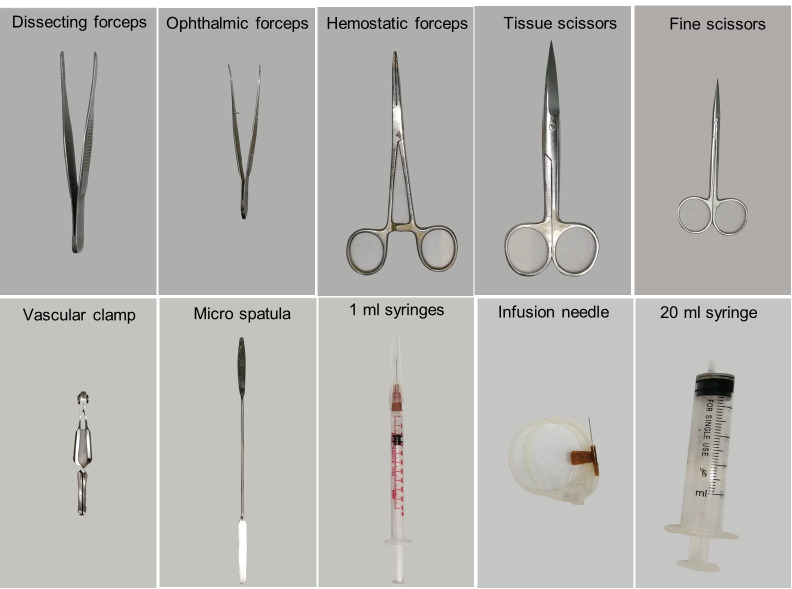
Dissecting forceps (RWD, catalog number: F12018-13) (Figure 1)
Ophthalmic forceps (RWD, catalog number: F12006-10) (Figure 1)
Hemostatic forceps (RWD, catalog number: F21002-12) (Figure 1)
Tissue scissors (RWD, catalog number: S13052-12) (Figure 1)
Fine scissors (RWD, catalog number: S12005-10) (Figure 1)
Vascular clamp (RWD, catalog number: R33001-48) (Figure 1)
Micro spatula (Thermo Fisher, catalog number: 21-101-10) (Figure 1)
1 ml and 20 ml syringe (Figure 1)
25- or 27-gauge infusion needle (Figure 1)
(Optional) Peristaltic pump (LONGERPUMP, catalog number: BT100-2J)
2.5 L and 5 L beakers
Thermometer (measuring range:100 °C, division value:1 °C)
Measuring cylinder
Analytical balance (SARTORIUS, catalog number: BSA124S)
Benchtop vacuum
0.22 μm PVDF filter set (Nalgene, catalog number: 291-4520)
50 ml conical tube (Thermo Fisher, catalog number: 339652)
Fume hood
Microwave
Magnetic stirrer with heating device (SCILOGEX, catalog number: MS7-H550-Pro)
Figure 1. Surgical instruments.
Procedure
-
Preoperative preparation
Measure and record the body weight to the nearest gram.
Pick the mouse up by its tail, place it on top of a cage rack, and gently pull its tail with one hand while allowing it to grab the iron wire firmly to stabilize it at a steady position.
Press the mouse down around the neck with one hand and hold it by the scruff of the neck. Hold as much skin as possible to have a secure grip so that the mouse cannot move during injection.
-
Administer 1.5% sodium pentobarbital at a dose of 0.06 ml per 10 g body weight through intraperitoneal injection at the lower left or right quadra of the abdomen ( Hou et al., 2021 ) (Figure 2).
Note: To avoid injuring the internal organ, do not advance the needle too much. Hold the mouse at a head-down position may also help.
-
Place the mouse back to its cage. Wait ~5 min. Assess if the mouse has reached a surgical plane of anesthesia by loss of response to tail or toe pinches (Reference 4).
Note: For neonatal mouse younger than 6 days of age, anesthesia can be achieved through hypothermia (Behringer et al., 2013). Place mouse pup in a conical tube or wrap it with latex glove (cut off the thumb of the glove for this purpose) and bury it up to the neck in crushed ice for 10-15 min to obtain a surgical pane of anesthesia. Analgesia state lasts ~10 min, thereby do not leave the pup on surgical station for too long. Perform the surgery as soon as possible.
-
(From this step on, please operate in fume hood.) Place the mouse on its back. Firmly tape or pin its four paws to a Styrofoam or wood surgical station so that nothing moves during the perfusion procedure.
Note: If the heart stops beating due to excessive anesthesia, perfusion should be started immediately, preferentially with saline containing 20 units/ml heparin to avoid clotting of blood.
Trim the tip of a 25- or 27-gauge infusion needle to make it slightly blunt (Figure 3) to reduce the risk of puncturing the aorta wall in the following steps (Reference 1). Polish the edges with sandpaper if necessary.
Connect the transfusion needle to a 20 ml syringe filled with saline. Flush the tubing and needle with saline to expel any air.
Fill another 20 ml syringe with 4% PFA solution.
-
Transcardiac perfusion with saline
Grip the skin on the chest with ophthalmic forceps and make an incision using tissue scissors to expose the xiphoid (a piece of arrowhead-shaped white bone).
Grip the xiphoid with ophthalmic forceps and make lateral incisions beneath the ribcage using tissue scissors to expose the diaphragm and liver.
Carefully make incisions in the diaphragm along the entire length of the rib cage using fine scissors.
Make two cuts through both sides of the rib cage up to the collarbone using tissue scissors. Reflect the sternum up over the head of the mouse with hemostat (or pint it to the surgical station, or cut it off) to fully expose the heart and lung (Figure 4).
Carefully tear off pericardial sac and any other tissues covering the heart using dissecting forceps to provide a clear view of the heart and vessels.
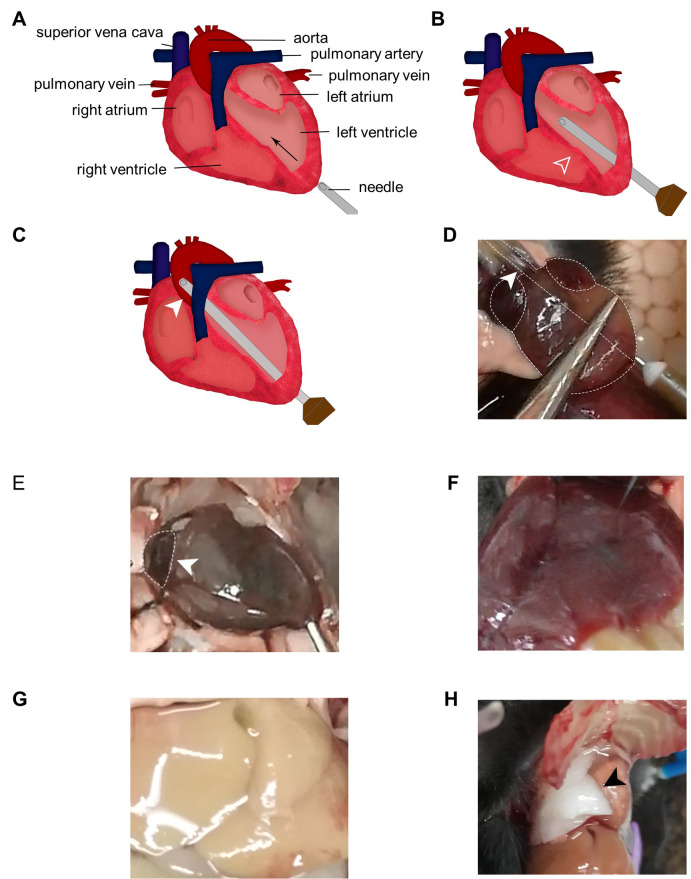
Secure the heart with dissecting forceps at a steady position. Insert the trimmed needle from the tip of the left ventricle at an angle approximately parallel to the midline of the heart (Figure 5A). As the needle tip is blunt, enough pressure needs to be applied to get through the ventricle wall. However, do not push too hard and mind the angle to make sure the needle does not advance into the left atrium or right ventricle. With experience, one will clearly feel the resistance before penetration and the loss of it afterwards. The heart should be beating and one may observe backflow of blood into the needle before perfusion starts.
-
Steadily advance the needle until it enters the ascending aorta. The tip of the needle is visible through the aorta wall (Figure 5B-5D). No resistance should be encountered if the needle moves in the right direction. Secure the needle in the aorta with vascular clamp or hemostatic forceps at appropriate position (arrowhead in Figure 5C).
Notes:
If the needle cannot be successfully inserted into the aorta, leave it in the left ventricle (~5 mm in for adult mouse, shorter for younger mouse; adjust wisely depending on the size of the heart) (Figure 5B), but it has to be secured with pins or tape to avoid slipping out of the heart during perfusion (Video 1). For neonatal pups, the aorta may be too narrow to fit the needle tip and too delicate to clamp, in which case leaving needle tip in the ventricle is preferred.
If the needle advanced too much into right ventricle or even pierce through the heart, withdraw and re-insert the needle promptly. If the wound is not too bad, it may not affect perfusion.
-
Make a small incision on the right atrium using fine scissors. Dark venous blood should flow out immediately. Start the saline perfusion at once at a constant speed of ~1 ml/5 s by manfully pushing the syringe or using a peristaltic pump. As saline flushes out the blood, the liver gradually turns pale (Figures 5E-F).
Notes:
If the needle tip is in the left ventricle instead of aorta, slower perfusion speed is preferred.
If the needle tip goes into right ventricle, one may observe signs of failed perfusion including inflation of lung (Figure 6), liquid dripping out of nose or mouth and incomplete decolor of liver.
Optional: Instead of manual injection, peristaltic pump can be used to better control the perfusion speed.
Stop perfusion when the fluid flowing out is clear of blood. For adult mice, it takes ~20 ml saline.
-
Transcardiac perfusion with 4% PFA (Video 1)
Switch from saline to 4% PFA. Make sure no bubble gets into the perfusion system during the switch ( Gage et al., 2012 ).
Steadily perfuse 4% PFA at a constant speed of ~1 ml/5 s. As PFA goes into circulation, one can observe signs including body twitching, tail flicking and head moving.
Perfuse ~15-20 ml 4% PFA for adult mouse. The whole mouse body should be very stiff and the liver may turns slightly pale brownish (a little bit darker color than it was before 4% PFA perfusion).
Remove the needle and unpin the mouse from the surgical station.
-
Brain dissection (Video 1)
Decapitate the mouse with tissue dissecting scissors (Figure 6, horizontal line). Remove the skin by first making an incision along the midline from the neck to the nose (Figure 6, vertical line) and then reflect the two flaps of skin rostrally and laterally to expose the skull (Figure 6B).
Hold the head tightly with one hand. Trim off bones at the caudal end with dissecting scissors (Figure 6B, dashed line). Clear off any residual muscle on the skull with forceps or scissors. If the 4% PFA was done properly, the brain will shrink a little bit and there will be some space between the brain and the bones forming the foramen magnum.
Slide one blade of the fine scissors into the foramen magnum (underneath the brain) with the sharp side facing the bone on one side. Make a lateral cut. Repeat the cut on the contralateral side. Carefully remove the skull covering the cerebellum with ophthalmic forceps.
-
At the rostral end of the mid-sagittal suture, insert the tip of one blade of the fine scissors between the foramen magnum and the brain with the sharp side facing the bone. Rapidly slide and cut the cranium along the mid-sagittal suture. Carefully remove the skull with forceps to expose the brain. An additional cut may be necessary to expose the olfactory bulb (Figure 6C).
Note: Be careful not to damage the brain during the operation. Peel off any meninges attaching to the skull before removing the bone chips; otherwise it may slice the soft brain tissue.
-
Using a micro spatula (or other flat and blunt tool) to sever the nerve bundle on the ventral surface of the brain and scoop the brain out.
Notes:
Compared to freshly dissected brain (Figure 7A, very soft and full of blood), successfully perfused and fixed brain will shrink a little bit, become harder and appear slightly pale brownish (Figure 7C). Unsuccessful perfusion may leave blood in the brain (Figure 7B) and make it appear pinkish. Post-fix the brain in 4% PFA overnight at 4 °C.
Postfix will further shrink, harden and darken the brain (Figure 7D).
Transfer the brain into PBS containing 0.01% sodium azide for long term storage at 4°C. Alternatively, transfer the brain into 30% sucrose solution, wait until it sinks to the bottom, and store at minus 20-80 °C ( Hou et al., 2021 ).
Figure 2. Intraperitoneal injection.
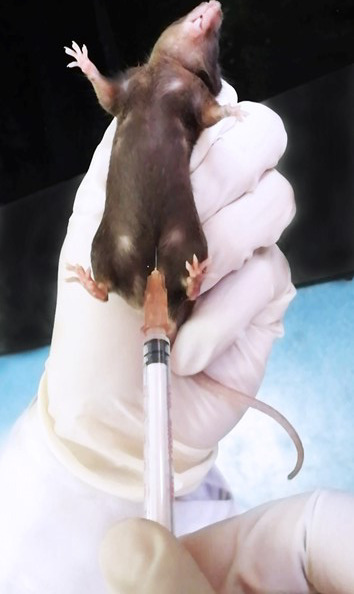
Figure 3. Needle trimming.
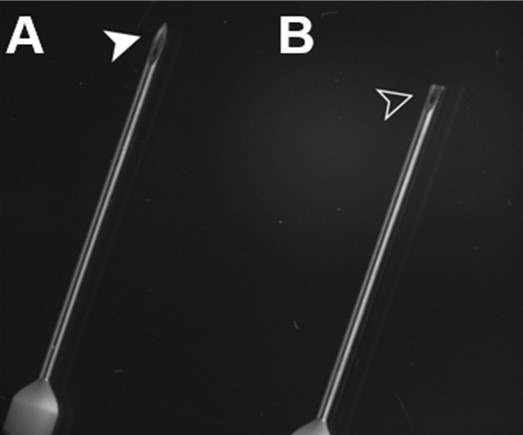
A. Untrimmed needle. B. Trimmed needle.
Figure 4. Thoracotomy.
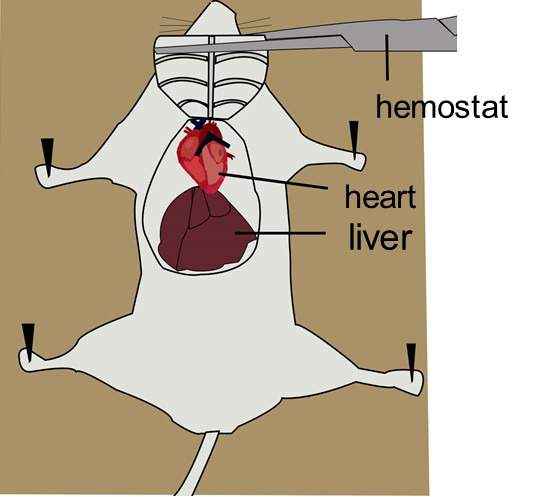
Figure 5. Needle insertion.
A. Position and direction of needle insertion. B. The needle tip can be left in the left ventricle halfway through the heart. Mind the trajectory so that the needle does not pierce through the septum (open arrowhead) into the right ventricles. C. Advance the needle into the aorta and clamp it at appropriate position (closed arrowhead). D. The needle tip is visible through the aortic wall (closed arrowhead). E. Make a small incision in the right atrium (closed arrowhead). F. The liver is filled with blood and appears red before perfusion. G. The liver loses blood and becomes pale after perfusion. H. Improper perfusion leads to accumulation of liquid in the lung and pulmonary edema (black arrowhead).
Video 1. Transcardiac Perfusion of the Mouse.
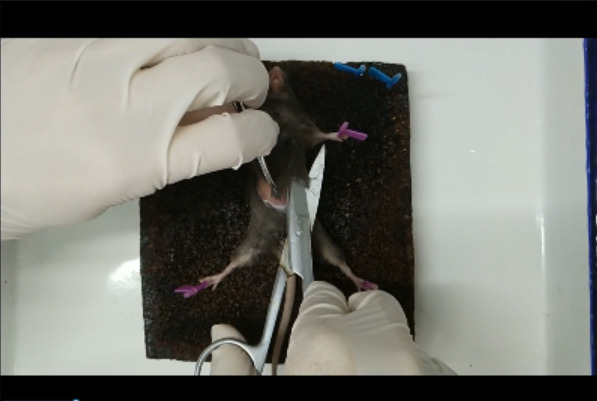
Figure 6. Brain dissection.
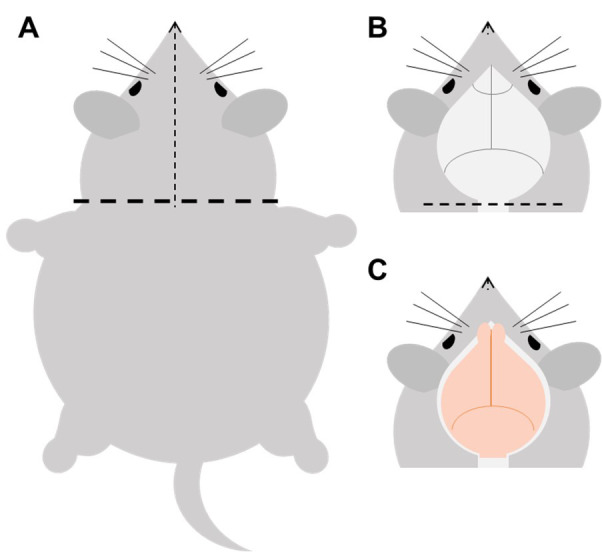
A. Cut the head off, cut the fur from the neck towards the tip of the nose (the dotted line), and expose the skull. B-C. Cut off the skull below the brainstem along the dotted line, and then remove the skull covering the cerebellum and cerebrum in turn to expose the brain tissue.
Figure 7. Representative images of brains dissected out under different conditions.
A. Freshly dissected brain is full of blood and very soft. B. Unsuccessfully perfused brain retains some blood. C. Successfully perfused and fixed brain before post-fixation. D. Brain after post-fixation. Scale bar: 4 mm.
Notes
Table 1. Troubleshooting.
| Problem observed | Possible cause | Solution |
| Fluid flows out from a position other than the right atrium. |
Needle piercing through the heart or aorta |
Withdraw the needle and re-insert it at the right angle and depth |
| Expanded lung; fluid flows out from the mouth and nose | Needle goes into the right ventricle | Withdraw the needle and re-insert it at the right angle and depth |
| Blood in the brain after perfusion; liver does not turn pale |
Ineffective perfusion of saline due to cardiac arrest before operation Blood clotting Air bubble in the perfusion system |
Be careful not to overdose the mouse when administering anesthesia Practice to avoid unnecessary delay during the operation procedure Perfuse with saline containing 20 units/ml heparin Avoid air bubble in the perfusion system |
| Brain is pale but soft after perfusion |
Ineffective perfusion of fixative due to air bubble in the perfusion system, or misplaced needle Low-quality 4% PFA (contains undissolved particles or expired) |
Be careful not to introduce air bubble in the perfusion system when changing from saline to PFA; Adjust the position of the needle Filter PFA with 0.22 μm PVDF; use freshly prepared PFA or properly stored PFA (for more details, please refer to the appendix) |
Recipes
-
4% paraformaldehyde (Table 2)
Precaution! Wear protective gear including goggles, mask, gloves and lab coat in the whole process.
Wash the measuring cylinder and beaker with deionized water.
Weigh 12.481 g NaH2PO4·2H2O and 114.605 g Na2HPO4·12H2O with an analytical balance.
Dissolve the salts in 2 L deionized water in a 2.5 L beaker with magnetic stirrer until the solution became clear.
Heat up the phosphate buffer to ~60 °C using microwave or heater.
Weigh 160 g PFA powder with analytical balance. Carefully add the PFA powder into the bottom of a 5 L beaker placed on a magnetic stirrer with heating device in a chemical fume hood.
-
Slowly pour the preheated phosphate buffer into the beaker with PFA while stirring. Adjust the heat setting to keep the buffer at a temperature between 50 and 60 °C. Stir the solution until PFA is fully dissolved which may take several hours. Use a thermometer to monitor the temperature throughout the whole process.
Note: 5 mol/L(N) NaOH solution can be added dropwise to raise the pH and help dissolving PFA, but equimolar HCl should be added to bring back the pH. Prepare 5 N NaOH solution: Weigh 2 g NaOH in a 50ml conical tube and add 10 ml deionized water. Gently shake the tube to fully dissolve NaOH. Do not close the cap or shake the tube too vigorously to avoid explosion of the tube or splashing of the solution due to sudden accumulation of large amount of heat during this process.
Add deionized water to bring up the volume to 4 L.
Connect the 0.22 μm PVDF bottle top filter set with a benchtop vacuum and a collecting bottle to filter the PFA solution.
-
For long term storage, aliquot the filtered solution into 50 ml centrifuge tube and store at -20 °C. Melt at 4 °C or room temperature and mix well before use.
Note: Aliquot no more than 45 ml per tube as the volume will expand when the liquid freezes.
Table 2. Recipe of 4% PFA .
| Chemical |
Molecular weight |
Working concentration |
1 L (g) | 2 L (g) | 4 L (g) | 5 L(g) |
| NaH2PO4·2H2O | 156.01 | 0.02 N | 3.1202 | 6.2404 | 12.4808 | 15.601 |
| Na2HPO4·12H2O | 358.14 | 0.08 N | 28.651 | 57.302 | 114.605 | 143.256 |
| Paraformaldehyde | 30.03 | 4% | 40 | 80 | 160 | 200 |
Acknowledgments
The present protocol is modified from the original version of our article (Hou et al., 2021) . This work is supported by funds from Shanghai Municipal Science and Technology Major Project (No.2018SHZDZX01) and ZJLab.
Competing interests
The authors declare no conflict of interest or competing interest.
Ethics
Experimental protocols and the use of animals were approved by the Institutional Animal Care and Use Committee at Fudan University and conducted in accordance with institutional guidelines of Institutes of Brain Science (IOBS), Fudan University, China.
Citation
Readers should cite both the Bio-protocol article and the original research article where this protocol was used.
References
- 1. Adult Mouse Transcardiac Perfusion. https://www.mbl.edu/bie/files/2015/01/mouse_transcard_perf11.pdf.
- 2. Behringer R., Gertsenstein M., Nagy K. and Nagy A.(2013). Manipulating the mouse embryo: a laboratory manual. 4th edition. Cold Spring Harbor Laboratory Press. [Google Scholar]
- 3. Gage G. J., Kipke D. R. and Shain W.(2012). Whole animal perfusion fixation for rodents. J Vis Exp 65(65). [DOI] [PMC free article] [PubMed] [Google Scholar]
- 4. Hou Y., Qi Z., Hongzhi L., Jinyun W., Shi Y., Yanqing Q., Mengmeng S., Zhenggang Y., Jiangteng L., Zhuhao W., Ling G. and Miao H.(2021). Topographical organization of mammillary neurogenesis and efferent projections in the mouse brain. Cell Rep 34(6).
- 5. Standard Operating Procedures(Transcardiac Perfusion). https://www.mcgill.ca/research/files/research/305-_transcardiac_perfusion_-_jan_2018_1.pdf.


