

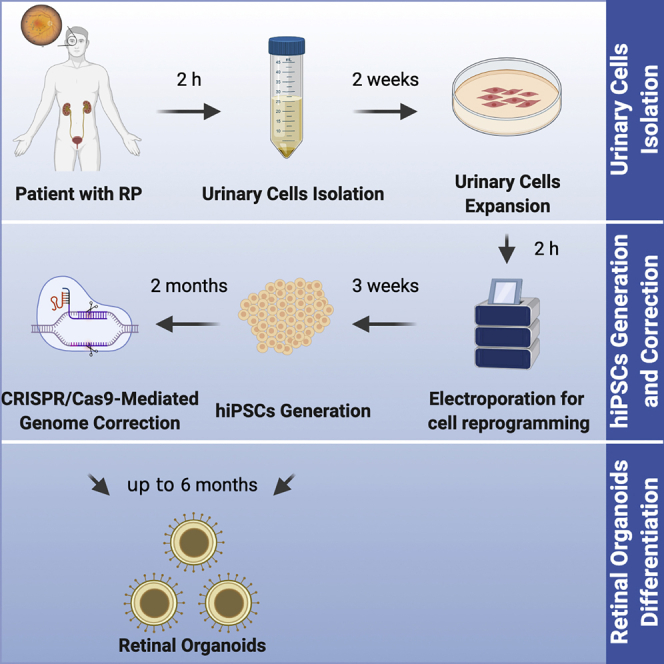
Summary
Human-induced pluripotent stem cells (hiPSCs) can be differentiated into well-structured retinal organoids. In this protocol, we successfully established 3D retinae from patient-derived hiPSCs and built the retinitis pigmentosa model in vitro. Moreover, mutation in the retinitis pigmentosa GTPase regulator (RPGR) gene was corrected by CRISPR-Cas9 gene editing, which rescued the structure and function of the 3D retinae.
For complete details on the use and execution of this protocol, please refer to Deng et al. (2018).
Subject areas: Cell isolation, CRISPR, Stem Cells, Cell Differentiation, Organoids
Graphical abstract
Highlights
-
•
Patient-specific human induced pluripotent stem cells (hiPSCs) were established.
-
•
The RPGR mutation was corrected by CRISPR/Cas9 in hiPSCs.
-
•
hiPSCs were differentiated into 3D retinal organoids.
Human-induced pluripotent stem cells (hiPSCs) can be differentiated into well-structured retinal organoids. In this protocol, we successfully established 3D retinae from patient-derived hiPSCs and built the retinitis pigmentosa model in vitro. Moreover, CRISPR-Cas9-mediated correction of the retinitis pigmentosa GTPase regulator mutation rescued the structure and function of the 3D retinae.
Before you begin
Reconstitution of reagents
Timing: 2.5–3.0 h
-
1.5 mg/mL DNase I (100×)
-
a.Dissolved 15 mg of DNase I in 3 mL of ultra-pure water.
-
b.After mixing well, use a 0.22-μm membrane filter for the sterilizing filtration.
-
c.Aliquot 100 μL of the dissolved DNase I into sterile 200-μL Eppendorf tubes.
-
d.Store the reconstituted solution at −20°C, which will be stable until the expiration date printed on the label.
-
a.
-
2.10 mM Y-27632 (1,000×)
-
a.Centrifuge quickly before opening the lid, 2000 × g for 30 s, to ensure that all the powder sediments at the bottom of the tube.
-
b.Dissolved 10 mg of Y-27632 in 3.1226 mL of dimethyl sulfoxide (DMSO).
-
c.After complete dissolution, aliquot 20 μL of dissolved Y-27632 into sterile 200-μL Eppendorf tubes.
-
d.Store the reconstituted solution at −80°C where it can remain for up to two years, and the powder can be stored at −20°C for three years.
-
a.
-
3.Recombinant human BMP4 (hBMP4)
-
a.Add 10 mg of bovine serum albumin (BSA) powder to 10 mL of ultra-pure water.
-
b.Mix slowly for 30 min, at least, at 25°C until the BSA powder is completely dissolved.
-
c.Filter the solution using a 0.22-μm filter to ensure sterile filtration.
-
d.Centrifuge quickly at 2000 × g for 30 s, before opening the lid, to ensure that all the powder sediments at the bottom of the tube.
-
e.Dissolved 50 μg of hBMP4 in sterile 4-mM HCl containing 0.1% BSA.
-
f.After complete dissolution, aliquot 20 μL of dissolved hBMP4 into sterile 200-μL Eppendorf tubes.
-
g.Store the solution at −20°C for up to 6 months. After reconstitution, it can be stored at 2°C to 8°C for up to 1 month, or store at −70°C for up to 3 months.
-
a.
-
4.5 mM retinoic acid (20×)
-
a.Dissolve 100 mg of retinoic acid in 3.33 mL of DMSO to obtain a stock solution (100 mM).
-
b.Aliquot and store in light protected vials at −80°C for up to 2 weeks.
-
c.Dilute 100 mM retinoic acid using DMSO to a 5-mM concentration and store the solution in the dark at -20°C for up to 2 weeks.
-
d.Diluted it in tissue culture medium right before use.
-
a.
CRITICAL: Retinoic acid is more sensitive to light, heat, and air in solution. The prepared retinoic acid stock solution should be stored in the dark until use.
-
5.100 mM Taurine (1,000×)
-
a.Add 0.125 g of taurine in to 10 mL of Dulbecco's phosphate buffered saline (DPBS).
-
b.After complete dissolution, aliquot 1 mL of taurine solution into sterile 1.5-mL Eppendorf tubes.
-
c.Store the solution at −20°C until the expiration date printed on the label.
-
a.
-
6.Matrigel preparation (protein concentration: 8.1 mg/mL)
-
a.Thaw Matrigel at 4°C for 1–2 days until it melts completely.
-
b.Store the 1.5-mL Eppendorf tubes and pipettes in the −20°C freezer one day in advance to prechill them.
-
c.Aliquot 370 μL of the Matrigel into prechilled 1.5-mL Eppendorf tubes on ice using prechilled pipettes.
-
d.Store the aliquots quickly at −20°C after labeling them.
-
a.
Preparation of tissue culture ware
-
7.Matrigel coating (protein concentration: 8.1 mg/mL)
-
a.Thaw 370 μL of aliquots at 4°C for 1–2 days until it melts completely.
-
b.Add 1 aliquot of Matrigel to 24 mL of Dulbecco's Modified Eagle's medium DMEM/F12 at 4°C using prechilled pipettes and mix well.
-
c.Add 1 mL of a Matrigel solution to each well of 6-well tissue culture plates and incubate for 30–60 min at 37°C before use.
-
a.
-
8.Gelatin coating
-
a.Add 1 mL of 0.1% gelatin to each well of the 6-well tissue culture plates.
-
b.Cover the entire bottom surface of plate after gentle shaking.
-
c.Incubate it for 30 min at 37°C before use.
-
a.
Key resources table
| REAGENT or RESOURCE | SOURCE | IDENTIFIER |
|---|---|---|
| Antibodies | ||
| PAX6 antibody | BioLegend | Cat# 901301 |
| CRX antibody | Abnova | Cat# H00001406-M02 |
| Rhodopsin | Sigma | Cat# O4886 |
| Recoverin | Millipore | Cat# AB5585 |
| L/M-opsin | Millipore | Cat# AB5405 |
| ARL13B | ProteinTech | Cat# 17711-1-ap |
| DAPI | Invitrogen Antibodies | Cat# D-1306 |
| Donkey anti-rabbit 594 | Invitrogen Antibodies | Cat# A-21207 |
| Donkey anti-rabbit 488 | Invitrogen Antibodies | Cat# A-21206 |
| Donkey anti-mouse 594 | Invitrogen Antibodies | Cat# A-21203 |
| Donkey anti-mouse 488 | Invitrogen Antibodies | Cat# A-21202 |
| Chemicals, peptides, and recombinant proteins | ||
| GlutaMAX | Life Technologies | Cat# 35050-061 |
| MEM non-essential amino acid solution (100×) (NEAA) | Sigma | Cat# M7145 |
| Fetal bovine serum (FBS) | Biological Industries | Cat# 04-002-1A |
| AlbuMAX II Lipid-Rich BSA | Gibco | Cat# 11021037 |
| Primocin | InvivoGen | Cat# ant-pm-1 |
| Penicillin-streptomycin (PS) | Gibco | Cat# 15140-122 |
| Dimethyl sulfoxide (DMSO) | Sigma | Cat# D2650 |
| TrypLE Select (1×), no phenol red | Life Technologies | Cat# 12563-011 |
| Accutase | STEMCELL Technologies Inc | Cat# 07920 |
| DNase I | Roche | Cat# 11284932001 |
| Y-27632-2HCl | Selleck | Cat# S1049 |
| KnockOut Serum Replacement - Multi-Species (KSR) | Gibco | Cat# A3181502 |
| Chemically Defined Lipid Concentrate | Thermo | Cat# 11905031 |
| Monothioglycerol | Sigma | Cat# M6145 |
| Recombinant human BMP4 | R&D Systems | Cat# 314-BP |
| N-2 Supplement (100×), liquid | Life Technologies | Cat# 17502-048 |
| Retinoic acid (RA) | Sigma | Cat# R2625 |
| Taurine | Sigma | Cat# T8691 |
| Matrigel, Growth Factor Reduced (GFR) Basement Membrane Matrix, Phenol Red-Free, ∗LDEV-Free | Corning | Cat# 356231 |
| EmbryoMax 0.1% Gelatin Solution | Millipore | Cat# ES-006-B |
| G418 disulfate salt | Sigma | Cat# G1279 |
| Agarose, low gelling temperature | Sigma-Aldrich | Cat# A0701 |
| Critical commercial assays | ||
| DMEM/Ham’s F12 | Gibco | Cat# 10565-042 |
| Ham’s F12 | Gibco | Cat# 11765-054 |
| DMEM basic | Gibco | Cat# C11995500bt |
| Dulbecco's phosphate buffered saline (DPBS) | Gibco | Cat# C141905005BT |
| TeSR-E8 Kit for hESC/hiPSC Maintenance | STEMCELL Technologies | Cat# 05990 |
| ncEpic hPSC Medium | Nuwacell Biotechnologies Co., Ltd | Cat# RP01001 |
| Iscove’s Modified Dulbecco Medium (IMDM) | Gibco | Cat# 12440053 |
| Ham's F-12 Nutrient Mixture | Gibco | Cat# 11765-054 |
| REGM BulletKit | Lonza | Cat# CC-3190 |
| P3 Primary Cell 4D-Nucleofector X Kit L | Lonza | Cat# V4XP-3024 |
| Cultured Cells DNA Kit | Simgen | Cat# 3001250 |
| Phanta Super-Fidelity DNA Polymerase | Vazyme | Cat# P505-d3 |
| 2× power Taq PCR Master Mix | BioTeke | Cat# PR1702 |
| P3 Primary Cell 4D-Nucleofector X Kit | Lonza | Cat# V4XP-3024 |
| QIAquick Gel Extraction Kit (250) | QIAGEN | Cat# 28706 |
| Endo-free Plasmid Mini Kit I (200) | Omega | Cat# D6948-02 |
| pEASY-Blunt Simple Cloning Kit | TransGen Biotech | Cat# CB111-01 |
| Oligonucleotides | ||
| Primer: pX330-sgRNA-F 5′- CACCGC ATGTAAACAACGTGTCACAA -3′ |
This paper | N/A |
| Primer: pX330-sgRNA-R 5′- AAACTTG TGACACGTTGTTTACATGC -3′ |
This paper | N/A |
| Primer F for correction verification CACAGACTAGAGAGTGGCAC | This paper | N/A |
| Primer R for correction verification CCTCTACCCTTGTCTTTCTC | This paper | N/A |
| Recombinant DNA | ||
| pX330 plasmid | Addgene | Cat# 42230 |
| Episomal reprogramming plasmids | System Biosciences (SBI) | Cat# SC900A-1 |
| Software and algorithms | ||
| Leica software | Leica | http://www.leica-microsystems.com/home/ |
| CRISPR sgRNA design tool | CRISPOR | http://crispor.tefor.net/ |
| Other | ||
| 6-well plates | Cyagen | Cat# 40106 |
| Non-stick 10-cm petri dish | Greiner | Cat# 663102 |
| 96-well V-bottomed conical wells | Sumitomo Bakelite | Cat# MS-9096VZ |
| 1,000-μL Pipette tips | Axygen | Cat# T-1000-R-S |
| 200-μL Universal Fit Pipet Tip | Axygen | Cat# T-200-Y-R-S |
| 10-μL Microvolume Pipet Tips | Axygen | Cat# T-300-R-S |
| 1.5 mL EP | Axygen | Cat# MCT-150-C |
| 0.6 mL EP | Axygen | Cat# MCT-060-C |
| 0.2 mL EP | Axygen | Cat# PCR-02-C |
| 15-mL Centrifuge tube | BD Falcon | Cat# 352097 |
| 50-mL Centrifuge tube | BD Falcon | Cat# 352070 |
| 5-mL Pipetting tube | BD Falcon | Cat# 357543 |
| 10-mL Pipetting tube | BD Falcon | Cat# 357551 |
| 25-mL Pipetting tube | BD Falcon | Cat# 357525 |
| 1,000-μL Pipette tips | Axygen | Cat# T-1000-R-S |
| 200-μL Pipette tips | Axygen | Cat# T-200-Y-R-S |
| 10-μL pipette tips | Axygen | Cat# T-300-R-S |
| Cryopreservation tubes | Corning | Cat# 430488 |
| Sterile square media bottle | Nalgene | Cat# c0006558 |
| Millex-GP, 0.22-μm filter | Millpore | Cat# SLGP033RB |
| 1-mL Injection needle | Kangkang | N/A |
| 50-mL Injection needle | Kangkang | N/A |
| V-Lance knife | Alcon Surgical | Cat# 8065912001 |
| Counting chambers | RONGYI | Cat# 1103 |
| 4°C freezers | Haier | Cat# HXC-936 |
| −20°C freezers | Haier | Cat# BCD-256WDGK |
| −80°C freezers | Panasonic | Cat# MDF-U3386S |
| CO2 incubator | Thermo Scientific | Cat# 3111 |
| Water bath | Yiheng | Cat# DK-8AB |
| Thermal cycler | Life Technologies | Cat# 4483636 |
| Centrifuge | Eppendorf | Cat# 5702 |
| Liquid nitrogen storage dewar | Thermo Scientific | Cat# CY50985 |
| Class II, Type A2 Biosafety Cabinets | Thermo Scientific | Cat# 1300 Series A2 |
| 4D-Nucleofector Core Unit | Lonza | Cat# AAF-1002B |
| 4D-Nucleofector X Unit | Lonza | Cat# AAF-1002X |
| Microscope | Life Technologies | Cat# EVOS XL |
Materials and equipment
Reconstitution of the media
Note: Make sure all the media and reagents are prepared under aseptic conditions and warmed at room temperature (20°C–25°C) before use.
Medium reconstitution for urinary cells
Primary medium
| Reagent | Final concentration | Amount |
|---|---|---|
| DMEM | 44.5% | 222.5 mL |
| Ham’F12 | 44.5% | 222.5 mL |
| FBS | 10% | 50 mL |
| Penicillin-Streptomycin (PS) | 1% (100 U/mL) | 5 mL |
| Total | n/a | 500 mL |
Note: Store the primary medium in the dark at 4°C and use it within 2 weeks.
Proliferation medium: (Renal Epithelial Basal Medium (REBM) Bullet Kit reconstitution)
| Reagent | Final concentration | Amount |
|---|---|---|
| Renal Epithelial Basal Medium (REBM) | n/a | 500 mL |
| SingleQuots Kit | 1.2% | 6 mL |
| Total | n/a | 506 mL |
Note: Store the proliferation medium in the dark at 4 °C and use it within 2 weeks.
Washing buffer:
| Reagent | Final concentration | Amount |
|---|---|---|
| Dulbecco's Phosphate Buffered Saline (DPBS) | n/a | 494 mL |
| Primocin | 0.2% | 1 mL |
| PS | 1% (100 U/mL) | 5 mL |
| Total | n/a | 500 mL |
Note: The solution should be freshly reconstituted before use.
100 μL Nucleofection solution
| Reagent | Final concentration | Amount |
|---|---|---|
| 4D-Nucleofector solution | 82% | 82 μL |
| Supplement solution | 18% | 18 μL |
| Total | n/a | 100 μL |
Note: The solution should be freshly reconstituted before use.
Medium reconstitution for hiPSCs
0.5-mM EDTA solution
| Reagent | Final concentration | Amount |
|---|---|---|
| 0.5 M EDTA | 1% (0.5 mM) | 500 μL |
| DPBS | n/a | 49.5 mL |
| Total | n/a | 50 mL |
Note: Store the solution at 4°C for up to 1 month.
TeSR-E8 medium
| Reagent | Final concentration | Amount |
|---|---|---|
| TeSR-E8 Basal Medium | n/a | 480 mL |
| TeSR-E8 25X Supplement | 4% (1×) | 20 mL |
| Total | n/a | 500 mL |
Note: Store the medium at 4°C for up to 1 month.
ncEpic hPSC medium
| Reagent | Final concentration | Amount |
|---|---|---|
| ncEpic Basal Medium | n/a | 496 mL |
| ncEpic 125X Supplement | 0.8% (1×) | 4 mL |
| Total | n/a | 500 mL |
Note: Store the medium at 4°C and use it within 2 weeks.
hiPSCs cryopreservation solution:
| Reagent | Final concentration | Amount |
|---|---|---|
| TeSR-E8 | 90% | 900 μL |
| DMSO | 10% | 100 μL |
| Total | n/a | 1 mL |
Note: The solution should be freshly reconstituted before use.
Medium reconstitution for retinal organoid differentiation
Cell dissociation solution:
| Reagent | Final concentration | Amount |
|---|---|---|
| TrypLE Select | n/a | 1 mL |
| DNase I (5 mg/mL) | 0.05 mg/mL | 10 μL |
| Y-27632 (10 mM) | 20 μM | 2 μL |
| Total | n/a | 1.012 mL |
Note: The solution should be freshly reconstituted before use.
Differentiation medium:
| Reagent | Final concentration | Amount |
|---|---|---|
| IMDM | 44% | 22 mL |
| F12 | 44% | 22 mL |
| KSR | 10% | 5 mL |
| Glutamax | 1% | 500 μL |
| Monothioglycerol | 450 μM | 1.95 μL |
| PS | 1% (100 U/mL) | 500 μL |
| Total | n/a | 50 mL |
Note: Store the differentiation medium at 4°C for up to 1 month.
Neural retina medium:
| Reagent | Final concentration | Amount |
|---|---|---|
| DMEM/F12 | n/a | 439.45 mL |
| FBS | 10% | 50 mL |
| N-2 Supplement (100 X) | 1% (1 X) | 5 mL |
| Retinoic acid (RA) | 0.5 μM | 50 μL |
| Taurine | 0.1 mM | 500 μL |
| PS | 1% (100 U/mL) | 5 mL |
| Total | n/a | 500 mL |
Note: Store the medium in the dark at 4°C and use it within 2 weeks.
Step-by-step method details
Establishment of hiPSCs from urine samples
Note: All the previously described procedures (Zhou et al., 2012) for urinary cell isolation and expansion were used with some modifications (Deng et al., 2018).
Urinary cell isolation
-
1.
Collect mid-streams urine samples (100 mL–300 mL) from volunteers.
-
2.
Transfer them into 50-mL tubes using a 25-mL pipette as soon as possible.
-
3.
Centrifuge the samples at 400 × g for 10 min at room temperature (20°C–25°C).
-
4.
Discard the supernatant carefully until 1 mL or less of the liquid is left in the tube.
-
5.
Resuspend and collect the liquid from one sample into a 50-mL tube.
-
6.
Add 10 mL of washing buffer to dilute the samples.
-
7.
Centrifuge at 200 × g for 10 min at room temperature (20°C–25°C).
-
8.
During centrifugation, aspirate the gelatin solution of the cell culture plates and wash twice using washing buffer.
-
9.
Add 1 mL of the primary medium into each gelatin-coated well.
-
10.
After centrifugation, discard the supernatant until 0.2 mL or less of the sample is left in the tube.
-
11.
Resuspend the sediment in 1 mL of primary medium.
-
12.
Transfer the cells onto gelatin-coated 6-well plates and then incubate the plates.
Expansion of urinary cells
Day 1, day 2, and day 3: Addition of the primary medium
-
13.
Add 1 mL of the primary medium to the wells to maintain the concentration of antibiotics and nutrition.
Day 4: Medium change to the proliferation medium
-
14.
Aspirate the culture medium until 1 mL is left in the wells.
-
15.
Add 1 mL of the proliferation medium. The urinary cell colonies can be seen under an inverted microscope (Figure 1A).
Figure 1.

Establishment of hiPSCs from urine samples
Bright field images are shown in (A–D).
(A) Urinary cells at day 4 after collection.
(B) Urinary cells at day 3 after passaging.
(C) hiPSC colonies at day 5 after reprogramming.
(D) Breaking the hiPSC colonies into a checkerboard-shaped grid before isolation.
Scale bars, 400 μm.
The following days: Half medium change using the proliferation medium
-
16.
Change half of the proliferation medium daily.
-
17.
Aspirate 1 mL of the medium in the wells, and add 1 mL of the proliferation medium.
Passaging the urinary cells
-
18.
Passage the urinary cells when they reach 80%–90% confluence.
-
19.
Aspirate all the culture medium, and wash the cells twice using 1 mL of DPBS each time.
-
20.
Then, dissociate the cells by adding 0.5 mL of TrypLE Select to each well and incubate the plates for 5 min at 37°C.
-
21.
Add the medium containing 10% FBS to stop the reaction.
-
22.
Centrifugate cells at 200 × g for 5 min and resuspend them using the proliferation medium after the supernatant is completely removed.
-
23.
Finally, seed the urinary cells in new gelatin-coated plates at a 1:4 split ratio for further expansion (Figure 1B).
Note: Small urinary cell colonies appeared within 3–5 days after plating and grew steadily.
Generation of integration-free hiPSCs using episomal plasmids
-
24.
Add the reprogramming plasmids (2 μg) encoding Oct4, Sox2, Lin28, Klf4, L-myc, p53shRNA, and the miR-302/367 cluster to the nucleofection solution.
-
25.
Wash the urinary cells twice with DPBS and then dissociate them to single cells using 0.5 mL of TrypLE Select.
-
26.
Count the cells using a counting chamber, and aspirate 105–106 cells for nucleofection.
-
27.
Then, centrifuge cells at 200 × g for 3.5 min at room temperature (20°C–25°C).
-
28.
Aspirate the supernatant as much as possible by using pipette tips.
-
29.
Resuspend cells in 100 μL of nucleofection solution.
-
30.
Gently transfer the sample to Nucleocuvette vessels and tap the vessels to make sure the sample is at the bottom of the vessels.
-
31.
Transfer the vessels to the retainer and electroporate them using the 4D-nucleofector system by using the T-020 program. Troubleshooting 1
-
32.
Finally, after the electroporation procedure, gently transferred the urinary cells into Matrigel-coated plates containing TeSR-E8 medium.
-
33.
Change the medium after 24 h of transfection.
-
34.
Grow the transfected urinary cells in a hypoxia chamber (5%–6% O2) until the human ESC-like colonies appear (Figure 1C).
hiPSC colony isolation and expansion
-
35.
Approximately three weeks post-electroporation, isolate hiPSC colonies according to following steps. First, break the hiPSC colonies into a checkerboard-shaped grid by using sharp needles under an inverted microscope (Figure 1D). Troubleshooting 2
Figure 2.

Representative pictures of "good" and "bad" colonies
Bright field images are shown in (A and B).
(A) “Good" colony after reprogramming.
(B) “Bad" colony after reprogramming.
Scale bars, 400 μm.
-
36.
Then, collect the colony pieces using 100-μL pipette tips and transfer them to new Matrigel-coated plates containing fresh TeSR-E8 medium supplemented with 10 μM Y-27632.
CRISPR-Cas9-mediated genome editing
sgRNA design and cloning
-
37.
RPGR mutation is used for hiPSC correction (Figure 3). Use the CRISPR sgRNA design tool to design sgRNA target exon 14 near the mutation site.
-
38.
Dissolve both oligos to 100 μM using nuclease-free water.
-
39.
Phosphorylate and anneal the two oligos using the following conditions: 37°C for 30 min, 95°C for 5 min and then bring the temperature down to 25°C at 5°C/min.
-
40.
In the meantime, digest the pX330 plasmid using BbSI at 37°C for 30 min.
Alternatives: Water bath can be used instead of the thermal cycler for heating.
-
41.
Purify the digested pX330 plasmid using a 1% agarose gel and QIAquick Gel Extraction Kit, following the manufacturer’s instructions.
-
42.
Detect the concentration of the digested pX330 plasmid using NanoDrop device.
-
43.
Then, set up a ligation reaction and incubate the digested pX330 plasmid and sgRNA at room temperature (20°C–25°C) for 10 min.
-
44.
Transform the product of ligation into competent cells following the manufacturer’s instructions.
-
45.
After amplification, extract the plasmid DNA containing the target sequence using QIAGEN EndoFree Plasmid Maxi Kit, by following the manufacturer’s instructions.
-
46.
Store it at −20°C before use.
-
47.
Analyze the plasmid DNA using Sanger sequencing.
Pause point: The plasmid DNA may be safely stored in the freezer until convenient.
Figure 3.

Gene editing using CRISPR-Cas9 by using homology-directed repair
Donor DNA design and plasmid cloning
-
48.
As a homologous recombinant template, amplify donor exon 14 from the normal template. Homology arms and a selection cassette are recommended.
-
49.
After amplified and purified, insert a 3.4 kbp homology directed repair (HDR) fragment carrying a selection cassette of neomycin (G418) into pEASY-Blunt simple cloning vector following pEASY-Blunt cloning protocol.
-
50.
Analyze the colonies using Sanger sequencing.
-
51.
After amplification, extract the plasmid DNA by using EndoFree Plasmid Mini Kit, following the manufacturer’s instructions.
-
52.
Store the plasmid DNA at −20°C before use.
Plasmid electroporation
-
53.
When the hiPSCs show 70%–80% confluence, use accutase to dissociate hiPSCs into single cells.
-
54.
Harvest and count the cells, centrifuge the required number of cells, and completely remove the supernatant.
-
55.
For the genome correction knock-in, mix 2 μg of the constructed pX330 plasmid and 2 μg of the targeting vector in nucleofector solution before electroporation.
-
56.
Resuspend the required number of cells in the nucleofector solution.
-
57.
Carefully transfer the mixture to 100-μL Nucleocuvette vessels.
-
58.
Perform transfection using the 4D-nucleofector system, under program CA-137.
-
59.
After electroporation, gently transfer the cells to Matrigel-coated plates containing TeSR-E8 medium supplemented with 10 μM Y-27632.
Note: It has been reported that using Y-27632 may increase the viability of stem cells (Watanabe et al., 2007).
Neomycin selection
-
60.
When the transfected cells reach 70%–80% confluence, add G418 to TeSR-E8 medium at a final concentration of 200 μg/mL for cell selection.
-
61.
Wash the cells with DPBS and refresh the medium daily.
Genome correction clone screening using PCR and sequencing
Collect the DNA
-
62.
After selection, G418-insensitive hiPSC colonies were isolated and expanded.
-
63.
Remove the TeSR-E8 medium, rinse the hiPSCs twice with DPBS, and dissociate the cells using an EDTA solution for 5 min.
-
64.
Remove the EDTA and resuspend hiPSCs in fresh TeSR-E8 medium.
-
65.
Centrifuge the suspension at 200 × g for 5 min and remove the medium.
-
66.
Then, extract the genomic DNA by using Cultured Cells DNA Kit, according to the manufacturer’s instructions.
PCR and production verification using sanger sequencing
-
67.
Amplify the genomic DNA using a Super-Fidelity PCR Kit and the following parameters: denaturation for 30 s at 98°C, denaturation for 15 s at 98°C, annealing for 60 s at 60°C, and extension for 30 s at 72°C for 35 cycles.
-
68.
Finally, perform an extension for 10 min at 72°C and hold the product at 4°C.
-
69.
Verify the PCR product using Sanger Sequencing.
Maintenance of hiPSC colonies
hiPSC recovery
-
70.
Remove the cell lines from liquid nitrogen and thaw them in a 37°C water bath as soon as possible. Troubleshooting 3
-
71.
Then, slowly dilute them with TeSR-E8 medium in a new tube.
-
72.
Centrifuge at 200 × g for 5 min at room temperature (20°C–25°C).
-
73.
Aspirate the supernatant and resuspend cells in TeSR-E8 medium using gentle pipetting.
-
74.
Then, culture cells in Matrigel-coated 6-well plates containing TeSR-E8 medium supplemented with 10 μM Y-27632, and incubate them after shaking.
Alternatives: For hiPSCs maintenance, ncEpic hPSC Medium can be used instead of TeSR-E8 medium.
Medium change
-
75.
Aspirate the medium in the 6-well plates and wash the hiPSCs with DPBS once or twice.
-
76.
Add 2–3 mL of TeSR-E8 medium to the plate and incubate them.
Passaging and cryopreservation of hiPSCs
-
77.
When cell confluence reaches 70% or more, passage the cells. Aspirate the medium in the 6-well plates and wash the hiPSCs with DPBS once.
-
78.
Add 1 mL of EDTA to digest the hiPSCs at 37°C for 5 min.
-
79.
For passaging, aspirate the EDTA and resuspend hiPSCs in TeSR-E8 Medium containing 10 μM Y-27632.
Note: It has been reported that using Y-27632 may increase the viability of stem cells (Watanabe et al., 2007).
-
80.
Break hiPSC clumps into smaller pieces using gentle pipetting, and add an appropriate volume of cells into a new Matrigel-coated 6-well plate.
-
81.
Passage the cells every third or fourth day.
-
82.
For cell freezing, aspirate the EDTA (from step 78) and resuspend hiPSCs with cell cryopreservation solution.
-
83.
Transfer hiPSCs in a freezing tube and perform gradient cooling.
-
84.
Store the hiPSCs in liquid nitrogen until use.
Generation of retinal organoids from hiPSCs
Note: All the previously described procedures (Kuwahara et al., 2015) for retinal organoid differentiation were used with slight modifications (Gao et al., 2020; Liu et al., 2020).
Day 0: Reaggregate cells
-
85.
When cell confluence surpasses 70%, dissociate the hiPSC colonies using a cell dissociation solution at 37°C for 3.5 min. Troubleshooting 4
-
86.
Then resuspend them in the differentiation medium.
-
87.
Break the hiPSC clumps into single cells using gentle pipetting.
-
88.
Count and dilute cells in the differentiation medium supplemented with 20 μM Y-27632.
-
89.
Then, reaggregate cells in 96 V-bottomed conical wells at a density of 12,000 cells per well, in a volume of 100 μL.
-
90.
Incubate the plates after shaking.
Day 6: Addition of hBMP4
-
91.
To change the differentiation medium, aspirate 100 μL of the medium from each well.
-
92.
Add 100 μL of the differentiation medium supplemented with 20 μM Y-27632 and 1.5 nM (55 ng/mL) hBMP4.
-
93.
Incubate the plates in CO2 incubator.
Day 9: Half differentiation medium changes
-
94.
Change half of the differentiation medium to achieve a lower concentration of hBMP4 (0.75 nM; final concentration: 27.5 ng/mL).
-
95.
Aspirated 60 μL of the medium from each well and add 60 μL of the differentiation medium supplement with 20 μM Y-27632.
-
96.
Incubate the plates in CO2 incubator.
Day 12: Half differentiation medium changes
-
97.
Change half of the differentiation medium to achieve a lower concentration of hBMP4 (0.375 nM; final concentration: 13.75 ng/mL).
-
98.
Aspirated 60 μL of the medium from each well and add 60 μL of the differentiation medium supplemented with 20 μM Y-27632.
-
99.
Incubate the plates in CO2 incubator.
Day 18: Transfer to non-stick petri dishes
-
100.
Transfer the aggregates into a Petri dish.
-
101.
Cut them into 2 to 3 pieces using a V-Lance Knife.
-
102.
Aspirate all the aggregates into 15-mL centrifuges tubes.
-
103.
Remove the supernatant after all the aggregates settle at the bottom of the tubes. Resuspend the aggregates in neural retina medium and transfer them into 9-cm non-stick Petri dishes.
Long-term culture of neural retinae
-
104.
Refresh the medium every 5 days and protect the culture from light. Troubleshooting 5
Expected outcomes
We successfully recapitulated RP predisposed by the RPGR mutation, using patient-derived retinae in a dish. The defects in patient hiPSC-derived retinae are consistent with those in their clinical phenotype. Significant defects of photoreceptor and shorted cilium were found in patient retinal organoids. The photoreceptor structure and ciliopathy were rescued by CRISPR-Cas9-mediated correction of RPGR mutation (Figure 4). This protocol studied RP in vitro utilizing RP patient-derived 3D retinal organoids.
Figure 4.

Immunofluorescence of the developing and late organoids
Representative confocal images of retinal organoids at different differentiation days.
(A) Retinal organoids stained with PAX6 (green), CRX (red), Recoverin (green), and DAPI (blue). Scale bars, 50 μm.
(B) Retinal organoids of different groups stained with Rhodopsin (red), L/M-opsin (green), ARL13B (green), and DAPI (blue). Scale bars, 20 μm (top) and 5 μm (bottom). W6, differentiation week 6. W9, differentiation week 9. W12, differentiation week 12. W22, differentiation week 22.
Limitations
Our protocol includes urinary cell reprogramming, CRISPR-Cas9-mediated genome editing, and retinal organoids differentiation. We not only successfully established hiPSCs from RP patients with the RPGR mutation but also achieved mutation correction using the CRISPR-Cas9 technology. The steps of the differentiation of human retinal organoids are based on the previously published protocol (Kuwahara et al., 2015), with slight modifications. Furthermore, retinal organoids derived from patient-specific hiPSCs rebuild the occurrence and development of RP in vitro. Thus, they are an ideal model for future disease treatment and drug discovery (Jin et al., 2019).
Troubleshooting
Problem 1
Electroporation Efficiency (step 31).
We noted variations among donor urinary cells. The electroporation efficiency can be impacted by the procedures used for urinary cells isolation, maintenance, and the culture environment after electroporation.
Potential solution
-
1.
Isolate urinary cells as quickly as possible (15–30 min) after collecting the urinary samples.
-
2.
To achieve a high electroporation efficiency, use urinary cells at passages 1–3.
-
3.
The cells grown on feeders after electroporation achieve a higher hiPSC generation efficiency than those grown on Matrigel-based feeder-free conditions (Sugii et al., 2011).
Problem 2
Loss of pluripotency after hiPSC colony isolation (step 35).
Potential solution
Isolate only well-separated and hESC-like colonies to ensure a hiPSC state before isolation. Scrape the differentiated cells using pipette tips under the microscope in the biological safety cabinet. Further, isolate the hiPSC colony under the microscope and inoculate it into a new Matrigel-coated dish.
Problem 3
A Poor hiPSC pluripotency status is observed after thawing (step 70).
Potential solution
Make sure that the morphology of hiPSCs was good before freezing, as this will influence their pluripotency post-thawing. Moreover, confirm that Y-27632 is added to the medium after thawing and passaging to enhance the viability of the stem cells. Furthermore, passage hiPSCs 2–3 times to adjust the cell status before thawing, and then proceed to the next experiment.
Problem 4
Differentiation Efficiency (step 85).
The differentiation efficiency varies with different cell lines. This might be due to some genetic or epigenetic factors. Moreover, the experimental procedures and the culture environment can also affect the differentiation efficiency. To improve the differentiation efficiency, we suggest that readers should refer to our recent publication about enhancing the efficiency of the photoreceptor precursor during retinal organoids differentiation (Pan et al., 2020).
Potential solution
-
1.
Isolate multiple cell lines from the same donor and perform several differentiation times.
-
2.
Fully characterize the hiPSC lines via immunostaining with pluripotency markers, karyotyping, and by analyzing teratoma formation.
-
3.
hiPSCs are sensitive to environmental changes during maintenance: thus, the culture medium should not be changed. Maintain the cell lines for 1–3 passages, if necessary.
-
4.
If death of retinal organoids is observed, reduce it by using the pipette tips.
Problem 5
Retinal organoids adhere to each other (step 104).
Potential solution
Gently shake the Petri dish every 2 days during the long-term culture of neural retinae; if necessary, separate the organoids that are stuck together, using a V-Lance Knife under a microscope.
Resource availability
Lead contact
Further information and requests for resources and reagents should be directed to and will be fulfilled by the lead contact, Zi-Bing Jin (jinzb502@ccmu.edu.cn).
Materials availability
The mutant and corrected hiPSC lines generated in this protocol will be made available on request, but we may require a payment and/or a completed Materials Transfer Agreement if there is potential for commercial application.
Data and code availability
This study did not generate or analyze any datasets or code.
Acknowledgments
This study was partly supported by the Beijing Natural Science Foundation (Z200014).
Author contributions
Writing: Y.P.L. and W.L.D.; editing, funding acquisition, and supervision, Z.B.J.
Declaration of interests
The authors declare no competing interests.
References
- Deng W.L., Gao M.L., Lei X.L., Lv J.N., Zhao H., He K.W., Xia X.X., Li L.Y., Chen Y.C., Li Y.P. Gene correction reverses ciliopathy and photoreceptor loss in iPSC-derived retinal organoids from retinitis pigmentosa patients. Stem Cell Reports. 2018;10:1267–1281. doi: 10.1016/j.stemcr.2018.02.003. [DOI] [PMC free article] [PubMed] [Google Scholar]
- Gao M.L., Lei X.L., Han F., He K.W., Jin S.Q., Zhang Y.Y., Jin Z.B. Patient-specific retinal organoids recapitulate disease features of late-onset retinitis pigmentosa. Front. Cell Dev. Biol. 2020;8:128. doi: 10.3389/fcell.2020.00128. [DOI] [PMC free article] [PubMed] [Google Scholar]
- Jin Z.B., Gao M.L., Deng W.L., Wu K.C., Sugita S., Mandai M., Takahashi M. Stemming retinal regeneration with pluripotent stem cells. Prog. Retin. Eye Res. 2019;69:38–56. doi: 10.1016/j.preteyeres.2018.11.003. [DOI] [PubMed] [Google Scholar]
- Kuwahara A., Ozone C., Nakano T., Saito K., Eiraku M., Sasai Y. Generation of a ciliary margin-like stem cell niche from self-organizing human retinal tissue. Nat. Commun. 2015;6:6286. doi: 10.1038/ncomms7286. [DOI] [PubMed] [Google Scholar]
- Liu H., Zhang Y., Zhang Y.Y., Li Y.P., Hua Z.Q., Zhang C.J., Wu K.C., Yu F., Zhang Y., Su J. Human embryonic stem cell-derived organoid retinoblastoma reveals a cancerous origin. Proc. Natl. Acad. Sci. U S A. 2020;117:33628–33638. doi: 10.1073/pnas.2011780117. [DOI] [PMC free article] [PubMed] [Google Scholar]
- Pan D., Xia X.X., Zhou H., Jin S.Q., Lu Y.Y., Liu H., Gao M.L., Jin Z.B. COCO enhances the efficiency of photoreceptor precursor differentiation in early human embryonic stem cell-derived retinal organoids. Stem Cell Res. Ther. 2020;11:366. doi: 10.1186/s13287-020-01883-5. [DOI] [PMC free article] [PubMed] [Google Scholar]
- Sugii S., Kida Y., Berggren W.T., Evans R.M. Feeder-dependent and feeder-independent iPS cell derivation from human and mouse adipose stem cells. Nat. Protoc. 2011;6:346–358. doi: 10.1038/nprot.2010.199. [DOI] [PMC free article] [PubMed] [Google Scholar]
- Watanabe K., Ueno M., Kamiya D., Nishiyama A., Matsumura M., Wataya T., Takahashi J.B., Nishikawa S., Nishikawa S.I., Muguruma K. A ROCK inhibitor permits survival of dissociated human embryonic stem cells. Nat. Biotechnol. 2007;25:681–686. doi: 10.1038/nbt1310. [DOI] [PubMed] [Google Scholar]
- Zhou T., Benda C., Dunzinger S., Huang Y., Ho J.C., Yang J., Wang Y., Zhang Y., Zhuang Q., Li Y. Generation of human induced pluripotent stem cells from urine samples. Nat. Protoc. 2012;7:2080–2089. doi: 10.1038/nprot.2012.115. [DOI] [PubMed] [Google Scholar]
Associated Data
This section collects any data citations, data availability statements, or supplementary materials included in this article.
Data Availability Statement
This study did not generate or analyze any datasets or code.