

Abstract
We discuss a methodology to generate and study knockout gene-edited human intestinal organoids. We describe the generation of knockout human embryonic stem cell lines that we then differentiate into mature human intestinal organoid tissue in Matrigel using several growth factors. We also discuss a pair of assays that can be used to study the integrity of the intestinal epithelial barrier of the human intestinal organoids under inflammatory stress conditions.
Keywords: Human embryonic stem cells, Human intestinal organoids, Crispr-Cas9, Transfection, Gene editing
1. Introduction
There is great interest in developing methods to model human disease in vitro. We propose a method to functionally analyze genetic risk factors for gastrointestinal disease in a human intestinal organoid (HIO) system. A Crispr-Cas9 gene-editing transfection-based platform [1] is used to knockout specific genes of interest in human embryonic stem cell (hESC) lines and develop monoclonal knockout cell lines. After expansion of these hESC lines, they are differentiated into HIOs as per published protocols [2, 3]. Studying these knockout hESC lines during and after differentiation into HIOs can give us insight into the potential roles of genes of interest during development and in mature human intestinal epithelium and mesenchyme.
2. Materials
2.1. Cell Lines and Culture Conditions
Two hESC lines have been used in our laboratory for this methodology, H9 and UCSF4.
Human intestinal organoids.
Matrigel or Geltrex.
mTeSR media for hESC maintenance.
Nunclon delta surface tissue culture plates for HIO culture.
2.2. Transfections
Standard Opti-MEM solution.
Lipofectamine Stem reagent.
2.3. Genomic DNA Isolation
Neutralization solution for blood (trademark solution from Sigma-Aldrich).
Lysis solution for blood (trademark solution from Sigma-Aldrich).
2.4. Targeting, Plasmid Design, and Genotyping
DNA sequence analysis tool (SnapGene, Clone manager).
Sanger sequence data analysis tool (Chromas, SnapGene).
2.5. Staining
Invitrogen’s BD permeabilization buffer (specific formulation designed to reduce nonspecific staining of fluorochrome labeled antibodies and increase fluorescent signal-to-noise ratios).
2.6. Reverse Transcriptase PCR
Applied Biosystem’s High Capacity cDNA Reverse Transcription Kit.
DNA gel extraction and RNA extraction kits.
3. Methods
3.1. Maintenance of Human Embryonic Stem Cells (Plate Preparation, Freezing, Thawing, Maintenance in Culture) [4]
3.1.1. Plate Preparation (See Note 1)
Aliquot 500 μL of hESC qualified Matrigel or Geltrex at 4 °C into 50 mL tubes. Can store 500 μL aliquots of hESC qualified Matrigel or Geltrex at −20 °C.
Dilute hESC qualified Matrigel at a concentration of 1:100 with 1× DMEM/F12 and keep on ice to prevent it from solidifying.
Prepare 6-well tissue culture plates by pipetting 1 mL of solution to each well. Gently shake plate to ensure solution evenly covers well.
Incubate plates at 37 °C overnight.
The plates can be used for hESC culture the next day. Unused plates can be stored in the incubator at 37 °C and remain usable for up to 2 weeks.
3.1.2. Thawing
Thaw frozen vial of hESCs in 37 °C water bath or by holding vial lid in gloved hand and gently swirling frozen portion in water (1–2 min).
Add cells to 5 mL of hESC cell media (we use mTeSR) in 15 mL conical tube.
Spin down tube in centrifuge at 200 × g for 1 min.
Aspirate media and resuspend with 2 mL of media (mTeSR) with Y-27632 ROCK inhibitor (1:1000 dilution) (10 mM stock solution).
Plate the above 2 mL onto 1 well of 6-well tissue culture plate.
Aspirate ROCK inhibitor supplemented media after 5–6 h (can leave overnight to increase stem cell yield) from the corner of the well and add 2 mL of fresh mTeSR media.
3.1.3. Feeding
Aspirate media from the corner of the well using a sterile pipette tip.
Add 2 mL of mTeSR media to the corner of the well.
Change media daily.
3.1.4. Passaging (See Note 2)
Aspirate media from the corner of the well.
Add 1 mL PBS to well to wash. Gently rock plate and aspirate PBS.
Add 1 mL 1× EDTA (1:1000 in PBS) (0.5 mM final concentration in PBS).
-
For maintenance: Let it sit for 1–2 min and observe cells through microscope. Edges should be coming off colonies, but colonies should not disassociate into single cells.
For differentiation: Let it sit for 4 min and observe cells through microscope. There should be more disassociation of colonies into single cells versus maintenance passage.
Add 1 mL of mTeSR media to well and pipet up and down 5–6 times with serological pipettor to dislodge all the cells from the surface of the well and transfer to tube.
Centrifuge for 1 min at 300 × g.
Aspirate the supernatant.
For maintenance: Add 12 mL of mTeSR and resuspend cell pellet in media with serological pipettor. For differentiation: Add 2 mL of mTeSR and resuspend cell pellet in media with serological pipettor.
For maintenance: Transfer 2 mL of media with cells into each well of 6-well plate. For differentiation: Transfer 500 μL of media to each well of 24-well plate.
Examine wells under microscope to ensure cell clusters floating in well.
For maintenance: Passage every 4–6 days. For differentiation: Start after 1–2 days when cells reach >80% confluency.
3.1.5. Freezing
Aspirate media from corner of well when hESCs reach 80% or greater confluency.
Add 1 mL PBS to well to wash. Gently shake and aspirate.
Add 1 mL 1× EDTA (1:1000 in PBS) (0.5 mM final concentration in PBS).
Leave it for 2–3 min to allow colonies to detach.
Add 1 mL of mTeSR. Pipet up and down 3–4 times to detach colonies from bottom of well and transfer to tube.
Spin down at 300 × g for 1 min.
Aspirate the supernatant.
Resuspend the pellet in 1 mL of Stem-CellBanker and transfer to cryogenic vial.
Store vials at −80 °C.
After 2–3 days, transfer vials to liquid nitrogen for long-term storage.
3.2. CRISPR-Based Genome Editing
3.2.1. Design of Targeting Constructs (Fig. 1)
Fig. 1.
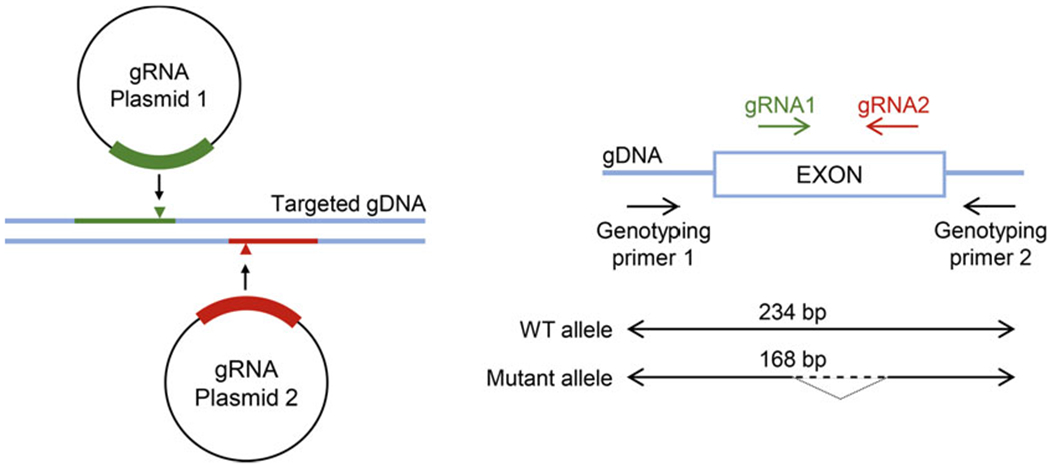
Schematic showing targeting strategy and design of genotyping primers (adapted from: https:/www.scbt.com/whats-new/crispr-systems)
Design sgRNAs using the IDT online tool. The online tool will provide a list of sgRNA targets based on the sequence you are interested in editing. In order to increase the chance of obtaining effectively knocked-out cells, select from the list of candidate sgRNA provided by the online tool with following specifications: both cut within the same exon, high on-target and low off-target scores, and the excised sequence between the two sgRNAs creates a codon frame shift in case the NHEJ does not lead to insertions or deletions. The distance between the PAM sequences should be not dividable by 3.
Find all 23 bp genomic sites of the form 5′-N20NGG-3″ near your intended target site (ideally ±50 bp). These may reside on the + or − strand.′
-
Incorporate 19 bp of the selected target sequence as highlighted here: 5′-NNNNN NNNNN NNNNN NNNNN NGG-3′ into the DNA fragment as indicated below:
TGTACAAAAAAGCAGGCTTTAAAGGAACCAATTCAGTCGACTGGATCCGGTACCAAGGTCGGGCAGGAAGAGGGCCTATTTCCCATGATTCCTTCATATTTGCATATACGATACAAGGCTGTTAGAGAGATAATTAGAATTAATTTGACTGTAAACACAAAGATATTAGTACAAAATACGTGACGTAGAAAGTAATAATTTCTTGGGTAGTTTGCAGTTTTAAAATTATGTTTTAAAATGGACTATCATATGCTTACCGTAACTTGAAAGTATTTCGATTTCTTGGCTTTATATATCTTGTGGAAAGGACGAAACACCGNNNNNNNNNNNNNNNNNNNGTTTTAGAGCTAGAAATAGCAAGTTAAAATAAGGCTAGTCCGTTATCAACTTGAAAAAGTGGCACCGAGTCGGTGCTTTTTTTCTAGACCCAGCTTTCTTGTACAAAGTTGGCATTA.
This 455 bp fragment bears all components necessary for gRNA expression, namely: U6 promoter + target sequence + guide RNA scaffold + termination signal.
Synthesize this as a gBlock.
Clone the synthesized gBlock into an empty backbone vector such as pCR-Blunt II-TOPO from Invitrogen for transfection and gRNA expression.
3.2.2. Transfection Based Genome Editing (Fig. 2)
Fig. 2.
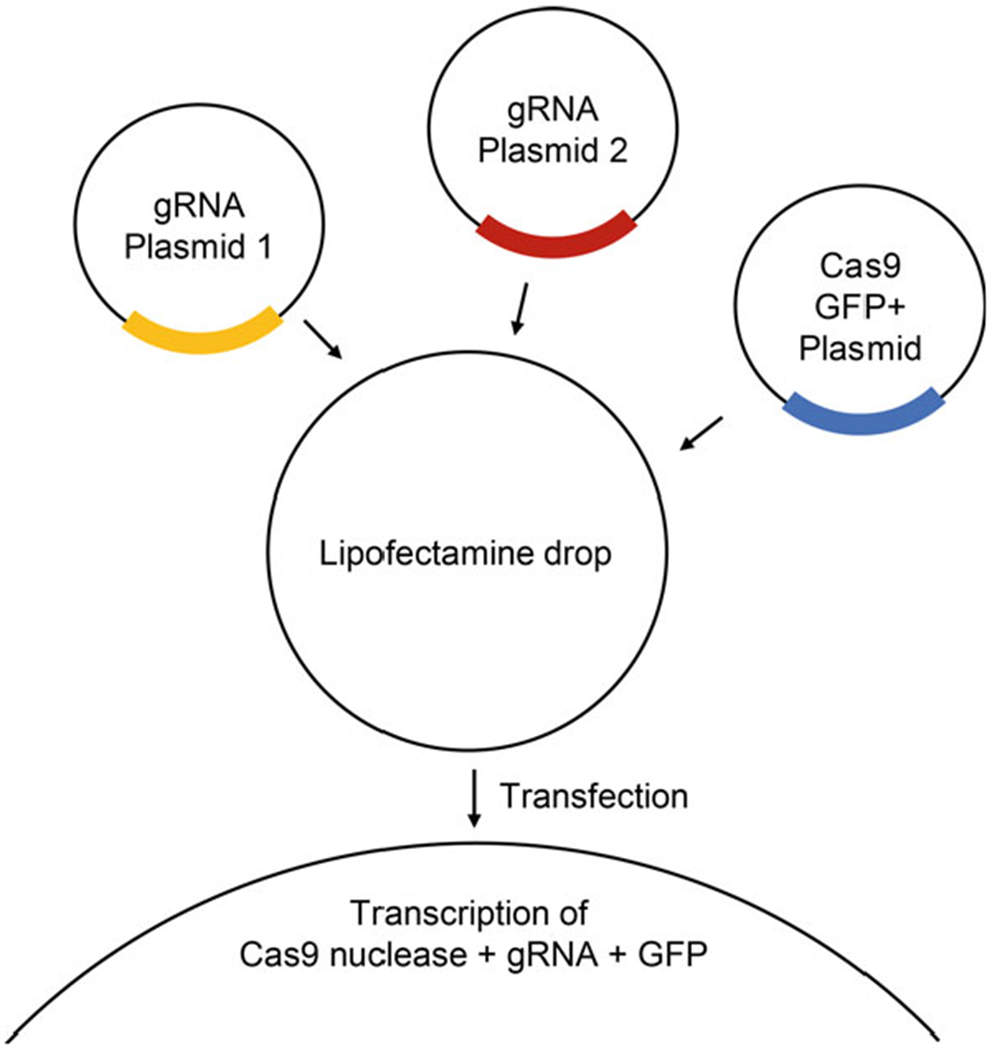
Schematic showing transfection based CRISPR editing of genome (adapted from: https:/www.scbt.com/whats-new/crispr-systems)
For the gene of interest, use 2 guide RNAs (on DNA plasmids) targeting 2 separate sites within either exon 1 or exon 2 [Subheading 3.2.1] and a Cas9-GFP expressing plasmid (see Note 3).
For transfection of one well of a six-well plate with cells at >80% confluency, we prepare two separate tubes first. Tube 1: 100 μL of Opti-MEM and 15 μL of Lipofectamine Stem Reagent. Tube 2: 100 μL of Opti-MEM and 1.3 μg of guide RNA 1 plasmid, 1.3 μg of guide RNA 2 plasmid and 1.3 μg of the pSpCas9-p2A-GFP (PX458) plasmid.
Pipet up and down to mix contents of each tube and let sit for 5 min at room temperature.
Transfer contents of tube 1 to tube 2.
Pipet up and down to mix contents of combined tube and let sit for 15 min.
Pipet up 200 μL of contents in a 200 μL pipettor.
Instead of pushing down, gently rotate top of the pipettor to release droplets slowly over the well. Move pipettor over the entire surface area of the well to increase the number of transfected cells.
Repeat step 6. until tube empty.
Place transfected cells into 37 °C incubator for 24 h.
Prepare 10 cm Matrigel-coated plates (5 mL of DMEM/F12 + Matrigel solution, described in plate preparation) and place them in 37 °C incubator overnight.
3.2.3. Establishment of Monoclonal Colonies
Aspirate media from corner of transfected well.
Add 1 mL of PBS to well to wash. Gently shake and aspirate.
Add 1 mL 1× EDTA (1:1000 in PBS) (0.5 mM final concentration in PBS).
Let sit for 4–5 min. Observe under the microscope, and make sure you see single cells.
Add 1 mL of mTeSR media to well and pipet up and down 5–6 times with serological pipettor to dislodge all the cells from the bottom of the well and transfer to tube.
Centrifuge at 300 × g for 1 min.
Aspirate media from tube.
Resuspend in 300 μL of mTeSR and transfer solution to flow sorting tube and place on ice.
Add DAPI to sample at a concentration on 1:10,000.
Add 1 mL of mTeSR media into empty 1.5 mL Eppendorf tube to sort cells into and keep the tube on ice.
Set up gating scheme on FACs-Sort machine, to select for GFP-positive and DAPI-negative single cells (Fig. 3).
Insert 1.5 cm Eppendorf tube into FACs-sort machine and start sorting, collect as many cells as possible (ideally ~5000 to 10,000 cells).
Place the 1.5 cm Eppendorf tube containing sorted cells on Ice immediately after sort.
Remove a 10-cm Matrigel plate from incubator.
Aspirate DMEM/F12 solution from the corner of the Matrigel plate.
Add Y-27632 ROCK inhibitor (1:1000 dilution) (10 mM stock solution) to 10 mL of mTeSR and add solution to the Matrigel plate (see Note 4).
Spin down the 1.5 mL Eppendorf tube with sorted cells.
Aspirate supernatant from the tube.
Resuspend pellet with 1 mL of mTeSR media from step 16 and add to the Matrigel plate.
Shake plate gently to evenly distribute cells across whole surface of the plate and then, place it in 37 °C incubator overnight.
Replace with fresh media (10 mL of mTeSR) the next morning.
Continue replacing media every 2 days for 2 weeks to allow colonies to form.
Check plate under the microscope to look for colonies as they form.
Once colonies are ~1–2 cm in diameter, pick individual clone colonies with 200 μL pipette tip under microscope and transfer to individual wells of 6-well Matrigel-coated plate.
Allow colonies 2–3 days to expand, replacing media daily.
If there is evidence of differentiation (darkening at the center of the colonies, or abnormal beaded looking cells at periphery of colonies), use 10 μL pipette tip to scrape off differentiated cells. Remove and replace with fresh media.
Passage and freeze clones as described in the passaging section above.
Isolate 1/3 of 1 well of 6-well plate of cells for genotyping during passaging.
Spin down cells for genotyping at 300 × g for 1 min in 1.5 mL Eppendorf tube.
Aspirate media.
Resuspend in 1 mL of PBS.
Spin down cells at 300 × g for 1 min in 1.5 mL Eppendorf tube.
Aspirate PBS.
Resuspend in 100 μL of lysis buffer.
In thermocycler, heat up lysed mixture to 75 °C for 15 min.
Add 900 μL of neutralization buffer to lysed solution and store genomic DNA in −20 °C for respective monoclonal lines.
Fig. 3.
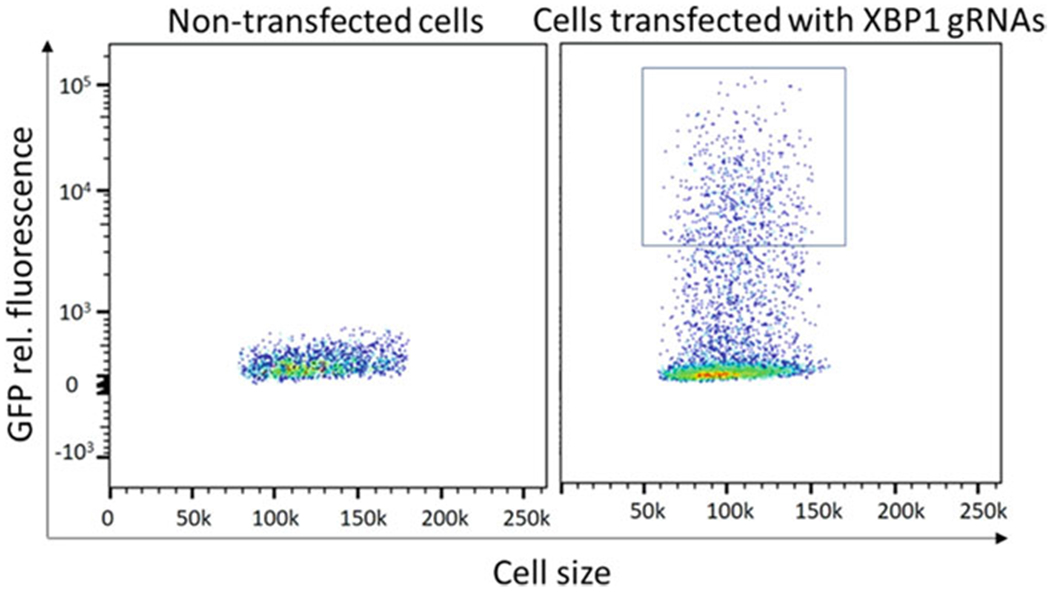
FACS-Sort with transfected cells being GFP positive
3.2.4. Genotyping of Monoclonal Colonies
Thaw genomic DNA of clone of interest on ice or holding vials in hands.
Design and order forward and reverse primers for targeting area of interest from CRISPR design above (Subheading 3.2.1).
Dilute genomic DNA (1:20) with H2O.
Prepare PCR reaction as described below to amplify region of interest (total volume of 20 μL): 2 μL of genomic DNA, 1 μL of F Primer (10× dilution), 1 μL of R Primer (10× dilution), 8 μL GoTaq polymerase (2μ working concentration), and 8 μL of H2O.
Run PCR reaction as follows: 95 °C for 2 min (1 cycle)—Initial Denaturation, 95 °C for 1 min; 65 °C for 1 min, 72 °C for 10 min (30 cycles)—Denaturation, Annealing, Extension; 72 °C for 5 min (1 cycle)—Final Extension; 4 °C for infinity—Soak.
Pipet total volume of 20 μL into a well of prepared 2.5% agarose gel.
Run gel at 100 V for 20 min or until running band makes it to bottom of the gel.
Wearing a face shield, observe the gel under UV light.
Cut out band from the gel with a scalpel. If CRISPR was effective, a shorter segment than the expected sequence should be observed on the gel (Fig. 4).
Purify PCR product from the gel piece by using a DNA gel extraction kit.
Submit purified PCR product for Sanger Sequencing.
Analyze DNA sequence and chromatogram of sequence to determine if desired homozygous deletion for gene of interest is achieved.
Fig. 4.
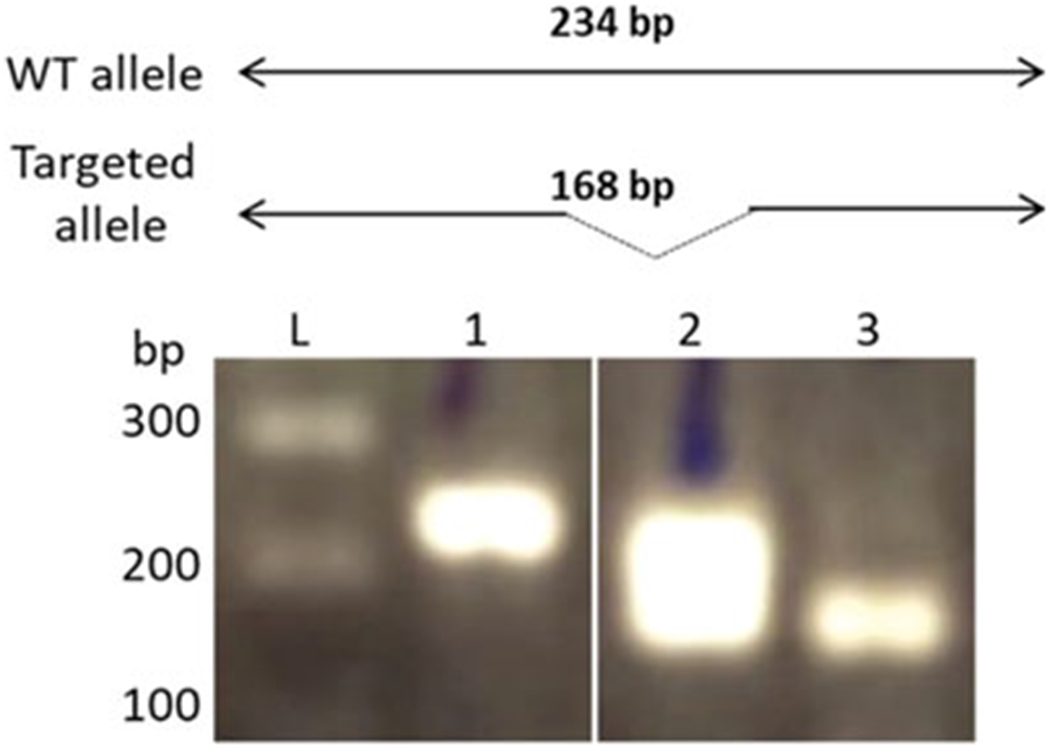
Genotyping PCR of clone, showing wildtype (1), heterozygous knockout (2) and homozygous knockout (3) for gene of interest
3.3. Differentiation of Human Embryonic Stem Cells (hESCs) to Human Intestinal Organoids (HIOs) (Fig. 5)
Fig. 5.
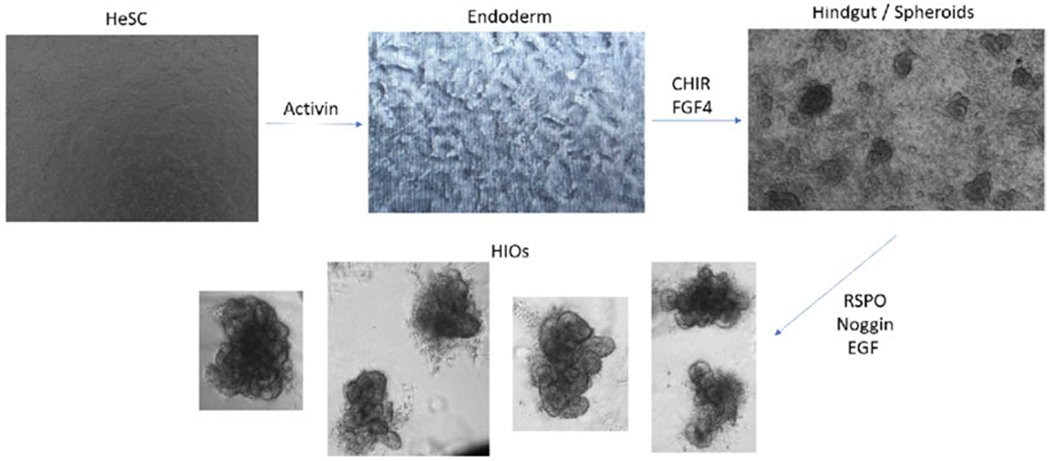
Differentiation protocol from hESCs to HIOs
3.3.1. Cell Culture Plate Preparation
Prepare 24-well Matrigel-coated plates for differentiation, place 250 μL of DMEM/F12 + Matrigel into each well and leave it in incubator overnight (described in plate preparation section above). Use the eight center wells of each plate for our differentiations.
When passaging (refer to passaging section above), plate three wells of >80% confluency to 8 wells of 24-well Matrigel-coated plate.
Allow cells to grow for 1–2 days until >80% confluent. Change media every day with 500uL of mTeSR per well.
3.3.2. hESC to Endoderm Differentiation (See Note 5)
-
Endoderm media (prepare and store at 4 °C):
Day 1 media—Combine RPMI 1640, l-glutamine (final concentration of 2 mM), Normocin (100 μg/mL), and Activin A (100 ng/mL); Day 2 media—Combine RPMI 1640, 0.2% dFBS (vol/vol), l-glutamine (final concentration of 2 mM), Normocin (100 μg/mL), and Activin A (100 ng/mL); Day 3 media—Combine RPMI 1640, 2% dFBS (vol/vol), l-glutamine (final concentration of 2 mM), Normocin (100 μg/mL), and Activin A (100 ng/mL).
Remove mTeSR from each well.
Replace with 500 μL of Day 1 media per well.
After 24 h, replace with Day 2 media per well.
After 24 h, replace with Day 3 media per well.
3.3.3. Endoderm to Hindgut Differentiation (Prepare and Store at 4 °C)
Hindgut media: combine RPMI 1640, 2% dFBS (vol/vol), l-glutamine (final concentration of 2 mM), Normocin (100 μg/mL), FGF4 (500 ng/mL), and CHIR99021 (6 mM).
Remove mTeSR from each well.
Replace with 500 μL of hindgut media daily from day 4 to 8.
On day 7 or day 8 of differentiation, observe plate under microscope and you will see spheroid budding off from layer of hindgut tissue in well.
3.3.4. Hindgut to HIO Maturation (Prepare and Store at 4 °C)
Combine advanced DMEM/F12, B27 supplement (1× final dilution), l-glutamine (2 mM final concentration), Normocin (100 μg/mL), HEPES buffer (15 mM final concentration), R-Spondin1 (500 ng/mL), Noggin (100 ng/mL), and EGF (100 ng/mL).
If there are budding spheroids on day 7 or day 8 of differentiation, can harvest and plate for HIO maturation.
With 1000 μL pipettor, pipet up and down 5–6 times on sides of well to knock off spheroids from basal hindgut layer.
Collect media with spheroids in 1.5 cm Eppendorf tube and let them settle to bottom.
Spin down at 50 × g for 1 min.
Aspirate media from Eppendorf tube while avoiding spheroids at the bottom.
Thaw 500 μL Matrigel pellet on ice.
Resuspend spheroid pellet with 500 μL of Matrigel by gently pipetting up and down to avoid bubbles and ensure spheroids are evenly distributed throughout Matrigel.
Work quickly as Matrigel will start to solidify in 5–10 min.
Switch to a 200 μL pipette tip to pick up 50 μL of spheroids + Matrigel resuspension.
In a new 24-well Nunclon delta surface tissue culture dish, place the resuspended bead of 50 μL into center of one well. Work carefully to avoid bubbles.
Repeat for the rest of spheroid-Matrigel suspension.
Flip the 24-well plate with beads upside down and incubate in 37 °C incubator for 15 min to allow Matrigel beads to solidify.
Add 500 μL human intestinal organoid media to corner of each well.
Replace media every 2–3 days.
3.3.5. Passaging HIOs
After 10–14 days in culture, HIOs will be ready to passage.
Cut tip of 1000 μL pipette tip to avoid disrupting structure of HIOs.
Using 1000 μL pipettor with cut tip, pipet up and down in well with HIOs and break Matrigel bead. Place contents of well into 1.5 cm Eppendorf tube.
Spin down at 50 × g for 1 min.
Carefully aspirate media and Matrigel leaving HIOs in bottom of Eppendorf tube.
Add 500 μL of fresh media to tube.
Using a 100 μL pipettor pipet up and down vigorously for 5–10 min to break and remove mesenchyme/break up HIOs into crypts. Avoid creating bubbles.
Spin down solution at 50 × g for 1 min.
Aspirate media leaving crypt epithelium at the bottom of the Eppendorf tube.
Resuspend gently in 200 μL of thawed Matrigel on ice to avoid creating bubbles, and plate as above (Subheading 3.3.1).
3.3.6. Validation of HIO Differentiation by Immunohistochemistry
At day 3 and day 8 of differentiation, plan to fix and stain wells for endoderm and hindgut markers as below.
Wash one well with cells with 500 μL of 1 × PBS.
Aspirate PBS and fix cells with 4% PFA, add 500 μL to one well for 20 min at room temperature.
Aspirate 4% PFA and wash cells with 0.5 mL of 1 × PBS.
Aspirate 1× PBS and add 500 μL 1× BD permeabilization/blocking buffer to well.
Incubate at room temperature for 20 min.
Aspirate 1× BD permeabilization/blocking buffer.
Add primary antibodies (endoderm—goat anti-SOX17 1:500 and rabbit anti-FOXA2 1:1000) (hindgut—rabbit anti-CDX2 1:500) to fresh 1 × BD buffer and add 500 μL onto each well.
Incubate overnight at 4 °C.
The next day, aspirate antibody solution and wash three times with 500 μL BD buffer, 5 min per wash.
Add secondary antibodies donkey anti-goat Alexa Fluor® 594 1:500 and donkey anti-rabbit Alexa Fluor® 488 1:500 to fresh 1× BD Buffer and pipet 500 μL onto each well. Make sure wells are covered with foil, to protect fluorescent secondary antibodies, from this step forward.
Incubate at room temperature for 2 h.
Aspirate the antibody solution and wash cells 3 times, for 5 min each wash, with 500 μL BD buffer.
Add DAPI (1:10,000 dilution) to 1× PBS and pipet 500 μL onto each well.
Incubate for 5 min at room temperature.
Aspirate solution and 500 μL of fresh 1× PBS.
Image under fluorescent microscope. Definitive endoderm will show positive staining for both SOX17 and FOXA2 and hindgut will show positive staining for CDX2.
Store plates in foil to protect from light at 4 °C.
3.3.7. Validation of HIO Differentiation by Quantitative PCR
At day 3 and day 8 of differentiation, plan to harvest RNA for qPCR.
Aspirate media from well.
Use 300 μL of RX buffer and pipet up and down 5–6 times to collect tissue from the bottom of well.
Collect solution in 1.5 mL Eppendorf tube.
Isolate RNA from RX buffer using RNA isolation kit.
Nanodrop sample to check the concentration of RNA eluted.
Set up and run RT-PCR reaction as per instructions on cDNA Reverse Transcription Kit.
Dilute cDNA five folds with H2O.
Set up qPCR for cDNA samples from Day 3 and Day 8 differentiation time points with qPCR primers for endoderm markers (SOX17and FOXA2) and hindgut markers (CDX2).
There should be upregulation of SOX17 and FOXA2 in endoderm samples and upregulation of CDX2 in hindgut samples.
3.4. Assays Looking at HIO Integrity and Response After Inflammatory Stimulus
3.4.1. Analysis of Epithelial Cell–Cell Junctional Markers
Immunohistochemistry to analyze E-cadherin expression and ZO-1 expression
Cut tip of a 1000 μL pipette tip.
Pipet 1 well with HIOs in Matrigel with 1000 μL pipettor up and down to break up Matrigel bead.
Place in 1.5 mL Eppendorf tube.
Spin down at 50 × g for 1 min.
Carefully aspirate solution and Matrigel leaving HIOs in tube.
Resuspend HIOs in 4% PFA solution and let fix at room temperature for 1 h.
Spin down at 50 × g for 1 min.
Aspirate PFA from tube leaving HIOs at bottom.
Add Rabbit ZO-1 Ab (1:250 dilution) or Rabbit E-cadherin Ab (1:350 dilution) to BD buffer.
Pipet 500 μL of desired antibody to tube with HIOs.
Let incubate at 4 °C overnight.
Next day, spin down at 50 × g for 1 min.
Aspirate primary antibody solution, leaving HIOs at bottom.
Wash 3 times with BD buffer, 10 min per wash, spin down and aspirate after last wash.
Add donkey anti-rabbit Alexa Fluor® 568 (1:500 dilution) to BD buffer.
Add 500 μL of secondary antibody solution to tube.
Incubate at room temperature for 2 h, cover with foil from this step forward to protect fluorescent antibody.
Spin down at 50 × g for 1 min.
Aspirate solution and wash 3 times with BD buffer, 10 min per wash, spin down and aspirate after last wash.
Add DAPI (1:10,000 dilution) in 1× PBS, leave at room temperature for 5 min.
Spin down at 50 × g for 1 min.
Aspirate solution and resuspend in 500 μL of 1× PBS.
Place HIOs on glass bottom petri dish and image under fluorescent microscope.
Store in 1× PBS with the dish covered in foil at 4 °C.
3.4.2. Inflammatory Challenge of HIOs, TNF-α Assay
Add hTNF-α at a final concentration of 25 nM to HIO media.
Pipet 500 μL into 3 wells with HIOs.
Cut 1000 μL pipette tip and collect HIOs from separate wells at following time points (0, 2, 6, and 12 h).
Collect HIOs in 1.5 mL Eppendorf tubes.
Spin down at 50 × g for 1 min.
Aspirate media from tube.
Resuspend in 4% PFA, fix at room temperature for 1 h.
Spin down at 50 × g for 1 min.
Add rabbit cleaved Caspase-3 antibody (1:250 dilution) to BD buffer.
Pipet 500 μL of primary antibody solution to tube with HIOs.
Let incubate at 4 °C overnight.
Next day, spin down at 50 × g for 1 min.
Aspirate primary antibody solution, leaving HIOs at bottom.
Wash with 3 times BD buffer, 10 min per wash, spin down and aspirate after last wash.
Add donkey anti-rabbit Alexa Fluor® 568 (1:500 dilution) to BD buffer.
Add 500 μL of secondary antibody solution to tube.
Incubate at room temperature for 2 h, cover with foil from this step forward to protect fluorescent antibody.
Spin down at 50 × g for 1 min.
Aspirate solution and wash 3 times with BD buffer, 10 min per wash, spin down and aspirate after last wash.
Add DAPI (1:10,000 dilution) in 1× PBS, leave at room temperature for 5 min.
Spin down at 50 × g for 1 min.
Aspirate solution and resuspend in 500 μL of 1 × PBS.
Place HIOs on glass bottom petri dish and image under fluorescent microscope. You should observe increased staining at the greater time points of assay.
Store in 1× PBS with the dish covered in foil at 4 °C.
Acknowledgments
This work was supported in part by the Kenneth Rainin Foundation through a Rainin Innovator Grant.
Footnotes
When preparing Matrigel-coated plates, care should be made to keep Matrigel at 4 °C or on ice prior to diluting with DMEM/F12. At room temperature, Matrigel will solidify within 5–10 min and will not mix evenly with DMEM/F12. If this occurs, Matrigel will not coat tissue culture plates evenly. This is also important to consider when plating HIOs with Matrigel beads. Since it takes 5–10 min for Matrigel to solidify, plates should be kept upside down after bead plating and/or Matrigel should be warmed up in hands prior to resuspending to allow Matrigel with HIOs to stay in bead form.
When working with hESC cultures, careful observation should be made daily in regards to cell morphology. Edges of colonies and centers of colonies may start to differentiate if left in culture without passaging >5–6 days. If this is noted, pipette tips may be used to scrape off the differentiated cells and cells should be passaged immediately. Also of note, spherical structures called embryoid bodies can develop and this will be seen budding off the surface of maintenance stem cell cultures. These should also be scraped off as they can affect efficiency of gene editing and differentiations.
We used 2 guide RNA plasmids along with a Cas9-GFP labeled plasmid for our transfections. Another potentially more efficient methodology to consider is to design and use a single plasmid containing both guide sequences and the Cas9-GFP sequence in the same plasmid. This should ensure that all GFP-positive cells sorted during the FACS sort would also contain both target sequences, theoretically, increasing the efficiency of the number of cells being edited.
We used a limited dilution method post-FACS sort to obtain clonal colonies for genotyping and expansion. By doing so, we assume that the clonal populations we obtain are from a single cell since we dilute out the cells on a 10-cm plate. It is possible that two cells could form a single polyclonal colony, but this is less likely. Another method to ensure definite monoclonal populations is to seed individual sorted cells into 96-well plates. However, we observed that single hESCs do not survive well when plated in single wells. Hence, we recommend using feeder cells if this methodology is used to help with clonal expansion of monoclonal colonies.
Another important consideration for our differentiations is the media in which hESCs are maintained. There are various choices for media such as mTeSR, E8 Flex, and Stemflex. However, not all media choices lead to efficient HIO differentiations. In our experience, using mTeSR for this protocol is the most successful method since it sets up the hESCs to go down the endodermal pathway most efficiently and to generate HIOs effectively.
References
- 1.Byrne SM, Church GM (2015) Crispr-mediated gene targeting of human induced pluripotent stem cells. Curr Protoc Stem Cell Biol 35:5A 8 1–5A 822 [DOI] [PMC free article] [PubMed] [Google Scholar]
- 2.McCracken KW, Howell JC, Wells JM, Spence JR (2011) Generating human intestinal tissue from pluripotent stem cells in vitro. Nat Protoc 6(12):1920–1928 [DOI] [PMC free article] [PubMed] [Google Scholar]
- 3.Spence JR, Mayhew CN, Rankin SA, Kuhar MF, Vallance JE, Tolle K, Hoskins EE, Kalinichenko VV, Wells SI, Zorn AM, Shroyer NF, Wells JM (2011) Directed differentiation of human pluripotent stem cells into intestinal tissue in vitro. Nature 470(7332):105–109 [DOI] [PMC free article] [PubMed] [Google Scholar]
- 4.Barber K, Studer L, Fattahi F (2019) Derivation of enteric neuron lineages from human pluripotent stem cells. Nat Protoc 14(4):1261–1279 [DOI] [PMC free article] [PubMed] [Google Scholar]