Abstract
Serial block-face scanning electron microscopy (SBF-SEM) allows for the collection of hundreds to thousands of serially-registered ultrastructural images, offering an unprecedented three-dimensional view of tissue microanatomy. While SBF-SEM has seen an exponential increase in use in recent years, technical aspects such as proper tissue preparation and imaging parameters are paramount for the success of this imaging modality. This imaging system benefits from the automated nature of the device, allowing one to leave the microscope unattended during the imaging process, with the automated collection of hundreds of images possible in a single day. However, without appropriate tissue preparation cellular ultrastructure can be altered in such a way that incorrect or misleading conclusions might be drawn. Additionally, images are generated by scanning the block-face of a resin-embedded biological sample and this often presents challenges and considerations that must be addressed. The accumulation of electrons within the block during imaging, known as “tissue charging,” can lead to a loss of contrast and an inability to appreciate cellular structure. Moreover, while increasing electron beam intensity/voltage or decreasing beam-scanning speed can increase image resolution, this can also have the unfortunate side effect of damaging the resin block and distorting subsequent images in the imaging series. Here we present a routine protocol for the preparation of biological tissue samples that preserves cellular ultrastructure and diminishes tissue charging. We also provide imaging considerations for the rapid acquisition of high-quality serial-images with minimal damage to the tissue block.
Keywords: Serial Block-Face Scanning Electron Microscopy, SBF-SEM, 3D-EM, 3D-Reconstruction, Tissue Preparation, Specimen Preparation, Serial Sections, Ultrastructure, High-resolution, Volumetric Imaging, Biological, Large Volume
SUMMARY:
This protocol outlines a routine method for using serial block-face scanning electron microscopy (SBF-SEM), a powerful 3D imaging technique. Successful application of SBF-SEM hinges on proper fixation and tissue staining techniques, as well as careful consideration of imaging settings. This protocol contains practical considerations for the entirety of this process.
INTRODUCTION:
Serial block face scanning electron microscopy (SBF-SEM) was first described by Leighton in 1981 where he fashioned a scanning electron microscope augmented with an in-built microtome which could cut and image thin sections of tissue embedded in resin. Unfortunately, technical limitations restricted its use to conductive samples, as non-conductive samples such as biological tissue accumulated unacceptable levels of charging (electron buildup within the tissue sample)1. While coating the block-face between cuts with evaporated carbon reduced tissue charging, this greatly increased imaging acquisition time and image storage remained a problem as computer technology at the time was insufficient to manage the large file sizes created by the device. This methodology was revisited by Denk and Horstmann in 2004 using a SBF-SEM equipped with a variable pressure chamber2. This allowed for the introduction of water vapor to the imaging chamber which reduces charging within the sample, making imaging of non-conductive samples viable albeit with a loss of image resolution. Further improvements in tissue preparation and imaging methods now allow for imaging using high vacuum, and SBF-SEM imaging no longer relies on water vapor to dissipate charging3–9. While SBF-SEM has seen an exponential increase in use in recent years, technical aspects such as proper tissue preparation and imaging parameters are paramount for the success of this imaging modality.
SBF-SEM allows for the automated collection of thousands of serially-registered electron microscopy images, with planar resolution as small as 3–5 nm10,11. Tissue, impregnated with heavy metals and embedded in resin, is placed within a scanning electron microscope (SEM) containing an ultramicrotome fitted with a diamond knife. A flat surface is cut with the diamond knife, the knife is retracted, and the surface of the block is scanned in a raster pattern with an electron beam to create an image of tissue ultrastructure. The block is then raised a specified amount (e.g., 100 nm) in the z-axis, known as a “z-step,” and a new surface is cut before the process is repeated. In this way a 3-dimensional (3D) block of images is produced as the tissue is cut away. This imaging system further benefits from the automated nature of the device, allowing one to leave the microscope unattended during the imaging process, with the automated collection of hundreds of images possible in a single day.
While SBF-SEM imaging primarily uses backscattered electrons to form an image of the block-face, secondary electrons are generated during the imaging process12. Secondary electrons can accumulate, alongside backscattered and primary-beam electrons that do not escape the block, and produce “tissue charging,” which can lead to a localized electrostatic field at the block-face. This electron accumulation can distort the image or cause electrons to be ejected from the block and contribute to the signal collected by the backscatter detector, decreasing the signal-to-noise ratio13. While the level of tissue charging can be decreased by reducing the electron beam voltage or intensity, or reducing beam dwell time, this results in a diminished signal-to-noise ratio14. When an electron beam of lower voltage or intensity is used, or the beam is only allowed to dwell within each pixel space for a shorter period of time, less backscattered electrons are ejected from the tissue and captured by the electron detector resulting in a weaker signal. Denk and Horstmann dealt with this problem by introducing water vapor into the chamber, thereby reducing charge in the chamber and on the block face at the cost of image resolution. With a chamber pressure of 10–100 Pa, a portion of the electron beam is scattered contributing to image noise and a loss of resolution, however this also produces ions in the specimen chamber which neutralizes charge within the sample block2. More recent methods for neutralizing charge within the sample block use focal gas injection of nitrogen over the block-face during imaging, or introducing negative voltage to the SBF-SEM stage to decrease probe-beam-lading energy and increase signal collected6,7,15. Rather than introducing stage bias, chamber pressure or localized nitrogen injection to decrease charge buildup on the block surface, it is also possible to increase the conductivity of the resin by introducing carbon to the resin mix allowing for more aggressive imaging settings16. The following general protocol is an adaptation of the Deerinck et al. protocol published in 2010 and covers modifications to tissue preparation and imaging methodologies we found useful for minimizing tissue charging while maintaining high resolution image acquisition3,17–19. While the previously mentioned protocol focused on tissue processing and heavy metal impregnation, this protocol provides insight into the imaging, data analysis, and reconstruction workflow inherent to SBF-SEM studies. In our laboratory, this protocol has been successfully and reproducibly applied to a wide variety of tissues including cornea and anterior segment structures, eyelid, lacrimal and harderian gland, retina and optic nerve, heart, lung and airway, kidney, liver, cremaster muscle, and cerebral cortex/medulla, and in a variety of species including mouse, rat, rabbit, guinea pig, fish, monolayer and stratified cell cultures, pig, non-human primate, as well as human20–23. While small changes may be worthwhile for specific tissues and applications, this general protocol has proven highly reproducible and useful in the context of our core imaging facility.
PROTOCOL:
All animals were handled according to the guidelines described in the Association for Research in Vision and Ophthalmology Statement for the Use of Animals in Vision and Ophthalmic Research and the University of Houston College of Optometry animal handling guidelines. All animal procedures were approved by the institutions in which they were handled: Mouse, rat, rabbit, guinea pig, and non-human primate procedures were approved by the University of Houston Animal Care and Use Committee, zebrafish procedures were approved by the DePauw University Animal Care and Use Committee, and pig procedures were approved by the Baylor College of Medicine Animal Care and Use Committee. All human tissue was handled in accordance with the Declaration of Helsinki regarding research on human tissue and appropriate institutional review board approval was obtained.
1. Tissue Processing
1.1. Prepare a stock solution of 0.4 M sodium cacodylate buffer by mixing sodium cacodylate powder in ddH2O. Thoroughly mix buffer and pH adjust the solution to 7.3. This buffer is used to make fixative (composition described below in step 1.3), washing buffer, as well as osmium and potassium ferrocyanide solutions.
NOTE: Perfusion fixation is often the best method of fixation for SBF-SEM studies, as fixation occurs rapidly and throughout the body. If perfusion fixation is not possible within your study design, skip to step 1.3.
1.2. Perform perfusion fixation with the appropriate physiological pressure for the animal model24–26. This is done via transcardial sequential perfusion with heparinized saline followed by fixative, each placed at a specific height (e.g., 100 cm) above the organism (appropriate to the physiological pressure of the vascular system in the animal model), with fixative flowing into the left ventricle, and exiting out of an incision made in the right atrium. Tissue of interest will become pale as blood is replaced with fixative, if all or a portion of your tissue does not blanche then tissue may not be appropriately fixed and ultrastructure may not be preserved.
1.3. Use a razor blade or sharp scalpel to trim tissue samples into blocks no larger than 2 mm x 2 mm x 2 mm. If step 1.2 was skipped, do this swiftly so that tissue can be immersion fixed as quickly as possible.
1.3.1. Alternatively, dissect tissue under fixative and transfer to fresh fixative to complete the immersion process. The final composition of the fixative consists of 0.1 M sodium cacodylate buffer containing 2.5% glutaraldehyde and 2 mM calcium chloride. Allow fixation to proceed for a minimum of 2 hours at room temperature and a maximum of overnight at 4 °C. If possible, use a rocker/tilt plate to gently agitate samples while fixing.
1.3.2. Alternatively, if an inverter microwave is available, fix tissue in aforementioned fixative under vacuum at 150 watts for 4 cycles of 1 minute on, 1 minute off. Microwave fixation is the preferred method for step 1.3 as it rapidly fixes tissue and preserves tissue ultrastructure27.
NOTE: Tissue should never be allowed to dry during this protocol, care should be taken to transfer tissue quickly from one solution to the next.
1.4. Wash fixed tissue 5x for 3 minutes each (15 minutes total) at room temperature in 0.1 M sodium cacodylate buffer containing 2 mM calcium chloride.
1.5. Make the following osmium ferrocyanide solution fresh, preferably during the previous wash steps. Combine a 4% osmium tetroxide solution (prepared in ddH2O) with an equal volume of 3% potassium ferrocyanide in 0.2 M cacodylate buffer with 4 mM calcium chloride. After the previous wash step, place the tissue in this solution for 1 hour on ice in the dark, and in the fume hood.
NOTE: Osmium tetroxide is a yellow crystalline substance that comes in an ampule. To create the osmium tetroxide solution, crack open the ampule, add ddH2O, and sonicate for 3–4 hours in the dark until the crystals are completely dissolved. Osmium tetroxide solution is a clear yellow solution, if the solution is black the osmium has been reduced and should no longer be used.
1.6. While the tissue is incubating in the osmium ferrocyanide solution, begin preparing the thiocarbohydrazide (TCH) solution. Prepare this solution fresh and have it readily available at the end of the 1 hour osmium ferrocyanide fixation period. Combine 0.1 g of thiocarbohydrazide with 10 mL of ddH2O and place this solution into a 60 ᵒC oven for 1 hour. To ensure the solution is dissolved, gently swirl every 10 minutes. Prior to use, filter this solution through a 0.22 μm syringe filter.
1.7. Prior to incubating in TCH, wash the tissue with room temperature ddH2O 5x for 3 minutes each (15 minutes total).
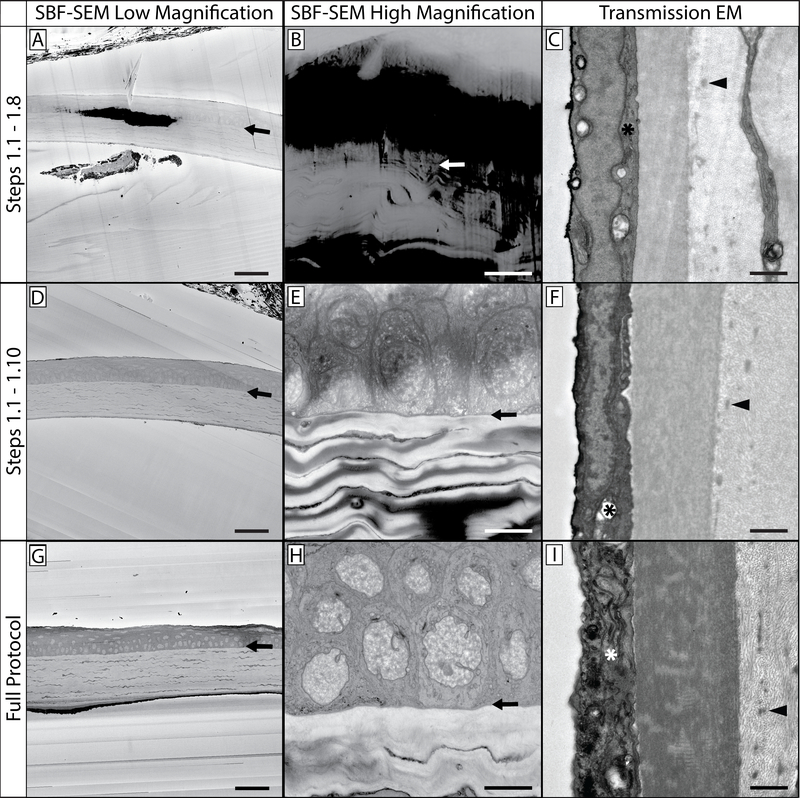
1.8. Place the tissue in the filtered TCH solution for a total of 20 minutes at room temperature (Figure 1A–C).
Figure 1: SBF-SEM and TEM comparisons at various steps in the protocol.
This protocol contains multiple steps in which sample tissue is stained with heavy metals. This affects not only tissue contrast and appreciation of cellular structures and organelles, but also the levels of charging that occurs when the tissue is imaged. This figure contains three distinct views of prepared tissue: a low magnification view (A, D & G), a high magnification view (B, E & H), and a TEM comparison of prepared mouse cornea (C, F & I). It can be noted that higher magnification images can result in increased tissue charging, as the electron beam is concentrated in a smaller region of tissue. The top row (A-C) is a representative sample from tissue processed through the completion of step 1.8, and has been impregnated with potassium ferrocyanide, osmium tetroxide, and thiocarbohydrazide. The arrows in the first two columns show the epithelial-stromal interface as a reference point. Note the low level of contrast in comparison to the bottom two rows, as well as the increased levels of tissue charging. The sample in the middle row (D-F) was processed through the completion of step 1.10 and benefits from an additional osmium tetroxide step, and is visibly more contrasted than the sample in the top row. While cellular structures are discernible, charging is still present. The sample in the bottom row (G-I) benefits from the full staining protocol and has minimal tissue charging. TEM imaging reveals tissue contrast levels imparted by the heavy metals present at each step (right column): organelles in the corneal endothelium (*) are more contrasted and apparent as tissue processing continues through the protocol. Additionally, stromal collagen and fibrillin details become more visible (arrowhead) as the protocol is completed. Panel A, D & G scale bar = 50 μm. Panel B, E & H scale bar = 10 μm. Panel C, F & I scale bar = 1 μm.
1.9. Following incubation in TCH, wash the tissue 5x for 3 minutes each (15 minutes total) in room temperature ddH2O.
1.10. Place tissue in ddH2O containing 2% osmium tetroxide (not osmium reduced with potassium ferrocyanide) for 30 minutes at room temperature. This should be done in the fume hood and in the dark as osmium can be reduced by light (e.g., under aluminum foil) (Figure 1D–F).
1.11. Following osmium tetroxide incubation, wash tissue 5x for 3 minutes each (15 minutes total) in room temperature ddH2O.
1.12. Place tissue in 1% aqueous uranyl acetate (uranyl acetate powder mixed in ddH2O) overnight in a refrigerator at 4 ᵒC.
1.13. Just before removing tissue from the refrigerator, prepare fresh Walton’s lead aspartate solution. Begin by dissolving 0.066 g of lead nitrate in 10 mL of 0.03 M aspartic acid solution (0.04 g aspartic acid in 10 mL of distilled water) and adjust pH to 5.5 with 1 N KOH (0.5611 g in 10 mL of distilled water).
CAUTION: A precipitate can form when adjusting the pH. This is not acceptable.
1.13.1. Using a stir bar, slowly add the 1 N KOH dropwise while monitoring pH. Pre-heat the finished clear lead aspartate solution in a 60 ᵒC oven for 30 minutes. If a precipitate forms the solution cannot be used and another solution must be prepared.
1.14. Remove the tissue from the refrigerator and wash 5x for 3 minutes each (15 minutes total) in room temperature ddH2O.
1.15. After washing, place the tissue in the warmed Walton’s lead aspartate solution for 30 minutes while maintaining the temperature at 60 °C.
1.16. After incubation in Walton’s lead aspartate, wash the tissue 5x for 3 minutes each (15 minutes total) in room temperature ddH2O (Figure 1G–I).
1.17. Dehydrate the tissue through an ice-cold acetone series (30%, 50%, 70%, 95%, 95%, 100%, 100%, and 100% acetone (in ddH2O where applicable) allowing 10 minutes for each step in the series.
1.18. Following the ice-cold dehydration series, place tissue in room temperature acetone for 10 minutes.
1.18.1. During this time, formulate Embed 812 ACM resin. Use the “hard mix” recipe as it is more resistant to beam damage. Mix the resin thoroughly, and place the tissue into Embed 812:acetone (1:3 mix) for 4 hours, followed by Embed 812:acetone (1:1 mix) for 8 hours or overnight, and finally Embed 812:acetone (3:1 mix) overnight. Perform these resin-embedding steps at room temperature.
1.19. The next day, place the tissue in 100% Embed 812 for 4–8 hours, then in fresh 100% Embed 812 overnight, and finally into fresh 100% Embed 812 for 4 hours. Perform these resin-embedding steps at room temperature.
1.19.1. Just before embedding, place a small amount of resin into a mixing container and slowly mix (a wooden stick can be used for stirring) in carbon black powder until the resin is saturated with the powder but is still fluid and does not become grainy. It should resemble thick ink and be able to slowly drip from the wooden stick without visible clumps.
1.20. Orient the tissue samples in a silicone rubber mold and take a picture so that sample orientation within the resin block is recorded and can be referenced. Cover the samples in carbon black saturated resin at the tip of the silicone mold and place the mold in an oven for ~1 hour at 65 ᵒC.
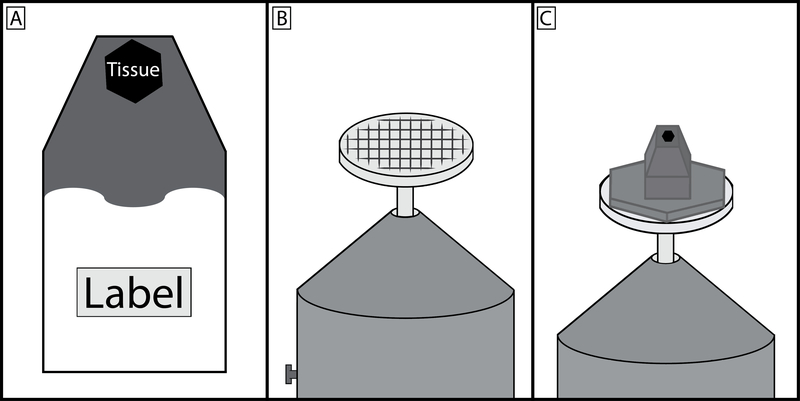
1.20.1. Place the mold at an incline to contain the resin at the tip of the mold where it covers the tissue sample. Place a label with an experiment/tissue sample identifier in the mold at the opposite end of the resin (Figure 2A).
Figure 2: Schematic of embedded tissue block, specimen pin, and final preparation.
(A) Tissue should be placed in a known orientation at the very tip of the resin mold and the upper third of the mold filled with carbon black saturated resin. The region of the mold furthest from the tissue should remain clear so that the experiment label can be clearly seen. (B) Specimen pin surface should be scratched to produce a grid pattern, this allows for a greater area of contact for the cyanoacrylate glue to harden between the prepared specimen block and pin. (C) The carbon black saturated resin should make a wide area of contact with the specimen pin head, however the region that is cut by the diamond knife should be no greater than 1×1 mm. It is good practice to taper the block towards the tip. This minimizes cutting forces on the diamond knife and by having a wider base, the block is more resistant to separating from the pin during sectioning.
1.21. Remove the silicone mold from the oven and fill the remainder of the mold with clear resin (no carbon black) making sure that the label remains visible. Cure the resin infused with carbon black enough as to not readily mix with the clear resin.
1.21.1 Prepare an extra well within the mold that does not contain tissue. Beginning with the extra well, fill the remainder of the mold with clear resin.
1.21.2 If the carbon black infused resin begins to bleed into the clear resin, place the silicone mold back into the oven for additional time (e.g., 15 minutes).
1.21.3 Once all of the tissue samples have been topped off with clear resin, place the silicone mold back into the oven (flat, no incline) at 65 ᵒC for 48 hours to complete the curing process.
2. Block Preparation
NOTE: The method will depend on how the sample is oriented in the block and how the sectioning is to take place. However, the most common tissue orientation finds the tissue centered in the tip of the resin block, perpendicular to the long end of the resin block.
2.1 In most cases, first trim the end of the block to locate the tissue by placing the specimen block in the microtome chuck with the tapered end sticking up approximately 5–6 mm out of the chuck. Lock it in place with the set screw and place it under a heat lamp.
2.2 After several minutes the block will be malleable and easy to trim. Place the chuck in the stereomicroscope holder and use a new double-edge razor blade to make thin sections parallel with the block face until the tissue is visible. This is best seen by angling light across the block face, the tissue sample will be less reflective and granular compared to those portions of the resin that are devoid of tissue. Consult the photograph taken of tissue samples prior to introduction of carbon black saturated resin for an idea of how and where the tissue is located.
2.3 Set one specimen pin holder aside for trimming purposes. This pin holder is never placed into the SEM chamber and can therefore be handled without gloves, this will be referred to as the trimming pin holder. Any specimen holder destined to be placed into the imaging chamber should never be touched without gloves. This avoids introducing grease and oil into the microscope chamber.
2.4 Place an aluminum specimen pin in the trimming pin holder and slightly tighten the set screw with the face (flat surface) of the pin held 3–4mm above the pin holder.
2.5 Make several deep, crisscrossing scratches in the face of the pin to provide a larger surface area for the glue used to hold the specimen in place. If an aluminum pin is used, a small steel flathead screwdriver is recommended for this step (Figure 2B).
2.6 Place the chuck containing the tissue sample back under the heat lamp until the resin becomes soft and malleable, then place it into the chuck-receptacle under the stereomicroscope.
2.7 Using a double-edged razor blade to trim away excess resin from the portion of the resin block containing the tissue sample. Ultimately the size of tissue block attached to the pin will be approximately 3 mm in diameter and 2–3 mm in height.
2.7.1. Carefully push the razor straight down into the resin block roughly 1–2 mm, then carefully push the razor horizontally into the resin block at a depth equal to the previous cut. Do this slowly and with great care, as it is possible to damage or cut away the portion of the block containing the tissue sample. As the two cuts meet, the excess resin will separate from the block. Continue to remove resin until only a 3 mm x 3 mm raised area remains.
2.8 After this initial trimming, place the block (still in the chuck) under the heat lamp for several minutes.
2.9 Once the resin becomes soft and malleable, place the block back under the stereomicroscope. Using a new double-edge razor blade, cut off the top of the resin block, roughly 1 mm below the trimmed portion, with a single smooth cut. A flat surface is preferable as this will be glued to the specimen pin. Be careful not to allow the sample to become lost, as this step requires some force which can transfer to the removed portion of the block and cause it to fly away. Place the cut and trimmed sample aside.
2.10 Place the trimming pin holder containing the cut aluminum pin in the stereomicroscope receptacle. Apply a thin layer of cyanoacrylate glue to the pin face such that it completely covers the pin without forming a visible meniscus. Pick up the trimmed piece of the tissue block with forceps and place in on the pin face. Center the tissue sample on the specimen pin. Push it down and hold it for several seconds. Allow the glue to set for several minutes.
2.11 When the glue is thoroughly dry, place the trimming pin holder back under the stereomicroscope. Using a fine file, file away excess resin so that no resin is overhanging the pin. The resin shape should resemble the circular pin head.
2.12 Locate the tissue on the raised portion of your resin block, oblique lighting is useful for this. Using a double-edge razor, the raised portion of the resin containing the tissue sample must be trimmed to an area no larger than 1 mm2. If possible, the block-face can be trimmed even smaller, this will reduce stress on the diamond knife and improve its longevity.
2.12.1. Remove as much excess resin as possible, leaving the block slightly longer in one dimension. This is done slowly and with care, as it is possible for the resin containing the tissue sample to break away if too much force is applied. While a razor is recommended, a fine metal file can be used for this step.
2.13 With a fine metal file angle the excess resin, in the area outside the raised portion containing the tissue sample, down towards the edge of the pin (Figure 2C).
2.14 Remove resin particles and dust from the prepared sample before applying silver paint followed by gold sputtering. Mix silver with acetone so that it is an easily spreadable liquid, akin to nail polish (but not so thin that it drips off of the applicator) and apply a thin coat to the entire sample block surface. Acetone evaporates rapidly, so it may be necessary to add additional acetone as the silver paint begins to thicken.
2.14.1 Allow the silver paint to dry overnight before loading into the microscope.
NOTE: This silver layer must be thin in order to avoid expanding the block-face beyond 1 mm x 1 mm, and while the silver paint has never damaged the diamond knife, smaller block-faces are still recommended to preserve the longevity of the diamond knife. The acetone mixed in with the silver must evaporate completely before gold-sputtering or loading the sample into the microscope to avoid introducing acetone vapor into the imaging chamber.
2.14.2 Following application of silver paint, apply a thin layer of gold to the sample block. Using a standard vacuum sputtering device equipped with a standard gold foil target, a chamber pressure of 200 milliTorr (Argon gas) and 40 milliamps running for 2 minutes will result in a 20 nm thick gold coating.
2.15 After coating, place the mounted and trimmed block in a tube with the appropriate experiment label attached. Create custom tubes using disposable transfer pipettes.
2.15.1. Cut the transfer pipette just below the bulb, leaving a short portion of the transfer pipette tube attached below the bulbous end. Shorten the tubular portion that was cut away, and cut the pipette tip back enough so that the aluminum specimen pin can be pushed snuggly inside of it.
2.15.2. Place the end containing the aluminum specimen pin within the bulbous end of the modified transfer pipette.
2.16 Before loading a prepared tissue block, carefully trim away excess silver paint from the surface of the block face.
3. SEM Settings for Imaging the Block Face
NOTE: The imaging settings that follow were produced on the device used by the authors, which is listed in the Table of Materials provided. While this device is capable of variable pressure imaging, best results were captured under high vacuum.
3.1. Dwell Time:
Use 12 μs/px during serial sectioning. When a region of interest has been identified, a higher resolution image can be acquired at 32 μs/px.
3.2. Vacuum Settings:
Use a gun pressure of 9e-008 Pa, a column pressure of 1.1e-004 Pa, and a chamber pressure of 9.5e-002 Pa.
3.3. Capture Time:
With the above settings, capture a 2048×2048 px image stack at a rate of 50 seconds per image. Higher resolution images of regions of interest can be captured at 4096×4096 px at just under 9 minutes per image.
3.4. Section Thickness:
Use 100–200 nm. Less is possible, but may require lower beam voltage, intensity, or dwell time.
3.5. High Voltage (HV):
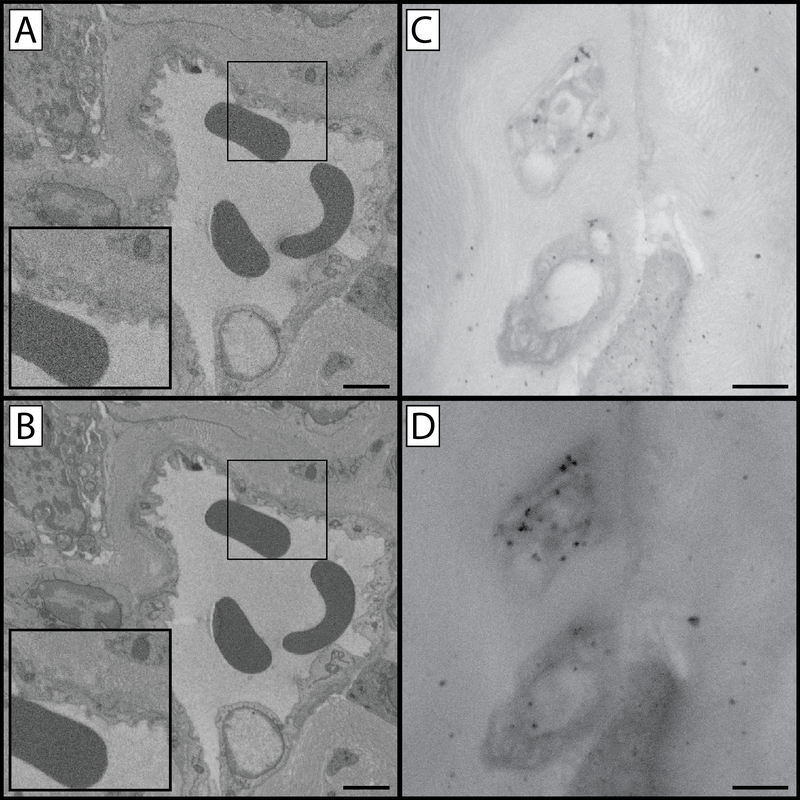
Use 7–12 kV. While increasing the voltage reduces the spot size and increases resolution, it introduces more possibility for beam damage. Higher kV increases the beam penetration which results in loss of details. However, lowering the kV degrades the signal to noise ratio (Figure 3)14.
Figure 3: Comparison of image capture settings.
(A & B) Panels A and B compare image quality and resolution as a function of pixel dwell time. Panel A was created using a 32 μs/pixel dwell time at 4 kV and suffers from a diminished signal to noise ratio as is apparent in the “grainy” appearance of the enlarged inset. Panel B was created using a 100 μs/pixel dwell time at 4 kV. Increasing the pixel dwell time increases the signal to noise ratio and reveals an increased level of cellular detail, however increased pixel dwell time has the potential to lead to tissue charging and/or heat build-up which softens the block and introduces cutting artefacts (chatter) when sectioning. Panels C and D compare images captured under identical exposure conditions but with two different beam kV values. Tissue in these panels was impregnated with gold-toned nanogold particles to make differences in beam-penetration depths more apparent. Panel C was captured at 9 kV while panel D was captured at 21 kV. Increased kV has the advantage of increased contrast (D), however details are lost as result of gathering electrons from a greater depth of tissue (C). As a result of sampling a larger cross section, larger numbers of immunogold particles specific for GAP 43 are visible while non-specific labeling remains the same resulting in an increased signal-to-noise ratio. Panel A & B scale bar = 2 μm. Panel C & D scale bar = 1 μm.
3.6. Beam Intensity (BI):
The author’s SBF-SEM device offers a beam intensity scale ranging from 1–20. On this scale, values of 5–7 give quality images without excessive charging and beam damage. The higher the BI the greater the resolution however, there is more chance of charging and beam damage14.
3.7. Spot Size and Image Magnification:
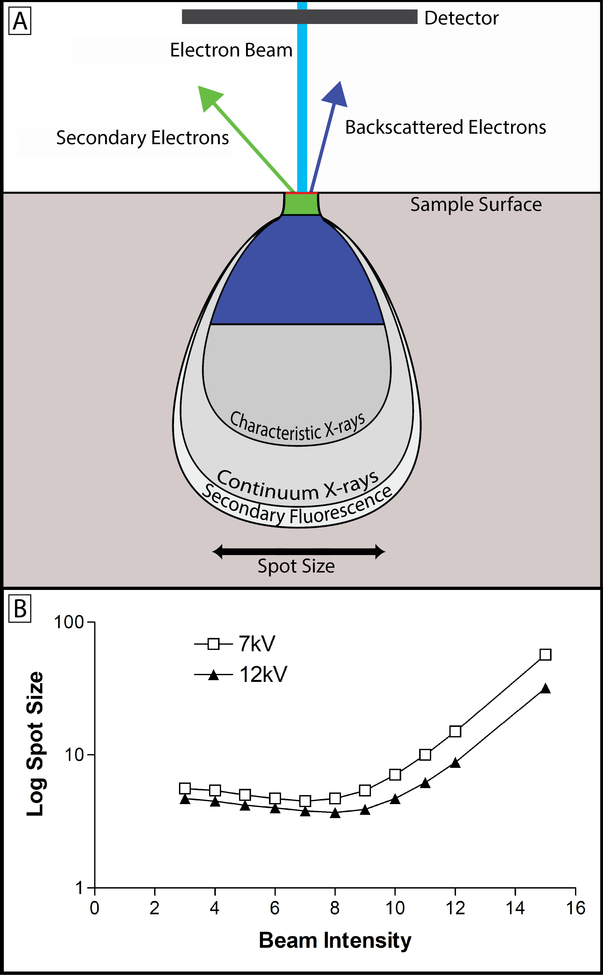
Determine the spot size by the beam intensity and voltage level. Ideally, the spot size should not be larger than the pixel size used. The pixel size is determined by dividing the field of view (FOV) by the number of pixels. For example, a 25 μm FOV with an image size of 2048×2048 px would give 12.2 nm per pixel. Therefore spot size should be no greater than 12.2 nm. Figure 4 shows how HV, BI and spot size are related.
Figure 4: Beam intensity, kV and spot size.
(A) Upon contacting the tissue sample, the electron beam (light blue) yields a teardrop-shaped interaction volume, from which varying forms of energy are produced from the interaction between beam electrons and the tissue sample. The teardrop shape is a function of tissue density and heavy metal staining along with beam energy, and the tilt angle of the electron beam43. While x-rays, auger electrons, and tertiary electrons are produced during SBF-SEM imaging, the primary concern is with backscattered (dark blue) and secondary (green) electrons13. The image produced with SBF-SEM imaging is produced by collecting backscattered electrons. These electrons originate from elastic interactions between the beam and the sample, and the signal collected is highly dependent on the atomic number of atoms interacted with – hence the need for heavy metal staining44. Secondary electrons originate from inelastic interactions between the beam and the sample and detection of their signal is highly dependent on surface orientation. Because the block-face is flat in SBF-SEM, secondary electrons do not contribute meaningfully to the signal collected13. In fact, secondary electron accumulation on the surface of the block can be a major source of charging and has a deleterious effect on image quality2. (B) This graph shows the relationship between beam intensity, beam kV, and spot size. The spot size is the spatial resolution of the beam, and determines the resolution limit of the images being produced. Lowering kV increases the spot size, but also decreases the imaging depth allowing for finer appreciation of detail. This has the effect of decreasing the detectable signal as well. Increasing beam intensity offers an initial improvement on spot size and signal detection, but rapidly increases levels of tissue charging. Ultimately, the beam intensity and kV values chosen are sample dependent and best determined empirically in relation to the scientific question being asked.
3.8. Working Distance (WD):
With block face imaging the working distance is not adjustable. It is simply a factor of focus. It will be nearly identical for all blocks imaged. While the working distance is not adjustable, it plays a critical role in the resolution of the image captured. As working distance decreases, the resolution limit on images captured increases. In some cases it may be possible to decrease the working distance by making modifications within the imaging chamber, however these modifications must be made at the user’s discretion. In order to decrease the working distance and increase image resolution, we loosened the door mount microtome screws and repositioned the microtome so that it rested ~2 mm closer to the beam detector after retightening the screws.
3.9. Resolution:
Using the above settings, x & y resolution as high as 3.8 nm is possible. It is important to note that resolution is limited by beam spot size as well as the pixel resolution of the image captures (e.g., a 20 μm field of view captured in a 2048×2048 pixel image has a pixel resolution of 9.8 nm, even if a 3.8 nm spot size was used). Image resolution in the z-plane is dependent on sectioning thickness, we find that 100–200 nm works well with this protocol.
REPRESENTATIVE RESULTS:
Mouse Cornea
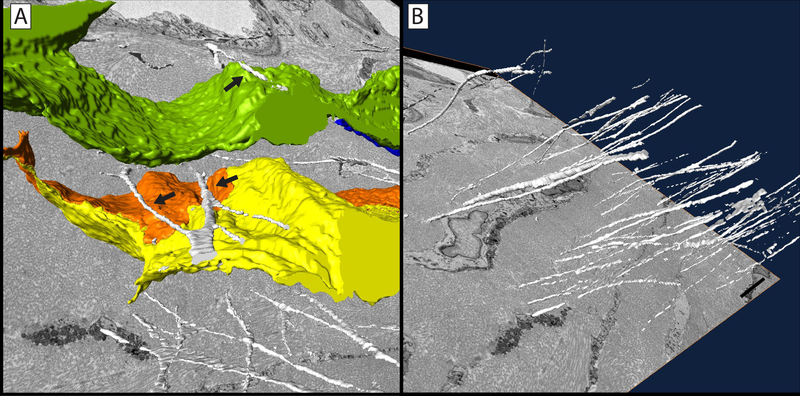
This protocol has been applied extensively to the mouse cornea. Using SBF-SEM imaging a network of elastin-free microfibril bundles (EFMBs) were shown to be present within the adult mouse cornea. It was previously believed that this network was only present during embryonic and early postnatal development. SBF-SEM revealed an extensive EFMB network throughout the cornea, with individual fibers found to be 100–200 nm in diameter when measured in cross-section. It was also found that this EFMB network was organized in distinct layers, with fibers closely associated with keratocytes, even lying within shallow invaginations on the keratocyte surface (Figure 5). The discovery of EFMB fibers in the adult cornea led to immunogold-labeling transmission electron microscopy (TEM), fluorescence and confocal studies to further understand the nature of this network23.
Figure 5: Elastin-free microfibril bundle network in the mouse cornea.
3D reconstruction of microfibrils (white) closely associated with keratocytes (yellow, orange & green) within the corneal stroma. The microfibrils can be seen adjacent to, and in some cases within shallow grooves in, corneal keratocytes (arrows) (A). This network of elastin-free microfibrils are organized in distinct layers within the corneal stroma (B). Scale bar = 2 μm. The image block reconstructed is 45×45 μm in the x & y axis, and 30 μm in the z axis with voxel a resolution of 22×22×100 nm.
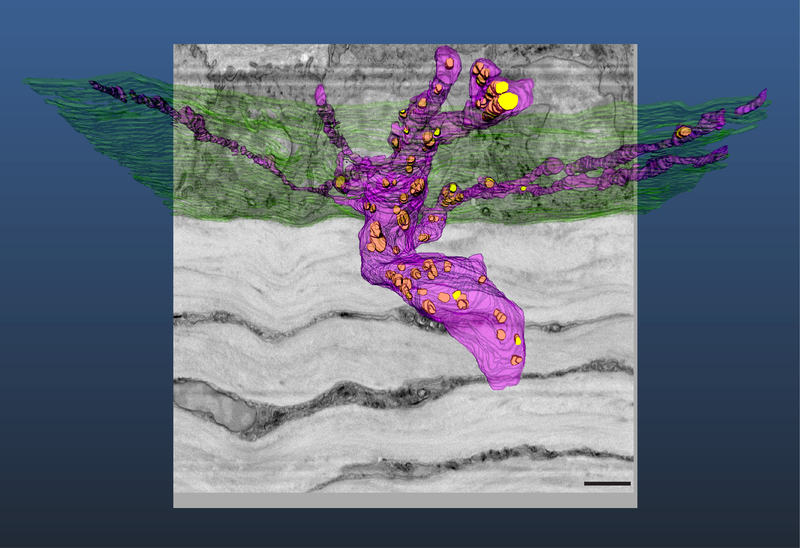
Further application of this protocol led to the discovery of a previously unknown population of central corneal nerves that fuse with basal epithelial cells at the stromal-epithelial border (Figure 6). Previously, it was believed that all nerves interacting with the epithelium at this border penetrated into the corneal epithelium and ramified producing the subbasal and epithelial plexi. In this study, ~45% of central nerves interacting with the basal epithelium underwent cell-cell fusion rather than simple penetration. Using stereological methods applied to SBF-SEM data sets, it was possible to show this novel nerve population had a surface-to-volume ratio roughly half that of penetrating nerves, consistent with their “swollen” appearance (Nerve Fusion - 3.32±0.25, Nerve Penetration – 1.39±0.14, p ≤ 0.05). 3D reconstructions of penetrating and fusing nerve bundles and their mitochondria were created, highlighting the lack of mitochondria in fused portions of the nerve bundles. The discovery of neuronal-epithelial cell fusion using SBF-SEM led to fluorescence studies verifying membrane continuity between the two fused cells21.
Figure 6: Reconstruction of corneal nerves passing through basal lamina at the stromal-epithelial border.
3D reconstruction of a penetrating nerve (purple) as it passes through the basal lamina (green). This nerve can be seen to bifurcate prior to penetration. After penetrating into the epithelium, both nerve branches underwent ramification. Mitochondria (yellow) are visible in the stromal and epithelial portions of the nerve bundle. Scale bar = 2.5 μm. The image block reconstructed is 25×25 μm in the x & y axis, and 14 μm in the z axis with a voxel resolution of 12×12×100 nm.
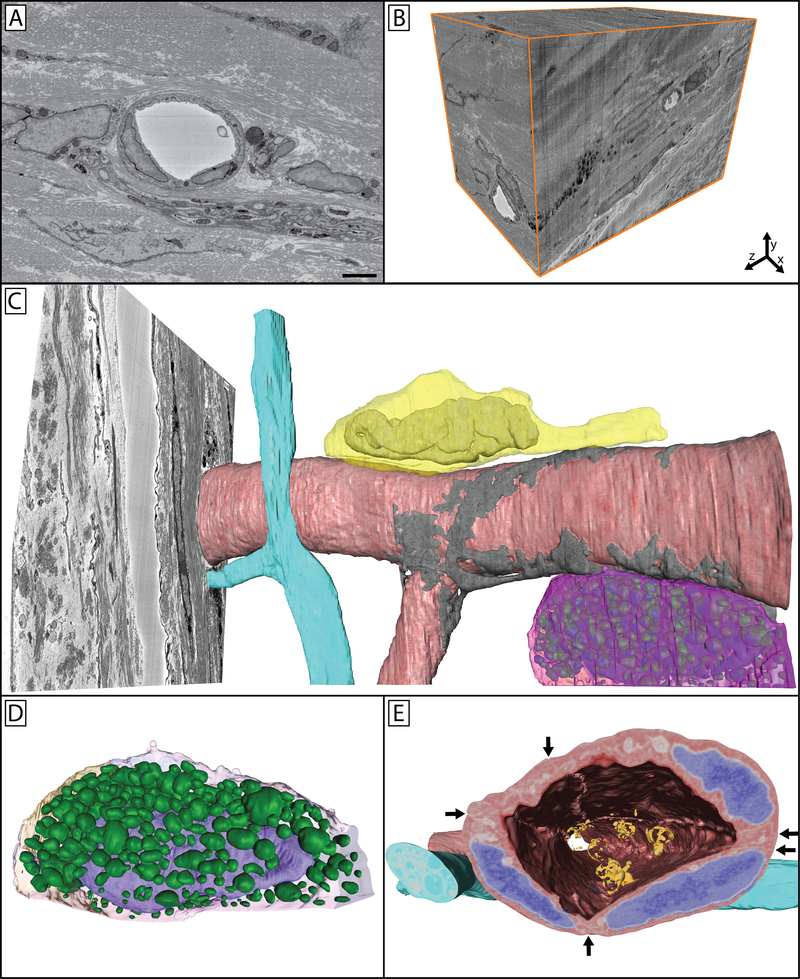
The central cornea is an avascular tissue, and as such the peripheral limbal vasculature is of particular importance to the overall health of the cornea. The cell-cell relationships and ultrastructure of this region is complex; however, the ability to appreciate these cell-cell interactions and ultrastructural connections has been limited in fluorescence and single section TEM studies. For this reason an SBF-SEM image stack containing limbal vasculature, nerve bundles, and associated cells was manually segmented for 3D reconstruction (Figure 7). In this image the close association between vascular endothelial junctions and an overlaying pericyte, the individual granules of a perivascular mast cell, the nucleus and leading edge of a neutrophil crawling along the outer surface of the blood vessel wall, as well as a passing nerve bundle can be seen.
Figure 7: Limbal vasculature and associated cells in the peripheral mouse cornea.
A single image (A) from a 3D image block (B) can be seen through which a vessel, nerve bundle, and associated cells travel. Panel C shows a reconstructed vessel (red) with an associated pericyte (gray) wrapped around it covering the endothelial cell junctions. A nerve bundle (blue) bifurcates in close proximity to this vessel as it travels through the tissue. A neutrophil (yellow) can be seen parallel to the long axis of the vessel, with its polymorphic nucleus visible within its cell body and the trailing uropod visible as a protrusion towards the right of the image. A mast cell (magenta) is visible on the underside of the vessel. Panel D isolates this mast cell, where its granules (green) can be more easily seen overlaying the nucleus (purple) within the cell. Panel E highlights the cellular structures overlaid on the cellular reconstructions, with endothelial nuclei denoted in blue, and adherent microparticles visible in the vessel lumen (orange). Arrows show cell-cell borders between endothelial cells, which can be further seen as raised ridges extending along the cells on the luminal side of the vessel. Panel A scale bar = 2 μm. The image block used to reconstruct these cells is 30×30 μm in the x & y axis, and 42.5 μm in the z axis with a voxel resolution of 14.6×14.6×100 nm.
Taken together, this body of work demonstrates the capability of this protocol to produce high quality 3D electron microscopy data sets in tissues rich in extracellular matrix and epithelium, as well as vasculature and associated cells.
Higher Order Primate Retina – Nerve Plexus and Vascular Network
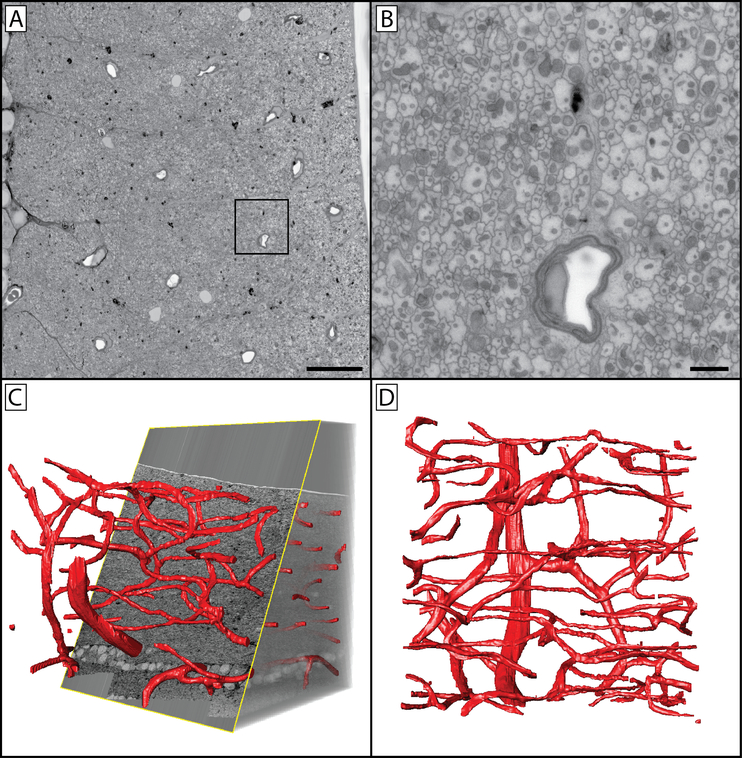
The retinal nerve fiber layer (RNFL) of higher order primates contains and depends on an extensive vascular network. Often, diseases of the retina involve changes in both parameters of the retinal nerve fiber layer as well as the vasculature found within it. Understanding the relationship between the RNFL and its vascular network in healthy, non-pathological tissue is the first step to understanding any changes that may occur as a result of disease. In order to better understand this relationship, the SBF-SEM protocol was applied to normal higher order primate retina and the reconstruction of the vascular network was performed and volumetric data extracted from this reconstruction (Figure 8). This 4,642,307 μm3 region of the RNFL contained a vascular bed 1.207×10⁻⁴ μL in volume, making up 2.6% of the total volume of the RNFL. This work demonstrates the capability of this protocol to produce high quality 3D electron microscopy data sets in dense neurological tissue.
Figure 8: Reconstructed vascular network of the non-human primate retinal nerve fiber layer.
(A) A 200×200 μm SBF-SEM image of the primate retina taken at 8192×8192 px. The location sampled is ~500 microns from the inferior temporal rim margin of a healthy eye with no pathology. The image series reconstructed in panels C & D were captured at 2048×2048 px, with imaging paused so that regions of interested could be imaged at 8192×8192 px. Panel B is the inlayed region of panel A, taken directly from the original image. Note the large number of axons and their mitochondria. (C) Orthoslice section through a 200×200×200 μm tissue volume of a control eye inferior temporal nerve fiber layer, with vasculature segmented. (D) Z-projection of the nerve fiber layer vasculature. This series illustrates the resolution possible in a large field using this methodology. Panel A scale bar = 20 μm. Panel B scale bar = 2 μm. Image series voxel resolution is 97.6×97.6×500 nm. Region of interest pixel resolution is 24.4×24.4 nm.
Zebrafish and Giant Danio Heart – Striated Muscle and Developing Vasculature
Both the zebrafish and the giant danio are important models for heart development and regeneration. Historically, the zebrafish heart is considered to consist of two anatomically distinct myocardial segments functioning together in support of the physiological demands of the zebrafish. However, the interface between these two ventricular layers was not well understood. Using this protocol, a previously unrecognized junctional region was discovered consisting of a thin sheet of fibroblasts. It was found that openings within this sheet allowed two separate myocardial segments to come into contact and form complex adhesions junctions including desmosomes and fascia adherens22.
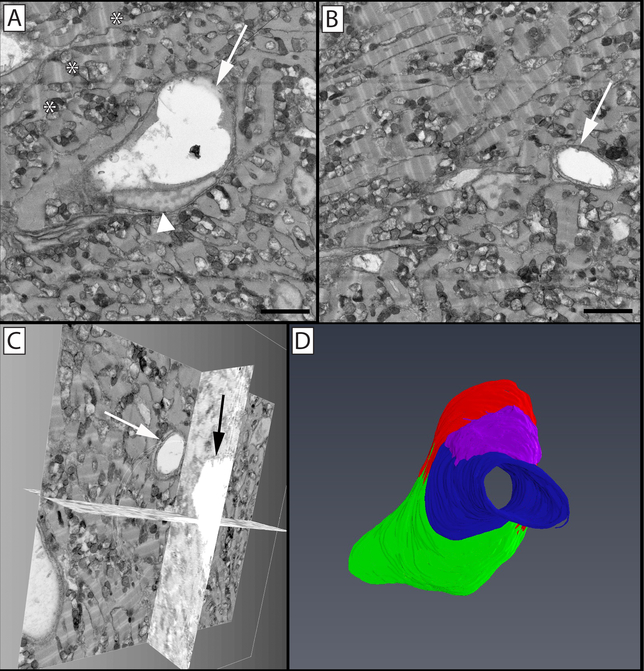
This protocol has been utilized in further work examining the vascular network of the developing giant danio heart (Figure 9). This method allows for the 3D appreciation of the developing cardiac myocyte network and its relationship with developing microvasculature. Taken together, this work demonstrates the capability of this protocol to produce high quality 3D electron microscopy data sets in muscle and highly vascularized tissues.
Figure 9: Segmentation and 3D volume rendering of vessels in the giant danio (Devario malabaricus) compact heart.
(A) Two-dimensional micrograph in an image stack, showing the profile of a central venular-size vessel (arrow) and an endothelial nucleus (arrowhead), with surrounding cardiac myocytes rich in mitochondria and well organized sarcomeres (*). (B) Two-dimensional micrograph of the image stack with a capillary-size vessel (arrow). (C) Biorthogonal projections of the micrograph stack showing the capillary in panel B projected through one orthogonal slice. (D) 3D rendering of segmented endothelial cells lining the reconstructed vessel. Illustrated in green, red, blue, and purple are four separate endothelial cells; the endothelial cell depicted in blue can be seen in cross section in panel B (arrow), while the endothelial cells depicted in red (arrow) and green (arrowhead) are seen in cross section in panel A. Panels A & B scale bar = 2 μm. The image block reconstructed is 30×30 μm in the x & y axis, and 16 μm in the z axis with a voxel resolution of 14.6×14.6×100 nm.
Image Settings, Charging, and Resolution
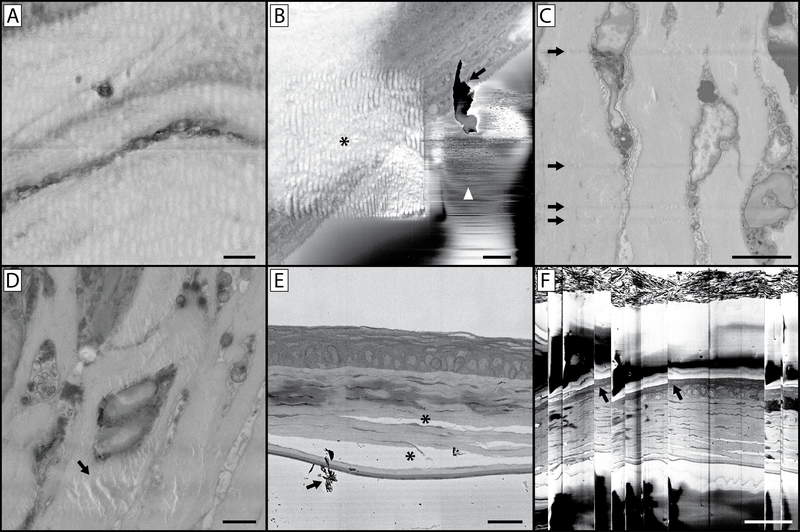
While appropriate fixation and heavy metal staining is necessary for quality SBF-SEM imaging, equally important is the use of conductive resin and proper imaging settings for the questions being addressed. In this protocol, the use of carbon black is employed in order to increase the conductivity of the sample block and provide a conduit to the mounting pin for the clearance of secondary electrons from the block-face. This has proven effective in combating tissue charging which often degrades image quality in tissues not prepared with carbon black16. In addition, the silver paint and gold sputtering applied to the block provides a dissipation pathway for electron buildup. Some devices allow for the addition of a focal charge compensator, which reduces charging by applying a puff of nitrogen over the block-face, however we have had similar success with the use of carbon black and the application of silver paint and gold sputtering to the block15. Lack of sample conductivity can lead to electron buildup visible as tissue charging (Figure 1), as well as discharges that are visible as abrupt image shifting and warping which dramatically diminish image quality (Figure 10B & F). The use of carbon black allows for imaging under high-vacuum and the use of image settings that result in high signal-to-noise ratio and improved image resolution. One such setting that leads to improved image quality is pixel dwell time. The SBF-SEM imaging process involves the raster scanning of an electron beam across the sample surface to generate backscattered electrons which the microscope detector can collect and interpret as signal. The length of time this beam is allowed to dwell within the space of each pixel leads to a more accurate pixel value being assigned to each pixel location (Figure 3A & B)2. There is a balance that must be struck between increased signal-to-noise, resolution and damage dealt to the block-face however. The beam effectively irradiates the block-face with high energy electrons which can break down and soften resin resulting in image degradation and cutting complications (Figure 10)28. The thinner the z-resolution required, the more difficult it becomes to maintain high-resolution imaging. We generally use z-steps of 100–200 nm, however z-step sizes of 25–50 nm have been reported5,29–31. With z-steps of this size, the break-down and softening of resin due to beam damage can lead to either compression of the resin causing the knife to miss a cut or cut the block-face but with “chatter” where the knife skips across the surface of the block creating ripples and bands13. While small z-steps are an attractive prospect, it is important to keep the specific research question in mind when choosing an appropriate z-step. Over-sampling can lead to substantial data-storage considerations as well as an increase in time required to produce 3D reconstructions.
Figure 10: Imaging complications and artefacts.
(A) The wavy and distorted nature of this image is the result of imaging using a pixel dwell time that is too long. This heats the resin block, leaving the block face soft and rubbery which results in a distorted image upon cutting. (B) This image contains a host of artefacts. The asterisk indicates a wavy distortion caused by prior imaging at a higher magnification and similar to panel A, concentrating the beam on a smaller region with a longer pixel dwell time has softened the resin in this region of interest. While the higher magnification image collected was free of artefacts, this can lead to a subsequent series of images where the sample underlying the region of interest appears distorted. This panel also illustrates the issue of debris accumulation on the block face (arrow) during imaging, also denoted by the arrow in panel E. If this becomes a persistent imaging problem, it will be necessary to break the vacuum, open the chamber and blow away debris accumulated on the diamond knife and around the sample. Small discharges of electrons from the block-face can lead to the rapid contrast changes and lines denoted by the white arrowhead. (C) This image illustrates knife scratches on the block face. This can occur due to a damaged knife, or debris accumulation on the edge of the knife. (D) The artefact denoted (arrow) is a result of the electron beam focused on (without sectioning) the block face for an extended period of time with the sample still in the imaging chamber. (E) Improper fixation of tissue can lead to separation of cellular structures and connective tissue (*). (F) If a large amount of charging occurs in your tissue or resin block, subsequent accumulation and discharge can occur which leads to the image “skipping” as is seen in this image. Note the distortion of the tissue in the image at these skipping points (arrows). Panel A scale bar = 1 μm. Panel B scale bar = 2 μm. Panel C scale bar = 5 μm. Panel D scale bar = 2 μm. Panel E scale bar = 25 um. Panel F scale bar = 50 um.
Tissue Fixation and Staining
Prior to heavy metal incubation, tissues must be fixed in glutaraldehyde. While we highly recommend microwave fixation under vacuum for the preservation of tissue ultrastructure27, if a laboratory grade microwave is not available a commercial inverter microwave with variable wattage can be substituted32–35. If this is done, extra care should be employed to ensure that tissue distortion does not occur. Improper tissue fixation can result in altered tissue morphology as can be seen in Figure 10E. This protocol, like most modern SBF-SEM staining protocols, has been adapted from the staining procedure outlined by Deerinck in 201017, based on the osmium-thiocarbohydrazide-osmium stains created by Willingham and Rutherford in 198436. The heavy metals utilized in this protocol add contrast to the cellular structures within a tissue sample (Figure 1). The initial osmium incubation occurs with reduced osmium which binds to C=C bonds in unsaturated fats leading to membrane and lipid staining37,38. Osmium is reduced by potassium ferrocyanide, which assists in the staining of saturated lipids and also acts to stabilize phospholipids39,40. Thiocarbohydrazide is subsequently added as a mordent that binds to the osmium from the first incubation, acting as a bridge on which further osmium is bound at a later stage in the protocol41. Uranyl acetate, which is a uranium salt, is an effective contrasting agent for lipids, nucleic acids and proteins, while lead citrate enhances contrast of proteins and glycogens. The varying affinities of these agents for cellular components further enhances the overall contrast within tissues over and above the osmium incubations42.
Imaging the Block-Face
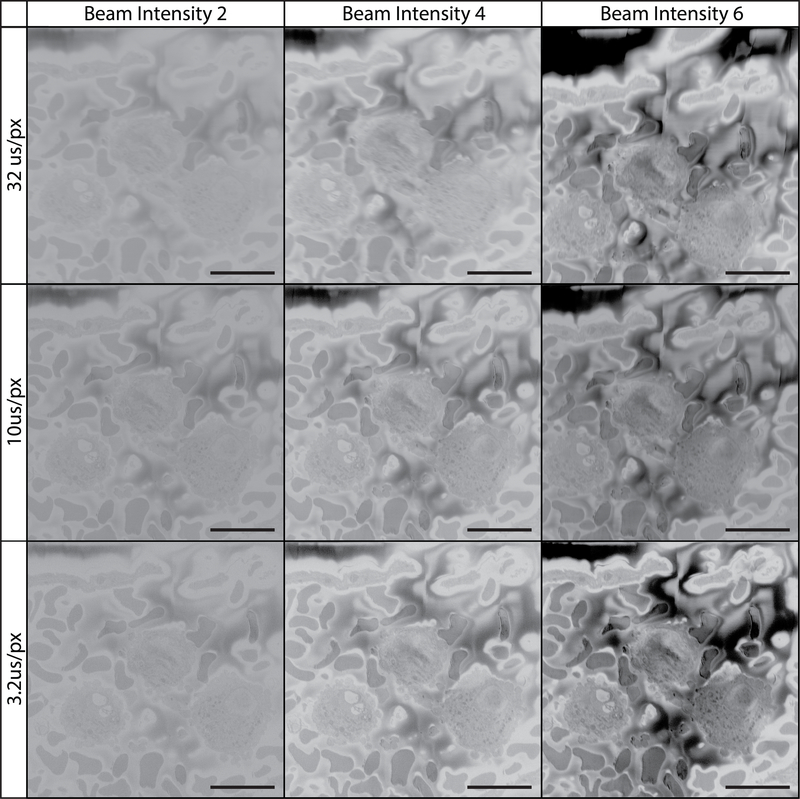
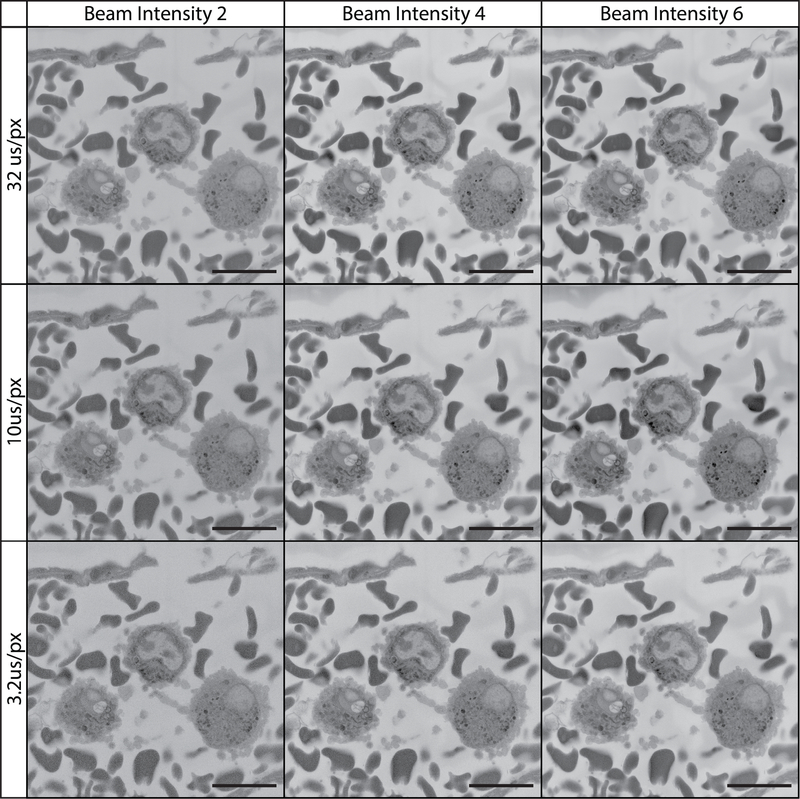
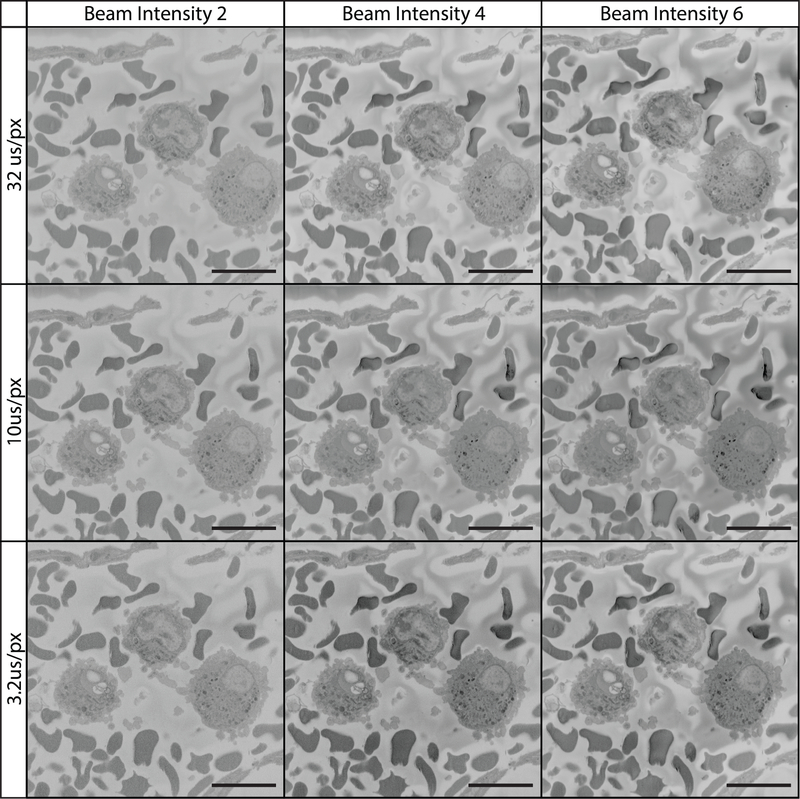
Figures 11–13 illustrate the combined effects of voltage, pixel dwell time and beam intensity. Conventional practice suggests a combination of low voltage, short dwell time and low beam intensity are necessary for optimal imaging and preventing beam damage to the sample block. Contrary to these settings, Figures 11–13 illustrate that higher voltages (e.g., 7 kV), longer dwell times (32 μs/px) and higher beam intensities (setting 6 in our case) can produce superior image quality over conventional settings.
Figure 11: Imaging tissue at 3 kV using various pixel dwell times and beam intensities.
All images were collecting using a 3 kV beam, beam intensity is on a device-specific scale ranging from 1 to 20. The field imaged is of the vascular lumen containing white and red blood cells. At this low kV it is difficult to appreciate cellular detail. Increasing the pixel dwell time had little effect. Increasing beam intensity to 6 improved image contrast.
Figure 13: Imaging tissue at 12 kV using various pixel dwell times and beam intensities.
All images were collected using a 12 kV beam, beam intensity is on a device-specific scale ranging from 1 to 20. The field imaged is of the vascular lumen containing white and red blood cells. At 12 kV, imaging is optimized by adjusting pixel dwell time and beam intensity. Charging is reduced/absent at shorter pixel dwell times while cellular detail and image contrast are best with a longer pixel dwell time and higher beam intensity.
SBF-SEM allows for the collection of serial electron microscopy images which can be collected as a 3D data set comprised of voxels. While this is an incredibly powerful use of SBF-SEM, this method also allows for the rapid and repeatable imaging of rare biological events or cells. Image acquisition using SBF-SEM can be monitored for rare events, and imaging paused in order to collect higher magnification/resolution images of these events. Furthermore, the block can be removed from the microscope chamber and the block-face sectioned for transmission electron microscopy (TEM) imaging. In this way large datasets of rare events can be collected using SBF-SEM as well as appreciated at the angstrom scale using TEM.
DISCUSSION:
The purpose of this methods paper is to highlight the tissue preparation and imaging methodology that has allowed our lab to reliably capture high-resolution serial electron microscopy images, and to point out critical steps that lead to this outcome as well as potential pitfalls that can occur when conducting SBF-SEM imaging. Success using this protocol requires proper fixation of tissue, impregnation of heavy metals into the sample, modifications of the embedding resin to reduce charging, as well as an understanding of the microscope and imaging settings used to collect images. The maxim, “quality in, quality out” is an appropriate axiom for SBF-SEM imaging. As the goal of SBF-SEM often is the appreciation or quantification of ultrastructural detail, extra care must be given to fixation strategy in order to ensure that tissue distortion does not occur. If tissue becomes distorted at any point in the preparation of samples (i.e., undergoes swelling, shrinking, or disruption of cellular morphology), then tissue reconstruction and quantization will not yield accurate data. Furthermore, the use of incorrect imaging settings can lead to loss of data that cannot be recaptured as SBF-SEM imaging is a destructive process. Additionally, care must be used when loading a tissue sample as the delicate diamond knife can be damaged by hasty or incorrect sample preparation. This can result in chips or breaks in the knife, which can leave visible scratch marks in images (Figure 10C). The diamond knife can also be damaged by calcified structures, hard granules, or accidentally embedded glass (e.g., from reagent ampules).
While the majority of SBF-SEM literature to date uses beam acceleration voltages in the range of 1 to 3 kV alongside pixel dwell times closer to 1–5 μs/px (Figure 11)45–49, the current protocol uses acceleration voltages of 7–12 kV and a pixel dwell time of 12 μs/px for serial imaging and 32 μs/px for imaging regions of interest (Figures 12 & 13). These settings, coupled with a slice thickness of 100–200 nm allows for high-quality and high resolution imaging of a wide range of biological tissue. Increased acceleration voltage allows for an increase in contrast, resolution, as well as signal-to-noise ratio. Increased dwell time further increases resolution and signal-to-noise ratio, while increased slice thickness leads to decreased charging on the block surface during sectioning and combats beam-induced damage in subsequent images14. While this imaging method may differ from convention, the images and datasets produced speak for themselves. If we had to speculate on the reason for this success, it is possible that it is a result of our unique combination of high kV values, longer pixel dwell times, and block preparation. Increasing imaging kV results in an increased interaction volume between the electron beam and the sample. This interaction volume is both deeper as well as wider resulting in a theoretical increase in the number of electrons detected that originate from deeper within the sample block, or from a wider cross section of tissue as the spot size teardrop increases in diameter. As SBF-SEM is interested in the surface detail of the block, this results in a theoretical decrease in signal-to-noise ratio. However, the increase in kV also pushes electrons deeper into the sample where they are less likely to escape the block and contribute to the electrons collected by the detector. With the added benefit of an increased signal via longer pixel dwell times and higher beam intensity, it is possible that this imaging method results in a greater increase in signal from the sample surface in relation to noise originating within the interaction volume. Additionally, the increased sample conductivity introduced with carbon black as well as silver and gold coating helps to ameliorate charge buildup which now occurs deeper within the block and further from the block-face. Indeed, Figures 11–13 show that as kV is increased sample charging begins to diminish as it is potentially pushed deeper into the block. Samples imaged at low magnification can be captured with adequate contrast using the conventional settings, however these images often lack detail upon close inspection. Our data clearly show that when using relatively high magnification where the goal is cellular detail, increasing the conventional settings can produce exceptional results. The 2020 article by P. Goggin, et al provides a useful table outlining the effect of changing imaging settings on final image quality, and is a helpful reference to consult if optimizing the protocol for novel tissues becomes necessary14. The 100–200 nm slice thickness recommended in this protocol has the added benefit of allowing the collection of large SBF-SEM data sets at a rapid rate. While collecting images at 12μs/px for example, imaging through a 100 μm depth at 2048×2048 px requires ~14 hours while sectioning at 100nm/section but would require ~56 hours if sectioned at 25nm/section. While x,y resolution remains unchanged as a result of section thickness, not accounting for the added ability to image using higher kV values and pixel dwell times that come with larger sections, it is important to note that the resolution along the z-axis does suffer. The loss of z-resolution is an important consideration and should be contemplated when deciding how tissue should be oriented in the resin block and in relation to the imaging plane, and has the potential to preclude the study of smaller cell features or interactions (e.g., synaptic invaginations or intracellular features on the scale of tens of nanometers). However, in addition to rapid imaging time, this protocol has additional added benefits in that it rapidly produces ideal datasets for stereological analysis as well as the study of rare biological events or cells. Larger section thickness can also aid in manual 3D reconstruction, as a 100 μm region sectioned at 100 nm/section would require manual segmentation of 1,000 images while the same region sectioned at 25 nm/section would require manual segmentation of 4,000 images.
Figure 12: Imaging tissue at 7 kV using various pixel dwell times and beam intensities.
All images were collected using a 7 kV beam, beam intensity is on a device-specific scale ranging from 1 to 20. The field imaged is of the vascular lumen containing white and red blood cells. At 7 kV, increasing beam intensity and pixel dwell time contributed to higher quality imaging.
SBF-SEM has the benefit of generating large datasets in a relatively short period. While data analysis can be performed using quantitative methods such as stereology, which will be discussed below, it can often be informative to create 3D reconstructions via image segmentation. An image stack created using SBF-SEM can be thought of as a collection of voxels, while segmentation is the process of assigning these voxels to user-defined objects thereby creating 3D representations of tissue structures. These reconstructions often provide a heretofore unseen perspective on tissue ultrastructure and cell-cell interaction (Figures 5–9). Furthermore, once reconstructions have been created it is possible to use data inherent in the reconstructions to extract a wealth of information from segmented tissue. Parameters ranging from surface area, volume, length and distance, as well as angular data are all readily available once a reconstruction has been created50,51. While this can be incredibly useful, especially when paired with videos and images pulled from reconstructed data sets, the time required for manual segmentation is an important consideration when attempting to extrapolate data from SBF-SEM datasets. There are currently a host of both free and purchasable software available for the manual and semi-manual segmentation of SBF-SEM image stacks. One free option for reconstruction software is the image processing package Fiji for ImageJ, an open source image processing program, which contains a segmentation editor plugin that allows for manual segmentation52,53. Additionally, the software Reconstruct offers an alternative free segmentation option54 (Figure 8). While potentially expensive, purchasable options often contain more robust feature sets, such as semi-automated segmentation processes or movie and image creation suites. One such option was used to create the reconstructions found in Figures 5–7 and 9 (Details available in Table of Materials). Additionally, tools are available for the creation, analysis, and rendering of contrast-based 3D reconstructions using virtual reality with the potential to greatly speed up the reconstruction process20,55. While not always available for all applications, a host of software tools are available for computer assisted manual segmentation which have the potential to greatly decrease the time required for segmentation56–58. Regardless of the software used, considerable forethought and an understanding of the question being answered, or gap in knowledge to be filled, by serial reconstructions should precede segmentation, as the process is laborious and time-intensive.
The production of 3D reconstructions comes with its own considerations. With larger data sets processing power can be a limiting factor, and so optimizing the use of system resources can be critical for maintaining a productive workflow and speeding up the reconstruction and rendering process. When rendering a 3D reconstruction, most software converts segmented image stacks into a surface comprised of interconnected triangles. If a reconstruction project is large or intricate, the rendering of these triangles can require a great deal of computing power. While working on a 3D reconstruction, it can be helpful to limit the number of triangles the reconstruction software can use to convert the segmented images into reconstructed surfaces. This can be useful for monitoring the progress of a 3D reconstruction during the segmentation process. Once segmentation is complete, the triangle limit can be removed before rendering images or videos of reconstructions. Alternatively, and if the reconstruction software allows for it, we have found success monitoring the progress of a reconstruction using volume rendering rather than surface generation. Volume rendering, while not as suitable for images or videos meant for publication or presentation, requires far less processing power and as such can be helpful in providing a smooth experience when reconstructing and preparing images and videos of reconstructions. Additionally, it is best practice when manually segmenting an SBF-SEM data set to define every object to be reconstructed with its own unique identifier. If a field of epithelial cells is being reconstructed for example, rather than assigning all epithelial cells to a voxel group entitled “epithelium,” each epithelial cell should be assigned its own moniker (i.e., Epi1, Epi2, Epi3, etc.). This affords greater freedom when the reconstruction is complete, as each cell can be either included or excluded from the final rendering, assigned different colors or transparencies, or removed or introduced individually if a video is being produced. Furthermore, this allows metrics such as surface area or volume to be collected from each reconstructed object rather than the object group as a whole.
Another incredibly powerful tool for extracting quantitative data from SBF-SEM image stacks is the practice of stereology. Stereology takes advantage the inherent mathematical relationships between three-dimensional objects and their two-dimensional representations (i.e., electron micrographs). SBF-SEM data sets are ideal for the application of stereology, as this method for extracting 3D information from large datasets is considerably less time- and labor-intensive when compared to segmented reconstruction. Stereology generally consists of applying geometric grids to random, uniformly sampled images and has been used extensively over the past 50 years in order to produce accurate and unbiased estimates of cell/organelle number, length, surface area, and volume21,59–63. While 3D reconstructions can be impressive and provide a novel perspective on biological tissues, it is often quicker, more accurate, reproducible, and conducive for large sample sizes to use a stereological approach to data extraction. While there are many papers discussing the practical application of stereology64–66, a number of textbooks provide useful, in-depth overviews of the methodology as well as provide a number of stereological grids which can be applied to the study of tissue ultrastructure67–69.
SBF-SEM is a powerful imaging method that allows for the three-dimensional appreciation of tissue ultrastructure. While the ability to create 3D datasets with SEM resolution puts previously unanswerable questions within our reach, proper tissue preparation and an understanding of SBF-SEM imaging is paramount for the success of studies that utilize this microscopy method. It is our hope that the application of this protocol to future studies will lead to greater and greater insight into the biological mysteries that surround us, and continue to push us further into the frontiers of human knowledge.
Supplementary Material
ACKNOWLEDGMENTS:
We would like to thank Dr. Sam Hanlon, Evelyn Brown, and Margaret Gondo for their excellent technical assistance. This research was supported in part by National Institutes of Health (NIH) R01 EY-018239 and P30 EY007551 (National Eye Institute), in part by the Lion’s Foundation for Sight, and in part by NIH 1R15 HD084262–01 (National Institute of Child Health & Human Development).
Footnotes
DISCLOSURES:
The authors have nothing to disclose.
REFERENCES:
- 1.Leighton SB SEM images of block faces, cut by a miniature microtome within the SEM - a technical note. Scanning Electron Microscopy. (Pt 2), 73–76 (1981). [PubMed] [Google Scholar]
- 2.Denk W, Horstmann H Serial block-face scanning electron microscopy to reconstruct three-dimensional tissue nanostructure. PLOS Biology. 2 (11), e329 (2004). [DOI] [PMC free article] [PubMed] [Google Scholar]
- 3.He Q, Hsueh M, Zhang G, Joy DC, Leapman RD Biological serial block face scanning electron microscopy at improved z-resolution based on Monte Carlo model. Scientific Reports. 8 (1), 12985 (2018). [DOI] [PMC free article] [PubMed] [Google Scholar]
- 4.Zankel A, Wagner J, Poelt P Serial sectioning methods for 3D investigations in materials science. Micron. 62, 66–78 (2014). [DOI] [PubMed] [Google Scholar]
- 5.Titze B, Genoud C Volume scanning electron microscopy for imaging biological ultrastructure. Biology of the Cell. 108 (11), 307–323 (2016). [DOI] [PubMed] [Google Scholar]
- 6.Ohta K et al. Beam deceleration for block-face scanning electron microscopy of embedded biological tissue. Micron. 43 (5), 612–620 (2012). [DOI] [PubMed] [Google Scholar]
- 7.Bouwer JC et al. Deceleration of probe beam by stage bias potential improves resolution of serial block-face scanning electron microscopic images. Advanced Structural and Chemical Imaging. 2 (1), 11 (2017). [DOI] [PMC free article] [PubMed] [Google Scholar]
- 8.Kizilyaprak C, Longo G, Daraspe J, Humbel BM Investigation of resins suitable for the preparation of biological sample for 3-D electron microscopy. Journal of Structural Biology. 189 (2), 135–146 (2015). [DOI] [PubMed] [Google Scholar]
- 9.Kittelmann M, Hawes C, Hughes L Serial block face scanning electron microscopy and the reconstruction of plant cell membrane systems. Journal of Microscopy. 263 (2), 200–211 (2016). [DOI] [PubMed] [Google Scholar]
- 10.Biazik J, Vihinen H, Anwar T, Jokitalo E, Eskelinen EL The versatile electron microscope: an ultrastructural overview of autophagy. Methods. 75, 44–53 (2015). [DOI] [PubMed] [Google Scholar]
- 11.Peddie CJ, Collinson LM Exploring the third dimension: Volume electron microscopy comes of age. Micron. 61, 9–19 (2014). [DOI] [PubMed] [Google Scholar]
- 12.Piňos J, Mikmeková Š, Frank L About the information depth of backscattered electron imaging. Journal of Microscopy. 266 (3), 335–342 (2017). [DOI] [PubMed] [Google Scholar]
- 13.Smith D, Starborg T Serial block face scanning electron microscopy in cell biology: Applications and technology. Tissue Cell. 57, 111–122 (2019). [DOI] [PubMed] [Google Scholar]
- 14.Goggin P et al. Development of protocols for the first serial block-face scanning electron microscopy (SBF SEM) studies of bone tissue. Bone. 131, 115107 (2020). [DOI] [PMC free article] [PubMed] [Google Scholar]
- 15.Deerinck TJ et al. High-performance serial block-face SEM of nonconductive biological samples enabled by focal gas injection-based charge compensation. Journal of Microscopy. 270 (2), 142–149 (2018). [DOI] [PMC free article] [PubMed] [Google Scholar]
- 16.Nguyen HB et al. Conductive resins improve charging and resolution of acquired images in electron microscopic volume imaging. Scientific Reports. 6, 23721 (2016). [DOI] [PMC free article] [PubMed] [Google Scholar]
- 17.Deerinck TJ, Bushong EA, Thor A, Ellisman MH NCMIR methods for 3D EM: a new protocol for preparation of biological specimens for serial block face scanning electron microscopy. National Center for Microscopy and Imaging Research. 6 (8) (2010). [Google Scholar]
- 18.Deerinck TJ et al. Enhancing Serial Block-Face Scanning Electron Microscopy to Enable High Resolution 3-D Nanohistology of Cells and Tissues. Microscopy and Microanalysis. 16 (S2), 1138–1139 (2010). [Google Scholar]
- 19.Kubota Y New developments in electron microscopy for serial image acquisition of neuronal profiles. Microscopy (Oxf). 64 (1), 27–36 (2015). [DOI] [PubMed] [Google Scholar]
- 20.Courson JA et al. Serial block-face scanning electron microscopy: A provocative technique to define 3-dimensional ultrastructure of microvascular thrombosis. Thrombosis Research. 196, 519–522 (2020). [DOI] [PMC free article] [PubMed] [Google Scholar]
- 21.Courson JA et al. Serial block-face scanning electron microscopy reveals neuronal-epithelial cell fusion in the mouse cornea. PLoS One. 14 (11), e0224434 (2019). [DOI] [PMC free article] [PubMed] [Google Scholar]
- 22.Lafontant PJ et al. Cardiac Myocyte Diversity and a Fibroblast Network in the Junctional Region of the Zebrafish Heart Revealed by Transmission and Serial Block-Face Scanning Electron Microscopy. PLoS One. 8 (8), e72388 (2013). [DOI] [PMC free article] [PubMed] [Google Scholar]
- 23.Hanlon SD, Behzad AR, Sakai LY, Burns AR Corneal stroma microfibrils. Experimental Eye Research. 132, 198–207 (2015). [DOI] [PMC free article] [PubMed] [Google Scholar]
- 24.Gage GJ, Kipke DR, Shain W Whole animal perfusion fixation for rodents. Journal of Visualized Experiments. 10.3791/3564 (65) (2012). [DOI] [PMC free article] [PubMed] [Google Scholar]
- 25.Davenport AT, Grant KA, Szeliga KT, Friedman DP, Daunais JB Standardized method for the harvest of nonhuman primate tissue optimized for multiple modes of analyses. Cell Tissue Bank. 15 (1), 99–110 (2014). [DOI] [PMC free article] [PubMed] [Google Scholar]
- 26.Schuster A et al. An isolated perfused pig heart model for the development, validation and translation of novel cardiovascular magnetic resonance techniques. Journal of Cardiovascular Magnetic Resonance. 12 (1), 53 (2010). [DOI] [PMC free article] [PubMed] [Google Scholar]
- 27.Hanlon SD, Patel NB, Burns AR Assessment of postnatal corneal development in the C57BL/6 mouse using spectral domain optical coherence tomography and microwave-assisted histology. Experimental Eye Research. 93 (4), 363–370 (2011). [DOI] [PMC free article] [PubMed] [Google Scholar]
- 28.Longiéras N, Sebban M, Palmas P, Rivaton A, Gardette JL Multiscale approach to investigate the radiochemical degradation of epoxy resins under high-energy electron-beam irradiation. Journal of Polymer Science Part A: Polymer Chemistry. 44 (2), 865–887 (2006). [Google Scholar]
- 29.Hashimoto T, Thompson GE, Zhou X, Withers PJ 3D imaging by serial block face scanning electron microscopy for materials science using ultramicrotomy. Ultramicroscopy. 163, 6–18 (2016). [DOI] [PubMed] [Google Scholar]
- 30.Rouquette J et al. Revealing the high-resolution three-dimensional network of chromatin and interchromatin space: A novel electron-microscopic approach to reconstructing nuclear architecture. Chromosome Research. 17 (6), 801 (2009). [DOI] [PubMed] [Google Scholar]
- 31.Briggman KL, Helmstaedter M, Denk W Wiring specificity in the direction-selectivity circuit of the retina. Nature. 471 (7337), 183–188 (2011). [DOI] [PubMed] [Google Scholar]
- 32.Katoh K Microwave-Assisted Tissue Preparation for Rapid Fixation, Decalcification, Antigen Retrieval, Cryosectioning, and Immunostaining. International Journal of Biochemistry & Cell Biology. 2016, 7076910 (2016). [DOI] [PMC free article] [PubMed] [Google Scholar]
- 33.Login GR, Dvorak AM A review of rapid microwave fixation technology: its expanding niche in morphologic studies. Scanning. 15 (2), 58–66 (1993). [DOI] [PubMed] [Google Scholar]
- 34.Jamur MC, Faraco CD, Lunardi LO, Siraganian RP, Oliver C Microwave fixation improves antigenicity of glutaraldehyde-sensitive antigens while preserving ultrastructural detail. Journal of Histochemistry and Cytochemistry. 43 (3), 307–311 (1995). [DOI] [PubMed] [Google Scholar]
- 35.Leong AS, Sormunen RT Microwave procedures for electron microscopy and resin-embedded sections. Micron. 29 (5), 397–409 (1998). [DOI] [PubMed] [Google Scholar]
- 36.Willingham MC, Rutherford AV The use of osmium-thiocarbohydrazide-osmium (OTO) and ferrocyanide-reduced osmium methods to enhance membrane contrast and preservation in cultured cells. Journal of Histochemistry and Cytochemistry. 32 (4), 455–460 (1984). [DOI] [PubMed] [Google Scholar]
- 37.Khan AA, Riemersma JC, Booij HL The reactions of osmium tetroxide with lipids and other compounds. Journal of Histochemistry and Cytochemistry. 9, 560–563 (1961). [DOI] [PubMed] [Google Scholar]
- 38.Belazi D, Solé-Domènech S, Johansson B, Schalling M, Sjövall P Chemical analysis of osmium tetroxide staining in adipose tissue using imaging ToF-SIMS. Histochemistry and Cell Biology. 132 (1), 105–115 (2009). [DOI] [PubMed] [Google Scholar]
- 39.Rivlin PK, Raymond PA Use of osmium tetroxide-potassium ferricyanide in reconstructing cells from serial ultrathin sections. Journal of Neuroscience Methods. 20 (1), 23–33 (1987). [DOI] [PubMed] [Google Scholar]
- 40.Aguas AP The use of osmium tetroxide-potassium ferrocyanide as an extracellular tracer in electron microscopy. Stain Technology. 57 (2), 69–73 (1982). [DOI] [PubMed] [Google Scholar]
- 41.Seligman AM, Wasserkrug HL, Hanker JS A new staining method (OTO) for enhancing contrast of lipid--containing membranes and droplets in osmium tetroxide--fixed tissue with osmiophilic thiocarbohydrazide(TCH). Journal of Cell Biology. 30 (2), 424–432 (1966). [DOI] [PMC free article] [PubMed] [Google Scholar]
- 42.Watson ML Staining of tissue sections for electron microscopy with heavy metals. II. Application of solutions containing lead and barium. Journal of Biophysical and Biochemical Cytology. 4 (6), 727–730 (1958). [DOI] [PMC free article] [PubMed] [Google Scholar]
- 43.Zhou W, Apkarian R, Wang Z, Joy D Fundamentals of Scanning Electron Microscopy. Scanning Microscopy in Nanotechnology. 1–40 (2006). [Google Scholar]
- 44.Tapia JC et al. High-contrast en bloc staining of neuronal tissue for field emission scanning electron microscopy. Nature Protocols. 7 (2), 193–206 (2012). [DOI] [PMC free article] [PubMed] [Google Scholar]
- 45.Buchacker T et al. Assessment of the Alveolar Capillary Network in the Postnatal Mouse Lung in 3D Using Serial Block-Face Scanning Electron Microscopy. Frontiers in Physiology. 10, 1357 (2019). [DOI] [PMC free article] [PubMed] [Google Scholar]
- 46.Keeling E et al. 3D-Reconstructed Retinal Pigment Epithelial Cells Provide Insights into the Anatomy of the Outer Retina. International Journal of Molecular Sciences. 21 (21) (2020). [DOI] [PMC free article] [PubMed] [Google Scholar]
- 47.Shang P et al. Chronic Alcohol Exposure Induces Aberrant Mitochondrial Morphology and Inhibits Respiratory Capacity in the Medial Prefrontal Cortex of Mice. Frontiers in Neuroscience. 14, 561173 (2020). [DOI] [PMC free article] [PubMed] [Google Scholar]
- 48.Pfeifer CR et al. Quantitative analysis of mouse pancreatic islet architecture by serial block-face SEM. Journal of Structural Biology. 189 (1), 44–52 (2015). [DOI] [PMC free article] [PubMed] [Google Scholar]
- 49.Wilke SA et al. Deconstructing complexity: serial block-face electron microscopic analysis of the hippocampal mossy fiber synapse. Journal of Neuroscience. 33 (2), 507–522 (2013). [DOI] [PMC free article] [PubMed] [Google Scholar]
- 50.Cocks E, Taggart M, Rind FC, White K A guide to analysis and reconstruction of serial block face scanning electron microscopy data. Journal of Microscopy. 270 (2), 217–234 (2018). [DOI] [PMC free article] [PubMed] [Google Scholar]
- 51.Borrett S, Hughes L Reporting methods for processing and analysis of data from serial block face scanning electron microscopy. Journal of Microscopy. 263 (1), 3–9 (2016). [DOI] [PubMed] [Google Scholar]
- 52.Schindelin J et al. Fiji: an open-source platform for biological-image analysis. Nature Methods. 9 (7), 676–682 (2012). [DOI] [PMC free article] [PubMed] [Google Scholar]
- 53.Rueden CT et al. ImageJ2: ImageJ for the next generation of scientific image data. BMC Bioinformatics. 18 (1), 529 (2017). [DOI] [PMC free article] [PubMed] [Google Scholar]
- 54.Fiala JC Reconstruct: a free editor for serial section microscopy. Journal of Microscopy. 218 (Pt 1), 52–61 (2005). [DOI] [PubMed] [Google Scholar]
- 55.Pidhorskyi S, Morehead M, Jones Q, Spirou G, Doretto G syGlass: interactive exploration of multidimensional images using virtual reality Head-mounted displays. arXiv preprint arXiv:1804.08197. (2018). [Google Scholar]
- 56.Cardona A et al. TrakEM2 software for neural circuit reconstruction. PLoS One. 7 (6), e38011 (2012). [DOI] [PMC free article] [PubMed] [Google Scholar]
- 57.Belevich I, Joensuu M, Kumar D, Vihinen H, Jokitalo E Microscopy Image Browser: A Platform for Segmentation and Analysis of Multidimensional Datasets. PLOS Biology. 14 (1), e1002340 (2016). [DOI] [PMC free article] [PubMed] [Google Scholar]
- 58.Luengo I et al. SuRVoS: Super-Region Volume Segmentation workbench. Journal of Structural Biology. 198 (1), 43–53 (2017). [DOI] [PMC free article] [PubMed] [Google Scholar]
- 59.Anderson HR, Stitt AW, Gardiner TA, Archer DB Estimation of the surface area and volume of the retinal capillary basement membrane using the stereologic method of vertical sections. Analytical & Quantitative Cytology & Histology. 16 (4), 253–260 (1994). [PubMed] [Google Scholar]
- 60.Gibbons CH, Illigens BM, Wang N, Freeman R Quantification of sweat gland innervation: a clinical-pathologic correlation. Neurology. 72 (17), 1479–1486 (2009). [DOI] [PMC free article] [PubMed] [Google Scholar]
- 61.Knust J, Ochs M, Gundersen HJ, Nyengaard JR Stereological estimates of alveolar number and size and capillary length and surface area in mice lungs. Anat Rec (Hoboken). 292 (1), 113–122 (2009). [DOI] [PubMed] [Google Scholar]
- 62.Mahon GJ et al. Chloroquine causes lysosomal dysfunction in neural retina and RPE: implications for retinopathy. Current Eye Research. 28 (4), 277–284 (2004). [DOI] [PubMed] [Google Scholar]
- 63.Michel RP, Cruz-Orive LM Application of the Cavalieri principle and vertical sections method to lung: estimation of volume and pleural surface area. Journal of Microscopy. 150 (Pt 2), 117–136 (1988). [DOI] [PubMed] [Google Scholar]
- 64.Weibel ER Stereological methods in cell biology: where are we--where are we going? Journal of Histochemistry and Cytochemistry. 29 (9), 1043–1052 (1981). [DOI] [PubMed] [Google Scholar]
- 65.Schmitz C, Hof PR Design-based stereology in neuroscience. Neuroscience. 130 (4), 813–831 (2005). [DOI] [PubMed] [Google Scholar]
- 66.Kristiansen SL, Nyengaard JR Digital stereology in neuropathology. Apmis. 120 (4), 327–340 (2012). [DOI] [PubMed] [Google Scholar]
- 67.Howard CV, Reed MG Unbiased Stereology. 2nd edn, (Garland Science/BIOS Scientific Publishers, 2005). [Google Scholar]
- 68.Reith A, Mayhew TM Stereology and Morphometry in Electron Microscopy: Problems and Solutions. (Hemisphere Publishing Corporation, 1988). [Google Scholar]
- 69.Mouton PR Principles and practices of unbiased stereology: an introduction for bioscientists. (Johns Hopkins University Press, 2002). [Google Scholar]
Associated Data
This section collects any data citations, data availability statements, or supplementary materials included in this article.


