

Abstract
Background:
The Bernese periacetabular osteotomy (PAO) is a widely used technique for the management of acetabular dysplasia and other hip deformities in adolescents and young adults. Originally, the approach was described with a release of both origins of the rectus femoris muscle1. In the more recently described rectus-sparing approach, both heads remain attached2,3. It has been proposed that this modification may decrease pain, ease postoperative rehabilitation, and avoid heterotopic ossifications, without limitations of the surgical overview.
Description:
Both the original and the rectus-sparing approach are modifications of the Smith-Petersen approach. The skin incision and further dissection remain identical in both approaches for the protection of the lateral femoral cutaneous nerve, the osteotomy of the anterior superior iliac spine (or takedown of the inguinal ligament), the exposure of the iliac fossa, and the medial retraction of the abdominal and iliopsoas muscles. In both variants, the further dissection traverses the iliopectineal bursa. In contrast to the original approach, in which the rectus muscle becomes part of the medial flap after releasing both heads, the rectus-sparing approach involves the undetached rectus muscle becoming part of the lateral flap while the medial flap includes the sartorius and iliacus-iliocapsularis muscles. The anterior capsule and deep structures can be accessed through the interval between the rectus femoris and iliopsoas muscles or lateral to the rectus muscle. The remaining surgical steps are again similar in both techniques. According to preference, the surgeon starts with the pubic osteotomy or with the ischial cut first, the latter avoiding additional bleeding from the pubic osteotomy. For the ischial osteotomy, the bone is accessed by making an anteroposterior tunnel between the medial capsule and the iliopsoas tendon anteriorly and between the medial capsule and the obturator externus muscle posteriorly. While the ischial osteotomy is an incomplete separation, the pubic osteotomy is a complete separation. It sections the superior pubic ramus medial to the iliopectineal eminence, in a somewhat oblique fashion. The third and fourth cuts are made in the iliac bone in such a way as to keep the posterior column intact. By connecting the posterior iliac and ischial cuts as the last osteotomy step, the acetabulum is freed and repositioned as needed. The aim of our cadaver dissection is primarily to describe part of the rectus-sparing approach and to test this modification for eventual disadvantages over the classic approach. The remaining steps of the procedure correspond to the approach as described earlier1,4, appreciating that several modifications of the procedure are in use.
Alternatives:
Nonsurgical treatment may be an alternative in borderline dysplasia; however, it needs to be reconsidered and eventually changed to surgical treatment when symptoms persist or come back. Other current techniques for surgical treatment of adolescent and adult hip dysplasia include triple and rotational or spherical osteotomies5-7.
Rationale:
The Bernese PAO is performed through a single incision. All cuts are performed from the inner side of the pelvis, avoiding interference with the vascularity of the acetabular and periacetabular bone, which mainly comes from the outside of the pelvis8. The procedure needs minimal hardware for fixation, and partial weight-bearing can be allowed. The PAO provides a wide range of acetabular reorientation options. Wide capsulotomy and intra-articular procedures are possible, as well as additional femoral corrections. Childbirth via natural delivery is possible even after bilateral PAO9. Nerve injuries can be guarded against with careful surgical execution of the osteotomies4.
Introductory Statement
Sparing the rectus origins during the approach for a periacetabular osteotomy (PAO), when possible, limits soft-tissue dissection, decreases operative time, and facilitates postoperative rehabilitation, while also allowing proper execution of osseous cuts and reorientation of the freed acetabulum.
Indications & Contraindications
Indications
Identical to the indications for the classic PAO technique for primary acetabular dysplasia10
Secondary acetabular dysplasia, e.g., after Legg-Calvé-Perthes disease and joint infection11,12
Joint instability after recurrent traumatic dislocation
Joint instability after corrective osteotomies of the proximal part of the femur, e.g., after anatomic correction of severe chronic slipped capital femoral epiphysis (SCFE) and after head reduction osteotomy for severe deformity of Legg-Calvé-Perthes disease15,16
Contraindications
Open triradiate cartilage in children ≤10 years old
Advanced osteoarthritis
Uncorrectable incongruity
Congenital low and high dislocation in children ≥12 years old
Severe secondary (false) acetabulum
Substantially reduced range of motion
Substantial loss of vascular supply to the acetabular bone from previous procedures
Step-by-Step Description of Procedure
The described cadaveric approach, which is demonstrated in a right hip, is based on an imageless technique for PAO, as was used in the original description1, which can be modified to the use of a C-arm. Moreover, with modifications of the technique by various surgeons, the choice of instruments might also vary among surgeons.
Step 1: Make a C-Shaped Incision if a Large Exposure Is Needed or Use a Bikini Incision, Which Is Cosmetically Advantageous
After placing the patient in the supine position and marking the anterior superior iliac spine (ASIS), use the modified Smith-Petersen approach and make a C-shaped incision from the anterior one-third of the iliac crest to the ASIS and from the ASIS to the anterolateral aspect of the thigh.
Position the patient supine and mark the ASIS.
Use a modified Smith-Petersen anterior hip approach.
Make a C-shaped (curved) incision, beginning at the anterior one-third of the iliac crest to the ASIS and from the ASIS further distally to the anterolateral aspect of the thigh (Fig. 1).
A bikini incision, which is cosmetically advantageous, is possible in slim patients, especially when minor corrections are required.
Fig. 1.

The classic curved skin incision over the ASIS of a right hip.
Step 2: Protect the Lateral Femoral Cutaneous Nerve (LFCN) with an Osteotomy of the ASIS
After incising the fascia over the belly of the tensor muscle, extend the fascial incision proximally toward the lateral border of the ASIS and then perform an osteotomy of the ASIS from lateral to medial.
Incise the fascia over the belly of the tensor muscle along the muscle axis.
Do not incise the fascia within the fatty zone between the tensor and sartorius muscles because the main branch of the nerve runs in this zone.
In approximately one-third of hips, a small branch of the LFCN diverts horizontally over the proximal part of the tensor muscle, and it must be sectioned to allow deeper exposure (Fig. 2).
Extend the fascial incision proximally toward the lateral border of the ASIS.
Perform an osteotomy of the ASIS (or mobilize the inguinal ligament) from lateral to medial, including the attached sartorius tendon and inguinal ligament (Video 1). Include the osteotomized ASIS in the medial fascial flap for the best protection of the LFCN (Fig. 3).
Fig. 2.

The same projection as in Figure 1 after the skin incision. The black arrow indicates the LFCN, the white arrow indicates the frequent branch of the nerve crossing the tensor fasciae latae (TFL), and the dotted line indicates the iliac crest. 1 = the ASIS, 2 = the TFL, and 3 = the sartorius muscle.
Fig. 3.

The same projection as in Figure 2, showing the spiked Hohmann retractor placed over the pelvic brim to retract the medial soft-tissue flap and expose the iliac fossa. The dashed line indicates the iliac crest, and the arrow indicates the LFCN. The 2 structures marked ASIS indicate the mobile and stable parts of the ASIS after the osteotomy.
Video 1.
ASIS osteotomy in a right hip. After a curved skin incision over the ASIS and tensor fascia, leaving the lateral femoral cutaneous nerve medially, a 15-mm piece of the spine with the sartorius origin is osteotomized.
Step 3: Expose the Inner Surface of the Iliac Bone
After placing a bag under the knee to achieve hip flexion of approximately 60°, detach the abdominal oblique muscle from the iliac crest, expose the internal aspect of the iliac fossa, and then retract the flap of abdominal and iliopsoas muscle medially.
Place a bag under the knee to achieve hip flexion of approximately 60°, which takes tension off the medial flap and makes retraction easier.
Detach the abdominal oblique muscle from the iliac crest and expose the internal aspect of the iliac fossa subperiosteally using periosteal elevators.
Retract the flap of abdominal and iliopsoas muscle medially with a spiked Hohmann retractor placed over the pelvic brim (Video 2).
Video 2.
Preparation of the iliac fossa. With the hip in flexion, the iliacus muscle is elevated from the inner pelvic aspect down to the AIIS using a small periosteal elevator. The gap is opened with a Hohmann retractor. The dissection continues distally between the rectus and iliacus muscles.
Step 4: Access the Deep Layers by Leaving the Origins of the Rectus Muscle Attached
After dissection of the iliacus muscle from the inner aspect of the ilium down to the ridge between the ASIS and the anterior inferior iliac spine (AIIS), access the ischium using the classic approach but leave the origins of the rectus muscle intact.
Continue subperiosteal dissection of the iliacus muscle from the inner aspect of the ilium down to the ridge between the ASIS and the AIIS.
Retract the sartorius and iliacus medially and the tensor laterally to expose the rectus femoris muscle.
In contrast to the classic approach, with complete dissection of both tendons of the rectus, leave the rectus origins intact.
Develop the interval between the rectus and iliacus muscles by separating and retracting these muscles to the lateral and medial sides, respectively (Video 3).
Retract the rectus muscle further laterally to access the iliocapsularis muscle overlying the anterior capsule. It originates from the medial and inferomedial aspect of the AIIS and the subspinous space (the space between the AIIS and the anterior acetabular rim). Separate the iliocapsularis muscle from the subspinous space and the capsule and retract it medially along with the iliacus muscle to expose the iliopectineal bursa (Video 4).
Lateral retraction of the rectus belly becomes easier with hip flexion and knee extension (see also Video 5).
After opening the iliopectineal bursa, identify the iliopectineal eminence and place a spiked Hohmann retractor in the pubic bone just medial to the eminence. It allows the medial soft-tissue flap to be pulled further medially and provides optimal exposure of the space between the psoas tendon and the capsule (Video 6). The vascular bundle of the lateral femoral circumflex artery (LFCA) to the tensor muscle traverses the entryway to the deeper structures more distally than in the classic approach (Figs. 4-A and 4-B). The tension is not excessive in flexion and extension of the hip (Video 7). In live surgery, the vascular pedicle of the tensor does not always need to be exposed or mobilized as is done in the classic approach.
Develop the space between the psoas tendon and the capsule bluntly down to the ischium. Start with closed scissors in a slightly medial direction to avoid bleeding from the infracotyloid vessel plexus (Video 8).
Make sure that the created space reaches the ischium between the capsule and the obturator externus muscle by strictly following the capsular surface. By doing so, the ascending branch of the medial femoral circumflex artery (MFCA), which runs laterally and along the inferior border of the obturator externus and parallel to it, is protected (Fig. 5-A); it is the main branch providing femoral head perfusion (Fig. 5-B).
Palpate the medial and lateral ischial borders as well as the inferior lip of the acetabulum with the tip of the closed scissors.
Enlarge the infracotyloid space by opening the scissors. The achieved access to the ischium is the same as that with the classic approach, with the only difference being that the rectus muscle is part of the lateral margin.
Figs. 4-A and 4-B The rectus-sparing and the classic PAO approach. TFL = tensor fasciae latae.
Fig. 4-A.

The rectus-sparing approach showing the osteotome for the first ischial cut in place between the rectus laterally and the iliocapsularis and iliacus medially. The Langenbeck retractors are holding the rectus muscle laterally. The small Hohmann retractor is spiked into the pubic bone, and the large reverse Hohmann retractor is retracting the medial flap. 1 = the transverse branch of the lateral circumflex femoral artery, and 2 = the iliopectineal eminence and bursae.
Fig. 4-B.

The classic approach showing the osteotome in place between the TFL laterally and the iliocapsularis as well as the rectus medially. The arrow indicates the transverse branch of the lateral femoral circumflex artery.
Figs. 5-A and 5-B Anatomic structures of the hip during the ischial osteotomy.
Fig. 5-A.

Illustration showing the position of the curved osteotome in relation to the adjacent anatomic structures during the ischial osteotomy. The black arrows indicate the deep branch of the medial femoral circumflex artery (MFCA), and the yellow arrow indicates the part running posterior to the intertrochanteric area. The white arrow indicates the lateral femoral circumflex artery (LFCA). The black arrowhead indicates the femoral artery. 1 = the hip capsule, and 2 = the obturator externus muscle.
Fig. 5-B.
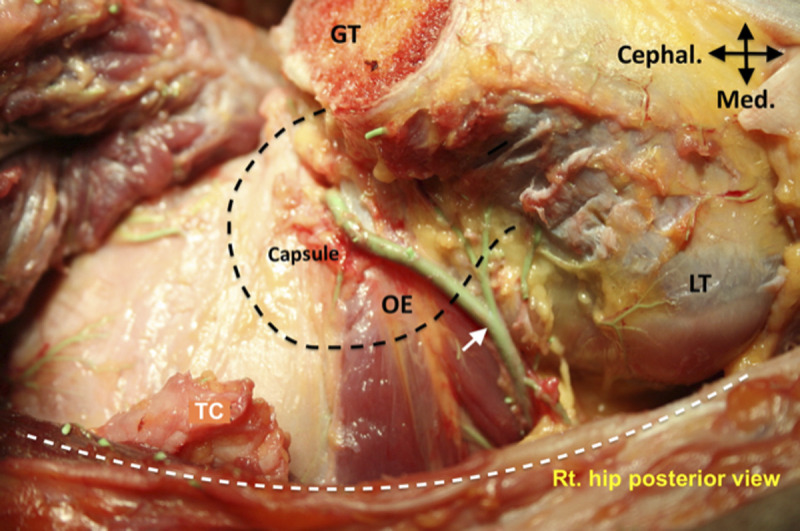
Posterior projection showing the deep branch of the MFCA (arrow), which runs along the distal border of the obturator externus muscle (OE), crosses its tendon near the greater trochanter (GT), and perforates the capsule to form the retinacular vessels. The white dashed line indicates the anterior border of the gluteus maximus, and the black dashed line indicates the femoral head position. LT = lesser trochanter, and TC = separated tendon of triceps coxae.
Video 3.
Separation of the rectus femoris muscle from the iliacus muscle. LFCN = lateral femoral cutaneous nerve.
Video 4.
Mobilization of the iliocapsularis. The interval between the rectus femoris, which is pulled laterally, and the lateral border of the iliocapsularis muscle is identified. The iliocapsularis is dissected off the capsule and the undersurface of the AIIS. The iliocapsularis is further pulled medially, allowing the iliopectineal bursa to open and expose the psoas tendon.
Video 5.
Influence of knee position on joint exposure. Besides hip extension, knee flexion limits exposure of the hip joint by tightening the tendon and muscle belly of the rectus, while hip flexion and knee extension relax the muscle and allow a perfect approach to the joint.
Video 6.
Exposure of the iliopectineal eminence. With the hip in flexion, a spiked Hohmann retractor is placed in the pubic bone. It allows the muscle flap to be medially retracted for exposure of the iliopectineal eminence.
Video 7.
Tension of the vascular bundle. The vascular bundle to the tensor muscle crosses the inferior part of the approach. Even when the medial flap is held away and the hip is extended, the tension of the bundle is not excessive.
Video 8.
Opening of the infracapsular space. To access the ischium, a closed pair of scissors is inserted between the anteroinferior capsule and the psoas tendon. By opening the blades of the scissors, a gap is created for insertion of the curved chisel.
Step 5: Execute the First Incomplete Ischial Cut by Inserting the Osteotome
After replacing the scissors with a large periosteal elevator and inserting the curved osteotome, confirm the best starting point for the ischial osteotomy, which is performed with 3 cuts.
Replace the scissors with a large periosteal elevator to protect the soft tissue during the introduction of the osteotome. Use a curved or a 30°-angled osteotome with 15-mm blade width.
Insert the curved osteotome by using the elevator as a slide bar (Video 9). Make sure there is no soft tissue between the capsule and the infracotyloid groove.
Confirm the best starting point of the osteotomy close to the inferior acetabular lip by scratching the ischial bone with the osteotome toward the acetabular lip, which stops this move. Execute the ischial osteotomy with 3 cuts in the following order: middle, medial, and lateral. First, secure the osteotome in the middle part of the ischium and align it toward the contralateral shoulder. Complete this part by driving the osteotome 2 to 3 cm in depth. The risk of perforating the medial and lateral cortices is low when doing the middle part first. In addition, the remaining medial and lateral bridges can be easily cut with less powerful blows and with a very low risk of soft-tissue damage. Second, do the medial cut with the hip in the same position. Secure the lateral spike of the bifid osteotome in the medial part of the middle osteotomy and drive the osteotome to approximately the same depth as the middle cut but aligned slightly toward the midline of the body.
Third, cut the lateral cortex last with the hip in full extension or in 20° to 30° of abduction to relax the sciatic nerve (Video 10).
Keep the knee extended to reduce the tension of the femoral nerve (see also Video 5).
Use fluoroscopy again when the position or depth of the osteotome is unclear.
Video 9.
Osteotomy of the ischium. The gap distal to the capsule is held open with a large periosteal elevator, allowing for the insertion of a curved osteotome without catching the surrounding soft tissues. Scratching the ischial surface with the osteotome blade, eventually confirmed by fluoroscopy, demonstrates the correct position at the infracotyloid groove. The osteotome is impacted approximately 2 to 3 cm into the ischium, aiming toward the ischial spine.
Video 10.
Leg position influencing the sciatic nerve tension during the ischial cut. If the osteotome is held in a slightly dangerous, or potentially perforating position, at the lateral cortex of the ischium, the video shows how motion of the hip and knee tensions the sciatic nerve and brings it closer to the osteotome or relaxes the nerve and moves it away.
Step 6: Execute the Complete Osteotomy of the Superior Pubic Ramus While Protecting the Obturator Neurovascular Bundle
After exposing the pubic ramus, protect the obturator neurovascular bundle with 2 blunt Hohmann retractors and then perform the osteotomy.
Expose the pubic ramus by tapping a spiked Hohmann retractor into the pubic bone as far medially as possible. This move is somewhat easier in the rectus-sparing approach because the muscle belly of the rectus is not part of the flap to be retracted medially. Expose the pubic ramus subperiosteally by proper development of the periosteal sleeve around the pubic ramus with gentle care.
Place blunt Hohmann retractors subperiosteally around the pubic bone for exposure and protection of the obturator neurovascular bundle that is passing behind the superior pubic ramus and exiting through the obturator foramen into the medial upper thigh compartment (Fig. 6). The tips of the retractors should meet deep to the pubic ramus for secure protection of the neurovascular bundle during osteotomy.
Make a wedge cut with an oscillating saw in the near cortex just medial to the eminence.
Orient an osteotome with a 15 to 20-mm blade in 45° from anterolateral to posteromedial and complete the separation of the bone. Make sure that the osteotomy is complete by spreading the fragments apart using a wider osteotome. Other options or cutting tools may be used for performing the pubic osteotomy. An oblique osteotomy of the pubic ramus can reduce the risk of damage to the obturator neurovascular bundle in case of inadvertent penetration of the far cortex by the osteotome8. In addition, wider osteotomy surfaces may improve the healing condition.
Pay attention to ensure that the retractors protect the neurovascular bundle during propagation of the osteotome (Video 11).
Fig. 6.

Subperiosteal exposure of the superior pubic ramus for the osteotomy, showing the protection of the obturator neurovascular bundle with 2 blunt Hohmann retractors. The black arrow indicates the iliopectineal eminence, and the white arrow indicates the superior ramus of the pubis. TFL = tensor fasciae latae.
Video 11.
Osteotomy of the pubic ramus. The osteotomy starts approximately 5 mm medial to the iliopectineal eminence, with the osteotome inserted in an oblique direction from anterolateral to posteromedial. It is important to protect the adjacent obturator neurovascular bundle with blunt Hohmann retractors.
Step 7: Expose the Supra-Acetabular Bone and Execute the Iliac Osteotomy Taking Care to Protect the Vascular Periacetabular Circuit on the Outside of the Ilium
After making a tunnel in the external surface of the ilium and placing a reverse curved Hohmann retractor to protect the abductor muscles, perform the supra-acetabular iliac osteotomy.
Finish the subperiosteal exposure of the internal surface of the ilium, including the surface of the quadrilateral plate, but avoid opening the greater and lesser sciatic notches; otherwise, slippage of the soft-tissue retractors posteriorly results in inadequate exposure of the internal aspect of the ilium. The tip of the reverse curved Hohmann retractor should rest on the bone surface to be effective in pushing the medial soft-tissue flap medially.
Stop any bleeding from the perforation hole (vascular foramen) of the iliolumbar artery using bone wax.
Place a blunt double-tipped retractor (Fig. 7) near the ischial spine to retract the medial soft-tissue flap (Fig. 8).
Make a tunnel in the external surface of the ilium between the ASIS and the AIIS toward the greater sciatic notch but leave the gluteus minimus tissue as much as possible attached to bone. It contains the vascular arcade just proximal to the insertion of the capsule (Fig. 9).
Place a blunt reverse curved Hohmann retractor in the sciatic notch. Make sure the tip of retractor is placed in the greater sciatic notch but is in contact with the bone (Video 12). Leave this retractor in place for protection of the abductors and sciatic nerve during the osteotomy and do not lever it laterally for exposure. Slight abduction is helpful for better protection of the abductors and sciatic nerve.
Do not detach the gluteus medius muscle from the external crest of the iliac bone (Fig. 10).
Use an oscillating saw for the supra-acetabular osteotomy and start it close to the ASIS stump. Confirm the best position for the anterior starting point of the iliac osteotomy on the basis of the pelvic dimensions. Ensure an adequate bone bridge between the osteotomy and the superior aspect of the acetabulum.
Stop the cutting 15 mm proximal to the pelvic brim (Video 13).
Make sure that the cut in the external cortex is completed to the level of the internal cut. This can be done by inserting a straight osteotome into the osteotomy from anterior to posterior.
Fig. 7.

Reverse curved retractors that are used to protect soft-tissue flaps inside (left retractor with double tip) and outside (round-tipped retractor) the supra-acetabular ilium.
Fig. 8.

A reverse curved retractor placed against the quadrilateral plate near the ischial spine allows a view of the iliac fossa and the quadrilateral surface. 1 = the iliac fossa, and 2 = the quadrilateral surface. TFL = tensor fasciae latae.
Fig. 9.

Posterior aspect of the right hip showing the vascular arcade of the acetabulum. The white arrow points to the superior gluteal artery (SGA); the yellow arrow, to the supra-acetabular branch of the SGA; and the black arrows, to the periosteal branch of the inferior gluteal artery. The dashed line indicates the retroacetabular course of the osteotomy.
Fig. 10.

Exposure for the supra-acetabular and retroacetabular osteotomies. The medial reverse retractor presses against the quadrilateral plate near the ischial spine. The lateral reverse retractor is placed through a small tunnel into the greater sciatic notch and protects the abductor muscles and the supra-acetabular vascular arcade. A third Hohmann retractor is placed into the pubic osteotomy. TFL = tensor fasciae latae.
Video 12.
Tunnel outside the ilium. To protect the abductor muscles from being injured during the supra-acetabular osteotomy, a tunnel is prepared subperiosteally, starting between the ASIS and the AIIS and progressing into the greater sciatic notch. A reversed Hohmann retractor is placed into the slot and advanced until it is held firmly in the notch.
Video 13.
The supra-acetabular osteotomy. The supra-acetabular osteotomy starts close to the ASIS. The saw blade is directed posteriorly and stops approximately 15 mm distant to the pelvic brim.
Step 8: Execute the Incomplete Retroacetabular Osteotomy by Avoiding Joint Penetration as Well as Separation of the Posterior Bone Column
Using a curved osteotome, perform the retroacetabular osteotomy and connect it to the supra-acetabular osteotomy at the pelvic brim.
Double-check the turning point between the supra-acetabular osteotomy and the retroacetabular osteotomy by visual and palpatory control of the distance from the estimated posterior cut to the joint and the greater sciatic notch. If unclear, fluoroscopic confirmation is advisable.
Cut the cortex over the distance from the turning point to the pelvic brim with a 10 to 15-mm osteotome. A double cut widening the osteotomy may ease further directing the retroacetabular cut.
Use a 10-mm osteotome to cut the inner cortex only and direct the instrument toward the ischial spine (Video 14).
Keep 1 edge of the osteotome visible while propagating.
Use fluoroscopy when difficulties exist in directing the osteotome as desired.
Advance the osteotome distally to approximately 3 to 4 cm from the pelvic brim.
Use a curved 15-mm osteotome, place it in the slot proximal to the brim, and orient it toward the opposite cortex so that it will perforate it at the same level as on the inner side of the ilium (Fig. 11).
Relax the gluteus medius muscle with some abduction of the flexed hip during propagation of the cut.
Avoid overpenetration of the external cortex by continuously checking the change in resistance and metallic sound of the osteotome.
Use a 20-mm straight osteotome in the supra-acetabular osteotomy and open the gap to ensure lateral completeness of both osteotomies.
When all cuts are executed precisely, place the osteotome somewhat deeper in the gap and mobilize the acetabular fragment with a levering move (Fig. 12).
Repeat all cuts in case the fragment cannot be mobilized with ease.
Place a small lamina spreader in the anterior osteotomy gap and open it. Do the same with a large spreader placed in the posterior gap. The resulting tension facilitates the execution of the last osteotomy step, which combines the retroacetabular osteotomy with the first ischial osteotomy.
After predrilling with a 3.2-mm drill-bit, insert a 5-mm Schanz screw in the acetabular fragment at the AIIS and direct it toward the posterosuperior fragment edge. With an attached handle, the Schanz screw allows further exposure of the quadrilateral surface. It also produces some fracture propagation of the retroacetabular osteotomy toward the ischial spine. Open the spreader completely (Video 15).
Fig. 11.

The supra-acetabular osteotomy is connected to the retroacetabular osteotomy at the pelvic brim using a curved osteotome. TFL = tensor fasciae latae.
Fig. 12.

The osteotomy gap is opened by leverage with a 20-mm straight osteotome. TFL = tensor fasciae latae.
Video 14.
Retroacetabular osteotomy. The retroacetabular osteotomy is executed using curved and straight osteotomes. At the small part anterior to the brim, both cortices are separated. For the true retroacetabular part, the osteotome is directed toward the ischial spine. With manual palpation and fluoroscopy, the protection of the posterior column between the superior and inferior portions of the hemipelvis can be verified.
Video 15.
Mobilization of the acetabular fragment. Using a Schanz screw and a lamina spreader, the osteotomized fragment can be placed under tension for further osteotomies. Despite a small osseous bridge between the retroacetabular and the first ischial cut, the acetabular fragment can be brought into the best position for separating this bridge.
Step 9: Execute the Fifth Osteotomy That Combines the Retroacetabular Osteotomy with the First Ischial Osteotomy
Using a bifid osteotome, combine the retroacetabular osteotomy with the first ischial osteotomy.
Use a 20-mm bifid osteotome with an angulation of 50° at approximately 4 cm from the tip. Place it deep on the quadrilateral bone. When the angulation of the osteotome levels the ridge of the pelvic brim, turn the osteotome approximately 20° further inward. In this position, the osteotome cuts the bone posterior to the joint (Fig. 13, Video 16).
Execute this cut with the hip in full extension. It allows maximal relaxation of the sciatic nerve and is a very efficient move to protect the nerve from being injured.
Penetration through the outside cortex can be controlled acoustically on the basis of the sound change of the hammer blows. A second cut is rarely necessary.
Fig. 13.

Further opening of the gap using a lamina spreader and a Schanz screw placed into the AIIS. TFL = tensor fasciae latae.
Video 16.
The last ischial cut. The last cut posterior to the joint is executed using an angulated osteotome with a 4-cm-long blade. With the axilla of the osteotome held against the brim, the osteotome penetrates the bone posterior to the joint.
Step 10: Reposition the Acetabular Fragment Through Simultaneous Levering Moves of the Schanz Screw and the Lamina Spreader
Using counterrotating movements, mobilize the fragment and place it in the desired position.
Reduce the tension in the lamina spreader by opening the handle halfway.
Make an outward turning move with the spreader to laterally displace the posterior edge of the fragment.
Simultaneously turn the handle of the Schanz screw in a rotating move toward the opposite side and downward (Video 17).
Check whether the fragment is completely disconnected and mobile; anterior rotation of the fragment should not result in a distance between the fragment and the stable ilium. Correction of the fragment version should also be possible.
Perform preliminary fixation with 2 to 3 Kirschner wires.
Check the range of impingement-free motion, especially internal rotation in flexion.
Check the fragment position with an anteroposterior radiograph of the pelvis. Ascertain that the radiograph represents a neutral nonrotated projection. If correction is not optimal, repeat it.
Use 3 screws for definitive fixation similar to the configuration of the classic technique.
Check the passive range of motion again in all planes. Specifically look for subspine impingement.
If passive range of motion, especially flexion in internal rotation, is not satisfactory, make a T-shaped capsulotomy to determine if there is an intra-articular source of impingement, which commonly is reduced femoral head-neck offset. With hip flexion and knee extension, the exposure of the joint is equal to the classic approach.
Video 17.
Disconnecting the fragment. With counterrotating movements, the acetabular fragment can be freed completely and brought into the desired position.
Results
The results of this cadaveric study show that the rectus-preserving technique is as effective as the classic technique in terms of reorientation of the acetabulum. Technical effort and difficulty are also identical. Exposure for the first ischial cut and the pubic cut are slightly more convenient in the rectus-sparing approach, an aspect of potential importance in a muscular patient with short stature. With careful attention to the important details of soft-tissue technique, the risk of damage to local soft tissues is not increased. The transverse branch of the LFCA to the tensor muscle, which crosses the inferior extension of the approach, is at no higher risk of being damaged than in the classic approach. The same is true for the nerve to the tensor muscle. The tension of the femoral nerve, especially the first branch, might be higher compared with the classic technique. A critical moment occurs during the first ischial cut, when the hip is extended to relax the sciatic nerve and the rectus muscle is retracted laterally (Video 18). Exposure and access to the joint for revision and eventual intra-articular procedures is made possible when the hip is flexed and the knee is extended (Video 5).
Video 18.
Femoral nerve stretching. Raising the medial muscle flap of the iliacus increases the tension of the femoral nerve, especially the most proximal branch to the rectus muscle. With extension of the hip, tension of the nerve is higher, and with flexion of the hip, tension is lower.
In general, transection and refixation of tendon and muscle as part of an approach cause additional trauma, which may be avoided if the procedure can be performed without tenotomy. The rectus-sparing approach for the Bernese PAO is therefore less invasive and has been shown to allow the technical execution of the osseous cuts and the correction of the freed acetabulum.
However, the rectus-sparing PAO may limit the access to the joint as well as the control of resultant subspine impingement after acetabular correction. If this is a problem, then the rectus tendon can be partially released as needed and refixed. Since the rectus muscle is part of the lateral soft-tissue flap in this technique, the nerve remains less protected by the less bulky medial soft-tissue flap. In addition, in contrast to the classic technique, the rectus muscle is pulled away from the femoral nerve during exposure, resulting in more tension on the nerve by the lateral flap, especially on its first branch to the rectus. Also, the risk of injury to the sciatic nerve may be increased when the ischial osteotomy is performed in flexion as recommended to protect the femoral nerve. The influence on the vascular bundle to the tensor muscle is unknown. Finally, high anterior fragment rotation may displace the AIIS anteriorly to produce a troubling subcutaneous bump. Further cadaveric dissections may help to clarify such concerns.
Pitfalls & Challenges
There is a certain risk of overstretching the femoral nerve, especially its first branch, during preparation and execution of the first ischial osteotomy and the pubic osteotomy. Excessive spreading of the approach or severe deformities may increase the risk (Video 18). However, to date, no nerve injuries have been reported, as far as we know.
Avoiding complete paralytic anesthesia is advisable to allow monitoring of nerve irritation during the procedure.
Access for mobilization and retraction of the iliocapsularis muscle is slightly more difficult with the rectus-sparing technique, especially near the origin at the undersurface of the AIIS. Flexion of the hip and extension of the knee make it easier.
Repositioning of the fragment, especially with the hip in flexion and external rotation, relaxes the rectus tendon (Video 19).
It is somewhat less easy to control the subspinous space for resultant extra-articular impingement after correction (Video 20).
During manipulation with the Schanz screw, the AIIS may break off. If so, it needs to be resected and the rectus tendon needs to be resutured as in the classic approach.
In oblong acetabula, anterior rotation of the acetabular fragment may displace the AIIS to become prominent under the skin. Trimming off the excessive bone and refixation of the rectus tendon may be necessary.
Other possible pitfalls and challenges of PAO are similar in the classic and the rectus-sparing approach.
Video 19.
Changing the rectus tension with fragment reorientation. Anterolateral rotational corrections of the acetabular fragment lead to a relaxation of the rectus tendon.
Video 20.
Control of fragment orientation. The rectus-sparing approach allows a large T-capsulotomy for optimal visualization of the head-neck junction, as well as for control of the impingement-free range of motion after fragment reorientation.
Acknowledgments
Note: The authors thank Diego Collado Jr. for his help with the editing of the videos.
Published outcomes of this procedure can be found at: Clin Orthop Relat Res. 2014 Oct;472(10):3142-9.
Investigation performed at the Department of Orthopaedic Surgery, Iran University of Medical Sciences, and the Department of Anatomy, Legal Medicine Organization, Tehran, Iran
Disclosure: The authors indicated that no external funding was received for any aspect of this work. On the Disclosure of Potential Conflicts of Interest forms, which are provided with the online version of the article, one or more of the authors checked “yes” to indicate that the author had other relationships or activities that could be perceived to influence, or have the potential to influence, what was written in this work. The Disclosure of Potential Conflicts of Interest forms are provided with the online version of the article (http://links.lww.com/JBJSEST/A336).
References
- 1.Ganz R, Klaue K, Vinh TS, Mast JW. A new periacetabular osteotomy for the treatment of hip dysplasias. Technique and preliminary results. Clin Orthop Relat Res. 1988. July;232:26-36. [PubMed] [Google Scholar]
- 2.Novais EN, Kim YJ, Carry PM, Millis MB. The Bernese periacetabular osteotomy: is transection of the rectus femoris tendon essential? Clin Orthop Relat Res. 2014. October;472(10):3142-9. Epub 2014 Jul 23. [DOI] [PMC free article] [PubMed] [Google Scholar]
- 3.Peters CL, Erickson JA, Anderson MB, Anderson LA. Preservation of the rectus femoris origin during periacetabular osteotomy does not compromise acetabular reorientation. Clin Orthop Relat Res. 2015. February;473(2):608-14. [DOI] [PMC free article] [PubMed] [Google Scholar]
- 4.Kalhor M, Collado D, Leunig M, Rego P, Ganz R. Recommendations to reduce risk of nerve injury during Bernese periacetabular osteotomy (PAO). JBJS Essent Surg Tech. 2017. November 22;7(4):e34. [DOI] [PMC free article] [PubMed] [Google Scholar]
- 5.Ninomiya S, Tagawa H. Rotational acetabular osteotomy for the dysplastic hip. J Bone Joint Surg Am. 1984. March;66(3):430-6. [PubMed] [Google Scholar]
- 6.Steel HH. Triple osteotomy of the innominate bone. J Bone Joint Surg Am. 1973. March;55(2):343-50. [PubMed] [Google Scholar]
- 7.Schramm M, Hohmann D, Radespiel-Troger M, Pitto RP. The Wagner spherical osteotomy of the acetabulum. Surgical technique. J Bone Joint Surg Am. 2004. March;86(Suppl 1):73-80. [DOI] [PubMed] [Google Scholar]
- 8.Kalhor M, Beck M, Huff TW, Ganz R. Capsular and pericapsular contributions to acetabular and femoral head perfusion. J Bone Joint Surg Am. 2009. February;91(2):409-18. [DOI] [PubMed] [Google Scholar]
- 9.Flückiger G, Eggli S, Kosina J, Ganz R. [Birth after peri-acetabular osteotomy]. Orthopade. 2000. January;29(1):63-7. German. [DOI] [PubMed] [Google Scholar]
- 10.Millis MB, McClincy M. Periacetabular osteotomy to treat residual dysplasia in adolescents and young adults: indications, complications, results. J Child Orthop. 2018. August 1;12(4):349-57. [DOI] [PMC free article] [PubMed] [Google Scholar]
- 11.MacDonald SJ, Hersche O, Ganz R. Periacetabular osteotomy in the treatment of neurogenic acetabular dysplasia. J Bone Joint Surg Br. 1999. November;81(6):975-8. [DOI] [PubMed] [Google Scholar]
- 12.Sierra RJ, Schoeniger SR, Millis M, Ganz R. Periacetabular osteotomy for containment of the nonarthritic dysplastic hip secondary to poliomyelitis. J Bone Joint Surg Am. 2010. December 15;92(18):2917-23. [DOI] [PubMed] [Google Scholar]
- 13.Clohisy JC, Nunley RM, Curry MC, Schoenecker PL. Periacetabular osteotomy for the treatment of acetabular dysplasia associated with major aspherical femoral head deformities. J Bone Joint Surg Am. 2007. July;89(7):1417-23. [DOI] [PubMed] [Google Scholar]
- 14.Clohisy JC, Nepple JJ, Ross JR, Pashos G, Schoenecker PL. Does surgical hip dislocation and periacetabular osteotomy improve pain in patients with Perthes-like deformities and acetabular dysplasia? Clin Orthop Relat Res. 2015. April;473(4):1370-7. [DOI] [PMC free article] [PubMed] [Google Scholar]
- 15.Ganz R, Horowitz K, Leunig M. Algorithm for femoral and periacetabular osteotomies in complex hip deformities. Clin Orthop Relat Res. 2010. December;468(12):3168-80. [DOI] [PMC free article] [PubMed] [Google Scholar]
- 16.Clohisy JC, Pascual-Garrido C, Duncan S, Pashos G, Schoenecker PL. Concurrent femoral head reduction and periacetabular osteotomies for the treatment of severe femoral head deformities. Bone Joint J. 2018. December;100-B(12):1551-8. [DOI] [PubMed] [Google Scholar]