

Abstract
Live confocal imaging of fluorescent reporters and stains in plant meristems provides valuable measurements of gene expression, protein dynamics, cell polarity, cell division, and growth. The spikelet meristem in the grass Brachypodium distachyon (Brachypodium) is well suited to live imaging because of the ease of dissection, small meristem size, simple arrangement of organs, and because each plant provides abundant spikelet meristems. Brachypodium is also far easier to genetically transform than other grass species. Presented here is a protocol for the growth, staging, dissection, mounting, and imaging of Brachypodium spikelet meristems for live confocal imaging.
Keywords: Live-imaging, Confocal, Grasses, Brachypodium, Development, Meristems, Microscopy, Plants
Background
Plant organs (leaves, branches, flowers) originate from meristems, the growing tips of a plant that contain a population of stem cells. Live confocal imaging of transcriptional reporters, fluorescent fusion proteins, and fluorescent stains has provided important spatial and temporal information about the myriad of gene products involved in meristem maintenance and organ initiation. Live imaging of the Arabidopsis thaliana inflorescence meristem is a continuing line of inquiry ( Reddy et al., 2004 ; Bhatia et al., 2016 ; Prunet et al., 2016 ; Willis et al., 2016 ; Landrein et al., 2018 ; Shi et al., 2018 ), while live imaging of meristems in plants outside of Arabidopsis has been limited ( Deb et al., 2015 ).
Presented here is a protocol for confocal live imaging the spikelet meristem of the grass Brachypodium distachyon (Brachypodium). There are several advantages to imaging Brachypodium spikelet meristems. First, the spikelet meristem is relatively small, which facilitates laser penetration and allows for ample resolution deep into the meristem tissue. Second, with attention to plant staging, spikelet meristem samples are easy to dissect and mount making rapid imaging of multiple samples easy. Third, the distichous phyllotaxy of organ initiation in the spikelet meristem, with each new organ initiated 180 degrees from the previous organ, enables the early events of organ initiation to be observed and allows for several stages of development to be captured with a single sample (O’ Connor et al., 2014 ). Finally, the spikelet meristem of grasses is the source of approximately 50% of all calories consumed by humans world-wide, making it an agronomically important research target.
Brachypodium is a useful model system because of its rapid growth cycle, ease of growth, small genome size, availability of a high-quality genome sequence, and most importantly for live imaging, the relative ease of genetic transformation (International Brachypodium Initiative, 2010; Bragg et al., 2012 ; Brutnell et al., 2015 ; Kellogg, 2015). Imaging fluorescent fusion-protein reporters in the Brachypodium spikelet has provided valuable insight into the mechanisms of auxin transport ( O'Connor et al., 2014 and 2017).
Materials and Reagents
Soil: Metro-Mix 360 (Sun Gro Horticulture)
Pots: ~5 x 7 cm square 24x cell trays (McCONKEY, catalog number: JMCS606HPB)
Clear plastic horticultural tray lids
Peters general purpose 20-20-20 fertilizer (ICL, Peters®, catalog number: G99290)
Wet paper towels
5 cm Petri dishes (Figure 1G)
Sharp razor blades (Figure 1A) (e.g., Gillette)
Syringe needle 21 G (Figure 1D) (Optional)
Pasteur pipette (Figure 1F)
1.5 ml microfuge tubes (optional, for counterstaining)
Brachypodium spikelets
1% agarose in water or MS (Murashige and Skoog) media
Propidium iodide stain (optional) (Sigma-Aldrich, catalog number: P4170)
FM4-64 dye (optional) (Thermo Fisher Scientific, InvitrogenTM, catalog number: T13320)
Propidium iodide solution (see Recipes)
FM4-64 solution (see Recipes)
Figure 1. Equipment.
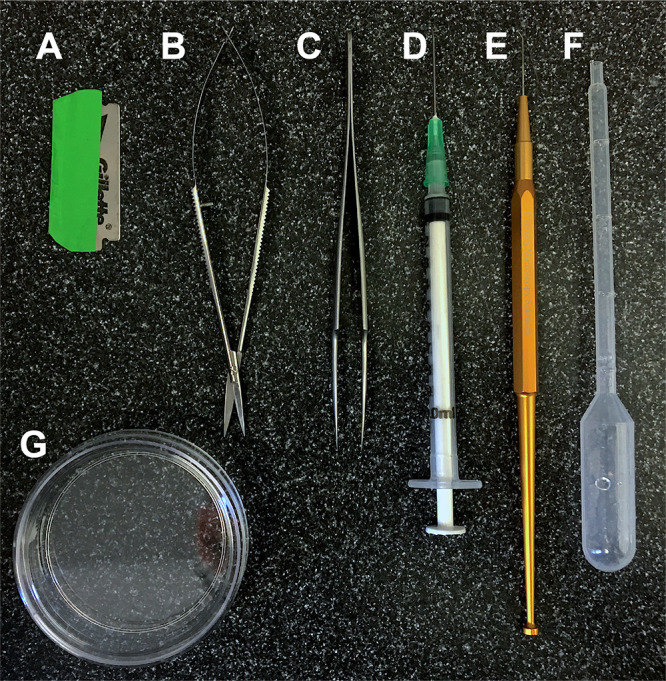
A. Sharp razor-blade for cutting nodes, an alternative to micro-scissors. B. Micro-scissors used for removing samples from the plant and cutting nodes during dissection. C. Small, sharp forceps used for removing lemmas. D. Syringe needle for removing lemmas covering the meristem or breaking off awns from immature lemmas, an alternative to a probe or sharp forceps. E. Bent probe for removing lemmas and lemma awns. F. Pasteur pipette for dispensing 1% agarose during mounting. The end can be cut off to facilitate flow. G. Small Petri dish for mounting samples. See the Materials and Reagents, and Equipment sections for details.
Equipment
-
Dissection equipment (see Figure 1)
Castro-Viejo Micro Scissors, 4" (102 mm), Straight Tips (Electron Microscopy Sciences, catalog number: 72933-01, Figure 1B)
Sharp Forceps (Ideal-Tek 110 mm Extra fine tips Forceps) (IDEAL-TEK, catalog number: 5.DX.0, Figure 1C)
Dissection Probe, Micro-Prober 45° 0.50 mm, combined with EMS Tool Handle (Electron Microscopy Sciences, catalog numbers: 62091-12, 62090-00) (Optional, Figure 1E)
Dissecting Stereomicroscope (Carl Zeiss, model: Stemi 2000; Leica Microsystems, model: MZ6; or similar)
-
Confocal microscope (Leica Microsystems, models: TCS SP5, TCS SP8; Carl Zeiss, models: LSM 510, LSM 780)
Note: We have successfully used several different laser-scanning confocal microscopes, including Leica SP5, Leica SP8, Zeiss 510, Zeiss 780, etc. In general, upright scopes with water-dipping objectives are easier to use, thus upright scopes are the focus of this protocol.
-
Microscope objectives
Most of our current data is derived from upright scopes with long working-distance water-dipping objectives. Objectives that we have used successfully are listed below, but similar objectives will suffice.
-
Leica Objectives
HCX APO 40x 0.8 Numerical Aperture water-dipping
HCX IRAPO 25x 0.95NA water-dipping
-
Zeiss Objectives
20x, 40x, 63x W-PLAN APOCHROMAT 1.0 Numerical Aperture water-dipping
-
Procedure
-
Growth
Brachypodium plants can be grown in a variety of soils, pots, temperatures and light regimes. In general, we try to accelerate the transition to flowering while still maintaining a healthy plant with several lateral branches. Using a 20 h light/4 h dark cycle and small pot sizes stimulates flowering, but in these conditions proper watering is important. Larger pot sizes and shorter day lengths will lengthen the time to flowering, but may yield more spikelets for imaging per plant.
Plants can be grown at higher densities if they are only used for harvesting spikelets. If plants are grown for seeds, a lower planting density or culling before flowering is recommended. See the Materials and Reagents section for pot sizes and soil recommendations. Below you will find general growth guidelines.
-
Seed preparation (optional)
For some batches of seed, germination can be improved by removing the lemma. The lemma is the outer leaf-like organ with a long protruding tendril-like mid-vein called the awn (Figure 3E). Peel off the lemma by gripping the awn and opening away from the seed.
-
Sowing
Ensure soil is well watered before sowing. Place 2 seeds per pot to ensure adequate germination. Plants will need to be culled down to 1 per pot if they are being grown for seed. Sow by pushing the seed vertically just below the soil surface with the awn end facing up.
-
Stratification (optional)
After sowing place trays at 4 °C for 2-4 days to synchronize germination.
-
Growth Conditions
20 h ~300 µmol light, 4 h dark.
28 °C day, 18 °C night.
-
Germination
Ensure trays are well watered before placing into the light, and cover with clear plastic lids until plants are germinated, up to one week.
-
Fertilization
Include fertilizer with every second watering according to manufacturer’s instructions.
-
Watering before flowering
Watering is performed by pouring ~1 cm of water into the bottom of each tray.
Note: It is critical that young plants never sit in standing water for long periods of time, especially during the first 2-3 weeks of growth. If plants do not soak up the added water in the bottom of the tray after ~20 min it should be drained by pouring out. Use the weight of the tray to determine watering. In general, water sparingly during the first few weeks to stimulate root growth. Plants that are overwatered early will not have a well-developed root system and will suffer during flowering.
-
Watering during flowering and seed set
After flowering and especially during seed-set, plants will need plenty of water. After the first addition of water, allow plants to soak for 15-20 min before adding a small amount of additional water. At this stage, plants can sit in a small amount of water to ensure they do not dry out (e.g., over the weekend). Maintaining adequate watering late in development is critical to seed set. Watering can be cut off at the first sign of senescence (brown/yellowing starting in the inflorescence) to accelerate seed drying. Alternatively, watering can be extended during most of senescence to increase seed yield.
-
-
Staging
Proper staging will ensure consistent results and facilitate dissection. In our growth conditions, Brachypodium has three main branching axes at floral transition. The central apical branch will generally flower first, and it is this branch that we focus on to harvest spikelet meristems. Upon the transition to flowering the apical meristem will first initiate several lateral spikelet (LS) meristems before transitioning into the terminal spikelet (TS) meristem (Figure 2A) (Derbyshire and Byrne, 2013; O'Connor et al., 2014 ). The terminal spikelet will mature first, followed by the lateral spikelets proceeding from the top of the inflorescence basally.
Each spikelet meristem initiates two sterile leaf-like glumes (GL) before initiating florets in a distichous phyllotaxy (180° between each organ) (Figure 2A). The first organ in each floret is the lemma (L), a leaf-like organ that subtends the floral meristem (FM) and will cover the seed at maturity (Figure 2B). At the tip of each lemma mid-vein is a long tendril called the awn (AW) (Figures 2A, 3E).
The key to staging is to identify branches where the floral transition has just occurred, but before the terminal spikelet fully emerges. This stage is easily identified because the awn of the terminal spikelet is visible emerging from the sheath of the last vegetative leaf (Figures 3B and 3C). At this stage the lateral spikelets will be immature and largely exposed. We have termed this stage the "first-awn" stage. The first-awn stage in the main axis occurs in our growth conditions starting approximately 3 weeks after moving plants to light, after the production of approximately 7 leaves. The earlier the first-awn stage is identified, the easier the lateral spikelets will be to dissect. It may be necessary to unroll the last vegetative leaf in order to see the first awn at the earliest stages (Figure 3B). Branches where the entire terminal spikelet has emerged from the last vegetative leaf (Figure 3D) are too old and are not suitable for harvesting spikelet meristems. At this late stage, the lateral spikelets are covered and tend to break off the main axis during dissection.
We have not noticed significant differences between lateral and terminal spikelet meristems, but harvesting meristems from a consistent position is recommended.
-
Dissection
Note:
See Video 1 for a demonstration of the entire dissection procedure.
These steps should be completed as quickly as possible. The sample will dry out if the cut end is not embedded in agarose quickly. A damp paper towel can be placed on the stage of the dissection scope to delay sample drying. Recommended dissection tools are shown in Figure 1.
Identify branches at the "first-awn" stage (Figure 4A)
Remove the sample from the main plant by cutting just below the last visible node. Node tissue is generally white and is covered in a collar of trichomes, hereafter called the "fuzzy collar" (FC) (Figure 4A).
Release the internal tissues by cutting through the entire stem just above the fuzzy collar of the node (Figure 4B).
Gripping the base lightly with your fingers (do not crush!), carefully pull the inner tissue out of the sheath tissue of the outer leaf.
Repeat until there is a single leaf surrounding the inflorescence. Usually, 2-3 leaves cover the immature inflorescence.
Once again, cut just above the fuzzy collar of the node (Figure 4C), carefully grip the leaf base with your fingers and pull out the inflorescence (Figure 4D).
Under the dissecting scope grip the sample by the terminal spikelet and select one of the lateral spikelets for dissection. Generally, the lowest lateral spikelet is the easiest to dissect.
-
Using a probe, syringe needle, or fine forceps start at the base of the spikelet and remove the immature bracts (Figure 4E) and any immature lemmas covering the spikelet meristem.
Note: The immature bracts and lemmas wrap around the spikelet, so it is often easier to remove them if you insert the probe on the opposite side of the spikelet meristem from the midvein and unwrap. The organ will break at the base.
Remove immature organs until the spikelet meristem is visible (Figure 4F).
For the last few lemmas that have not grown enough to cover the spikelet meristem, only the awns should be removed by gripping with forceps and bending away from the spikelet meristem apex until the awn breaks off. Note: If these awns are not removed a bubble will form around the spikelet meristem making staining and imaging under water impossible.
The exposed spikelet meristem is now ready for optional staining or mounting (Figure 4G).
-
Counterstains (optional)
After dissection, samples can be counterstained by placing directly into a 1.5 ml microfuge tube containing the stain of choice (Figure 5A). Make sure a bubble does not surround the spikelet meristem and that it does not contact the side of the tube.
We have successfully used propidium iodide to stain cell walls (Figures 5B and 5D, Propidium iodide:10 μg/ml in water for 10-20 min). Propidium iodide is normally excluded from the inside of the cell by the plasma membrane. Thus, damaged or dead cells will stain internally, especially in the nucleus, and damaged samples are easily identified.
We also regularly use the vital stain FM4-64 to stain cell membranes and endocytic vesicles (Figure 5C, FM4-64 (Figure 5C): 50 µg/ml in water for 5-15 min). Short stain times (5-10 min) will mark only the cell membrane, while longer stain times will mark vesicles as the stain is endocytosed.
-
Mounting
-
Once the target spikelet meristem is revealed, you can cut off the other spikelets so the sample will lie flat in the dish.
Note: Be sure to leave enough tissue at both ends to act as mounting points (Figure 4H).
Using molten 1% agarose and a Pasteur pipette, "glue" the two ends of the sample down in the center of a ~5 cm Petri dish (Figure 4H).
Working quickly before the agarose solidifies, adjust the sample so the target meristem sits in the plane of the dish. This may involve twisting the main branch axes quite severely.
After the agarose completely solidifies cover with water and image immediately, do not allow the sample to dry out.
-
-
Imaging
Imaging parameters will depend on the specific reporter, sample, confocal, objective, and other factors, but general recommendations are provided here.
Most confocals will have settings to automatically optimize XY and Z resolutions. These are a good starting point, but these settings often oversample for most experiments and lead to long scan times and possible bleaching. For routine moderately-high resolution imaging, we use around 1024 x 1024 resolution and a field of view of 200 µm or less. Lower resolutions around 512 x 512 may be suitable for some experiments and will greatly increase the scanning speed. We recommend a bit depth of at least 12, especially if quantifying florescence. We generally use a zoom of approximately 3x with a 20x objective and a Z step-size of 0.5-3 µm with the pinhole set to 1 airy unit, although these settings should be adjusted to the particular sample and experimental goal.
Because the spikelet meristem is symmetrical, only one half of the depth needs to be imaged in order to get a good sense of a particular expression domain. The sample can be turned 90°, re-mounted with agarose and re-imaged to get a different view (Figures 2B and 2C). The relatively small size of the Brachypodium spikelet meristem means it is generally easy to image deep into the tissue. However, the fluorescent signal will decrease deeper into the tissue, especially at the base of the spikelet meristem (Figure 5D).
Figure 3. Inflorescence staging.
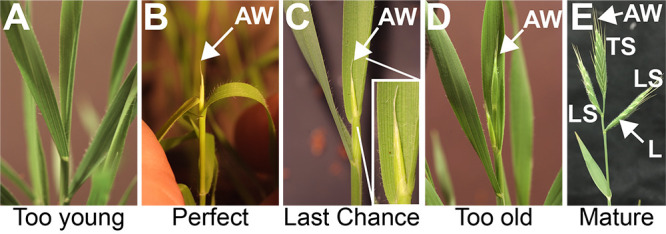
Stages of Brachypodium inflorescence development (A)-(E). A. Prior to the transition to flowering the inflorescence is not visible. B. The ideal stage for dissection is when the top of the terminal spikelet just emerges from the last vegetative leaf. The most identifying feature of the transition to flowering is the appearance of the awn, the tendril-like organ at the tip of each floret, clearly visible in panel E (labeled AW in B-E). Often the last vegetative leaf needs to be unrolled and opened slightly to reveal the terminal spikelet awn. Plants at this early “first-awn” stage are the easiest to dissect. C. The end of the ideal stage occurs when the terminal spikelet completely emerges from the last vegetative leaf. Panel C shows the very end of the permissible stage. Inset shows detail of the first awn of the terminal spikelet. D. Inflorescences where the terminal spikelet has fully emerged are not suitable for imaging. E. The mature Brachypodium inflorescence with the terminal spikelet (TS) and two lateral spikelets (LS). The mature lemmas (L) and awns (AW) are clearly visible at this stage.
Figure 2. Brachypodium spikelet meristems.
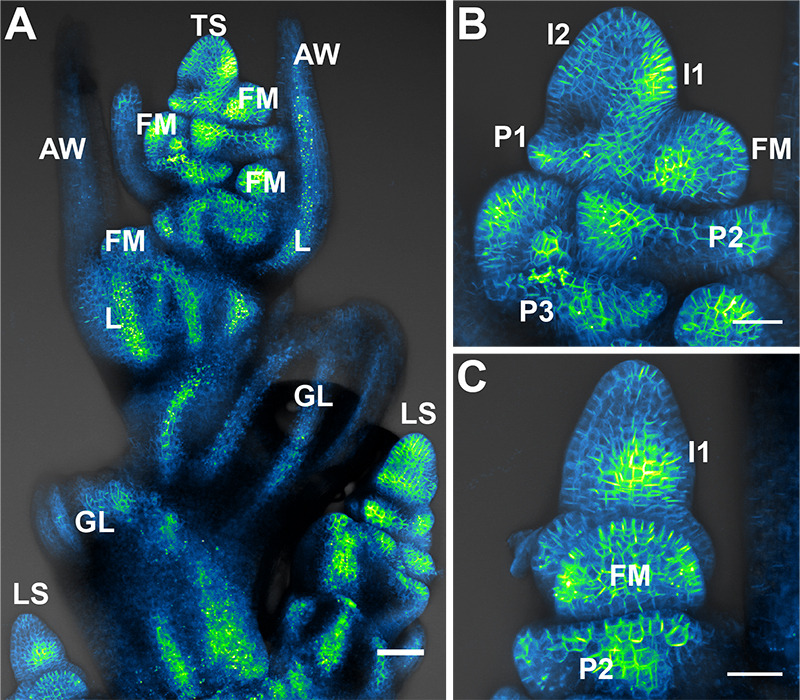
A. Maximum projection of Citrine (a YFP variant) tagged SoPIN1 auxin transport protein in the Brachypodium inflorescence. Normally with the staging method described in the text the terminal spikelet (TS) will not be exposed as in this image. The sterile glumes (GL), floral meristems (FM), lemmas (L), and awns (AW) of the terminal spikelet (TS) are labeled. The lateral spikelets (LS) are positioned perpendicular to the terminal spikelet and mature later. B. Maximum projection of SoPIN1 in a Brachypodium spikelet meristem. This side-on view is how we normally image. The youngest to oldest incipient lemma primordia are labeled I2 and I1, while youngest to oldest primordia are labeled P1, P2, and P3. The youngest floral meristem is also labeled (FM). C. The inflorescence can be turned 90 degrees to capture a view of the spikelet meristem where lemma primordia and the floral meristem are imaged end-on. In this maximum projection I1 convergent polarization of SoPIN1 (I1), the P2 lemma (P2), and the floral meristem (FM) are labeled. Scale bars = 50 µm in (A), 25 µm in (B) and (C).
Video 1. Video of dissection and mounting of Brachypodium spikelet meristem.
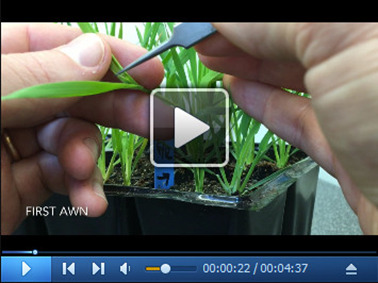
Video shows how to identify the first awn stage, dissect out the spikelet meristem sample, remove organs covering the meristem, and mount for confocal imaging.
Figure 4. Dissection and mounting of spikelet meristems.
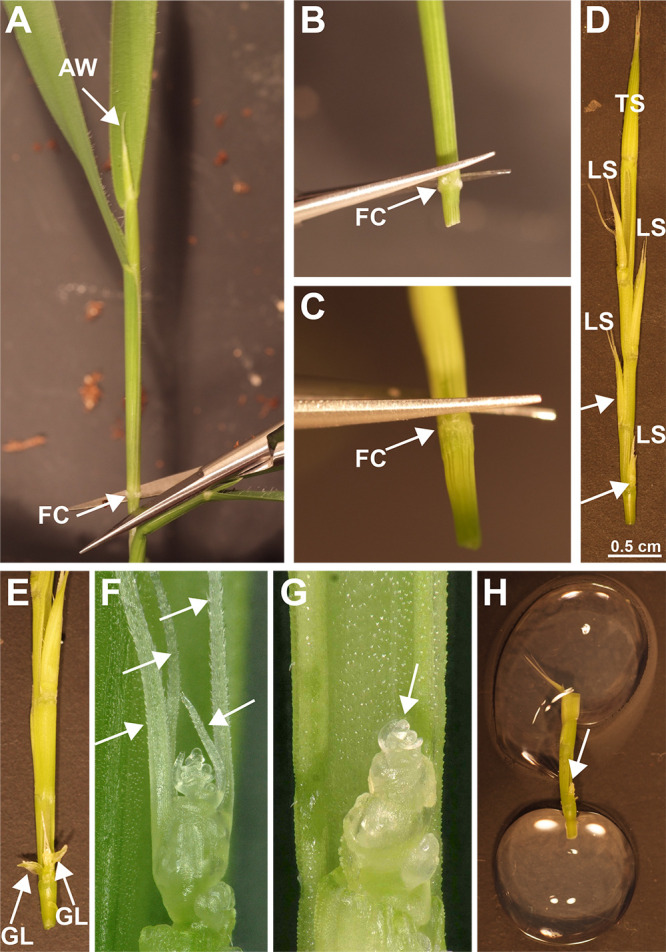
A. First remove the sample by cutting below the fuzzy collar (FC) of the last visible node. B. Using micro-scissors or razor-blade cut just above the fuzzy collar (FC) of the node to release the inner tissues. C. Once the inner nodes are removed from the sheath by pulling out, repeat by carefully cutting just above the fuzzy collar (FC) of the next node. D. Repeat until the entire inflorescence is released by pulling on the end of the terminal spikelet (TS). The basal most lateral spikelets (arrows) are typically the easiest to dissect because they are less likely to break off, and the meristems are more exposed. E. Expose the meristem by removing the glume (GL) and lemma primordia wrapped around the spikelet meristem. F. Remove the remaining lemma awns (arrows) by carefully bending down and breaking off or by using the sharp end of a syringe needle to cut off. G. Once all lemmas and lemma awns are removed the meristem is fully exposed (arrow) and ready for mounting or optional counterstaining. H. After optional counterstaining, the inflorescence is trimmed and mounted in a Petri dish by adhering the ends with drops of 1% agarose. Immerse the sample in water to prevent drying and image immediately.
Figure 5. Counterstains.
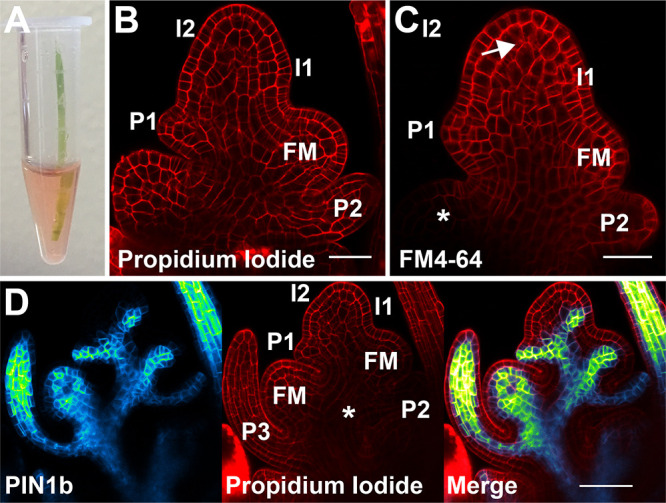
A. Samples can be carefully placed directly in staining solution in a microfuge tube. B. Medial confocal z-section of a propidium iodide stained spikelet meristem showing the cell walls. Lemma primordia are labeled from youngest to oldest I2, I1, P1, P2. The youngest floral meristem is also labeled (FM). C. Medial confocal z-section of an FM4-64 stained spikelet meristem showing primarily the cell membrane. Internalized stain is shown with an arrow. The asterisk marks the unstained floral meristem. Incipient lemma primordia are labeled from youngest to oldest I2 and I1, while primordia are labeled P1 and P2. The youngest floral meristem is labeled (FM). D. Medial confocal z-section co-localization of Citrine-tagged PIN1b and propidium iodide stained cell walls. Left PIN1b, middle propidium iodide, and right merged image. Note the reduced staining of propidium iodide deep in the center of the spikelet (asterisk); this tissue is both hard to stain and image because of the thickness of the tissue. Lemma primordia are labeled from youngest to oldest I2, I1, P1, P2, P3. Floral meristems are labeled (FM). Scale bars = 25 µm in (B) and (C), 50 µm in (D).
Data analysis
In order to ensure reproducibility, multiple samples should be imaged from multiple plants derived from multiple transgenic events from multiple plant grow-ups. We regularly try to image at least 16 total spikelets per genotype, 8x each from two transgenic events. More samples may be necessary to account for variability.
Data can be analyzed in various ways depending on the experiment. We recommend the Fiji distribution of the ImageJ software ( Schindelin et al., 2012 ). We regularly add a color Lookup table (Image > Lookup Tables) and reduce the maximum gray-value display range (The top slider in the Brightness/Contrast window. Image > Adjust > Brightness/Contrast). Confocal noise can also be reduced by applying a median filter (Process > Filter > Median). Finally, if the data is captured as a Z-stack, part of or the entire stack can be displayed as a 2D image by applying a maximum intensity projection (Image > Stacks > Z Project….Max Intensity). Maximum projections are suitable for display, but not for quantification.
Recipes
-
Propidium iodide solution
10 μg/ml in distilled water
-
FM4-64 solution
50 µg/ml in distilled water
Acknowledgments
This work was funded by the Gatsby Charitable Foundation. Protocols were developed when funded by the National Science Foundation and the United States Department of Agriculture. Thanks to Sarah Hake and Ottoline Leyser for supporting the development of Brachypodium as an imaging system, John Vogel and the Vogel lab for the years of successful collaboration on Brachypodium transgenics, and to the Carnegie Institution for Plant Biology for housing me during manuscript preparation. Finally, thanks to Ray Wightman and Heather Cartwright, imaging facility support is integral to microscopy innovation.
Competing interests
The author declares no competing interests.
Citation
Readers should cite both the Bio-protocol article and the original research article where this protocol was used.
References
- 1. Bhatia N., Bozorg B., Larsson A., Ohno C., Jönsson H. and Heisler M. G.(2016). Auxin Acts through MONOPTEROS to regulate plant cell polarity and pattern phyllotaxis. Curr Biol 26(23): 3202-3208. [DOI] [PMC free article] [PubMed] [Google Scholar]
- 2. Bragg J. N., Wu J., Gordon S. P., Guttman M. E., Thilmony R., Lazo G. R., Gu Y. Q. and Vogel J. P.(2012). Generation and characterization of the Western Regional Research Center Brachypodium T-DNA insertional mutant collection. PLoS One 7(9): e41916. [DOI] [PMC free article] [PubMed] [Google Scholar]
- 3. Brutnell T. P., Bennetzen J. L. and Vogel J. P.(2015). Brachypodium distachyon and Setaria viridis: Model Genetic Systems for the Grasses . Annu Rev Plant Biol 66: 465-485. [DOI] [PubMed] [Google Scholar]
- 4. Deb Y., Marti D., Frenz M., Kuhlemeier C. and Reinhardt D.(2015). Phyllotaxis involves auxin drainage through leaf primordia. Development 142(11): 1992-2001. [DOI] [PubMed] [Google Scholar]
- 5. Derbyshire P. and Byrne M. E.(2013). MORE SPIKELETS1 is required for spikelet fate in the inflorescence of Brachypodium . Plant Physiol 161(3): 1291-1302. [DOI] [PMC free article] [PubMed] [Google Scholar]
- 6. International Brachypodium Initiative(2010). Genome sequencing and analysis of the model grass Brachypodium distachyon . Nature 463(7282): 763-768. [DOI] [PubMed] [Google Scholar]
- 7. Kellogg E. A.(2015). Brachypodium distachyon as a Genetic Model System . Annu Rev Genet 49: 1-20. [DOI] [PubMed] [Google Scholar]
- 8. Landrein B., Formosa-Jordan P., Malivert A., Schuster C., Melnyk C. W., Yang W., Turnbull C., Meyerowitz E. M., Locke J. C. W. and Jönsson H.(2018). Nitrate modulates stem cell dynamics in Arabidopsis shoot meristems through cytokinins . Proc Natl Acad Sci U S A 115(6): 1382-1387. [DOI] [PMC free article] [PubMed] [Google Scholar]
- 9. O'Connor D. L., Elton S., Ticchiarelli F., Hsia M. M., Vogel J. P. and Leyser O.(2017). Cross-species functional diversity within the PIN auxin efflux protein family. Elife 6: e31804. [DOI] [PMC free article] [PubMed] [Google Scholar]
- 10. O'Connor D. L., Runions A., Sluis A., Bragg J., Vogel J. P., Prusinkiewicz P. and Hake S.(2014). A division in PIN-mediated auxin patterning during organ initiation in grasses. PLoS Comput Biol 10(1): e1003447. [DOI] [PMC free article] [PubMed] [Google Scholar]
- 11. Prunet N., Jack T. P. and Meyerowitz E. M.(2016). Live confocal imaging of Arabidopsis flower buds . Dev Biol 419(1): 114-120. [DOI] [PMC free article] [PubMed] [Google Scholar]
- 12. Reddy G. V., Heisler M. G., Ehrhardt D. W. and Meyerowitz E. M.(2004). Real-time lineage analysis reveals oriented cell divisions associated with morphogenesis at the shoot apex of Arabidopsis thaliana . Development 131(17): 4225-4237. [DOI] [PubMed] [Google Scholar]
- 13. Schindelin J., Arganda-Carreras I., Frise E., Kaynig V., Longair M., Pietzsch T., Preibisch S., Rueden C., Saalfeld S., Schmid B., Tinevez J. Y., White D. J., Hartenstein V., Eliceiri K., Tomancak P. and Cardona A.(2012). Fiji: an open-source platform for biological-image analysis. Nat Methods 9(7): 676-682. [DOI] [PMC free article] [PubMed] [Google Scholar]
- 14. Shi B., Guo X., Wang Y., Xiong Y., Wang J., Hayashi K. I., Lei J., Zhang L. and Jiao Y.(2018). Feedback from lateral organs controls shoot apical meristem growth by modulating auxin transport. Dev Cell 44(2): 204-216 e206. [DOI] [PubMed] [Google Scholar]
- 15. Willis L., Refahi Y., Wightman R., Landrein B., Teles J., Huang K. C., Meyerowitz E. M. and Jönsson H.(2016). Cell size and growth regulation in the Arabidopsis thaliana apical stem cell niche . Proc Natl Acad Sci U S A 113(51): E8238-E8246. [DOI] [PMC free article] [PubMed] [Google Scholar]