Abstract
Studies of pollen germination and post-germination development are not only essential for understanding plant reproduction but also are an excellent model system for tip-based growth. Here we describe easy, reproducible methods for germination and growth of pollen from the model plant Arabidopsis thaliana in artificial conditions. Our growth system can be used both for pollen placed directly on this artificial substrate as well as for the so-called ‘semi in vivo’ method. This is where a pistil is cut shortly after hand-pollination and the pollen tubes grow through the plant tissue and emerge from the cut end onto the surface of the artificial medium.
Keywords: Arabidopsis thaliana, Pollen, Germination, Pollen tube, In vitro, Semi in vivo
Background
The pollen of flowering plants is widely used as a model system for rapid, tip-based growth. Naturally, studies of pollen biology are also essential for understanding plant fertility and reproductive development. However, a simple and reliable method for germinating pollen from the model plant Arabidopsis thaliana and sustaining rapid, morphologically normal pollen tube growth in vitro has been frustratingly elusive. Prior to developing our own method (Rodriguez- Enriquez et al., 2013 ), described here, we attempted to replicate several published methods, but after numerous attempts we failed to generate satisfactory results. For instance, replicating Boavida and McCormick’s method in the lab was difficult as it has a remarkably narrow temperature optimum (22 °C) and this is a situation that clearly does not reflect the reproductive biology of A. thaliana in vivo (Boavida and McCormick, 2007). Furthermore, there are issues with germination rate and local pollen density in this method that also do not entirely reflect natural events on the stigmatic surface. Our first clue that there were key ‘missing factors’ necessary for reliable pollen germination in vitro came from observations that placing stigmatic surfaces of A. thaliana on such artificial media stimulated high levels of pollen germination in the region around the stigmatic surface. This happened even when the pollen grains were not in any direct contact with this plant tissue. Subsequently, experimental work established that two factors were particularly important (Rodriguez- Enriquez et al., 2013 ). Firstly, the use of cellulosic membrane on the surface of the agarose-based medium–which likely acted to mimic the ‘dry stigma’ environment that A. thaliana pollen encounters in vivo. Secondly, we discovered that the polyamide spermidine is a potent stimulant of pollen germination. We also found several other factors that contribute to the success and reproducibility of the experiments (Rodriguez- Enriquez et al., 2013 ). Below, we describe in detail a step-by-step method for in vitro germination of pollen from A. thaliana Columbia (Col) and Landsberg erecta (Ler) ecotypes, the two commonly used lab ecotypes.
After our study was published, several groups have employed our method in experimental work on A. thaliana ( Waterworth et al., 2015 ; MacAlister et al., 2016 ; Rottmann et al., 2016 ). Intriguingly, by using a modified version of our system, Rottmann et al. (2016) proved that our medium could support pollen tube growth emerging from the severed end of pollinated pistils where the style had been cut and the tissue laid on the medium. Previously, Qin et al. (2009) had achieved this “semi in vivo” growth technique using a different medium and demonstrated that pollen tube growth through the style elicited a novel transcriptome when compared with pollen grains grown in vitro at a comparable developmental stage. Here, we confirm that this technique works well with our novel medium first described in Rodriguez-Enriquez et al. (2013) , and give a step-by-step protocol to permit its replication. This technical modification might be useful to study a number of processes. For example, it allows the evaluation of whether maternal factors on the stigmatic surface and style affect pollen germination and pollen tube growth rates, as the number of pollen tubes and the timing of their emergence can be visualized and quantified.
Materials and Reagents
-
Materials
Glass microscope slides
Falcon tubes
Glass pipettes
Cellophane membrane (Cellulose) (Innovia Films, catalog number: 325P)
-
pH indicator strips:
Paper DOSATEST, pH 0-14 (VWR, catalog number: 35309.606)
DOSATEST, pH 7-14 (VWR, catalog number: BDH35312.607)
-
Plant material: Arabidopsis thaliana
Notes:
We use Arabidopsis thaliana plants grown under standard environmental glasshouse conditions for this species, at 25 °C and where necessary with supplemental lighting (optimally, by high-pressure sodium grow light bulbs) to maintain conditions of 140 μmol·m-2·sec-1 with a 16 h day length. Inferior levels of illumination were associated with much poorer levels of pollen germination in our experience. Plants were grown in a 4:1 ratio of multipurpose peat-based compost to horticultural vermiculite. Plant quality is paramount for consistency in these experiments.
To maintain good plant growth, we were careful not to grow the seedlings at high or even medium densities in the pots (normally 3-5 plants in a 9 cm diameter pot). It is better to sow seeds in situ, if possible, and to thin out the seedlings to this small number as soon as they appear.
It is essential never to water overhead when flowering as irrigating in this way will increase the probability that pollen in opening flowers is rendered inviable due to rupturing of pollen grains. We ensure that plants are watered well by placing the pots in plastic seed trays without holes and keeping up to 2 cm of water in the bottom of the tray.
We like to add a small amount (c. 0.75 g) of slow release Osmocote fertilizer to the tray to guarantee the plants have a constant supply of nutrients.
It is very important to harvest the flowers for pollen germination in the correct developmental stage, for consistency. Only plants that had already progressed into flowering and just started to develop seed pods (siliques) on the main inflorescence axis should be used. It is also most important to avoid using the pollen from older plants that have started to exit the flower production process (i.e., those with fewer unopened flower buds than siliques and mature flowers), since they have a dramatically declining percentage of pollen germination.
-
Chemical reagents
Note: All of the following are stored at room temperature unless otherwise stated.
Agarose (e.g., Molecular Grade, Bioline, catalog number: BIO-41025)
Boric acid (Sigma-Aldrich, catalog number: B9645)
Calcium chloride (Sigma-Aldrich, catalog number: C1016)
Calcium nitrate (Sigma-Aldrich, catalog number: C1396)
Casein enzymatic hydrolysate (N-Z-Amine A) (Sigma-Aldrich, catalog number: C0626), stored at 4 °C
Distilled, autoclaved water
-
Ferric ammonium citrate (Sigma-Aldrich, catalog number: F5879)
Note: Deliquescent and light sensitive, ensure storage in a tightly sealed light-proof container.
Gamma amino butyric acid (GABA) (Sigma-Aldrich, catalog number: A2129)
Myo-inositol (Sigma-Aldrich, catalog number: I5125), stored at 4 °C
Potassium hydroxide
-
Spermidine (Sigma-Aldrich, catalog number: S0266)
Note: Store at 4 °C; spermidine is highly hygroscopic and air-sensitive so always ensure that the lid is very well sealed.
Sucrose (Sigma-Aldrich, catalog number: S9378)
-
Standard solution (see Recipes)
Sucrose stock solution
Boric acid stock solution
Calcium chloride stock solution
Calcium nitrate stock solution
Potassium chloride stock solution
Casein enzymatic hydrolysate stock solution
Ferric ammonium citrate stock solution
Myo-inositol stock
Spermidine stock
GABA stock
Equipment
PAP Pen (e.g., Liquid Block Super PAP pen; Daido Sangyo Saitama, Japan)
Microscope slide boxes
Water bath or dry heat block
Temperature controlled oven
Pipettes
Tweezers
Scalpel/razor blade
Fine scissors
Small glass beaker
Microwave
Photomicroscope, with multiple lenses and camera unit
Hand-held counter
Software
ImageJ software
Procedure
-
Setting up in vitro germination
The first requirement for this system is to set up a simple storage box for the agar pad slides that you will make. To store multiple slides, we use microscope slide boxes that seal well. To maintain a humid atmosphere, we insert a small water-moistened wad of tissue paper at one end of the box, away from where the slides will be positioned. These wads are retained by a clean slide (see Figure 1). Be careful not to saturate the paper with water, otherwise the water will run out and ruin the slides.
The second requirement is to generate a simple incubation chamber for the slides (see Figures 1 and 6). This can be achieved by taking a sealable plastic container, or even a Petri dish, placing a layer of water-saturated tissue paper on the bottom, then placing in parallel arrays glass pipettes (or glass stirring rods) to generate a support for the slides (to elevate them just above the tissue paper) (Figure 6). Equally, the same arrangement as in the slide storage container can be used (Figure 1). Prior to the experiment, we keep this at 24 °C in the incubator oven.
To generate the slides, we first use a PAP pen to draw an enclosure on the glass slide surface, around 1.5 x 2 cm (Figure 2). The slight ridge provided by the PAP pen wax mark ensures that when molten agar is added to the glass surface, it forms a neat pad rather than flowing over the slide.
Set a dry heat block or water bath at 60-65 °C. Using sharp surgical scissors, cut rectangles from the cellophane membrane of c. 1.2 x 1.7 cm, so that they will just fit in to the area of the agarose pad.
The recipe of the medium used for an optimum trade-off between pollen germination rates and pollen tube growth is described in the Recipes section. Other media combinations (other than the standard solution described) that can modify the percentage of pollen germination and the pollen tube growth can be found in Rodriguez-Enriquez et al. (2013) , these can be used depending on specific needs.
To prepare the medium, all the stock solutions–excluding myo-inositol, spermidine and GABA–were combined with water in a Falcon tube and mixed thoroughly. Next, agarose was added to a final concentration of 0.05% (25 mg for 5 ml), the Falcon tube with a very loose cap was placed in a small Pyrex glass beaker, then heated gently in a microwave at low-medium power for short periods (e.g., 10-30 sec bursts). To dissolve the agarose, the cap was tightened and the tube inverted several times to mix. This is repeated several times until the solution is almost boiling and the agarose has dissolved and distributed evenly. This can also be achieved by using a very small Pyrex glass beaker, and stirring using a glass rod, which is especially useful for volumes over 5 ml. Take care not to boil over the agarose and be careful when removing and manipulating hot liquids directly from the microwave. Wearing suitable eye protection and other protective equipment is essential.
Immediately place the Falcon tube in the heat block or water bath. After it has cooled to the block/bath temperature, add the myo-inositol, spermidine and GABA from the stock solutions. Invert several times to mix. Finally, use the pH indicator strips to determine the pH by dipping the strip into the hot solution. We found that the pH optima for the media differed depending on the ecotype. For Col ecotype, we adjust the pH to 8.0 whilst for Ler ecotype we adjust to pH 7.0. This adjustment is achieved using a dilute KOH solution. Several indicator tests and small additions of diluted KOH solution may be required to obtain the correct pH level. Ensure that, after addition of KOH, the solution is mixed well before testing the pH as the solution is relatively viscous. As the volume of KOH solution added is small, the medium composition is not significantly altered.
-
Retain the Falcon tube in the heat block or water bath, to ensure that the agarose does not set. Place the slides on a very flat surface with the PAP pen marked side upwards. Using a 1 ml pipette, pipette enough of the molten agar solution contained in the Falcon tube into the enclosure to fill it up and make a pad (Figure 3). The agarose will rapidly cool and set, and they can either be used immediately or stored for later use (Figure 1).
If stored for later use, quickly place in the storage slide box (Figure 1) and thoroughly seal the outside of the box with clingfilm. In a fridge at 4 °C, these slides can be used for up to 7 days after preparation. We recommend writing the date of preparation on the box of slides or on the slides themselves.
Be sure not to use old slides, as microbial growth (especially fungal contamination) will severely interfere with pollen growth. When using stored slides for inoculations (Steps A10-A12 below), ensure that the box(es) of slides are removed from the fridge at least 1 h before use, to allow equilibration with room temperature. For quicker equilibration, slides can be placed in a humid chamber, rested on glass or pipettes over tissue paper wetted with warm water (40-50 °C), for a period of 15 min.
If using the slides immediately, the rectangle of cellophane needs to be placed on the surface of the agarose pad to form the cellulosic contact surface for the pollen. Grasp the cellophane between two pairs of tweezers, holding it at the edges, and gently make contact with the agarose surface and then release (Figure 4). Even adhesion can be troublesome to achieve from dry cellophane rectangles as they can curl up. This can be mitigated by keeping the cellophane in a humid chamber for a couple of minutes before use. Ensure that the cellophane lies flat on the surface without any air bubbles underneath it. Any air bubbles that form can be gently squeezed out by delicately pressing with the edge of the tweezers.
It is important to inoculate the surface of the cellophane with pollen grains without delay. To do this, use flowers that are just starting to open (c. day 1 to day 2 stage, Boavida and McCormick, 2007). It is important to choose opening flowers where the anthers are just starting to liberate pollen as the yield of grains is far greater. We found that it is consistently better to use flowers for inoculations in the morning. Holding them by the pedicel (stalk) with forceps, dab and streak them several times in one general location onto the cellophane surface (Figure 5). It is also possible to transfer pollen from the flower to a very fine paintbrush, and to use this to deposit the pollen on the surface (If using a paintbrush, ensure that it is thoroughly washed in distilled water and completely dried after use to clean the bristles of any remnant pollen grains.) It is important to develop a technique of movement in depositing the pollen that ensures that the pollen is not highly clumped but instead is distributed in a relatively evenly spaced monolayer (Naturally, this varies from individual experimenter to individual experimenter. To do this effectively, we encourage a few tests with different techniques and check with a microscope on the pollen distribution). For a single pad, we take flowers and systematically distribute their pollen across the surface (c. 12 flowers, in 3 x 4 rows, is usually sufficient per slide).
Remove the slides to the humid chamber and place on the raised support or in the slide box. Ensure that the slides do not roll off and fall onto the wet surface when sealing the lid back on and placing in the incubator at 24 °C.
-
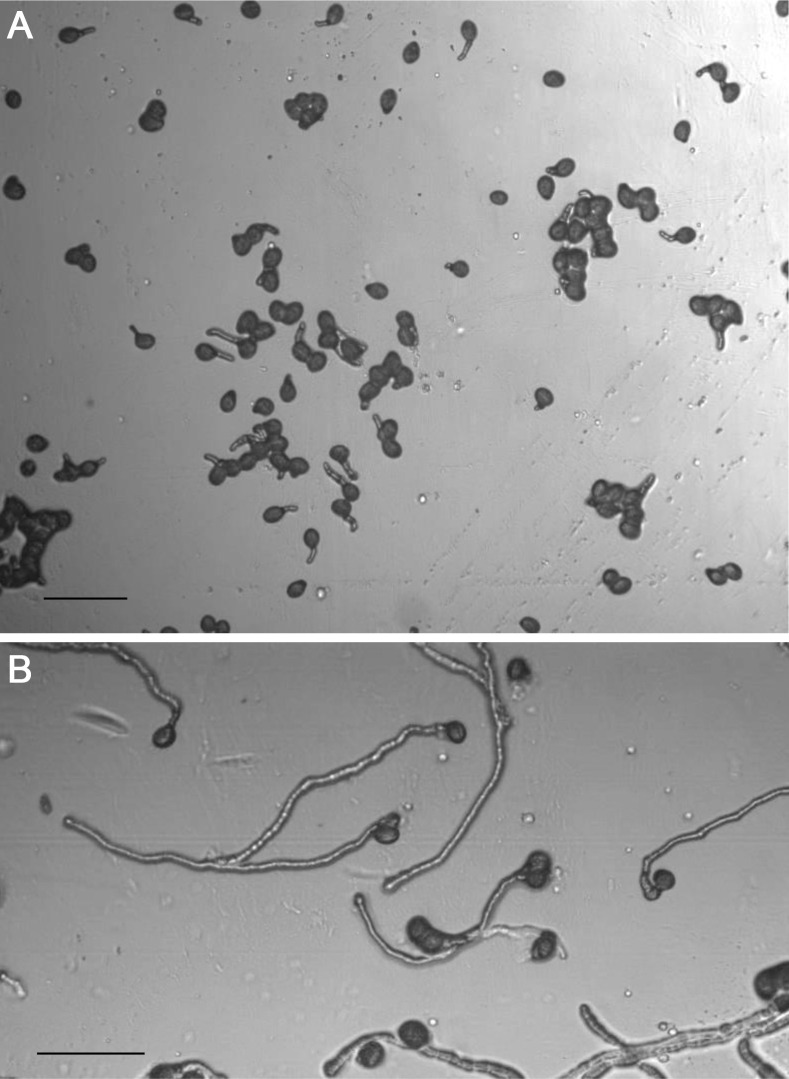
Within 1 h, the initiation of pollen germination should be visible (Figure 7). Slides can be removed from the humid chamber and rapidly examined and photographed under a microscope at intervals. Be sure to minimize the time outside of the humid chamber as the slides will dehydrate rapidly. For example, we carry the slides within a humid chamber (see Figure 6) to the microscope to minimize stress to the pollen.
If required for downstream analysis (e.g., protein, DNA or RNA extraction; fixation for microscopy), germinating pollen can be easily washed from the surface of the membrane. This is best achieved by removing the membrane and immersion into a small Petri dish containing a few milliliters of the basic growth medium that has been made up without the addition of agarose. The pollen is easily dislodged and can be further concentrated from the liquid medium, for example with a short and very gentle centrifugation at 500 × g for 30 sec.
-
Setting up semi in vivo growth
It is essential for this procedure to emasculate flower buds before anther dehiscence. This allows simultaneous deposition of the desired pollen on the stigmatic surface. Using fine forceps, remove the six anthers from the late unopened flower bud with great care, avoiding any damage to the female reproductive parts. Where the anthers release pollen or the stigma becomes damaged, discard the flower. Remove and discard any other open or opening flowers on this plant and place back in the greenhouse, isolated from other A. thaliana plants with flowers shedding pollen to ensure contamination of the stigmatic surface with other pollen does not take place. If possible, leave overnight for the stigma to further mature. Any damaged stigmas will wither during this time. However, for success we advise not leaving the stigma for an extended time (over 24 h) before pollination.
Pollinate the stigmatic surfaces of emasculated flowers with the desired pollen. As pollen germination and penetration into stigmatic tissue takes at least 1 h ( Cheung et al., 2010 ), it is necessary to leave it on the pollinated stigmas for at least this period of time. This reduces the probability of pollen grains becoming disorientated when the stigmatic surface contacts the medium, thus reducing the number of pollen tubes growing onto the medium without penetration of the style.
Follow the procedure outlined in Steps A1-A10, to make slides. Preparation of slides in advance is advised.
Whilst gently supporting the tissue with a pair of tweezers, use a clean, sharp scalpel blade to cut the style at the junction to the ovary. Using fresh, sharp blades really assist in success. Without crushing the tissue, place them horizontally onto the cellophane (Figure 8). This transfer from plant to medium has to be performed as quickly as possible as these are delicate tissues that will dehydrate very quickly.
Finally, follow Step A12 as rapidly as possible.
Pollen tubes will take several hours (up to 12 h) to emerge from the cut end of the stigma (Figure 9), and the material should be checked periodically after being placed on the medium.
Figure 1. Humid chamber made from a slide box, in which slides can be stored in the fridge and also used as an incubation chamber for pollen germination and tube growth.
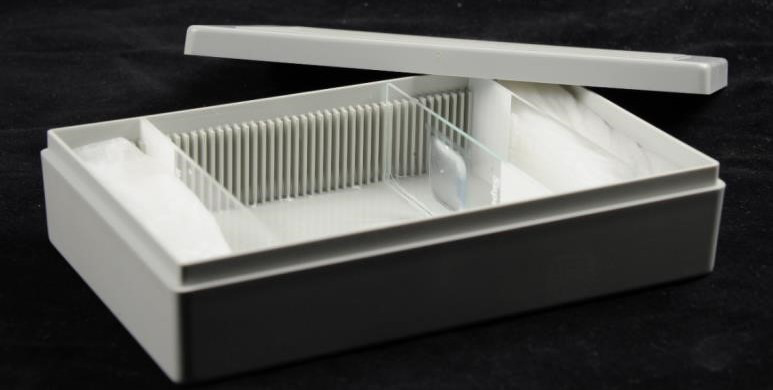
Figure 6. Set-up for incubation of a single slide in a Petri dish as a humid chamber.
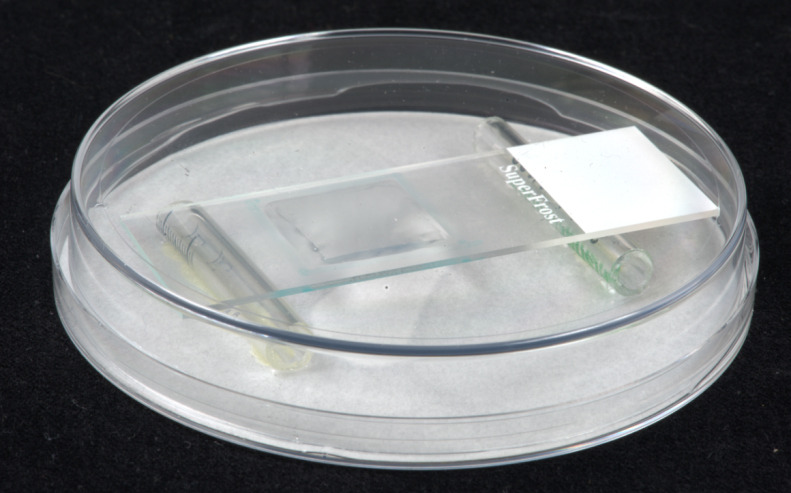
Figure 2. The surface of a glass slide showing the enclosure drawn on using a PAP pen, allowing containment of molten agarose medium.

Figure 3. Pipetting of molten agarose medium into the enclosure (A), which results in an agarose pad after it has set (B).
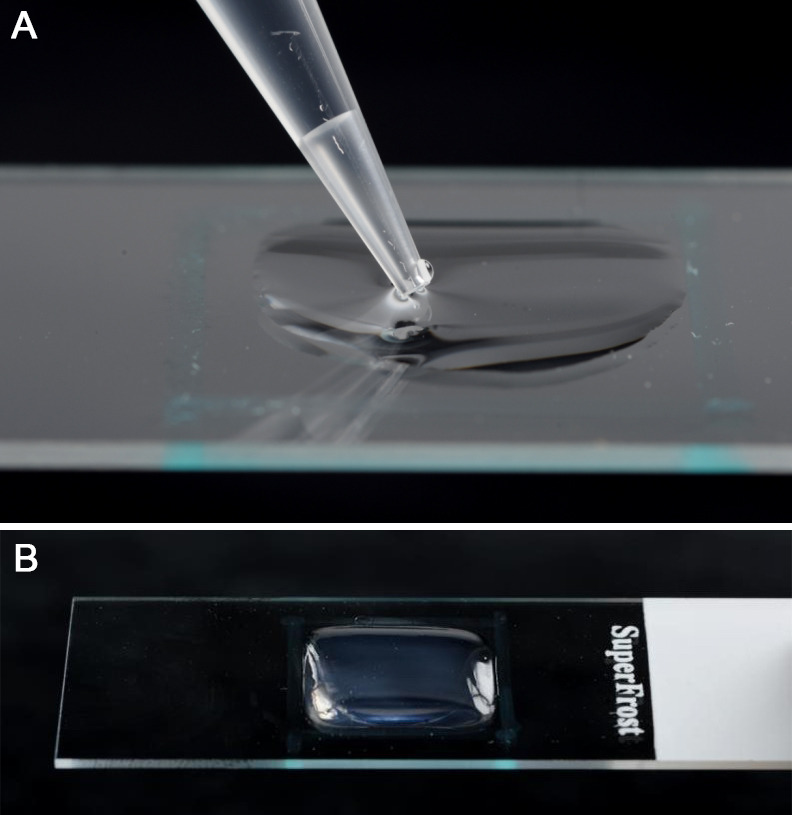
Figure 4. Placement of the cut cellophane membrane onto the surface of the agarose pad.
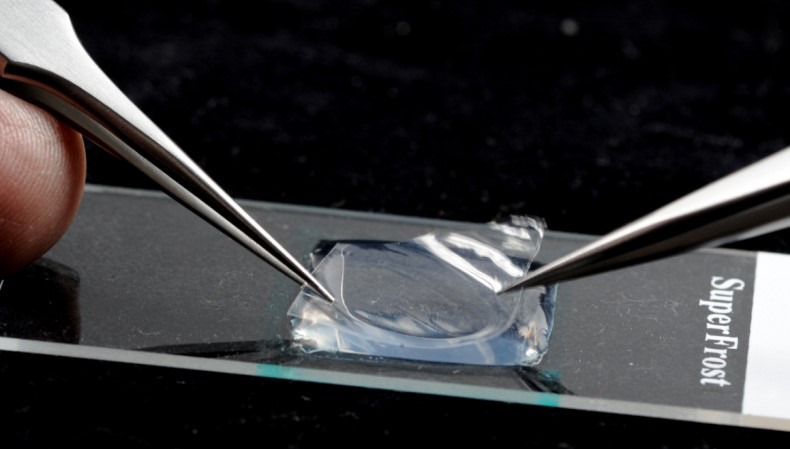
Figure 5. Brushing and dabbing of the flower, using forceps to hold the pedicel, to deposit pollen on the cellophane surface.
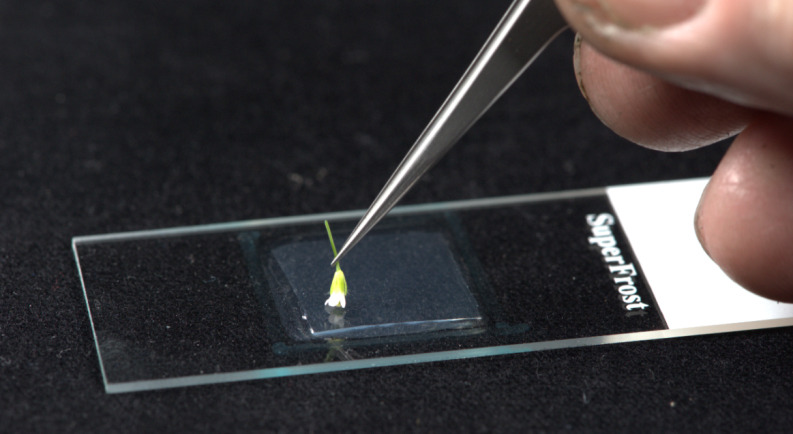
Figure 7. Pollen germination and tube growth after 1 h (A) and after 6 h (B).
Scale bars = 100 µm.
Figure 8. Positioning of the pollinated, excised stigma/style material on the surface of the cellophane overlying the agarose pad.
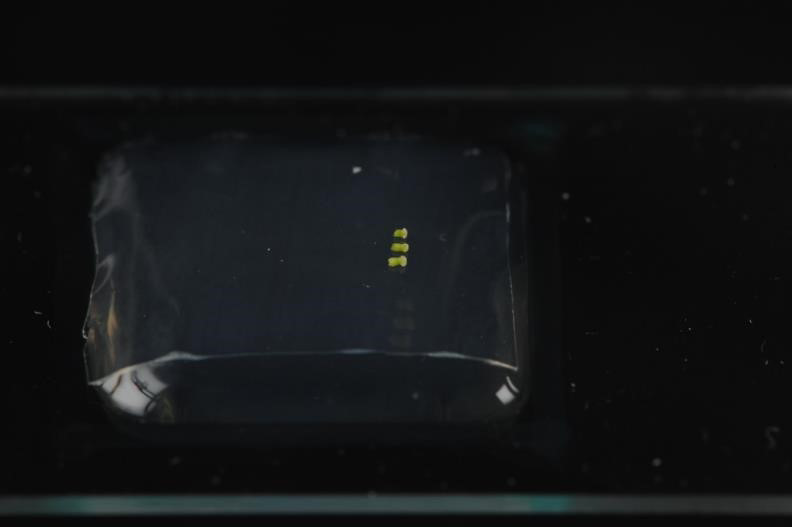
Figure 9. Pollen tubes in the semi in vivo system after overnight development.
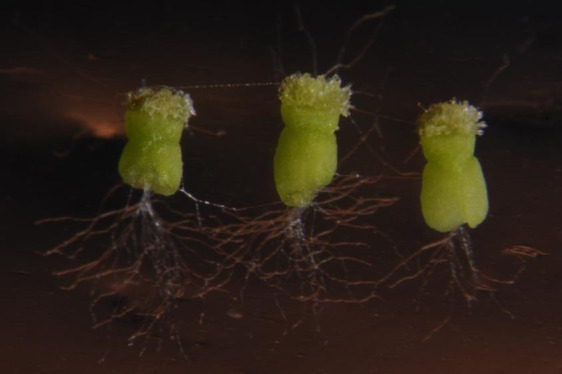
Extensive pollen tube growth from the cut ends of the styles is readily visible.
Data analysis
-
Pollen germination
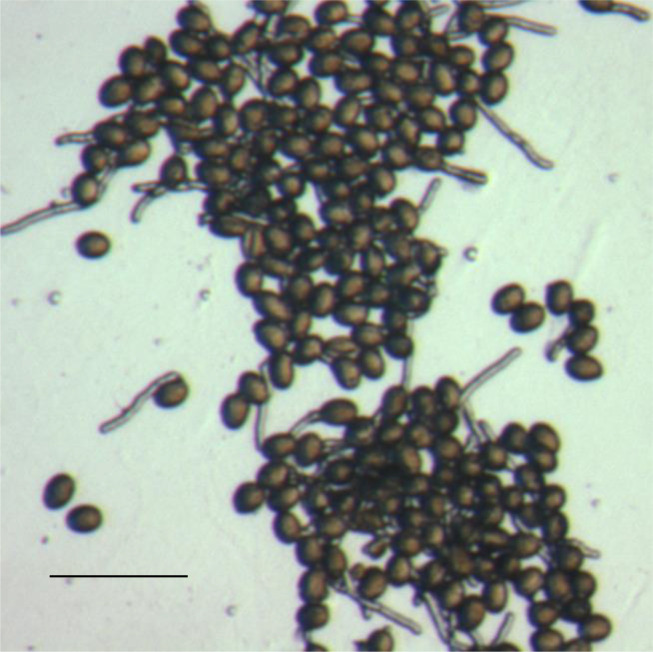
Using wild-type pollen, we found that 5 h after contact with the medium was an ideal time to measure in vitro pollen germination percentage (Rodriguez- Enriquez et al., 2013 ). This is because pollen tube length is typically at a relatively optimal size for easy scoring of whether the pollen has germinated or not. We scored a pollen grain as germinated when it showed the emergence of an intact, tube-shaped, relatively transparent structure. Scoring of germination was achieved using random selection of discrete, independent fields on the slide surface (Figure 7). A slide was taken, with the first field in the top left-hand corner, then the slide was moved horizontally so that a totally different field was in view, and this was performed across the slide until the edge of the membrane. Then, the slide was moved vertically so that a new non-overlapping field was in view, and then moved horizontally again. Repeated in this way, multiple fields with pollen from different flowers can be studied. A level of selection is necessary and unavoidable, as the pollen has been distributed non-randomly on the cellophane surface. For example, we avoid analysis of fields where the pollen is too clumped together as shown in Figure 10, as distinguishing discrete germination is much more difficult to almost impossible under these circumstances. Developing a technique that generates a relatively even distribution of pollen grains is important. To count the number of germinated pollen grains, it is possible to score directly using a hand-held counter. However, it is also possible to photograph the field for later data analysis. Here, taking duplicate images of the same field but with slightly altered focus can assist in discriminating germination events that are otherwise difficult to resolve due to size and orientation. We found that analysis of 300 pollen grains from across multiple fields was adequate (Rodriguez- Enriquez et al., 2013 ).
-
Pollen tube growth
To analyze pollen tube lengths in vitro, we use the same method as for pollen germination but image capture of the fields is essential. In our previous work, pollen tube length has been determined by use of ImageJ (https://imagej.nih.gov/ij/) software (Rodriguez- Enriquez et al., 2013 ). Using ImageJ, the length of 100 randomly selected pollen tubes was sufficient to yield useful results. Only when pollen germination was minimal did we use only 50 pollen tubes for measurements. Image capture and analysis in this manner is potentially possible for semi in vivo pollen tube growth. Here, good separation of the maternal tissue on the cellophane surface is essential, as otherwise the pollen tubes can emerge and entangle with other. Other methods have been employed to measure pollen tube length using our germination system, e.g., Rottmann et al. (2016) .
-
Kinetic analysis
It is possible to measure pollen germination and pollen tube growth kinetics using the techniques described above, removing the slide periodically (for instance every 2 h) from the humid chamber and rapidly recording data on the microscope before return to the humid chamber. Minimizing the time outside of the humid chamber is especially important if the same slide is to be re-examined on multiple occasions. We found that measurements up to 24 h after contact of pollen with the medium in vitro would yield useful results. After 24 h, in vitro pollen tubes had ceased to grow much further and had started to visibly deteriorate in quality.
Note: Where results are intended for publication, it is advisable to replicate the same experiments on different days to ensure that the data collected is representative. Also, in kinetic studies, be careful to be consistent; comparing growth kinetics using the same slide repeatedly removed from the humid chamber and measured with different slides selected from the same batch and removed only once from the humid chamber is undesirable.
Figure 10. A group of densely clumped pollen grains in the process of germination.
Scale bar = 100 µm.
Notes
The method that we have devised is relatively trouble-free and robust. Two factors do need great care. Firstly, excellent and consistent results will only be obtained when great attention has been given to the plant material used in the studies. This is the most important factor of all. Secondly, we found that spermidine is a potent trigger for germination, and also has an effect on pollen tube growth (Rodriguez- Enriquez et al., 2013 ); careful use of this easily degraded molecule is necessary. Adhering closely to the detailed notes in the procedure above should give the user the consistent results required for publication.
Recipes
-
Standard solution
10% sucrose
0.01% boric acid
1 mM CaCl2
1 mM Ca(NO3)2
1 mM KCl
0.03% casein enzymatic hydrolysate
0.01% ferric ammonium citrate
0.01% myo-inositol
0.1 mM spermidine
10 mM GABA
We use the stock solutions (see the end of this section) to generate 5 ml standard solution, enough for around 10-12 slides with agar pads.
1 ml sucrose stock
50 µl boric acid stock
100 µl calcium chloride stock
100 µl calcium nitrate stock
100 µl potassium chloride stock
150 µl casein enzymatic hydrolysate stock
50 µl ferric ammonium citrate stock
10 µl myo-inositol stock
10 µl spermidine stock
100 µl GABA stock
Distilled sterile water to 5 ml
-
Sucrose stock solution
50% (w/v) dissolved in sterile distilled water
This solution can be stored in the fridge for up to 4 weeks
-
Boric acid stock solution
1% (w/v) dissolved in sterile distilled water
This solution an be stored in the fridge for up to 4 weeks
-
Calcium chloride stock solution
50 mM dissolved in sterile distilled water
This solution can be stored in the fridge for up to 8 weeks
-
Calcium nitrate stock solution
50 mM dissolved in sterile distilled water
This solution can be stored in the fridge for up to 8 weeks
-
Potassium chloride stock solution
50 mM dissolved in sterile distilled water
This solution can be stored in the fridge for up to 8 weeks
-
Casein enzymatic hydrolysate stock solution
1% (w/v) dissolved in sterile distilled water
This solution can be stored in the fridge for up to 2 weeks
-
Ferric ammonium citrate stock solution
1% (w/v) dissolved in sterile distilled water
This solution can be stored in the fridge for up to 8 weeks, ensure light is excluded
-
Myo-inositol stock
50 mg/ml dissolved in sterile distilled water
This solution can be stored in the fridge for up to 2 weeks
-
Spermidine stock
50 mM dissolved in sterile distilled water
This solution is best made up fresh for critical experiments, but can be stored in the fridge for up to 2 weeks
-
GABA stock
500 mM dissolved in sterile distilled water
This solution can be stored in the fridge for up to 2 weeks
-
Acknowledgments
We thank Saher Mehdi and Helen Prescott for their help with this work, and John Baker for contributing to the photography. We also thank research project students Eleanor Barnes and David Jones for using this technique and giving us new insights into its effectiveness under different conditions. This protocol was adapted from Rodriguez- Enriquez et al., 2013 .
Competing interests
There are no conflicts of interest.
Citation
Readers should cite both the Bio-protocol article and the original research article where this protocol was used.
References
- 1. Boavida L. C. and McCormick S.(2007). Temperature as a determinant factor for increased and reproducible in vitro pollen germination in Arabidopsis thaliana . Plant J 52(3): 570-582. [DOI] [PubMed] [Google Scholar]
- 2. Cheung A. Y., Boavida L. C., Aggarwal M., Wu H. M. and Feijo J. A.(2010). The pollen tube journey in the pistil and imaging the in vivo process by two-photon microscopy . J Exp Bot 61(7): 1907-1915. [DOI] [PubMed] [Google Scholar]
- 3. MacAlister C. A., Ortiz-Ramirez C., Becker J. D., Feijo J. A. and Lippman Z. B.(2016). Hydroxyproline O-arabinosyltransferase mutants oppositely alter tip growth in Arabidopsis thaliana and Physcomitrella patens . Plant J 85(2): 193-208. [DOI] [PMC free article] [PubMed] [Google Scholar]
- 4. Qin Y., Leydon A. R., Manziello A., Pandey R., Mount D., Denic S., Vasic B., Johnson M. A. and Palanivelu R.(2009). Penetration of the stigma and style elicits a novel transcriptome in pollen tubes, pointing to genes critical for growth in a pistil. PLoS Genet 5(8): e1000621. [DOI] [PMC free article] [PubMed] [Google Scholar]
- 5. Rodriguez-Enriquez M. J., Mehdi S., Dickinson H. G. and Grant-Downton R. T.(2013). A novel method for efficient in vitro germination and tube growth of Arabidopsis thaliana pollen . New Phytol 197(2): 668-679. [DOI] [PubMed] [Google Scholar]
- 6. Rottmann T., Zierer W., Subert C., Sauer N. and Stadler R.(2016). STP10 encodes a high-affinity monosaccharide transporter and is induced under low-glucose conditions in pollen tubes of Arabidopsis . J Exp Bot 67: 2387-2399. [DOI] [PMC free article] [PubMed] [Google Scholar]
- 7. Waterworth W. M., Drury G. E., Blundell-Hunter G. and West C. E.(2015). Arabidopsis TAF1 is an MRE11-interacting protein required for resistance to genotoxic stress and viability of the male gametophyte . Plant J 84(3): 545-557. [DOI] [PMC free article] [PubMed] [Google Scholar]


