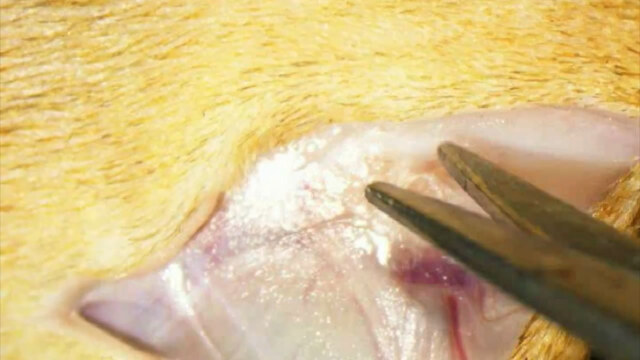
Abstract
Injury to the central nervous system is characterized by damage that spreads from the initial point of impact into the surrounding adjacent tissue, in a phenomenon referred to as secondary degeneration. The optic nerve can be used to effectively model injury and secondary degeneration to white matter tracts. Partial transection of the dorsal aspect of the nerve leaves the ventral aspect initially undamaged but vulnerable to secondary degeneration, allowing study of tissue exclusively vulnerable to secondary degeneration. Thus the partial optic nerve transection model of secondary degeneration is a valuable tool to study the pathology of spreading damage following neurotrauma and can be used to assess potential efficacy of therapeutic strategies.
Keywords: Neurotrauma, Secondary degeneration, Partial optic nerve transection, Visual system, Optic nerve
Background
Traumatic injury to the central nervous system (CNS) is the direct damage to the brain or spinal cord resulting from a physical insult. Traumatic brain injury and spinal cord injury are major public health issues and have significant associated costs (Access Economics, 2009). The optic nerve has long been used as a model for CNS injury, particularly to white matter tracts, and the response to injury has been well characterized in a range of species, from fish where there is complete regeneration of severed retinal ganglion cell axons, to mammals where regeneration is abortive, and damage is compounded by the process of secondary degeneration ( Harvey et al., 2006 ). As a model, the optic nerve has many attractive features: it is a white matter tract that is accessible, the level of damage can be easily controlled, the associated neuronal cell bodies are in the eye and can easily be studied, downstream anatomical pathways are well described and the impact of damage or potential therapeutic intervention can be studied at the molecular, biochemical, histological and behavioral levels. As such, damage to the optic nerve can be used to study neurotrauma, secondary degeneration, regeneration, neuronal plasticity, and remote responses.
Commonly injury to the CNS is partial, with a focal insult and adjacent initially spared tissue. The trauma triggers a cascade of secondary events, creating a toxic environment in the adjacent tissue and leading to progressive secondary degeneration with increasingly widespread pathology, as well as tissue and functional loss over time. Therapeutic targeting of secondary degeneration is possibly the most promising avenue for treatment of CNS trauma, as it involves protection of initially undamaged tissue rather than repair of transected neurons (Fitzgerald, 2014). However, the mechanisms by which these secondary events occur are complex and need to be elucidated in order to develop treatment strategies. Resultant therapeutics may be relevant to other conditions such as stroke and glaucoma, where similar mechanisms may apply (Tezel, 2006). Partial transection of the optic nerve in rat provides an excellent model to study secondary degeneration (Levkovitch- Verbin et al., 2003 ; Fitzgerald et al., 2009 ). This is because, in contrast to optic nerve crush injuries, only retinal ganglion cell (RGC) axons in the dorsal aspect of the nerve are transected, allowing spatial segregation of a primary injury from adjacent tissue in ventral nerve that is exclusively subject to secondary degeneration ( Payne et al., 2012 ). Additionally, RGCs in ventral retina are subject only to secondary degenerative events whilst those in dorsal retina are subject to both primary and secondary insults ( Payne et al., 2012 ). Thus, the partial transection model is particularly useful for examining events associated with secondary degeneration, since there is a clear delineation between axons in dorsal nerve that are transected by the primary injury and axons lying ventrally that are initially spared but are affected by secondary degenerative events. This protocol describes in detail the surgical and associated procedures used to perform a partial transection of the optic nerve in adult rats. The procedure is best performed with two people, one to do the pre- and post-operative care and one to do the surgery.
Materials and Reagents
Note: Unless otherwise stated, items are supplied by general laboratory suppliers and veterinary or medical suppliers.
-
Sterilized items (autoclaved or purchased as sterile)
1 ml syringes (Becton Dickenson, catalog number: 309659)
Gauge 27 needles, 3 per animal (Becton Dickenson, catalog number: 305109)
Cotton wool balls (Supermarket home brand)
Surgical gauze swab, cut into 1cm squares (ProVet, GAUZ HS N1)
Small animal surgical drapes with window of approximately 2 cm x 4 cm (Theatrewrap, SA)
Silicon instrument mat (e.g., Medline DYNJHOLD1)
Square restaurant grade linen napkin(s) (e.g., Lunaweddingandeventsupplies.com.au, black linen napkin 50 cm x 50 cm)
Stainless steel instrument dish (e.g., Instrumentation concept, KDY8)
Scalpel blade #11 (ProVet, SCAL HS11) (or to your preference)
Suture thread [Silkam #4 (AMA, BRAC0762130) or #6 (AMA,BRAC0762113) or to your preference]
Surgical gloves (ProVet, GLOV CLF7)
Distilled water (in house, autoclaved in Schott bottles)
Phosphate buffered saline pH 7.2 (PBS) (in house, autoclaved in Schott bottles)
-
Non-sterile items
Permanent marker (Officeworks)
Spray bottles containing 70% ethanol (Spray bottle from hardware store, e.g., Bunnings)
Clean gown (ProVet, GOWN S KS)
Hair cover (e.g., Medline NONBOUF21)
Surgical mask (ProVet, SURG MHS03)
Autoclave bags (Provet, Henry Schen, various sizes, AUTO P HM2; AUTO P HM4)
Bubble wrap cut to size to place around the rat (Officeworks)
Tape (masking tape, Officeworks)
Paper towel (Tork)
Tube rack (Thermo fisher, 21-200-285)
50 ml Falcon tube (Thermo fisher, NUN339652) containing 70% ethanol
Small Petri dishes (Thermo fisher, Sterilin 121V)
70% ethanol
Vaseline
-
Biological material
Rats [Female Piebald Viral Glaxo (PVG) rats 160 g+ obtained from Animal Resource Centre (ARC), Canning Vale, WA 6970]
-
Drugs
Note: All drugs purchased through ProVet (provet.com.au).
-
Ketamine [Ketamil, Troy Laboratories, 50 mg/kg [50 mg/ml] diluted in phosphate buffered saline (PBS)]
Note: Ketamil is a scheduled poison and should be stored with appropriate levels of security. It should be protected from light and stored at room temperature, observing expiry date on the product label.
Xylazil [Xylazil, Troy Laboratories, 10 mg/kg (10 mg/ml) diluted in PBS (Store at 20-25 °C and observe product expiry date on label.)]
Carprieve (Norbrook Australia, Pty. Ltd.; Victoria, Australia, 5 mg/kg (5 mg/ml in sterile water) (Store protected from light at 2 °C to 8 °C. Once open store refrigerated for up to 28 days.)
Luxyl protective eye drops (Tubilux Pharma SpA Via Costarica 20/22 Pomezia Italy) (Store below 25 °C. Once open store refrigerated for a maximum of 60 days and dispose of immediately should sterility be compromised.)
Betadine (500 ml ProVet, BETA AS) (Store below 25 °C protected from light, observing any expiry information on the label.)
-
Equipment
Schott bottles 50-250 ml
-
Surgical instruments (Kaisers surgical instruments Pty Ltd)
Watchmakers forceps (one or two coarse, one or two medium and two fine points)
A medium pair with tips bent inwards towards each other to form a ‘hook’ is also useful
Fine dissecting spring-form scissors (in different sizes)
Needle holder or small Spencer Wells forceps for suturing
Small scissors for cutting suture thread
Bench-top autoclave (Siltex, Practica 20L lab steam sterilizer)
Weigh balance suitable for weighing animals (e.g., Mettler Toledo, MW 1002T/00)
Small animal clippers (e.g., Wahl KM2)
Binocular surgical/dissecting microscope with sufficient working distance (e.g., Nikon, model: SMZ460)
Light source to illuminate surgical site (e.g., Schott, catalog number: KL 1500 LED)
Clear Perspex animal supports approx. 25 x 10 cm (made in house; also available from Plastic Warehouse)
Mouth bar (Made in house through engineering workshop, Figure 1) (An alternative would be to adapt the mouth bar from a stereotaxic frame such as the WPI 502612)
Small retort stand and boss head clamp (Labdirect, Kartell retort stand; Technos boss head clamp)
Diamond keratotomy knife (Geuder, catalog number: G-19345)
Small animal heat pad (My pet warehouse, Ref 234016)
Spare animal cage(s) for use during induction of anesthesia and/or after recovery
anal thermometer
Figure 1. Stainless steel mouth bar.
A. The mouth bar was machined from a stainless steel rod. (B) Shaped to slip into the mouth and (C) with a hole for the top incisors to go through. B and C. The nose clamp has a curved end to accommodate the nose and is tightened with the use of two screws. One presses the clamp onto the nose and the second applies slight upwards pressure from beneath the nose clamp.
Note: Also required is a suitable surgical table or bench space.
Procedure
-
Preparation prior to surgery
Autoclave water and PBS in Schott bottles approx. 50-100 ml (can be prepared in advance and stored).
Autoclave surgical instruments, cotton wool balls, 1 cm2 gauze swabs, silicon instrument mat, drapes, mouth bar, and linen napkin if required. Use commercial autoclave bags and run a dry cycle at the end of the autoclave cycle. Items can then be stored in their autoclave bags for future use.
-
On the day of surgery
Wear personal protective equipment (PPE), using sterile/clean gowns, masks, hair covers and gloves as appropriate. If the surgeon is also doing all the pre- and post-operative procedures, then fresh sterile gloves, clean gown, hat, and mask must be worn at the start of surgery. This prevents any residual fur on gloves or clothing from contaminating the wound and sterile environment around the animal.
-
Prepare anesthetic and analgesic reagents:
Ketamine (Ketamil, Troy Laboratories, 50 mg/kg; 50 mg/ml) in combination with Xylazil (Xylazil, Troy Laboratories, 10 mg/kg; 50 mg/ml; dilute with sterile PBS where necessary.)
Carpreive (Norbrook Australia, Pty. Ltd.; Victoria, Australia 5 mg/kg; 5 mg/ml in sterile water)
Prepare any paperwork required under the animal ethics approval (for example procedure sheets, anesthetic records, post-operative care, and monitoring sheets).
In the recovery area, turn on the electric heat pad and cover with paper towels. Place sterile PBS, Carprieve analgesic, Luxyl (or similar) eye lubricant, 1 ml syringes, and gauge 27 needles ready to administer post-operative treatments (Figure 2). Have a pen handy to complete the required paperwork.
In the pre-operative area, spray bench surfaces with 70% ethanol. Have ready the small animal clippers, Perspex animal support, paper towels, bubble wrap blanket, tape, a bottle of sterile PBS, a bottle of sterile water, sterile gauze swabs (approx. 1 cm2) and sterile cotton wool balls (in their autoclave bags), and two small Petri dishes (Figure 3).
Spray the Perspex animal support with 70% ethanol and allow to dry.
Place Betadine and 70% ethanol in small Petri dishes ready to sterilize the skin once shaved.
Surgical table/bench: spray down surfaces and equipment with 70% ethanol. Include the retort stand and anything that might be touched during surgery such as microscope focus wheels, eye pieces, etc. Remove the linen napkin, silicon instrument mat, mouth bar and instruments from their autoclave bags and arrange on the bench next to the retort stand and microscope (Figure 4). Place the stainless steel instrument tray towards the back of the napkin and pour 70% ethanol into it to a sufficient depth to cover any instrument, suture thread, etc. that might need to be placed in there. Also at the back place the tube rack and 50 ml Falcon tube containing 70% ethanol. This serves as a receptacle for the suturing instruments between animals. Remove the plastic guards from the diamond knife, depress the plunger to extend the diamond out of the barrel but it should not protrude beyond the metal cutting depth guard. Return the knife to its cradle in the box and sterilize by spraying with 70% ethanol (Figure 4). The knife can be blotted dry or allowed to air dry but must be dry before introduction into the orbit. The knife should be kept secured in its box towards the back of the linen napkin.
-
-
Ready to commence surgery
Surgical procedures are described for partial transection of the right optic nerve. (Video 1)
-
Weigh the rat, noting the weight on the procedure sheet and identify the rat with permanent marker on the tail or via ear clipping as required by the local animal ethics committee.
Note: If doing more than one rat all animals can be weighed and labeled before commencing surgery.
Administer the appropriate dose of anesthetic intraperitoneally (i.p.) using a 1 ml syringe fitted with a 27 gauge needle and place the rat into a separate cage during induction. Do not proceed until the animal shows no response to foot pinch test.
Prepare the head: by shaving with the small animal clippers. Long strokes are preferable, going from the front of the ears to midway between the eye and tip of the nose. Avoid damaging the whiskers. The shave needs to be close to the skin but not so close as to cause abrasion.
Wipe the surface of the bench to remove any loose fur and then remove as much clipped fur as possible from the animal’s head, including the eyes, by first blowing (over a bin) and then by swabbing from front to back with swabs of cotton wool wetted with PBS until no fur is seen on the swab. This is important because bits of fur in the wound or on the cornea can cause irritation and inflammation.
Wrap the animal in bubble wrap to keep warm, using tape to secure the wrap and place on the Perspex animal support.
-
Once the area is cleaned of loose fur the surgical site is sterilized by triple swabbing alternately with 70% ethanol and Betadine. A small gauze swab is dipped in 70% ethanol, squeezed to eliminate excess liquid and wiped once in a naso-temporal direction along the shaved skull. This is followed by the same action with a betadine swab continuing with alternate applications until each has been administered three times finishing with a betadine wipe. It is important not to have the swabs too wet, as ethanol or betadine contacting the eyes can lead to damage and inflammation. Wait until the skin surface is dry before making an incision.
Note: During surgery the depth of anesthesia should be monitored by observing breathing and/or testing the foot pinch reflex.
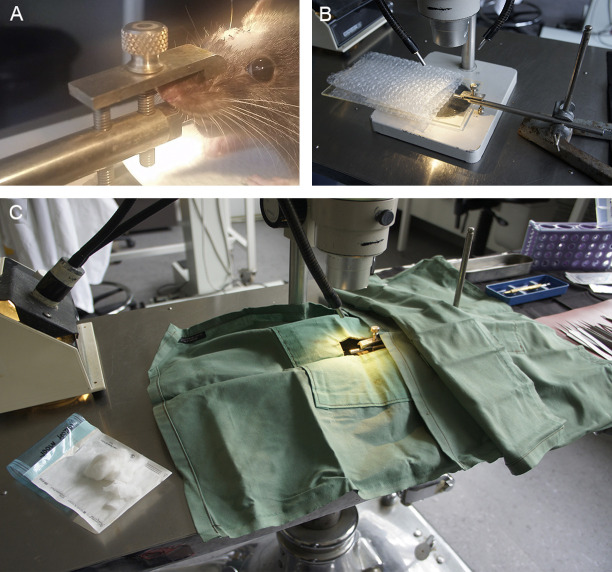
Place the animal onto the mouth bar to support the head and position beneath the microscope, adjusting the light to illuminate the head. Ensure that the tongue is not pushed back into the mouth and that the incisors are inserted into the hole in the bar. Gently tighten the screw to secure the head. The angle of the head can be adjusted to facilitate surgery by rotating the mouth bar in the boss clamp. Use a second drape to cover the retort stand so that there is a continuous sterile surface (Figure 5).
-
Apply sterile lubricant to the eyes and cover the animal with the drape so that the top of the head and right eye are accessible through the window in the drape.
Note: The eye can be damaged if exposed to bright light, therefore protect the eye by having illumination at lower intensity or shielding with the drape until the skin is incised and pulled forward over the eye.
Make an incision along the skull, slightly offset from the midline towards the right eye, curving slightly. The direction of the incision along the naso-temporal axis can suit the handedness of the surgeon. There is generally less bleeding if the skin is dry.
Using coarse/medium forceps hold the skin at the incision edge and pull towards and over the eye, stretching the connective tissue beneath. This also affords some protection from the light source which can now be turned up if desired.
The outline of the bony margin above the eye should be visible, with the tip of the spring-form scissors in an open position. Run the tip along the bone about two thirds along towards the nasal margin to create a small hole in the connective tissue. Bone should be visible through the small hole.
Keeping the blade of the scissors as close to the bone as possible, extend the opening nasally and temporally by cutting or by blunt dissection, i.e., pulling the connective tissue away from the bone with a push/pull action, grasping connective tissue at the margin of the eye with forceps (avoid damaging the eye itself) and pulling forwards whilst bracing against the bone with the scissors.
-
Use the scissors to cut slightly into the facial muscle at the temporal margin so that the eye is now easily accessible and can be gently pulled forward.
Note: There is a large blood vessel close to the bony ridge at the temporal side of the orbit. As the skin is pulled forwards, this stretches and moves further away from the bone. It is generally visible, so look for it and avoid it. There will be minor bleeding which can be addressed with small swabs of cotton wool or gauze.
You can now see lachrymal glands surrounded by membrane at the back of the eye and a ligament running on the surface that runs from the margin of the eye towards the back of the orbit. Small blood vessels run alongside this ligament. The ligament is cut with iridectomy scissors at the margin of the eye avoiding the blood vessels if possible.
The superficial lachrymal gland needs to be moved to the side. This is achieved by making a hole in the surrounding membrane at the nasal margin of the eye with the scissor tip and using an open blade of the scissors to tear the membrane along its margin. Small blood vessels will stretch if the dissection is ‘blunt’ rather than using the scissors to ‘cut’ and this is preferable.
The lachrymal gland is then teased over to the nasal side whilst simultaneously stretching the membrane on the temporal side pulling with forceps. This allows the gland to be deflected and gives access to the underlying layers of extraocular muscle and deeper lachrymal glands.
The small blood vessels within the membrane should still be visible running across a thin layer of muscle. With hooked forceps pick up the muscle and carefully cut with scissors to create an opening that can be widened by opening the scissor blades. Little by little, work temporally along this muscle so that it is completely severed. There is another large blood vessel in the temporal orbit, so care is needed to avoid this. The underlying lachrymal gland will be visible.
Another muscle needs to be cut. This is located in the ‘hinge’ of the flap of the superior lachrymal gland that was deflected nasally. Pick up the muscle with (hooked) forceps and cut, little by little until it is cut through.
Once the extraocular muscles are cut, two lobes of lachrymal tissue become visible. The optic nerve resides beneath their common boundary, which is sometimes hard to see. The lobes can be encouraged to separate by placing the blades of the scissors flat under the blood vessels within the original top membrane and opening them across the surface of the glands. This stretching releases the membrane attachment and the two lobes can be seen distinctly.
Gently tease the lobes apart with forceps to expose the optic nerve beneath. They will want to return to their original position, so use forceps in both hands to hold back the glands whilst freeing the nerve from connective tissue by placing the forceps tips at the side of the nerve and opening the tips gently. Small spring-form scissors can also be used to cut connective tissue to free the optic nerve. Do not touch the nerve itself.
-
Once you can see that there is space around the nerve, you can pass a fine cotton wool sling underneath. The sling is made by pulling a very small amount off a sterile cotton wool ball and twisting the threads together and back on itself so that there are no loose threads to get entangled around the nerve. This is going to support the nerve whilst making the cut but also helps to keep the lachrymal glands back.
Use two pairs of medium/fine forceps. Pick up the end of the sling with one pair of fine forceps and introduce the end to one side of the nerve (whichever suits your handedness) whilst holding the second pair of forceps in the space by the other side of the nerve. The end of the sling is gently pushed under one side of the nerve and is grasped by the other pair of forceps. Once grasped the sling is gently fed through using both forceps in a push-pull motion taking care not to expose the nerve to torsional forces. The sling usually absorbs liquid in the orbit and this helps to lubricate its passage beneath the nerve. Observe the nerve and check that it is not twisted (indicated by rotation of blood vessels). Drape the ends of the sling against the lachrymal glands to hold them back.
-
Increase the magnification of the microscope before using fine forceps to pick up the outer sheath overlying the optic nerve about 1-2 mm behind the optic nerve head. Try not to cut the larger blood vessels that are visible within the sheath. Using the finest spring-form iridectomy scissors, make a small cut longitudinally along the nerve; this can be extended by further cutting or stretching the membranes.
Note: Do not remove any membrane, just allow it to open to expose the nerve. The final layer, the pia mater, is very fine and delicate. This is picked up by the finest forceps and cut longitudinally with the finest scissors.
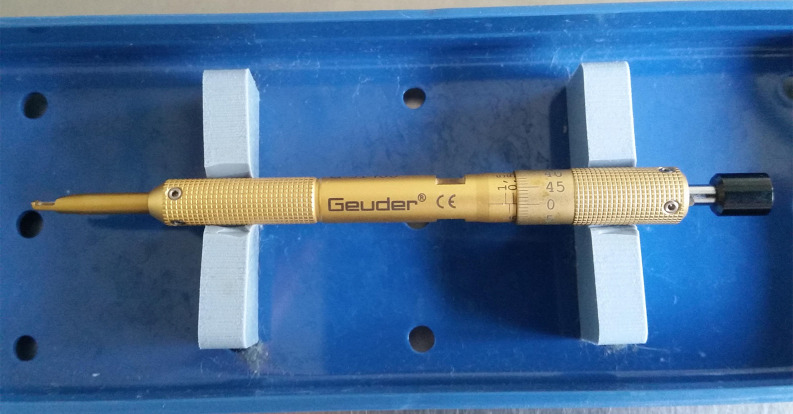
Once the nerve parenchyma is exposed, withdraw the forceps and set the diamond knife to the desired depth of cut, determined by the protrusion of the diamond knife beyond the protective guard. This is adjusted using the Vernier scale on the barrel of the knife, each notch on the scale representing 10 µm (Figure 6). In our hands, setting protrusion from the guard to 200 µm results in transection of approximately one quarter of the depth of the nerve. If there is any accumulation of fluid around the nerve, then swab with a small piece of cotton wool. The nerve cuts best when it is not too wet.
Keeping the blade as vertical as possible (in the restricted space) draw it across the surface of the nerve whilst supporting the nerve by holding either sheath or cotton sling with fine forceps in the other hand. When the sheath is completely removed the knife easily passes through the nerve parenchyma; there is no need to apply downward pressure. Downward pressure compresses the nerve and results in a deeper cut. The cut is seen through the microscope, and the nerve parenchyma is exposed as the wound opens slightly.
The knife is then removed, blade retracted inside the guard, sprayed with ethanol and placed into its cradle ready for the next surgery. Occasionally some tissue may adhere to the blade, in which case it can be removed by rinsing with sterile water before spraying with 70% ethanol.
Cut the cotton sling close to the nerve with a pair of scissors (not fine) so that it may be withdrawn from either side without creating torsional forces on the nerve.
Observe the nerve in its natural position in the orbit and note any deviation of the cut from dorsal. The sheath can be gently eased back over the nerve but is not sutured.
Check that there are no residual fibers from the cotton wool or stray pieces of fur and when satisfied reposition the lower lachrymal glands over the nerve. The most superficial lachrymal gland is then repositioned over the lower glands. Adjust the focus as you zoom out from the nerve and keep checking carefully for any fibers and fur that may have got into the wound, removing with forceps.
An internal suture may be put in place to close the orbit but generally is unnecessary as healing occurs naturally and very quickly and an internal suture is potentially another irritant. Occasionally, and particularly in the inexperienced surgeon, the opening to expose the back of the eye may be larger and internal sutures may then be indicated. Should an internal suture be required, one or two individual sutures using #6 thread are placed through the original connective tissue cut to expose the orbit and the fine layer overlying the bone on the edge of the orbit. Finally close the skin using a #4 or #6 suture thread, ensuring that the skin is relaxed and not puckered, allowing for the fact that there will be minor swelling. Gently wipe the wound with sterile cotton wool to remove superficial blood.
Remove the animal from the mouth bar and transfer to the recovery area. Swab the wound gently once with a sterile 1 cm2 betadine swab which has been squeezed of excess liquid. Administer 1 ml sterile PBS sub-cutaneously to the groin area for hydration and Carprofen analgesic at 5 mg/kg also subcutaneously. Re-apply lubricant drops to the eyes as necessary during recovery. Sometimes the eye bulges from the orbit post-surgery; gentle pressure with a saline soaked swab can replace the eye in its normal position. An anal thermometer lubricated with Vaseline can be used to monitor body temperature.
Monitor recovery according to your institute/animal ethics guidelines.
-
When the animal is semi-conscious transfer to a warm recovery cage (half the base on a heat pad) and continue monitoring according to criteria set out in the animal ethics approval.
Note: Following successful surgery, the eye should remain clear and bright. The pupil dilates during surgery due to cutting the nerve whilst opening the sheath. However the pupil recovers quickly and is usually observed as constricted the following day. Watch out for dullness, swelling, bleeding, or cloudiness of the cornea which can indicate inflammation or infection.
-
Figure 2. Post-operative recovery area.
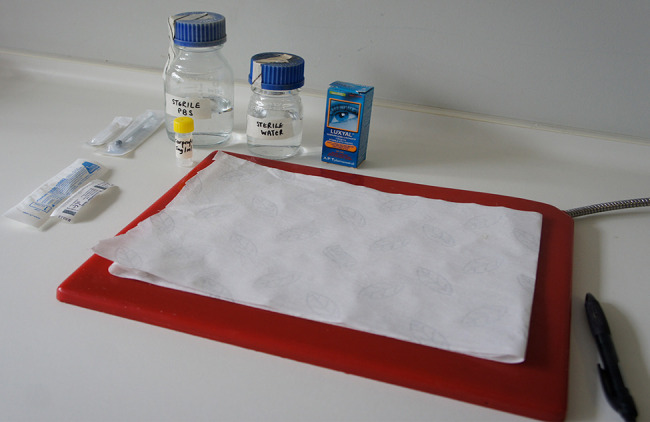
Paper towel covered heat pad, sterile PBS, analgesic, eye drops, 1 ml syringes and needles.
Figure 3. Pre-operative preparation area.
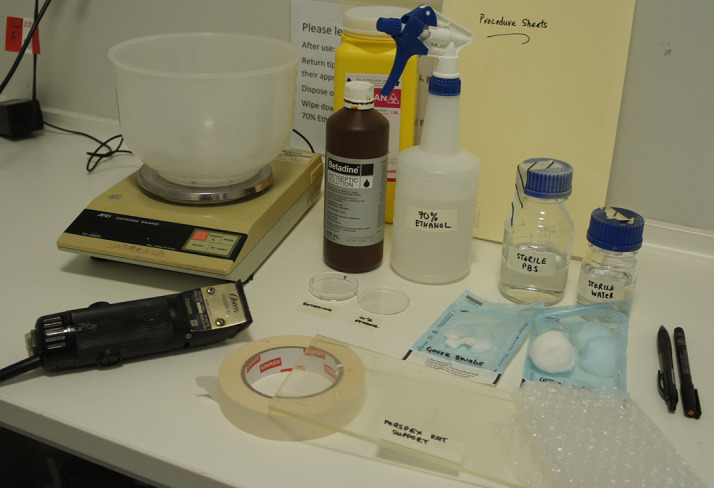
Animal balance, clippers, betadine, 70% ethanol, small Petri dishes, sterile PBS, sterile water, cotton wool, gauze swabs, Perspex animal support, masking tape, bubble wrap, permanent marker, pen and procedure sheets.
Figure 4. Surgical requirements.
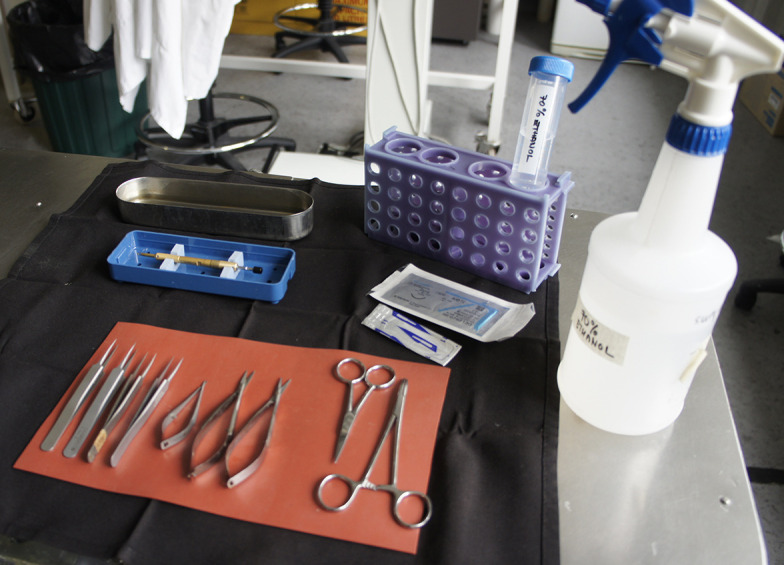
Sterile linen napkin, silicon mat, selected instruments for surgery and suturing, scalpel blade, suture thread, diamond knife, stainless steel instrument dish containing 70% ethanol, tube rack with 50 ml falcon containing 70% ethanol, spray bottle of 70% ethanol.
Video 1. Video of the partial optic nerve transection procedure.
This video was made at The University of Western Australia in accordance with the National Health and Medical Research Council Australian Code of Practice for the care and use of animals for scientific purposes and all procedures were approved by The University of Western Australia Animal Ethics Committee, approval number RA3/100/1485.
Figure 5. Surgical set-up.
A. Anesthetized rat positioned on the mouth bar; the incision is made in whichever direction suits the handedness of the surgeon. B. Mouth bar positioned in retort stand and with Perspex rat support and bubble wrap to illustrate position of the rat. C. Surgical drapes positioned over the retort stand to create a continuous sterile surface between the linen napkin and the surgical drape positioned over the rat. The window in the drape allows access to the right eye and top of the skull. Sterile cotton wool and gauze on the left.
Figure 6. Diamond keratotomy knife showing Vernier adjustment to change the protrusion of the blade beyond the guard and thus determine the depth of cut.
Data analysis
Tissue analysis: For comparative analysis, sham surgical procedures should include everything except opening the meninges and drawing the diamond blade across the nerve. At various times after the partial optic nerve transection procedure, the animal is euthanized and tissue collected.
The method of euthanasia and tissue collection depends upon the nature of the experiment and analysis to be conducted. For example, immunohistochemistry analysis or electron microscopy with subsequent semi-quantitative analysis of immunoreactivity or ultrastructure of optic nerve sections is best performed following perfusion fixation, sucrose cryoprotection, and cryosectioning. Prior to euthanasia, behavioral tests of visual function may be performed. These techniques are beyond the scope of the present protocol and can be readily accessed from alternative sources.
Notes
Successful surgery has little impact on the external appearance of the eye. The eye should be bright, clear and lie centrally in the orbit. The utmost care should be taken to reduce bleeding and tissue damage to a minimum. The time taken to perform the surgery can also have an effect. The lens becomes hypoxic and opaque although this generally reverses during recovery. Practice improves both skill and speed. Bleeding during surgery can be reduced by using small cotton wool swabs.
Complications arising post recovery usually result from excess damage to the surrounding connective, muscle and lachrymal tissues causing inflammation. The eye may bulge out from the orbit, be misaligned or can become dull. There may be dried blood around the margin. Reduced blood supply to the eye can cause retinal degeneration and opacity of the lens. Any blood within the eye is indicative of hemorrhage.
Infection may occur if sterile technique is inadequate. A dull film over the cornea or a raised opaque area on the cornea may indicate infection. The wound generally heals quickly and cleanly after the triple swabbing technique and suturing to align the margins. The wound margins will show slight inflammation initially but should remain clean with no pus or bleeding.
Serious swelling around the eye may indicate a foreign body, such as cotton wool, within the orbit. Check very carefully and remove all fibers and any fur before closing the wound.
Occasionally sutures may ‘come out’ due to grooming by cage mates or scratching and this may result in the skin wound being re-opened. Scratching may indicate infection or that the sutures were too tight. Stitches should be ‘relaxed’ to allow for the slight swelling that will occur. The ethics protocol should allow the animal to be re-anesthetized and re-sutured if necessary.
Acknowledgments
MF is supported by an NHMRC Career Development Fellowship (APP1087114).
Competing interests
There are no conflicts of interest or competing interests.
Ethics
All procedures involving animals were approved by the University of Western Australia Animal Ethics Committee, approval number RA3/100/1485, and adhered to the National Health and Medical Research Council Australian Code of Practice for the care and use of animals for scientific purposes.
Citation
Readers should cite both the Bio-protocol article and the original research article where this protocol was used.
References
- 1. Fitzgerald M.(2014). Strategies to limit dysmyelination during secondary degeneration following neurotrauma. Neural Regen Res 9(11): 1096-1099. [DOI] [PMC free article] [PubMed] [Google Scholar]
- 2. Fitzgerald M., Bartlett C. A., Evill L., Rodger J., Harvey A. R. and Dunlop S. A.(2009). Secondary degeneration of the optic nerve following partial transection: the benefits of lomerizine. Exp Neurol 216(1): 219-230. [DOI] [PubMed] [Google Scholar]
- 3. Harvey A. R., Hu Y., Leaver S. G., Mellough C. B., Park K., Verhaagen J., Plant G. W. and Cui Q.(2006). Gene therapy and transplantation in CNS repair: the visual system. Prog Retin Eye Res 25(5): 449-489. [DOI] [PubMed] [Google Scholar]
- 4. Levkovitch-Verbin H., Quigley H. A., Martin K. R., Zack D. J., Pease M. E. and Valenta D. F.(2003). A model to study differences between primary and secondary degeneration of retinal ganglion cells in rats by partial optic nerve transection. Invest Ophthalmol Vis Sci 44(8): 3388-3393. [DOI] [PubMed] [Google Scholar]
- 5. Economics Access.(2009). The economic cost of spinal cord injury and traumatic brain injury in Australia. Victorian Neurotrauma Initiative.
- 6. Payne S. C., Bartlett C. A., Harvey A. R., Dunlop S. A. and Fitzgerald M.(2012). Myelin sheath decompaction, axon swelling, and functional loss during chronic secondary degeneration in rat optic nerve. Invest Ophthalmol Vis Sci 53(10): 6093-6101. [DOI] [PubMed] [Google Scholar]
- 7. Tezel G.(2006). Oxidative stress in glaucomatous neurodegeneration: mechanisms and consequences. Prog Retin Eye Res 25(5): 490-513. [DOI] [PMC free article] [PubMed] [Google Scholar]


