Abstract
Expansion microscopy is an imaging method based on isotropic physical expansion of biological samples, which improves optical resolution and allows imaging of subresolutional cellular components by conventional microscopes. Centrioles are small microtubule-based cylindrical structures that build centrosomes and cilia, two organelles essential for vertebrates. Due to a centriole’s small size, electron microscopy has traditionally been used to study centriole length and ultrastructural features. Recently, expansion microscopy has been successfully used as an affordable and accessible alternative to electron microscopy in the analysis of centriole and cilia length and structural features. Here, we describe an expansion microscopy approach for the analysis of centrioles and cilia in large populations of mammalian adherent and non-adherent cells and multiciliated cultures.
Keywords: Expansion microscopy, Centriole, Centrosome, Centriole length, Cilia
1. Introduction
The size of most cellular organelles is beyond the attainable spatial resolution of light microscopy, which is ~220 nm in lateral and ~550 nm in axial dimensions. This obstacle prevents studying the morphology of most organelles and the spatial and dynamic properties of their components. To decipher the ultrastructural features of cellular organelles, electron microscopy has been widely used in biological sciences since the 1950s. However, electron microscopy is a tedious and specialized technique that does not provide information about protein localization. Thus, a class of superresolution imaging techniques has been invented to overcome the resolution barrier of conventional light microscopy and to enable imaging of fluorescently labeled cellular components in nanoscale resolution [1–3]. Recently expansion microscopy has been developed to circumvent the problem of limited optical resolution, by physically increasing the size of the specimen [4–8]. Expansion microscopy is based on embedding a specimen in a swellable polymer and cross-linking the specimen components or fluorescent moieties to it. The polymer is then physically expanded in water, resulting in isotropic expansion of the components of the specimen linked to the polymer. Increased physical distance between components of the expanded specimen allows their imaging by conventional microscopes with increased resolution. Expansion protocols follow one of the two different original approaches developed by the Boyden [5] and Chung [7] laboratories. In the first approach, the sample is first immunolabeled, immunofluorescent molecules are chemically crosslinked to the polymer, and proteins are enzymatically digested before expansion. In the second approach, specimen components are cross-linked to the polymer, proteins are denatured by high temperature and sodium dodecyl sulfate (SDS), immunolabeled, and the polymer linked to immunolabeled proteins is expanded.
Centrioles are cellular structures that build centrosomes and cilia. They are organized as ninefold symmetrical cylinders comprising nine sets of microtubule singlets, doublets or triplets (Fig. 1) [9–11]. They can range from 200 nm to several microns long and are ~230 nm wide. In addition to microtubules, centrioles are comprised of dozens of proteins and dozens of associated pericentriolar components, which extend further from the centriole (Fig. 1) [12–15]. Structural, numerical, and biochemical aberrations of centrioles are associated with pathologies such as cancer and a group of hereditary diseases known as ciliopathies [16–19].
Fig. 1.
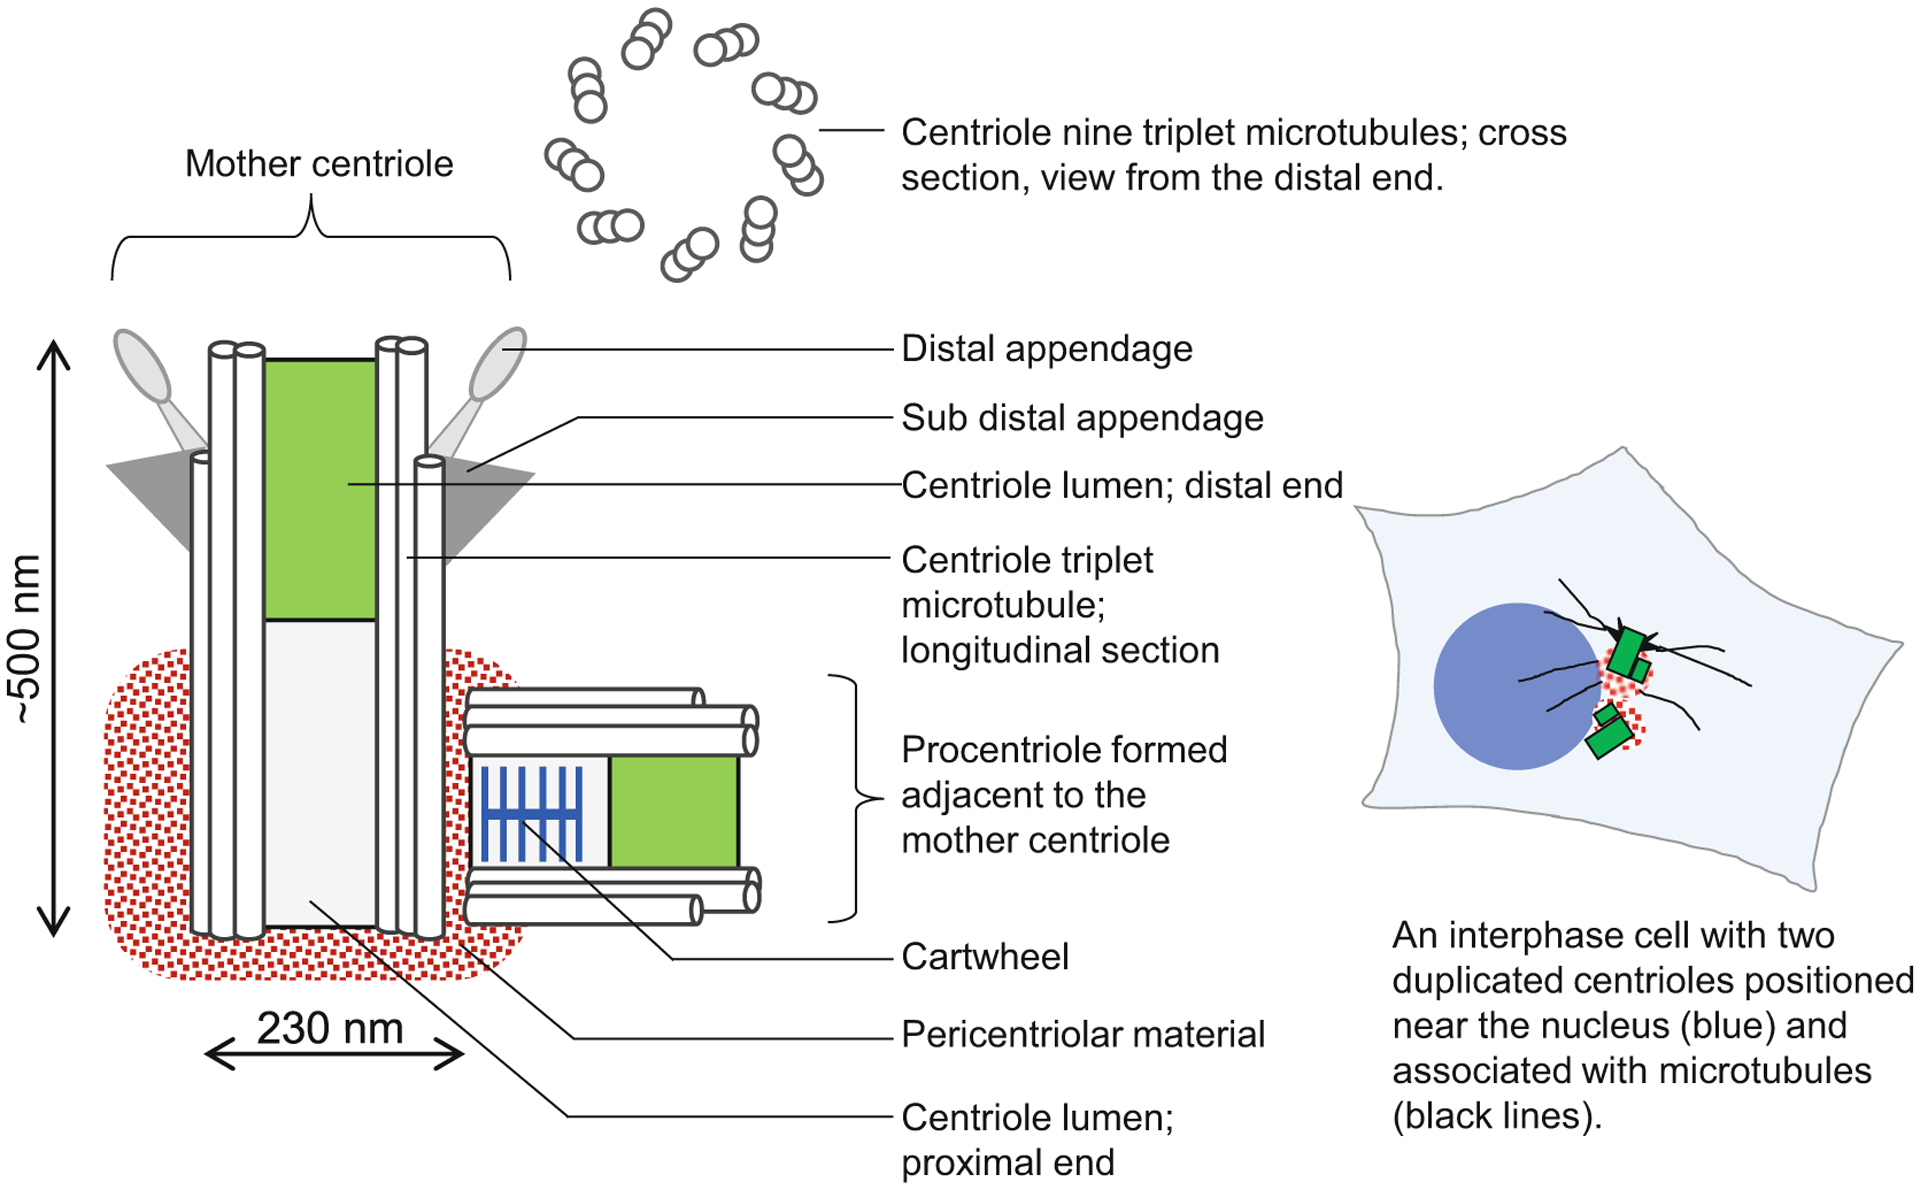
Organization of a human centriole/centrosome. Scheme shows organization of a typical duplicated mother centriole associated with a procentriole. Human centrioles are built of nine microtubule triplets organized in a perfect rotational symmetry. Mother centrioles are, on their proximal end, associated with a proteinaceous complex called pericentriolar material, which is the site of many centrosomal functions. A centriole with associated pericentriolar material is called a centrosome. On their distal end, fully assembled mother centrioles harbor distal appendages and subdistal appendages, which mediate cilia assembly and microtubule anchoring, respectively. Centrioles propagate by duplication, during which a new procentriole forms in association with the proximal end of the mother centriole. Proximal ends of procentriole contains a cartwheel, which promotes ninefold organization of procentrioles. A typical somatic cell has only two mother centrioles, which can be unduplicated (in G1), or duplicated (in S, G2, and mitosis)
Centriole and centrosome size are close to or below the diffraction limit of classical light microscopy, and they are challenging objects for classical optical microscopy, which cannot be used to precisely determine their length or the intricate patterns of their components. Here we describe an expansion protocol (based on the original protocol from Chung laboratory), adapted for the analysis of centrioles and cilia in large populations of cultured cells using conventional microscopy [20]. This approach can be affordably employed in any typical cell biology laboratory and can be used as an alternative to electron and superresolution microscopy for studying centriole length, number, duplication, structural features, ciliation, and localization of various centrosomal components [20, 21].
2. Materials
2.1. Cell Culture
Mammalian cells grown in suspension or adherent to a coverslip or petri dish or Transwell-Clear permeable filter supports.
25 mm round glass coverslips, thickness # 1.5.
Poly-L-lysine: Reconstitute poly-L-lysine in dH2O to 1 mg/mL. To coat coverslips, add poly-L-lysine solution to the coverslips, incubate for 5 min at room temperature (RT), remove poly-L-lysine, wash coverslips in dH2O, and allow them to dry at RT. Solution can be reused 3–4 times. For long-term storage aliquot and store at ≤ −20 °C.
Cell culture incubator with 5% CO2.
2.2. Expansion Reagents, Buffers, and Polymerization Mixture
10× PBS, pH 7.4.
37% Formaldehyde (Electron Microscopy Sciences; 15686).
Fixing solution: 4% formaldehyde in 1× PBS. Prepare fresh.
40% acrylamide solution (Sigma; A4058).
Formaldehyde–acrylamide solution: 6 mL 40% acrylamide solution, 0.86 mL 37% formaldehyde, 0.8 mL 10× PBS, and 0.34 mL dH2O. Prepare fresh.
40% acrylamide–bisacrylamide solution (19:1) (Sigma; A9926).
Sodium acrylate (Sigma; 408220): Once opened, keep in desiccator.
Ammonium persulfate.
TEMED.
- Polymerization mixture (20% acrylamide, 0.04% bisacrylamide, 7% sodium acrylate, 0.5% TEMED, 0.5% ammonium persulfate, in 1× PBS). Prepare fresh. This solution is prepared in four stages.
-
Stage 1.Weigh 280 mg of sodium acrylate in a 2 mL microcentrifuge tube 1, add 1.440 mL of 2× PBS, vortex, and keep on ice (the final volume is ~1.580 mL).
-
Stage 2.Prepare a fresh stock of 5% ammonium persulfate: weigh 50 mg of ammonium persulfate into a 2 mL microcentrifuge tube, add 1 mL of 2× PBS. Vortex and keep on ice.
-
Stage 3.In a precooled 15 mL tube, combine the entire content of tube 1 (~1.580 mL of sodium acrylate solution) with 1.920 mL of 40% acrylamide solution, 0.08 mL of 40% acrylamide–bisacrylamide solution, and 0.02 mL of TEMED. Mix and keep on ice.
-
Stage 4.Finalize the polymerization mixture by adding 0.4 mL of a cold 5% ammonium persulfate stock. Vortex, and keep on ice to slow polymerization. At this point the polymerization mixture is complete and needs to be added to the precooled coverslip with cells as soon as possible.
-
Stage 1.
SDS buffer (for boiling): 129.3 mL dH2O, 20 mL 4 N NaCl, 20 mL 1 M Tris–HCl (pH 9.0), and 230.7 mL 10% SDS (346.8 mM). Keep at RT.
2.3. Expansion Tools and Equipment
4 mm biopsy puncher (Integra; 33-34-P/25).
Vacuum pick-up tool (Ted Pella; 528-2).
Reverse tweezers.
Flat-tip tweezers.
Cell strainer that fits a 50 mL conical tube, no specific pore size.
Incubator at 40 °C.
Plasticware: 35, 60, and 100 mm petri dishes, 2 and 5 mL microcentrifuge tubes, 15 and 50 mL conical tubes.
Parafilm.
2 and 0.5 L glass beaker.
Thermometer.
Timer.
Ice bucket with a lid.
2.4. Immunofluorescent Labeling
Immunofluorescence (IF) buffer: 1% BSA, 0.05% Tween-20 in 1× PBS. Filter using 0.22 μm filter, and store at 4 °C.
DAPI (ThermoFisher Scientific; D1306): Dissolve 10 mg in 2 mL of dH2O. Vortex well. Aliquot and store for long-term storage at ≤ −20 °C. Take one aliquot and further dilute tenfold to prepare 1× stock solution (0.5 mg/mL), which can be kept at 4 °C for several months.
Table 1.
A list of commercially available primary antibodies with tested compatibility with this protocol
| Protein | Dilution | Vendor (host species, catalog number) |
|---|---|---|
| Acetylated tubulin | 1:4000 | Sigma (mouse, T7451) |
| Polyglutamylation | 1:800 | Adipogen (rabbit, AG-25B-0030-C050) |
| γ-Tubulin | 1:500 | Sigma (mouse, T5326) |
| α-Tubulin | 1:500 | Sigma (mouse, T6074) |
| β-Tubulin | 1:250 | Abcam (rabbit, ab15568) |
| SAS-6 | 1:200 | Santa Cruz (mouse, sc-81431) |
| CP110 | 1:1000 | Proteintech (rabbit, 12780-1-AP) |
| Cep290 | 1:600 | Abcam (rabbit, ab84870) |
| Cep152 | 1:1000 | Bethyl (rabbit, A302-479A) |
| Cep63 | 1:200 | Millipore (rabbit; 06-1292) |
| Pericentrin | 1:400 | Abeam (rabbit, ab4448) |
| Centrobin | 1:200 | Abcam (mouse, ab70448) |
| CCDC41 | 1:100 | Sigma (rabbit, HPA038161) |
| SCLT1 | 1:100 | Sigma (rabbit, HPA036561) |
| FBF1 | 1:100 | Sigma (rabbit, HPA023677) |
| Cep164 | 1:500 | Proteintech (rabbit, 22227-1-AP) |
| ANKRD26 | 1:200 | GeneTex (rabbit, GTX128255) |
| ODF2 | 1:150 | Proteintech (rabbit, 12058-1-AP) |
| ARL13B | 1:150 | Abcam (rabbit, ab83879) |
| RPGRIP1L | 1:150 | Proteintech (rabbit, 55160-1-AP) |
| IFT88 | 1:150 | Proteintech (rabbit, 13967-1-AP) |
| Rootletin | 1:50 | Santa Cruz (mouse, sc-374056) |
Table 2.
A list of goat secondary antibodies with tested compatibility with this protocol
| Protein | Dilution | Vendor; catalog number |
|---|---|---|
| Anti-mouse Alexa Fluor 488 | 1:800 | Thermo Fisher Scientific; A11029 |
| Anti-rabbit Alexa Fluor 488 | 1:800 | Thermo Fisher Scientific; A11034 |
| Anti-mouse Alexa Fluor 555 | 1:800 | Thermo Fisher Scientific; A28180 |
| Anti-rabbit Alexa Fluor 555 | 1:800 | Thermo Fisher Scientific; A21429 |
| CF647 anti-mouse antibody | 1:800 | Biotium; 20042 |
| CF647 anti-rabbit antibody | 1:800 | Biotium; 20045 |
3. Methods
In this chapter, we describe a procedure for expansion and microscopy analysis of centrioles and centrosomes in cultured cells attached to coverslips (due to their self-adhering properties, or after their interaction with a poly-L-lysine coating). However, the same procedure can be used for cells grown in Transwells or any petri dish (see Note 1). Expansion of samples includes nine major steps which are delineated in Fig. 2. Each step of the protocol illustrated in Fig. 2 is described in detail in one of the nine sections of this chapter.
Fig. 2.
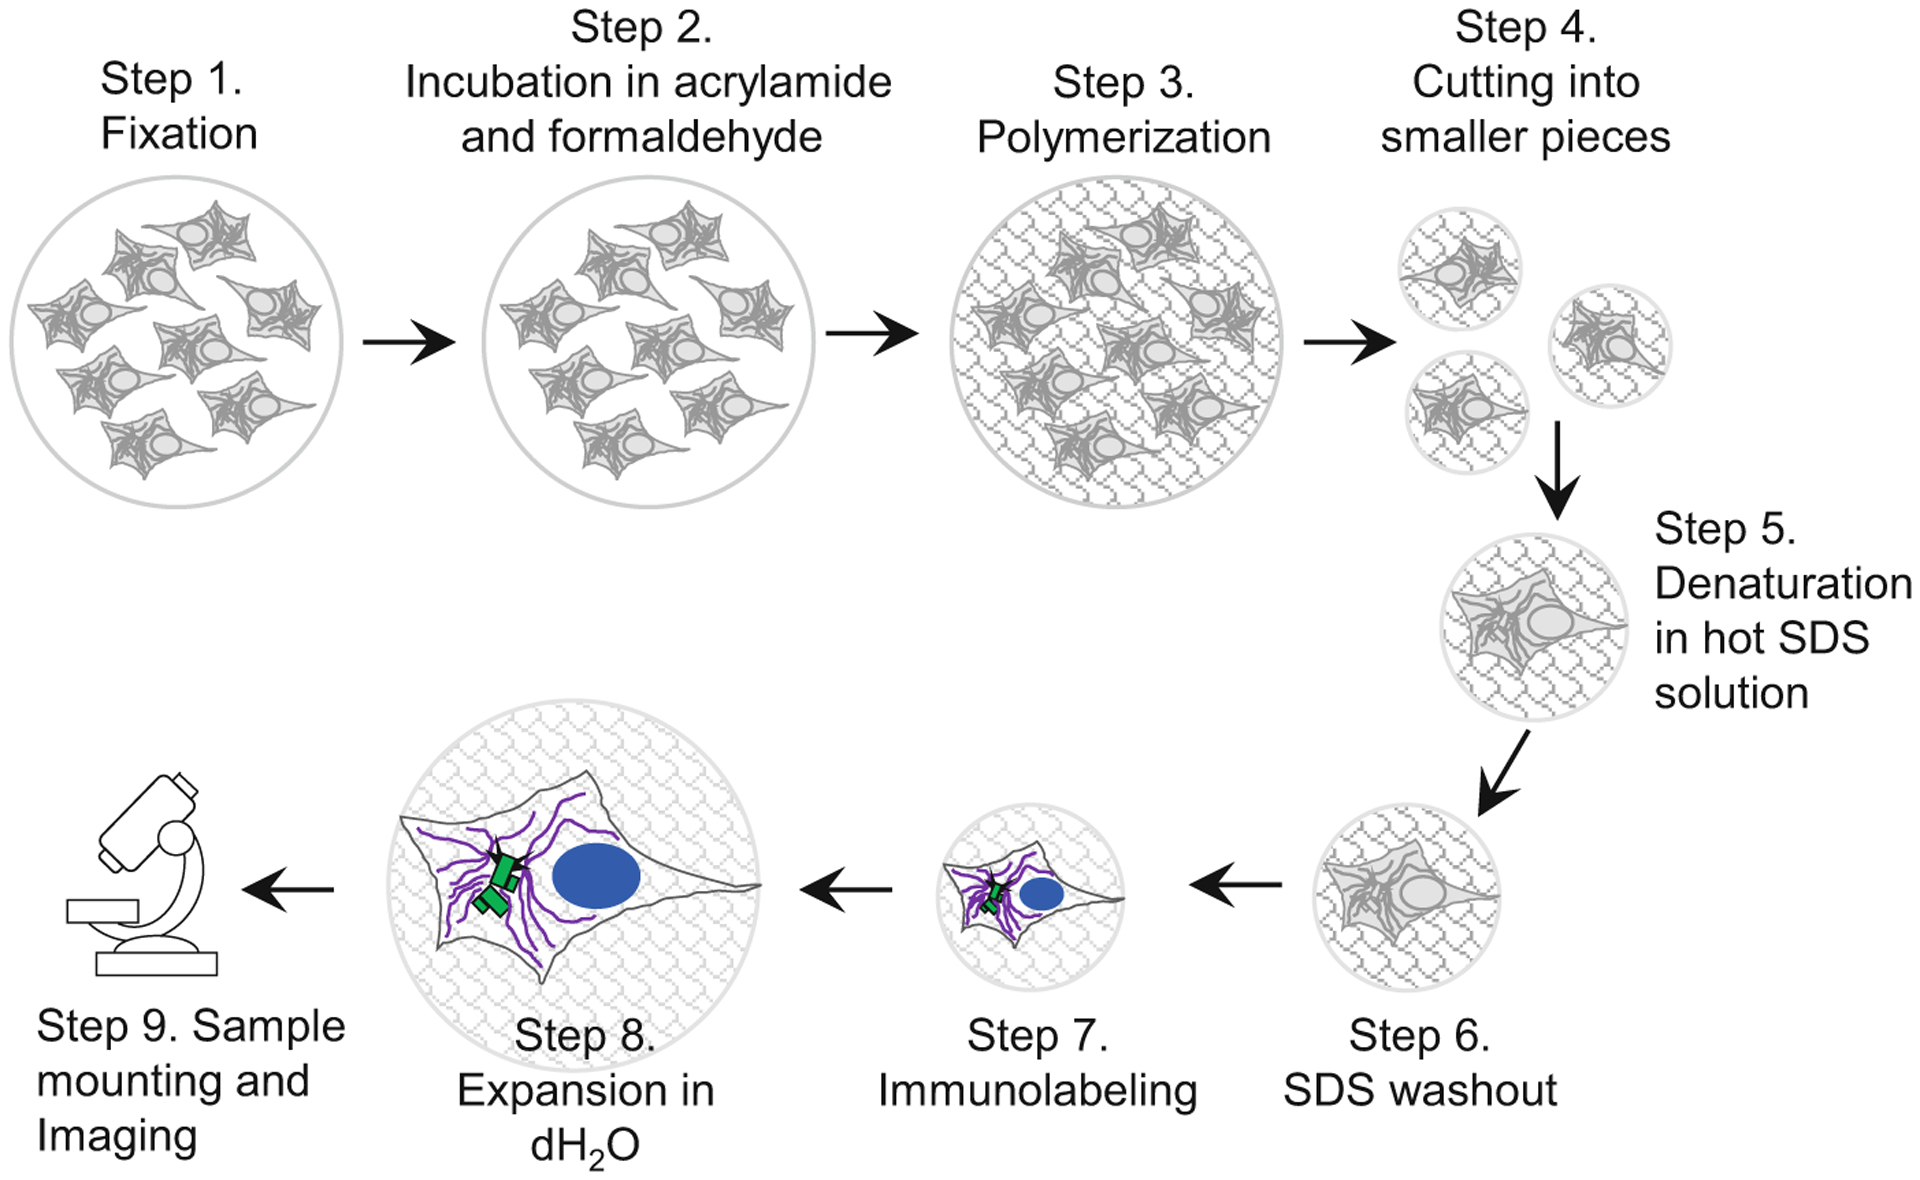
Key steps in sample preparation for expansion microscopy. A scheme illustrates major steps of the protocol, as described in the subheadings of Subheading 3. Cells growing on the coverslip are fixed and then incubated in a mixture of acrylamide and formaldehyde solution, which establishes chemical groups required for crosslinking of the sample components to the polymer during subsequent polymerization step. After polymerization, the sample is cut to several smaller samples. Individual samples (or ‘punches’ if a biopsy puncher is used to excise smaller pieces of the gel) are boiled in the presence of high SDS concentration, to denature proteins and to allow expansion of various cellular structures. During this time, the gel, and the biological specimen within, expands ~2-fold. In the subsequent step, SDS is thoroughly washed out of the gel, which is required for efficient immunolabeling. Proteins of interest are then immunolabeled with primary and secondary antibodies, and DNA is labeled using DAPI. After immunolabeling, samples are gradually expanded by incubation in dH2O
3.1. Sample Preparation and Fixation
Plate self-adherent cells on 25 mm round glass coverslips and prepare them according to experimental needs. Or collect non-adherent or mitotic cells and adhere them to the round 25 mm coverslip precoated with poly-L-lysine. To do this, centrifuge cells 3 min at 160 × g, resuspend them in a small volume of growth medium or 1× PBS, load them to poly-L-lysine coated coverslips, and fix ~1 min later.
Fix cells in freshly prepared fixing solution for 1 h at RT. After fixation, samples can be stored for several hours in 4% formaldehyde before proceeding to Subheading 3.2. Note that previously immunolabeled and imaged samples can also be expanded using this method (see Note 1).
For expansion of multiciliated cells grown on Transwell-Clear permeable filter supports, remove the filter from the well using a scalpel and place it on the surface of the coverslip with the cells facing up. Add fixing solution directly to the cells. Alternatively, cells on the filters can be fixed by immersing the filter in the fixing solution in a tube (remain mindful which side contains cells).
3.2. Incubation with Acrylamide and Formaldehyde
After fixation, transfer each coverslip to a 35 mm petri dish and add 2 mL of freshly made formaldehyde–acrylamide solution (see Note 2). Scale up the amount of formaldehyde–acrylamide solution depending on the number of coverslips that need to be covered, 8 mL suffices for four coverslips.
Swirl the petri dishes with coverslips several times. Formaldehyde–acrylamide solution should evenly cover the coverslips.
Seal petri dishes with Parafilm and incubate the samples in a humid incubator at 40 °C for 16 h.
3.3. Polymerization
After incubation at 40 °C, transfer each coverslip(s) containing cells to a clean 60-mm petri dish.
Wash the coverslips three times with 1× PBS, 10 min each time at RT.
While washing the cells, layer the bottom of a 100-mm petri dish with Parafilm (Fig. 3a).
Transfer the coverslip(s) with cells to Parafilm-coated petri dish with cells facing up.
Add ~0.5 mL of 1× PBS to each coverslip to prevent drying of the sample.
Prepare ice–water bath by filling an ice bucket with ice and water (Fig. 3a).
Place the Parafilm-coated petri dish into the ice–water bath to cool down coverslips with cells for ~20 min (Fig. 3a). The ice–water bath ensures good contact with the bottom of the dishes and thus efficient cooling.
Add complete polymerization mixture (see Note 3) to the precooled coverslip with cells following steps 9–12. Try to complete steps 9–12 as quickly as possible. Samples need to remain cold.
Remove 1× PBS from the sample by tilting the Parafilm-coated dish with samples.
Aspirate residual 1× PBS from the edge of the coverslip. Try to remove as much 1× PBS as possible.
Add 1 mL of complete polymerization solution on the top of each coverslip, and quickly pipette up and down at three different spots along the coverslip edge, to mix the polymerization solution with residual 1× PBS.
Remove ~0.5 mL of polymerization mixture, leaving behind ~0.5 mL on each coverslip (Fig. 3a).
Keep the samples with the polymerization mixture on ice for 20 min with the lid on the petri dish (polymerization should start in about 5 min). Put the lid on the ice bucket to maintain cold environment.
Transfer the petri dish containing samples to a flat surface and additionally incubate for ~1–2 h at RT (Fig. 3b). If polymerization was successful, coverslips will be coated with a layer of a flexible gel that does not break and is easy to handle (see Note 4).
Fig. 3.
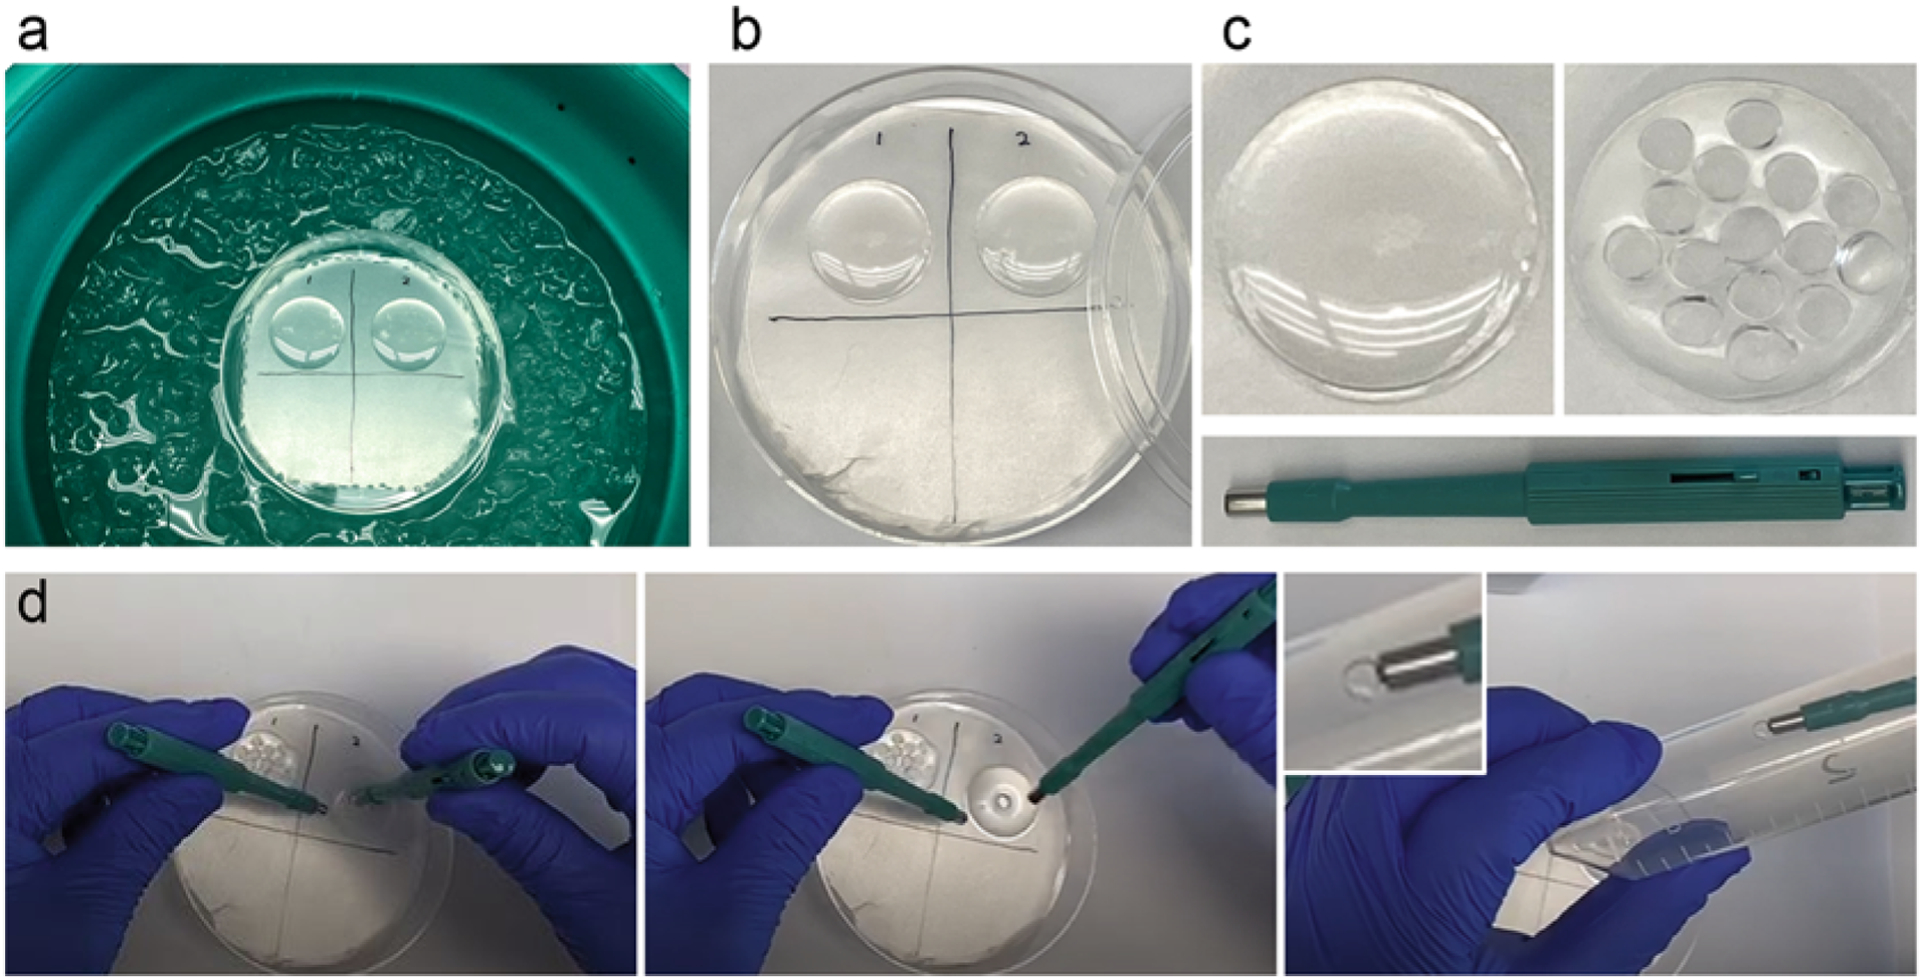
Polymerization and punching. (a) A 100-mm petri dish with its bottom layered by Parafilm on the top of an ice–water bath. Two coverslips with cells facing up are covered with polymerization mixture. Samples are kept on ice during the first 20 min of polymerization, followed by incubation at RT for another 1–2 h (b). (c) A coverslip containing cells and polymerized gel before (left) and after (right) samples have been excised using a 4-mm biopsy puncher (green, below). Multiple individual samples can be excised from one gel. (d) Punching and transferring of a punch to a 50 mL conical tube
3.4. Cutting (Punching) the Sample into Multiple Smaller Samples
With a 4-mm biopsy puncher, carefully cut out several gel punches from each coverslip (Fig. 3c, d). Cells will be detached from the coverslip and remain in the gel.
Place punches to the bottom of an empty 50 mL conical tube (Fig. 3d) (see Notes 5 and 6). Gel punches should be sturdy enough for gentle handling with a flat-tip tweezer or by a vacuum pick-up tool (our recommended way of handling punches).
Gently push punches to the bottom of the 50 mL tube (Fig. 4a).
Multiple punches can be cut out from one 25-mm round coverslip (Fig. 3c), if the cells were evenly plated across the coverslip. After polymerization, cells can be easily observed within the gel using a cell-culture microscope.
Fig. 4.
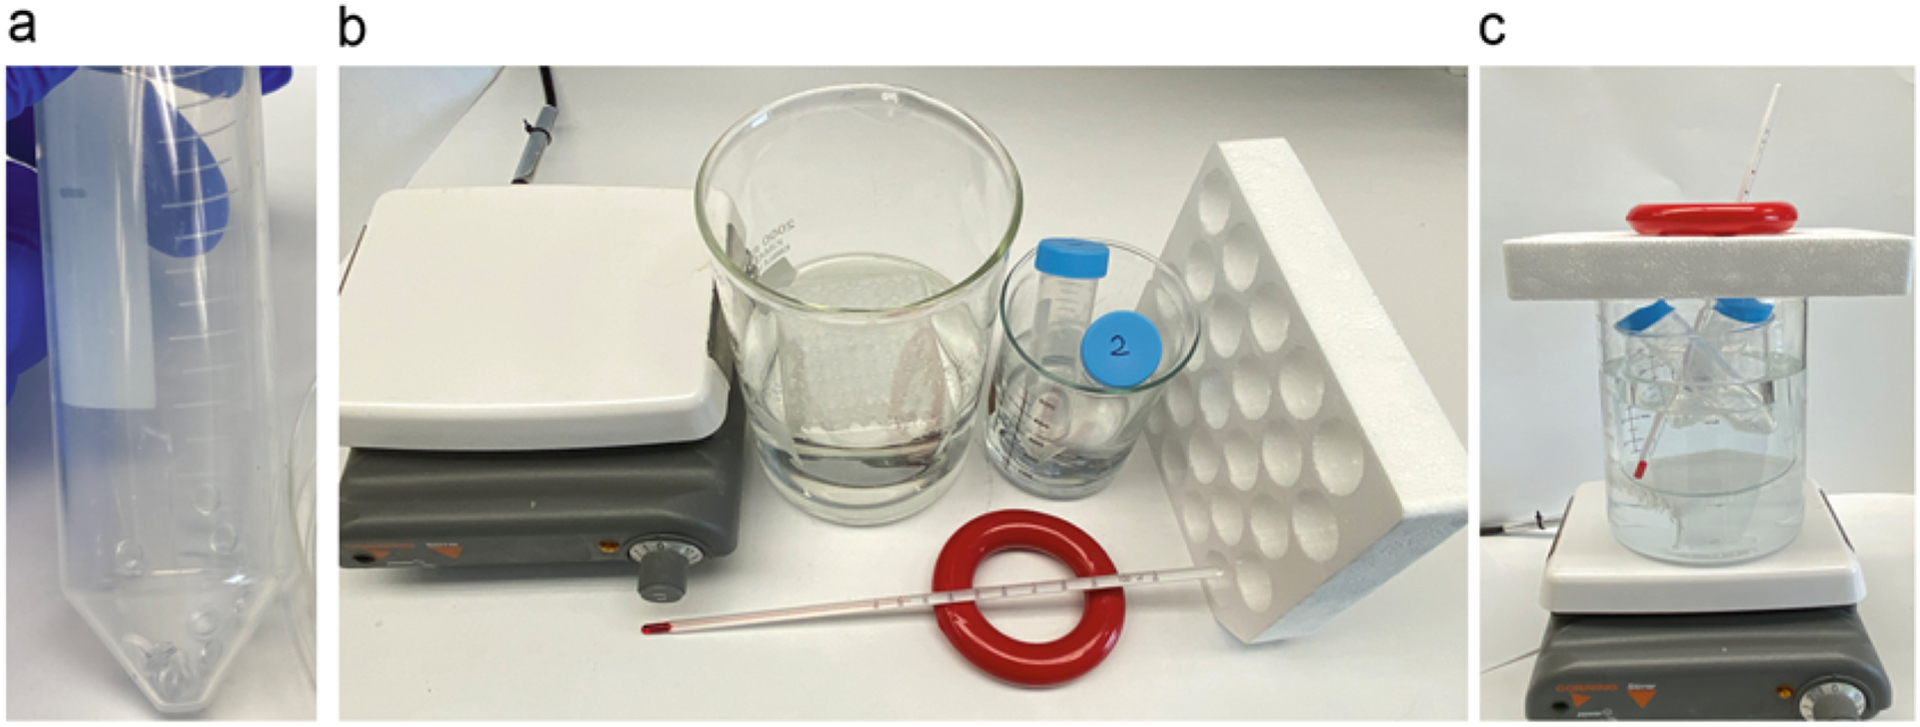
Denaturation by boiling in SDS buffer. (a) One 50 mL conical tube with multiple gel punches before boiling. (b) Equipment used for boiling of the samples. (c) Assembled boiling equipment. Large and small beaker are filled with water. A polystyrene tube-rack and weight serve to prevent evaporation and splashes during boiling. A thermometer is used to monitor the real-time temperature of the water bath. Samples are heated in 50 mL conical tubes
3.5. Denaturation by Boiling in SDS Buffer
Assemble the boiling equipment (Fig. 4b) as shown in Fig. 4c: place a smaller 500 mL beaker inside a larger, 2 L, beaker with a plastic tip-rack underneath the small beaker.
Fill both beakers with water to ~50% of their volumes.
Cover the large beaker (for instance with a polystyrene tube rack) and bring the temperature of the water bath >90 °C.
To monitor the real-time temperature inside, put a thermometer through the polystyrene tube rack into the water of the small beaker (Fig. 4c).
Preheat ~25 mL SDS buffer in a 50 mL conical tube in the water bath.
When the temperature in the water bath reaches >90 °C, place the 50 mL conical tube with gel punches in the water bath and incubate for 10 min (dry heat the punches).
Add preheated 25 mL SDS buffer to the 50 mL conical tube containing punches and swirl.
Place the 50 mL tube containing punches and SDS buffer into the water bath. Boil the punches in SDS buffer for 1 h, with gentle swirling every 10 min.
After boiling, remove 50 mL tubes from water bath and allow the SDS buffer with punches to cool down to RT.
3.6. SDS Washout
Remove SDS buffer by pipetting or using a cell strainer.
Add ~40 mL 1× PBS to 50 mL tube.
Place the tube on a shaking platform and gently shake for 20 min at RT. Repeat washing nine more times at RT. After SDS washout, the size of punches will be ~2-fold larger than before boiling (Fig. 5a).
Leave the punches in 1× PBS overnight on a shaking platform at 4 °C and follow by several more washes the next day at RT (see Note 7).
Fig. 5.
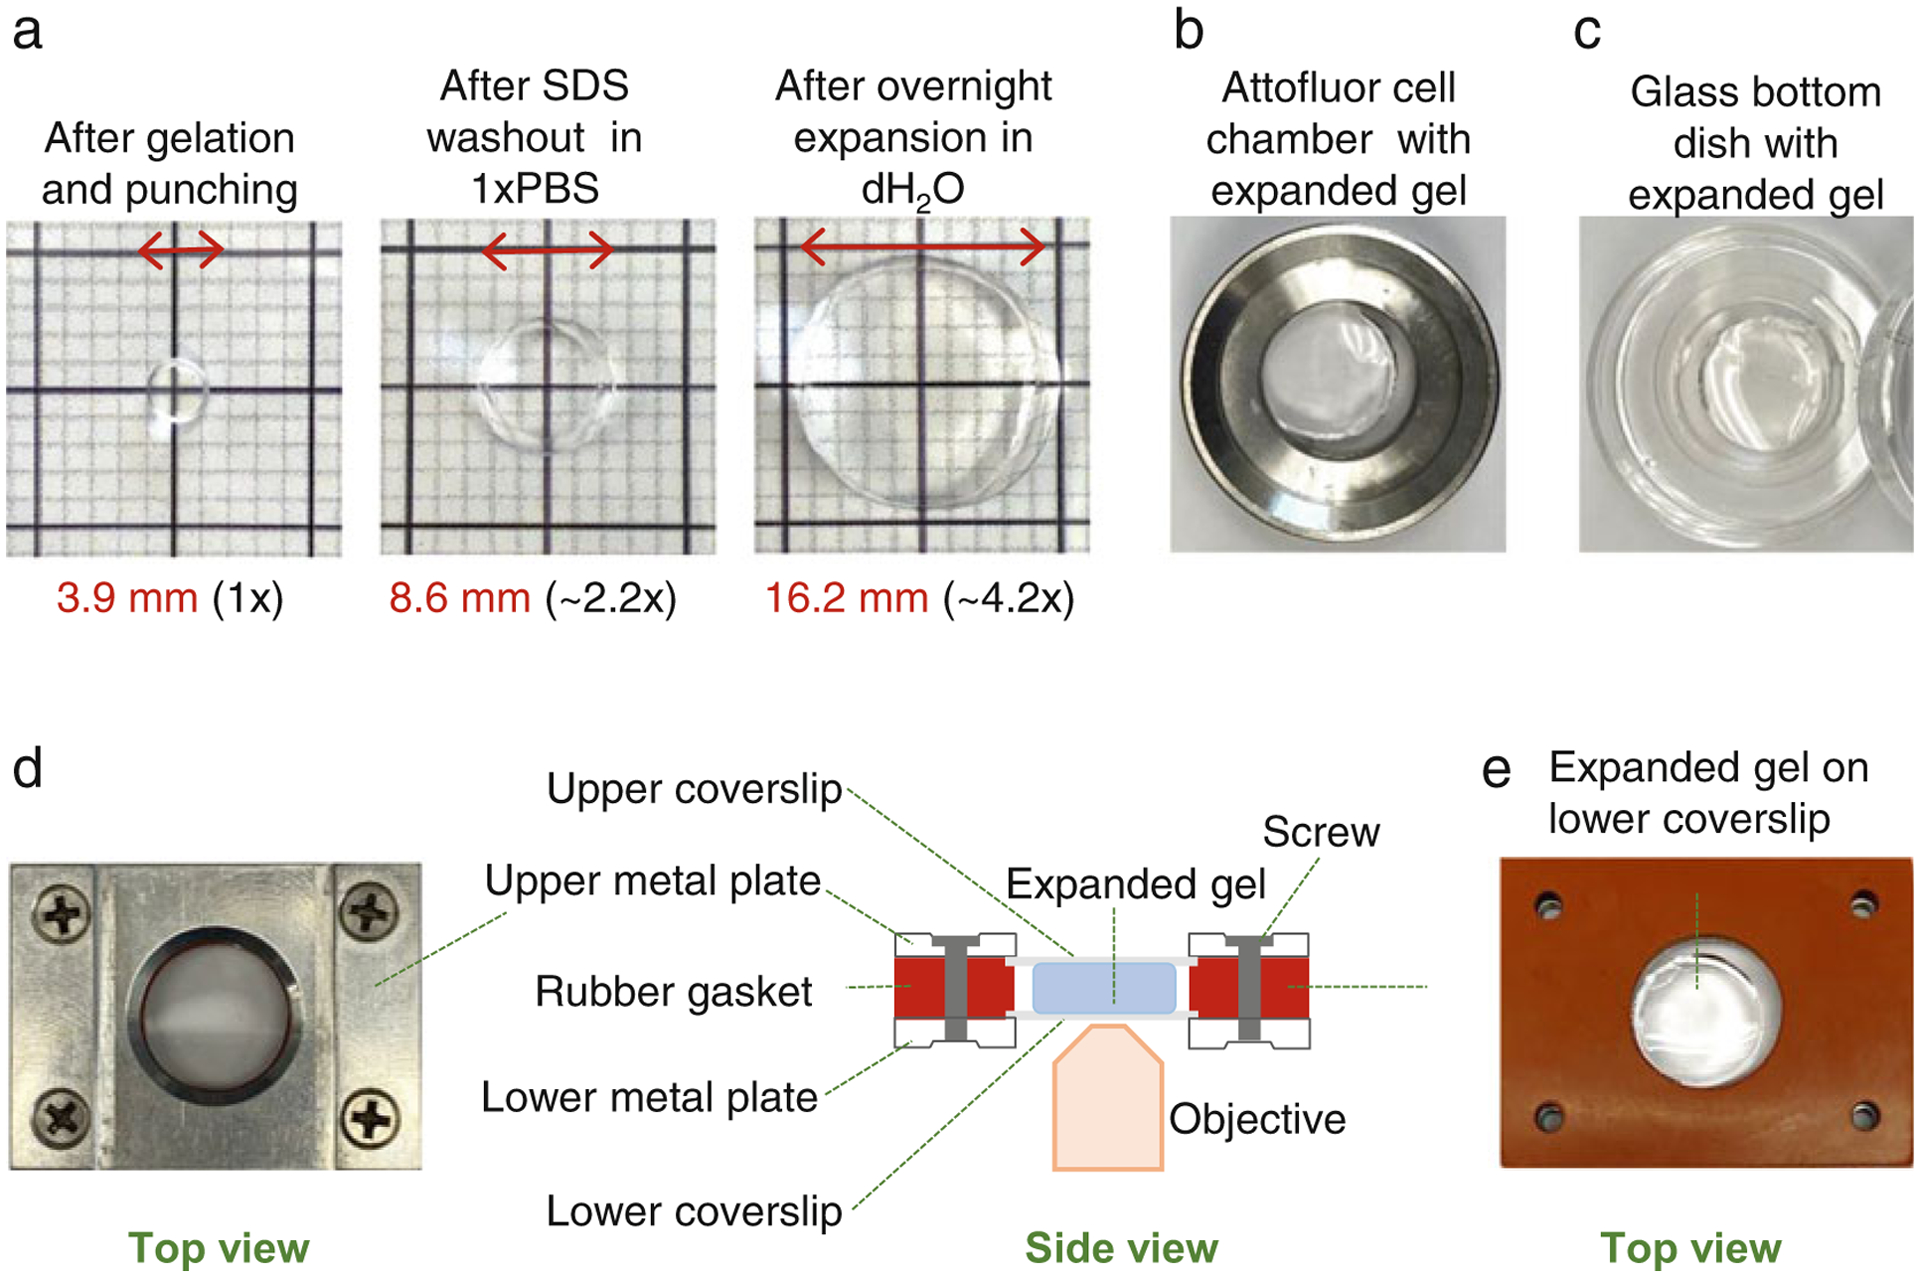
Expansion of immunolabelled samples and mounting of the samples for imaging. (a) Examples of gel punches at three different stages of the protocol. Left: After punching. Middle: after SDS wash-out. Right: after expansion in dH2O. (b) Attofluor chamber with an expanded punch. (c) A glass bottom dish with an expanded punch. (d) Left: A Rose chamber with an expanded punch and filled with dH2O assembled for imaging. Right: A scheme illustrates an assembled Rose chamber as viewed from the side (for more details see Subheading 3.9). Rose chambers are ideal for imaging of expanded gels because both surfaces of the gel can be accessible for imaging by flipping the chamber. This is particularly useful if there is ambiguity as to which surface contains a layer of cells. In addition, the gel is secured between two coverslips, which prevents moving of the gel during imaging. (e) Example of an expanded punch placed in the Rose chamber before addition of dH2O and closing of the chamber with the upper coverslip and the upper metal plate. Please note that the volume of polymerization solution (Subheading 3.3) needs to be adjusted to yield the gel thickness optimal for immunostaining and imaging. Alternatively, excess gel can be cut off using a scalpel
3.7. Immunolabeling
Transfer washed punches to 60-mm petri dish containing 1.5 mL of 1× PBS (for instance, collect them using a cell strainer and flip the strainer over the petri dish).
Using a vacuum pick-up tool or a flat-tip tweezer, carefully transfer one punch into a 2 mL round bottom microcentrifuge tube (or if more punches are to be immunolabeled with the same antibodies, transfer 2–3 punches to a 5 mL microcentrifuge tube).
Add ~0.5 mL of IF buffer per punch to the microcentrifuge tube and block for 1–2 h at RT with gentle shaking.
Dilute primary antibody (or multiple antibodies if costaining) in IF buffer. Then add 0.3–0.5 mL of the antibody solution per punch and incubate at RT for ~2 h, followed by incubation at 4 °C for 24–48 h, with gentle shaking (see Note 8).
Wash primary antibody in 1× PBS for 1–2 h with gentle shaking, exchanging 1× PBS every 10 min.
Dilute secondary antibody(ies) at 1:800 in IF buffer. Use ~0.5 mL of diluted antibody per punch.
Add DAPI from 1× stock solution to final dilution of 1:1000.
Incubate punches with secondary antibodies/DAPI solution for 1–2 h at RT, followed by incubation at 4 °C for 24 h, with gentle shaking.
3.8. Expansion of Immunolabeled Samples in dH2O
Start expanding immunolabeled gel punches by transferring punches to a petri dish or 50 mL tube.
Add dH2O to wash and expand punches for the first 2 h at RT, exchanging dH2O every 10 min.
Continue expanding overnight at 4 °C with gentle agitation (see Note 9). Monitor expansion by measuring the size of the punches (Fig. 5a).
3.9. Sample Mounting and Imaging
To prevent gels from shrinking, imaging needs to be performed in dH2O and all imaging dishes need to be thoroughly cleaned and rinsed with dH2O. For imaging, punches can be mounted in Attofluor cell chambers or in any glass-bottom petri dishes (Fig. 5b, c). However, we prefer mounting expanded samples in a homemade variation of a Rose Chamber (Fig. 5d) [22]. The chamber consists of two metal hollow plates, and one silicone rubber gasket. In the assembled chamber, above and below the rubber gasket is a coverslip (Fig. 5d, e). The space between two coverslips creates an imaging chamber which, in this case, will hold an expanded gel and dH2O. To prevent sliding of the expanded punches during imaging, coverslips or petri dishes can be coated with poly-L-lysine.
Imaging of expanded samples can be performed on any conventional microscope [20, 21]. Oil objectives of high magnifications (60× and 100×) can also be used (Fig. 6), especially if the structure of interest is localized close to the coverslip. Imaging of centrioles and cilia localized deeper in cells and mitotic cells is also possible using oil immersion, but it is facilitated using water immersion objectives. To achieve increased resolution, other imaging modalities such as structured illumination microscopy can be used [20].
Fig. 6.
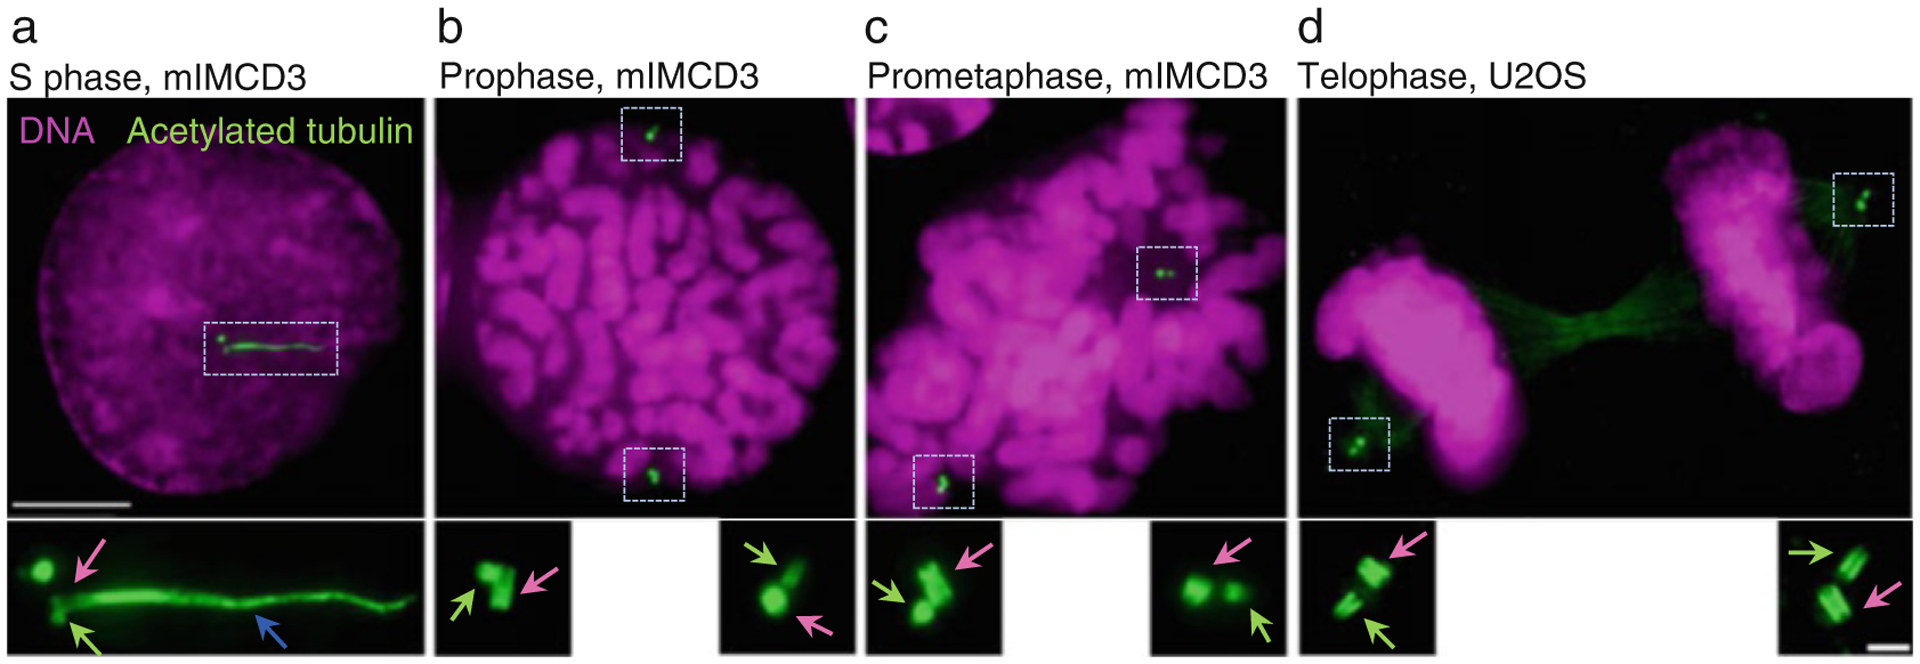
Examples of expanded centrioles and cilia using herein described method. Cells were grown on coverslips, expanded ~4.2×, and immunolabeled using an antibody recognizing acetylated tubulin. DNA is labeled with DAPI. (a) An interphase cell with two mother centrioles (pink arrow) associated with procentrioles (green arrow). One mother centriole is ciliated (blue arrow is pointing to the ciliary axoneme). (b–d) Examples of cells in various stages of mitosis. Each mother centriole (pink arrows) is associated with one procentriole (green arrows). Centrioles are in various orientations. Scale bars: 20 and 2 μm for the inserts
4. Notes
The protocol described here can also be used for expansion of previously immunolabeled cells that were previously fixed in cold methanol for 5 min or fixed in 1.5% formaldehyde for 4 min followed by cold methanol for 5 min [20]. Previously immunolabeled cells should not be embedded in hardening mounting medium prior to expansion. The best expansion results will be obtained if immunolabeled samples are kept in 1× PBS during imaging and are expanded as soon as possible. Before expansion, immunolabeled samples need to be postfixed with 4% formaldehyde in 1× PBS for 1 h at RT (that is, starting from Subheading 3.1). As an alternative to round 25 mm coverslips, cells can be grown on the coverslips of any size and in various types of petri dishes. However, the volume of polymerizing mixture (Subheading 2.2) will need to be adjusted, to achieve an optimal gel thickness of ~1–2 mm (before expansion).
After fixation in 4% formaldehyde, do not wash the samples. Remove the fixative and directly add freshly made formaldehyde–acrylamide solution.
Please note that the recommended polymerization mixture (20% acrylamide, 0.04% bisacrylamide, 7% sodium acrylate, 0.5% TEMED, 0.5% ammonium persulfate, in 1× PBS) will result in ~4.2-fold expansion of the gel/sample. The expansion factor can be changed by varying the concentration of bisacrylamide while, keeping the concentrations of other components constant. In our hands, the polymerization mixtures with the final percentages of bisacrylamide of 0.02%, 0.04%, 0.1%, and 0.2%, result in the ~5-, 4.2-, 3.6-, and 3.2-fold expansion, respectively [20]. Scale up the amount of polymerization mixture depending on the number of coverslips (4 mL is enough for four coverslips). However, try not to handle more than four coverslips at a time during the polymerization step of the protocol (Subheading 3.3).
All the reagents (2× PBS, 40% acrylamide solution, 40% acrylamide–bisacrylamide, sodium acrylamide, ammonium persulfate, and TEMED) and tubes must be precooled before finalizing the polymerization mixture, otherwise the gel may polymerize too fast and unevenly, causing uneven expansion of the samples later on. After polymerization, a gel may have ruffled edges, and sometimes may detach from the coverslip and curl. This is not unusual, and it will not affect expansion. Flat-tip tweezers and a biopsy puncher can be used to gently unravel curled gels before punching or cutting.
If cells were evenly plated across the coverslip, multiple punches/pieces can be punched/cut out of one 25-mm round coverslip (Fig. 3d). Since the distance between cells also increases during expansion, it is important to start the experiment with optimal cell confluency. Low confluency will require immunolabeling of multiple punches and require more material (such as antibodies) and labor. On the other hand, a cell confluency that is too high may result in rounding of the cells and in centrioles being positioned further from the coverslip, which is not optimal for subsequent imaging. Thus, cell density needs to be carefully optimized.
Transwell-Clear permeable filter can be punched/cut together with gel, since the filter usually remains attached to the gel after polymerization. Also, do not peel off the filter immediately after punching, as it might damage the gel. After boiling in SDS buffer (Subheading 3.5), the filter can easily be peeled off.
It is critical to remove all SDS before immunostaining. Poor washing will result in poor immunolabeling. After SDS washout, extra punches can be stored in 1× PBS at 4 °C and can be immunolabeled even a week later. However, prolonged storage will diminish the quality of immunostaining.
Table 1 provides primary antibodies compatible with our protocol. Please note that for each cell type or a specific batch of antibody, additional troubleshooting may be needed for optimal immunolabeling results. Duration of immunolabeling can be shortened, although it may result in a weaker signal.
There is no a strict protocol as to how to expand gel punches. Duration of expansion has to be determined empirically and will depend on the size of the punches, and on the volume and the frequency of exchanged dH2O.
Acknowledgments
We thank members of LPDS and Dr. Valentin Magidson for critical reading of the manuscript, and Dr. Catherine Sullenberger for acquiring images used in Fig. 3d. This work was supported by the Intramural Research Program of the National Institutes of Health (NIH), National Cancer Institute to J.L.
References
- 1.Schermelleh L et al. (2019) Super-resolution microscopy demystified. Nat Cell Biol 21(1):72–84 [DOI] [PubMed] [Google Scholar]
- 2.Bates M, Huang B, Zhuang X (2008) Super-resolution microscopy by nanoscale localization of photo-switchable fluorescent probes. Curr Opin Chem Biol 12(5):505–514 [DOI] [PMC free article] [PubMed] [Google Scholar]
- 3.Schermelleh L, Heintzmann R, Leonhardt H (2010) A guide to super-resolution fluorescence microscopy. J Cell Biol 190(2):165–175 [DOI] [PMC free article] [PubMed] [Google Scholar]
- 4.Asano SM et al. (2018) Expansion microscopy: protocols for imaging proteins and RNA in cells and tissues. Curr Protoc Cell Biol 80(1): e56. [DOI] [PMC free article] [PubMed] [Google Scholar]
- 5.Chen F, Tillberg PW, Boyden ES (2015) Optical imaging. Expansion microscopy. Science 347(6221):543–548 [DOI] [PMC free article] [PubMed] [Google Scholar]
- 6.Chozinski TJ et al. (2016) Expansion microscopy with conventional antibodies and fluorescent proteins. Nat Methods 13(6):485–488 [DOI] [PMC free article] [PubMed] [Google Scholar]
- 7.Ku T et al. (2016) Multiplexed and scalable super-resolution imaging of three-dimensional protein localization in size-adjustable tissues. Nat Biotechnol 34(9):973–981 [DOI] [PMC free article] [PubMed] [Google Scholar]
- 8.Tillberg PW, Chen F (2019) Expansion microscopy: scalable and convenient super-resolution microscopy. Annu Rev Cell Dev Biol 35:683–701 [DOI] [PubMed] [Google Scholar]
- 9.Gupta A, Kitagawa D (2018) Ultrastructural diversity between centrioles of eukaryotes. J Biochem 164(1):1–8 [DOI] [PubMed] [Google Scholar]
- 10.Vorobjev IA, Chentsov Yu S (1982) Centrioles in the cell cycle. I Epithelial cells. J Cell Biol 93(3):938–949 [DOI] [PMC free article] [PubMed] [Google Scholar]
- 11.Anderson RGW (1972) The three-dimensional structure of the basal body from the Rhesus monkey oviduct. J Cell Biol 54(2):246–265 [DOI] [PMC free article] [PubMed] [Google Scholar]
- 12.Mennella V et al. (2012) Subdiffraction-resolution fluorescence microscopy reveals a domain of the centrosome critical for pericentriolar material organization. Nat Cell Biol 14(11):1159–1168 [DOI] [PMC free article] [PubMed] [Google Scholar]
- 13.Mennella V et al. (2014) Amorphous no more: subdiffraction view of the pericentriolar material architecture. Trends Cell Biol 24(3):188–197 [DOI] [PMC free article] [PubMed] [Google Scholar]
- 14.Lawo S et al. (2012) Subdiffraction imaging of centrosomes reveals higher-order organizational features of pericentriolar material. Nat Cell Biol 14(11):1148–1158 [DOI] [PubMed] [Google Scholar]
- 15.Sonnen KF et al. (2012) 3D-structured illumination microscopy provides novel insight into architecture of human centrosomes. Biol Open 1(10):965–976 [DOI] [PMC free article] [PubMed] [Google Scholar]
- 16.Nigg EA, Raff JW (2009) Centrioles, centrosomes, and cilia in health and disease. Cell 139(4):663–678 [DOI] [PubMed] [Google Scholar]
- 17.Nigg EA, Schnerch D, Ganier O (2017) Impact of centrosome aberrations on chromosome segregation and tissue architecture in cancer. Cold Spring Harb Symp Quant Biol 82:137–144 [DOI] [PubMed] [Google Scholar]
- 18.Bettencourt-Dias M et al. (2011) Centrosomes and cilia in human disease. Trends Genet 27(8):307–315 [DOI] [PMC free article] [PubMed] [Google Scholar]
- 19.Wang L, Dynlacht BD (2018) The regulation of cilium assembly and disassembly in development and disease. Development 145(18): dev151407. [DOI] [PMC free article] [PubMed] [Google Scholar]
- 20.Sahabandu N et al. (2019) Expansion microscopy for the analysis of centrioles and cilia. J Microsc 276(3):145–159 [DOI] [PMC free article] [PubMed] [Google Scholar]
- 21.Kong D et al. (2020) Prolonged mitosis results in structurally aberrant and over-elongated centrioles. J Cell Biol 219(6):e201910019. [DOI] [PMC free article] [PubMed] [Google Scholar]
- 22.Rose GG et al. (1958) A cellophane-strip technique for culturing tissue in multipurpose culture chambers. J Biophys Biochem Cytol 4(6):761–764 [DOI] [PMC free article] [PubMed] [Google Scholar]


