

Summary
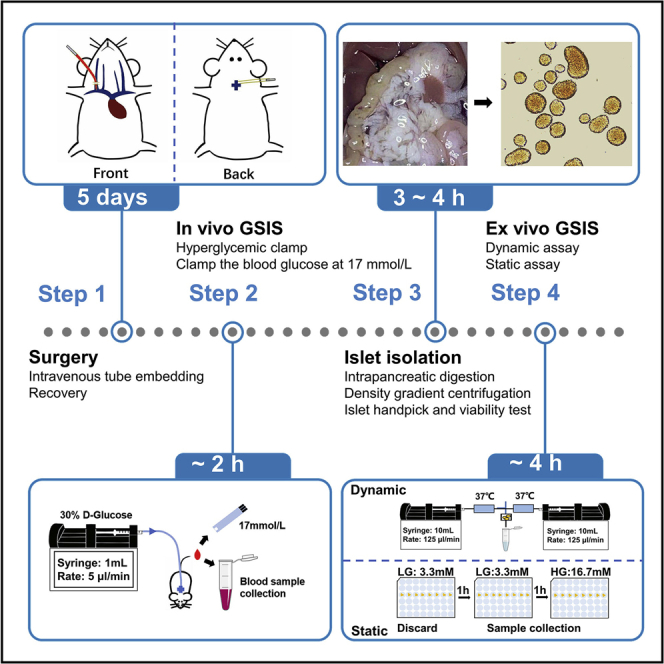
Pancreatic islet β cells secrete insulin in a biphasic manner when sensing high blood glucose level. This protocol describes the evaluation of different phases of insulin secretion, as well as basal, glucose-stimulated and total insulin secretion abilities, thereby enabling precise assessment of β cell function both in vivo and ex vivo. The in vivo assay consists of intravenous tube imbedding surgery and hyperglycemic clamp. The ex vivo assay consists of islet isolation, dynamic perfusion and static immersion.
For complete details on the use and execution of this protocol, please refer to Sun et al. (2021).
Subject areas: Cell Biology, Cell isolation, Metabolism, Model Organisms
Graphical abstract
Highlights
-
•
Glucose-stimulated biphasic insulin secretion (GSIS) in mouse islet β cells
-
•
Optimized and detailed tube embedding surgery for in vivo GSIS assay
-
•
Careful islet isolation and verification is essential for ex vivo GSIS assay
-
•
Adaptable procedure to monitor both human and murine islet β-cell function ex vivo
Pancreatic islet β cells secrete insulin in a biphasic manner when sensing high blood glucose level. This protocol describes the evaluation of different phases of insulin secretion, as well as basal, glucose-stimulated and total insulin secretion abilities, thereby enabling precise assessment of β cell function both in vivo and ex vivo. The in vivo assay consists of intravenous tube imbedding surgery and hyperglycemic clamp. The ex vivo assay consists of islet isolation, dynamic perfusion and static immersion.
Before you begin
This protocol has been modified based on previous work to enable the accurate assessment of the glucose-stimulated insulin secretion (GSIS) function of β cells(Lacy and Kostianovsky, 1967, Sun et al., 2021, Wang et al., 2018, Zhu et al., 2013). We have used 10-week-old male C57BL/6J mice weighing 23 ± 2 g as an example to describe the details of several segments. Compared with previous work, we have provided exhaustively detailed diagrams of the surgery (DeFronzo et al., 1979, Henquin et al., 2006, Hotamisligil et al., 1993), and the economical and efficient equipment for islet perfusion (Iwashita et al., 2007, Nie et al., 2013).
The minimum age of mice suitable for this protocol is 6 weeks, however, animals that are too thin or too fat, or with severe diabetic symptoms may affect the success ratio of the surgery. The mice used in this protocol were housed under a 12 h light/dark cycle at 23°C–25°C, and the animal studies were approved by the Research Animal Care Committee of Nanjing Medical University. Before attempting this protocol, please ensure that the use of animals and tissue for your research has received ethical approval.
Intravenous tube embedding surgery
Timing: [1 week]
-
1.Sterilization of surgical consumable instruments
-
a.Sterilize surgical instruments by autoclaving, this includes ophthalmic tweezers, ophthalmic scissors, fine tweezers, Vannas scissors, gauze swabs, absorbent cotton balls and swabs (Figure 1A).
-
b.Prepare 75% ethanol aqueous solution, iodine volts solution, and 200 U/mL heparin saline solution.
-
c.Cut a 70 mm length of 0.3048 mm inner diameter (ID) silicone tube so that one end is flat and the other is cuspate. Cut a 1.5 mm length of 0.508 mm ID silicone tube with both flat ends for use (Figure 1B).
-
d.As shown in the schematic diagram, spread the 0.508 mm ID tube with fine tweezers, then thread the 0.3048 mm ID tube through it until the cuspate end is 11 mm away from the end of the outer tube (Figure 1C).
-
e.Rinse them three times with heparin saline solution, and insert a 10 mm length stainless plug at the flat end before use (Figure 1D).
-
a.
-
2.Intravenous tube imbedding surgery
-
a.Clean and disinfect the surgical table. Meanwhile, turn on the anesthesia machine for about 5 min to fill the chamber with isoflurane.
-
b.Put the experimental mouse into the chamber to narcotize it.
-
c.Transfer the mouse to the surgical table under a stereo microscope, and maintain the narcosis status with isoflurane through mask.
-
d.Preserve the skin in the front and back of neck, then disinfect it with iodine volts solution (Figure 2A).
-
e.Position the mouse with the head pointing towards you, then scissor a 10 mm length incision about 5 mm above clavicle on the right side (Figure 2B).
-
f.Separate the external jugular vein from the connective tissue with blunt tweezers (Figure 2C).
-
g.Fold a sterilized 60 mm length suture line, then double-thread it across the vein (Figure 2D).
-
h.Ligate the vein at the distal part while leave a slipknot at the proximal part (Figure 2E).
-
i.Scissor a V-shaped incision between the two joints with the Vannas scissor (Figure 2F).
-
j.Insert the sharp end of recombined silastic tube into the vein, then secure the silastic tube with reserved slipknot (Figures 2G-2I).
-
k.Construct a subcutaneous tunnel across skin from the wounds to the back of neck with a tweezer, and embed a sterilized 2 mm ID hollow metallic tube(Figures 2K and 2L).
-
l.Insert the flat end of recombined silastic tube into the hollow metallic tube, and pipe the silastic tube through the tunnel, then remove the metallic tube away (Figure 2M).
-
m.Move away the stainless plug and inject heparin solution up to 100 μL, then block the tube with the plug again. Suture wound and disinfect with iodine volt.
-
n.The flat end of the silastic tube will extend about 20 mm outside the wounds, so the redundant part needs to be cut off.
-
o.House the mice individually in cages for 5 days to recover.
-
p.Given the risk of bacterial infection, the mice are given acidic, antibiotic water for 3 days. The water is first adjusted to pH 2.6 with concentrated HCl and then autoclaved in 1L bottles. Then, to 1L of acidic H2O, add 10 mL of 10 mg/mL neomycin in saline and 400 μL 25 mg/mL polymyxin B sulfate in water, sterilized by filtration.
-
q.Keep the silastic tube unobstructed, by injecting up to 50 μL heparin into the tube every other day, prior to the hyperglycemic clamp.
-
r.Disinfect the wounds with iodine volts solution every day until the fur are regrown.
-
a.
Note: The surgery for the glucose clamp test usually requires simultaneous arteriovenous intubation, but tube imbedding in the artery leads to a higher blockage rate of the silastic tube. The administration of glucose via the jugular vein and blood sample collection from the tail vein is suitable for the experiment. Overall, we chose to embed the tube in jugular vein as the solution for the in vivo evaluation of glucose-stimulated insulin secretion.
Figure 1.

Prepare for intravenous tube embedding surgery
(A) The main surgical instruments for surgery, including 2 mm inner diameter (ID) hollow metallic tube, Vannas scissor, fine tweezer, ophthalmic tweezer and scissor from left to right.
(B) Prepare discrete device, including a 0.3048 mm ID silicone tube cut into 70 mm length, a 0.508 mm ID silicone tube cut into 1.5 mm length, and a 10 mm length stainless plug cut from a drawing pin.
(C) Assemble the prepared silicone tube by spreading the 0.3048 mm ID tube through the 0.508 mm ID tube.
Note: The hollow tube showed in graph (A) is taken from a gauge 16 pipetting needle.
Figure 2.

Schematic diagram of intravenous imbedding surgery
(A) Preserving skin with a shaver, the red pane refers to where to cut, the scale bar refers to 10 mm (step 2d).
(B) Cut off skin and expose the jugular vein (step 2e).
(C) Separate the jugular vein with a tweezer (step 2f).
(D) Threading suture line through the vein (step 2g).
(E) Ligate the vein at the distal part (step 2h).
(F) Cut a V-shaped incision (step 2i).
(G) Insert the silastic tube (step 2j).
(H) Ligate the tube at proximal part (step 2j).
(I) Ligate the tube at distal part with reserved slip knot (step 2j).
(J) Cut off skin on the back of mouse, the incision locates in the middle 1.5 cm from back of the head.
(K) Construct a subcutaneous tunnel across skin with a tweezer (step 2k).
(L) Embedding the hollow metallic tube (step 2k).
(M) Piping the silastic tube through the tunnel beneath skin (step 2l).
Note: The schematics we provided were magnified in different sizes to help readers easier to understand, and the scale bars in B - M refer to 1 mm.
CRITICAL: As shown in the graphical abstract, there is a vulnerable branch vessel adjacent the jugular vein which is easily to be cut because of neglect during surgery. To avoid this, observe 30s when finished the ligation of silastic tube and jugular vein (step 2j), find and ligate the wound on the branch vessel if bleeding persists.
Key resources table
| REAGENT or RESOURCE | SOURCE | IDENTIFIER |
|---|---|---|
| Chemicals, peptides, and recombinant proteins | ||
| Sodium chloride | Sigma | CAT# S9888 |
| Potassium chloride | Sigma | CAT# P3911 |
| Magnesium chloride hexahydrate | Sigma | CAT# M9272 |
| Magnesium sulfate anhydrous | Sigma | CAT# M7506 |
| Sodium phosphate dibasic dodecahydrate | Sigma | CAT# 71649 |
| Sodium dihydrogen phosphate dihydrate | Sigma | CAT# 71505 |
| Potassium dihydrogen phosphate | Sigma | CAT# 1048730 |
| Sodium hydrogen carbonate | Sigma | CAT# 1063290 |
| Calcium chloride anhydrous | Sigma | CAT# C5670 |
| D-glucose | Sigma | CAT# 158968 |
| RPMI 1640 medium | Gibco | CAT# A1049101 |
| Ethanol | Sigma | CAT# 459836 |
| Histopaque 1077 | Sigma | CAT# 10771 |
| Collagenase V | Sigma | CAT# C9263 |
| Heparin | Millipore | CAT# 375095 |
| Bovine Serum Albumin (BSA) | VWR | CAT# 0332 |
| Penicillin/Streptomycin | Gibco | CAT# 15140-122 |
| Fluorescein Diacetate (FDA) | Invitrogen | CAT# F1303 |
| Propidium Iodide (PI) | Invitrogen | CAT# P1304 |
| Acetone | Sigma | CAT# 179124 |
| Ammonium hydroxide solution | Sigma | CAT# 221228 |
| Mannitol | Sigma | CAT# M9647 |
| Dithizone (DTZ) | Sigma | CAT# D5130 |
| Experimental models: organisms/strains | ||
| 8–10-week-old male mouse: C57BL/6J | The Jackson Laboratory | JAX: 000664 |
| Other | ||
| Vannas scissor | RWD life science | CAT# S11037-08 |
| Fine tweezer | RWD life science | CAT# F11030-11 |
| Animal anesthetic machine | RWD life science | CAT# R540 |
| Refrigerated Centrifuge | Beckman coulter | CAT# Allegra X-30 B06315 |
| Infusion warmer | Zhuhaifoyen Technology | CAT# JW-1103A |
| 0.3048 mm ID Silicone tube | Instech | CAT# BTSIL-025 |
| 0.508 mm ID Silicone tube | Instech | CAT# BTSIL-037 |
| 4-way X connector | Instech | CAT# SCX25 |
| 1.6 mm Luer taper | Nordson Medical | CAT# MTLL004-1 |
| 3-way Y connector | Instech | CAT# SCY25 |
| Syringe filter | Millipore | CAT# SLHV033N |
| Syringe pump | Harvard Apparatus | CAT# 70-4500 |
| TC Dish 100, Suspension | SARSTEDT | CAT# 83.3902.500 |
| Gauge 16 pipetting needle | Merck | CAT# CAD7954 |
Note: The 5-0 silk suture line, 1 mm ID silicone tube, blood taking needle and medical disposable sterile three-way valve are necessary but can be purchased from local supplier.
Materials and equipment
Hanks’ balanced salt solution without glucose (HBSS 2×)
| Reagents | Weight (g/L) | Final concentration (mmol/L) |
|---|---|---|
| Sodium chloride | 16 | 273.784 |
| Potassium chloride | 0.8 | 10.732 |
| Magnesium chloride hexahydrate | 0.2 | 0.984 |
| Magnesium sulfate heptahydrate | 0.2 | 0.812 |
| Sodium phosphate dibasic dodecahydrate | 0.2410 | 0.674 |
| Potassium dihydrogen phosphate | 0.12 | 0.882 |
| Sodium hydrogen carbonate | 0.7 | 8.332 |
| Calcium chloride anhydrous | 0.28 | 2.522 |
Dissolve these reagents one by one in listed order, then sterilize by filtration and store it at 4°C. Dilute it twice with sterilized water for immediate use.
Digestion buffer
| Reagents | Stock concentration | Final concentration | Amount |
|---|---|---|---|
| HBSS | 2× | 1× | 25 mL |
| Collagenase V | n/a | 0.8 mg/mL | 0.040 g |
| Total | Add deionized water and constant volume to 50 mL | ||
Prepare in a sterile environment, always prepare freshly, and do not store.
Stop solution
| Reagents | Stock concentration | Final concentration | Amount |
|---|---|---|---|
| HBSS | 2× | 1× | 50 mL |
| CBS | n/a | 10% (v/v) | 10 mL |
| Penicillin/Streptomycin | 100× | 1× | 1 mL |
| Total | Add deionized water and constant volume to 100 mL | ||
Prepare in a sterile environment, always prepare freshly, and do not store.
Culture medium
| Reagents | Stock concentration | Final concentration | Amount |
|---|---|---|---|
| RPMI1640 | 1× | 1× | 89 mL |
| FBS | n/a | 10% (v/v) | 10 mL |
| Penicillin/Streptomycin | 100× | 1× | 1 mL |
| Total | Add deionized water and constant volume to 100 mL | ||
Prepare in a sterile environment, always prepare freshly, and do not store.
Dithizone (DTZ) solution
| Reagents | Amount |
|---|---|
| DTZ | 10 mg |
| Ethanol | 3 mL |
| Ammonium hydroxide solution | 50 μL |
| Total | Add deionized water and constant volume to 15 mL |
Dissolve DTZ in ethanol and ammonium hydroxide solution, then constant volume to 15 mL. Sterilize the solution by filtration and store at –20°C.
Fluorescein diacetate/ Propidium iodide (FDA/PI) solution
| Reagents | Stock concentration | Final concentration | Amount |
|---|---|---|---|
| FDA | 5 mg/mL | 2.5 mg/mL | 500 μL |
| PI | 2 mg/mL | 1 mg/mL | 500 μL |
Dissolve FDA in acetone to a concentration of 25 mg/mL, then attenuate with 0.6 mol/L mannitol aqueous solution to 5 mg/mL. Dissolve PI in 0.6 mol/L mannitol aqueous solution. Store stock solution at 4°C, mix them freshly to use with equal proportion, then attenuate with sterile water.
Krebs-Ringer-bicarbonate-HEPES buffer (KRB)
| Reagents | Weight (g/L) | Final concentration (mmol/L) |
|---|---|---|
| Sodium chloride | 31.558 | 270 |
| Potassium chloride | 1.074 | 7.2 |
| Magnesium sulfate anhydrous | 0.241 | 1 |
| Sodium dihydrogen phosphate dihydrate | 0.312 | 1 |
| Calcium chloride anhydrous | 0.666 | 3 |
| Sodium hydrogen carboante | 0.672 | 4 |
Dissolve these reagents one by one in listed order, then sterilize by filtration and store it at 4°C.
Low glucose buffer
| Reagents | Stock concentration | Final concentration | Amount |
|---|---|---|---|
| KRB | 2× | 1× | 10 mL |
| BSA | 10% (w/v) | 0.02% (w/v) | 400 μL |
| Glucose (dynamic test) | - | - | - |
| Glucose (static test) | 50% (w/v) | 3.3 mmol/l | 23.7 μL |
| Total | Add deionized water and constant volume to 20 mL | ||
Prepare in a sterile environment, always prepare freshly, and do not store.
High glucose buffer
| Reagents | Stock concentration | Final concentration | Amount |
|---|---|---|---|
| KRB | 2× | 1× | 10 mL |
| Glucose (dynamic test) | 50% (w/v) | 20 mmol/l | 143.88 μL |
| Glucose (static test) | 50% (w/v) | 16.7 mmol/l | 120.14 μL |
| BSA | 10% (w/v) | 0.02% (w/v) | 400 μL |
| Total | Add deionized water and constant volume to 20 mL | ||
Prepare in a sterile environment, always prepare freshly, and do not store.
High potassium buffer
| Reagents | Stock concentration | Final concentration | Amount |
|---|---|---|---|
| KRB | 2× | 1× | 10 mL |
| Potassium chloride | 4 M | 50 Mm | 250 μL |
| Glucose (dynamic test) | - | - | - |
| Glucose (static test) | 2.78 mol/l | 3.3 mmol/l | 23.74 μL |
| BSA | 10% (w/v) | 0.02% (w/v) | 400 μL |
| Total | Add deionized water and constant volume to 20 mL | ||
Prepare in a sterile environment, always prepare freshly, and do not store.
Insulin content extraction buffer
| Reagents | Stock concentration | Final concentration | Amount |
|---|---|---|---|
| Ethanol | 100% | 74% | 37 mL |
| Hydrochloric acid | 37% | 1.4% | 700 μL |
| Total | Add deionized water and constant volume to 50 mL | ||
Prepare in a sterile environment, store at 4°C up to 3 months.
Step-by-step method details
In vivo glucose-stimulated insulin secretion assay (hyperglycemic clamp)
Fasting the experimental mice before hyperglycemic clamp for 10–12 h. This step includes preparation of buffers, mouse fixation and hyperglycemic clamp. The required concentration and volumes of reagents are described in the table below.
| Reagent | Needed for | Total amount |
|---|---|---|
| 30% D-glucose solution | Intravenous Injection | 10 μL/g body weight |
| 10 u/mL Heparin | Prevent blood from coagulation | 5 μL/g body weight |
Note: Dissolve D-glucose in deionized water, while dissolve heparin in saline solution, and sterilize these solutions by filtration.
-
1.Mouse fixation
-
a.Sterilize three-way Y connector with 75% ethanol solution, connect two of the joints to 0.3048 mm ID silicone tubing.
-
b.Stock one of the silicone tube with 10 mm long stainless plug, while flushing the other with D-glucose solution.
-
c.Withdraw D-glucose solution into a 1 mL syringe, then joint the syringe and 0.3048 mm ID silicone tube with a flat needle.
-
d.Weigh the pre-fasted mouse, then narcotize it in the anesthesia chamber.
-
e.Transfer the experimental mouse to operating table and keep narcosis status with isoflurane through mask.
-
f.Remove the plug in the back of mouse neck, and inject heparin up to 50 μL to ensure the tube is unobstructed.
-
g.Connect the flat end protruding from mouse skin to the unoccupied joint of the three-way Y connector.
-
h.Transfer mouse to the fixator and acclimate it for about 30 min.
-
a.
-
2.Hyperglycemic clamp
-
a.Adjust the infusion rate according to mouse weights, the initial rate of glucose solution is 30 mg/kg/min.
-
b.Measure the blood glucose level with a glucose meter through the tail vein and collect a fasting blood sample.
-
c.Turn on the syringe pump and collect blood samples at 2, 5, and 10 min. Estimate the insulin levels and draw the insulin secretion curve when finished the experiment, then calculate the area under curve (AUC)and record them as first-phase insulin secretion.
-
d.Adjust glucose infusion rate (GIR) to clamp blood glucose level at 306 mg/dL (± 18 mg/dL), according to blood glucose levels measured every 10 min. For convenience of operation, the blood glucose levels can be clamped at 17 mmol/L (± 1 mmol/L), since the glucose meter records the value in mM units. Record the blood glucose levels and GIR in Table 1 when the experiment is in progress.
-
e.Collect blood samples every 10 min. Estimate the insulin levels and draw the insulin secretion curve when finished the experiment, then calculate the area under curve (AUC) and record them as second-phase insulin secretion.
-
f.The glucose perfusion time can last up to 120 min, however it can be stopped when the blood glucose level is clamped and the perfusion rate reach a stable level (± 0.5 μL/min) within 30 min.
-
g.Stop the pump and dismantle the infusion device, then insert the stainless plug into the end of the silastic tube on the mouse.
-
h.Transfer each mouse to their own cage for another 3 days to recover.
-
i.Centrifuge blood samples at 675 g for 30 min, then collect serum carefully and store samples at –20°C for up to 4 weeks, or at –80°C for up to 2 months if it is not detected in time.
-
j.Measure insulin levels with an insulin ELISA kit. At least 3 μL serum for each replicate to measure is required, which can be diluted to 5 μL by saline solution.Note: The unit of GIR is recorded as μl/min during experiment, but it should be converted to mg·min–1/kg finally.CRITICAL: Given the requirements for the measurement of insulin, at least 15 μl whole blood is necessary for serum isolation. The collected blood samples should be stored on ice before centrifuging.
 Pause point: Sample detection can be performed 1 day to several weeks after storing the samples at −20°C or –80°C.Optional: Red-blood-cell from same strain is necessary for blood transfusion, when the volume of blood sample collection is over 10% of total volume of experimental mouse (relationship between body weight and blood volume is about 2 ml/ 25 g), the procedure for red-blood-cell acquisition is as follows (k - n).
 -
k.Centrifuge whole blood sample from donor mouse at 4°C, 450 g, for 20 min, then discard plasma and platelets, measure the volume of red-blood-cell with pipette.
-
l.Wash the red-blood-cell with 10 U/mL heparin saline solution and centrifuge again at 4°C, 450 g, for 20 min. The volume of heparin saline solution for wash is according to the volume measured in (k).
-
m.Resuspend the cells with heparin saline solution, the volume is the same as in (k), and then store the red-blood-cell on ice before use.
-
n.Connect the red-blood-cell in syringe and mouse with four-way X connector, and the rate of transfusion is 2 μL/min.
-
a.
Note: To avoid unwanted contamination, please use aseptic technique when performing these procedures.
Table 1.
The processing of glucose infusion rate (GIR)
| NO. | Weight (g) | K | |||||||||||
|---|---|---|---|---|---|---|---|---|---|---|---|---|---|
| Time (min) | 0 | 10 | 20 | 30 | 40 | 50 | 60 | 70 | 80 | 90 | 100 | 110 | 120 |
| Blood glucose level (mmol/L) | A1 | A2 | A3 | A4 | A5 | A6 | A7 | A8 | A9 | A10 | A11 | A12 | A13 |
| Blood glucose level (mg/dL) | An×18 | ||||||||||||
| Glucose infusion rate (μl/min) | B1 | B2 | B3 | B4 | B5 | B6 | B7 | B8 | B9 | B10 | B11 | B12 | B13 |
| Glucose infusion rate (mg·min–1 /kg) | GIR | ||||||||||||
Ex vivo glucose-stimulated insulin secretion assay
This step includes islet isolation and static and dynamic monitoring of islet GSIS function. Before the experiments begin, prepare the reagents below:
Mice were fasted for 10–12 h before islet isolation. The required concentration and volumes of reagents are described in the table below.
| Reagent | Needed for | Amount |
|---|---|---|
| Digestion buffer | Intrapancreatic digestion | ~ 3 mL/ mouse |
| HBSS | Clean and separation of islets | 2.5 mL/ mouse |
| Stop solution | Stop digestion | ~ 6 mL/ mouse |
| Histopaque | Islet separation | 2.5 mL/ mouse |
| Culture medium | Islet recovery | 4 mL/ 300 islets |
| DTZ solution | Islet identification | 2 mL |
| FDA/PI | Cell viability verification | 1 mL |
| Low glucose buffer | Dynamic or static GSIS | 10 mL/ incubation |
| High glucose buffer | Dynamic or static GSIS | 5 mL/ incubation |
| High potassium buffer | Dynamic or static KSIS | 5 mL/ incubation |
| Insulin extraction buffer | Insulin content extraction from islets | 2 mL/ incubation |
-
3.Intrapancreatic perfusion of collagenase.
-
a.Narcotize the mouse by intraperitoneal injection of 2% pentobarbital sodium solution according to body weight (40 mg/kg). Transfer the mouse to the operating table when anesthetized.
-
b.Disinfect the abdominal skin with ethanol solution.
-
c.Cut off the skin and then muscular layer along the midabdominal line.
-
d.Separate the major duodenal papilla from duodenum with fine tweezer and ligate the bile duct (Figures 4A- and 4B).
-
e.Expose the chest and cut off the auricula dextra to bleed venous blood until the liver turns white. Wipe up the blood.
-
f.Assemble the intravenous needle and a 5 mL syringe, then bend the needle to 45°for insertion.
-
g.Insert the needle into the common bile duct until the pinhole is inserted at least 2 mm (Figure 4C).
-
h.Begin to perfuse digestion buffer from the common bile duct proximal to the liver to the pancreas following the insertion (Figure 4D).
-
i.The volume of perfusate is adjustable within the scope of 1–2 mL, until the whole pancreas is crystal clear. The perfusion should be finished within 1 min (Figure 4E).
-
j.Strip off the filled pancreas from the bottom, up along the direction of the intestines to the stomach to the spleen, as soon as possible.
-
k.Transfer the pancreas to a sterilized 50 mL centrifuge tube in an ice-bath, and proceed to the next step till all the mice are sacrificed (Figure 4F).
-
a.
Note: The 50 ml centrifuge tube can store 2–3 pancreata for the digestion procedure.
-
4.Islet isolation from pancreas
-
a.Add another 2–3 mL collagenase to the centrifuge tube to make the volume to the 5 mL scale line.
-
b.Transfer the tube to 37°C shaking water bath for 18 min.
-
c.Remove the tube and vortex at 700 g for 10 s. The digestion should be homogenous without large pieces of pancreatic tissue. If this is not the case, digest the tissue for another 2–5 min.
-
d.Add 10 mL HBSS with 10% CBS, vortex the tube to stop digestion.
-
e.Filter the undigested tissue through 0.600 mm bore diameter sieves (30 mesh), and collect the filtered mixture in a new 50 mL centrifuge tube.
-
f.Centrifuge at 385 g for 2 min.
-
g.Discard the supernatant, then add another 10 mL HBSS and resuspend the sediment.
-
h.Centrifuge at 385 g for 2 min.
-
i.Discard supernatant, then add 5 mL histopaque and resuspend the sediment.
-
j.Transfer the mixture to a sterilized glass 15 mL centrifuge tube.
-
k.Adding 5 mL HBSS slowly along the wall of the tube with a syringe.
-
l.Centrifuge at 770 g for 20 min, with a uniform acceleration rate of 9 g and a uniform deceleration rate of 2 g.
-
a.
Note: The centrifuge needs to be pre-cooled to 4°C, and the uniform acceleration or deceleration rate was 9 g if not otherwise stated.
-
5.Islet sorting and cell viability verification
-
a.Remove the mid-layer of the supernatant with a pipettor to a 10 cm dish containing 8 mL stop solution. The color of isolated islets is tawny.
-
b.Beginners may have difficulty in distinguishing islets from pancreatic tissues, especially if the islets are light in color. Add 8 μL DTZ solution into the dish, and stain islets at 37°C for 1 min. Since β cells in islets contain high amounts of zinc ions, that they can optionally be stained by DTZ solution.
-
c.Pick up the islets under the stereoscopic microscope, and transfer them to a10 cm dish containing 10 mL stop solution.
-
d.Pick up the islets again and transfer them to a 10 cm dish containing 10 mL culture medium and allow them to recover for 8–12 h.
-
e.For subsequent GSIS assays, the cell viability of the total islet preparation must be greater than 80%. FDA/PI staining can be used to identify viable cells as the following steps described.
-
f.Transfer 30–50 individual islets randomly to a 3.5 cm dish containing 500 μL PBS, add 1 mL FDA/PI solution and stain the islets for 20 min at 20–25°Cin the dark.
-
g.Discard the supernatant, and wash the islets with PBS for 5 min.
-
h.Repeat the wash three times, then transfer the stained islets to a 3.5 cm dish containing 1.5 mL PBS.
-
i.Observe and photograph the islets under a fluorescence microscope, the excitation light for PI is 536 nm, but 494 nm for FDA. Cells that stained red by PI are apoptotic cells, while those stained green by FDA are viable.
-
j.The percentage of stained cells can be calculated using Image J software, area covered by red-stained cell should no more than 5% of total islet area.
-
a.
-
6.Dynamic monitoring of islet function.
-
a.Prepare perfusion buffers, including low glucose buffer, high glucose buffer and high potassium buffer, and incubate them at 37°C water bath.
-
b.Assemble the perfusion device, including syringe pump, 10 mL injection syringe, 1 mm ID silastic tube, infusion warmer, three-way valve, 1.6 mm Luer taper, 0.45 μm bore diameter syringe filter, and needle for blood taking needle.
-
c.Equilibration of islets in low-glucose buffer
-
i.Pick up 120 islets per group and incubate them in low glucose buffer at 37°C for 1 h, then transfer them into syringe filter.
-
ii.Switch the three-way valve to connect the syringe filter and injection syringe with low-glucose buffer.
-
iii.Adjust the perfusion rate at 125 μL/min, then turn on the syringe pump to perfuse islets for 20 min with low-glucose buffer.
-
i.
-
d.Islet perfusion
-
i.Continue to perfuse low glucose buffer for 10 min, and collect the perfusate every 1 min as one sample through the blood taking needle into a 1.5 mL Eppendorf tube.
-
ii.Switch the three-way valve to connect the syringe filter and injection syringe with high glucose buffer.
-
iii.Turn on the syringe pump loaded with high glucose buffer and simultaneously turn off the syringe buffer loaded with low glucose buffer.
-
iv.Perfuse with high glucose buffer for 25 min and collect the perfusate every 1 min as one sample.
-
v.Switch the three-way valve again to connect syringe filter and injection syringe with low glucose perfusion buffer.
-
vi.Turn off the syringe pump loaded with high glucose buffer and simultaneously turn on the syringe pump loaded with low glucose buffer to re-equilibrate islets for 20 min (Sun et al., 2021).
-
vii.Replace the high glucose buffer with high potassium buffer and relevant silastic tube during re-equilibration.
-
viii.Continue to perfuse low glucose buffer for 10 min, and collect the perfusate every 1 min as one sample.
-
ix.Switch the three-way valve to connect the syringe filter and injection syringe with the high potassium buffer.
-
x.Continue to perfuse high potassium buffer for 15 min, and collect the perfusate every 1 min as one sample. Turn off all of the syringe pump.
-
xi.The perfusion samples can be stored at –20°C up to 4 weeks, or at –80°C up to 2 months.
-
i.
-
e.Insulin content extraction
-
i.Flush out islets from the islet deposit chambers using 5 mL low glucose buffer.
-
ii.Flush the syringe three times and collect flushing buffer in a 10 cm dish.
-
iii.Count the number of islets and collect them in a 1.5 mL Eppendorf tube, extract the insulin content with 1 mL extraction buffer at 4°C for 12 h.
-
iv.Centrifuge the extraction buffer at 4°C, 900 g for 5 min, and collect 500 μL supernatant. The samples can be stored at –20°C for up to 4 weeks, or at –80°C for up to 2 months.
-
i.
-
f.Sample calibration
-
i.Centrifuge the remaining islets at 300 g for 5 min and discard the liquid.
-
ii.Extract total DNA or protein and measure the relative concentration. If the number of islets differs between groups due to the manipulations, calibrate them according to islet number.
-
iii.The DNA or protein concentration is used to calibrate the insulin secretion capability of each sample. Dynamic insulin secretion can be calibrated and recorded in Table 2.
-
i.
-
a.
-
7.Static monitoring of islet function
-
a.Prepare buffer and incubate them at 37°C water bath.
-
b.The static assay is carried out in 48 well cell culture plate with 200 μL liquid per well.
-
c.Run at least6 replicates per group, 8–10 islets are acceptable for each replicate.
-
d.Equilibrate the islets in low glucose buffer and incubate for 1 h.
-
e.Rotate the plate in the same direction to gather the islets into the center of the well, then remove the fluid from the edge of the well and discard it.
-
f.Add another 200 μL low glucose buffer and incubate for 1 h, then collect 150 μL supernatant as the low glucose-stimulated insulin secretion sample.
-
g.Discard the remaining buffer, add 200 μL high glucose buffer and incubate for 1 h, then collect 150 μL supernatant as the high glucose-stimulated insulin secretion sample.
-
h.Discard the remaining buffer and extract the insulin content by adding 200 μL extraction buffer and incubating at 4°C for 12 h.
-
i.The sample calibration protocol is the same as that used for the dynamic monitoring assay.
-
a.
Note: Take care not to pipette any cell debris when acquiring the sample during the static assay
-
8.
Sample detection
Figure 4.

Intrapancreatic perfusion of collagenase
(A) Separate the major papilla from the duodenum (step 3d).
(B) Ligate the bile duct, the ligation is performed as the red pane labeled in A (step 3d).
(C) Insert the needle into the bile duct near the liver (step 3g).
(D) Start to perfuse by pushing syringe slowly from common bile to pancreas (step 3h).
(E) The fulfilled pancreas (step 3i).
(F) Keep digestion buffer away from light in ice-bath before use, and store delaminated pancreas in 50-mL centrifuge tube in ice-bath before digestion (step 3k).
Table 2.
The processing of dynamic insulin secretion curve
| DNA concentration (ng/μL) | C | Volume of DNA (μl) | D | ||||
|---|---|---|---|---|---|---|---|
| Time (min) | 1 | 2 | 3 | N … | 58 | 59 | 60 |
| Insulin (ng/mL) | E1 | E2 | E3 | En … | E58 | E59 | E60 |
| Insulin (pg·min–1 / mg DNA) | |||||||
Insulin levels of perfusate, static samples and content samples are detected with insulin ELISA kits or radioimmunoassay. The same dilutions are decided according to preliminary experiment.
Expected outcomes
This protocol is optimized for the evaluation of GSIS function of β cells. The typical results of hyperglycemic clamp are shown in (Figure 3). For ex vivo evaluation of β-cell function, islets need to be isolated and cell viability verified prior to this, the typical cell viability verification are shown in (Figure 5D). The use of this protocol to monitor islet function dynamically has been demonstrated in (Figure 6) and (Figure 7), while the static monitoring results have been demonstrated in (Figure 8). However, due to the different circumstance that islets suffer, neither the 1st nor the 2nd phases of insulin secretion is exactly the same between in vivo and ex vivo assay (Henquin et al., 2006).
Figure 3.

The observed outcome of hyperglycemic clamp of 10-week-old male C57Bl/6J mice
(A) The record of blood glucose levels during hyperglycemic clamp (n=4).
(B) GIR recorded during hyperglycemic clamp.
(C) Serum insulin levels, measured by insulin ELISA kit, during hyperglycemic clamp.
(D) The area under curve (AUC) calculated according to (C), and the AUC of 0–10 min refers to the 1st phase and 10–90 min refers to the 2nd phase during hyperglycemic clamp.
Figure 5.

Centrifuge to separate islets and cell viability identification
(A) Schematic diagram of centrifugal separation of islets (step 4, i - k).
(B) Schematic diagram of centrifugal separation result (step 4l).
(C) DTZ stained islets are scarlet, the scale bar refers to 100 μm (step 5, b and c).
(D) Cell viability identification of isolated islets. Islets showed in the left row are suitable for GSIS, while the central necrosis islets in the right row are unsuitable (Zmuda et al., 2011), the scale bar refers to 100 μm (step 5, e - g).
Figure 6.

Overview of the setup of perfusion apparatus and detailed diagram of islet chamber
(A) The perfusion system including syringe pumps, 10 mL syringes, infusion warmers, 1 mm ID silastic tubes and islet chamber.
(B) The islet chamber is composed of a three-way valve (a), a syringe filter (b) and needle from blood taking needle (c), star refers to islet deposit chamber.
Figure 7.

The observed outcome of dynamic monitoring of glucose-stimulated insulin secretion function of islets from 10-week-old male C57Bl/6J mice
(A) Insulin levels in islet perfusate during dynamic assessment, and calibrated according to total DNA.
(B) The area under curve (AUC) calculated according to (A), and the AUC of 10–20 min refers to the 1st phase and 20–35 min refers to the 2nd phase during dynamic assessment.
Figure 8.

The observed outcome of static monitoring of glucose-stimulated insulin secretion function of islets from 10-week-old male C57Bl/6J mice
(A) Insulin levels in low glucose or high glucose buffer during static assessment, and calibrated according to total DNA.
(B) Insulin levels in low glucose or high glucose buffer during static assessment, and calibrated according to insulin content when there is no difference in insulin content according to total DNA or protein.
Quantification and statistical analysis
Student t test are sufficient to compare in this protocol, and p <0.05 is considered statistically significant. However, we have provided the Tables below to make it easier for readers to convert data.
Limitations
This protocol we provided aims to evaluate GSIS function of whole β cells in ultimate glucose concentration. The differences of insulin secretion phases can be observed exactly. However, the process of GSIS in a single β cell includes multiple procedure, such as glucose trans-membrane, energy metabolism, protein synthesis and transport of insulin granules, etc. Obviously, this protocol is limited to confirm which process influences the result precisely. Therefore, further experiments need to be performed when significant differences are observed during islet function assessment.
Troubleshooting
Problem 1
Increase the survival ratio of mice during intravenous tube embedding surgery (before you begin step 2).
Potential solution
Ensure the operating table, surgical instruments and consumables are sterilized or well disinfected before the surgery. Round off both the end of stainless plug and 2 mm ID hollow tube, so that the mouse would not suffer undeserved injury or infection during the surgery. House the mice individually in cages to avoid them from biting each other after the surgery. The use of antibiotic is necessary, especially for mice with severe diabetic symptoms.
Problem 2
The intravenous embedded tube was obstructed before hyperglycemic clamp (major step 1).
Potential solution
In order to prevent the blockage of intravenous embedded tube, we have to inject heparin immediately up to 100 μL into the embedded tube in step 2 m in the intravenous tube embedding surgery. However, there exists probabilistic blockages during mouse recovery. If the clot locates at the very end of the tube exposed outside the body, then cut away the tube including clot. If the clot locates beneath the skin, try to extract the clot with a 5 mL syringe. Otherwise, hyperglycemic clamp cannot be performed on the mouse that the embedded tube was obstructed.
Problem 3
Fail to clamp blood glucose levels at 306 ± 18 mg/dL during hyperglycemic clamp (major step 2).
Potential solution
The blood glucose levels of mice during hyperglycemic clamp may fail to fall within the scheduled range in 120 min, if the deviation value between two experimental groups was not greater than 18 mg/dL, the tested value was useful. Otherwise, leave the mice to recover for another 3 days, then perform the test again.
Problem 4
Fail to obtain plentiful enough number of islets (major step 3–5).
Potential solution
The adequate number of islets we can obtain from a 10-week-old C57BL/6J male mouse is 130 ± 20 regardless of their size. However, mice under 8-week-old or have severe diabetic symptom have less islets. If you fail to acquire plentiful enough number of islets, try to examine and find the solution follow the steps below: First, please ensure the pancreas were well digested that there should be a little tissue left on the sieves in step 6. e, if not try to digest the pancreas for another 2–5 min. Second, resuspend the sediment with HBSS and look under the microscope to inspect if there exist islets in the turbid liquid. Finally, adjust the magnification of the objective lens to examine the integrity of islet envelope, if it is broken means the digestion is over, try to lower the concentration of collagenase or digestion time next time.
Problem 5
Fail to stimulate insulin secretion by using high glucose buffer (major step 6).
Potential solution
Make sure that the perfusion solution is correct according to our formula, especially the concentration of calcium in KRB. Extend the equilibration time in low glucose solution, including in the dishes and in islet chamber. Islet viability may also need to be verified again, what’s more we advise to culture islets ex vivo no more than 72 h.
Resource availability
Lead contact
Further information and requests for resources and reagents should be directed to and will be fulfilled by the lead contact, Dr. Xiao Han (hanxiao@njmu.edu.cn).
Materials availability
This study did not generate any unique materials or reagents.
Data and code availability
This study did not generate any unique datasets or code.
Acknowledgments
This study was supported by research grants from the National Natural Science Foundation of China (81870531 and 82070843 Y-X.Z., 81830024 to X.H.). X.H. and Y.X. are fellows at the Collaborative Innovation Center for Cardiovascular Disease Translational Medicine.
Author contributions
Conceptualization, X.H. and Y.-X.Z.; investigation, Y.-X.Z., Y.-C.Z., Y.Z., P.S., and X-A.C.; writing-original draft, Y.-C.Z. and Y.Z.; writing-review & editing, Y.-X.Z., Y.-C.Z., and X.H.; funding acquisition, Y.-X.Z. and X.H.; supervision, X.H.
Declaration of interests
The authors declare no competing interests.
Contributor Information
Yun-Xia Zhu, Email: zhuyx@njmu.edu.cn.
Xiao Han, Email: hanxiao@njmu.edu.cn.
References
- DeFronzo R.A., Tobin J.D., Andres R. Glucose clamp technique: a method for quantifying insulin secretion and resistance. Am. J. Physiol. 1979;237:E214–E223. doi: 10.1152/ajpendo.1979.237.3.E214. [DOI] [PubMed] [Google Scholar]
- Henquin J.-C., Nenquin M., Stiernet P., Ahren B. In vivo and in vitro glucose-induced biphasic insulin secretion in the mouse: pattern and role of cytoplasmic Ca2+ and amplification signals in beta-cells. Diabetes. 2006;55:441–451. doi: 10.2337/diabetes.55.02.06.db05-1051. [DOI] [PubMed] [Google Scholar]
- Hotamisligil G.S., Shargill N.S., Spiegelman B.M. Adipose expression of tumor necrosis factor-α: Direct role in obesity-linked insulin resistance. Science. 1993;259:87–91. doi: 10.1126/science.7678183. [DOI] [PubMed] [Google Scholar]
- Iwashita N., Uchida T., Choi J.B., Azuma K., Ogihara T., Ferrara N., Gerber H., Kawamori R., Inoue M., Watada H. Impaired insulin secretion in vivo but enhanced insulin secretion from isolated islets in pancreatic beta cell-specific vascular endothelial growth factor-A knock-out mice. Diabetologia. 2007;50:380–389. doi: 10.1007/s00125-006-0512-0. [DOI] [PubMed] [Google Scholar]
- Lacy P.E., Kostianovsky M. Method for the isolation of intact islets of Langerhans from the rat pancreas. Diabetes. 1967;16:35–39. doi: 10.2337/diab.16.1.35. [DOI] [PubMed] [Google Scholar]
- Nie J., Liu X., Lilley B.N., Zhang H., Pan Y.A., Kimball S.R., Zhang J., Zhang W., Wang L., Jefferson L.S. SAD-A kinase controls islet β-cell size and function as a mediator of mTORC1 signaling. Proc. Natl. Acad. Sci. U S A. 2013;110:13857–13862. doi: 10.1073/pnas.1307698110. [DOI] [PMC free article] [PubMed] [Google Scholar]
- Sun Y., Zhou Y., Shi Y., Zhang Y., Liu K., Liang R., Sun P., Chang X., Tang W., Zhang Y. Expression of miRNA-29 in pancreatic β cells promotes inflammation and diabetes via TRAF3. Cell Rep. 2021;34:108576. doi: 10.1016/j.celrep.2020.108576. [DOI] [PubMed] [Google Scholar]
- Wang H.H., Zhou C.L., Lv M., Yang Q., Li J.X., Hou M., Lin J., Liu X.M., Wu Y.T., Sheng J.Z. Prenatal high estradiol exposure induces sex-specific and dietarily reversible insulin resistance through decreased hypothalamic INSR. Endocrinology. 2018;159:465–476. doi: 10.1210/en.2017-03017. [DOI] [PubMed] [Google Scholar]
- Zhu Y., You W., Wang H., Li Y., Qiao N., Shi Y., Zhang C., Bleich D., Han X. MicroRNA-24/MODY gene regulatory pathway mediates pancreatic β-cell dysfunction. Diabetes. 2013;62:3194–3206. doi: 10.2337/db13-0151. [DOI] [PMC free article] [PubMed] [Google Scholar]
- Zmuda E.J., Powell C.A., Hai T. A method for murine islet isolation and subcapsular kidney transplantation. J. Vis. Exp. 2011;50:2096. doi: 10.3791/2096. [DOI] [PMC free article] [PubMed] [Google Scholar]
Associated Data
This section collects any data citations, data availability statements, or supplementary materials included in this article.
Data Availability Statement
This study did not generate any unique datasets or code.