Summary
Changes in mitochondrial size, shape, and subcellular position, a process collectively known as mitochondrial dynamics, are exploited for various cancer traits. Modulation of subcellular mitochondrial trafficking and accumulation at the cortical cytoskeleton has been linked to the machinery of cell movements, fueling cell invasion and metastatic spreading. Here, we detail a technique to track changes in mitochondrial volume using a commercial CellLight™ Mitochondria-RFP/GFP reporter and live confocal microscopy. This allows a real-time study of mitochondrial dynamics in live cells.
For complete details on the use and execution of this protocol, please refer to Bertolini et al. (2020).
Subject areas: Cancer, Microscopy, Molecular/Chemical Probes
Graphical abstract

Highlights
-
•
Protocol to measure mitochondrial dynamics in live cells
-
•
Use of time-lapse confocal imaging to capture the dynamics of mitochondria
-
•
Deconvolution of 4D images
-
•
Steps for analysis of changes in mitochondrial volume
Changes in mitochondrial size, shape, and subcellular position, a process collectively known as mitochondrial dynamics, are exploited for various cancer traits. Modulation of subcellular mitochondrial trafficking and accumulation at the cortical cytoskeleton has been linked to the machinery of cell movements, fueling cell invasion and metastatic spreading. Here, we detail a technique to track changes in mitochondrial volume using a commercial CellLight™ Mitochondria-RFP/GFP reporter and live confocal microscopy. This allows a real-time study of mitochondrial dynamics in live cells.
Before you begin
Culturing cells for live-cell imaging
Timing: [10 min, 24 h before cells transfection]
Prepare the cell before starting this protocol. Refer to key resources table for a complete list of materials and equipment. This protocol is optimized for adherent cell lines.
-
1.
Carefully remove the culture medium by aspiration and rinse the cells with 5 mL of PBS twice to remove residual α-1-antitrypsin in the fetal bovine serum (FBS) in the culture medium which would inhibit trypsin.
-
2.
Detach cells from the plate by adding 1 mL of 0.05% trypsin to a 100 mm diameter dish to cover the plate surface and incubate the plate at 37°C. Usually, for tumor cell lines the incubation time is around 2–3 min.
-
3.
Add complete medium (RPMI 1640 containing 5% FBS and 10 U/mL of penicillin-streptomycin) to inhibit trypsin activity. A minimum of 3 times trypsin volume (3 mL) should be added to complete trypsin inactivation.
-
4.
Resuspend cells into a single-cell suspension by gently pipetting up and down. Transfer the cells into a 15 mL sterile tube and centrifuge at 350 g for 5 min at R.T. (room temperature, 22°C–25°C).
-
5.
Carefully remove supernatant avoiding cell pellet disruption and add 10 mL of the complete culture medium to the cells pellet and resuspend.
-
6.
Count the cells and seed 104 cells in 1.5 mL of complete medium in glass-bottom dishes (#1.5 35 mm dishes from MatTek).
Note: Cells must not reach more than 70% confluence at the acquisition. (Figure 1A – Left: correct confluence, Right: too many cells in one field).
Figure 1.
Representative images of cells
(A) On the left representative image of cells at the appropriate confluence; on the right representative image of too dense cells. Scale bar = 100 μm.
(B) On the left, representative image of well-spread cells; on the right representative image of rounded cells, not properly attached to the dish. Scale bar = 25 μm.
-
7.
Leave the cells at least overnight (O.N., 16 h) at 37°C to allow them to attach to the plate before the transfection.
Note: The cells need to be around 70% confluent and adhere to the dish to image them (Figure 1B – Left: example of well-spread cells; Right: rounded cells, difficult to image). If necessary, leave the cells another 24 h at 37°C before the transfection.
Note: This protocol has been applied to different types of adherent cells in our laboratory, including breast cancer cell lines (MCF7, T47D) (Bertolini et al., 2020), prostate cancer cell lines (PC3, DU145) (Li et al., 2020, Wang et al., 2019), glioblastoma cell lines (LN229) (Li et al., 2020), normal epithelial cells (MCF10A) (Bertolini et al., 2020) and mouse neutrophils.
CRITICAL: It is important that cells are spread out and adhere to the plate before starting with imaging. If working with cell lines that do not attach to the plate properly it is possible pre-coat the dish with poly-L-lysine before cell seeding.
Key resources table
| REAGENT or RESOURCE | SOURCE | IDENTIFIER |
|---|---|---|
| Chemicals, peptides, and recombinant proteins | ||
| CellLight™ Mitochondria-RFP, BacMam 2.0 | Thermo Fisher | Cat # C10601 |
| CellLight™ Mitochondria-GFP, BacMam 2.0 | Thermo Fisher | Cat # C10600 |
| MitoTracker™ Deep Red FM | Thermo Fisher | Cat # M22426 |
| DPBS, pH 7.4 | Thermo Fisher | Cat # 10010023 |
| RPMI 1640 Medium | Thermo Fisher | Cat # 21875034 |
| Trypsin-EDTA (0.25%), phenol red | Thermo Fisher | Cat # 25200056 |
| Fetal Bovine Serum, certified, United States | Thermo Fisher | Cat # 16000044 |
| Penicillin-Streptomycin (10,000 U/mL) | Thermo Fisher | Cat # 15140122 |
| Poly-L-lysine solution | Millipore Sigma | Cat # P4707-50ML |
| Experimental models: cell lines | ||
| LN229 | ATCC | ATCC® CRL-2611™ |
| Software and algorithms | ||
| Leica LasX LS software | Leica Microsystems | https://www.leica-microsystems.com/products/microscope-software/p/leica-las-x-ls/ |
| Hyugens Professional software | Scientific Volume Imaging | https://svi.nl/Huygens-Software |
| Other | ||
| 35 mm Dish, No. 1.5 Coverslip, 14 mm Glass Diameter, Uncoated | MatTek Life Sciences | Cat # P35G-1.5-14-C |
| Corning® tissue-culture treated culture dishes | Millipore Sigma | Cat #CLS430167 |
| Corning® 15 mL centrifuge tubes | Millipore Sigma | Cat # CLS430766 |
| 5 mL Nunc™ Serological Pipettes | Thermo Fisher | Cat # 170355N |
| 10 mL Nunc™ Serological Pipettes | Thermo Fisher | Cat # 170356N |
| Leica TCS SP8 X WLL Scanning Confocal Microscope | Leica Microsystems | Leica DMi8 CS Inverted system with AFC to maintain Z position |
| Objective HC PL APO 40×/1,30 OIL CS2 | Leica Microsystems | #506358 |
| Objective HC PL APO 63×/1,40 OIL CS2 | Leica Microsystems | #506350 |
| Fluorescence Filter Cubes: DAPI, CFP, FITC, Rhod long pass | Leica Microsystems | #91007 |
| Environmental Chamber: Tokai-Hit Stage Top Incubation System with GM-8000 Hypoxia Gas Mixer | Spectra Services | #GM-8000 |
Step-by-step method details
Mitochondrial labeling
Timing: [O.N., 16 h]
Transfect the cells with CellLight™ Mitochondria-RFP, BacMan 2.0 (Thermo Fisher) following the manufacturer’s instructions.
CRITICAL: The transfection efficiency may vary from cell line to cell line. It is crucial to optimize transfection conditions. Imaging is not suggested if less than 60% of the cells are successfully transfected.
-
1.
Add 3 μL of BacMan 2.0 reagent per 104 cells directly in the complete medium and incubate O.N. at 37°C.
Note: Volume of BacMan 2.0 reagent = (number of cells desired x particle per cell (PPC)) / 108 particles / ml.
Note: BacMan 2.0 reagents works with most cell types between 10 and 50 particles per cell (PPC). In our setting we used a PPC of 30.
-
2.
Check the transfection efficiency using a confocal microscope. After incubation O.N. most of the cells (60–70%) should be red (Ex = 555, Em = 584 nm).
Note: To optimize the transfection efficiency you may need to variate the PPC, cell density, or incubation time.
-
3.
At the confocal microscope, the transfected cells should show well defined and bright mitochondria (Figure 2B).
Note: This transient transfection can be detected starting after overnight incubation up to five days.
Note: Due to the duration of transgene expression (up to 5 days) it is possible, after CellLight™ Mitochondria-RFP transfection, treating cells with experimental drugs, if desired.
CRITICAL: Frequently the transfection is not equally efficient in all the cells, resulting in some cells being brighter than others (Figure 2). It is possible to reduce this variability changing the transfection conditions, increase the PPC and/or increasing the incubation time.
Figure 2.
Fluorescence images (40×) of cells transfected with BacMan 2.0 overnight
(A) Representative image of non-uniform transfection between different cells. Scale bar = 50 μm.
(B) Zoom of well labeled cells that can be used for subsequent study.
(C) Zoom of cells with weak mitochondria labeling, not appropriate for subsequent study. Left: B/W image of BacMan 2.0 transfection, right: overlap between BF image and fluorescence image. Scale bar = 25 μm.
Live confocal acquisition
Timing: [2 min/image—multiple acquisitions are performed for each condition]
To track each single mitochondrion and quantify its volume over time, the images need to be acquired at high resolution and deconvolved. To acquire the images in live cells with a short interval (3 s) we used the Leica TCS SP8 X W.L.L. Scanning Confocal Microscope with a 40× or 63× objective (see key resource table for details). Being able to acquire the images every 3 s will increase the ability of the software to keep track of each individual mitochondrion over-time.
-
4.
Images should be acquired (12-bit) using a white-light supercontinuum laser set at 0.2% intensity, excitation wavelength 555 nm, and the emission wavelength 584 nm collected using a Hyd detector. Set scanning format: 512 x 512 and set Pinhole Unit: AU, Airy 1. Pixel size 72.22 nm x 72.22 nm and optical section thickness automatically calculated by the software (Figure 3 point 1). For each XYZT, a z-stack of 30-40 slices, with a step size of 0.12 μm, was required to image the whole cell (Figure 3 point 2).
-
5.
Set the scanning speed to 8000 Hz and to further increase speed, turn on Bidirectional X. If there is any image distortion, adjust Phase X.
-
6.
Perform time-lapse imaging for 2 min with a 3 s interval (Figure 3 point 3).
-
7.
Adjust the zoom → 4× to sample the image at the optimum density/ Nyquist Rate. A Nyquist calculator is available online at https://svi.nl/NyquistCalculator
CRITICAL: The acquisition time can vary based on the cell line as well as the interval between each acquisition. For cancer cell lines that move, it is essential to use a short acquisition (2 min), however the time can be adjusted based on the cell line used. When a new cell line is used, it is better to perform some test to optimize the condition: acquire movies with different lengths (i.e. 2, 3 and 4 min) and check the stability of the cell in the selected time frame (the cell should not move in the selected interval). Once the total acquisition time is determined, the interval between each acquisition can be adjusted based on the cell line used. Usually, dynamic cell lines also have active and dynamic mitochondria, and we suggest acquiring every 3 seconds. If the analysis shows no changes in mitochondrial volume over time, the interval can be extended. Based on our experience for a panel of prostate, breast, glioblastoma, and lung cancer cell lines and normal breast epithelial cells, we acquired with a 3 second-intervals for 2 min.
Figure 3.
Microscope setting
Limitation: The interval time between each acquisition cannot be reduced under 3 s (using the Leica TCS SP8 X W.L.L. Scanning Confocal Microscope) due to the speed limitation of the machine. Acquisition of the whole volume of the cell in z, requires around 3 s (the time can vary based on cell volume/dimension). The interval time increases with the size of the cell. It is important to acquire the whole cell in the z dimension to have an excellent 3D reconstruction analysis.
CRITICAL: Due to the use of a zoom, one single cell (or only part of it in the case of giant cells) can be imaged in each video clip.
Note: Acquire at least 10 cells for each condition to have a full representation of your sample.
Note: Select cells with similar fluorescence intensity (Figure 2B) and with well-defined mitochondria (example in Figure 4).
Figure 4.
Representative image (acquire with a confocal microscope, 63×) of well-defined mitochondria
Scale bar = 100 μm.
Note: If possible, select a cell small enough to fit in the field of view. If working with large cells, select half or a part of it. It is always better to choose the peripheral area of the cell where the mitochondria are spread out.
Troubleshooting: It is crucial to avoid fluorescence bleaching over time; the high speed of the acquisition combined with a low intensity of the laser helps to prevent photobleaching. Maintain the white laser setting between 0.2 and 0.5% to avoid cell damage. Do not increase the line and frame accumulation (set both values to 1); line and frame accumulation can be used to increase the acquired signal without increasing the laser intensity, but this would cause a significant increase in the acquisition time.
Troubleshooting 2: The acquired cells must not move during acquisition. Using a short acquisition time (2 min) helps to reduce the risk of cell movement, but it is possible to pretreat the plate with poly-L-lysine to stabilize the cell if the cell moves.
Image deconvolution
Timing: [15 min/image]
To increase the resolution and the quality of the images, it is necessary to deconvolve them. We use the Huygens professional software, but it is possible to use alternative software (e.g., NIS elements Deconvolution and ImageJ). Deconvolution is a computational technique to improve the contrast and resolution of digital images captured with the microscope, removing out of focus light or assigning the out of focus light to the original light source. The deconvolution process reverses the effects of blur in the recorded images and decreases the noise (Figure 5A). After the deconvolution process, the image presents a black background, and the mitochondria are well defined and separated (Figure 5B).
-
8.
Transfer file to a computer workstation.
Note: The size of the data files can be significant—transfer files to the computer data drive. Do not try and process files over a server or from an external drive. Original files need to be protected and can get corrupted if the data stream gets disconnected during processing.
-
9.
Open Huygens professional software: Huygens Professional (HuPro-20.10), SVI-HuPro, (modules: Full File reader and LASAF and exchange bundle).
Note: The two modules are not included in the basic SVI-Pro license. The full file reader opens Leica .LIF files and the LASAF exchange bundle exports images to and from LASAF to SVI-HuPro.
-
10.Open Leica Software: Leica Microsystems Leica Application Suite X (3.5.6.21594); modules: LAS-AF WPF 3D advanced Basic (10269) + LAS-AF WPF 3D Advanced Full (10290) + LAS-AF WPF 3D Advanced Analysis (10400).
-
11.Open a Project: the L.A.S. X software will open with the Acquire tab selected.
-
a.Select the Open projects tab (Figure 6B, pink label).
-
b.Click on the Open button (Figure 6B, yellow label), navigate to your folder on the computer data drive, and select the Leica image file .LIF.
-
c.Print Image Properties (Figure 6C):
-
i.Select one image from the project list. The active image is highlighted in red.
-
ii.Right-click on the active file, select Properties from the drop-down list.
-
iii.Print image properties.
-
i.
-
a.
-
12.Export to Huygens Professional (Figure 7).
-
a.Right click on the selected image (it is also possible to transfer multiple images at the same time).
-
b.Select export → to Huygens Professional.
-
a.
Note: The transferring can take some time (1–5 min) according to the file size and computer capabilities.
-
13.Edit and Verify Microscope Parameters.
-
a.Open the Edit Microscope Parameters window, click on the button located in the main toolbar or thumbnail toolbar (Figure 8A).
-
b.Use the Leica image properties report from step 11c (Figure 6C) to check the metadata imported with the image file.
-
c.Update the Embedding med. refractive index: 1.38 (Figure 8B, red box).
-
d.Update the Excitation (555 nm) and Emission (584 nm) wavelength.
-
e.Click on the Set all verified button.
-
f.Save the Image Properties.
-
g.Click the Accept button.
-
a.
Note: Embedding Medium, Enter 1.38. The refractive index for the cell cytoplasm is 1.38, 1.39 for the nucleus, and 1.42 for the mitochondria. The surrounding medium has a refractive index of 1.334.
-
14.Start the deconvolution process
-
a.Open the Deconvolution Wizard: click on the button located in the main toolbar (Figure 9A).
-
b.Enter Deconvolution Wizard (Figure 9B).
-
c.Point Spread Function (P.S.F.) selection: the software allows to upload a measured P.S.F., otherwise, the software will automatically generate a theoretical P.S.F. (Figure 10).Note: The measured P.S.F. acts as a calibration of the microscope, relating a known physical object (bead) with what the microscope actually measures (bead image).
-
d.Crop stage: if necessary, it is possible to crop the image to reduce the area that needs to be deconvolved as much as possible (Figure 11).Note: cropping the image removing unnecessary areas will significantly decrease the deconvolution time.
-
e.Inspecting the image histogram: the histogram allows you to visually inspect the intensity distribution of the image. First, it allows you to check for saturation (clipping) of the measured values. If clipping is present the histogram will show sharp peaks at the left or rightmost sides. Second, if present, it will spot a significant amount of black level. This shows up as a gap on the left (Figure 12). The distribution as seen in Figure 12 is of acceptable quality.Note: clipping occurs when input signals are too high. Clipping at the right-hand side of the histogram indicates saturation. Saturation is caused by overexposure, for example by raising the laser intensity above the maximum pixel value image file can be accepted.
-
f.Estimate parameters: in this stage the background value of the image can be automatically estimated or manually entered (Figure 13).Note: In this protocol the background is automatically estimated.
-
i.Select in/near object to estimate background (Figure 13A, yellow box).
-
ii.Click the Auto button (Figure 13A).
-
iii.Click the Accept button (Figure 13B, red box).Note: In the automatic estimation, the background is determined as an average of a circular search area. By default, this area has a radius of 0.7 microns.
-
i.
-
g.Deconvolution setup: In this step, deconvolution occurs based on results from the previous stage (Figure 14). The software will generate the default parameters for deconvolving images.Maximum iterations: the default setting is 40.Note: This value can be adjusted depending on the desired final quality of the image. The higher this value, the higher the quality of the image. However, if the setting of maximum iteration is too high, it may distort the image.Signal to Noise ratio: this parameter controls the sharpness of the image.Note: A noisy confocal image usually has an SNR (Signal to Noise Ratio) value lower than 20. The optimal SNR is calculated as: √(Max intensity / Detector gain).Quality threshold (Q.T.): beyond a certain number of iterations (usually 100) the difference between different iterations becomes not significant. The Q.T. establishes the threshold below which the iterations are stopped.Note: The smaller the threshold, the higher is the quality of the image.Iteration mode: The ‘optimized’ mode is highly recommended, because the iteration steps are more extensive than in classic mode.Bleaching correction: set to ‘if possible’, so the bleaching correction is always performed in the case of confocal images with time series.Brick layout: set to ‘auto’, the software will split images in these situations (i) the system’s memory is insufficient, or (ii) spherical aberration is present.Press ‘deconvolution preview’ to quickly test a defined test of deconvolution parameters.
-
i.Press ‘deconvolve’ to activate the process.
-
i.
-
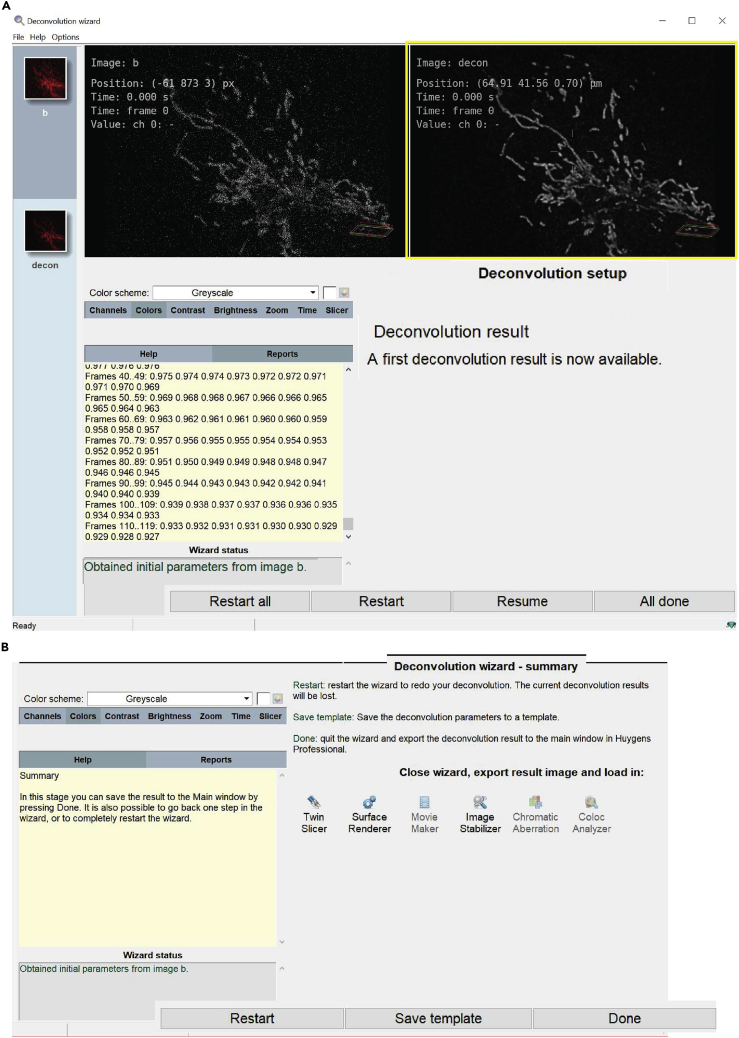
h.The deconvolution result is displayed in the right-hand box of the software (Figure 15A, yellow box). At this stage, it is possible to:
-
i.Select restart to return to the deconvolution setup to change the background setting;
-
ii.Select resume to return to the stage where the deconvolution parameters can be entered;
-
iii.Accept the result pressing ‘All done’.Note: After pressing ‘all done’, the software can ‘save the template’ (Figure 15B) to save the used setting and reapply it to the other images.
-
iv.Close the deconvolution process by pressing ‘Done’, the button will quit the wizard and export the deconvolved image(s) to the main window in Hyugens professional (image pre -left- and post -right- deconvolution shown in Figure 5).
-
i.
-
a.
-
15.
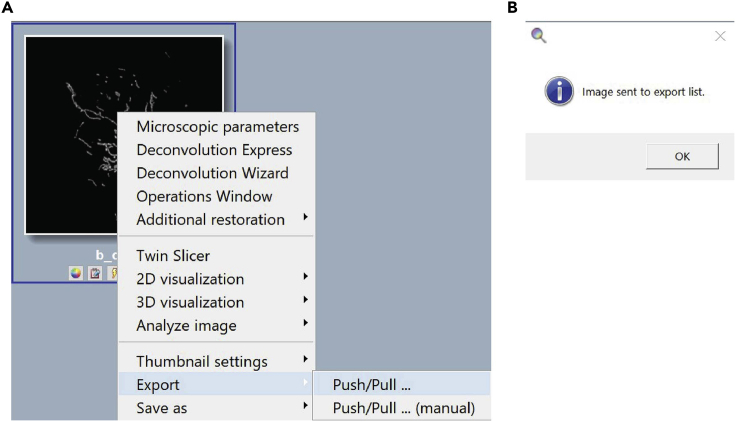
Export images to the Leica Software (Figure16A): right click on the image, select ‘Export’ and then ‘push/pull’. When the image is sent to the export list, a message in Figure 16B will appear. It is possible to export multiple images at the same time.
Figure 5.
Example of a 3D deconvolved image
Representative 3D image before (A) and after (B) the deconvolution process. Scale bar = 10 μm.
Figure 6.
Leica Las X software setting
Leica Las X software (A) File opening settings, (B) how to open a project, and (C) how to obtain image properties detail.
Figure 7.
Export image from Leica Las X to Huygens professional software
Figure 8.
Step 13 of the deconvolution process, edit image parameters
(A) Open the Edit Microscope Parameters window.
(B) Edit Microscope Parameters window.
Figure 9.
Steps 14a and 14b of the deconvolution process, starts the deconvolution wizard
(A) Open Deconvolution Wizard.
(B) Enter Deconvolution Wizard.
Figure 10.
Step 14c of the deconvolution process, select the P.S.F. setting
Figure 11.
Step 14d of the deconvolution process, cropping tool
Figure 12.
Step 14e of the deconvolution process, inspecting the image histogram
Figure 13.
Step 14f of the deconvolution process, measurement of the background
(A) Automatic estimation of the background.
(B) Background estimation.
Figure 14.
Step 14g of the deconvolution process, sets up the deconvolution parameters
Figure 15.
Step 14h of the deconvolution process, starts the deconvolution
(A) Deconvolution results.
(B) Save deconvolution template.
Figure 16.
Export the deconvolved image from Huygens professional to Leica Las X software
(A) Export image to Leica Las X software.
(B) Message that confirm the image export.
Mitochondrial volume quantification
Timing: [5 min/image]
The Leica LAS X software allows the researcher to quantify the volume of each mitochondrion in the cell. Thus, it is possible to investigate the variation of mitochondrial volume (increase in volume due to fusion event, decrease in volume to fission event) over time. The quantification is done with 3D images over time. It is critical to work with well-defined images in which it is possible to discriminate every single mitochondrion as a single object (e.g., image shown in Figure 5B). High resolution and clarity of the image allow the software to discriminate the mitochondria as individual objects and to follow them over time.
The exported image(s) will appear now in the L.A.S. X software. The analysis will be performed on 3D reconstructed images to follow the variation of mitochondrial volume.
-
16.Open the image of interest using The Leica L.A.S. X software:
-
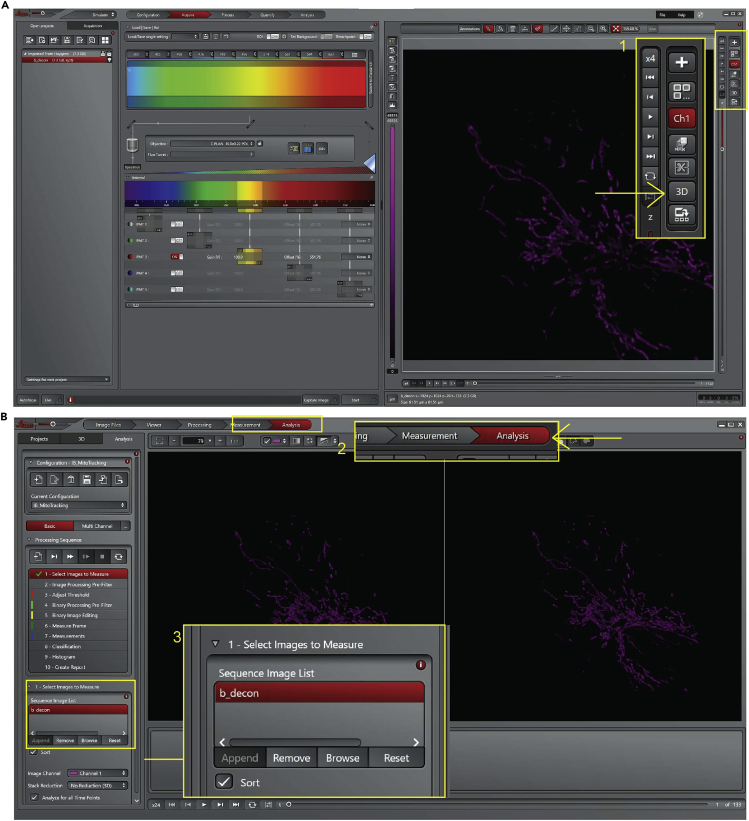
a.click on the 3D button (up right-hand, Figure 17A, yellow arrow);
-
b.click on analysis (top panel, Figure 17B, point 2, yellow arrow);
-
c.to analyze the image of interest, select the image and then click on the ‘append’ button; if you do not append the image the software will work on the first image in your list (left panel, Figure 17B, point 3, yellow arrow).
-
a.
Figure 17.
Leica Las X software, step 16 of the analysis process, selects of the image to measure
(A) Click on the 3D button.
(B) Start the analysis.
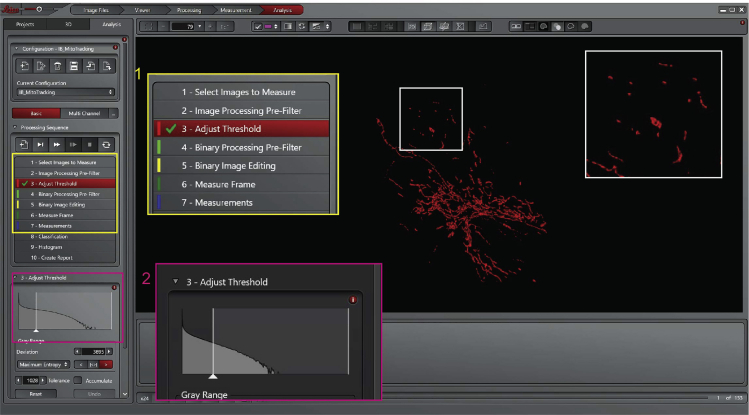
Once the image has been selected and appended to the software, it is possible to start with the analysis. First, set the threshold by hand (use the same threshold for all the images in one experiment). Then, separate objects and finally, select the region of interest to analyze the mitochondrial volume (the region of interest is drawn by hand and must inlcude around 10–20 mitochondria).
-
17.Adjust threshold:
-
a.Adjust the threshold (Figure 18, Processing Sequence panel, point 3). Adjust the threshold using the same parameters for all the images of a single experiment. The red mask shows what is considered an object after adjusting the threshold. The single mitochondrion must be visualized as individual object (white box, Figure 18).
-
a.
- 18.
Note: mitochondria size is around 0.5–1 micrometer.
-
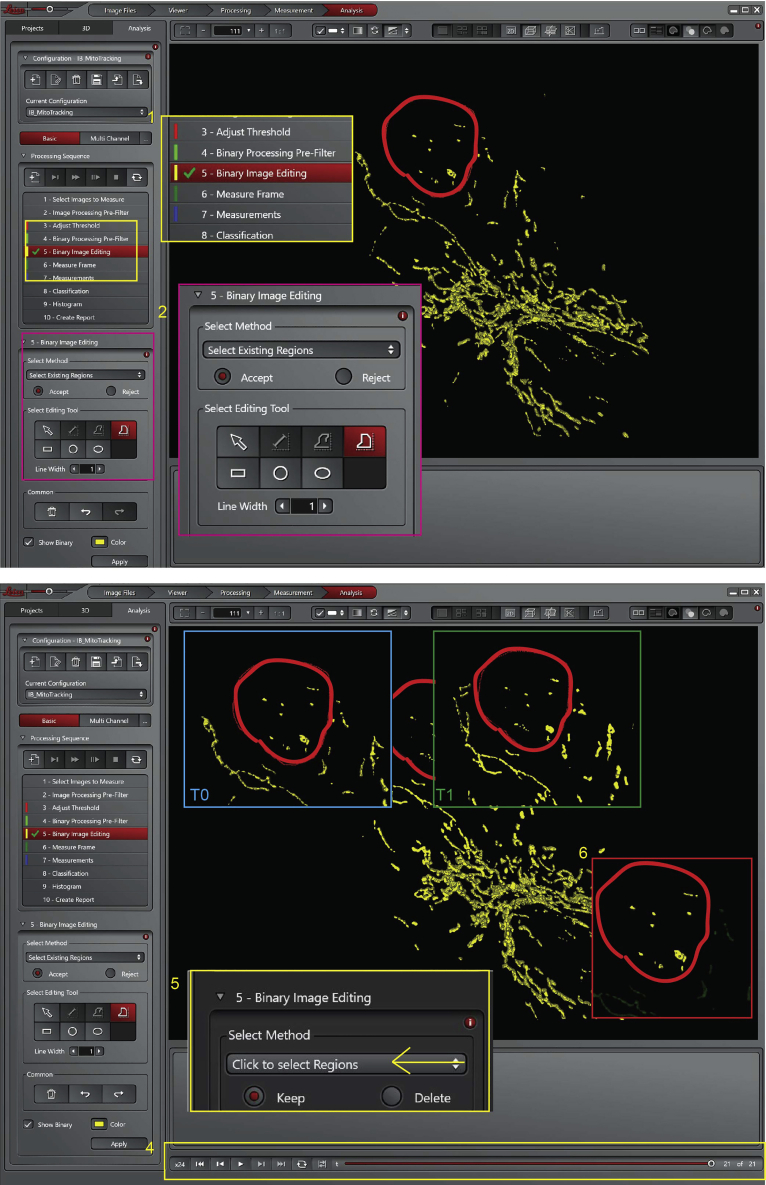
19.Select the region of interest (R.O.I.):
-
a.It is important to select a region containing a limited number (10–20) of well resolved mitochondria.Note: at least 3 R.O.I. for each cell are analyzed.
 CRITICAL: If the number of mitochondria is too high, it would not be easy to see differences in mitochondrial volume over time. The designed method evaluates the variation of the mean volume of the mitochondria contained in the R.O.I. over time.
 - b.
-
c.Check that the mitochondria within the region of interest do not go out of it or that mitochondria initially excluded from that region do not become included over time. This would bias the results. Moving the time bar (Figure 20, point 4) you will see the movement of the mitochondria in the selected area.
-
d.Select ‘Click on select Regions’ (Figure 20, point 5), which will exclude from the analysis every object out of the region of interest. The objects considered for the analysis are yellow, the ones excluded in light green (Figure 20, point 6).
 CRITICAL: It is always better to choose a region where the mitochondria are not too dense; thus, the software can easily recognize them as separate objects. Figure 20 point 3.
-
a.
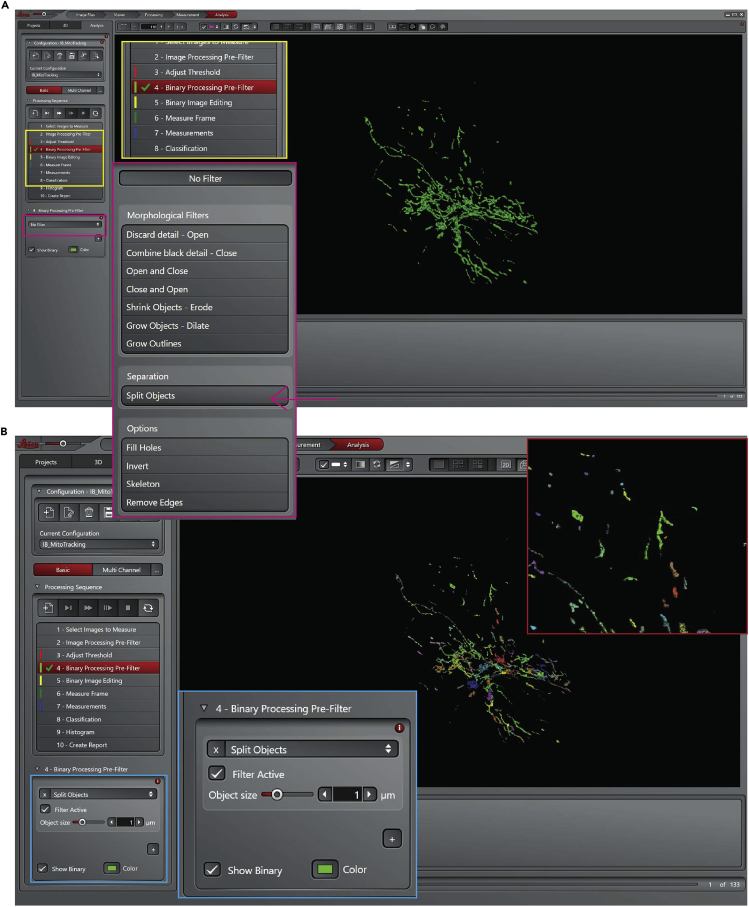
Figure 18.
Leica Las X software, step 17 of the analysis process, adjust the threshold
Figure 19.
Leica Las X software, step 18 of the analysis process, split objects
(A) Select objects tool.
(B) Setting to split objects.
Figure 20.
Leica Las X software, step 19 of the analysis process, selects of the R.O.I
Once the mitochondria that need to be analyzed are selected, proceed with the measurement of the volume. The software can measure the volume of every single object (mitochondrion) for each time frame, providing an evaluation of the variation over time. The software produces an excel file in which the volume of all the objects presents in the R.O.I. in each time frame is displayed.
-
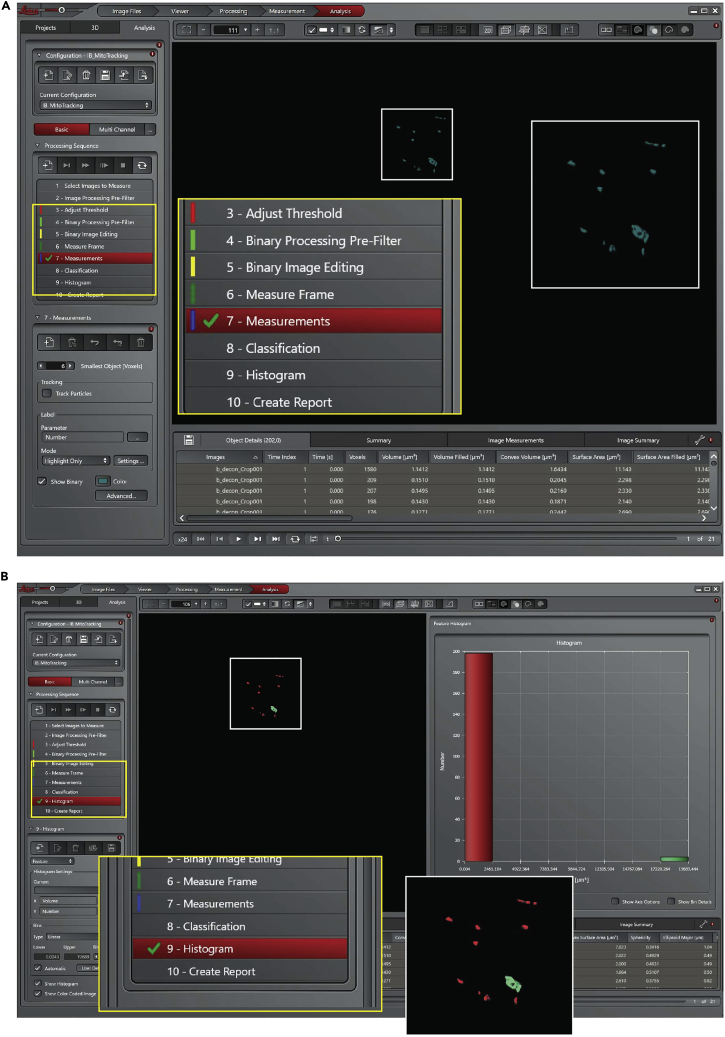
20.Measurement of mitochondrial volume:
-
a.Click on ‘Measure frame’ point 6 of Processing Sequence panel, Figure 21A.
-
b.Click on ‘Measurements’ point 7 of Processing Sequence panel, Figure 21A. In the bottom panel (7. Measurements) select 6 as smallest object [voxel] and unflag ‘track particle’. At this point the software analyzes the volume of each single object (mitochondrion) overtime.
-
c.Click on ‘Histogram’ point 9 of Processing Sequence panel, Figure 21B. The software creates a schematic Histogram of the analyzed objects, and different colors are associated to different volumes.
-
a.
-
21.Create Report:
-
a.To export the data, click on ‘Create Report’, point 10 of the Processing Sequence panel.
-
b.An excel file will be generated that contains different tabs/sheets. Select the ‘Feature Details’ sheet (Table 1).
-
c.In this sheet, all the information for every single object over time is listed. Copy the ‘Time Index’ and the ‘Volume’ columns and paste them into a new excel file.
-
a.
Note: Repeat the process for at least 3 different R.O.I. for each cell. Thus, you will have a value representative of the whole cell and not only for one selected point.
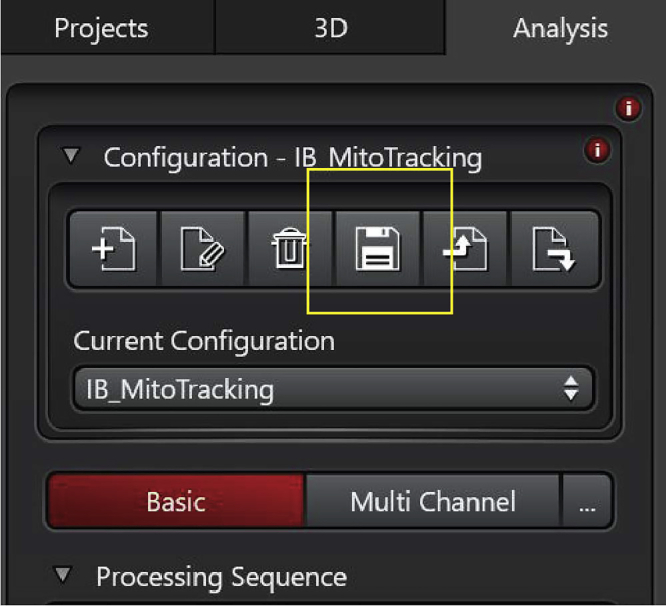
Note: The protocol can be saved and reused for all the subsequent analyses. To save it, click on the ‘save’ icon on the top left of the page (Figure 22).
Figure 21.
Leica Las X software, steps 20 of the analysis process, measurements and create the histogram
(A) Start the measurment of the objects over time.
(B) Histogram of the size distribution of the analyzed objects.
Table 1.
Report created from the Leica Las X software with information about mitochondrial volume overtime
| Number | Image index | Time index | Time [s] | Trajectory | Voxels | Volume [μm³] |
|---|---|---|---|---|---|---|
| 1.0 | 1.0 | 1.0 | 0.000 | 2 | 125.000 | 0.153 |
| 2.0 | 1.0 | 1.0 | 0.000 | 100.000 | 0.122 | |
| 3.0 | 1.0 | 1.0 | 0.000 | 5 | 84.000 | 0.103 |
| 4.0 | 1.0 | 1.0 | 0.000 | 1 | 84.000 | 0.103 |
| 5.0 | 1.0 | 1.0 | 0.000 | 3 | 64.000 | 0.078 |
| 6.0 | 1.0 | 1.0 | 0.000 | 51.000 | 0.062 | |
| 7.0 | 1.0 | 1.0 | 0.000 | 6 | 22.000 | 0.027 |
| 8.0 | 1.0 | 1.0 | 0.000 | 7 | 20.000 | 0.024 |
| 9.0 | 1.0 | 1.0 | 0.000 | 15.000 | 0.018 | |
| 10.0 | 1.0 | 1.0 | 0.000 | 4 | 14.000 | 0.017 |
| 11.0 | 1.0 | 1.0 | 0.000 | 12.000 | 0.015 | |
| 12.0 | 1.0 | 1.0 | 0.000 | 8.000 | 0.010 | |
| 13.0 | 1.0 | 2.0 | 3.000 | 1 | 349.000 | 0.427 |
| 14.0 | 1.0 | 2.0 | 3.000 | 2 | 159.000 | 0.195 |
| 15.0 | 1.0 | 2.0 | 3.000 | 3 | 113.000 | 0.138 |
| 16.0 | 1.0 | 2.0 | 3.000 | 4 | 84.000 | 0.103 |
| 17.0 | 1.0 | 2.0 | 3.000 | 5 | 40.000 | 0.049 |
| 18.0 | 1.0 | 2.0 | 3.000 | 6 | 27.000 | 0.033 |
| 19.0 | 1.0 | 2.0 | 3.000 | 18.000 | 0.022 | |
| 20.0 | 1.0 | 2.0 | 3.000 | 7 | 13.000 | 0.016 |
| 21.0 | 1.0 | 2.0 | 3.000 | 8 | 11.000 | 0.013 |
| 22.0 | 1.0 | 2.0 | 3.000 | 9 | 10.000 | 0.012 |
| 23.0 | 1.0 | 2.0 | 3.000 | 6.000 | 0.007 | |
| 24.0 | 1.0 | 3.0 | 6.000 | 1 | 162.000 | 0.198 |
| 25.0 | 1.0 | 3.0 | 6.000 | 2 | 113.000 | 0.138 |
| 26.0 | 1.0 | 3.0 | 6.000 | 1 | 108.000 | 0.132 |
| 27.0 | 1.0 | 3.0 | 6.000 | 5 | 26.000 | 0.032 |
| 28.0 | 1.0 | 3.0 | 6.000 | 3 | 24.000 | 0.029 |
| 29.0 | 1.0 | 3.0 | 6.000 | 7 | 14.000 | 0.017 |
Figure 22.
Save button
Analysis of variation of mitochondrial volume over time
Timing: [less than 5 min/region of interest]
The next step consists of the measurement of the mitochondrial volume over time. The average volume of the mitochondria at each time point is measured. The variation during the time course is measured as fold increase or decrease from the initial volume. Therefore, it is possible to discriminate between fusion and fission events. If a fusion event occurs (two mitochondria merged to became one), the volume of the mitochondrion will increase, giving a fold increase higher than 1. On the other hand, if a fission event occurs (one mitochondrion divides to became two), the volume will decrease, giving a fold increase lower than 1.
-
22.
To analyze the variations of mitochondrial volume overtime, first, prepare an excel file reporting in each column the volume of the mitochondria for each time point (Table 2); then calculate the average of mitochondrial volume (Table 2).
-
23.
To calculate the variation over time, divide the average volume of the mitochondria at T1 (3 s) over the volume at T0 (0 s), T2 (6 s) over T1 (3 s), and so on …
-
24.
Repeat the procedure for each area analyzed. Prepare a new excel table with the volume variation over time for each R.O.I. (Table 3).
-
25.
After optimizing, set up a threshold to calculate the frequency of fission and fusion events. For our purposes, a fold increase higher than 1.3 represents a fusion event, and a fold decrease lower than 0.7 represents a fission event. (Table 3).
Note: The fold increase or decrease magnitude can vary based on the volume of the mitochondria before the fusion and fission event and the number of events in the 3 seconds interval.
Note: The threshold to calculate fission and fusion events has been optimized, matching the analyzed movies with the fold increase generated by the analysis. Variation smaller than 1.3 or higher of 0.7 (in the analyzed cell lines, n = 5) cannot be considered a biological event, but only an endogenous mitochondrial shape variation. It is possible that using this threshold few fission/fusion events are lost but maintaining the same threshold through the whole analysis makes it consistent across the different conditions.
Table 2.
Example of analysis, measure of the average volume of the mitochondria overtime
| Time | Volume | Time | Volume | Time | Volume | Time | Volume | Time | Volume | Time | Volume | Time | |
|---|---|---|---|---|---|---|---|---|---|---|---|---|---|
| 1.0 | 0.153 | 2.0 | 0.427 | 3.0 | 0.198 | 4.0 | 0.354 | 5.0 | 0.080 | 6.0 | 0.126 | 7.0 | |
| 1.0 | 0.122 | 2.0 | 0.195 | 3.0 | 0.138 | 4.0 | 0.321 | 5.0 | 0.062 | 6.0 | 0.113 | 7.0 | |
| 1.0 | 0.103 | 2.0 | 0.138 | 3.0 | 0.132 | 4.0 | 0.176 | 5.0 | 0.033 | 6.0 | 0.081 | 7.0 | |
| 1.0 | 0.103 | 2.0 | 0.103 | 3.0 | 0.032 | 4.0 | 0.091 | 5.0 | 0.024 | 6.0 | 0.072 | 7.0 | |
| 1.0 | 0.078 | 2.0 | 0.049 | 3.0 | 0.029 | 4.0 | 0.066 | 5.0 | 0.020 | 6.0 | 0.065 | 7.0 | |
| 1.0 | 0.062 | 2.0 | 0.033 | 3.0 | 0.017 | 4.0 | 0.051 | 5.0 | 0.015 | 6.0 | 0.026 | 7.0 | |
| 1.0 | 0.027 | 2.0 | 0.022 | 3.0 | 0.017 | 4.0 | 0.045 | 5.0 | 0.009 | 6.0 | 0.023 | 7.0 | |
| 1.0 | 0.024 | 2.0 | 0.016 | 3.0 | 0.015 | 4.0 | 0.018 | 6.0 | 0.018 | 7.0 | |||
| 1.0 | 0.018 | 2.0 | 0.013 | 3.0 | 0.009 | 4.0 | 0.016 | 6.0 | 0.010 | 7.0 | |||
| 1.0 | 0.017 | 2.0 | 0.012 | 4.0 | 0.016 | 6.0 | 0.007 | 7.0 | |||||
| 1.0 | 0.015 | 2.0 | 0.007 | 4.0 | 0.015 | 6.0 | 0.007 | 7.0 | |||||
| 1.0 | 0.010 | 4.0 | 0.012 | 7.0 | |||||||||
| 7.0 | |||||||||||||
| 7.0 | |||||||||||||
| Average | 0.061 | 0.092 | 0.065 | 0.098 | 0.035 | 0.050 | |||||||
| Fold increase | 1 | 1.51161 | 0.706827 | 1.507813 | 0.351739 | 1.439853 |
Table 3.
Example of analysis, measurement of the variation of the volume overtime
| Time (sec) | #1 | #2 |
|---|---|---|
| 0 | 1 | 1 |
| 3 | 1.51161 | 0.658055 |
| 6 | 0.706827 | 1.552345 |
| 9 | 1.507813 | 1.555146 |
| 12 | 0.351739 | 0.774704 |
| 15 | 1.439853 | 0.915306 |
| 18 | 0.978635 | 1.201784 |
| 21 | 2.285942 | 0.619202 |
| 24 | 1.270732 | 0.637385 |
| 27 | 0.817838 | 1.900321 |
| 30 | 0.661239 | 1.285096 |
| 33 | 0.723159 | 0.92314 |
| 36 | 1.68589 | 1.482574 |
| 39 | 0.839052 | 0.966948 |
| 42 | 0.998606 | 1.530545 |
| 45 | 0.932899 | 0.448427 |
| Fusion event | 5 | 5 |
| Fission event | 2 | 4 |
Expected outcomes
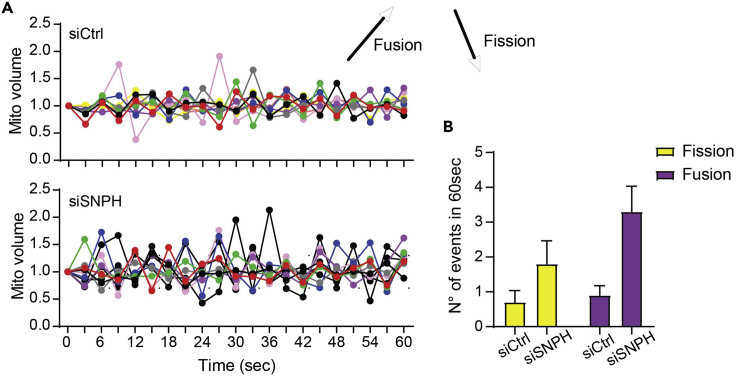
The number of fission and fusion events can vary based on the cell line used. Usually, mitochondrial dynamics are low at steady state, with an average of 1–2 fission and fusion events per minute per cell. Mitochondrial dynamics can be illustrated as variation overtime (Figure 23A). Each line will represent the variation of mitochondrial volume over-time. Otherwise, it can be presented as a total number of fission and fusion events in one minute (Figure 23B).
Figure 23.
Example of mitochondrial dynamics results
(A) Variation of mitochondrial volume overtime, upper graph condition siCtrl and bottom graph condition siSNPH in LN229 cell line.
(B) The total number of fission and fusion events in the two different conditions analyzed.
For example, we used the LN229 cell line after silencing of syntaphilin (SNPH) to modulate mitochondrial dynamics. Our laboratory has already demonstrated that SNPH inhibits the speed and distance traveled by individual mitochondria and suppresses organelle dynamics when expressed in tumors. SNPH silencing increases fission and fusion events in cancer cell line (including LN229) (Caino et al., 2016, Caino et al., 2017).
Figure 23 shows the increase in mitochondrial dynamics (both fission and fusion) in the LN229 cell line after silencing for SNPH (siSNPH) compared to control cells (siCtrl).
Limitations
Mitophagy events
Mitophagy can selectively remove damaged or redundant mitochondria. Mitophagy is an essential part of mitochondrial stress response and homeostasis regulation, also playing a regulatory role in mitochondrial quality control.
Mitochondrial volume can also be affected if mitochondria undergo mitophagy; this method does not discriminate between fission events due to mitochondrial dynamics or events due to mitophagy. It is possible to use parallel approaches to investigate if mitophagy is activated in the analyzed cells. One possible approach could be a western blot evaluation of mitophagy-related proteins: Fundc1, Nix, Pink1-Parkin, SMURF1, HMGB1. It is also possible to evaluate mitochondrial depolarization since mitophagy is also induced by sustained mitochondrial depolarization.
Cell movements
To track changes in mitochondria dynamics the cells must not move during the image acquisition. The acquisition interval is usually short enough that most of the cells do not significantly move. Suppose the experiment needs to be performed with cells that move in this interval. In that case, it may be possible to reduce the acquisition time (acquire images every 2 s for 80 s) or coat the plate with poly-L-lysine to reduce the cell movement.
Troubleshooting
Problem
If the cells are too confluent in the field of view, it is possible to have two cells in one field of view (Figure 24A). When this is the case, the mitochondria cannot be segmented appropriately between the two cells during the downstream analysis.
Figure 24.
Examples of possible problems during imaging
(A) Two cells in the same field of view.
(B) Rounded cells not properly attached to the glass.
(C) Cells growth with no problem, one cell for field of view and properly attached to the glass.
Scale bar = 10 μm.
Potential solution
Select a different field of view in this sample. If this is the case for all fields of view, decrease the number of cells seeded.
Problem
The cells are not adequately attached to the dish, they appear with a rounded shape, and the mitochondria are all concentrated in the same area (Figure 24B). It is impossible to analyze this image because the software cannot properly separate and discriminate the single object (mitochondrion). Cells should appear as in Figure 24C.
Potential solution
Select a different field of view in this sample. If all the cells look like Figure 24B, increase the time between seeding and acquisition.
Problem
The transfection efficiency can vary from cell to cell. It is always better before starting the experiment to set up the best transfection conditions.
Potential solution
The transfection efficiency can vary from cell to cell. For optimal results it could be necessary to alter the P.P.C. (particle per cell), volume, cell density, temperature, or incubation time When it is not feasible to obtain an efficient transfection efficiency, MitoTracker™ Deep Red FM (M22426, Thermo Fisher Scientific) can be used to stain the mitochondria.
Problem
Quenching of the signal overtime.
Potential solution
The high speed of the acquisition combined with a low intensity of the laser helps to prevent this. The speed can be increased by setting the scanning format at 512 x 512; setting the scanning speed at 8000 Hz and turning on the Bidirectional X. Maintain the white laser setting below 0.5% to avoid cell damage.
Problem
Phototoxicity during imaging.
Potential solution
To decrease the risk of phototoxicity, one possibility is to use a dye with an excitation wavelength as far as possible from U.V. Using the MitoTracker DeepRed with an excitation/emission of 644/665 can be a good option in case of cells sensible to phototoxicity. As specified above (quenching), decreasing the acquisition time for each time frame is another solution as well as decreasing the laser intensity.
Resource availability
Lead contact
Further information and request for resources and reagents should be directed to and will be fulfilled by the lead contact, Dr. Dario Altieri (daltieri@wistar.org).
Materials availability
This study did not generate new unique reagents.
Acknowledgments
We thank James Hayden for assistance with time-lapse video microscopy in the Imaging Core Facility. This work was supported by NIH grants P01 CA140043 and R35 CA220446.
Author contributions
I.B. conceived and designed the method; and I.B., F.K., and D.C.A. wrote the paper.
Declaration of interests
The authors declare no competing interests.
Data and code availability
This study did not generate new unique data and/or code.
References
- Bertolini I., Ghosh J.C., Kossenkov A.V., Mulugu S., Krishn S.R., Vaira V., Qin J., Plow E.F., Languino L.R., Altieri D.C. Small extracellular vesicle regulation of mitochondrial dynamics reprograms a hypoxic tumor microenvironment. Dev. Cell. 2020;55:163–177.e6. doi: 10.1016/j.devcel.2020.07.014. [DOI] [PMC free article] [PubMed] [Google Scholar]
- Caino M.C., Seo J.H., Aguinaldo A., Wait E., Bryant K.G., Kossenkov A.V., Hayden J.E., Vaira V., Morotti A., Ferrero S. A neuronal network of mitochondrial dynamics regulates metastasis. Nat. Commun. 2016;7:13730. doi: 10.1038/ncomms13730. [DOI] [PMC free article] [PubMed] [Google Scholar]
- Caino M.C., Seo J.H., Wang Y., Rivadeneira D.B., Gabrilovich D.I., Kim E.T., Weeraratna A.T., Languino L.R., Altieri D.C. Syntaphilin controls a mitochondrial rheostat for proliferation-motility decisions in cancer. J. Clin. Invest. 2017;127:3755–3769. doi: 10.1172/JCI93172. [DOI] [PMC free article] [PubMed] [Google Scholar]
- Li J., Agarwal E., Bertolini I., Seo J.H., Caino M.C., Ghosh J.C., Kossenkov A.V., Liu Q., Tang H.Y., Goldman A.R. The mitophagy effector FUNDC1 controls mitochondrial reprogramming and cellular plasticity in cancer cells. Sci. Signal. 2020;13:eaaz8240. doi: 10.1126/scisignal.aaz8240. [DOI] [PMC free article] [PubMed] [Google Scholar]
- Wang Y., Agarwal E., Bertolini I., Ghosh J.C., Seo J.H., Altieri D.C. IDH2 reprograms mitochondrial dynamics in cancer through a HIF-1alpha-regulated pseudohypoxic state. FASEB J. 2019;33:13398–13411. doi: 10.1096/fj.201901366R. [DOI] [PMC free article] [PubMed] [Google Scholar]
Associated Data
This section collects any data citations, data availability statements, or supplementary materials included in this article.
Data Availability Statement
This study did not generate new unique data and/or code.


