

Summary
Myocardial infarction (MI) is one of the most common causes of death worldwide. Animal models for MI are useful for studying the pathophysiology and developing therapies. Here, we describe a surgical protocol for permanent ligation of the left anterior descending coronary artery in mice, which mimics human acute coronary syndrome. This protocol includes descriptive step-by-step surgical procedures and high-quality surgical videos, which are useful for performing stable and highly reproducible operations.
For complete details on the use and execution of this protocol, please refer to Maruyama et al. (2021)
Subject areas: Cell Biology, Health Sciences, Model Organisms
Graphical abstract
Highlights
-
•
Permanent LAD ligation is an effective approach to generate a mice MI model
-
•
Mice MI models are useful for understanding the pathophysiology of human MI
-
•
This protocol includes high-quality surgical videos to understand the procedures
-
•
This protocol is useful for performing stable and reproducible MI models in mice
Myocardial infarction (MI) is one of the most common causes of death worldwide. Animal models for MI are useful for studying the pathophysiology and developing therapies. Here, we describe a surgical protocol for permanent ligation of the left anterior descending coronary artery in mice, which mimics human acute coronary syndrome. This protocol includes descriptive step-by-step surgical procedures and high-quality surgical videos, which are useful for performing stable and highly reproducible operations.
Before you begin
-
1.
Male C57BL/6N mice (8–12 weeks, 22–27 g) were used in this study. All animal experiments were approved by the University of Tokyo and Tokyo Women’s Medical University Animal Care and Use Committee and were performed in accordance with institutional guidelines. Mice were housed under a 12 h light/dark cycle and provided with food and water ad libitum.
-
2.
Sterilize the surgical instruments in 0.1% benzalkonium chloride for 10 min and dry the instruments with Kimwipes.
Note: Put on gloves, a mask, a surgical cap, and a lab coat before surgery.
Key resources table
| REAGENT or RESOURCE | SOURCE | IDENTIFIER |
|---|---|---|
| Pentobarbital | Kyoritsu Seiyaku | N/A |
| Isoflurane | AbbVie | N/A |
| Buprenorphine | Merck | Cat# B7536 |
| Ethanol (75%) | Yamazen | Cat# 3019 |
| Experimental models: Organisms/strains | ||
| 8–12-Week-old male C57BL/6N mice | Sankyo Lab Service | Cat# C57BL/6NCrSlc |
| Software and algorithms | ||
| LabChart Reader | ADInstruments | https://www.adinstruments.com/products/labchart-reader |
| ImageJ | NIH | https://imagej.nih.gov/ij/ |
| GraphPad Prism 9 | GraphPad Software Inc | https://www.graphpad.com/scientific-software/prism/ |
| Other | ||
| Benzalkonium chloride | Nihon Pharmaceutical | Cat# 123150255 |
| Nitrile examination glove | Ansell | N/A |
| Surgical mask | Unicharm | Cat# 103-4903111550685 |
| Surgical hair cap | Kawanishi Industry | Cat# 7045 |
| Lab coat | Nagaileben | N/A |
| Endotracheal intubation tube (See Figure 1) | Original | N/A |
| 18-Gauge intravenous cannula | Terumo | Cat# FF-1832 |
| 20-Gauge intravenous cannula | Terumo | Cat# FF-2032 |
| 22-Gauge intravenous cannula | Terumo | Cat# FF-2232 |
| 24-Gauge intravenous cannula | Terumo | Cat# FF-2419 |
| Magic Bond | Asahi Engineering | Cat#0865 |
| Hair removal cream | Veet | N/A |
| ECG plate | Original | N/A |
| ECG monitor | Nihon Kohden | Cat# AB-621G |
| Ventilator | Ugo Basile | Cat# 28025 |
| Anesthesia apparatus | Univentor | Cat# 400 |
| Anesthesia induction chamber | Original | N/A |
| 8-0 Polypropylene suture | Johnson & Johnson | Cat# 8740H |
| 6-0 Polyglactin suture | Johnson & Johnson | Cat# D5890 |
| 4-0 Silk surgical suture | Johnson & Johnson | Cat# K881H |
| Surgical microscope | Konan Medical | Cat# 300S |
| Heating lamp | Welch Allyn | Cat# LS-150 |
| Strait nipper | Fine Science Tools | Cat# 16140-11 |
| Rib retractor | Fine Science Tools | Cat# 17003ー03 |
| Tweezers | Dumont | Cat# AGT508 |
| Pean forceps | TAIYO COMPANY | Cat# AA 215/13 |
| Straight tweezers | Dumont | Cat# DU-4 INOX |
| Curved scissors | Fine Science Tools | Cat# 14029-10 |
| Adson forceps | BRC Co | Cat# 15-351 |
| Micro Needle Holder | Fine Science Tools | Cat# 12075-14 |
| Needle holder | Leibinger | Cat# 36-06641 |
| Hooked forceps | Igarashi | N/A |
| Toothless forceps | Fine Science Tools | Cat# 11002-13 |
| Micro scissors | Fine Science Tools | Cat# 15017-10 |
| Micro scissors | Napox | Cat# B-13H |
| Toothless forceps | Igarashi | N/A |
| Kimwipes | Nippon Paper Crecia | Cat# 62011 |
| Animal warmer | Softron | Cat# THC-31 |
| Mice diet | CLEA | Cat# CE-2 |
| Mice soft diet | Original | N/A |
| 4% Paraformaldehyde | Nacalai Tesque | Cat# 09154-85 |
| Paraffin | Kanto Chemical | Cat# 32026-02 |
| Hematoxylin solution | Merck | Cat# 109249 |
| Eosin | Kanto Chemical | Cat# 14002-30 |
| Anilin blue solution | Muto | Cat# 40201 |
| Masson staining solution | Muto | Cat# 40251 |
Alternatives: References for basic chemicals, laboratory materials, dissection tools, and the microscope in the key resources table can be replaced by similar products from various providers.
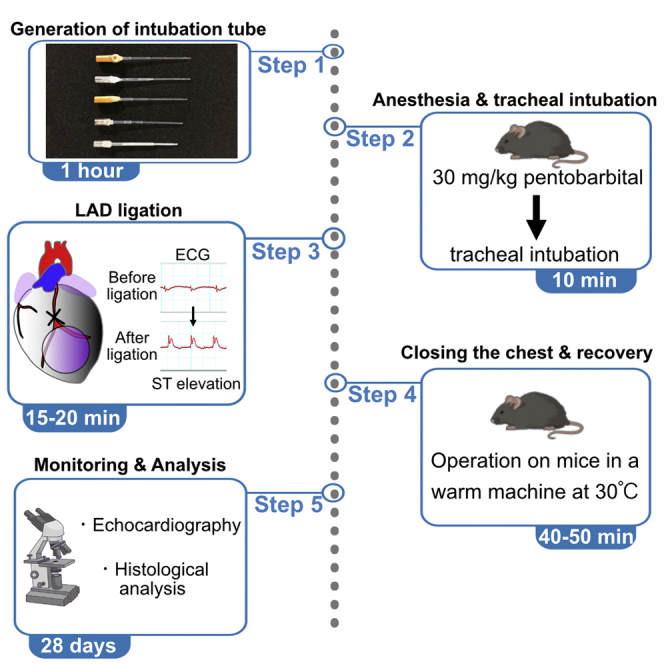
Step-by-step method details
Timing: 1 h
Generation of homemade endotracheal intubation tube
-
1.
Prepare 18, 20, 22, and 24-gauge intravenous cannulas (Figure 1A) and cut the part which is placed in blood vessels into 1.5–3 cm lengths.
-
2.
Pass a thinner cannula through a thicker cannula and combine them into a single cannula. To make it easier to use, the total length of the combined cannula should be around 5 cm.
-
3.
Attach the connecting parts for anesthesia apparatus.
-
4.
To prevent air leakage from the connection site between the combined cannula and the connection parts for anesthesia apparatus, seal the connection site between them with an ultraviolet hardening type adhesive (Figures 1B–1E).
Figure 1.

Generation of endotracheal intubation tube
(A) In total, 18 to 24-gauge intravenous cannulas are used for making a endotracheal intubation tube.
(B) Ultraviolet (UV) hardening type adhesive.
(C and D) The connection site between the endotracheal intubation tube and the tube for anesthesia apparatus is attached by UV hardening type adhesive.
(E) Finished products.
Anesthesia and tracheal intubation
-
5.
Weigh the mouse to determine the dosage of anesthetic drugs. The surgical setup is depicted in Figure 2A.
-
6.
Anesthetize the mice with an intraperitoneal injection of 30 mg pentobarbital/kg of body weight for intubation.
-
7.
Check the depth of anesthesia by pinching the tail.
Note: When the mouse responds to the pain stimuli, use isoflurane at an appropriate dosage (1–4%) and oxygen with a flow rate of 0.5 L/min in an induction chamber (Figure 2B) connected to an anesthesia machine (Figure 2C).
-
8.
Grasp and raise the tongue with a blunt tweezer and intubate with a homemade endotracheal intubation tube (Figures 1A–1E).
Note: To clearly see the epiglottis, project a flashlight around the throat from above.
-
9.
Connect the cannula to the ventilator (Figure 2D) and check the chest movement to ensure proper intubation.
Note: If the abdomen is swollen, esophageal intubation is suspected, and intubation should be repeated according to step 8.
-
10.
Place the mouse in a supine position on the electrocardiogram (ECG)-monitoring pad using adhesive tapes (Figure 2E). Connect the endotracheal intubation tube to an inhalation anesthesia apparatus and ventilator. Anesthesia is maintained with isoflurane (1–4%) in 100% oxygen with a flow rate of 0.5 L/min.
-
11.
Set the ventilator tidal volume of 8 mL/kg, ventilation rate of 100 strokes/min, and positive end-expiratory pressure (PEEP) of 2 cm H2O.
Note: From now on, work under a microsurgery stereomicroscope (Figure 2F), and the mice were warmed with a heating lamp during operation (Figure 2G).
Pause point: 10–30 min.
-
12.
Apply hair removal cream from the throat to the precordial region and gently shave the mouse’s fur with a razor.
Figure 2.

Setup for the operation
(A). An example of surgical setup. a and b, needle holders; c, strait nipper; d, curved scissors; e and f, micro scissors; g–l, various forceps; m, rib retractor; n, pean forceps.
(B) Anesthesia apparatus.
(C) Anesthesia induction chamber.
(D) Ventilator.
(E) ECG plate.
(F) Surgical microscope.
(G) Heating lamp.
(H) Mice warmer.
Surgical procedure for ligation of the left anterior descending coronary artery
-
13.
Pick the skin on the xiphoid process, making a small incision following a longitudinal incision from the xiphoid process to the sternocleidomastoid muscle using small scissors.
Note: To avoid excessive bleeding, proceed without incision of the fascia. In case of bleeding, apply gentle pressure to the bleeding point with rolled Kimwipes.
Note: Related to steps 13–24, see Methods video S1
-
14.
Using small scissors, peel the connective tissue under the thymus to make a space between the thymus and the sternocleidomastoid muscle.
-
15.
Cut fascia and pectoralis muscles along the left side of the sternum from the base of the sternocleidomastoid muscle to the sixth rib.
-
16.
To create a space for a rib cut nipper, make a small hole using forceps on the left side of the sternum at the third intercostal space (the space between the third and fourth ribs).
Note: Make sure not to hurt the heart or lungs when making a hole. (See the troubleshooting section)
-
17.
Cut the third, fourth, and fifth ribs with a rib cut nipper. Simultaneously, you can cut the third to fifth intercostal muscles. Release the uncut intercostal muscles using forceps.
-
18.
Gently set the rib retractor into the space and spread the ribcage.
Note: At this time, the pleura tears together.
-
19.
Using a tweezer and micro scissors, carefully remove the pericardium and left lower part of the thymus from the ventral side of the heart to easily show the left atrium.
-
20.
Place small pieces of rolled Kimwipes below the left ventricle to make it easier to ligate the left anterior descending (LAD) coronary artery.
-
21.
Locate the ligature suture points. Although the running pattern of LAD varies, as a standard, we use points 2–3 mm below the line connecting the lowest point of the left atrium and the left ventricular apex (Figure 3).
-
22.
Use a needle holder to pass an 8-0 polypropylene suture at the ligation point. Gently pull the suture to avoid excessive injury to the heart tissues. Tie the ligature using forceps with two knots in the same direction (also referred to as the surgeon’s knot).
Note: At this step, the ligature is not completely tied.
-
23.
Confirm the color change of the left ventricle (Figure 4A) and ST-elevation with an ECG monitor (Figures 4B and 4C). The lower left part of the left ventricle will turn pale after ligation within 10 s (Figure 4A).
CRITICAL: Sometimes, it is difficult to confirm the color change after ligation. ECG can help confirm whether LAD ligation is performed properly. This step is important because the LAD coronary artery running pattern varies among individual mice. We use 0.2–0.5 mV ST elevation in I, II, Lead augmented vector left (aVL), and Lead augmented vector foot (aVF) leads and mirror image change in Lead augmented vector right (aVR) lead as a reference.
-
24.
Tie the ligature using forceps in a two-way alternate direction with several knots.
Note: At this point, the ligature is completely settled.
Figure 3.

Schematic representation of the ligation point
RV, right ventricle; LV, left ventricle; LA, left atrium.
Figure 4.

The changes of color and ECG monitor after LAD ligation
(A) A comparison of the left ventricular color between pre-ligation and post-ligation.
(B and C) A comparison of ECG waveforms between pre-ligation and post-ligation. A 1 horizontal scale represents 0.05 s, and 1 vertical scale represents 0.5 mV. aVL, Lead augmented vector left; aVR, Lead augmented vector right; aVF, Lead augmented vector foot.
Closing the chest after surgery
-
25.Remove the rolled Kimwipes located under the heart.Note: Related to steps 25–29, see Methods video S2.
-
26.
Release retractors holding ribs and intercostal muscles to help them return to their original place.
-
27.
Using 6-0 polyglactin suture, suture the left intercostal and corresponding right intercostal muscles together with the right pectoralis muscle.
-
28.
Using 6-0 polyglactin suture, suture the left and right pectoralis muscles with a simple interrupted suture pattern.
-
29.
Close the skin using a 4-0 silk suture in a continuous suture pattern.
Post-operative procedures and follow-up
-
30.
Turn off inhaled isoflurane.
-
31.
Check whether the operated mouse comes out from anesthesia by pinching its tail.
-
32.
Interrupt temporarily ventilator and confirm the spontaneous breathing of the mouse by checking the regular movement of the thorax.
-
33.
Stop ventilator and remove the intratracheal cannula.
-
34.
Remove adhesive tapes from the limbs.
-
35.
For postoperative analgesia, inject an opiate drug buprenorphine (0.1 mg/g) intraperitoneally .
-
36.
Place the mouse in a warm machine at 30°C for at least 30 min (Figure 2H). Monitor the mouse for any life-threatening condition, such as excessive dyspnea or hemorrhage.
Note: We considered operated mice as fully recovered status when they moved around voluntarily. Even if mice did not move voluntarily, we returned mice to normal cages within 40 min.
Note: Apply predefined interruption criteria when necessary to avoid excess suffering (e.g., uncontrolled bleeding or labored breathing).
-
37.
Monitor the mouse daily for the first 3 days. After the first 3 days, check the mice every 7 days. Provide it with a soft diet (ordinally food mixed with water) and water ad libitum.
Note: Apply predefined interruption criteria when necessary to avoid excess suffering (e.g., continuous crouching, 25 % or more weight loss within 1 week, or labored breathing).
-
38.
For Histological analysis, hearts were collected, fixed with 4% paraformaldehyde for 16–20 h at 4°C, embedded in paraffin. The sections (4 μm) were stained with hematoxylin and eosin for Hematoxylin and eosin (HE) staining, or Masson’s staining solution and aniline blue for Masson-trichrome staining.
Expected outcomes
We monitored the heart with cardiac echocardiography in short-and long-axis views before surgery, on postoperative day 2, and every 7 days until 28 days after surgery (Figures 5A and 5B, and Methods video S3). Left ventricular dimension at end-diastole (LVDd) and end-systole (LVDs) increased after LAD ligation (Figure 5C). The ejection fraction (EF) and fractional shortening (FS) were decreased (Figure 5C). These data indicate left ventricular remodeling and subsequent cardiac dysfunction. Additionally, we generated heart sections 28 days after surgery. The sections were subjected to hematoxylin and eosin (HE) and Masson’s trichrome staining to determine the fibrotic area after LAD ligation (Figures 5D and 5E). In the MI heart, the fibrotic area stained blue with Masson’s trichrome staining was increased compared to sham-operated hearts (Figure 5D). The survival probability is shown in Figure 5F.
Figure 5.

Echocardiography and histological analysis after LAD ligation
(A) Time series of the operated hearts in a long-axis view.
(B) Schematic representation of the long-axis view of echocardiography.
(C) Left ventricular dimension at end-diastole (LVDd) and end-systole (LVDs), Ejection fraction (EF), and fractional shortening (FS) (n=14 animals, per time point).
(D) Hematoxylin and eosin (HE) and Masson-trichrome staining of sham and injured hearts. The blue dotted line represents an infarcted area.
(E) The Masson-trichrome-stained fibrotic area was calculated by ImageJ software. Each dot represents a value obtained from one sample (n, Sham=8, MI=11).
(F) Survival probability (n, Sham=8, MI=20). RV, right ventricle; LV, left ventricle; Ao, aorta; LA, left atrium. Scale bars, 1 mm (D). All the data are presented as the means ± SEM, and statistical analyses were performed using a non-parametric Mann-Whitney’s u-test. ∗∗∗∗p < 0.0001.
Quantification and statistical analysis
The extent of fibrosis in sections was quantified as the relative area of positive Masson’s trichrome-stained area (blue fibrosis) normalized to the total section area using ImageJ software. Data are presented as the mean ± standard error of the mean (SEM). Mann-Whitney’s u-tests were applied to two-group comparisons. p-values less than 0.05 were considered statistically significant.
Limitations
LAD ligation is a key determinant of the success and reproducibility of the operation. Collectively, the size of the injured area and survival rate were also highly influenced by the ligation point. For example, it is assumed that if the ligation point is at a higher position, the infarct size will became larger and the mortality rate will increase. This is one of the limitations for beginners. To address this problem, we adapted ECG monitoring and checked ST changes (Figures 4B and 4C), which is useful for confirming the proper ligation. When ST change is not observed in ECG, another ligation should be added adjacent to the position 1–2 mm away from the original ligation point.
Troubleshooting
Problem 1
Bleeding could be one of the most common causes of death during operation (related to steps 13–29).
Potential solution
To avoid bleeding, you should use blunt-ended instruments when the operation field has low visibility. When there is bleeding, press the bleeding point using rolled Kimwipes.
Problem 2
Pneumothorax is another potential cause of death during or after surgery (related to steps 13–29).
Potential solution
To avoid pneumothorax, you should use blunt-ended instruments as much as possible.
Problem 3
Operated mice died because of deep anesthesia (related to step 32).
Potential solution
The effective dose and median lethal dose (LD50) of pentobarbital are both around 50 mg/kg of body weight. Therefore, we recommend the use of combined anesthesia with 30 mg pentobarbital /kg of body weight and 1–4% isoflurane. The depth of anesthesia should be adjusted by isoflurane inhalation.
Problem 4
Esophageal intubation is another potential cause of death during surgery due to hypoxia (related to step 8).
Potential solution
To avoid esophageal intubation, you should confirm the epiglottis as a landmark of endotracheal intubation and the thorax movement when you connect the endotracheal intubation tube with the anesthesia apparatus. When the abdomen is swollen, esophageal intubation is highly suspected and you should repeat intubation step.
Problem 5
Lethal arrhythmias (e.g., ventricular tachycardia or ventricular fibrillation) are another potential cause of death during or after surgery (related to steps 22–24 and limitations section).
Potential solution
To prevent this problem, it is important to have a fixed place to ligate the LAD coronary artery. Higher point of ligation will lead to larger infarction size and cause lethal arrythmias, which are difficult to deal with when it is happened.
Resource availability
Lead contact
Further information and requests for resources or reagents should be directed to and will be fulfilled by the lead contact, Kazuaki Maruyama (k.maruyama0608@gmail.com).
Materials availability
This study did not generate new unique reagents.
Acknowledgments
This work was supported in part by Grants-in-Aid for Scientific Research from the Ministry of Education, Culture, Sports, Science and Technology, Japan (19H01048 to H.K., 20K17072 to K.M., and 19K08308 to S.M.-T.); the Platform for Dynamic Approaches to Living System from the Ministry of Education, Culture, Sports, Science and Technology, Japan; and Core Research for Evolutional Science and Technology (CREST) of the Japan Science and Technology Agency (JST), Japan (JPMJCR13W2).
Author contributions
K.M., S.M.-T., and H.K. conceived the study and designed the experiments. K.M. performed the histological analysis and wrote the manuscript. K.N. implemented the cardiac injury model. K.Y. performed the echocardiography and helped with the data analyses. K.M., S.M.-T., K.I.-Y., and H.K. coordinated the experimental work and analyzed the data.
Declaration of interests
The authors declare no competing interests.
Footnotes
Supplemental information can be found online at https://doi.org/10.1016/j.xpro.2021.100775.
Contributor Information
Kazuaki Maruyama, Email: k.maruyama0608@gmail.com.
Sachiko Miyagawa-Tomita, Email: s_tomita@yamazaki.ac.jp.
Data and code availability
This study did not include new datasets.
References
- Maruyama K., Naemura K., Arima Y., Uchijima Y., Nagao H., Yoshihara K., Singh M.K., Uemura A., Matsuzaki F., Yoshida Y., Kurihara Y., Miyagawa-Tomita S., Kurihara H. Semaphorin3E-PlexinD1 signaling in coronary artery and lymphatic vessel development with clinical implications in myocardial recovery. iScience. 2021 doi: 10.1016/j.isci.2021.102305. 102305. [DOI] [PMC free article] [PubMed] [Google Scholar]
Associated Data
This section collects any data citations, data availability statements, or supplementary materials included in this article.
Supplementary Materials
Data Availability Statement
This study did not include new datasets.