

Abstract
The Latarjet procedure is used for the treatment of anterior glenohumeral instability in the presence of bone loss. One decade after a fully arthroscopic Latarjet procedure was described, this technique has been modified to reduce the risk of complications and improve the fixation method. We aimed to simplify the components of this surgical procedure.
Technique Video
We present our technique about Modified arthroscopic Latarjet procedure: button fixation without splitting of the subscapularis. The patient was in the “beach chair” position and five portals were created. After a diagnostic arthroscopy examination was performed, the lower surface, tip, base of the coracoid process, and conjoined tendon were identified. The lateral soft tissue of the conjoined tendon was released to a sufficient length to not affect transfer of the coracoid process. The coracoacromial ligament was excised at the insertion of the coracoid to expose its lateral and upper surfaces. Afterwards, the pectoralis minor was released from the coracoid ∼5-cm downwards from the junctions of pectoralis minor and conjoined tendon to ensure that transfer of the coracoid process was not affected The lower surface of the coracoid was freshened and smoothened to match the bone bed of the anterior glenoid with a burr. A thin cannula was used to guide the drilling of two holes in the coracoid bone. A 1.2-mm K-wire was drilled 6.5-mm proximal to the coracoid tip and the second K-wire was drilled 16.5-mm proximal to the coracoid tip. These two holes were 10-mm apart. Two PDS lines were passed through the bone tunnels for traction and guidance, respectively.
After ensuring an adequate length of coracoid bone, the coracoid was osteotomized with an 20° osteotome and the length of coracoid graft was < 25 mm. After that, the labrum and capsule were detached completely from the glenoid up to the 6 o’clock position. The glenoid was refreshed by a burr.
The upper edge of the subscapularis was pressed downwards by a switching stick until the 4 o’clock and 5 o’clock positions of the anterior glenoid were exposed.
The distance from the center point of the glenoid tunnel to the edge of the anterior glenoid was determined according to the coracoid width (in this case, the coracoid width was 12 mm, the distance from the center point of the glenoid tunnel to the edge of the bone graft was 6 mm). Two drills were employed to create two tunnels at 3:30 and 4:30 o’clock positions.
Two Mini TightRopes were used for fixation. The long buttons were passed through the coracoid bone and from the anterior to posterior directions of the glenoid bone following the guidance of the suture. When the long buttons were passed through the posterior wall of the glenoid bone then turned over for fixation. After the position of the coracoid graft had been confirmed, the anterior round buttons of the Mini TightRope were tightened. The position of the coracoid bone and its relationship with the subscapularis was examined after fixation.
Introduction
The Latarjet procedure is used to address the recurrence of anterior glenohumeral instability in cases of failed previous stabilization, as well as in patients with an Instability Severity Index score >6 points or >20% glenoid bone loss.1,2 This procedure has “triple locking” factors to prevent anterior instability of the shoulder: 1) dynamic “sling” effect of the conjoint tendon; 2) “bony effect” of increasing the glenoid surface area; 3) “Bankart effect” of repairing the capsulolabral complex to the bone or the stump of the coracoacromial ligament to the capsule.3,4
In 2007, Lafosse et al.5 described a fully arthroscopic Latarjet procedure involving use of two screws to fix the coracoid process to the anterior glenoid. Since then, arthroscopic Latarjet techniques have improved. Recent systematic reviews and meta-analyses have demonstrated that arthroscopic Latarjet is a reliable and satisfactory procedure for patients because it elicits a limited amount of pain and allows for rapid recovery6, 7, 8 compared with that obtained with the open Latarjet procedure. However, concerns remain because the arthroscopic Latarjet procedure is technically demanding9 and has a steep learning curve compared with that for the open procedure.9,10
The aim of the Latarjet procedure is to transfer the coracoid to the anterior glenoid at the 4 o’clock position for fixation. In the early stage of the Latarjet procedure, release of the subscapularis tendon from the lesser tuberosity is required to expose the anterior glenoid.11 The subscapularis muscle is split so as not to affect subscapularis strength.12 However, subscapularis splitting also influences the subscapularis tendon. If the anterior glenoid must be exposed clearly, more parts of the subscapularis should be split, which affects subscapularis integrity further. In some special cases, static anterior subluxation of the humeral head after the Latarjet procedure may be related to subscapularis splitting.4 Moreover, the subscapularis part that is split is close to the axillary nerve.13 Thus, for the arthroscopic Latarjet procedure, the axillary nerve must be exposed before subscapularis splitting. This splitting step increases the difficulty of the procedure because surgeons must protect the axillary nerve but also provide adequate exposure of the glenoid so as to fix the coracoid process and not to damage the subscapularis excessively. Various devices, such as a special retractor for subscapularis splitting,12 have been developed to assist surgery, but they do not reduce the difficulty of this procedure substantially. Moreover, subscapularis splitting is more difficult in patients with a strong and thick subscapularis.
The modified Torg–Bristow procedure is often used to address anterior glenohumeral instability.14 In this procedure, the anterior glenoid is exposed by pulling down the ST instead of splitting it. Moreover, this procedure involves transferring the coracoid to an approximate 4 o’clock position. It is similar to the Latarjet procedure, and its clinical outcome is excellent.14 We were inspired by the modified Torg–Bristow procedure to improve the Latarjet technique without subscapularis splitting. In our modified nonsplitting Latarjet technique, we need to only find the upper edge of the subscapularis and press the subscapularis downward without splitting it. In this way, the 4 o’clock position of the anterior glenoid can be exposed clearly. Another advantage is that it is far away from the axillary nerve when the glenoid is exposed by pressing the ST downward. Hence, the axillary nerve does not need additional exposure and can be protected from damage. The approach simplifies the procedure substantially and reduces the duration of the surgical procedure.
In the present study, we used modified buttons of diameter 2.7 mm (Mini TightRope; Arthrex, Naples, FL) with a traction line for fixation.
Surgical Technique (with Video Illustration)
Position and Portal Creation
The surgical technique is demonstrated in Video 1. The patient was positioned in the “beach chair” position under regional interscalene nerve block and general anesthesia. Five portals were created (Fig 1).
Fig 1.
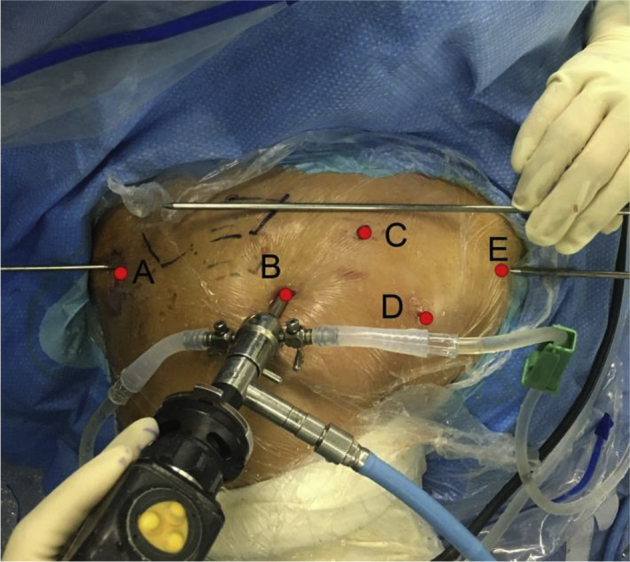
Arthroscopic portals of a right shoulder in the “beach chair” position. The posterior (A) portal was 2-cm inferior and 1-cm medial to the posterolateral angle of the acromion. The superolateral portal (B) was located 1-cm anterior and 1-cm lateral to the anterolateral corner of the acromion. The supracoracoid portal (C) was located above the base of the coracoid bone. The infracoracoid portal (D) was established under observation through portal A. Portal D was located in the axillary fold, 5-cm distal to the coracoid tip, and in the middle of conjoined tendon. The medial inferior portal (E) was created along the parallel line of portal A, When making portal E, we entered an switching stick from the posterior approach as a guide, and the switching stick points to 4’o clock direction of the glenoid rim. An switching stick was used outside the joint parallel to the direction of the switching stick inside the joint. Under the guidance of the two switching sticks, the B portal was used for observation, the puncture needle was entered in the antero medial direction. In the joint, it needs to see that the puncture needle is parallel to the switching stick inside, and the height is at the 4 o’clock level of the glenoid rim. Then make a skin incision.
The posterior portal (A) was located 2 cm inferior and 1 cm medial to the posterolateral angle of the acromion and was parallel to the cartilage surface of the glenohumeral joint. Portal A was used for observation. The superolateral portal (B) was located 1 cm anterior and 1 cm lateral to the anterolateral corner of the acromion. Portal B was used to prepare the coracoid and visualize the Bankart lesion. The supracoracoid portal (C) was located above the base of the coracoid bone. It was created under observation of portal B (Fig 2A); a puncture needle was used for location to enable an appropriate angle for the drilling, tunneling, and osteotomy of the coracoid bone. The infracoracoid portal (D) was established under observation through portal A (Fig 2B). Portal D was located 5 cm distal to the coracoid tip in the axillary fold. Portal D was used for visualization during coracoid separation and glenoid preparation. The medial inferior portal (E) was created along the parallel line of portal A. If a line was drawn from portal A and portal E, the line was parallel with the articular surface of glenoid in transverse view, and the level of the line was about 4 o’clock to the glenoid (with reference to the right shoulder). When making portal E, we entered a switching stick from the posterior approach as a guide, and the switching stick points to 4′o clock direction of the glenoid rim. A switching stick was used outside the joint parallel to the direction of the switching stick inside the joint. Under the guidance of the two switching sticks, the B portal was used for observation, the puncture needle was entered in the anteromedial direction. In the joint, the puncture needle needs to be parallel to the switching stick inside, and the height is at the 4 o’clock level of the glenoid rim (Fig 2C). Then make a skin incision. Portal E was used for coracoid preparation, separation of the pectoralis minor, glenoid preparation, and introduction of the guiding system for coracoid fixation. Portal E was vital for making tunnels in the glenoid bone from anterior to posterior directions; portal E helps to determine the position and direction of the tunnels made in the glenoid bone.
Fig 2.

Arthroscopic view of portals C, D, and E. (A) The arthroscopic view of portal D was in the middle of the conjoined tendon. (B) The supracoracoid portal C was created under the view of portal D under the guidance of a puncture needle. (C) The medial inferior portal E was created to separate the pectoralis minor.
Step 1: Evaluation of the Glenohumeral Joint
A diagnostic arthroscopy of the glenohumeral joint was undertaken through portal A. This included the chondral surfaces and bone defects of the glenoid and humeral head, glenoid labrum, inferior glenohumeral ligament complex, and rotator cuff.
Step 2: Preparation, Drilling, and Osteotomy of the Coracoid Bone
After portal B had been created (Fig 3A), the rotator-cuff interval was opened. First, the lower surface, tip, boundary of the coracoid process, and conjoined tendon were identified (Fig 3B). Second, the coracoacromial ligament was excised at the insertion of the coracoid to expose its lateral and upper surfaces (Fig 3 C and D). Third, the lateral soft tissue of the conjoined tendon was released to a sufficient length to not affect transfer of the coracoid process. The space between the superficial side of the conjoined tendon and the deep side of the deltoid muscle and pectoralis major was opened by blunt separation (Figure 3G). Then, portals C, D, and E were established in accordance with the methods described above. Afterwards, the pectoralis minor was released from the coracoid ∼5-cm downwards from the junctions of pectoralis minor and conjoined tendon to ensure that transfer of the coracoid process was not affected (Fig 3 F and G). Attention was paid to avoid injury to the musculocutaneous nerve on the medial side of the conjoined tendon. Under observation through portal A, the lower surface of the coracoid was freshened and smoothened to match the bone bed of the anterior glenoid with a burr entry from portal B (Fig 3H). If the 30° arthroscopic view from portal A was limited for the lower surface of the coracoid, a 70° camera was used to obtain a clearer view.
Fig 3.

Separation of the coracoid. A. Arthroscopic view from portal A in a right shoulder in the beach chair position showing the creation of portal B. (B) A radiofrequency were used to separate the conjoined tendon and the tip and the lower surface of the coracoid under the arthroscopic view from portal A. (C) The upper surface of the coracoid were separated by cut off coracoacromial ligament. D. Separation of the upper surface of the coracoid. E. Portal D were created under the arthroscopic view from portal B. F. Identification of the conjoined tendon and separation of pectoralis minor under arthroscopic view from portal B. G. The conjoined tendon and pectoralis minor were separated by a radiofrequency from portal D and view from portal B. H. Preparation of the base of the coracoid for matching the glenoid using a burr from portal A under the arthroscopic view of portal B. LHBT: long head of bicep tendon; HH: humeral head; MGHL: middle glenohumeral ligament. SSc: subscapularis.
A thin cannula from portal C was used to guide the drilling of two holes in the coracoid bone (Fig 4B). A 1.2-mm K-wire was drilled 6.5-mm proximal to the coracoid tip and at the center of the outer and inner edges of the coracoid. A second K-wire was drilled 16.5-mm proximal to the coracoid tip. These two holes were 10-mm apart (Fig 4A). The K-wire was perpendicular to the surface of the coracoid bone, and the exit point was in the middle of the deep surface of the coracoid bone. A 2.7-mm core drill (the diameter of the long button of the Mini TightRope was 2.7 mm) was used to create two bone tunnels along the two K-wires (Fig 4). Two PDS lines were passed through the bone tunnels for traction and guidance, respectively (Fig 4C and 4D).
Fig 4.

Schedule and the arthroscopic view of coracoid drilling. A. The length of the coracoid graft was <25 mm. Two holes (2.7 mm in diameter) were drilled and were 10-mm apart. B. A thin cannula from portal C was used to guide the drilling of two holes in the coracoid bone. A needle with PDS line inserted was pass through the hole (C) and the PDS line was pull out from the base of the coracoid (D).
It has been reported that the length of bone graft available for transfer of the coracoid process without injury to the coracoclavicular ligament is 26.4 mm.15 In this procedure, the length of coracoid graft was < 25 mm. After ensuring an adequate length of coracoid bone, the coracoid was osteotomized with an 20° osteotome, which was introduced through portal C (Fig 5 B and C).
Fig 5.

Osteotomy of the coracoid bone. Schedule of coracoid osteotomy (A). Arthroscopic view from the B portal in a right shoulder in the beach chair position. PDS lines were passed through the two holes, and the osteotomy was undertaken using an osteotome (A and B). Image (C) shows the osteotomized coracoid bone.
Step 3: Glenoid preparation
Under observation through portal B, a shaver from portal D was used to expose the entire superior rim of the subscapularis while noting the position of the axillary nerve. The anterior joint capsule was pushed away from the glenoid by the switching stick through portal C to expose the labrum clearly. The labrum and capsule were detached completely from the glenoid up to the 6 o’clock position (Fig 6A, 6B and 6C). Afterwards, the anterior glenoid was refreshed and flattened by a burr (Fig 6E). The shoulder joint was internally rotated slightly to reduce the tension in the subscapularis. After passing the switching stick through portal A, the upper edge of the subscapularis was pressed downwards until the 4 o’clock and 5 o’clock positions of the anterior glenoid were exposed (Fig 6E and 6F). The 4 o’clock position was marked by radiofrequency.
Fig 6.

Glenoid preparation. Arthroscopic view from the B portal in a right shoulder in the beach chair position. A. The capsule was attached to the glenoid before separation. B. The capsule was separated by a shovel. C. The glenoid were exposed to 6 o’clock at least. D. In order to match the transferred coracoid and to create better healing processs, the anterior face of the glenoid was refreshed by a burr after separation. E. The glenoid was exposed enough and finished separation. F. The subscapularis was press down by switching stick to expose the anterior face of glenoid.
Step 4: Glenoid tunneling and coracoid fixation
Under observation through portal D, the guiding system for the glenoid tunnel was entered from portal E (Fig 7B). The subscapularis was pressed downwards by the switching stick from portal A. The width of the coracoid bone was measured preoperatively by computed tomography. The distance from the center point of the glenoid tunnel to the edge of the anterior glenoid was determined according to the coracoid width (if the coracoid width was 12 mm, the distance from the center point of the glenoid tunnel to the edge of the bone graft was 6 mm) (Fig 7B). The 4 o’clock position was marked. A special drill (2.7 mm in diameter) whose tail could pass through the suture was used. Two drills were employed to create two tunnels at 3:30 and 4:30 o’clock positions which were 6-mm medial to the edge of the anterior glenoid.
Fig 7.

Drilling of glenoid tunnels. Schedule of drilling of glenoid tunnels (A). Arthroscopic view from portal D. The subscapularis muscle is pressed downwards by an switching stick. The guide was entry from portal E and a tunnel was drilled in the 3:30 o’clock position (B). SSc, subscapularis.
The direction of the 2.7-mm drill was judged by the entry point on the glenoid rim and exit points on the posterior skin. The ideal entry point was at the 3:30 and 4:30 o’clock positions of the anterior glenoid for fixation of two buttons. Portal E was vital for tunnel creation in the glenoid bone from anterior to posterior directions; the suitability of portal E decided the position and direction of the tunnels of the glenoid bone. In contrast, use of portal E for creating bone tunnels from posterior to anterior directions was less important.
Two sutures were brought into the tails of the 2.7-mm drills and passed through the tunnels, separately. Two Mini TightRopes (2.7 mm in diameter) were used for fixation. A suture was passed through the long button as the guide line (Fig 8A). The long buttons were passed through the coracoid tunnels following the guidance of the PDS traction lines. Then, the long buttons were passed through the glenoid tunnels following the guidance of the traction lines in the glenoid (Fig 8B). The proximal coracoid tunnel corresponded to the glenoid tunnel at the 3:30 o’clock position. The distal coracoid tunnel corresponded to the tunnel at the 4:30 o’clock position(Fig 9A and 9B). The long buttons were passed through the posterior wall of the glenoid bone and turned over for fixation. After the position of the coracoid graft had been confirmed, the anterior round buttons of the Mini TightRope were tightened and tied with ≥5 tight knots to fix the coracoid graft (Fig 9C).
Fig 8.

Button modification. There was a long button, a round button, and a suture in the modified button (A). The long buttons were passed through the coracoid bone and from the anterior to posterior directions of the glenoid bone (B) and tightened (C).
Fig 9.

The position of the transferred coracoid. Schedule of the coracoid and the subscapularis after fixation (A and B). Arthroscopic view of the transferred coracoid, a round button was ready to be tightened (C). Arthroscopic view from the A portal in a right shoulder in the beach chair position shows the final positioning of the transferred coracoid. Graft is flush to the glenoid margin. (D).
The position of the coracoid bone and its relationship with the subscapularis was examined after fixation (Fig 9D). If a Bankart repair was undertaken simultaneously, the anterior capsule and subscapularis were carefully and fully mobilized so that the anterior capsule could be repaired. If full mobilization could not be achieved, the anterior joint capsule and labrum were pulled down together with the subscapularis, which complicated the Bankart. The postoperative anteroposterior X-ray and CT scan were performed early for assess the position of the transferred coracoid process (Fig 10).
Fig 10.

Radiograph and 3D-CT showing the postoperative position of the coracoid. A. Right shoulder. Postoperative anteroposterior view shows the coracoid fixed with 2 buttons. B and C. 3D-CT image shows the correct position of the graft. Black arrows: long buttons; white arrows: round buttons; red arrows: the transferred coracoid.
Postoperative care
Postoperatively, the shoulder was immobilized in a 15° abduction brace for 8–12 weeks. Movement of the hand and wrist was immediately postoperatively was allowed. Passive activity of the shoulder was started from 2 weeks within the pain-free range of motion. External rotation with the arm at the side was limited to 0° within 2 weeks, 20° within 4 weeks, and 40° within 8 weeks postoperatively. Active flexion of the elbow in the first 6 weeks was not allowed. Active movement of the shoulder was started gradually at 6–8 weeks. The brace was removed gradually from 8 weeks to 12 weeks. Active resisted elbow flexion was not allowed in 12 weeks due to traction of the biceps. Resisted elbow flexion or external rotation of the shoulder was allowed for ≥3 months to reduce the risk of bone absorption. Active strengthening was not allowed until the surgeon judged it appropriate and radiographic healing of the coracoid graft was visualized during follow-up. Return to contact sports, throwing, or heavy labor activities were, in general, not allowed for ∼6 months.
Discussion
Concerns regarding the possible complications and the steep learning curve of the arthroscopic Latarjet technique have been raised.4,9,16 We applied a modified Torg–Bristow procedure to the arthroscopic Latarjet procedure which did not involve subscapularis splitting. The modified arthroscopic Latarjet procedure we employed had four main advantages (Table 1).
Table 1.
Advantages, limitation and risks of the arthroscopic latarjet procedure without splitting of the subscapularis
| Advantages | Limitation | risks |
|---|---|---|
|
|
|
First, the duration of the surgical procedure was shortened. In a typical arthroscopic Latarjet procedure, the subscapularis and axillary nerve should be exposed, and then the subscapularis is split. However, subscapularis splitting is time-consuming. If the anterior glenoid is exposed more clearly, more parts of the subscapularis must be split, which influences the structural integrity and function of the subscapularis.17 Moreover, this procedure is more difficult to undertake in patients with a strong and thick subscapularis. Our arthroscopic Latarjet procedure does not involve subscapularis splitting (which is a complicated step) and simplifies the procedure.
The second advantage is that exposure of the glenoid by pressing the ST downwards means that the axillary nerve does not need additional exposure, which protects the axillary nerve. Anatomical studies have shown that the axillary nerve is near the site of subscapularis splitting.18 Therefore, the axillary nerve must be exposed to ensure its safety and to determine how far medially or laterally the ST and SUBSCAPULARIS can be dissected. Our procedure is safe because it does not require subscapularis splitting and transfer of the coracoid process over the subscapularis.
The third advantage of our procedure is that it has little effect on the subscapularis. In the early stages of the Latarjet procedure, part of the subscapularis is removed from the lesser tuberosity, which exerts a great influence on subscapularis strength. In 1991, Jobe introduced a method for subscapularis splitting to expose the anterior glenoid without resecting the subscapularis from the lesser tuberosities.12 This method is adopted currently, but it influences subscapularis strength postoperatively. Moreover, the part of the subscapularis to be split is at the juncture of the subscapularis tendon and subscapularis belly, which has a great influence on the structure and function of the subscapularis. Our procedure avoids this problem; only the upper edge of the subscapularis needs to be found, and the 4 o'clock position of the anterior glenoid can be exposed clearly by pressing the subscapularis downwards without splitting it.
The fourth advantage of our method is based on the finding that the static anterior instability of the humeral head is a complication of the Latarjet procedure.4 It may be caused by subscapularis splitting.19 Our procedure can avoid this problem.
Different fixation methods can be used to fix the transferred coracoid: we have tried buttons, screws, anchors, and hybrids of these methods. Each of these fixation methods has advantages and disadvantages.20 Button fixation is simple and safe.21,22 Although it is a soft fixation, a certain degree of micromotion after fixation can occur. Double-button fixation can reduce the micromotion and rotation of the transferred coracoid process. If there is residual micromotion after double-button fixation, the lines after tightening can be fixed with lateral-row nails, and micromotion can be lessened. This method of double-button fixation is user-friendly and can achieve excellent fixation. Screw fixation demands pronounced surgical skills, accuracy in bone-tunnel direction, and matching of bone surfaces.23 Anchor fixation requires suture-tying, which is also a type of soft fixation.
The success of the Latarjet procedure is largely dependent on accurate placement of the coracoid graft relative to the glenoid rim. Malpositioning of the transferred coracoid process can lead to complications.20,24 We describe an excellent standardized method for creating the medial inferior portal (portal E). For example, the direction from portal E should be parallel to the articular surface of the glenoid bone, a condition that is conducive to the production of bone tunnels. Moreover, the tunnel in the glenoid bone should form an ideal angle (0–11°) with the glenoid surface. If the angle is not appropriate, then the exit point near the glenoid notch will affect the suprascapular nerve and cause weakness upon external rotation. Portal E is vital for creating tunnels in the glenoid bone from anterior to posterior directions. The suitability of portal E decides the position and direction of the tunnels in the glenoid bone. In contrast, portal E is less important for creating bone tunnels from posterior to anterior directions.25
However, our method has two main limitations. First, carrying out this procedure while undertaking a Bankart repair simultaneously is difficult. As such, it requires careful separation of the joint capsule, labrum, and subscapularis. Second, trimming the coracoid graft is challenging, especially after osteotomy of the coracoid bone without a bone-graft holder. Therefore, the lower surface of the coracoid bone should be trimmed before the osteotomy.
Footnotes
The authors report no conflicts of interest in the authorship and publication of this article. Full ICMJE author disclosure forms are available for this article online, as supplementary material.
Supplementary Data
We present our technique about Modified arthroscopic Latarjet procedure: button fixation without splitting of the subscapularis. The patient was in the “beach chair” position and five portals were created. After a diagnostic arthroscopy examination was performed, the lower surface, tip, base of the coracoid process, and conjoined tendon were identified. The lateral soft tissue of the conjoined tendon was released to a sufficient length to not affect transfer of the coracoid process. The coracoacromial ligament was excised at the insertion of the coracoid to expose its lateral and upper surfaces. Afterwards, the pectoralis minor was released from the coracoid ∼5-cm downwards from the junctions of pectoralis minor and conjoined tendon to ensure that transfer of the coracoid process was not affected The lower surface of the coracoid was freshened and smoothened to match the bone bed of the anterior glenoid with a burr. A thin cannula was used to guide the drilling of two holes in the coracoid bone. A 1.2-mm K-wire was drilled 6.5-mm proximal to the coracoid tip and the second K-wire was drilled 16.5-mm proximal to the coracoid tip. These two holes were 10-mm apart. Two PDS lines were passed through the bone tunnels for traction and guidance, respectively.
After ensuring an adequate length of coracoid bone, the coracoid was osteotomized with an 20° osteotome and the length of coracoid graft was < 25 mm. After that, the labrum and capsule were detached completely from the glenoid up to the 6 o’clock position. The glenoid was refreshed by a burr.
The upper edge of the subscapularis was pressed downwards by a switching stick until the 4 o’clock and 5 o’clock positions of the anterior glenoid were exposed.
The distance from the center point of the glenoid tunnel to the edge of the anterior glenoid was determined according to the coracoid width (in this case, the coracoid width was 12 mm, the distance from the center point of the glenoid tunnel to the edge of the bone graft was 6 mm). Two drills were employed to create two tunnels at 3:30 and 4:30 o’clock positions.
Two Mini TightRopes were used for fixation. The long buttons were passed through the coracoid bone and from the anterior to posterior directions of the glenoid bone following the guidance of the suture. When the long buttons were passed through the posterior wall of the glenoid bone then turned over for fixation. After the position of the coracoid graft had been confirmed, the anterior round buttons of the Mini TightRope were tightened. The position of the coracoid bone and its relationship with the subscapularis was examined after fixation.
References
- 1.Balg F., Boileau P. The instability severity index score. A simple pre-operative score to select patients for arthroscopic or open shoulder stabilisation. J Bone Joint Surg Br. 2007;89:1470–1477. doi: 10.1302/0301-620X.89B11.18962. [DOI] [PubMed] [Google Scholar]
- 2.Wong S.E., Friedman L.G.M., Garrigues G.E. Arthroscopic Latarjet: Indications, Techniques, and Results. Arthroscopy. 2020;36:2044–2046. doi: 10.1016/j.arthro.2020.06.002. [DOI] [PubMed] [Google Scholar]
- 3.Vezeridis P.S., Ishmael C.R., Jones K.J., Petrigliano F.A. Glenohumeral Dislocation Arthropathy: Etiology, Diagnosis, and Management. J Am Acad Orthop Surg. 2019;27:227–235. doi: 10.5435/JAAOS-D-17-00056. [DOI] [PubMed] [Google Scholar]
- 4.Domos P., Lunini E., Walch G. Contraindications and complications of the Latarjet procedure. Shoulder Elbow. 2018;10:15–24. doi: 10.1177/1758573217728716. [DOI] [PMC free article] [PubMed] [Google Scholar]
- 5.Lafosse L., Lejeune E., Bouchard A., Kakuda C., Gobezie R., Kochhar T. The arthroscopic Latarjet procedure for the treatment of anterior shoulder instability. Arthroscopy. 2007;23 doi: 10.1016/j.arthro.2007.06.008. 1242 e1241-1245. [DOI] [PubMed] [Google Scholar]
- 6.An V.V., Sivakumar B.S., Phan K., Trantalis J. A systematic review and meta-analysis of clinical and patient-reported outcomes following two procedures for recurrent traumatic anterior instability of the shoulder: Latarjet procedure vs. Bankart repair. J Shoulder Elbow Surg. 2016;25:853–863. doi: 10.1016/j.jse.2015.11.001. [DOI] [PubMed] [Google Scholar]
- 7.Bliven K.C.H., Parr G.P. Outcomes of the Latarjet Procedure Compared With Bankart Repair for Recurrent Traumatic Anterior Shoulder Instability. J Athl Train. 2018;53:181–183. doi: 10.4085/1062-6050-232-16. [DOI] [PMC free article] [PubMed] [Google Scholar]
- 8.Hurley E.T., Lim Fat D., Farrington S.K., Mullett H. Open Versus Arthroscopic Latarjet Procedure for Anterior Shoulder Instability: A Systematic Review and Meta-analysis. Am J Sports Med. 2019;47:1248–1253. doi: 10.1177/0363546518759540. [DOI] [PubMed] [Google Scholar]
- 9.Leuzinger J., Brzoska R., Metais P., et al. Learning Curves in the Arthroscopic Latarjet Procedure: A Multicenter Analysis of the First 25 Cases of 5 International Surgeons. Arthroscopy. 2019;35:2304–2311. doi: 10.1016/j.arthro.2019.03.035. [DOI] [PubMed] [Google Scholar]
- 10.Valsamis E.M., Kany J., Bonnevialle N., et al. The arthroscopic Latarjet: a multisurgeon learning curve analysis. J Shoulder Elbow Surg. 2020;29:681–688. doi: 10.1016/j.jse.2019.10.022. [DOI] [PubMed] [Google Scholar]
- 11.Picard F., Saragaglia D., Montbarbon E., Tourne Y., Thony F., Charbel A. [Anatomo-clinical consequences of the vertical sectioning of the subscapular muscle in Latarjet intervention] Rev Chir Orthop Reparatrice Appar Mot. 1998;84:217–223. [PubMed] [Google Scholar]
- 12.Jobe F.W., Giangarra C.E., Kvitne R.S., Glousman R.E. Anterior capsulolabral reconstruction of the shoulder in athletes in overhand sports. Am J Sports Med. 1991;19:428–434. doi: 10.1177/036354659101900502. [DOI] [PubMed] [Google Scholar]
- 13.Sager B., Gates S., Collett G., Chhabra A., Khazzam M. Innervation of the subscapularis: an anatomic study. JSES Open Access. 2019;3:65–69. doi: 10.1016/j.jses.2019.02.001. [DOI] [PMC free article] [PubMed] [Google Scholar]
- 14.Torg J.S., Balduini F.C., Bonci C., et al. A modified Bristow-Helfet-May procedure for recurrent dislocation and subluxation of the shoulder. Report of two hundred and twelve cases. J Bone Joint Surg Am. 1987;69:904–913. [PubMed] [Google Scholar]
- 15.Terra B.B., Ejnisman B., de Figueiredo E.A., et al. Anatomic study of the coracoid process: safety margin and practical implications. Arthroscopy. 2013;29:25–30. doi: 10.1016/j.arthro.2012.06.022. [DOI] [PubMed] [Google Scholar]
- 16.Castropil W., Schor B., Bitar A., Medina G., Ribas L.H., Mendes C. Arthroscopic Latarjet: Technique Description and Preliminary Results. Study of the First 30 Cases. Rev Bras Ortop (Sao Paulo) 2020;55:208–214. doi: 10.1055/s-0039-3400523. [DOI] [PMC free article] [PubMed] [Google Scholar]
- 17.Paladini P., Merolla G., De Santis E., Campi F., Porcellini G. Long-term subscapularis strength assessment after Bristow-Latarjet procedure: isometric study. J Shoulder Elbow Surg. 2012;21:42–47. doi: 10.1016/j.jse.2011.03.027. [DOI] [PubMed] [Google Scholar]
- 18.Apaydin N., Uz A., Bozkurt M., Elhan A. The anatomic relationships of the axillary nerve and surgical landmarks for its localization from the anterior aspect of the shoulder. Clin Anat. 2007;20:273–277. doi: 10.1002/ca.20361. [DOI] [PubMed] [Google Scholar]
- 19.Werner C.M., Jacob H.A., Dumont C.E., Gerber C. [Static anterior glenohumeral subluxation following coracoid bone block in combination with pectoralis major transfer: a case report and biomechanical considerations] Rev Chir Orthop Reparatrice Appar Mot. 2004;90:156–160. doi: 10.1016/s0035-1040(04)70039-2. [DOI] [PubMed] [Google Scholar]
- 20.Boileau P., Gendre P., Baba M., et al. A guided surgical approach and novel fixation method for arthroscopic Latarjet. J Shoulder Elbow Surg. 2016;25:78–89. doi: 10.1016/j.jse.2015.06.001. [DOI] [PubMed] [Google Scholar]
- 21.Dalmas Y., Thelu C.E., Laumonerie P., Girard M., Faruch M., Bonnevialle N. Arthroscopic double-button Latarjet: two-thirds of bone block healed at 90 days. Knee Surg Sports Traumatol Arthrosc. 2021;29:136–142. doi: 10.1007/s00167-019-05830-7. [DOI] [PubMed] [Google Scholar]
- 22.Boileau P., Saliken D., Gendre P., et al. Arthroscopic Latarjet: Suture-Button Fixation Is a Safe and Reliable Alternative to Screw Fixation. Arthroscopy. 2019;35:1050–1061. doi: 10.1016/j.arthro.2018.11.012. [DOI] [PubMed] [Google Scholar]
- 23.Athwal G.S., Meislin R., Getz C., Weinstein D., Favorito P. Short-term Complications of the Arthroscopic Latarjet Procedure: A North American Experience. Arthroscopy. 2016;32:1965–1970. doi: 10.1016/j.arthro.2016.02.022. [DOI] [PubMed] [Google Scholar]
- 24.Minuesa-Asensio A., Garcia-Esteo F., Merida-Velasco J.R., et al. Comparison of Coracoid Graft Position and Fixation in the Open Versus Arthroscopic Latarjet Techniques: A Cadaveric Study. Am J Sports Med. 2020;48:2105–2114. doi: 10.1177/0363546520930419. [DOI] [PubMed] [Google Scholar]
- 25.Hachem A.I., Costa D.'O.G., Rondanelli S.R., Rius X., Barco R. Latarjet Cerclage: The Metal-Free Fixation. Arthrosc Tech. 2020;9:e1397–e1408. doi: 10.1016/j.eats.2020.05.024. [DOI] [PMC free article] [PubMed] [Google Scholar]
Associated Data
This section collects any data citations, data availability statements, or supplementary materials included in this article.
Supplementary Materials
We present our technique about Modified arthroscopic Latarjet procedure: button fixation without splitting of the subscapularis. The patient was in the “beach chair” position and five portals were created. After a diagnostic arthroscopy examination was performed, the lower surface, tip, base of the coracoid process, and conjoined tendon were identified. The lateral soft tissue of the conjoined tendon was released to a sufficient length to not affect transfer of the coracoid process. The coracoacromial ligament was excised at the insertion of the coracoid to expose its lateral and upper surfaces. Afterwards, the pectoralis minor was released from the coracoid ∼5-cm downwards from the junctions of pectoralis minor and conjoined tendon to ensure that transfer of the coracoid process was not affected The lower surface of the coracoid was freshened and smoothened to match the bone bed of the anterior glenoid with a burr. A thin cannula was used to guide the drilling of two holes in the coracoid bone. A 1.2-mm K-wire was drilled 6.5-mm proximal to the coracoid tip and the second K-wire was drilled 16.5-mm proximal to the coracoid tip. These two holes were 10-mm apart. Two PDS lines were passed through the bone tunnels for traction and guidance, respectively.
After ensuring an adequate length of coracoid bone, the coracoid was osteotomized with an 20° osteotome and the length of coracoid graft was < 25 mm. After that, the labrum and capsule were detached completely from the glenoid up to the 6 o’clock position. The glenoid was refreshed by a burr.
The upper edge of the subscapularis was pressed downwards by a switching stick until the 4 o’clock and 5 o’clock positions of the anterior glenoid were exposed.
The distance from the center point of the glenoid tunnel to the edge of the anterior glenoid was determined according to the coracoid width (in this case, the coracoid width was 12 mm, the distance from the center point of the glenoid tunnel to the edge of the bone graft was 6 mm). Two drills were employed to create two tunnels at 3:30 and 4:30 o’clock positions.
Two Mini TightRopes were used for fixation. The long buttons were passed through the coracoid bone and from the anterior to posterior directions of the glenoid bone following the guidance of the suture. When the long buttons were passed through the posterior wall of the glenoid bone then turned over for fixation. After the position of the coracoid graft had been confirmed, the anterior round buttons of the Mini TightRope were tightened. The position of the coracoid bone and its relationship with the subscapularis was examined after fixation.