

Summary
Endothelial cells (ECs) lining blood vessels are implicated in organ development, function, and maintenance. We present a detailed protocol enabling isolation and characterization of primary mouse brain ECs, including quality controls and functional assays. These procedures promote survival of primary brain ECs for the assessment of endothelial health. Since alterations in brain ECs are involved in the onset and progression of neurological disorders, this protocol represents a valuable tool to better understand the roles of ECs in brain health.
For complete details on the use and execution of this profile, please refer to Ouellette et al. (2020).
Subject areas: Cell Biology, Cell culture, Cell isolation, Cell-based Assays, Molecular Biology, Neuroscience
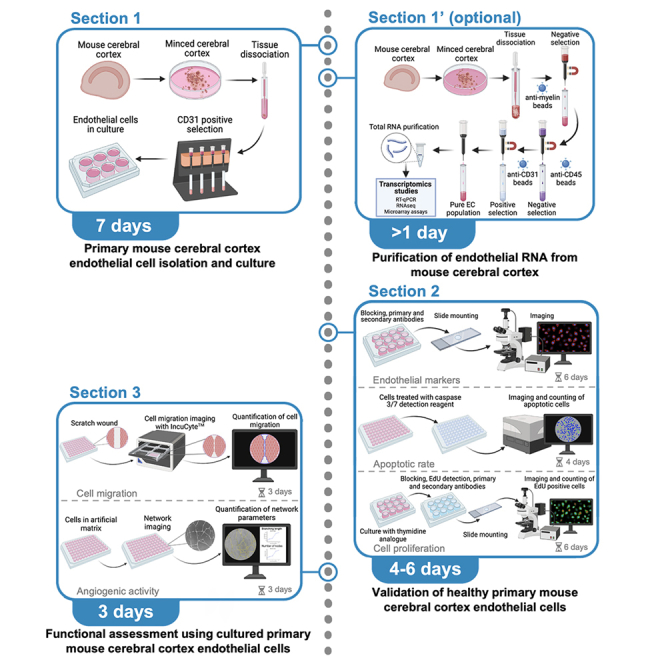
Graphical abstract
Highlights
-
•
Streamlined approach to determine the health of cultured mouse brain endothelial cells
-
•
Protocol focused on primary endothelial cell from mouse cerebral cortex
-
•
Complete procedures from molecular analysis to cell behavior including quality controls
Endothelial cells (ECs) lining blood vessels are implicated in organ development, function, and maintenance. We present a detailed protocol enabling isolation and characterization of primary mouse brain ECs, including quality controls and functional assays. These procedures promote survival of primary brain ECs for the assessment of endothelial health. Since alterations in brain ECs are involved in the onset and progression of neurological disorders, this protocol represents a valuable tool to better understand the roles of ECs in brain health.
Before you begin
The following protocol describes the specific steps to isolate, purify, maintain and characterize primary mouse brain (cortical) endothelial cells (ECs). These procedures have been optimized for isolation of ECs from young mice at postnatal day (P) 14 of either sex. While the following protocols may be used for isolation of adult primary mouse brain ECs, adult ECs will grow significantly slower (please read the limitations section). Refer to the key resources table for a complete list of reagents and tools. All studies were approved by the University of Ottawa Animal Care Committee and conducted in accordance to guidelines of the Canadian Council on Animal Care.
Key resources table
| REAGENT or RESOURCE | SOURCE | IDENTIFIER |
|---|---|---|
| Antibodies | ||
| Rat anti-CD31 (use at 1:200) | BD Pharmingen | Cat#553370 |
| Rabbit anti-VE-Cadherin (use at 1:500) | Abcam | Cat#ab33168 |
| Goat anti-Iba1 (use at 1:1000) | Abcam | Cat#ab107159 |
| Goat anti-PDGRβ (use at 1:200) | R&D systems | Cat#AF1042 |
| Guinea pig anti-NeuN (use at 1:1500) | Millipore Sigma | Cat#ABN90 |
| Guinea pig anti-GFAP (use at 1:1000) | Synaptic Systems | Cat#173004 |
| Mouse anti-αSMA (use at 1:200) | Sigma-Aldrich | Cat#A2547 |
| Donkey anti-Rat IgG (H+L) Highly Cross-Adsorbed Secondary Antibody, Alexa Fluor 488 (use at 1:300) | Invitrogen | Cat#A-21208 |
| Donkey anti-Rabbit IgG (H+L) Highly Cross-Adsorbed Secondary Antibody, Alexa Fluor 568 (use at 1:300) | Invitrogen | Cat#A-10042 |
| Donkey anti-Rabbit IgG (H+L) Highly Cross-Adsorbed Secondary Antibody, Alexa Fluor 647 (use at 1:300) | Invitrogen | Cat#A-31573 |
| Donkey anti-goat IgG (H+L) cross-absorbed secondary antibody, Alexa Fluor 568 (use at 1:300) | Invitrogen | Cat#A-11057 |
| Goat anti-guinea pig IgG (H+L) Highly cross-absorbed secondary antibody, Alexa Fluor 488 (use at 1:300) | Invitrogen | Cat#A-11073 |
| Goat anti-guinea pig IgG (H+L) Highly cross-absorbed secondary antibody, Alexa Fluor 647 (use at 1:300) | Invitrogen | Cat#A-21450 |
| Donkey anti-mouse IgG (H+L) cross-absorbed secondary antibody, Alexa Fluor 568 (use at 1:300) | Invitrogen | Cat#A10037 |
| Alexa Fluor™ 488 Phalloidin (use at 1:40) | Invitrogen | Cat#A12379 |
| Chemicals, peptides, and recombinant proteins | ||
| EGMTM-2 MV Microvascular Endothelial Cell Growth Medium-2 BulletKitTM | Lonza | Cat#CC-3202 |
| Penicillin-Streptomycin (10,000 U/mL) | Thermo Fisher Scientific | Cat#15140122 |
| HBSS without calcium/magnesium | Gibco | Cat#14170-120 |
| HBSS with calcium/magnesium | Gibco | Cat#14025-092 |
| Attachment factor 1× | Gibco | Cat#S-006-100 |
| Albumin, Bovine (BSA) | VWR | Cat#0332-100G |
| CD31 MicroBeads, Mouse | Miltenyi Biotec | Cat#130-097-418 |
| Myelin Removal Beads II, human, mouse, rat | Miltenyi Biotec | Cat#130-096-733 |
| CD45 MicroBeads, Mouse | Miltenyi Biotec | Cat#130-052-301 |
| Sterile 1× PBS | Wisent BioProducts | Cat#311-011-CL |
| TrypLE™ Express Enzyme (1×), no phenol red | Thermo Fisher Scientific | Cat#12604013 |
| Alconox detergent | VWR | Cat#21835-032 |
| Virkon® S Disinfectant and Virucide | Fisher Scientific | Cat#NC9549979 |
| CellEvent™ Caspase-3/7 Green Detection | Thermo Fisher Scientific | Cat#C10423 |
| Staurosporine | Thermo Fisher Scientific | Cat# BP2541100 |
| Hoechst 33342, Trihydrochloride, Trihydrate-10 mg/mL Solution in Water | Invitrogen | Cat#H3570 |
| Paraformaldehyde 20% Solution, EM grade | Electron Microscopy Sciences | Cat#15713-S |
| Fluoromount-G™ | Electron Microscopy Sciences | Cat#17984-25 |
| Triton-X-100 | VWR | Cat#0694-1L |
| Fish gelatin blocking buffer, 10% | VWR | Cat#M319-500mL |
| Donkey serum, sterile filtered | Wisent Bioproducts | Cat#035-150 |
| Dimethyl sulfoxide,DMSO | sigma-Aldrich | Cat#D8418-100mL |
| DAPI | Invitrogen | Cat#D1306 |
| Matrigel® Matrix Basement Membrane, Growth Factor Reduced | Fisher Scientific | Cat#354230 |
| Sodium chloride (NaCl) | VWR | Cat#0241-5KG |
| Sodium phosphate dibasic anhydrous (Na2HPO4) | VWR | Cat#0404-1KG |
| Sodium phosphate monobasic (NaH2PO4H2O) | VWR | Cat#BDH9298.2.5 |
| β-mercaptoethanol, Molecular biology grade | Merck Millipore | Cat#444203 |
| Critical commercial assays | ||
| Neural Tissue Dissociation Kit (P) | Miltenyi Biotec | Cat#130-092-628 |
| Click-iT™EdU Alexa Fluor™ 594 Imaging Kit | Invitrogen | Cat#C10339 |
| E.Z.N.A.® HP Total RNA Kit | OMEGA bio-tek | Cat#R6812-01 |
| RNase-free DNase I Set | OMEGA bio-tek | Cat#E1091 |
| Experimental models: Organisms/strains | ||
| Mouse: B6129SF1/J (14 days old, male or female) | The Jackson Laboratory | Cat#101043 |
| Software and algorithms | ||
| IncuCyte® ZOOM Software | Essen Bioscience | N/A |
| Fiji Image J | Schindelin et al., 2012 | https://imagej.net/software/fiji/ |
| Angiogenesis Analyzer for Image J | Carpentier, 2012 | https://imagej.nih.gov/ij/macros/toolsets/Angiogenesis%20Analyzer.txt |
| Other | ||
| 70 μM pore size strainer | VWR | Cat#76327-100 |
| LS columns | Miltenyi Biotec | Cat#130-042-401 |
| LD columns | Miltenyi Biotec | Cat#130-042-901 |
| MACS® MultiStand | Miltenyi Biotec | Cat#130-042-303 |
| QuadroMACS™ separator | Miltenyi Biotec | Cat#130-090-976 |
| IncuCyte® ImageLock Plates | Essen Bioscience | Cat#4379 |
| IncuCyte® 96-well WoundMaker Tool | Essen Bioscience | Cat#4563 |
| German glass coverslips, 12 mm round, #1 thickness | Mandel | Cat#NEU-GG-12-1.5-OZ |
| Corning® cryogenic vials, internal thread | Millipore sigma | Cat#CLS431386 |
| Mr. Frosty™ Freezing Container | Thermo Fisher Scientific | Cat#5100-0001 |
| Superfrost Plus Microscope Slides | Fisher Scientific | Cat#12-550-15 |
| 96-Well Tissue Culture Plate, Non-treated, Sterilized, Non-Pyrogenic | VWR | Cat#10861-562 |
| IncuCyte™ Zoom® Apparatus | Essen Bioscience | N/A |
| Nikon Eclipse TE2000-E inverted microscope | Nikon | N/A |
| Zeiss Axio Imager M2 microscope | Zeiss | N/A |
| Axiocam 506 mono | Zeiss | N/A |
| ApoTome.2 module | Zeiss | N/A |
Step-by-step method details
Section 1: Primary mouse cerebral cortex endothelial cell isolation and culture
Preparation of reagents and medium for primary mouse cerebral cortex endothelial cell isolation
Timing: 20 min (on the day prior to cell isolation)
-
1.Reagent preparation
-
a.Enzyme P [included in the “Neural Dissociation Kit (P)”] is ready to use. Prepare aliquots of 200 μL to avoid repeated freeze-thaw cycles. Store aliquots at −20°C. This kit contains buffers and enzymes for 50 isolations.
-
b.Resuspend lyophilized Enzyme A with 1 mL of Buffer A in provided vial labeled Enzyme A (included in the same kit). Do not vortex. The final Enzyme A solution is clear when fully resuspended. Prepare aliquots of 40 μL and store at −20°C.
-
a.
Note: To resuspend Enzyme A, slowly pipette up and down (∼5–10 times) using a 1 mL pipette until powder is no longer visible.
-
2.Endothelial cell medium preparation
-
a.Thaw SingleQuots™ Kit (included in EGM™-2 MV Microvascular Endothelial Cell Growth Medium-2 BulletKit™). Add SingleQuots™ Kit to basal medium. Do not refreeze.
-
b.Add 1% penicillin/streptomycin to prepared BulletKit™ medium.
-
a.
-
3.
Autoclave all dissection tools (curved forceps, straight forceps, large scissors, curved small scissors).
CRITICAL: Once thawed, SingleQuots™ Kit must be mixed with basal medium within 72 h. After BulletKit™ medium is prepared, use within 1 month.
Mouse cerebral cortex dissection
Two cortical hemispheres (i.e., one mouse brain) are ideal for plating endothelial cells in 2 wells of a 6-well plate to promote cell survival and growth following isolation.
-
4.
Clean dissection bench using 70% or 100% ethanol.
-
5.
Submerge dissection tools and razor blade in 100% ethanol for a minimum of 30 min prior to dissection.
-
6.Cortical dissection (Figures 1A–1H)
-
a.Prepare a 12-well plate with 1 mL of cold HBSS (without calcium/magnesium).
-
b.Sacrifice the mouse by cervical dislocation.Note: No anesthesia or carbon dioxide overdose is recommended before the cervical dislocation. This might disrupt endothelial cell health. A guillotine can be used for quick euthanasia.
-
c.Decapitate mouse and extract brain rapidly from the skull (Collins et al., 2018; Meyerhoff et al., 2021).
-
d.Transfer the brain into a petri dish containing cold HBSS without calcium/magnesium. Remove the cerebellum and brain stem, leaving cerebral hemispheres intact.
-
e.Bisect cerebral hemispheres along midline using a sterile razor blade. Repeat with the other hemisphere.
-
f.Place each hemisphere with the medial side facing up. Using curved forceps remove striatum, hippocampus and thalamus, leaving the cortex intact. Repeat with the other hemisphere.
-
g.Using a razor blade, mince cortex in small pieces and delicately transfer fragments using a sterile 3 mL plastic transfer pipette to a 12-well plate containing 1 mL of cold HBSS without calcium/magnesium.
-
h.Repeat with next mouse.
-
i.Once dissections are complete, delicately transfer each pair of minced cortex submerged in cold HBSS (without calcium/magnesium) from the 12-well plate into a 15 mL conical tube placed on ice, using a 3 mL transfer pipette.
-
a.
Figure 1.

Mouse cerebral cortex dissection from freshly extracted brain
(A) The brain is removed fresh from skull, and the cerebellum is discarded (dotted line depicts cut). Scale bar: 2 mm.
(B and C) Cerebral hemispheres are separated using a razor blade or scalpel (dotted midline shows cut axis). Dorsal view is shown in C (i.e., cortex surface up).
(D) Hemispheres are placed medial side facing up. Dotted line depicts the interior of the cortical ‘cup’ (i.e., striatum, hippocampus and thalamus) that will be scooped out. Scale bar: 2 mm.
(E) Using curved forceps, remove striatum, hippocampus and thalamus from cortical cup (see D). Straight forceps may be used to stabilize the brain during dissection.
(F and G) Remove leftover olfactory bulb including pigmented vessels using razor blade or scalpel (dotted line in F depicts cut). Scale bar: 2 mm.
(H) Using a razor blade, mince cortical pair in medium-to-small pieces to facilitate ensuing tissue dissociation (avoid mincing too small and for too long to limit damage to endothelial cells). Scale bar: 2 mm.
(I–K) Tissue dissociation steps for cell isolation. (I) Enzyme mix 1 and 2 have been added to minced tissue. (J) Cortical pair is dissociated after being pipetted up and down ~10 times with a 3mL transfer pipette. (K) Cortical pair is fully dissociated after being pipetted up and down ~10 times with a glass Pasteur pipette.
Primary endothelial cell isolation
All following steps are performed in sterile conditions in a biosafety cabinet. These steps have been adapted from the Miltenyi biotec “Neural Dissociation Kit (P)” and CD31 MicroBeads protocols found on Miltenyi biotec website. The volumes described below are for the isolation of one mouse brain (i.e., two cerebral cortices). The end result consists of a semi-pure endothelial cell culture. A pure endothelial cell culture will be reached after 48 h in culture (see steps 33–34).
-
7.Prepare a 6-well plate for endothelial cell culture.
-
a.Add 2 mL of 100% ethanol per well of a 6-well plate. Let plate incubate at room temperature in the biosafety cabinet for 1 h. Aspirate 100% ethanol and let plate dry.Note: Prepare 2 wells of a 6-well plate for each pair of cortical hemispheres.
-
b.Add 1 mL of 1× attachment factor (Gibco, Cat#S-006-100) to each well and let sit at room temperature for 30 min. Aspirate 1× attachment factor and let plate dry.Note: The attachment factor contains gelatin which promotes the growth of microvascular endothelial cells.
-
a.
-
8.
Prepare PEB buffer (see Table 1).
Note: Steps 7 and 8 may be completed at the same time as the following steps of the cell isolation.
-
9.Prepare enzyme mix 1.
-
a.Mix 1900 μL of buffer X with 50 μL of enzyme P [included in “Neural dissociation kit (P)”] for a final volume of 1950 μL. Do not vortex.
-
b.Pre-heat mixture at 37°C for 15 min.
-
a.
Note: Prepare separate tubes of enzyme mix 1 for each mouse.
-
10.
Centrifuge minced cortex at 300×g for 2 min at room temperature and aspirate supernatant.
-
11.
Add 1950 μL of pre-heated enzyme mix 1 to each tube containing minced cortex.
-
12.
Incubate minced cortex for 15 min at 37°C. Tap and gently swirl the tube (∼5 times) to dislodge tissue every 5 min.
-
13.Prepare enzyme mix 2.
-
a.Mix 20 μL of buffer Y with 10 μL of enzyme A [included in “Neural dissociation kit (P)”] for a final volume of 30 μL. Do not vortex.
-
a.
Note: Prepare separate tubes of enzyme mix 2 for each mouse.
-
14.
Add 30 μL of enzyme mix 2 to each tube containing minced cortex following 15 min incubation (Figure 1I). Invert gently.
-
15.
Dissociate cortical pair mechanically using a sterile 3 mL plastic transfer pipette, pipetting up and down slowly (∼10 times; Figure 1J). Avoid forming air bubbles.
-
16.
Incubate tissue at 37°C for 10 min. Tap and gently swirl the tube every 5 min.
-
17.
Dissociate tissue mechanically using a glass Pasteur pipette (Figure 1K). Avoid forming air bubbles.
Note: Continue with dissociation until tissue can be pipetted up and down without difficulty (∼10 times). Pieces of tissue may still be visible following second dissociation.
-
18.
Incubate dissociated tissue at 37°C for 10 min. Tap and gently swirl the tube every 5 min.
-
19.
Place a 70 μM strainer on a 50 mL tube and wash strainer with 1 mL of HBSS with calcium/magnesium.
-
20.
Apply cell suspension to prepared 70 μM strainer and add 10 mL of HBSS with calcium/magnesium to strainer.
-
21.
Discard 70 μM strainer and centrifuge cell suspension at 300×g for 10 min at room temperature. Aspirate supernatant.
-
22.
Resuspend cells with 1 mL of PEB buffer. Transfer to a 1.5 mL tube.
-
23.
Centrifuge cell suspension at 300×g for 5 min at 4°C and aspirate supernatant.
-
24.
Resuspend cell pellet in 270 μL of PEB buffer.
-
25.Prepare CD31 MicroBeads
-
a.Vortex CD31 MicroBeads bottle.
-
b.Add 30 μL of CD31 MicroBeads to cell suspension.
-
a.
Note: CD31 MicroBeads have been designed for the positive selection of endothelial cells from mouse tissues.
-
26.
Incubate cell suspension containing CD31 MicroBeads for 20 min at 4°C while being agitated on a rotator.
-
27.
Add 1 mL of PEB buffer to cell suspension and centrifuge at 300×g for 5 min at 4°C. Aspirate supernatant.
-
28.
Resuspend pellet with 1 mL of PEB buffer.
-
29.Preparation for positive selection
-
a.Place LS columns on magnetic separator (MACS® MultiStand and QuadroMACS™ Separator) with a 15 mL collection tube. One LS column per mouse is required.
-
b.Add 2 mL of PEB buffer to each LS column.
-
c.Warm 50 mL of endothelial cell culture medium at room temperature.
-
a.
-
30.
Apply cell suspension to LS column and wash columns 3 times with 0.5 mL of PEB buffer. Discard total effluent.
Note: Following positive selection, endothelial cells are trapped within the LS column.
-
31.Endothelial cell collection
-
a.Label 15 mL conical tubes.
-
b.Remove LS column from magnetic separator and place on labelled 15 mL conical tube.
-
c.Add 2 mL of endothelial cell culture medium to each LS column. Immediately flush out endothelial cells by firmly pushing the plunger into the LS column.
-
a.
-
32.
Add 1 mL of endothelial cells to the 1× attachment factor coated 6-well plate and 1 mL of endothelial cell medium to each well. Place plate in a 37°C incubator at 5% CO2.
Note: Each mouse cortex will yield 2 wells of a 6-well plate using this protocol. Elution volume may be increased to plate endothelial cells in additional wells. However, caution must be taken when doing this approach as endothelial cells in culture require to be at a high density to assure attachment when first plated following isolation. This cell isolation protocol results in a semi-pure endothelial cell culture. A pure endothelial cell population will be achieved within 48 h of culture (see steps 33–34).
Table 1.
PEB buffer
| Reagent | Final concentration | Amount |
|---|---|---|
| Albumin, bovine (BSA) | 0.5% | 0.25 g |
| HBSS without calcium/magnesium | n/a | 50 mL |
| Total | n/a | 50 mL |
Store at −20°C for up to 4 weeks.
Maintenance of primary mouse cerebral cortex ECs
Endothelial cells may require up to 7 days to reach confluency. However, growth rate will depend on initial endothelial cell plating density. Culture medium must be changed 48 h after isolation to remove non-adherent cells and replenish nutrients. After 48 h of culture a pure endothelial cell population is achieved.
-
33.
Aliquot endothelial cell medium. A total of 2 mL is required per well. Let medium warm up at room temperature for 15 min. Slowly aspirate endothelial medium from wells containing cells and replace with fresh medium.
-
34.
Endothelial cell medium must be replaced every second day up until 80% confluence is reached (∼7 days). Troubleshooting 1
Pause point: Once endothelial cells are 70%–80% confluent, they may be used for subsequent quality controls and functional assessment. Conversely, cells may be frozen for later use using 10% DMSO.
Freezing stocks of primary mouse cerebral cortex ECs
-
35.Harvest primary endothelial cells
-
a.Aliquot TrypLE™ Express Enzyme (1×) in a 15 mL conical tube (1 mL per well of a 6-well plate). Incubate at 37°C for 30 min. Aliquot endothelial cell medium [same volume as TrypLE™ Express Enzyme (1×)].
-
b.Aspirate old culture medium from endothelial cells and wash twice with sterile 1× PBS. Aspirate 1× PBS.
-
c.Add 1 mL of TrypLE™ Express Enzyme (1×) per well containing cells and place in the 37°C, 5% CO2 incubator for 5 min.CRITICAL: After 5 minute incubation tap plate. Most cells should be detached. If several cells are still attached to the plate, place plate back in the 37°C, 5% CO2 incubator for 2 min.
-
d.After incubation, add 1 mL of endothelial cell medium to each well and tap plate to detach cells.
-
a.
-
36.
Transfer cells to a 15 mL conical tube and centrifuge for 5 min at 500×g. Aspirate supernatant. Resuspend cell pellet using endothelial cell medium.
Note: Cells from one well should be frozen in one cryovial.
-
37.
Add 900 μL of resuspended cells to each cryovial.
-
38.
Slowly add 100 μL of sterile DMSO to each cryovial. Slowly pipette cells up and down to mix DMSO.
-
39.
Place cryovials containing cells in Mr. Frosty™ freezing container.
Note: This container ensures optimal cooling rate for cell preservation.
-
40.
Place container at −80°C for 24 h.
-
41.
Transfer cryovials from Mr. Frosty™ freezing container to liquid nitrogen for long term storage.
Thawing stocks of primary mouse cerebral cortex ECs
-
42.
Prepare 6-well plate coated with 1× attachment factor as described for cell isolation. Warm 10 mL of endothelial cell medium at room temperature.
-
43.
Aliquot 2 mL of pre-heated endothelial cell medium in a 15 mL conical tube.
-
44.
Remove cryovial from liquid nitrogen and place in 37°C water bath for 1–2 min.
Note: A small piece of frozen cells should still be visible after cryovial is removed from 37°C water bath.
-
45.
Transfer cells to prepared 15 mL conical tube containing 2 mL of endothelial cell medium.
-
46.
Centrifuge cells for 5 min at 500×g. Aspirate supernatant.
-
47.
Resuspend pellet in endothelial cell medium.
Note: One cryovial should be separated into two wells of a 6-well plate with a final volume of 2 mL per well.
-
48.
Place cells in a 37°C, 5% CO2 incubator.
-
49.
Endothelial cell medium must be replaced every second day up until 80% confluence is reached. Cells may be used for subsequent quality controls and experiments.
Section 1': Purification of endothelial RNA from mouse cerebral cortex
The described cell isolation protocol in steps 1–32 yields a semi-pure population of ECs (purified passively through changes of culture medium). Indeed, after 48 h of culture, a pure EC population is reached (Figure 2). However, in order to perform the acute purification of endothelial RNA following EC isolation from mouse cerebral cortex, additional selection steps must be completed to ensure optimal purity of isolated ECs. Note that with the preparation below, a lower cell density is obtained compared to the isolation protocol described in steps 4–32.
Figure 2.

Quality controls with primary mouse cortical ECs isolated from P14 male animals
(A and B) Control of endothelial culture purity using double staining for phalloidin and VE-Cadherin, at two time points. At 24 h, VE-Cadherin-negative contaminating cells (∗) can be observed, scale bar: 150μM (A). At 48 h, endothelial culture purity is achieved, as all cells display VE-Cadherin immunoreactivity, scale bar: 50μM (B).
(C) Left, Assessment of endothelial gene enrichment using RNAseq data (Ouellette et al., 2020) normalized to a publicly available database (Zhang et al., 2014; http://www.brainrnaseq.org/). Right, Assessment of neuronal contamination (same as Left). These data show that a very low level of contamination was achieved.
(D) Representative images (left) and quantification (right) of immunocytochemical staining for endothelial markers CD31 or VE-Cadherin. Distribution of VE-Cadherin fluorescence intensity is shown as example (10 μM × 20 μM white boxes represent areas of quantified staining). Scale bar: 40μM.
(E) Representative images (left) and quantification (right) for the assessment of apoptosis in EC cultures. The Caspase-3/7 green assay reveals apoptotic rates. Scale bar: 300μM.
In (A, B, D, and E), stained endothelial cells were imaged with a Zeiss Axio Imager M2 microscope equipped with a digital camera (Axiocam 506 mono) and the ApoTome.2 module.
Acute isolation of primary cerebral cortex endothelial cells
-
50.
Prepare 50 mL of sterile 1× PBS and 0.5% BSA buffer (Table 2).
-
51.
Resuspend cells with 180 μL of prepared sterile 1× PBS and 0.5% BSA buffer and transfer to a 1.5 mL tube.
-
52.
Add 20 μL of myelin removal beads to each tube.
-
53.
Incubate at 4οC for 15 min while being agitated on a rotator.
-
54.Preparation for negative selection
-
a.Place LS columns on magnetic separator (MACS® MultiStand and QuadroMACS™ Separator) with a 15 mL collection tube. One LS column per mouse is required.
-
b.Add 3 mL of sterile 1× PBS and 0.5% BSA buffer to each LS column.
-
a.
-
55.
Apply cell suspension to LS column and wash columns 2 times with 1 mL of sterile 1× PBS and 0.5% BSA buffer. Collect unlabeled cells that pass through the column.
-
56.
Centrifuge cell suspension in 15 mL collection tube at 300×g for 10 min. Aspirate supernatant completely.
-
57.
Resuspend cell pellet in 270 μL of PEB buffer (Table 1) and transfer to a new 1.5 mL tube.
-
58.Prepare CD45 MicroBeads for negative selection
-
a.Vortex CD45 MicroBeads bottle.
-
b.Add 30 μL of CD45 MicroBeads to cell suspension.
-
a.
-
59.
Incubate cell suspension containing CD45 MicroBeads for 20 min at 4°C while being agitated on a rotator.
-
60.
Add 1 mL of PEB buffer to cell suspension and centrifuge at 300×g for 10 min at 4°C. Aspirate supernatant.
-
61.
Resuspend pellet with 500 μL of PEB buffer.
-
62.Preparation for negative selection
-
a.Place LD columns on magnetic separator (MACS® MultiStand and QuadroMACS™ Separator) with a 15 mL collection tube. One LD column per mouse is required.
-
b.Add 2 mL of PEB buffer to each LD column.
-
a.
-
63.
Apply cell suspension to LD column and wash columns 2 times with 1 mL of PEB buffer. Collect unlabeled cells that pass through the column.
-
64.
Continue with step 23–31 in primary endothelial cell isolation protocol.
Note: Elution may be performed using PEB buffer instead of endothelial cell culture medium only for acute RNA extraction.
Table 2.
Sterile 1× PBS (50 mM, pH 7.4) and 0.5% BSA buffer
| Reagent | Final concentration | Amount |
|---|---|---|
| Albumin, bovine (BSA) | 0.5% | 0.25 g |
| Sterile 1× PBS | n/a | 50 mL |
| Total | n/a | 50 mL |
Store at −20°C for up to 4 weeks.
RNA purification
All following steps have been adapted from the OMEGA bio-tek “E.Z.N.A.® HP Total RNA kit” protocol.
-
65.
Add 20 μL β-mercaptoethanol in 1 mL of GTC Lysis buffer found in OMEGA bio-tek E.Z.N.A.® HP Total RNA kit. Prepare 1 mL 70% ethanol.
Note: Volume of prepared β-mercaptoethanol mixed with GTC Lysis buffer and 70% ethanol depends on number of samples to undergo the RNA purification (350 μL of buffer and 70% ethanol/sample is required).
-
66.
Centrifuge 15 mL tubes containing ECs at 500×g for 5 min and aspirate supernatant.
-
67.
Resuspend cells in 350 μL of GTC Lysis buffer mixed with β-mercaptoethanol. Vortex to mix thoroughly.
-
68.
Insert a RNA homogenizer mini columns into a 2 mL collection tube.
-
69.
Transfer lysate (from step 67) to the RNA homogenizer mini column. Centrifuge at 13,000×g for 1 min. Save filtrate and discard RNA homogenizer mini column.
-
70.
Add 350 μL of 70% ethanol to filtrate. Vortex to mix thoroughly.
Note: Using scissors cut the cap from a 2 mL tube in order to close the 2 mL collection tube. The kit does not provide caps for vortexing.
-
71.
Insert a HiBlind® RNA mini column into a new 2 mL collection tube.
-
72.
Transfer 700 μL sample to the HiBlind® RNA mini column. Centrifuge at 10,000×g for 1 min. Discard filtrate and reuse collection tube.
-
73.Prepare DNase I digestion mixture
-
a.Add 73.5 μL of E.Z.N.A.® DNase I digestion buffer and 1.5 μL of RNase-free DNase I (20Kunitz/ μL) to a 1.5 mL tube.
-
a.
Note: Volume describe in step 73 is for one sample. Adjust volumes accordingly for total number of samples.
-
74.
Add 250 μL of RNA wash buffer I to HiBlind® RNA mini column of each sample. Centrifuge at 10,000×g for 1 min. Discard the filtrate and reuse collection tube.
-
75.
Add 75 μL of DNase I digestion mixture directly to the surface of the membrane of the HiBlind® RNA mini column.
Note: Mixture must be added on the membrane to ensure DNA digestion is complete.
-
76.
Let sit at room temperature for 15 min.
-
77.
Add 250 μL RNA wash buffer I. Let sit at room temperature for 2 min. Centrifuge at 10,000×g for 1 min. Discard filtrate and reuse collection tube.
-
78.
Add 500 μL of RNA wash buffer II prepared with 100% ethanol (preparation according to manufacturer’s protocol). Centrifuge at 10,000×g for 1 min. Discard filtrate and reuse collection tube.
-
79.
Repeat step 78.
-
80.
Centrifuge the empty HiBlind® RNA mini column at maximum speed for 2 min to dry the column.
-
81.
Transfer HiBlind® RNA mini column to a clean 1.5 mL tube.
-
82.
Add 60 μL of DNase-free water to HiBlind® RNA mini column. Centrifuge at maximum speed for 2 min.
-
83.
Pass eluted sample (60 μL) through HiBlind® RNA mini column a second time. Centrifuge at maximum speed for 2 min.
-
84.
Measure RNA concentration using Nanodrop. Troubleshooting 2
-
85.
Store eluted RNA at −80°C.
-
86.
Extracted RNA may be used for subsequent reverse transcription- quantitative polymerase chain reaction (RT-qPCR), RNA deep-sequencing or microarray technologies.
Section 2: Validation of healthy primary mouse cerebral cortex endothelial cells
The following steps are essentially completed before starting any assessment on endothelial cells. The quality controls are required when experiments involve cells isolated from mice with different genotypes or receiving treatments. This will identify any basic alterations between groups. These additional steps consist at a minimum confirmation of a pure endothelial cell population using immunocytochemistry, transcriptomics technologies, number of apoptotic cells, as well as endothelial cell proliferation.
Quality control #1: Confirmation of the endothelial identity of primary ECs in culture
This quality control step consists of confirming the identity of the isolated cells. Here, immunocytochemistry is performed using endothelial cell markers (Figures 2A, 2B, and 2D).
-
87.Preparation of 12-well plate.
-
a.Add a 12 mm glass coverslip to each well of a 12-well plate.
-
b.Add 1 mL of 100% ethanol to each well containing a 12 mm glass coverslip and let incubate for 1 h in sterile conditions. This is to sterilize glass coverslips.
-
c.After incubation, aspirate 100% ethanol and let dry.
-
d.Coat 12-well plate containing 12 mm glass coverslip with 500 μL of 1× attachment factor and let incubate for 30 min at room temperature in sterile conditions.
-
e.After incubation, aspirate 1× attachment factor and let dry.
-
a.
-
88.Harvest primary endothelial cells
-
a.Aliquot TrypLE™ Express Enzyme (1×) in a 15 mL conical tube (1 mL per well of 6-well plate). Incubate at 37°C for 30 min. Aliquot endothelial cell medium [same volume as TrypLE™ Express Enzyme (1×)].Note: One confluent well of a 6-well plate contains approximately 8 × 10⁴ cells to 1 × 10⁵ cells. A total of 2–3 confluent wells of a 6-well plate is required to seed 12 wells of a 12-well plate with 1 × 10⁴ cells per well.
-
b.Aspirate old culture medium from endothelial cells and wash twice with sterile 1× PBS. Aspirate 1× PBS.
-
c.Add 1 mL of TrypLE™ Express Enzyme (1×) per well containing cells and place in a 37°C, 5% CO2 incubator for 5 min.CRITICAL: After 5 minute incubation tap plate. Most cells should be detached. If several cells are still attached to the plate, place the plate back in the 37°C, 5% CO2 incubator for 2 min.
-
d.After incubation, add 1 mL of endothelial cell medium to each well and tap plate to detach cells.
-
e.Transfer cells to a 15 mL conical tube and centrifuge for 5 min at 500×g. Aspirate supernatant. Resuspend cells in 1 mL of endothelial cell medium.
-
a.
-
89.
Count cells using a hemocytometer.
Optional: Cells may be counted using an automated cell counter.
-
90.
Seed cells at a density of 1 × 10⁴ cells per well in a coated 12-well plate with a final volume of 1 mL per well.
Note: Cells are added directly to the coverslip to encourage attachment of cells. Once all cells have been seeded, medium is added.
-
91.
Place 12-well plate containing cells in a 37°C, 5% CO2 incubator for 3–4 days.
Note: Endothelial cell media requires to be replaced every second day until 40%–60% confluence is reached.
-
92.
Once cells have reached required confluency on glass coverslips, aspirate endothelial culture medium from 12-well plate containing cells. Wash cells twice with 1 mL sterile 1× PBS.
-
93.Fixation of endothelial cells
-
a.Prepare 4% PFA in 1× PBS.
-
b.Add 500 μL of 4% PFA to 12-well plate containing 12 mm glass coverslips and cells. Let incubate for 10 min at room temperature.
-
c.Aspirate 4% PFA from cells and wash twice with 1 mL sterile 1× PBS. After second wash, add 1 mL of sterile 1× PBS to each well.
-
a.
Note: Once cells are fixed, the next steps do not need to be performed under a biosafety cabinet but can be continued at the bench.
-
94.Immunocytochemistry of endothelial cells.
-
a.Prepare blocking solution [10% donkey serum, 0.5% fish gelatin mixed in 0.1% PBST (see Tables 3 and 4)]. A total of 1.5 mL per well is required for entire experiment.Note: We use donkey serum because secondary antibody used here were raised in donkey. In general, the serum contained in the blocking solution should match species of the secondary antibodies.
-
b.Add 500 μL of blocking solution to each well containing cells and let incubate at room temperature for 60 min. Aspirate blocking solution.
-
c.Add 500 μL primary antibodies diluted in blocking solution to each well. We used endothelial markers, rabbit anti-VE-Cadherin at a concentration of 1:500 and rat anti-CD31 at a concentration of 1:200.Note: A combination of additional non-endothelial markers is suggested to confirm the purity of isolated cells when initially establishing this protocol. These markers include primary antibodies for neurons (guinea-pig anti-NeuN, 1:1500), pericytes (goat anti-PDGFRß, 1:200), astrocytes (guinea-pig anti-GFAP, 1:1000), microglia (goat anti-Iba1, 1:1000) and smooth muscle cells (mouse anti-αSMA, 1:200).
-
d.Incubate at room temperature for 2 h while being slowly agitated on an orbital shaker.
- e.
-
f.Add 500 μL of secondary antibodies diluted in blocking solution to each well. We used donkey anti-rabbit IgG (H+L) highly cross-absorbed secondary antibody, Alexa Fluor 568 at a concentration of 1:300 and donkey anti-rat IgG (H+L) highly cross-absorbed secondary antibody, Alexa Fluor 488 at a concentration of 1:300.Note: For non-endothelial markers, suggested secondary antibodies consist of donkey anti-goat IgG (H+L) cross-absorbed secondary antibody Alexa Fluor 568 at a concentration of 1:300 for pericytes or microglia, goat anti-guinea pig IgG (H+L) highly cross-absorbed secondary antibody Alexa Fluor 488 at a concentration of 1:300 for astrocytes, goat anti-guinea pig IgG (H+L) highly cross-absorbed secondary antibody Alexa Fluor 647 at a concentration of 1:300 for neurons and donkey anti-mouse IgG (H+L) cross-absorbed secondary antibody Alexa Fluor 568 at a concentration of 1:300 for smooth muscle cells. Another suggested antibody to confirm pure EC population includes Alexa Fluor 488-Phalloidin for staining F-actin. This stain may be added to the wells following the 2 washes of 0.2% PBST (step 94h). Dilute Phalloidin at a concentration of 1:40 in the blocking solution and add to cells for 1 h. After incubation, proceed with step 94i.
-
g.Incubate at room temperature for 60 min while protected from light and slowly agitated on an orbital shaker. Troubleshooting 3
-
h.Wash cells twice for 5 min with 2 mL of 0.2% PBST. Aspirate 0.2% PBST.
-
i.Add 1 mL of DAPI in 0.1M PB solution (see Table 6) at a concentration of 1:20,000 to each well. Incubate for 5 min while protected from light. Aspirate DAPI solution.
-
j.Wash cells twice for 5 min with 1 mL of 0.1M PB.
-
k.Mounting slides
-
i.Add ∼10 μL of Fluoromount-G™ media on a slide.
-
ii.Using forceps remove glass coverslip with cells from 12-well plate.CRITICAL: Glass coverslips are extremely fragile. Do not apply too much pressure with forceps as they will break. Practice removal of glass coverslip from 12-well plate before attempting with cells. If glass coverslip breaks and falls on bench, it can still be imaged.
-
iii.Dip coverslip in water and place face down on slide with Fluoromount-G™ drop.
-
iv.Let slide dry at room temperature for 1 h while being protected from light. Place slides at 4°C overnight to dry.
-
v.Image cells.
-
i.
-
a.
Table 3.
1× PBS (50 mM, pH 7.4) buffer
| Reagent | Final concentration | Amount |
|---|---|---|
| Na2HPO4 | 41.34 mM | 5.87 g |
| NaH2PO4H2O | 8.69 mM | 1.20 g |
| NaCl | 154 mM | 9.00 g |
| Sterile water | n/a | Fill up to 1 L |
| Total | n/a | 1 L |
Store at room temperature (20°C–22°C) for up to 1 year.
Table 4.
0.1% PBST buffer
| Reagent | Final concentration | Amount |
|---|---|---|
| Triton® X-100 | 0.1% | 250 μL |
| 1× PBS | n/a | 249.75 mL |
| Total | n/a | 250 mL |
Store at room temperature (20°C–22°C) for up to 1 year.
Table 5.
0.2% PBST buffer
| Reagent | Final concentration | Amount |
|---|---|---|
| Triton® X-100 | 0.2% | 500 μL |
| 1× PBS | n/a | 249.5 mL |
| Total | n/a | 250 mL |
Store at room temperature (20°C–22°C) for up to 1 year.
Table 6.
PB (0.1M, pH 7.4) buffer
| Reagent | Final concentration | Amount |
|---|---|---|
| Na2HPO4 | 82.7 mM | 11.74 g |
| NaH2PO4H2O | 17.39 mM | 2.40 g |
| Sterile water | n/a | Fill up to 1 L |
| Total | n/a | 1 L |
Store at room temperature (20°C–22°C) for up to 1 year.
Quality control #2: Measure the expression of signature endothelial genes and non-endothelial genes from purified RNA
Additional gene expression assays such as RT-qPCR, RNA deep sequencing (RNAseq) or microarray technologies (Ouellette et al., 2020) can be used to confirm EC population purity following the acute purification of RNA described in purification of endothelial RNA from mouse cerebral cortex (Figure 2C).
Quality control #3: Evaluation of apoptotic rate in cultured primary mouse cerebral cortex endothelial cells
The following step consist of a third quality control. This assay allows for the detection and quantification of programmed cell death following caspase activation (Figure 2E).
-
95.Preparation of 96-well plate.
-
a.Coat a 96-well plate with 100 μL of 1× attachment factor.
-
b.Let plate incubate for 30 min at room temperature in sterile conditions.
-
c.Aspirate 1× attachment factor and let dry.
-
a.
-
96.Harvest primary endothelial cells.
-
a.Aliquot TrypLE™ Express Enzyme (1×) in a 15 mL conical tube (1 mL per well of 6-well plate). Incubate at 37°C for 30 min. Aliquot endothelial cell medium [same volume as TrypLE™ Express Enzyme (1×)].Note: One confluent well of a 6-well plate contains approximately 8 × 10⁴ cells to 1 × 10⁵ cells. One confluent well can seed up to one 96-well plate.
-
b.Aspirate old culture medium from endothelial cells and wash twice with sterile 1× PBS. Aspirate 1× PBS.
-
c.Add 1 mL of TrypLE™ Express Enzyme (1×) per well containing cells and place in a 37°C, 5% CO2 incubator for 5 min.CRITICAL: After 5 minute incubation tap plate. Most cells should be detached. If several cells are still attached to the plate, place the plate back in the 37°C, 5% CO2 incubator for 2 min.
-
d.After incubation, add 1 mL of endothelial cell medium to each well and tap plate to detach cells.
-
e.Transfer cells to a 15 mL conical tube and centrifuge for 5 min at 500×g. Aspirate supernatant. Resuspend cells in 1 mL of endothelial cell medium.
-
a.
-
97.
Count cells using a hemocytometer.
Optional: Cells may be counted using an automated cell counter.
-
98.
Seed cells at a density of 5 × 10³ cells per well in coated 96-well plate with a final volume of 200 μL per well.
-
99.
Place 96-well plate containing cells in a 37°C, 5% CO2 incubator for 48 h.
-
100.
Visually confirm that cells have attached to plate with 70%–80% confluence.
-
101.
Treat 3–4 wells with 1 μM staurosporine for 6 h to act as the positive control.
Note: Number of wells for positive control depends on available cells.
-
102.
Remove media and replace with 5 μM of CellEvent™ Caspase-3/7 Green Detection Reagent diluted in endothelial cell medium to each well and incubate for 30 min in a 37°C, 5% CO2 incubator.
-
103.
Wash cells twice using 100 μL sterile 1× PBS.
-
104.
Fix endothelial cells using 100 μL of 2% paraformaldehyde for 30 min and wash cells twice using 100 μL sterile 1× PBS.
-
105.
Stain nuclei using Hoechst 33342 following manufacturers protocol.
-
106.
Image cells.
Note: Cellomics ArrayScan VTI high-content imaging platform running on HCS Studio software was used to image caspase-3 positive cells.
-
107.
Following imaging, count caspase-3 positive cells (green) using Fiji-Image J (Schindelin et al., 2012).
Quality control #4: Quantification of endothelial cell proliferation in culture using a thymidine analogue
This fourth quality control step consist of the assessment of proliferation in cell culture using an 5-Ethynyl-2′-deoxyuridine (EdU) incorporation assay.
-
108.Preparation of 12-well plate.
-
a.Add a 12 mm glass coverslip to each well of a 12-well plate.
-
b.Add 1 mL of 100% ethanol to each well containing a 12 mm glass coverslip and let incubate for 1 h in sterile conditions. This is to sterilize glass coverslips.
-
c.After incubation, aspirate 100% ethanol and let dry.
-
d.Coat 12-well plate containing 12 mm glass coverslip with 500 μL of 1× attachment factor and let incubate for 30 min at room temperature in sterile conditions.
-
e.After incubation, aspirate 1× attachment factor and let dry.
-
a.
-
109.Harvest primary endothelial cells.
-
a.Aliquot TrypLE™ Express Enzyme (1×) in a 15 mL conical tube (1 mL per well of 6-well plate). Incubate at 37°C for 30 min. Aliquot endothelial cell medium [same volume as TrypLE™ Express Enzyme (1×)].
-
b.Aspirate old culture medium from endothelial cells and wash twice with sterile 1× PBS. Aspirate 1× PBS.
-
c.Add 1 mL of TrypLE™ Express Enzyme (1×) per well containing cells and place in a 37°C, 5% CO2 incubator for 5 min.CRITICAL: After 5 minute incubation tap plate. Most cells should be detached. If several cells are still attached to the plate, place the plate back in the 37°C, 5% CO2 incubator for 2 min.
-
d.After incubation, add 1 mL of endothelial cell medium to each well and tap plate to detach cells.
-
e.Transfer cells to a 15 mL conical tube and centrifuge for 5 min at 500×g. Aspirate supernatant. Resuspend cells in 1 mL of endothelial cell medium.
-
a.
-
110.
Count cells using a hemocytometer.
Optional: Cells may be counted using an automated cell counter.
-
111.
Seed cells at a density of 5 × 10³ cells per well in coated 12-well plate with a final volume of 1 mL per well.
-
112.
Place 12-well plate containing cells in a 37°C, 5% CO2 incubator for 3–4 days.
Note: Endothelial cell media requires to be replaced every second day until ∼60% confluence is reached.
-
113.Rates of endothelial cell proliferation was determined using a Click-iT 5-ethynyl-2′-deoxyuridine (EdU) assay. Protocol was adapted from the manufacturer’s instructions.
-
a.Prepare 20 mM stock solution of EdU (5 mg of EdU in 1 mL of sterile 1× PBS).
-
b.Dilute 20 mM EdU in 1/10 endothelial cell medium (5 μL of 20 mM EdU in 45 μL of endothelial cell medium).
-
c.Add 10 μL of diluted EdU in 490 μL of endothelial cell medium (final concentration 20 μM in 500 μL).Note: This volume is for 1 well of a 12-well plate. Volume will need to be modified accordingly for more wells containing cells.
-
d.Remove 500 μL of endothelial cell medium of each well of 12-well plate containing cells.
-
e.Add 500 μL of EdU at 20 μM to each well containing cells.Note: A final volume of 1 mL is in each well containing cells. Therefore, final concentration of EdU in well is 10 μM.
-
f.Incubate cells in a 37°C, 5% CO2 incubator for 48 h without changing endothelial cell medium.
-
g.Fixation of endothelial cells
-
i.Prepare 4% PFA in 1× PBS.
-
ii.Add 500 μL of 4% PFA to 12-well plate containing 12 mm glass coverslips and cells. Let incubate for 10 min at room temperature.
-
iii.Aspirate 4% PFA from cells and wash twice with 1 mL of 3% BSA in 1× PBS.Note: Once cells are fixed, the next steps do not need to be performed under a biosafety cabinet but may be continued at the bench.
-
iv.Aspirate washing solution. Add 1 mL of 0.5% Triton® X-100 in 1× PBS to each well. Incubate at room temperature for 20 min.
-
i.
-
h.EdU detection
-
i.Prepare 1× Click-iT® reaction cocktail according to manufacturer’s protocol (found in Click-iT™ EdU Alexa Fluor™ 594 Imaging Kit).
-
ii.Remove 0.5% Triton® X-100 in 1× PBS solution from each well. Wash cells twice with 1 mL of 3% BSA in 1× PBS.
-
iii.Add 0.5 mL of 1× Click-iT® reaction cocktail to each well containing cells.
-
iv.Incubate plate for 30 min at room temperature, while protected from light.
-
v.Remove reaction cocktail and wash cells once with 1 mL of 3% BSA in 1× PBS.
-
vi.Proceed to immunocytochemistry. Follow protocol as of step 94c.Note: Primary antibody and secondary antibody used following EdU incorporation assay are rabbit anti-VE-Cadherin at a concentration of 1:500 and donkey anti-rabbit IgG (H+L) highly cross-absorbed secondary antibody, Alexa Fluor 647 at a concentration of 1:300. Troubleshooting 4
-
i.
-
a.
-
114.Image cells.
-
a.Take ten images using 20× objective.
-
b.Count EdU positive cells using the Cell Counter plugin in Fiji-Image J (Schindelin et al., 2012).
-
a.
Section 3: Functional assessment using cultured primary mouse cerebral cortex endothelial cells
Assessment of endothelial cell migration
Cells must have reached 70%–80% confluence before completing scratch wound assay. This assay is a convenient method for analysis of cell migration (Figure 3A). This protocol is adapted from the Incucyte ZOOM® 96-Well Scratch Wound Cell Migration & Invasion Assays User Manual. Troubleshooting 5
-
115.Prepare 96-well ImageLock plate.
-
a.Coat a 96-well ImageLock plate with 100 μL of 1× attachment factor.
-
b.Let plate incubate for 30 min at room temperature in sterile conditions.
-
c.Aspirate 1× attachment factor and let dry.
-
a.
-
116.Harvest primary endothelial cells.
-
a.Aliquot TrypLE™ Express Enzyme (1×) in a 15 mL conical tube (1 mL per well of 6-well plate). Incubate at 37°C for 30 min. Aliquot endothelial cell medium [same volume as TrypLE™ Express Enzyme (1×)].
-
b.Aspirate old culture medium from endothelial cells and wash twice with sterile 1× PBS. Aspirate 1× PBS.
-
c.Add 1 mL of TrypLE™ Express Enzyme (1×) per well containing cells and place in a 37°C, 5% CO2 incubator for 5 min.CRITICAL: After 5 minute incubation tap plate. Most cells should be detached. If several cells are still attached to the plate, place the plate back in the 37°C, 5% CO2 incubator for 2 min.
-
d.After incubation, add 1 mL of endothelial cell medium to each well and tap plate to detach cells.
-
e.Transfer cells to a 15 mL conical tube and centrifuge for 5 min at 500×g. Aspirate supernatant. Resuspend cells in 1 mL of endothelial cell medium.
-
a.
-
117.
Count cells using a hemocytometer.
Optional: Cells may be counted using an automated cell counter.
-
118.
Seed cells at a density of 2 × 10⁴ cells per well in coated 96-well ImageLock plate with a final volume of 100 μL per well.
Note: All wells of 96-well ImageLock plate must have 100 μL, even if there are no cells in wells. Do not write on top of the plate.
-
119.
Place 96-well ImageLock plate containing cells in a 37°C, 5% CO2 incubator for 48 h.
-
120.Preparing and creating wounds using WoundMaker™
-
a.Fill wash boat 1 with 45 mL of sterile water and place WoundMaker™ pin block in water for 5 min.
-
b.Fill wash boat 2 with 45 mL of 70% ethanol and place WoundMaker™ pin block in the solution for 5 min.
-
c.Place WoundMaker™ pin block on an empty wash boat.
-
d.Insert 96-well ImageLock plate containing cells and media into the base plate holder. Remove plate cover.
-
e.Place WoundMaker™ pin block onto the base plate holding the cells. Push and hold lever.CRITICAL: If cells are too confluent, large sheets of cells will be removed and wound will not be uniform between wells. Troubleshooting 6
-
f.Lift WoundMaker™ pin block and replace with 96-well ImageLock plate cover.
-
g.Aspirate and replace endothelial cell culture medium to remove floating cells.
-
a.
-
121.
Place 96-well ImageLock plate containing cells and 100 μL fresh media into the IncuCyte™ Zoom® Apparatus to record cell migration.
Note: ZOOM software is scheduled for repeat scanning with images taken every 2 h for 24 h. In the software make sure ‘scan type’ is set to Scratch Wound and Wide Mode.
-
122.Clean WoundMaker™ after use.
-
a.Fill wash boat 4 with 45 mL of 0.5% Alconox and place WoundMaker™ pin block in solution for 5 min.
-
b.Fill wash boat 5 with 45 mL of 1% Virkon S. and place WoundMaker™ pin block in the solution for 5 min.
-
c.Fill wash boat 1 with 45 mL of sterile water and place WoundMaker™ pin block in water for 5 min.
-
d.Fill wash boat 2 with 45 mL of 70% ethanol and place WoundMaker™ pin block in the solution for 5 min.
-
e.Place WoundMaker™ on its base and store at room temperature.
-
a.
-
123.
Quantification of migration assay is performed using IncuCyte® ZOOM Software. More detailed information on data analysis can be found at the Essen BioScience website.
Figure 3.

Expected outcomes with primary mouse cerebral cortex ECs isolated from P14 male animals
(A) Representative images (left) and quantification (right) for a scratch wound-healing assays used to measure migration of primary mouse brain ECs. The orange lines indicate cellular migration fronts. Scale bar: 300μM.
(B) In vitro network formation assay using primary mouse brain ECs from P14 brains to assess vascular network formation and remodeling over 48 h in a growth factor-reduced Matrigel®. Left, representative images at the 8hr time point, scale bar: 500μM. Right, Quantifications of network density (i.e., total endothelial tube length) and network nodes (i.e., total number of branching hubs). Image in (B) was captured using a Nikon Eclipse TE2000- E inverted microscope. All data displayed are mean ± S.E.M.
Assessment of endothelial cell angiogenic activity
The following steps are to be completed after cell isolation and 70%–80% confluence has been reached. This endothelial cell tube formation assay measures the ability of endothelial cells to form capillary-like structures in a extracellular matrix (Matrigel®; Figure 3B).
Day prior to tube formation assay
-
124.
Place a 96-well plate and 200 μL pipette tips at −20°C overnight.
-
125.
Reduced growth factor Matrigel® should be at 4°C overnight to ensure slow thawing.
Day of tube formation assay
-
126.Harvest primary endothelial cells and preparation of growth factor reduced Matrigel® plate
-
a.Aliquot TrypLE™ Express Enzyme (1×) in a 15 mL conical tube (1 mL per well of 6-well plate). Incubate at 37°C for 30 min. Aliquot endothelial cell medium [same volume as TrypLE™ Express Enzyme (1×)].
-
b.Place 96-well plate and 200 μL pipette tips (from the −20°C freezer) as well as growth factor reduced Matrigel on ice in the biosafety cabinet.
-
c.Aspirate old culture medium from endothelial cells and wash twice with sterile 1× PBS. Aspirate 1× PBS.
-
d.Add 1 mL of TrypLE™ Express Enzyme (1×) per well containing cells and place in a 37°C, 5% CO2 incubator for 5 min.CRITICAL: After 5 minute incubation, tap plate. Most cells should be detached. If several cells are still attached to the plate, return plate to the 37°C, 5% CO2 incubator for 2 min.
-
e.During 5 min incubation, add 50 μL of growth factor reduced Matrigel® per well of cold 96-well plate. Quickly remove any visible bubbles in wells containing growth factor reduced Matrigel®. After removing bubbles, a minimum of 40 μL growth factor reduced Matrigel® must be left in the well for assay. Place 96-well plate containing growth factor reduced Matrigel in a 37°C, 5% CO2 incubator for 30 min.Note: Hold the neck of the Matrigel® bottle to reduce heat transfer. Prepare 3 wells of growth factor reduced Matrigel per mouse for accurate assessment of angiogenic capacity. Always leave the 96-well plate on ice to prevent Matrigel® polymerization until all wells are ready to be transferred to the incubator.
-
f.After incubation, add 1 mL of endothelial cell medium to each well of 6-well plate and tap plate to detach cells.
-
g.Transfer cells to a 15 mL conical tube and centrifuge for 5 min at 500×g. Aspirate supernatant. Resuspend cells in 1 mL of endothelial cell medium.
-
a.
-
127.
Count cells using a hemocytometer.
Optional: Cells may be counted using an automated cell counter.
-
128.
A total of 6 × 10⁴ cells is required per mouse in a final volume of 450 μL of endothelial cell medium.
Note: For each mouse, 3 wells of a 96-well plate will be prepared. A total of 6 × 10⁴ cells per mouse is needed. Each well of the 96-well plate will contain 2 × 10⁴ cells. One confluent well of a 6-well plate is needed to prepare 3 wells of a 96-well plate with matrigel (one confluent well contains approximately 8 × 10⁴ cells to 1 × 10⁵ cells).
-
129.
After the 30 min incubation of the 96-well plate containing growth factor reduced Matrigel®, seed 2 × 10⁴ cells (150 μL) per well containing matrix.
-
130.
Place 96-well plate containing matrix and endothelial cells in a 37°C, 5% CO2 incubator until imaging time points (4 h, 8 h, 24 h, 48 h). Troubleshooting 7
Note: Imaging was completed with a Nikon Eclipse TE2000-E inverted microscope.
-
131.Quantification of tube formation assay using Fiji-image J (Schindelin et al., 2012).
-
a.Download macro: Angiogenesis Analyzer for ImageJ (Carpentier, 2012)
-
b.Install and open macro in Fiji-image J.
-
c.Choose file containing all tube formation images and select “Analyze HUVECS Phase Contrast” and let macro run.
-
d.Once analysis is complete, export file in Excel. Branching length is found under “Total branching length” column and number of nodes is found under “Nb master junction” column. Using this data angiogenic activity differences between may be determined.
-
a.
Expected outcomes
Our protocol yields pure primary mouse brain EC cultures, whereby ECs can be utilized for subsequent characterization and functional assays. In culture, ECs will reach a pure population within 48 h of culture, and confluence within 7 days. Using a double staining of phalloidin and VE-Cadherin revealed a pure EC population after 48 h in culture as all cells are VE-Cadherin positive (Figures 2A and 2B). As of this stage, population purity and health can be confirmed, and assessment of functional characteristics can be completed. Of note, endothelial behavior will start to change after two passages. Therefore, cell isolation from multiple mice may be required to complete the entirety of this protocol, in order to eliminate the need of additional passaging of cells. We emphasize the importance of validating the nature of ECs and of confirming their health in culture prior to any functional assessment. Additional transcriptomics assays can confirm EC population purity following acute cell isolation. Using deep RNA sequencing, we confirmed endothelial gene enrichment from purified endothelial RNA as well as a very low neuronal contamination (Figure 2C). Following immunocytochemical staining for endothelial markers CD31 and VE-cadherin (other markers can be used), intercellular junctions can be delineated and their distribution quantified. For instance, normal distribution of staining can be quantified across cell-cell junctions using the profile plot tool in ImageJ. A peak in staining intensity should be observed at cell-cell junctions (Figure 2D). Using the caspase-3/7 green assay to assess apoptotic rates of cortical ECs allows direct count of the proportion of apoptotic cells. Number of apoptotic cells (green) are counted and expressed as % of total cells in each image. In our hands, healthy WT mouse brain ECs isolated at P14 yield ∼4% of apoptotic ECs (Figure 2E). Our protocol also describes a fourth quality control with the measure of EC proliferation. The number of EdU positive cells is counted and expressed as % of total cells. For more information, please consult our recent publication Ouellette et al. (2020) in which this experiment was performed using human-derived endothelial cells. Once EC identity and health are confirmed, these cells can undergo various functional assays. This protocol describes two assays: a cell migration assay and an angiogenic activity assay. For cell migration assessment, a scratch wound is imaged and measured during 24 h. Imaging at different time points during this period allows to measure the percent of healed area throughout time (Figure 3A). To measure angiogenic activity of ECs, a Matrigel®-based network formation assay is used. Imaging at different time points allows to quantify the formation of new endothelial networks. At 8 h post-seeding, branching and nodes can be readily identified in this 3D matrix. An extensive network will be formed until ∼12 h, after which the network will collapse due to nutrient depletion within the well (Figure 3B).
Limitations
This protocol has been optimized for the isolation and characterization of primary mouse cerebral cortex endothelial cells (ECs) isolated from P14 pups. While these steps can be applied to younger (e.g., embryos, <P14) or adult (≥P50) mice, note that cell isolations from adult mice are more challenging and yield a lower number of ECs. Thus, adult mice cortices may need to be pooled to get a higher cell density. Moreover, adult primary brain ECs are more sensitive to manipulations and require an extended amount of time for growth before functional assays.
The cell isolation procedure described in primary mouse cerebral cortex endothelial cell isolation and culture yields a semi-pure EC population, in part contaminated by myelin debris; therefore, the precise number of ECs following this isolation cannot be determined. However, once EC colonies grow and expand, a total of 80,000–100,000 confluent cells can be counted in one well from a 6-well plate. With acute isolation of ECs for gene expression studies (purification of endothelial RNA from mouse cerebral cortex), the number of cells is not counted to preserve cell population integrity by reducing manipulations. As noted in Ouellette et al. (2020), ECs from two P14 brains (four cerebral cortices) are pooled into one biological replicate to obtain a sufficient amount of total RNA for transcriptomic studies.
Troubleshooting
Problem 1
Low number cells have attached to culture plate (step 34).
Potential solution
Following cell isolation decrease elution volume in order to have a higher density of endothelial cells for initial plating. Plate all cells within one well of a coated 6-well plate.
Problem 2
Low RNA concentration (step 84).
Potential solution
To increase RNA concentration, pool ECs from 4 cortices (2 mice) following ECs elution from LS column. This will increase the number of cells prior to the RNA extraction. Therefore, yield a higher concentration of RNA.
Problem 3
Endothelial cells have detached during immunocytochemistry (step 94g).
Potential solution
During all incubations, plates containing cells may be slowly agitated. However, if cells are being washed away during incubation or washing steps, leave plate on the bench without being agitated during incubations. During washing steps, a plastic transfer pipette with a 200 μL tip can be used to aspirate buffers to decrease the chance of disturbing the cells.
Problem 4
Emission bleed between A594 and A647 (step 113h).
Potential solution
An alternate fluorophore may be used for immunocytochemistry. Secondary antibody donkey anti-rabbit IgG (H+L) highly cross-absorbed secondary antibody, Alexa Fluor 488 at a concentration of 1: 300 is recommended instead of Alexa Fluor 647.
Problem 5
Incucyte ZOOM® equipment is not available (steps 115–123).
Potential solution
A traditional scratch wound assay can be used in this quality control protocol. In this case, the plate is prepared as described in step 95. Endothelial cells are seeded at a density 2 × 10⁴ cells per well of a coated 96-well plate. The plate containing the cells is placed in a 37°C, 5% CO2 incubator for 48 h. A sterile 200 μL pipette tip is used to create a straight wound withing each well. Cell migration imaging at time points of interest can be completed using an inverted phase contrast microscope attached to a camera until the wound is closed.
Problem 6
Large cell sheets have been removed following wound (step 120e).
Potential solution
If cells are too confluent, large cell sheets will be removed during wound creating: 1) decrease seeding density of endothelial cells, or 2) create wound after 24 h of plating instead of 48 h. By decreasing cell seeding density and time before assay, a single layer of cells will be formed. This single layer of cells will lead to a defined wound.
Problem 7
Cells within matrix appear round and no branching has formed after 24 h (step 130).
Potential solution
If cells are dying within the matrix, it is possible that the amount of time allotted for cell counting is too long. Thus, it would be beneficial to harvest cells in batches that way they are out of an optimal growing environment for a shorter amount of time increasing their chance of survival.
Resource availability
Lead contact
Further information and requests for resources and reagents should be directed to and will be fulfilled by the lead contact, Baptiste Lacoste: blacoste@uottawa.ca
Materials availability
This study did not generate new unique reagents.
Acknowledgments
For this work, J.O. was supported by Ph.D. scholarship awards from the Canadian Institutes of Health Research (CIHR) and the Canadian Vascular Network (CVN), and B.L. by a research grant from the CIHR (grant #388805). We thank the Cell Biology and Image Acquisition (CBIA) Core Facility at Faculty of Medicine at University of Ottawa.
Author contributions
J.O. optimized and carried out experiments, wrote the manuscript draft and participated in figure generation. B.L. proofread the manuscript, provided guidance in writing, and participated in figure assembly.
Declaration of interests
Authors declare no competing interest.
Contributor Information
Julie Ouellette, Email: jouel100@uottawa.ca.
Baptiste Lacoste, Email: blacoste@uottawa.ca.
Data and code availability
Data and codes are available from the lead contact upon request as well as from supplementary material from Ouellette et al. (2020) Nat. Neurosci.
References
- Carpentier G. ImageJ News; 2012. Contribution: Angiogenesis Analyzer. [Google Scholar]
- Collins S., Wagner C., Gagliardi L., Kretz P., Fischer M.-C., Kessler P., Kannan M., Yalcin B. A method for parasagittal sectioning for neuroanatomical quantification of brain structures in the adult mouse. Curr. Protoc. Mouse Biol. 2018;8:e48. doi: 10.1002/cpmo.48. [DOI] [PubMed] [Google Scholar]
- Meyerhoff J., Muhie S., Chakraborty N., Naidu L., Sowe B., Hammamieh R., Jett M., Gautam A. Microdissection of mouse brain into functionally and anatomically different regions. J. Vis. Exp. 2021;168:e61941. doi: 10.3791/61941. [DOI] [PubMed] [Google Scholar]
- Ouellette J., Toussay X., Comin C.H., Costa L.D.F., Ho M., Lacalle-Aurioles M., Freitas-Andrade M., Liu Q.Y., Leclerc S., Pan Y., et al. Vascular contributions to 16p11.2 deletion autism syndrome modeled in mice. Nat. Neurosci. 2020;23:1090–1101. doi: 10.1038/s41593-020-0663-1. [DOI] [PubMed] [Google Scholar]
- Schindelin J., Arganda-Carreras I., Frise E., Kaynig V., Longair M., Pietzsch T., Preibisch S., Rueden C., Saalfeld S., Schmid B., et al. Fiji: an open-source platform for biological-image analysis. Nat. Methods. 2012;9:676–682. doi: 10.1038/nmeth.2019. [DOI] [PMC free article] [PubMed] [Google Scholar]
- Zhang Y., Chen K., Sloan S.A., Bennett M.L., Scholze A.R., O'Keeffe S., Phatnani H.P., Guarnieri P., Caneda C., Ruderisch N., et al. An RNA-sequencing transcriptome and splicing database of glia, neurons, and vascular cells of the cerebral cortex. J. Neurosci. 2014;34:11929–11947. doi: 10.1523/JNEUROSCI.1860-14.2014. [DOI] [PMC free article] [PubMed] [Google Scholar]
Associated Data
This section collects any data citations, data availability statements, or supplementary materials included in this article.
Data Availability Statement
Data and codes are available from the lead contact upon request as well as from supplementary material from Ouellette et al. (2020) Nat. Neurosci.