

Summary
Exposure to ultraviolet (UV) light induces DNA damage, predominantly cyclobutane pyrimidine dimers (CPD) and 6,4-photoproducts (6,4-PP), as well as rare, atypical photoproducts at thymidine-adenine (TA) sequences. We have recently shown ‘TA’ photoproducts are induced in UV-irradiated oligonucleotides and across the budding yeast genome. Here, we describe a protocol for mapping atypical ‘TA’ photoproducts in vitro and in vivo. This protocol overcomes the technical challenges involved in accurately mapping such rare photoproducts by using ultraviolet damage endonuclease (UVDE) enzymes.
For complete details on the use and execution of this protocol, please refer to Laughery et al. (2020).
Subject areas: Bioinformatics, Model Organisms, Molecular Biology, Sequence analysis, Sequencing
Graphical Abstract
Highlights
-
•
UVDE enzyme cleaves ‘TA’ photoproducts in UV-irradiated oligos and the yeast genome
-
•
CPD photolyase treatment ensures only 6,4-PPs and atypical lesions are mapped
-
•
Bioinformatic pipelines precisely locate where these ‘TA’ lesions formed in vivo
Exposure to ultraviolet (UV) light induces DNA damage, predominantly cyclobutane pyrimidine dimers (CPD) and 6,4-photoproducts (6,4-PP), as well as rare, atypical photoproducts at thymidine-adenine (TA) sequences. We have recently shown ‘TA’ photoproducts are induced in UV-irradiated oligonucleotides and across the budding yeast genome. Here, we describe a protocol for mapping atypical ‘TA’ photoproducts in vitro and in vivo. This protocol overcomes the technical challenges involved in accurately mapping such rare photoproducts by using ultraviolet damage endonuclease (UVDE) enzymes.
Before you begin
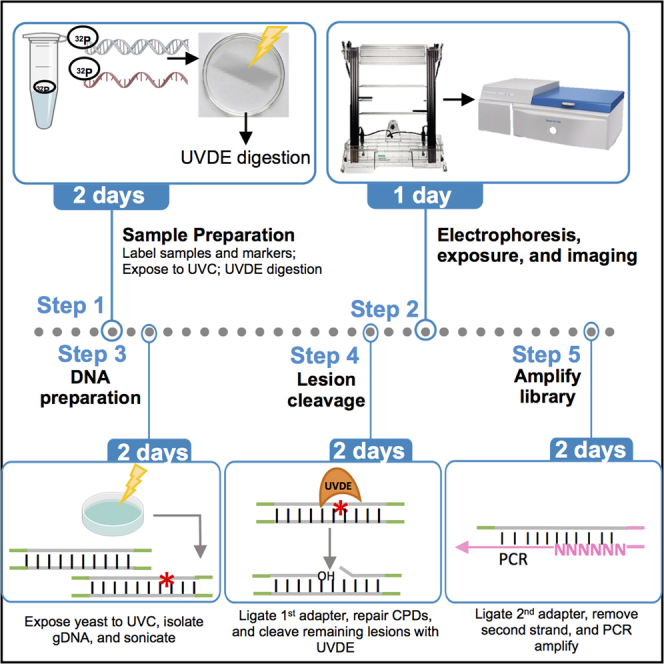
Here we describe a protocol that utilizes the recently discovered ability of UVDE to cleave atypical ‘TA’ UV lesions. The in vitro section of the protocol validates UVDE cleavage of ‘TA’ photoproducts in oligonucleotides, and the in vivo UVDE-seq section of the protocol uses UVDE to map atypical photoproducts throughout the Saccharomyces cerevisiae genome (Figure 1). This protocol may be modified for use in other organisms or cell lines.
Figure 1.

In vitro and in vivo ‘TA’ photoproduct cleavage protocol overview
Design primers
Timing: 0.5 days
-
1.
Design oligos containing five ‘TA’ repeats (Figure 2) and the marker oligos spanning the expected sizes of ‘TA’ lesions, as well as adapters and primers for in vivo mapping.
Figure 2.

In vitro characterization of ‘TA’ photoproduct (adapted from Laughery et al., 2020)
Prep equipment and reagents
-
2.
Wipe down the beta shield, equipment (gel apparatus), and goggles using ethanol to clear away dirt/dust and to have a better visibility.
-
3.
Prepare buffers and reagents essential for the experiment and plan using 32P within the first half-life for best signal.
-
4.
Adapters must be ligated prior to use. To do this, combine 40 μL of 100 mM of each strand (top and bottom, Table 1), 10 μL 10× ligase buffer, and 10 μL dH2O. Incubate using the annealing conditions below.
| Steps | Temperature | Time |
|---|---|---|
| Initial denaturation | 95°C | 5 min |
| Annealing | 95°C | 1 min |
| −1°C per cycle | ||
| Hold | 4°C | Forever |
-
5.
1.5M NaOH must be made fresh, either once a month or after every 3 uses, whichever comes first. 0.15M NaOH must be made fresh the day it will be used.
Table 1.
Oligonucleotides used for UVDE-seq
| Adapters | |
| trP1 top | 5′-CCTCTCTATGGGCAGTCGGTGAT-phosphorothioate-T-3′ |
| trP1 bottom | 5′-phosphate-ATCACCGACTGCCCATAGAGAGGC-dideoxy-3′ |
| A1 top | 5′-phosphate-ATCCTCTTCTGAGTCGGAGACACGCAGGGATGAGATGGC-dideoxy-3′ |
| A1 bottom | 5′-biotin-CCATCTCATCCCTGCGTGTCTCCGACTCAGAAGAGGATNNNNNN-C3 phosphoramidite-3′ |
| A2 top | 5′-phosphate-ATCACGAACTGAGTCGGAGACACGCAGGGATGAGATGGC-dideoxy-3′ |
| A2 bottom | 5′-biotin-CCATCTCATCCCTGCGTGTCTCCGACTCAGTTCGTGATNNNNNN-C3 phosphoramidite-3′ |
| A3 top | 5′-phosphate-ATCTCAGGCTGAGTCGGAGACACGCAGGGATGAGATGGC-dideoxy-3′ |
| A3 bottom | 5′-biotin-CCATCTCATCCCTGCGTGTCTCCGACTCAGCCTGAGATNNNNNN-C3 phosphoramidite-3′ |
| A4 top | 5′-phosphateATCGCGATCTGAGTCGGAGACACGCAGGGATGAGATGGC-dideoxy-3′ |
| A4 bottom | 5′- biotin-CCATCTCATCCCTGCGTGTCTCCGACTCAGATCGCGATNNNNNN-C3 phosphoramidite-3′ |
| Primers | |
| Primer trP1 | 5′-CCTCTCTATGGGCAGTCGGTGATT-3′ |
| Primer A | 5′-CCATCTCATCCCTGCGTGTCTCCGAC-3′ |
Key resources table
| REAGENT or RESOURCE | SOURCE | IDENTIFIER |
|---|---|---|
| Chemicals, peptides, and recombinant proteins | ||
| E. coli CPD photolyase | Dr. Steven Roberts (Laughery et al., 2020) | N/A |
| T. Thermophilus UVDE enzyme | Dr. Steven Roberts (Laughery et al., 2020) | N/A |
| Critical commercial assays | ||
| Ampure XP Beads | Beckman Coulter | A63881 |
| ATP(γ-32P) | PerkinElmer | BLU002Z250UC SB4 |
| Dynabeads M-280 Streptavadin beads | Thermo Scientific | 11205D |
| Glycogen | Thermo Fisher Scientific | FERR0561 |
| Next dA-Tailing Module | New England Biolabs | E6053L |
| Next End Repair Module | New England Biolabs | E6050L |
| Quick Ligase Module | New England Biolabs | E6056L |
| RNase A | Fisher Scientific | FEREN0531 |
| Shrimp Alkaline Phosphatase | Thermo Fisher Scientific | 78390500UN |
| T4 Polynucleotide Kinase | New England Biolabs | M0201S |
| Taq polymerase | VWR | 2428-9844 |
| Terminal Transferase Module | New England Biolabs | M0315L |
| Deposited data | ||
| Raw UVDE-seq data | This study (Laughery et al., 2020) | GEO: GSE144679 |
| Experimental models: Organisms/strains | ||
| Saccharomyces cerevisiae (BY4741) | ATCC | 4040002 |
| Oligonucleotides | ||
| ‘TA’ oligos, marker oligos, trP1 and A adapters, and primers (see Tables 1 and Table 2) | Integrated DNA Technologies | N/A |
| Software and algorithms | ||
| Bowtie2 | (Langmead and Salzberg, 2012) | http://bowtie-bio.sourceforge.net/bowtie2/index.shtml |
| Samtools | (Li et al., 2009) | http://samtools.sourceforge.net/ |
| Other | ||
| 100 bp DNA ladder | New England Biolabs | N3231 |
| 100% Ethanol | Decon Labs | V1016 |
| 100% Formamide | Fisher Scientific | 46-101-00ML |
| 40% Acrylamide: Bisacrylamide | Bio-Rad Laboratories | 1610145 |
| 5” × 7” plastic developing tray | United States Plastic Corp. | 52050 |
| 6× purple gel loading dye | New England Biolabs | B7024S |
| Acid-washed beads | Sigma-Aldrich | G9268-500G |
| Agarose | Fisher Scientific | BP160-100 |
| Agarose gel apparatus | Thermo Fisher Scientific | 09-528-110 |
| Benchtop upright beta shield | FISHER BIOTEC | FB-BT-1-FIS |
| Beta containers/discards | FISHER BIOTEC | S29138 |
| Beta shields | Nalgene | 6700-2418 |
| BioRupter Sonicator | Diagenode, Inc. | UCD-300 TM |
| Coverslips | Corning | 48397-163 |
| ddATP or ddGTP | Roche Diagnostics | 03 732 738 001 |
| dNTPs | New England Biolabs | N0447S |
| Filterpaper sheets | VWR | 47749-838 |
| Geiger Muller Counter & probe 44-9 | Ludlum | N/A |
| Gel dryer attached to vacuum | Bio-Rad Laboratories | 165-1745/165-1746 |
| Hand-held UVA lamp | Spectroline | ENF-240C |
| HydroTech Vacuum pump | Bio-Rad Laboratories | Model 583 |
| Illustra G-50 columns | GE Healthcare | 27-5330-01 |
| Imagequant TL v8.1 software | Cytiva Life Sciences | 29000605 |
| Magnetic phosphor screen | GE healthcare | N/A |
| Magnetic tube rack | Thermo Fisher Scientific | 12321D |
| Microcentrifuge | Eppendorf | 5405000107 |
| NanoDrop Spectrophotometer ND-1000 | Thermo Fisher Scientific | SKU: 2353-30-0010 |
| Phenol:Chloroform:Isoamyl alcohol (PCI) | Fisher Scientific | BP1752I-400 |
| Rotator | Express Lab Werks | Tc7 |
| Centrifuge (Sorvall Legend T/RT) | Kendro Laboratory Products | N/A |
| Sequencing gel apparatus | Bio-Rad Laboratories | 165-3860/165-3861/165-3862/165-3863 |
| Stratalinker UV Crosslinker TM1800 | StrateGene | 400071 (120 V) / 400072 (230 V) / 400672 (100 V) |
| Thermocycler | Eppendorf | 2231000814 |
| TPX tubes | Diagenode, Inc. | C30010010-100 (M-50001) |
| Typhoon FLA 7000 series | GE Healthcare | N/A |
| UV light box | N/A | N/A |
| UV-A Radiometer | Fisher Scientific | 06-662-65 |
| UV-C Radiometer | Spectroline | DM-254N |
Materials and equipment
10× TBE buffer
| Reagent | Final concentration | Amount |
|---|---|---|
| Tris base | 0.89M | 108 g |
| Boric Acid | 0.89M | 55 g |
| Disodium EDTA | 0.02M | 9.3 g |
| dH2O up to | 1 L | |
Stir and adjust pH to 8. Store at 23°C for 1+ year.
2× Gel Loading dye
| Reagent | Final concentration | Amount |
|---|---|---|
| Formamide | 95% | 9.5 mL |
| Disodium EDTA | 0.5% | 50 mg |
| Xylene cyanol | 0.1% | 10 mg |
| Bromophenol blue | 0.1% | 10 mg |
| Total | 10 mL | |
Aliquot and store at −20°C for 1+ year.
Yeast extract peptone dextrose (YPD) medium
| Reagent | Amount |
|---|---|
| Bacto-peptone | 18 g |
| Yeast extract | 9 g |
| Glucose | 18 g |
| Tryptophan | 0.135 g |
| ddH2O | 900 mL |
Autoclave to sterilize. Store at 23°C for 1+ year.
Yeast Lysis buffer
| Reagent | Final concentration | Amount |
|---|---|---|
| TritonX-100 | 2% (v/v) | 1 mL |
| SDS 10% | 1% (w/v) | 5 mL |
| Tris-Cl 1M pH 8 | 10mM | 0.5 mL |
| NaCl 5M | 100mM | 1 mL |
| EDTA 0.5M pH 8 | 1mM | 0.1 mL |
| dH2O up to | 50 mL | |
Store at 23°C for 1+ year.
TE buffer pH 8
| Reagent | Final concentration | Amount |
|---|---|---|
| Tris-HCl | 10 mM | 1.57 g |
| EDTA | 1 mM | 0.292 g |
| dH2O up to | 1 L | |
Stir and adjust pH to 8. Store at 23°C for 1+ year.
1× Saline sodium citrate (SSC)
| Reagent | Final concentration | Amount |
|---|---|---|
| 3M NaCl | 150 mM | 2.5 mL |
| 300mM Sodium citrate | 15 mM | 2.5 mL |
| dH2O up to | 50 mL | |
Store at 23°C for 1+ year.
40% PEG8000
| Reagent | Final concentration | Amount |
|---|---|---|
| PEG8000 | 0.4× | 4 g |
| 5M NaCl | 1.25M | 2.5 mL |
| dH2O up to | 10 mL | |
Sterilize. Store at 23°C for up to 6 months.
10× UVDE reaction buffer
| Reagent | Final concentration | Amount |
|---|---|---|
| 200 mM HEPES (pH 6.5) | 20 mM | 10 mL |
| 1M NaCl | 100 mM | 10 mL |
| 10mM MnCl2 | 1 mM | 10 mL |
| dH2O up to | 100 mL | |
Stir and heat to mix. Filter sterilize. Store at 4°C for one year.
CPD Photolyase reaction buffer (Liu et al., 2011)
| Reagent | Final concentration | Amount |
|---|---|---|
| 1M NaCl | 100 mM | 10 mL |
| 0.5M Tris-HCl (pH 7.5) | 50 mM | 10 mL |
| 200mM DTT | 20 mM | 10 mL |
| 10mM EDTA | 1 mM | 10 mL |
| 100% glycerol | 50% (v/v) | 50 mL |
| dH2O up to | 100 mL | |
Stir and heat to mix. Filter sterilize. Store at 4°C for one year.
2× Bind and Wash buffer
| Reagent | Final concentration | Amount |
|---|---|---|
| 1M Tris 7.5 | 20 mM | 1 mL |
| 5M NaCl | 4M | 40 mL |
| 0.5M EDTA | 2 mM | 200 μL |
| dH2O up to | 50 mL | |
Filter sterilize. Store at 23°C for 1+ year.
3M NaOAc
| Reagent | Final concentration | Amount |
|---|---|---|
| NaOAc | 3M | 24.61 g |
| dH2O up to | 50 mL | |
Adjust pH to 5.2 using glacial acetic acid. Store at 23°C for 1+ year.
1.5M NaOH
| Reagent | Final concentration | Amount |
|---|---|---|
| NaOH | 1.5M | 0.6 g |
| dH2O up to | 10 mL | |
Store at 23°C for up to one month.
5M NaCl
| Reagent | Final concentration | Amount |
|---|---|---|
| NaCl | 5M | 292 g |
| dH2O up to | 1 L | |
Store at 23°C for 1+ year.
0.5M EDTA
| Reagent | Final concentration | Amount |
|---|---|---|
| Disodium EDTA.2H2O | 0.5M | 186.1 g |
| dH2O up to | 1 L | |
Stir and adjust pH to 8 using NaOH. Store at 23°C for 1+ year.
Step-by-step method details
CRITICAL: Appropriate safety protocol has to be followed while handling radioactive material. Wear Lab coat, goggles and gloves. Each step is performed behind the shield without accidently getting exposed to the beta rays of 32P ideally in a radioactive certified hood. Discard the pipette tips carefully into a radioactive waste container.
Labelling DNA using 32P and purification of labelled DNA
In this step the ‘TA’ oligos and markers (Table 2) are labelled using ATP(γ-32P) and purified using G-50 columns to get rid of the unincorporated radioactive nucleotides.
-
1.
Add the ingredients listed below and incubate the reaction mixture at 37°C for 45 min and 65°C for 20 min.
| Reagent | Final concentration | Amount |
|---|---|---|
| Annealed Primers (100 μM) | 2 μM | 1 μL |
| ATP(γ-32P) | 0.2 microcurie | 1 μL |
| 10× PNK buffer | 1× | 5 μL |
| T4 polynucleotide kinase | 0.2 units | 1 μL |
| ddH2O | N/A | 42 μL |
| Total | 50 μL | |
Table 2.
Oligonucleotides for in vitro UVDE digest
| Annealed primers | |
| OWY395 | 5′-GCGTGTGCACGTATATATATACGCGCGTGTG-3′ |
| OWY396 | 5′Biotin-CACACGCGCGTATATATATACGTGCACACGC-3′ |
| ‘TA’ oligonucleotide markers | |
| OSS27: TA-PP marker oligo, 11 bases | GCGTGTGCACG |
| OSS28: TA-PP marker oligo, 13 bases | GCGTGTGCACGTA |
| OSS29: TA-PP marker oligo, 15 bases | GCGTGTGCACGTATA |
| OSS30: TA-PP marker oligo, 17 bases | GCGTGTGCACGTATATA |
| OSS31: TA-PP marker oligo, 19 bases | GCGTGTGCACGTATATATA |
| OSS32: TA-PP marker oligo, 21 bases | GCGTGTGCACGTATATATATA |
| OSS33: TA-PP marker oligo, 9 bases | GCGTGTGCA |
| OSS34: TA-PP marker oligo, 8 bases | GCGTGTGC |
| OSS35: TA-PP marker oligo, 7 bases | GCGTGTG |
-
2.Purify the labelled primers using G-50 columns (GE health care) according to manufacturer’s instruction (illustra MicroSpin G-50 Columns).
-
a.Vortex the sephadex G-50 column at low speed to resuspend the column. The tip below should be snipped off and the cap has to be opened to 1/4th turn. Do not open too much to avoid the lid coming off during centrifugation.
-
b.Place the column into a collection tube and centrifuge at 735×g for one minute.Note: Centrifugation speed and time must be followed strictly according to manufacturer’s recommendation to elute the right amount of DNA. Especially because low speed will lead to inefficient removal of buffer in the first step leading to dilution of purified DNA sample in the elution step. Sometimes, the column might retain the buffer after a single centrifugation. Here it may be necessary to modify the manufacturer’s protocol by an additional centrifugation step for a minute to efficiently remove buffer suspended in the column. Phenol:Chloroform extraction of DNA could be used to purify labelled DNA as an alternative to G-50 column purification.
-
c.After packing resin column, add labelled DNA to the center without poking into the resin. Centrifuge at 735×g for 2 min to elute labelled DNA.Note: Check the radioactivity of the eluted DNA using a Geiger Muller counter at this step with maximal setting (100×). A stronger signal should be detected usually in the range of 100× or 10×. Failure of labelling or purification steps might lead to weaker signal of labelled samples.
-
a.
-
3.
Set up a labelling reaction using the marker oligos as listed below.
| Reagent | Amount |
|---|---|
| Marker oligos OSS35, OSS33, OSS27 | 17 μL each |
| Marker oligo OSS34 | 20 μL |
| Marker oligos OSS28 | 7 μL |
| Marker oligos OSS29, OSS30, OSS31, OSS32 | 2 μL each |
| 10× PNK buffer | 10 μL |
| ATP(γ32-P) | 2 μL |
| Polynucleotide Kinase | 2 μL |
| Total | 100 μL |
-
4.
Incubate the reaction at 37°C for 45 min and then inactivate the enzyme by incubating at 65°C for 20 min.
-
5.
Purify the labelled oligos using G-50 column as mentioned above.
Note: Some of the base markers with a very small size difference might run closely together on the gel, hindering the exact determination of size. To circumvent this, it is recommended to label those markers separately and load them in a separate well next to the samples. Since G-50 columns cannot efficiently elute oligos less than 20 nucleotides, it is wise to start with comparatively higher amounts of lower size oligonucleotides (at least double the amount of higher size oligonucleotides).
Exposing labelled oligos to varying doses of UV-C
In this step, the labelled and purified ‘TA’ oligo is exposed to increasing doses of UV-C.
-
6.Dilute the labelled product from step 5 with ultrapure water to 400 μL. Clean a coverslip with Kimwipe and using a marker pen, draw lines at the back of the cover slip to demarcate samples while spotting.
-
a.For each UV exposure, as well as the ‘no exposure’ sample, prepare a petri plate with a cut piece of wet paper towel (cold water). On the back of the clean coverslip draw vertical lines to demarcate 3–4 compartments for samples.
-
b.DNA is spotted (as 4 spots of 10 μL) into the allotted spaces and the coverslip is placed into the petri plate.
-
a.
-
7.
Set the Stratagene UV-C crosslinker in the timer mode. Place the petri plate with the samples inside the UV-C crosslinker. Samples are exposed to UV for different time points namely 2.5 min, 5 min, 7.5 min, 10 min, 12.5 min, 15 min and 30 min.
Note: The wet paper towel minimizes water evaporation from the sample during exposure and helps to avoid sliding of coverslip to the bottom of petri plate.
-
8.
Pool the 10 μL spots after UV exposure at each time point using a pipette and transfer into a 1.5 mL tube. Place tubes on ice until all time point samples have been collected.
-
9.
Add 60 μL of Phenol:Chloroform:Isoamyl alcohol (neutral pH) to the samples and vortex for 30 s. Add 220 μL of water and briefly vortex. Centrifuge the samples at 16,873×g for 6 min.
-
10.
Carefully pipette 200 μL of the upper aqueous phase and transfer to a new 1.5 mL Eppendorf tube. Add 3 μL of glycogen, 20 μL of 3M NaOAc pH 5.2 and 800 μL of 100% ice cold ethanol. Mix well and incubate at −20°C for at least 1 h.
Pause point: Incubation step could be extended to 16 h at −20°C.
-
11.
Pellet the DNA by centrifuging at highest speed 16,873×g for 1 h. The pellet will be visible at the bottom of the tube as a small translucent spot.
-
12.
Pipette out ethanol and add 70% ethanol into each tube. Leave the pellet untouched and centrifuge again for 20 min.
-
13.
Carefully pipette out ethanol without touching the pellet. Do a short spin to get all residual ethanol to the bottom. Carefully pipette out the ethanol left out around the pellet without disturbing the pellet. Let the pellet dry for 5–10 min in the hood.
Note: It is ideal to cast the gel during the day of UVDE digestion.
UVDE digestion and sample preparation
In this step, the DNA samples exposed to UV are digested with UVDE enzyme and prepared for the next electrophoresis step.
-
14.
Add 1 μL of 10× UVDE buffer (pH 6.5), 8 μL of water and resuspend the pellet. Vortex to mix and centrifuge shortly to bring the reaction mixture to the bottom of the tube.
-
15.Add 1 μL of UVDE enzyme and incubate at 55°C for 1 h.
-
a.Using a pipette mix the enzyme with the reaction mixture before incubating.
-
a.
-
16.
After incubation add 50 μL of TE buffer (pH 8) and add 60 μL of PCI. Add 250 μL of water and vortex well for 30 s.
-
17.
Centrifuge for 6 min at 16,873×g. Carefully pipette out 200 μL of the upper phase and transfer to a new 1.5 mL Eppendorf tube. Add 3 μL of glycogen, 20 μL of 3M sodium acetate pH 5.2 and 800 μL of 100% ethanol and invert the tube few times to mix, then store at −20°C for at least 1 h.
Note: pH neutralization of the sample after UVDE digestion is essential at this step. If not done, this might lead to uneven migration of sample during electrophoresis that is usually carried out under alkaline conditions.
-
18.
Centrifuge samples at 16,873×g for 1 h to pellet DNA. DNA will appear as a small translucent spot at the bottom of the tube.
Note: Set up the gel apparatus and start pre-running the gel during pelleting and washing steps. Check section ‘pre-running, sample loading and gel electrophoresis’ for complete details.
-
19.
Without touching the pellet, carefully pipette out ethanol, add 1 mL of 70% ethanol to the tube and centrifuge at 16,873×g for 20 min. Carefully pipette out ethanol. Do a short spin to collect residual ethanol sticking on to the sides of the tube. Using a pipette carefully pipette out residual ethanol without touching the pellet.
Note: Once DNA is pelleted using 100% ethanol, leave the pellet undisturbed in the subsequent steps during 70% ethanol wash or do not resuspend the pellet during ethanol wash step.
-
20.
Air dry the pellet for 5–10 min behind the beta shield in the hood. Add 6 μL of water, 6 μL of 100% formamide and vortex to dissolve the pellet. Briefly centrifuge the tubes to bring down sample to the bottom of the tube.
-
21.
Heat samples at 95°C for 10 min before loading on to the gel.
Prepping and assembly of glass plates
This is a preparation step for casting the denaturing urea polyacrylamide gel. A neat and clean assembly of glass plates facilitates smooth casting of the gel. (Sequi-Gen GT Nucleic Acid Electrophoresis Cell Instruction Manual)
-
22.Lay the outer long and inner short IPC glass plates flat on the table surface supported by two pipette tip boxes. Using a Kimwipe, wipe the surface of Sequi-Gen GT glass plates with water, then with ethanol. Let it dry.
-
a.Add 2–3 drops of Rain-X to one side of the outer (long) glass plate and spread it evenly throughout the glass plate using a clean Kimwipe. This will appear as a thin film of coating on the glass plate when it is wet. This coated side will be in contact with the gel.Note: Excess RainX should be cleaned from the plate. Otherwise, this leads to floating of gels while running the gel.
-
b.Wipe the spacers (0.17 mm) with ethanol and place one on each side of the integral plate chamber (IPC) glass plate. Now place the long outer glass plate over the spacers. Lift the whole set up and place vertically onto a clean surface and insert the GT lever clamps on each side one after the other. The clamps must be tight enough to avoid any leakages. Place the whole set up into the precision caster base and loosen the precision caster cam pegs so that the precision cam pegs fit properly into the holes of the side clamp. Tighten the precision caster cam pegs and lay the whole set up flat on the bench with the upper part a few inches raised. One could use a 15 mL centrifuge tube for the raised support.
-
a.
Preparation and casting of denaturing urea polyacrylamide gel
A denaturing 15% polyacrylamide urea gel is casted in this step.
-
23.
Add the specified ingredients in a 200 mL beaker with stir bar to make the urea gel solution.
| Reagent | Amount |
|---|---|
| 40% Acrylamide | 26.25 mL |
| 10 × TBE | 7 mL |
| ddH2O | 14.75 mL |
| Urea | 29.7 g |
| 10% APS | 0.75 mL |
| TEMED | 0.02 mL |
-
24.Place the beaker on a magnetic stirrer and let it stir until urea dissolves completely.
-
a.After urea dissolves completely, place the beaker on ice until you are ready to inject the solution into the gel apparatus. This step avoids quick/earlier solidification of gel before injection or during injection into the gel apparatus.
-
a.
-
25.Right before casting the gel, add 750 μL of 10% APS and 20 μL of TEMED to the gel solution and mix slowly and gently, avoiding formation of bubbles.
-
a.Suck up the solution gently using the Luer taper attached to a 60 mL syringe. It is critical to avoid bubbles at this step. If there are any bubbles formed, make sure to get rid of them (by gentle tapping and injecting the bubble out of the syringe and Luer taper) before injecting the solution into the gel apparatus.
-
a.
-
26.Slowly inject the gel solution. Once the glass plates are filled with the gel solution, insert the comb between the glass plates.
-
a.While injecting and fixing the comb, be gentle to avoid any air bubbles at the interface between gel and comb. Otherwise, wells might get uneven at the bottom after solidification. Make sure to use combs and spacers of same thickness.
-
a.
-
27.Let the gel solidify for at least 1 h.
-
a.The gel can be left to solidify for up to 16 h. The edges can be covered with wet paper towel soaked in 1× TBE and then covered with saran wrap and stored flat at 4°C (up to a few days but not more than a week).
-
a.
Pre-running, sample loading and electrophoresis
UVDE digested samples are loaded and electrophoresis at high voltage current is carried out at this step.
-
28.Set up the gel assembly behind a beta shield. Do not take out the gel plates from behind the shield once the radioactive sample is loaded on to the gel.
-
a.The gel assembly is placed inside the GT base buffer tank and the glass plates are supported with GT bottom safety cover that has screws to be tightened to secure the vertical glass plates to GT base.
-
a.
Note: Refer to Sequi-Gen® GT Nucleic Acid Electrophoresis Cell instruction manual for complete details (Sequi-Gen GT Nucleic Acid Electrophoresis Cell Instruction Manual)
-
29.Pour 1× TBE buffer into the buffer chamber at the bottom and the inner buffer chamber attached to the lPC shorter glass plate.
-
a.Flush the wells with buffer using a gel loading pipette.
-
b.Cover the inner buffer chamber with GT top safety cover so that the electrodes on the GT lever clamps are connected to the electrodes on the GT top safety cover.CRITICAL: Use caution while handling high voltage powerpack. Leakage of buffer is possible during the run. Make sure the GT lever clamps are fit snuggly to avoid buffer leakage. Monitor gel electrophoresis few times during the run to check for buffer leakage.
-
c.Connect the system to a high voltage powerpack. Pre-run the gel at 60 watts for 30–40 min or until the thermosensor tape on the glass plates shows the temperature between 40°C–50°C. Turn off the powerpack, take off the lid, and flush the wells gently once again to get rid of urea.CRITICAL: Every step after this is carried out safely behind a beta shield. Be cautious and gentle while handling radioactive samples and gels. Avoid cluttering of the bench space where radioactivity is handled.
-
a.
-
30.Add 12 μL of the heated samples to the wells. Leave one well empty between marker and samples. 10 μL of diluted marker oligos can be added to the wells. Heating of marker oligos is not necessary.
-
a.It is recommended to check the radioactivity of samples and marker oligos using Geiger Muller counter. Total radioactivity of markers should be 3 to 5 times less than the total radioactivity of samples. Dilute the marker oligos using water to adjust for ideal radioactivity signal. This helps reduce the signal intensity of markers taking over the signal intensity of samples while imaging. We do not add loading dye to samples and marker oligos but adding loading dye to empty wells helps track the gel running. Without loading dye it is hard to determine how far the gel has run.
-
b.Electrophoresis is carried out at 60 watts for 2 h and 10 min. At this time point the dye should have separated into upper and lower band. The lower band should reach approximately 10–15 cm from the bottom of the glass plates.
-
c.Turn off the high voltage current and remove the GT top safety cover lid disconnecting the electrodes. Carefully pour the buffer into a wide mouthed radioactive waste beaker.
-
d.Using a separator, try to gently separate the glass plates such that the gel sticks to the bottom plate. Gently flip the glass plates if the gel is sticking on to the upper plate.
-
e.Cover the gel with saran wrap.
-
a.
Exposure to phosphor screen and imaging
The urea polyacrylamide gel is exposed to a phosphor screen and the signal is captured using a typhoon scanner. The image is quantified using Imagequant software.
-
31.
Place phosphor screen on top of the gel covered by saran wrap so that the white portion (phosphor side) is facing the gel and leave the phosphor screen undisturbed for 2 h.
-
32.Take magnetic phosphor stage near the phosphor screen. Once the phosphor screen sticks to stage adjust phosphor screen to center of the platform within the enclosed raised frame.
-
a.If the screen is not properly aligned within the enclosed frame, there are chances of the screen getting stuck or slipped during scanning process in typhoon scanner
-
a.
-
33.Place the magnetic platform onto Typhoon scanner such that the pegs on the typhoon scanner fit into holes of the magnetic platform.
-
a.Appropriate alignment is essential at this step otherwise the platform will get stuck during the scanning process.
-
a.
-
34.
Scan image using typhoon scanner phosphorimaging software. Save the image and analyze using ImageQuant software. Lanes were manually created and spots corresponding to ‘TA’ lesions were quantified and exported to excel. The values obtained were used to make the graph shown in Figure 3.
Note: Refer to Typhoon™ FLA 7000 user manual for complete details on using phosphor stage and scanning procedure (Typhoon FLA 7000 User Manual).
Figure 3.
Agarose gel confirmation of proper sample sonication
In vivo UV-C damage induction
The purpose of this step is to induce sufficient numbers of 6,4-PPs and atypical UV lesions to be mapped. A UV-C dose between 500 and 600 J/m2 will induce approximately one 6,4-PP per 1 kb yeast DNA.
-
35.Grow yeast cells in yeast extract peptone dextrose (YPD) medium for 16 h and subculture the yeast cells in 40 mL (20 mL per timepoint) YPD. Incubate the cells at 30°C to an OD600 of about 0.8 (between 0.4–1.0).
-
a.Subculture growth will take around 6 h, depending on the strains being used.
-
b.Pellet cells at 3200×g for 5 min, remove media, and resuspend in 40 mL ddH2O.
-
i.Exposing cells suspended in colored media such as YPD to UV-C will result in reflection of UV off the media, and thus a lower UV dose than intended.
-
i.
-
a.
-
36.
Aliquot 20 mL of cells for “No UV” samples, centrifuge, remove the medium, and store the cell pellet at −80°C.
-
37.In a dark room, pour remaining 20 mL of cells into a 5” × 7” plastic developing tray (or other container that will allow for ample spread of cells). Expose cells to 500–600 J/m2 UV-C (based on manufacturer’s calculations) with the container lid off.
-
a.Immediately transfer irradiated cells to a conical tube, pellet cells as described above, and remove supernatant.
-
i.It is recommended that gDNA be isolated immediately. However, cells may be stored at −80°C until gDNA isolation if necessary.
-
i.
-
a.
-
38.For UV-exposed naked DNA control libraries, grow cells as described above, but do not expose to UV-C light.
-
a.Following gDNA isolation (described in next section), resuspend pellet in 100 μL ddH2O.
-
b.Spot DNA onto microscope cover slip in 10 μL aliquots.
-
i.Expect to recover about 80% of starting volume.
-
ii.If sample is spotted onto a microscope slide it will spread out and will not be able to be recovered.
-
i.
-
c.Place cover slip onto a dish filled with ice. This will help combat sample evaporation.
-
d.Expose sample to 400–500 J/m2 UV-C. The UV dose of naked DNA samples should be approximately 80% of the cellular dose.
-
i.Following UV exposure, pipette samples off of cover slip and combine in 1.5 mL microcentrifuge tube.
-
ii.Bring total volume up to 310 μL with dH2O. Samples can be taken to sonication as described below.
-
i.
-
a.
Genomic DNA (gDNA) isolation
The purpose of these steps is to extract whole genomic DNA from UV-irradiated yeast for subsequent lesion mapping using UVDE-seq.
-
39.Let cells thaw at 23°C.
-
a.Rinse cells with ddH2O to remove residual media.
-
b.Add 250 μL yeast lysis buffer to cell pellet. Resuspend cells and transfer to a 1.5 mL microcentrifuge tube.
-
c.Add approximately 150 μL acid-washed glass beads and 250 μL PCI (25:24:1, pH ∼6.7). Vortex at highest setting for 4 min.
-
i.Following vortex, endogenous photolyase activity is killed and samples are safe to be in light.
-
i.
-
d.Add 200 μL TE buffer pH 8 and vortex for 1 min.
-
e.Centrifuge for 10 min at minimum 15,871×g.
-
f.Transfer the clear aqueous layer to a fresh tube and precipitate the DNA by adding 1 mL 100% cold Ethanol. Incubate for 3–5 min at 23°C and centrifuge for 3 min at minimum 15,871×g.
-
i.A pellet should be seen at the bottom of the tube.
-
i.
-
g.Remove the supernatant mixture of TE buffer and 100% Ethanol and rinse pellet with 500 μL 75% Ethanol. Centrifuge for 3 min at minimum 15,871×g.
-
h.Remove 75% Ethanol and briefly spin the tube to pull excess Ethanol to the bottom of the tube. Pipette off remaining Ethanol.
-
i.Air dry pellet for approximately 5 min, or until remaining Ethanol has evaporated.
-
j.Dissolve the gDNA pellet in 200 μL TE buffer pH 8 by pipetting and/or vortexing.
-
k.Add 2 μL RNase A. Tap tube to mix and incubate at 37°C for 30–60 min
-
i.60 min helps to reduce smaller bands on gel.
-
i.
-
l.Add 200 μL PCI (25:24:1, pH ∼6.7) and vortex for 30 s.
-
m.Add 200 μL TE buffer pH 8 and invert tube several times to mix.
-
n.Centrifuge for 5 min at minimum 15,871×g.
-
o.Transfer aqueous layer to a new 1.5 mL microcentrifuge tube.
-
i.Add 1/10th total volume 3M NaOAc and flick to mix.
-
ii.Add 2 volumes of cold 100% Ethanol and invert to mix.Pause point: Incubate at −20°C for at least 15 min, but preferably 16 h.
-
i.
-
p.Centrifuge for 30 min at 15,871×g in 4°C microcentrifuge. Discard supernatant.
-
q.Wash pellet with 500 μL cold 75% Ethanol. Centrifuge for 5 min at 15,871×g in 4°C microcentrifuge.
-
i.Remove supernatant, then briefly spin down tube to pull down and remove excess Ethanol.
-
ii.Air dry pellet for approximately 5 min, or until remaining Ethanol has evaporated.
-
i.
-
r.Resuspend pellet in 310 μL ddH2O.
-
s.If creating a naked DNA library, take the samples to UV-C exposure as described above in UV-C damage induction.
-
a.
Sonication and ethanol precipitation
Sonication allows for the fragmentation of genomic DNA into approximately 200–700 bp in length.
-
40.
Transfer 310 μL sample to a TPX tube.
-
41.
Sonicate using BioRuptor for 15 cycles, 30 s on/off on the HIGH setting.
-
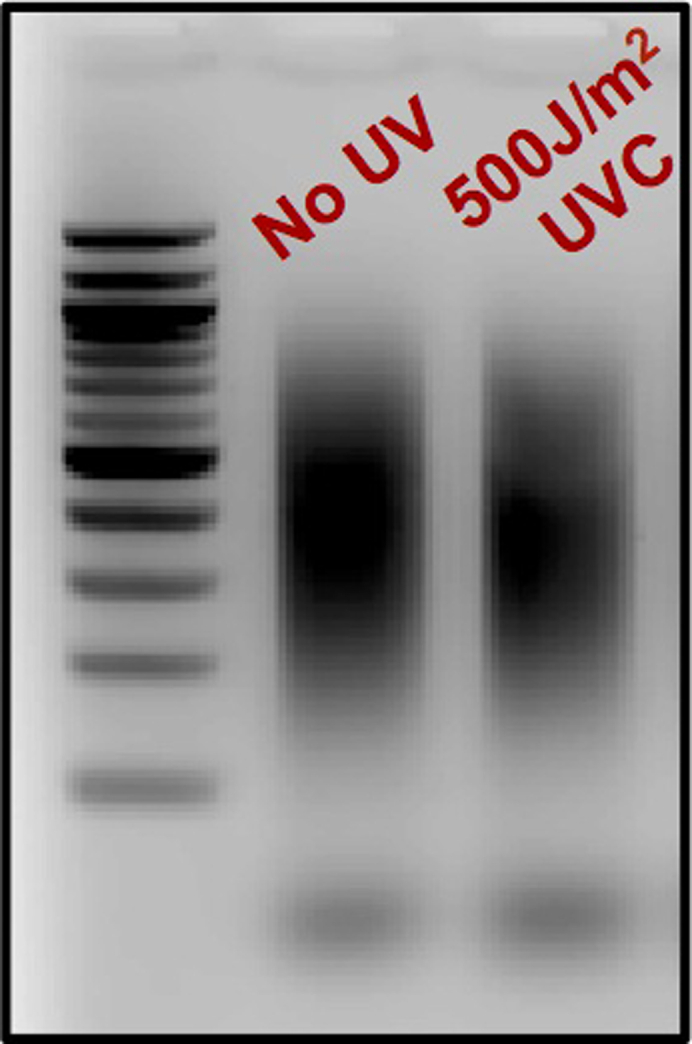
42.Confirm fragment size distribution by running a 2% agarose gel for 20 min at 120V (Figure 3).
-
a.Run the following: 5 μL sonicated DNA sample + 1 μL 6× purple loading dye and 3 μL of 20 ng/μL 100 base pair DNA ladder + 2 μL ddH2O + 1 μL 6× purple loading dye.
-
b.Image agarose gel on Typhoon using Cy2 filter to verify that DNA fragments range from 200–700 bp in length.
-
a.
-
43.Following agarose gel confirmation, transfer samples from TPX tubes to 1.5 mL microcentrifuge tubes.
-
a.Add 2 μL glycogen, 30 μL 3M NaOAc, and 850 μL 100% cold Ethanol to each tube, flicking to mix between addition of each reagent.
-
b.Incubate tubes at −80°C for at least 1 h or −20°C for 16 h.
-
a.
-
44.
Centrifuge for over 1 h at 15,871×g at 4°C to pellet DNA.
-
45.Discard supernatant and wash pellet with 500 μL cold 75% Ethanol.
-
a.Centrifuge for 30 min at 15,871×g at 4°C.
-
b.Remove Ethanol, then briefly spin tube to pull down and remove excess Ethanol.
-
a.
-
46.
Air dry pellet for approximately 5 min, or until remaining Ethanol has evaporated.
-
47.
Dissolve pellet in 110 μL ddH2O by pipetting and/or vortexing.
-
48.If standardization among samples is necessary, measure DNA concentration of each sample using a spectrophotometer. Samples should be standardized to the UV-exposed sample with the lowest DNA concentration. Determine the amount of each sample to carry forward, bringing the final volume of each sample up to 110 μL.
-
a.To verify standardization, dilute 5 μL of sample into 20 μL ddH2O (1:5 dilution) and run 5 μL of each sample on a 2% agarose gel (Figure 4).
-
a.
-
49.Purify DNA by adding 1.2× volume (132 μL) of AMPure XP beads to sample.CRITICAL: Vortex or resuspend the AMPure XP beads prior to use.
-
a.Vortex, then allow to incubate on bench for 5 min.
-
b.Place tubes on magnet rack. Allow beads to move to the magnet (approximately 2 min) and remove supernatant.
-
c.Wash beads twice with 500 μL of cold 75% Ethanol.
-
i.Pipette off Ethanol.
-
ii.Remove tubes from magnet and briefly spin tube to pull down excess Ethanol that may remain on the sides of the tubes. Place tubes back on magnet rack. Pipette off remaining Ethanol.
-
i.
-
a.
Performing this additional spin helps ensure excess Ethanol is not left behind in the tube and carried forward through subsequent steps.
-
d.Air dry beads for approximately 5 min, or until beads appear to be slightly dry and have a faintly cracked surface.CRITICAL: Do not over dry beads
-
e.
Resuspend beads in 86 μL ddH2O by vortexing. Incubate at on bench for 5 min.
-
f.Place tubes on magnet rack and transfer supernatant to a fresh 1.5 mL microcentrifuge tube.Optional: Run 5 μL of 1:5 diluted sample on a 2% agarose gel to confirm standardization and AMPure bead purification. Make sure intensity of samples are within 15% intensity of each other.
Figure 4.
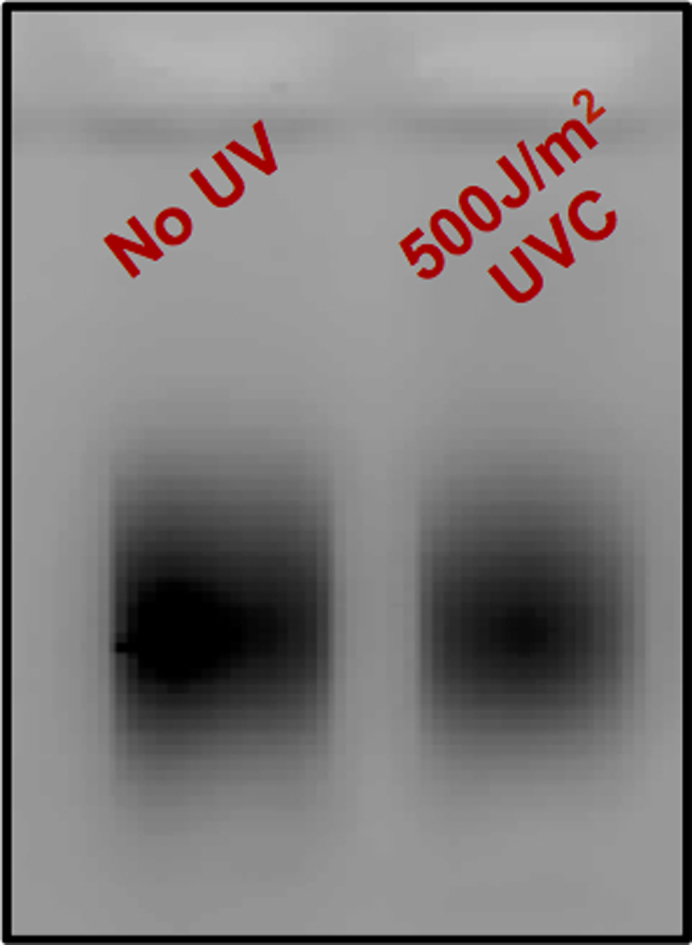
Agarose gel confirmation of sample standardization
End repair, dA-tailing, and first adapter ligation
This step aims to eliminate overhangs that may be created during sonication and ligate the trP1 adapter to the 3′ end of the DNA fragments.
-
50.
Add 10 μL 10× buffer and 5 μL of enzyme mix from NEBNext end repair module. Incubate at 20°C for 2 h.
-
51.Purify DNA by adding 1.2× volume of AMPure XP beads (120 μL) to each tube, briefly vortex to mix, and incubate at 23°C for 5 min.
-
a.Place tubes on magnet rack. Allow beads to move to the magnet (approximately 2 min) and remove supernatant.
-
b.Wash beads twice with 500 μL of 75% cold Ethanol.
-
i.Pipette off Ethanol.
-
ii.Remove tubes from magnet and briefly spin tube to pull down excess Ethanol. Place tubes back on magnet rack. Pipette off remaining Ethanol.
-
i.
-
c.Allow beads to air dry on bench (approximately 5 min).
-
d.Resuspend beads in 42 μL ddH2O by vortexing to mix.
-
a.
-
52.Add 5 μL of 10× buffer and 3 μL of Klenow fragment (3’->5′ exo) from NEBNext dA-tailing module. Incubate tubes at 37°C for 1 h.
-
a.To purify DNA, add 17 μL 5M NaCl and 22.5 μL of 40% PEG 8000 (1.25M NaCl), and vortex to mix.
-
b.Place tubes on magnet rack. Allow beads to move to magnet and remove supernatant.
-
c.Wash beads twice with 500 μL of 75% cold Ethanol.
-
i.Pipette off Ethanol.
-
ii.Remove tubes from magnet and briefly spin tube to pull down excess Ethanol. Place tubes back on magnet rack. Pipette off remaining Ethanol.
-
i.
-
d.Air dry beads for approximately 5 min, or until beads appear to be slightly dry and appear to have a cracked surface.
-
e.Resuspend beads in 20 μL ddH2O by vortexing to mix.
-
a.
-
53.
Add 10 μL NEB 5× buffer, 15 μL of 40 μM double-stranded dstrP1 adapter, and 5 μL NEB quick ligase, flicking to mix. Incubate mixture at 20°C for 2 h (preferred) or 16°C for at least 12 h.
First adapter confirmation
Before continuing, it is important to check the success of your first adapter ligation. Successful ligation of the first (trP1) adapter will result in ample signal of PCR product (appears as a smear) using the trP1 primer. It is possible for signal of the UV-exposed sample to appear lower than that of the unexposed samples. We believe this is due to polymerase struggling to process through UV damage.
-
54.To the first adapter ligation reaction, add 17 μL 5M NaCl and 22.5 μL of 40% PEG8000 (1.25M NaCl), vortexing to mix.
-
a.Place tubes on magnet rack. Allow beads to move to the magnet and remove supernatant.
-
b.Wash beads twice with 500 μL of cold 75% Ethanol.
-
i.Pipette off Ethanol.
-
ii.Remove tubes from magnet and briefly spin to pull down excess Ethanol. Place tubes back on magnet rack. Pipette off remaining Ethanol.
-
i.
-
c.Air dry beads for approximately 5 min, or until beads appear to be slightly dry and appear to have a cracked surface.CRITICAL: Do not over dry beads
-
d.Resuspend beads in 100 μL ddH2O. Vortex to mix and incubate at 23°C for 5 min.
-
e.Place tubes on magnet rack and transfer supernatant to a fresh 1.5 mL tube.
-
a.
-
55.
Take measurement of samples using a NanoDrop spectrophotometer. Samples must total 50 μg or less.
-
56.
Perform PCR to confirm first adapter ligation using volumes listed below (20 μL reaction volume).
Reagent 1× Vol. (μL) Taq Buffer 2 3 mM DNTPs 1 5 μM trP1 Primer 1 H2O 14.85 DNA Sample 1 Taq polymerase 0.15 -
a.PCR should follow steps shown below.
Steps Temperature Time Cycles Initial denaturation 94°C 3 min 1 Denaturation 94°C 30 s 5–9 cycles Annealing 55°C 30 s Extension 72°C 30 s Final extension 72°C 1 min 1 Hold 4°C Forever
-
a.
-
57.Run 10 μL on a 2% agarose gel at 120 V for 20 min (Figure 5).
-
a.Image on Typhoon using Cy2 filter.
-
a.
-
58.
Following PCR verification, bring volume up to 195 μL with ddH2O.
Figure 5.
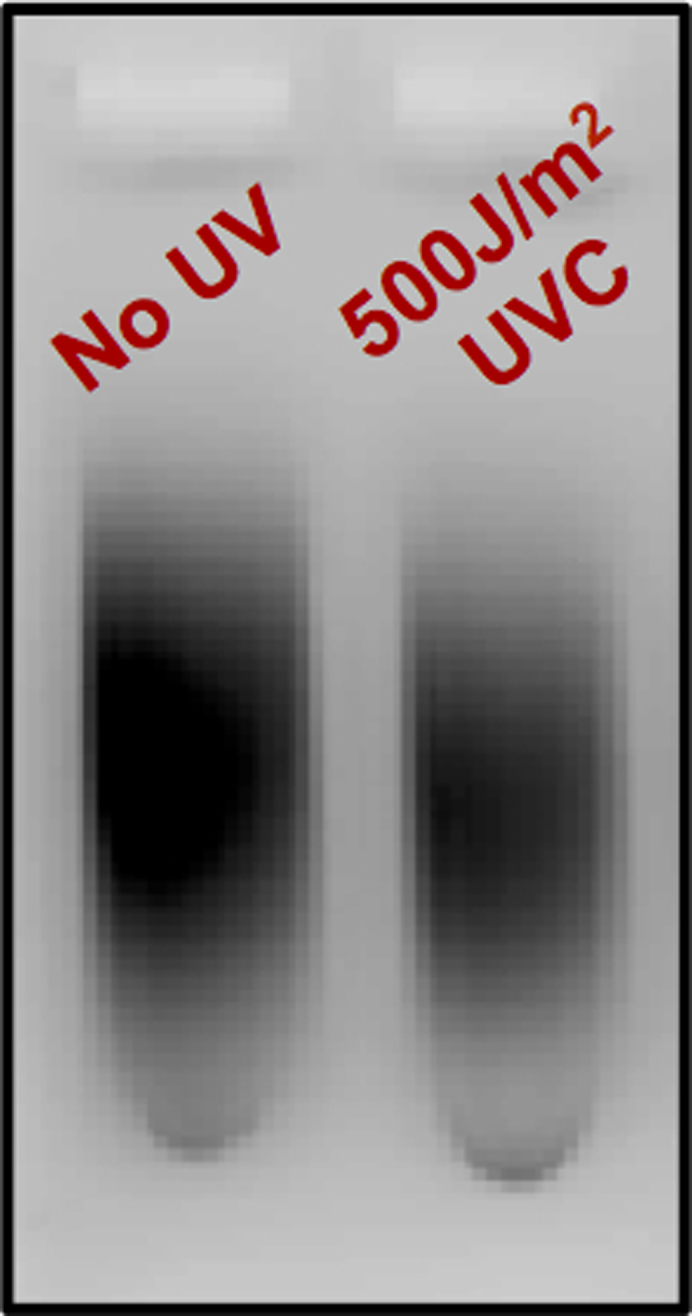
Agarose gel confirmation of first adapter ligation
CPD photolyase treatment and UVDE cleavage
These steps aim to repair CPD lesions, leaving behind only (6–4)PP and atypical lesions that are subsequently cleaved by UVDE. Cleavage by UVDE creates a 3′ OH group just upstream of the lesion, which allows for second (A) adapter ligation.
-
59.
Add 25 μL NEB 10× terminal transferase buffer, 2.5 μL 10 mM ddATP or ddGTP, 25 μL 2.5 mM CoCl2, and 2.5 μL 20 U/μL NEB terminal transferase, flicking to mix between each reagent. Incubate at 37°C for 2 h.
-
60.Add 1.2× volume of AMPure XP beads (300 μL) to each tube, briefly vortex to mix, and incubate at 23°C for 5 min.
-
a.Place tubes on magnet rack. Allow beads to move to magnet and remove supernatant.
-
b.Wash beads twice with 500 μL of cold 75% Ethanol.
-
i.Pipette off Ethanol.
-
ii.Remove tubes from magnet and briefly spin tube to pull down excess Ethanol. Place tubes back on magnet rack. Pipette off remaining Ethanol.
-
i.
-
c.Air dry beads for approximately 5 min, or until beads appear to be slightly dry and have a faintly cracked surface.
-
d.Resuspend beads in 25 μL ddH2O. Vortex to mix. Let sit at 23°C for 5 min.
-
e.Place tubes on magnet rack. Allow beads to move to magnet and move supernatant to a clean 1.5 mL tube.
-
a.
-
61.Add 3 μL CPD photolyase buffer and 2 μL CPD photolyase to each tube. Incubate at 23°C under 365 nm UV light for 2 h.
-
a.If using a hand-held UV light, you may place samples under a glass pyrex dish and set the light on top of the Pyrex.
-
i.The distance at which the hand-held UV light should be placed above the sample is based on the manufacturer’s recommendation and should be verified using a radiometer. Additionally, conditions should be optimized to ensure repair of all CPD lesions.
-
i.
-
a.
-
62.Following incubation, add 30 μL PCI (25:24:1, pH ∼6.7) and vortex about 30 s.
-
a.Add 30 μL TE buffer pH 8 and invert 3 times.
-
b.Centrifuge samples at 15,871×g for 10 min in 4°C microcentrifuge.
-
c.Transfer aqueous layer to new tube.
-
d.Add 1.5 μL glycogen, 6 μL 3M NaOAc (or 1/10th final volume), and 150 μL–200 μL cold 100% Ethanol. Incubate at −80°C for at least 1 h.
-
e.Following incubation, centrifuge samples at 15,871×g for 15 min in 4°C microcentrifuge.
-
f.Remove supernatant and wash pellet with 400 μL cold 75% Ethanol. Spin at 15,871×g for 5 min in 4°C microcentrifuge.
-
g.Remove Ethanol and dry pellet near flame for about 5 min until all Ethanol has evaporated.
-
a.
-
63.Resuspend pellet in 21 μL ddH2O. Add 6 μL 10× UVDE buffer and 3 μL UVDE. Incubate at 55°C for 45 min.CRITICAL: move quickly after this step!
-
a.Add 1.2× volume (36 μL) of AMPure XP beads to sample. Allow to incubate on bench for 5 min.
-
b.Place tubes on magnet rack. Allow beads to move towards magnet and remove supernatant. Wash beads twice with 500 μL of cold 75% Ethanol.
-
i.Pipette off Ethanol.
-
ii.Remove tubes from magnet a briefly spin tube to pull down excess Ethanol. Place tubes back on magnet rack. Pipette off remaining Ethanol.
-
i.
-
c.Air dry beads for approximately 5 min, or until beads appear to be slightly dry and appear to have a cracked surface.
-
d.Resuspend beads in 85 μL ddH2O. Vortex to mix.CRITICAL: Do not remove beads
-
a.
Dephosphorylation and second adapter ligation
These steps aim to dephosphorylate the 5′ ends of the DNA fragments to avoid self-ligation and circularization of samples, and ligate the second (A) adapter to the 3′ end.
-
64.Add 10 μL of 10× SAP (Shrimp Alkaline Phosphatase) buffer to each tube, flicking to mix. Add 5 μL of 1 U/μL SAP to each tube, flicking to mix. Incubate at 37°C for 1 h, followed by 65°C for 15 min to heat kill the reaction.
-
a.Add 34 μL NaCl and 45 μL 40% PEG8000 (1.25M NaCl) to each tube, briefly vortexing to mix.
-
b.Place tubes on magnet rack. Allow beads to move to magnet and remove supernatant.
-
c.Wash beads twice with 500 μL of 75% cold Ethanol.
-
i.Pipette off Ethanol.
-
ii.Remove tubes from magnet a briefly spin to pull down excess Ethanol. Place tubes back on magnet rack. Pipette off remaining Ethanol.
-
i.
-
d.Air dry beads for approximately 5 min, or until beads appear to be slightly dry and appear to have a cracked surface.CRITICAL: Do not over dry beads
-
e.Resuspend beads in 29 μL ddH2O by vortexing to mix.
-
i.Incubate on bench for 5 min.
-
ii.Pellet beads using the magnet rack and transfer supernatant to a new tube.
-
i.
-
a.
-
65.Incubate tubes at 95°C for 5 min in thermal cycler to denature DNA.
-
a.Immediately transfer to ice to snap cool.
-
a.
-
66.
Add 10 μL NEB 5× buffer, 6 μL 40 μM dsA adapter (adapters A1-A6, one per sample), and 5 μL NEB T4 quick ligase to each tube and incubate in thermal cycler at 20°C for 2 h OR at 16°C for at least 12 h.
Second adapter confirmation
Before continuing with library preparation, it is important to verify the success of your second adapter ligation. Successful ligation of the first (trP1) adapter will result in signal of PCR product (appears as a smear) using the Cy3-labelled A primer.
-
67.Purify DNA by adding 1.8× volume (90 μL) of AMPure XP beads to sample. Allow to incubate at 23°C for 5 min.
-
a.Place tubes on magnet rack. Allow beads to move to magnet and remove supernatant.
-
b.Wash beads twice with 500 μL of 75% cold Ethanol.
-
i.Pipette off Ethanol.
-
ii.Remove tubes from magnet rack and briefly spin tube to pull down excess Ethanol. Place tubes back on magnet rack. Pipette off remaining Ethanol.
-
i.
-
c.Air dry beads for approximately 5 min, or until beads appear to be slightly dry and appear to have a cracked surface.
-
d.Resuspend beads in 40 μL ddH2O by vortexing to mix.
-
e.Incubate on bench for 5 min. Pellet beads using the magnet rack.
-
a.
-
68.
Transfer supernatant to a new tube. Run PCR to check second adapter ligation, using the reagents listed below and the reaction steps previously described in the ‘end repair, dA-tailing, and first adapter ligation’ section.
| Reagent | 1× vol. (μL) |
|---|---|
| Taq buffer | 2 |
| 3 mM dNTPs | 1 |
| 5 μM trP1 primer | 1 |
| 5 μM Cy3 primer A | 1 |
| H2O | 15 |
| DNA | 1 |
| Taq polymerase | 0.15 |
-
69.Following PCR, add 5.3 μL of 50% glycerol to each PCR tube (final glycerol concentration will be 10%).
-
a.Load 10 μL of each sample and run on 2% agarose gel without any gel dye at 120 V for 20 min.
-
b.Image on Typhoon using Cy3 filter.
-
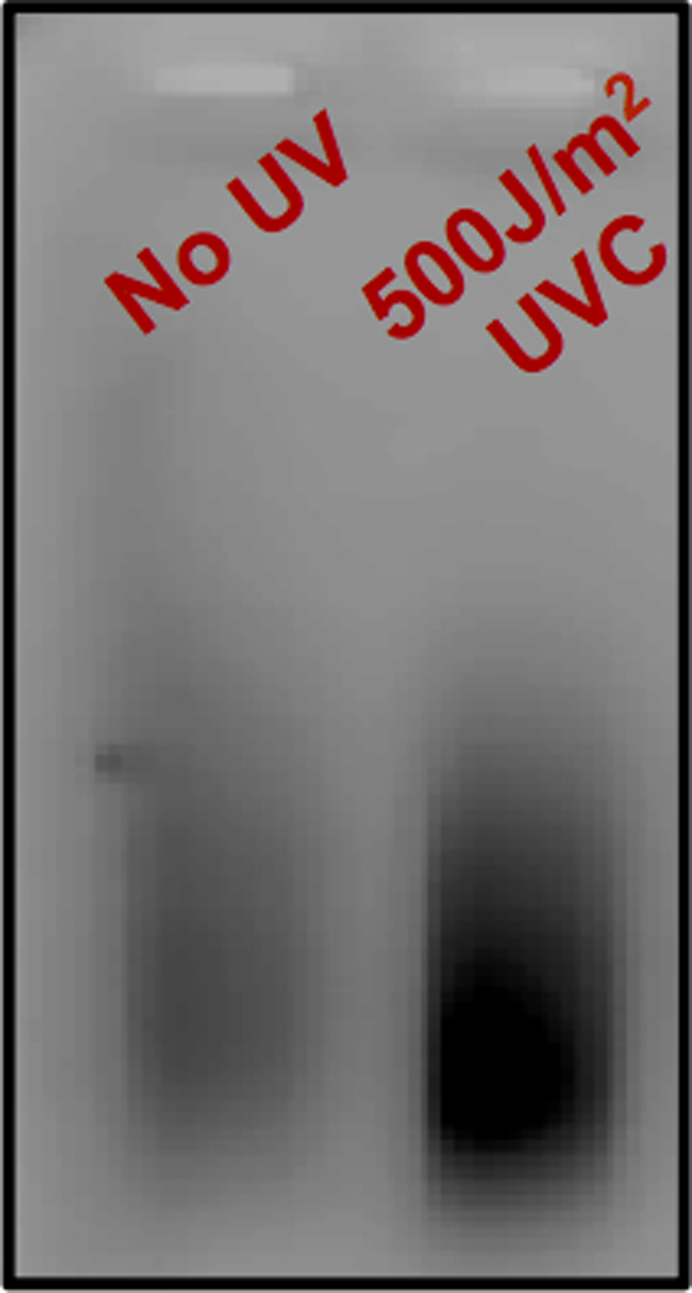
c.You should expect to see more signal in the UV-exposed sample compared to the unexposed sample.
-
a.
Single-stranded library preparation
Brief description: These steps allow for the removal of the second strand of DNA that does not contain the lesion of interest, leaving a single stranded DNA template to be PCR amplified and sequenced.
-
70.Add 20 μL Dynabeads M-280 Streptavidin per sample to a fresh 1.5 mL microcentrifuge tube and place it on the magnet rack.
-
a.Discard the supernatant.
-
a.
-
71.Add 1 mL 1× bind-and-wash buffer to tubes and briefly vortex to mix.
-
a.Centrifuge tubes briefly to pull down contents.
-
b.Place tubes on magnet rack and discard supernatant.
-
a.
-
72.Add 40 μL 2× bind-and-wash buffer and briefly vortex tubes.
-
a.Centrifuge tubes briefly to pull down contents.
-
a.
-
73.Add samples to tubes with streptavidin beads (entire 40 μL volume).
-
a.Vortex tubes briefly and leave on rotator at 23°C for 15 min.
-
b.Place tubes on magnet rack and discard supernatant.
-
a.
-
74.Add 1× 50 μL saline sodium citrate to each tube and briefly vortex.
-
a.Incubate on rotator for 10 min.
-
b.Place tubes on magnet rack and discard supernatant.
-
a.
-
75.Add 40 μL of 0.15M NaOH to each tube and briefly vortex, then place on rotator for 10 min at 23°C.
-
a.Place tubes on magnet rack and transfer supernatant to a new tube.
-
a.
-
76.Repeat the NaOH capture and pool with remainder of sample. Add 120 μL ddH2O to tube of pooled eluate from NaOH capture. Add 2 μL glycogen, 20 μL 3M NaOAc, and 550 μL cold 100% Ethanol, flicking to mix between addition of each reagent.
-
a.Incubate samples at −20°C for at least 12 h.
-
a.
Second strand synthesis
Amplification of the single stranded DNA template, using the double stranded A adapter as the primer.
-
77.Remove samples from −20°C and centrifuge samples for at least 1 h at 15,871×g in microcentrifuge at 4°C to pellet DNA.
-
a.Discard supernatant and wash pellet with 500 μL cold 75% Ethanol.
-
b.Centrifuge for 30 min at 15,871×g at 4°C.
-
c.Remove supernatant, briefly spin down tube to pull down and remove excess Ethanol.
-
d.Air dry pellet for approximately 5 min, or until remaining Ethanol has evaporated.
-
a.
-
78.
Dissolve pellet in 19.5 μL master mix by pipetting/vortexing. Components of the master mix are listed below.
| Reagent | 1× Vol. (μL) |
|---|---|
| Taq Buffer | 2 |
| 3 mM DNTPs | 1 |
| 5 μM Primer A | 1 |
| H2O | 16.85 |
| DNA Sample | - |
-
79.For the Taq polymerase, make a master mix consisting of 8 μL dH2O, 1 μL Taq buffer, and 1 μL Taq polymerase. This is enough for 6 samples.
-
a.Add 1.5 μL Taq master mix to each PCR tube.
-
a.
-
80.
Perform PCR as described below.
| Steps | Temperature | Time |
|---|---|---|
| Denaturation | 98°C | 2 min |
| Annealing | 55°C | 30 s |
| Extension | 72°C | 1 min |
| Hold | 4°C | Forever |
-
81.Purify DNA by adding 1.8× volume (37.8 μL) of AMPure XP beads to sample.
-
a.Allow to incubate at 23°C for 5 min.
-
b.Place tubes on magnet rack. Allow beads to move to the magnet and remove supernatant.
-
c.Wash beads twice with 500 μL of 75% cold Ethanol.
-
i.Pipette off Ethanol.
-
ii.Remove tubes from magnet and briefly spin tube to pull down excess Ethanol. Place tubes back on magnet rack. Pipette off remaining Ethanol.
-
i.
-
d.Air dry beads for approximately 5 min, or until beads appear to be slightly dry and appear to have a cracked surface.
-
e.Resuspend beads in 30 μL ddH2O by vortexing to mix and incubate at 23°C for 5 min.
-
f.Place tubes on magnet rack and transfer supernatant to a fresh tube.
-
a.
-
82.Perform PCR to confirm second-strand synthesis using the volumes specified below.
Reagent 1× Vol. (μL) trP1 adapter only 1× Vol. (μL) trP1 + A adapter Taq Buffer 2 2 3 mM DNTPs 1 1 trP1 Primer 1 1 Primer A - 1 H2O 15.85 14.85 DNA Sample 1 1 Taq polymerase 0.15 0.15 -
a.One set should contain only trP1 primers (negative control), another should contain both trP1 primers and PrimerA.
-
b.The PCR should be run for 8 cycles using the parameters outlined in the ‘end repair, dA-tailing, and first adapter ligation’ section.
-
a.
-
83.Following PCR, run 10 μL of each sample on a 2% agarose gel at 120 V for 20 min.
-
a.Ample signal should be observed in the set containing both primers, in contrast to the very low signal that should be observed in the set containing one primer.
-
a.
Final library amplification and sequencing
This final step aims to amplify the UVDE-seq library to achieve ample reads for Ion Torrent sequencing. The number of PCR cycles is limited to avoid amplification bias of certain sequences.
-
84.Perform PCR to amplify library using volumes specified below.
Reagent 1× Vol. (μL) Taq Buffer 5 3 mM DNTPs 2.5 trp1 Primer 2.5 Primer A 2.5 H2O 29.125 DNA Sample 13 Taq polymerase 0.375 -
a.Reaction should run for 8 cycles following steps detailed in the ‘end repair, dA-tailing, and first adapter ligation’ section.
-
a.
-
85.Following PCR, add 1.2× volume of AMPure XP beads (66 μL) to each tube.
-
a.Allow to incubate at 23°C for 5 min.
-
b.Place tubes on magnet rack. Allow beads to move to the magnet and remove supernatant.
-
c.Wash beads twice with 500 μL of 75% cold Ethanol.
-
i.Pipette off Ethanol.
-
ii.Remove tubes from the magnet and briefly spin to pull down excess Ethanol. Place tubes back on magnet. Pipette off remaining Ethanol.
-
i.
-
d.Air dry beads for approximately 5 min, or until beads appear to be slightly dry and appear to have a cracked surface.
-
e.Resuspend beads in 30 μL ddH2O by vortexing to mix and incubate at 23°C for 5 min.
-
f.Pellet beads on magnet rack and transfer supernatant to a fresh tube.
-
a.
-
86.
Run 5 μL of sample on a 2% agarose gel at 120 V for 30 min. Image gel on Typhoon using Cy2 filter (Figure 6).
-
87.
If final library looks good (signal enrichment in UV-exposed samples), combine 5 μL of each sample into a new 1.5 mL tube and submit for Ion Torrent sequencing.
Figure 6.
Agarose gel confirmation of final library preparation
Bioinformatic analysis
Bioinformatic analysis aims to align sample sequences to the yeast genome (SacCer3) to calculate the abundance of 6,4-PPs and atypical TA lesions throughout. Perl scripts are modified from Ding et al., (2015).
-
88.Bioinformatic analysis should complete the following tasks:
-
a.Separate sequencing reads based on the unique 6 nt barcode sequence associated with each second (A) adapter and remove barcode sequences from fastq file of sequencing reads. Barcode sequences are specified below.
Adapter Barcode A1 AAGAGGAT A2 TTCGTGAT A3 CCTGAGAT A4 ATCGCGAT A5 TACTGGAT A6 GAACTGAT -
b.Align reads to the SacCer3 genome using Bowtie2.bowtie2 -x saccer3 -U [fastq filename] -S [sam filename]
-
c.Convert .sam file to .bam file using Samtools.samtools view -b -S [sam filename] >[bam filename]
-
d.Convert .bam file to .bed file using bedtools2.bedtools bamtobed -i [bam filename] >[bed filename]
-
e.Locate the site where damage occurred on the opposite strand of DNA. Example perl script to locate the dinucleotide damage site is shown below.while ( my $line = <STDIN> ) {my @field = split /\t/, $line;if ( $field[5] =∼ s/\+/-/ ) {$field[2] = $field[1];$field[1] -= 2; }else {$field[5] =∼ s/-/\+/;$field[1] = $field[2];$field[2] += 2; }if ( $field[1] >= 0 ) {print join "\t", @field; } }
-
f.Extract dinucleotide sequences for each of the damage sites using bedtools2.fastaFromBed -s -name -fi saccer3_genome.fa -bed [damagebed file] -fo [damage fasta file]
-
g.Count dinucleotide sequence associated with each lesion for each sequencing library. An example Perl script is given below.my %dinuc_count;while ( my $line = <STDIN> ) {chomp $line;if ($line =∼ /ˆ>/ ) {next; }$dinuc_count{$line}++; }foreach my $key (sort keys %dinuc_count) {print "$key\t$dinuc_count{$key}\n"; }
-
h.Keep only TA lesions by filtering out non-TA lesion sites. An example Perl script to accomplish this is shown below.print STDERR "Enter name of bed file:\n";my $bedfile = <STDIN>;chomp $bedfile;open (BED, "$bedfile");print STDERR "Enter name of matching dinucleotide sequence file:\n";my $dinucfile = <STDIN>;chomp $dinucfile;open (DINUC, "$dinucfile");my $head = "";my $dinucseq = "";my $match_flag = 1;while( my $line = <BED> ) {my @field = split /\t/, $line;if ( $match_flag ) {my $temp = <DINUC>;chomp $temp;$dinucseq = <DINUC>;chomp $dinucseq;if ( $temp =∼ /\(/ ) {my @fields = split /\(/, $temp;$head = $fields[0];$head =∼ s/ˆ>//; } }if ( $head eq $field[3] ){$match_flag = 1;if ( $dinucseq =∼ /TA/ ) {print $line; } } }
-
i.Plot your output (Figure 7) using GraphPad Prism or another software program of your choosing.
-
a.
Figure 7.

Bioinformatic analysis of lesion distribution (adapted from Laughery et al., 2020)
Expected outcomes
The success of the in vitro validation depends on several factors. First, careful design of the ‘TA’ oligo to induce ‘TA’ photoproduct formation by UV-C light is important. The oligo that we designed here works well for robust induction of ‘TA’ photoproducts (Figures 3A and 3C). Second, selection of the repair enzyme that is able to cleave ‘TA’ photoproducts is critical. Under the conditions we used in this protocol, and as previously suggested in Bryan et al. (2014), the UVDE enzyme ensures optimal cleavage of the ‘TA’ lesion. Failure to observe cleaved products in the denaturing PAGE gel might indicate suboptimal digestion of UVDE that could be attributed to poor quality of the enzyme or one of the buffer components not working well. Finally, a good quality gel image (Figure 3B) largely depends on the signal intensity of 32P labelled samples/marker oligos, neutralization of the pH of the UVDE buffer in the samples before loading, and on the electrophoresis running conditions.
The first indication that library preparation was successful will be the agarose gel following the final library amplification (step 86). UV-exposed samples should have visibly more product signal on the gel than unexposed control samples (Figure 6). This will result from more UV lesions being cleaved by UVDE in the UV-exposed samples, which creates the 3′ OH substrate for second adapter ligation. Following library sequencing via the Ion Torrent platform, one can expect anywhere between 17–30 million reads per sample. Bioinformatic analysis must begin by trimming the barcode sequences associated with each adapter. Lack of barcode trimming will result in improper or incomplete sequence alignment. Following analysis outlined in step 55, one can expect to see enrichment of canonical 6–4PPs (TC, TT, CC, CT), as well as noncanonical TA lesions in comparison to unexposed samples (0 h UV compared to No UV sample, Figure 7).
Limitations
Handling radioactive material (32P) needs trained and experienced personnel. Fluorescent labels are not optimal as they might get photobleached differentially for various UV-C doses used in this experiment. The success of each step followed in this protocol cannot be determined until gel imaging on day 3. The quantity of DNA that can be taken through the UVDE treatment may be a limiting factor as well. The UV-C exposure and UVDE cleavage steps were optimized using 50 μg (total) DNA. It is imperative that this quantity is not exceeded, or else UV damage induction and lesion cleavage may be less efficient and ultimately result in decreased enrichment of mappable UV-induced damage.
Troubleshooting
Problem 1
Gel breakage during separation of gel from glass plate and during drying is very common when running urea polyacrylamide gels (step 31).
The traditional way is to cut out a filter paper and to place the filter paper on top of the gel. The gel attached to the filter paper is carefully separated from the glass plate. The gel is then covered with a saran wrap.
Place the filter paper side to the gel dryer and turn the heat and vacuum on. Dry the gel for one hour or more until all vapor disappears from the outlet tube attached to the dryer.
Place the dried gel onto a cassette and cover with phosphor screen and expose up to 16 h.
Potential solution
We have adjusted this protocol to expose the phosphor screen to a wet gel (covered with saran wrap) placed on gel device/ glass plate to avoid the risk of gel breakage while separating gel from the glass plates.
Problem 2
Radioactive signal of samples/marker oligos is too high or too low (steps 1–5).
Potential solution
Dilute samples and marker oligos to be less than 100× signal on Geiger Muller counter. When newly labelled marker oligos are not diluted, the signal intensity of the marker oligos will mask the samples while imaging the phosphor screen. Marker oligos should be at least 3–5 times less intense than the samples on a Geiger Muller counter.
If the signal is too low, this may be due to insufficient signal from 32P. Check the half-life of 32P. Additionally, this may be due to the T4 polynucleotide kinase enzyme and its buffer not working well.
Problem 3
Failure to see digested products on gel.
Potential solution
The UVDE enzyme is not functioning well or the buffer and incubation conditions are not suitable for the enzyme action (steps 14–17).
This can also be due to the UV lamp not working sufficiently (step 7).
UV lesion formation and UVDE digestion can be optimized using a control oligo containing CPD-forming dipyrimidine sequences, such as the oligos described in Mao et al. (2018) and Sivapragasam et al. (2021).
Problem 4
Loss of DNA during AMPure XP bead purification
Potential solution
AMPureXP bead purification must be carried out very carefully (steps 49, 51, 52, 54, 60, 63, 64a, 67, 81, 85). Do NOT over dry beads. This will result in loss of your library. Following removal of 500 μL 70% Ethanol, briefly spin down tubes to draw down excess Ethanol from the sides of the tube, place back on magnet rack, and using a 10 μL micropipette, pipette off all remaining Ethanol that you can. Next, air dry beads on bench for 5–7 min. Carefully watch beads, and once they appear dry (with small cracks starting to form) add solute. Do NOT exceed 7 min, and do NOT dry beads near a flame. This will over dry the beads and result in a loss of DNA.
Problem 5
Incomplete sonication.
Potential solution
Proper sonication is essential to successful Ion Torrent sequencing. If DNA is not fragmented to the appropriate sizes (step 41), one can optimize the number of cycles used for sonication. If DNA fragments are too large (greater than 700 bp) the number of cycles should be increased, and if the fragments are too small (less than 200 bp) the number of cycles should be decreased.
Resource availability
Lead contact
Further information and requests for resources and reagents should be directed to and will be fulfilled by the lead contact, John J. Wyrick (jwyrick@wsu.edu).
Materials availability
This study uses CPD photolyase, which can be purchased from commercial sources, and UVDE, which can be expressed and purified from E. coli, as previously described in Laughery et al. (2020).
Acknowledgments
The authors thank Drs. Peng Mao and Kathiresan Selvam for helpful edits. We thank Drs. Steven Roberts and Alexander Brown for the purified CPD photolyase and UVDE enzymes. We appreciate Weiwei Du and Mark Wildung at the Genomics Core at Washington State University for Ion Torrent sequencing services. This work is supported by NIEHS grants R21ES029655 (to J.J.W.), R01ES028698 (to J.J.W.), R01ES032814 (to J.J.W.). K.A.B. is a trainee of the NIGMS funded training grant (T32GM008336). Sequencing gel apparatus image source: https://www.bio-rad.com/en-us/category/nucleic-acid-sequencing?ID=ae5be56f-4d93-45e0-8b92-470e31274cb9. Typhoon FLA 7000 series image source: https://cdn.cytivalifesciences.com/dmm3bwsv3/AssetStream.aspx?mediaformatid=10061&destinationid=10016&assetid=14443
Author contributions
K.A.B. and S.S. performed the experiments and wrote the manuscript and J.J.W. edited the manuscript.
Declaration of interests
The authors declare no competing interests.
Contributor Information
Kaitlynne A. Bohm, Email: kaitlynne.bohm@wsu.edu.
Smitha Sivapragasam, Email: s.sivapragasam@wsu.edu.
John J. Wyrick, Email: jwyrick@wsu.edu.
Data and code availability
The UVDE-seq data have been submitted to the NCBI Gene Expression Omnibus (GEO; https://www.ncbi.nlm.nih.gov/geo/) under accession number GEO: GSE144679. Code used in this study can be found in the above protocol.
References
- Bryan D.S., Ransom M., Adane B., York K., Hesselberth J.R. High resolution mapping of modified DNA nucleobases using excision repair enzymes. Genome Res. 2014;24:1534–1542. doi: 10.1101/gr.174052.114. [DOI] [PMC free article] [PubMed] [Google Scholar]
- Ding J., Taylor M.S., Jackson A.P., Reijns M.A. Genome-wide mapping of embedded ribonucleotides and other noncanonical nucleotides using emRiboSeq and EndoSeq. Nat. Protoc. 2015;10:1433–1444. doi: 10.1038/nprot.2015.099. [DOI] [PMC free article] [PubMed] [Google Scholar]
- Langmead B., Salzberg S. Fast gapped-read alignment with Bowtie 2. Nat Methods. 2012;9:357–359. doi: 10.1038/nmeth.1923. [DOI] [PMC free article] [PubMed] [Google Scholar]
- Laughery M.F., Brown A.J., Bohm K.A., Sivapragasam S., Morris H.S., Tchmola M., Washington A.D., Mitchell D., Mather S., Malc E.P., et al. Atypical UV photoproducts induce non-canonical mutation classes associated with driver mutations in melanoma. Cell Rep. 2020;33:108401. doi: 10.1016/j.celrep.2020.108401. [DOI] [PMC free article] [PubMed] [Google Scholar]
- Li H., Handsaker B., Wysoker A., Fennell T., Ruan J., Homer N., Marth G., Abecasis G., Durbin R. 1000 Genome Project Data Processing Subgroup, The Sequence Alignment/Map format and SAMtools. Bioinformatics. 2009;16:2078–2079. doi: 10.1093/bioinformatics/btp352. [DOI] [PMC free article] [PubMed] [Google Scholar]
- Liu Z., Tan C., Guo X., Kao Y.-T., Li J., Wang L., Sancar A., Zhong D. Dynamics and mechanism of cyclobutane pyrimidine dimer repair by DNA photolyase. PNAS. 2011;108:14831–14836. doi: 10.1073/pnas.1110927108. [DOI] [PMC free article] [PubMed] [Google Scholar]
- Mao P., Brown A.J., Esaki S., Lockwood S., Poon G.M.K., Smerdon M.J., Roberts S.A., Wyrick J.J. ETS transcription factors induce a unique UV damage signature that drives recurrent mutagenesis in melanoma. Nat. Commun. 2018;9:2626. doi: 10.1038/s41467-018-05064-0. [DOI] [PMC free article] [PubMed] [Google Scholar]
- Sivapragasam S., Stark B., Albrecht A.V., Bohm K.A., Mao P., Emehiser R.G., Roberts S.A., Hrdlicka P.J., Poon G.M.K., Wyrick J.J. CTCF binding modulates UV damage formation to promote mutation hot spots in melanoma. EMBO J. 2021;40:e107795. doi: 10.15252/embj.2021107795. [DOI] [PMC free article] [PubMed] [Google Scholar]
Associated Data
This section collects any data citations, data availability statements, or supplementary materials included in this article.
Data Availability Statement
The UVDE-seq data have been submitted to the NCBI Gene Expression Omnibus (GEO; https://www.ncbi.nlm.nih.gov/geo/) under accession number GEO: GSE144679. Code used in this study can be found in the above protocol.