Clinical mycology laboratories now prepare fewer tease mounts of filamentous fungi but increasingly use a variety of tape touch or Scotch Tape methods to microscopically study molds. Mounts are often prepared with clear cellophane tape by a procedure similar to that described in Larone's Third Edition of Medically Important Fungi: a Guide to Identification (1). Because it is not the most commonly used tape for general purposes, clear tape is often available only in craft or art supply stores. Characteristically, clear tape is a relatively thick and tough film with variable optical qualities. Preparation of tape touch mounts using frosted tape offers several advantages. First, it is readily available as a standard desk item in almost every laboratory or office, it is physically a very flat, thin material, and, finally, it can be torn easily. Handling any tape with gloved hands may present difficulties, but preparing tape touch mounts with bare hands can also pose some safety risks for the mycologist. A simple, safe, and easily executed mounting method using frosted tape is outlined herein. It results in a high-quality tape mount for microscopic study.
The procedure.
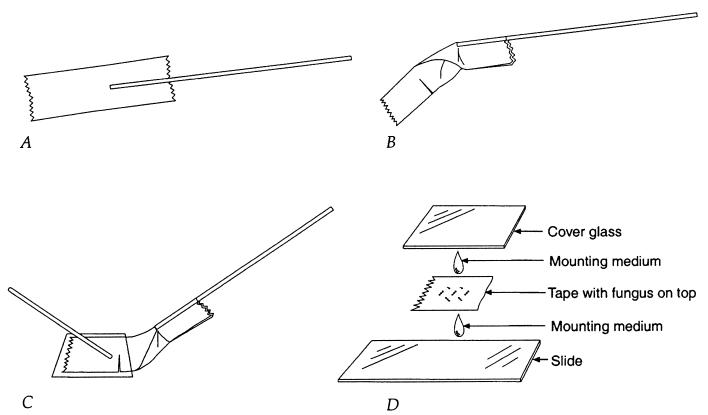
Using ungloved hands, tear, from a tape roll, a piece of frosted tape about 2 in. long. Place an applicator stick parallel to the length of the tape, laying it overlapped about 1/2 in. onto the middle of the sticky side of the tape (Fig. 1A). Fold the tape around the stick and onto itself, adhesive against adhesive, anchoring it to the stick. Using scissors, make a cut, perpendicular to the tape length, one-half to one-third across the tape width, about 1/2 in. from the free end (Fig. 1B). Several tape “flags” may be prepared at once if multiple tape touch mounts are to be made. Gloves may be put on at this time if required. To prepare a mount, hold a tape flag by the applicator stick handle and touch the tape to a fungal colony in a culture dish opened in a biological safety cabinet. To ensure contact between the tape and the mold colony, use a second applicator stick to press the tape down onto the mycelial surface. Lift the tape flag with attached fungal elements from the colony and lower it onto a drop of mounting medium such as lacto-fuchsin or lacto-phenol aniline blue on a cover glass. Using the second applicator stick, hold the corner of the end of the tape firmly on the cover glass while pulling the first stick gently away (Fig. 1C). This motion will tear the scissor cut, leaving the piece of tape bearing the fungus in the mounting medium on the cover glass. Apply a second drop of mounting medium to the exposed tape surface and carefully lower a microscope slide onto it. Lift and invert the preparation so the cover glass is uppermost. The completed mount, now ready for microscopic study, is composed of the cover glass, the fungal structures in mounting medium, the tape, the second drop of mounting medium, and finally the microscope slide (Fig. 1D).
FIG. 1.
Safe and effective tape touch method using frosted tape. (A) The applicator stick is positioned on the sticky side of frosted tape. (B) The tape is wrapped around an applicator stick, which secures the tape to the stick, and a horizontal cut is made 0.5 in. from the free end. (C) The tape is touched to the fungus and placed fungus-side down on a drop of mounting medium on a cover glass, and the stick is removed. (D) An exploded view of the completed tape touch preparation is shown.
Generally, mounts prepared in this way have superior optical quality because the tape is behind the fungus, not in the optical path where it could cause distortion of the microscopic image. Because the tape is thin, the mount usually lies flat without the annoying ripples that can occur in mounts using thicker, clear tape. If the tape is carefully trimmed, smaller flags can be fashioned to prepare tape touch mounts from tube cultures.
REFERENCE
- 1.Larone, Davise H. Medically important fungi. 3rd ed. Washington, D.C.: ASM Press; 1995. [Google Scholar]


