Abstract
Objective:
To test the hypotheses that (1) there is no significant difference between the effects of two burs on the surface roughness of enamel after orthodontic debonding, and (2) there is no difference between resin removal times of the two burs.
Materials and Methods:
The crowns of 20 premolars were embedded in acrylic blocks, and the buccal surfaces were subjected to atomic force microscopy (AFM), with measurement of initial roughness values. The brackets were bonded with a light-cured adhesive and were debonded with a debonding plier. In half of samples, adhesive remnants were removed with a tungsten carbide bur, whereas a fiber-reinforced composite bur was used in the other half. The second AFM measurements were made after resin removal. Duration of removal procedures was also recorded. Results of roughness and duration measurements were analyzed with the use of repeated measurements analysis of variance and independent t-tests, respectively.
Results:
The two resin removal instruments had significantly different effects on enamel roughness; higher average roughness (Sa) (P < .001), root mean square roughness (Sq) (P = .046), and maximum roughness depth (Smax) (P < .001) values were obtained with use of the tungsten carbide bur. Time required for resin removal with the composite bur was significantly greater than time required with the carbide bur (P < .001).
Conclusion:
The hypothesis is rejected. The composite bur used for resin removal creates smoother surfaces after orthodontic bonding; however, the process takes longer than it does when the tungsten carbide bur is used.
Keywords: Surface roughness, Resin removal, Composite bur, Tungsten carbide bur, Debonding
INTRODUCTION
Direct bonding of orthodontic attachments on etched enamel surfaces has been commonly considered and accepted to be clinically successful. Removal of attachments and all resin remnants from tooth surfaces is the final procedure required to return the enamel surface as closely as possible to the original pretreatment condition.1 Therefore, many researchers have introduced different techniques for resin removal and subsequent enamel polishing without causing iatrogenic damage; these include scraping with a scaler or a band-removing plier and removal with a tungsten carbide bur in a contra-angle handpiece, as well as the use of Sof-Lex discs (3M ESPE, St Paul, Minn).1–4 Ultrasonic applications and air abrasion techniques with aluminum oxide particles have been investigated as alternative methods for removing adhesive remnants.5,6 In addition, studies have demonstrated that laser energy degrades the bonding resin, and that lower force is used for bracket removal, suggesting that it could be used for resin removal as well.7
The commonly preferred method is to use a suitable bur in conjunction with a polishing disc and subsequently a polishing paste.8 If the normal enamel surface is seen after all adhesive has been removed, polishing with pumice or prophylaxis paste may be optional. Zachrisson and Büyükyılmaz9 indicated that about 30,000 rpm is optimal speed for resin removal without enamel damage. Clinical and laboratory studies have revealed that rotary instruments may alter the enamel surface irreversibly by causing deep scratches or lost enamel. Frequently, adhesive remnant has been found on the enamel surface, even after cleaning and polishing with rotary instruments.9
Along with the development of conventional instruments, new burs that are more conservative have been designed for the enamel surface. A new composite bur, reinforced by zircon-rich glass fiber, was initially designed to gently remove cement, stains, and colored coatings from the surface of the enamel; it has also been advocated for use in orthodontics for clean-up procedures after debonding. The manufacturer defines the special characteristic of this instrument as comprising fiber sections with abrasive power, which cover the entire working surface and split up into small fragments when they act on a hard surface, thereby offering cutting sections of zircon/glass fibers in a resin matrix. Eventually, nonabrasiveness toward dental enamel was suggested; however, a rather slight abrasive effect on the filling and on bonding composites is attained in dentistry today.10
After resin removal, evaluation of the smoothness of enamel surfaces via scanning electron microscopy (SEM) photomicrographs is unreliable and subjective. Because the surfaces cannot be quantitatively evaluated with SEM, this method cannot be used for comparative assessment of enamel roughness.11 Atomic force microscopy (AFM) analysis is an alternative method that uses multiple mechanical scans in high resolution and is especially recommended for analysis of such surfaces with nanoscale irregularities.12,13 Furthermore, this method offers several advantages, such as minimal sample preparation, two-dimensional (2D) and three-dimensional (3D) images obtained at the same time, and the possibility of reexamination of the sample.14,15
Enamel roughness may change according to the resin removal method used, thus the two hypotheses investigated in this in vitro study are as follows: (1) there is no significant difference between the effects of two burs on the surface roughness of enamel evaluated by means of AFM, after orthodontic debonding, and (2) there is no difference between resin removal times of the two burs.
MATERIALS AND METHODS
Twenty maxillary premolars, freshly extracted for orthodontic reasons, were used in this study. Teeth were selected on the basis of visual observation of the solidity of labial surfaces, that is, no caries, no cracks on the coronal portion, and no exposure to chemicals. The teeth were stored in distilled water before preparation and testing. The roots of the teeth were removed, and the crowns were embedded in self-cured acrylic resin, with labial surfaces uppermost. The teeth were cleaned and polished with nonfluoridated pumice, rinsed with water, and dried with oil-free compressed air. All samples were sent to the laboratory in plastic zipper bags to prevent surface contamination. Then, the surface roughness of the samples was evaluated using a surface probe/atomic force microscope (SPM/AFM) for initial measurement. The AFM (Digital Instruments MMAFM-2/1700EXL, Santa Barbara, Calif) was operated in the contact mode first to obtain topographic images over selected areas on the surface. This instrument was supported with a scanner with maximum range of 125 µm × 125 µm × 5 µm in x, y, and z directions, respectively. To measure roughness values, the tip was moved across the surface, and three different points were measured on the same surface located in the center of the samples. For statistical analysis, the average of these three measurements was used. Images were acquired with a scan rate of 2.03 Hz and 5-µm scan sizes. A no platform (NP) type silicon nitride probe at 12 to 40 kHz with a normal bending constant of 0.06 to 0.58 N/m was used. The force applied to the surface was 10−6 N. Each measurement consisted of 512 scans. These measurements involved three roughness parameters expressed in nanometers:
Average roughness (Sa) value: the arithmetic mean of the height of peaks and depth of valleys from a mean line.
Root mean square roughness (Sq): the height distribution relative to the mean line.
Maximum roughness depth (Smax): value that represents isolated profile features.
After initial measurements were taken, the teeth were etched for 30 seconds with a 37% phosphoric acid gel (Etching Agent, Reliance Orthodontic Products, Itasca, Ill) and were thoroughly rinsed with water and air dried. Adhesive resin (Light Bond, Reliance Orthodontic Products) was placed on the bracket bases, the brackets were bonded to the prepared enamel, excess adhesive was removed, and the resin was light cured for 40 seconds. All samples were stored in water at room temperature for 24 hours, and brackets were debonded with a debonding plier.
The teeth were randomly assigned to two equal groups. In the first group, removal of resin remnants was performed with an eight-bladed tungsten carbide bur (Komet, Gebr Brasseler, Lemgo, Germany) and a low-speed handpiece (Figure 1). In the second group, a fiber-reinforced composite bur (Stainbuster, Abrasive Technology Inc, Lewis Center, Ohio) was used for resin removal; this bur was operated with a low-speed handpiece and water cooling according to the manufacturer's instructions (Figure 2). All bonding, debonding, and resin removal procedures were applied to the samples by the same operator, and a new bur was used for each tooth (Figure 3). Complete removal of the resin remnants was verified clinically by visual inspection under a dental operating light. The time required to remove the entire adhesive resin completely from the enamel surface was recorded in seconds. After clean-up procedures were completed, final roughness parameters were registered.
Figure 1.
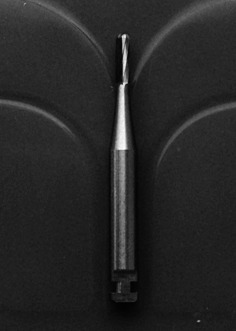
Tungsten carbide bur.
Figure 2.
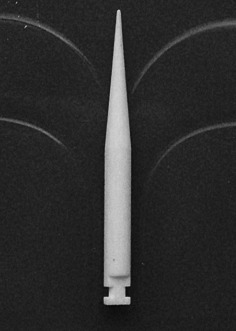
Composite bur.
Figure 3.
Samples and applications of the burs.
The distributions of the measurements were investigated with the Kolmogorov Smirnov normality test, then parametric tests were used. Data for roughness values were statistically evaluated by repeated measurements analysis of variance (ANOVA) for each resin removal method. The independent t-test was used for the duration of removal procedures. Significance was determined at a probability value of P < .05 for all tests.
RESULTS
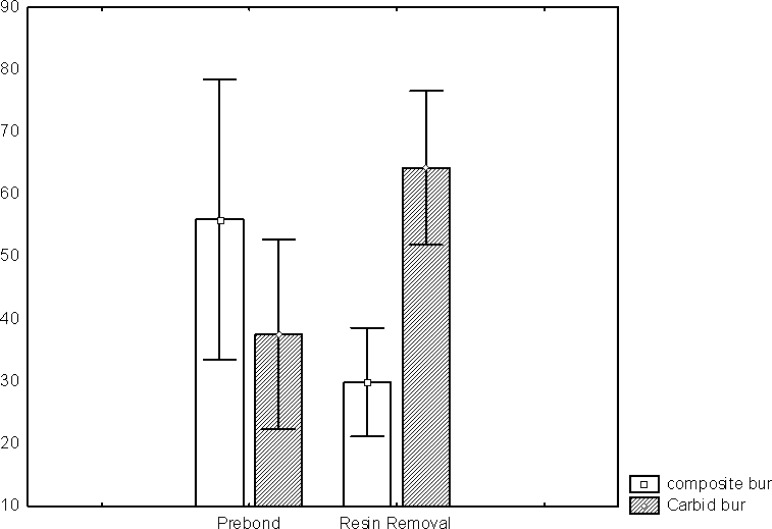
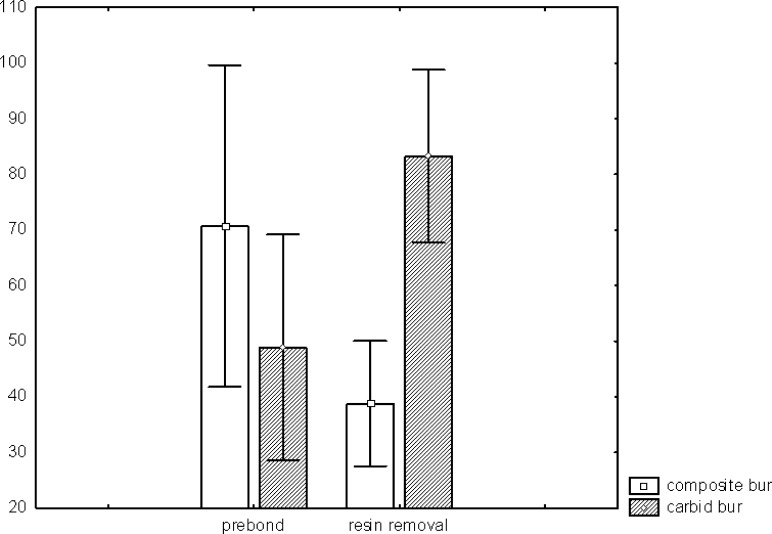
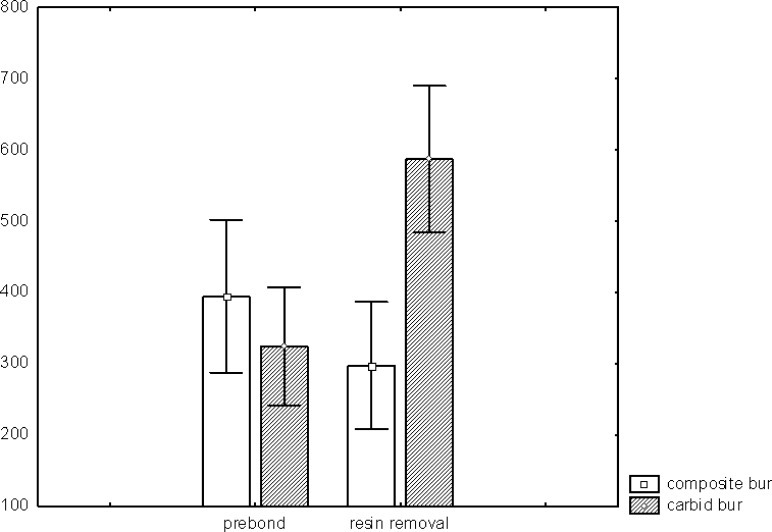
Results of surface roughness measurements (nm) for each group are summarized in Table 1. ANOVA for Sa values revealed significant differences between groups (P < .001). Multiple comparisons showed that the tungsten carbide bur group had significantly greater irregularities when compared with the composite bur group (Figure 4). According to the Sq values, the two resin removal methods produced significantly different results; use of the composite bur for resin removal improved the surface profile (P = .046) (Figure 5). Figure 6 shows the findings for Smax, which revealed a statistically significant difference between the two methods, with the carbide bur producing higher Smax values (P < .001).
Table 1.
Results of Surface Roughness Measurement for Each Group
Figure 4.
Results of average roughness (Sa).
Figure 5.
Results of root mean square roughness (Sq).
Figure 6.
Results of maximum roughness depth (Smax).
Differences between prebond and debond surface roughness of the samples are in accordance with views obtained by AFM scans; significantly rougher surfaces were visible on 3D views of the finished surfaces with a tungsten carbide bur (Figures 7 and 8).
Figure 7.
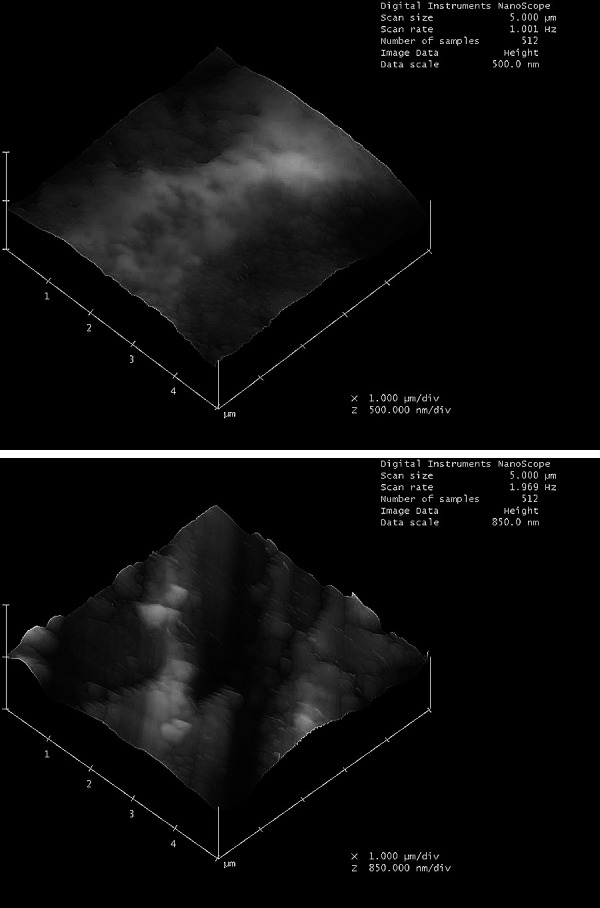
AFM scans of a tungsten carbide bur sample—prebond. AFM scans of a tungsten carbide bur sample—after resin removal.
Figure 8.
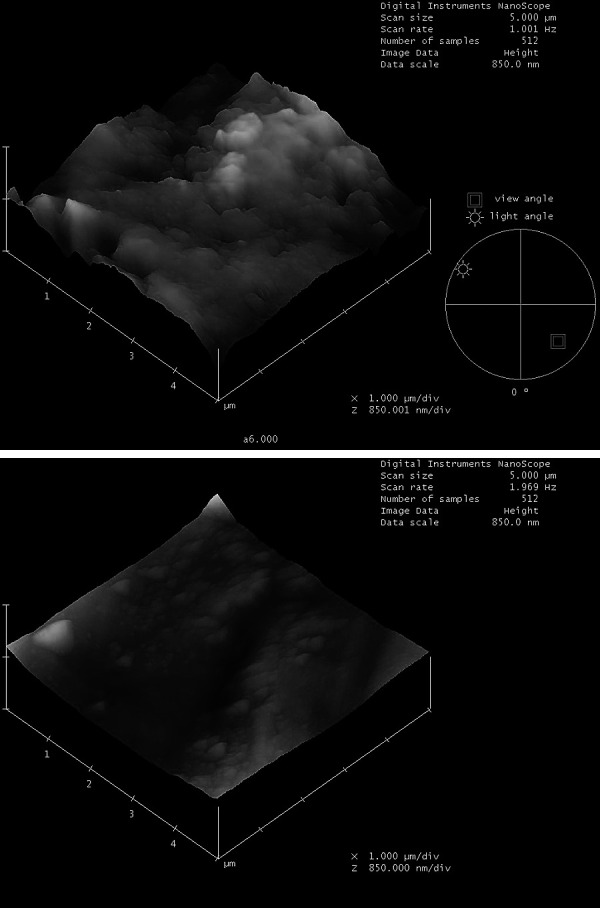
AFM scans of a composite bur sample—prebond. AFM scans of a composite bur sample—after resin removal.
The duration of resin removal methods is presented in Table 2; results demonstrate that use of the composite bur is more time consuming than use of the tungsten carbide bur (P = .092).
Table 2.
Duration of the Two Methods Used in the Study
DISCUSSION
The influence of the enamel surface after orthodontic treatment is inevitable. Regardless of the methods used, some scarring occurs after bracket debonding and removal of resin remnants.1 Enamel surface alterations after bracket removal are important with regard to the outer layer of enamel, which includes a higher mineral content and more fluoride in comparison with deeper layers. Damage to the enamel surface may lead to decreased enamel resistance and increased risk of decalcification.16
Before any enamel treatment was provided, no statistically significant difference in surface roughness was noted between the groups. On the other hand, finishing instruments affected the surface roughness parameters, that is, higher Sa values were obtained with use of the carbide bur than the composite bur (P < .001). This difference between surface roughness in the two groups was in accordance with views obtained by AFM scans (Figures 7 and 8). According to these results, our first hypothesis in the introduction section is rejected; the composite bur provided a smoother enamel surface than was produced by the carbide bur after orthodontic debonding. Furthermore, in the composite bur group, roughness values obtained after finishing procedures were completed were lower than initial values. Similarly Trakyali et al.17 reported that Stainbuster may eliminate surface roughness and improve the light reflection of enamel.
In this study, AFM was used to assess surface configurations. AFM is accepted as a suitable method for analysis of hard surfaces that exhibit microirregularities.13,18 This method involves a noninvasive approach with minimal sample preparation. Furthermore, AFM provides 2D and 3D images at the same time, and it allows reexamination of the sample.13–15 SEM images can be taken to evaluate surface smoothness; however, this method cannot provide a quantitative assessment—only subjective information.19,20 Therefore, SEM analyses may be used only as a supportive tool for quantitative evaluation methods. In our study, quantitative measurements with AFM provided a comparative assessment between groups.
Some studies of surface configuration have measured the surface in two dimensions and have used only Sa values as a roughness parameter.21,22 Whitehead et al.23 reported that Sa was insufficient for registration of the surface profile. The same Sa values may indicate different roughness features because Sa cannot differentiate projections or depressions. To determine profile shape, additional roughness variables such as Smax or Sz (the average maximum peak to valley height) may be recommended. Even in these conditions, results must be interpreted carefully because of the features of the stylus mode used for measuring depending on the features of the stylus, the limitations of surface profilometry should be identified.23 Similarly, Wennerberg et al.24 emphasized that 2D measurements were not sufficient, and that a proper surface description should contain parameters from height and horizontal measurements. In this study, we used Sa, Sq, and Smax as indicators of surface roughness; the results of these parameters were similar. Generally, the carbide bur increased enamel roughness, whereas the composite bur had a roughness-reducing effect.
The second hypothesis in this study was rejected also; the time required for resin removal with the composite bur was longer than time required with the tungsten carbide bur. The reason for this may involve aggressive cutting with the sharp blades of carbide burs. Composite burs have no blade; they act by grinding layer after layer. During abrasion, their fibers divide into fragments and the resin matrix is ruined, revealing a new section of glass fibers. This action provides a self-sharpening feature. According to the manufacturer's instructions, Stainbuster does not heat up while it is used with or without water spray, and the use of water is helpful for cleaning up the grinding remnants.10
Clinical Considerations
In the oral cavity, bacterial plaque can easily adhere to hard surfaces (tooth, prosthesis, filling material, or implant) if they are rough. According to the literature, reduction in surface roughness will lead to a remarkable decrease in plaque formation and maturation.25,26 With respect to this study, finishing with the composite bur creates a much smoother surface than is seen in the initial condition and thereby may reduce the occurrence of bacterial colonization.
Time-consuming procedures could be unappealing to the clinician, although the instrument provides better results. Thus, to reduce the duration of resin removal, first, adhesive remnants can be abraded with a tungsten carbide bur, then the composite bur can be used for removal of the last adhesive layer.
CONCLUSIONS
After orthodontic bonding, the composite bur used for resin removal creates smoother surfaces compared with the carbide bur—even smoother than original surfaces.
Application of a composite bur is more time consuming than use of a carbide bur.
Acknowledgments
Special thanks to Mrs Fahrunnisa Dınkcıoğlu for her grammatical contributions.
REFERENCES
- 1.Campbell P. M. Enamel surfaces after orthodontic bracket debonding. Angle Orthod. 1995;65:103–110. doi: 10.1043/0003-3219(1995)065<0103:ESAOBD>2.0.CO;2. [DOI] [PubMed] [Google Scholar]
- 2.Rouleau B. D, Jr, Marshall G. W, Jr, Cooley R. O. Enamel surface evaluations after clinical treatment and removal of orthodontic brackets. Am J Orthod. 1982;81:423–426. doi: 10.1016/0002-9416(82)90081-1. [DOI] [PubMed] [Google Scholar]
- 3.Hong Y. H, Lew K. K. Quantitative and qualitative assessment of enamel surface following five composite removal methods after bracket debonding. Eur J Orthod. 1995;17:121–128. doi: 10.1093/ejo/17.2.121. [DOI] [PubMed] [Google Scholar]
- 4.Howell S, Weekes W. T. An electron microscopic evaluation of the enamel surface subsequent to various debonding procedures. Aust Dent J. 1990;35:245–252. doi: 10.1111/j.1834-7819.1990.tb05402.x. [DOI] [PubMed] [Google Scholar]
- 5.Krell K. V, Courey J. M, Bishara S. E. Orthodontic bracket removal using conventional and ultrasonic debonding techniques, enamel loss, and time requirements. Am J Orthod Dentofacial Orthop. 1993;103:258–266. doi: 10.1016/0889-5406(93)70007-B. [DOI] [PubMed] [Google Scholar]
- 6.Kim S. S, Park W. K, Son W. S, Ahn H. S, Ro J. H, Kime Y. D. Enamel surface evaluation after removal of orthodontic composite remnants by intraoral sandblasting: a 3-dimensional surface profilometry study. Am J Orthod Dentofacial Orthop. 2007;132:71–76. doi: 10.1016/j.ajodo.2005.07.027. [DOI] [PubMed] [Google Scholar]
- 7.Thomas B. W, Hook C. R, Draughn R. A. Laser-aided degradation of composite resin. Angle Orthod. 1996;66:281–286. doi: 10.1043/0003-3219(1996)066<0281:LADOCR>2.3.CO;2. [DOI] [PubMed] [Google Scholar]
- 8.Zachrisson B. U, Årtun J. Enamel surface appearance after various debonding techniques. Am J Orthod. 1979;75:121–137. doi: 10.1016/0002-9416(79)90181-7. [DOI] [PubMed] [Google Scholar]
- 9.Zachrisson B. U, Büyükyılmaz T. Chapter 14. Bonding in orthodontics. In: Graber T. M, Varnasdal R. J, Vig K. W, editors. Orthodontics Current Principles and Techniques 4th ed. St Louis: Elsevier Mosby; 2005. pp. 579–659. [Google Scholar]
- 10. http://www.stainbuster.com Accessed January 2010.
- 11.Winchester L, Orth M. Direct orthodontic bonding to porcelain: an in vitro study. Br J Orthod. 1991;18:299–308. doi: 10.1179/bjo.18.4.299. [DOI] [PubMed] [Google Scholar]
- 12.Binning G, Quate C. F, Gerber C. Atomic force microscope. Phys Rev Lett. 1986;56:930. doi: 10.1103/PhysRevLett.56.930. [DOI] [PubMed] [Google Scholar]
- 13.Kakaboura A, Fragouli M, Rahiotis C, Silikas N. Evaluation of surface characteristics of dental composites using profilometry, scanning electron, atomic force microscopy and gloss-meter. J Mater Sci Mater Med. 2007;18:155–163. doi: 10.1007/s10856-006-0675-8. [DOI] [PubMed] [Google Scholar]
- 14.Karan S, Toroglu M. S. Porcelain refinishing with two different polishing systems after orthodontic debonding. Angle Orthod. 2008;78:947–953. doi: 10.2319/081307-374.1. [DOI] [PubMed] [Google Scholar]
- 15.Tholt de Vasconcellos B, Miranda-Junior W. G, Prioli R, Thompson J, Oda M. Surface roughness in ceramics with different finishing techniques using atomic force microscope and profilometer. Oper Dent. 2006;4:442–449. doi: 10.2341/05-54. [DOI] [PubMed] [Google Scholar]
- 16.Ogaard B. Oral microbiological changes, long-term enamel alterations due to decalcification and caries prophylactic aspects. In: Brantly W. A, Eliades T, editors. Orthodontic Materials Scientific and Clinical Aspects. Thieme: Stuttgart; 2001. pp. 124–139. [Google Scholar]
- 17.Trakyali G, Ozdemir F. I, Arun T. Enamel colour changes at debonding and after finishing procedures using five different adhesives. Eur J Orthod. 2009;31:397–401. doi: 10.1093/ejo/cjp023. [Epub 2009 May 21.] [DOI] [PubMed] [Google Scholar]
- 18.Marshall G. W, Jr, Balooch M, Gallagher R. R, Gansky S. A, Marshall S. J. Mechanical properties of the dentinoenamel junction: AFM studies of nanohardness, elastic modulus and fracture. J Biomed Mater Res. 2001;4:87–95. doi: 10.1002/1097-4636(200101)54:1<87::aid-jbm10>3.0.co;2-z. [DOI] [PubMed] [Google Scholar]
- 19.Piacentini C, Sfondrini G. A scanning electron microscopy comparison of enamel polishing methods after air-rotor stripping. Am J Orthod Dentofacial Orthop. 1996;109:57–63. doi: 10.1016/s0889-5406(96)70163-4. [DOI] [PubMed] [Google Scholar]
- 20.Eliades T, Gioka C, Eliades G, Makou M. Enamel surface roughness following debonding using two resin grinding methods. Eur J Orthod. 2004;26:333–338. doi: 10.1093/ejo/26.3.333. [DOI] [PubMed] [Google Scholar]
- 21.Ayad M. F, Rosenstiel S. F, Hassan M. M. Surface roughness of dentin after tooth preparation with different rotatory instrumentation. J Prosthet Dent. 1996;75:122–128. doi: 10.1016/s0022-3913(96)90087-6. [DOI] [PubMed] [Google Scholar]
- 22.Wahle J. J, Wendt S. L. Dentinal surface roughness: a comparison of tooth preparation techniques. J Prosthet Dent. 1993;69:1160–1164. doi: 10.1016/0022-3913(93)90135-b. [DOI] [PubMed] [Google Scholar]
- 23.Whitehead S. A, Shearer A. C, Watts D. C, Wilson N. H. F. Comparison of two stylus methods for measuring surface texture. Dent Mater. 1999;15:79–86. doi: 10.1016/s0109-5641(99)00017-2. [DOI] [PubMed] [Google Scholar]
- 24.Wennerberg A, Sawase T, Kultje C. The influence of Carisolv on enamel and dentine surface topography. Eur J Oral Sci. 1999;107:297–306. doi: 10.1046/j.0909-8836.1999.eos107410.x. [DOI] [PubMed] [Google Scholar]
- 25.Quirynen M, Bollen C. M. The influence of surface roughness and surface-free energy on supra- and subgingival plaque formation in man: a review of the literature. J Clin Periodontol. 1995;22:1–14. doi: 10.1111/j.1600-051x.1995.tb01765.x. [DOI] [PubMed] [Google Scholar]
- 26.Gaikwad R. M, Sokolov I. Silica nanoparticles to polish tooth surfaces for caries prevention. J Dent Res. 2008;87:980–983. doi: 10.1177/154405910808701007. [DOI] [PubMed] [Google Scholar]


