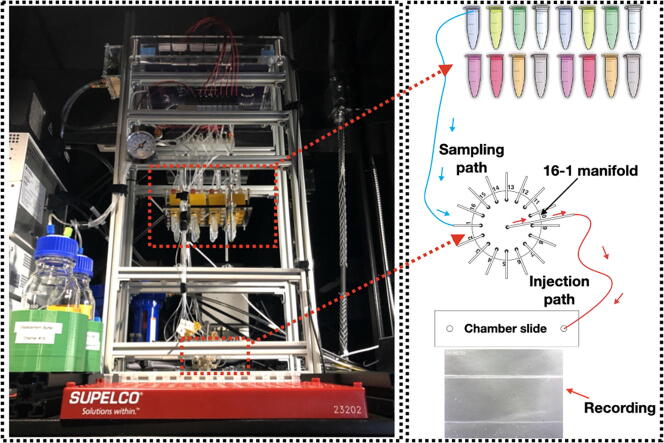
Graphical abstract
Keywords: Liquid handling, Sequential FISH-based imaging, Laboratory automation, Pneumatic driven, ESP32
Abstract
Fluorescent in situ hybridization (FISH) can provide spatial information about DNA/RNA targets in fixed cells and tissues. However, the workflows of multiplexed FISH-based imaging that use sequential rounds of hybridization quickly become laborious as the number of rounds increases because of liquid handling demands. Here, we present an open-source and low-cost fluidics system that is purpose built for automating the workflows of sequential FISH-based imaging. Our system features a fluidics module with 16 addressable channels in which flow is positive pressure-driven and switched on/off by solenoid valves in order to transfer FISH reagents to the sample. Our system also includes a controller with a main printed circuit board that can control up to 120 solenoid valves and allows users to control the fluidics module via serial communication. We demonstrate the automatic and robust fluid exchange with this system by targeting the alpha satellite repeat in HeLa cell with 14 rounds of sequential hybridization and imaging. We anticipate that this simple and flexible system will be of utility to researchers performing multiplexed in situ assays in a range of experimental systems.
Specifications table
| Hardware name | Integrated Multichannel Fluidics System |
|---|---|
| Subject area |
|
| Hardware type |
|
| Closest commercial analog | Microfluidics Unit – BRUKER. Available at: https://www.bruker.com/en/products-and-solutions/fluorescence-microscopy/super-resolution-microscopes/microfluidics-unit.html (Accessed: 28th January 2022). The fluidics system presented here has a controller that can control up to 120 channels and the built cost is at a fraction of that of the commercial system. |
| Open source license | GPL, MIT |
| Cost of hardware | USD5000 |
| Source file repository | https://doi.org/10.17632/tkm4w7wp3v.1; https://github.com/dzhaojie/Fluidics-system-for-FISH |
Hardware in context
Fluorescent in situ hybridization (FISH) is a technique that uses fluorescently labeled nucleic acid probes to target genomic and/or transcriptomic sequences of interest in cells and tissues through hybridization. After hybridization, the locations and abundances of the targets can be detected by fluorescence microscopy. Therefore, FISH enables researchers to obtain spatial genomic and transcriptomic information relevant to their research. Recent developments in FISH technology have focused on improving its multiplexing capability in order to efficiently detect more than a dozen genes and/or RNAs in one experiment by either spectral encoding [1], [2] or sequential hybridization [3], [4], [5], [6]. Recent advances in multiplexing strategies involve combining spectral encoding of the DNA/RNA targets with sequential hybridization of FISH readout probes to detect thousands of DNA/RNA species [7], [8], [9], [10]. Sequential FISH procedures usually involve many rounds of hybridization. During each round, readout probes are hybridized and imaged and their signal is removed by either one or two of these methods: photobleaching, competitive displacement via branch migration facilitated by the binding of “toehold” oligonucleotides, or chemical stripping of the readout probes. Protocols for sequential FISH-based imaging are usually complicated and involve multiple liquid handling and/or exchange steps in each hybridization round. Therefore, they are time consuming and labor-intensive for manual implementation, preventing them from being widely adopted.
Commercially available liquid handling solutions [11], [12], [13] are either hard to adapt to sequential FISH-based imaging or are expensive when the rounds of imaging need to be scaled up. An open-source integrated automation solution capable of handling more than a dozen rounds of fluid exchange for sequential hybridization would help address this challenge. Integrated microfluidics platforms have been demonstrated to perform all assay steps in an entire FISH protocol [14]. However, these platforms can only perform up to a dozen hybridization rounds and they are difficult to scale up. Other solutions utilize peristaltic pumps combined with rotative valves to automate fluid exchanges up to 24 rounds in imaging chambers [15] or with Lego-hardware to support up to 128 syringe pumps to input reagents into a peristaltic pump driven flow system [16]. While these solutions provide high-throughput automation, peristaltic pumps offer less stability in flow rate control for long-term experiments like performing sequential FISH for more than a dozen rounds [17]. On the other hand, pressure-driven provides high stability and pulseless flow [17].
Here, we present an open-source fluidics system with 16 channels individually driven by positive pressure for the automation of sequential FISH-based imaging protocols. We show robust fluid exchange with the system through 14 rounds of fluorescent oligo hybridization (2 other channels were used for washing buffer and probe displacement buffer) to readout primary probes hybridized at the alpha satellite repeat in HeLa cells. While maintaining a comparable dead volume (100 µL) to commercial ones, this open-source, standalone fluidics system offers a custom designed sample loading module (no extra tools required) for conveniently loading probe solutions to significantly reduce experiment prep time. The version of the system introduced here provides support for 2 mL microcentrifuge tubes and large volume glass bottles that use “GL45” caps, and in practice any other type of fluid reservoir could be used (e.g., 15 or 50 mL conical tubes) provided they have an integrated Luer adapter. Moreover, as each channel is controlled by its own solenoid valve, in theory these reservoirs could be replaced over the course of an imaging experiment. We demonstrate the integrated operation of our system with a Nikon Eclipse Ti-2 microscope controlled by proprietary Nikon NIS-Elements software, but as our system itself relies only on open-source code and serial communication to operate, it can readily be paired with any proprietary or open source instrument control software that supports serial communication. Our system costs ∼3–6-fold less than similar commercial options and requires an estimated ∼1 month of construction and basic testing. It can also be integrated with a microscope enabling users to run/test FISH-based imaging protocols easily in their own laboratories.
Hardware description
Design overview
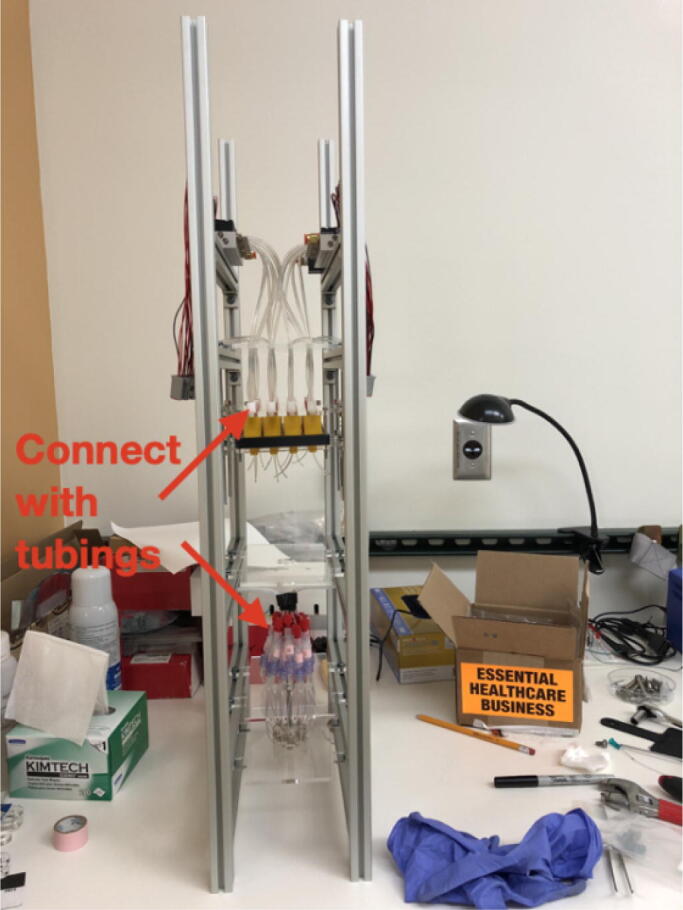
The fluidics system here was designed with full automation and minimized reagent cost in mind. It also was built with low cost and widely available components. It operates via positive pressure-driven flow to introduce FISH reagents to the sample. The positive pressure can come from any common laboratory compressed air source. The whole system includes a fluidics module and a PCB controller. An overview of the fluidics module is shown in Fig. 1. A compressed gas line runs first through a filter module (component R2) and then a pressure regulator (component R3). The pressurized gas is then distributed into 16 individual lines by a splitting manifold (component R6) and 2 solenoid valve and manifold assemblies (component SV1&SV2). These 16 gas lines (T4) can be individually addressed to pressurize a designated reservoir filled with FISH probes or washing buffer. The 16 fluid lines (T2) coming out of the reservoirs are then combined by a mini manifold (with 16 inlets and 1 inlet) and become a single fluid line connected directly to the inlet of a sample chamber. A sample loading module (not shown in the diagram) composed of an array of 16 custom designed and 3D-printed Eppendorf tube adapters (component E1 here) was designed and assembled for easy sample loading using conventional 2 mL Eppendorf tube (component b). A structural frame (not shown in Fig. 1 but shown in the Graphical Abstract above) was built to organize all the components into a standalone machine.
Fig. 1.
Overall schematic of the fluidics module (pneumatic and fluidcs components) designated by letters and numbers (as referenced to the Bill of materials).
Controller PCB
A controller was designed for controlling the on/off state of the solenoid valves, the pressure regulator, and a flow rate sensor, as well as handling serial communication with the microscope PC running the imaging routines. The main PCB of the controller is based on the design in the open-source microfluidics control system by Craig Watson [18]. It uses Espressif ESP32 devkit C as microcontroller and PCA9698 as I/O expander. Here, the PCB can address up to 120 solenoid valves after adding 2 more PCA9698 chips. Additionally, an interface is also added for a flow rate sensor (MFS, ElveFlow) powered by 9 V and it uses analog pins to read in the voltage output by the sensor. The 9 V is provided by a 12 V to 9 V regulator. The interface for the pressure regulator is designed to control a commercial digital pressure regulator from (MPV, Proportion-Air). This controller handles all the messages from the PC through USB serial communication to operate the fluidics system.
User interface
A user interface for flow rate calibration was developed using PyQt (Fig. 2). It has 4 tabs. The first 3 tabs are designed to run the main procedures for flow rate calibration including channel priming, flow rate calibration, and flow rate verification. The 4th tab is for selecting an individual channel to inject a solution for a user-defined amount of time for eliminating bubbles before setting up an imaging experiment. Calibration data and the resulting injection time (from a user defined volume to inject) for each channel will be saved as.npy files by the app. In this demonstration with a use case in our lab, the resulting injection times for each channel in the.npy file named WaitTime.npy can be transferred into a NIS-Elements (Nikon software for imaging) Macro file and used in NIS-Elements’s ND acquisition with time-lapse imaging. Nikon NIS-Elements macro codes are provided in the project’s repository for running the 14-round sequential FISH imaging of the alpha satellite repeat in HeLa cell as a demonstration experiment with the fluidics system.
Fig. 2.
The GUI for the automatic calibration of the fluidics system. Shown here is the calibration tab with calibration parameters configured for target flow rate 600 µL/min.
Design files summary
bill_of_materials.xlsx: There are 8 sheets in this file. Except the sheets named ‘Tubings’ and ‘Remaining components’, each sheet lists components for a module and/or assembly described in the step-by-step building guide in the supplementary materials.
fluidics_system_controller_PCB_design_files.zip: KiCAD design files for the controller PCB.
Eppendorf_tube_adaptor_3D_print_files.zip: STL files for 3D printing the Eppendorf tube adaptor and the slot panel that is designed for arranging and securing the adapters.
laser_cut_acrylic_panel_organizer.ai: Illustrator file for laser cutting the panels for assembling the structural frame and the Eppendorf tube adapter array.
controller_case_laser_cut.3dm: Rhinoceros design file for laser cutting the controller case.
case_for_pressure_regulator_laser_cut.pdf: pdf file for laser cutting the pressure regulator case.
large_reservoir_holder.stl: STL file for 3D printing the large reservoir holders for securing large glass bottles for the washing buffer and displacement buffer used in the 14-round sequential FISH imaging demonstration experiment.
user_interface_app_for_flow_rate_calibration.zip: Python scripts for the user interface app for automatic flow rate calibration.
NIS-Element_Macro_codes.zip: Folder with NIS-Elements Macro code for running the fluidics system and routines for the fluid exchange in the 14-round sequential FISH imaging demonstration experiment.
Fluidics System Controller with ESP32: Folder with source code for the firmware of the controller PCB.
Bill of materials summary
A separate bill of materials file named “bill_of_materials.xlsx” is included in the supplementary materials with multiple sheets. Each sheet lists parts for an individual module and/or assembly that makes up the fluidic system. The table below lists all the parts from that file. The cost for the component is listed in currency USD. The following designator abbreviations are used: “T” = “Tubings”; “P” = “Printed Circuit Board” (PCB); “S” = “Structural Frame”; “O” = “One-way check valve assembly”; “E” = “Eppendorf tube adapter array”; “SV” = “Solenoid valve array”; “C” = “14-channel imaging”; “R” = “Remaining components”.
| Designator | Component | Number | Cost per unit -currency | Total cost -currency | Source of materials | Material type |
|---|---|---|---|---|---|---|
| T1 | Polyurethane Tubing for Air and Water, 5/32″ ID, 1/4″ OD, Clear Colors, 50 ft roll | 5648K69 | 23.5 | 23.5 | McMaster-Carr | Polymer |
| T2 | Saint-Gobain™ Tygon™ ND 100-80 Tubing (500′ roll, 0.06″ OD, 0.02″ ID) | 14-171-284 | 325.5 | 325.5 | Fisher Scientific | Polymer |
| T3 | Polyurethane Tubing for Air and Water, 1/16″ ID, 1/8″ OD, Clear Colors | 5648K67 | 6.5 | 6.5 | McMaster-Carr | Polymer |
| T4 | E-3603 Tygon PVC Tubing for Chemicals, 1/16″ ID, 1/8″ OD | 5155T12 | 17.5 | 17.5 | McMaster-Carr | Polymer |
| T5 | E-3603 Tygon PVC Tubing for Chemicals 1/8″ ID, 3/16″ OD |
5155T16 | 29.5 | 29.5 | McMaster-Carr | Polymer |
| T6 | Tubing, 50A Durometer, 0.058 in. ID × 0.077 in. OD (1.5 mm × 2 mm), 50 ft coil (15.24 m) | T2007 | 10.5 | 10.5 | QOSINA | Polymer |
| P1 | ESP32-DevKitC | ESP32-DevKitC | 10 | 10 | Espressif | Semiconductor |
| P2 | PCA9698 | PCA9698DGG,518 | 4.53 | 13.59 | NXP | Semiconductor |
| P3 | UNL2803A | ULN2803ADW | 1.51 | 22.65 | TI | Semiconductor |
| P4 | TLV2374 | 296-11967-1-ND | 1.81 | 9.05 | DigiKey | Semiconductor |
| P5 | 2.54 mm Pitch, 0.64 mm Width H-DAC 64 High Density Automotive Connectors, Dual Row, Female Harness Assembly, 16 Circuits, Polarization Option 1, Natural | 538-30700-1167 | 2.02 | 30.3 | Molex | Polymer |
| P6 | 2.54 mm Pitch, H-DAC 64 High Density Automotive Header, Dual Row, Vertical, 16 Circuits, Polarization Option 1, Natural, Tray | 538-30700-4160 | 2.49 | 37.35 | Molex | Polymer |
| P7 | Cable Crimp | 1393366-1 | 0.2 | 50 | DigiKey | Metal |
| P8 | Polarized Connectors - Housing (4-Pin) | PRT-08097 | 0.45 | 2.25 | SparkFun | Polymer |
| P9 | Polarized Connectors - Crimp Pins | PRT-08100 | 1.95 | 1.95 | SparkFun | Polymer |
| P10 | Polarized Connectors - Header (4 pin) | PRT-0823 | 0.45 | 0.9 | SparkFun | Polymer |
| P11 | DC Barrel Jack Adapter - Breadboard Compatible | PRT-10811 | 0.95 | 0.95 | SparkFun | Polymer |
| P12 | Wall Adapter Power Supply – 12VDC 600 mA | TOL-09442 | 5.59 | 5.59 | SparkFun | Other |
| P13 | 12 V to 5 V regulator | R-78E5.0-1.0 | 3.26 | 3.26 | DigiKey | Semiconductor |
| P14 | 12 V to 24 V regulator | DSN6009 | 10.99 | 10.99 | Amazon | Semiconductor |
| P15 | Stackable Header – 3 Pin | PRT-13875 | 0.5 | 0.5 | SparkFun | Polymer |
| P16 | 12 V to 9 V regulator | R-78E9.0-0.5 | 2.89 | 2.89 | DigiKey | Semiconductor |
| P17 | Pin header for ESP32 for | PRT-00115 | 1.5 | 6 | SparkFun | Polymer |
| P18 | 0.1 uF capacitor | 1276-1007-1-ND | 0.1 | 2 | digiKey | Semiconductor |
| P19 | 6.8 uF capacitor | 478-8447-1-ND | 0.79 | 3.95 | digiKey | Semiconductor |
| P20 | 10 uF capacitor | 445-14484-1-ND | 0.38 | 3.8 | digiKey | Semiconductor |
| P21 | 1.6 K resistor | P20615CT-ND | 0.36 | 3.6 | digiKey | Semiconductor |
| P22 | 1.8 K resistor | P20621CT-ND | 0.36 | 3.6 | digiKey | Semiconductor |
| P23 | 3.3 K resistor | P20651CT-ND | 0.36 | 3.6 | digiKey | Semiconductor |
| P24 | Printed PCB board | N/A | 121.33 | 121.33 | OSHPARK | Semiconductor |
| S1 | 20 mm × 20 mm T-Slotted Profile - Four Open T-Slots - 30 in. | 20-2020 | 6.75 | 27 | 80/20, LLC | Metal |
| S2 | 20 mm × 20 mm T-Slotted Profile - Four Open T-Slots - 12 in. | 20-2020 | 3.87 | 46.44 | 80/20, LLC | Metal |
| S3 | 20 Series 2 Hole - Inside Corner Bracket | 20-4119 | 2.85 | 68.4 | 80/20, LLC | Metal |
| S4 | 5.30 mm ID Washer | Nov-40 | 0.11 | 5.28 | 80/20, LLC | Metal |
| S5 | M5 Slide-in Economy T-Nut Block | 14122 | 0.21 | 16.8 | 80/20, LLC | Metal |
| S6 | M5 × 10.00 mm Button Head Socket Cap Screw | 13-5310 | 0.24 | 11.52 | 80/20, LLC | Metal |
| S7 | 45 mm × 45 mm T-Slotted Profile - Four Open T-Slots − 22 in. | 45-4545-Black-FB | 20.12 | 40.24 | 80/20, LLC | Metal |
| S8 | 45 Series 2 Hole - Gusseted Inside Corner Bracket | 45-4332-Black | 5.26 | 21.04 | 80/20, LLC | Metal |
| S9 | Bolt Assembly: M8 × 18.00 mm Black BHSCS with Standard Drop-In T-Nut - Bright Zinc | 75-3619 | 1.15 | 4.6 | 80/20, LLC | Metal |
| S10 | 8.51 mm ID Washer | 11-6042 | 0.13 | 0.52 | 80/20, LLC | Metal |
| S11 | Post-Assembly T-Slot Nuts, M5 | 26016-01 | 10.49 | 20.98 | Inventables | Metal |
| S12 | Laser cut acrylic panel (3/16″ thick), tubing organization | N/A | 9.4 | 9.4 | Custom laser cut | -Other |
| S13 | Laser cut acrylic panel (3/16″ thick), tubing organization | N/A | 9.4 | 9.4 | Custom laser cut | -Other |
| S14 | Laser cut acrylic panel (3/16″ thick), tubing organization | N/A | 9.4 | 9.4 | Custom laser cut | -Other |
| S15 | Laser cut acrylic panel (3/16″ thick), tubing organization | N/A | 9.4 | 9.4 | Custom laser cut | -Other |
| O1 | Valco manifolds | Z16M1PK | 300 | 300 | Valco Instruments Co. Inc. | Polymer |
| O2 | Super-Corrosion-Resistant 316 Stainless Steel Socket Head Screw, M6 × 1 mm Thread, 30 mm Long | 92290A332 | 17.5 | 17.5 | McMaster-Carr | Metal |
| O3 | 18-8 Stainless Steel Hex Nut, M6 × 1 mm Thread | 91828A251 | 14.73 | 14.73 | McMaster-Carr | Metal |
| O4 | Duckbill Check Valve; Yellow Inlet, Clear Outlet | 80089 | 1.28 | 25.6 | QOSINA | Polymer |
| O5 | One-way luer check valve, SAN with silicone diaphragm, female-male | EW-30505-92 | 9.7 | 9.7 | Cole-Parmer | Polymer |
| O6 | Idex P-628 Threaded Luer Adapter, Natural ETFE, 0.040″ Bore, Female Luer × Female 1/4-28 Flat Bottom | UX-02014-03 | 4.49 | 22.45 | Cole-Parmer | Polymer |
| E1 | 3D printed adapter body | N/A | 0.24 | 7.68 | Custom 3D print | Polymer |
| E2 | Tapered Heat-Set Inserts for Plastic 1/4″-28 Thread Size, 1/2″ Installed Length, Brass | 93365A260 | 13.12 | 26.24 | McMaster-Carr | Metal |
| E3 | Oil-Resistant Hard Buna-N O-Ring,2 mm Wide, 6 mm ID | 1247N173 | 3.71 | 3.71 | McMaster-Carr | Other |
| E4 | Flangeless Male Nut Delrin®, 1/4-28 Flat-Bottom, for 1/8″ OD - White | P-303 | 1.39 | 55.6 | IDEX Health & Science | Polymer |
| E5 | Flangeless Ferrule Tefzel™ (ETFE) 1/4-28 Flat-Bottom, for 1/8″ OD | P-300 | 1.39 | 55.6 | IDEX Health & Science | Polymer |
| E6 | Flangeless Male Nut Delrin®, 1/4-28 Flat-Bottom, 1/16″“ OD | P-202X | 12.1 | 48.4 | IDEX Health & Science | Polymer |
| E7 | Flangeless Ferrule Tefzel™ (ETFE), 1/4-28 Flat-Bottom, for 1/16″ OD | P-200 | 1.39 | 55.6 | IDEX Health & Science | Polymer |
| E8 | 3D printed slot panel for Eppendorf tube adaptor | N/A | 0.75 | 0.75 | Custom 3D print | Polymer |
| E9 | Laser cut bottom panel (3/16″ thick), Sample loading module assembly | N/A | 9.4 | 9.4 | Custom laser cut | Polymer |
| E10 | Laser cut top panel (3/16″ thick), Sample loading module assembly | N/A | 9.4 | 9.4 | Custom laser cut | Polymer |
| E11 | 18-8 Stainless Steel Socket Head Screw M3 × 0.5 mm Thread, 50 mm Long | 91292A026 | 4.77 | 4.77 | McMaster-Carr | Metal |
| E12 | Zinc-Plated Steel Hex Nut Low-Strength, M3 × 0.5 mm Thread | 90591A121 | 1.9 | 1.9 | McMaster-Carr | Metal |
| E13 | Low-Strength Zinc-Plated Steel Threaded Rod, M5 × 0.8 mm Thread, 300 mm long | 94595A217 | 5.61 | 11.22 | McMaster-Carr | Metal |
| E14 | Zinc-Plated Steel High Hex Nut, Class 6, M5 × 0.8 mm Thread | 90725A030 | 9.55 | 9.55 | McMaster-Carr | Metal |
| E15 | 316 Stainless Steel Washer, for M5 Screw Size, 5.3 mm ID, 10 mm OD | 90965A160 | 4.77 | 4.77 | McMaster-Carr | Metal |
| SV1 | Pneumadyne 3-way normally open Solenoid Valves | S10MM-30-12-2 | 30.01 | 600.2 | Pneumadyne | Non-specific |
| SV2 | 10-Station Solenoid Manifolds | MSV10-10 | 36.4 | 72.8 | Pneumadyne | Metal |
| SV3 | 1/16 Tube Id Barb Straight Connectors (10-32 UNF) | EB10 | 42.5 | 42.5 | Pneumadyne | Metal |
| SV4 | Push-to-Connect Tube Fitting for Air & Water, Straight Adapter, 1/4″ Tube OD × 10-32 UNF Male | 7880T122 | 2.89 | 5.78 | McMaster-Carr | Metal |
| SV5 | Black-Oxide Alloy Steel Socket Head Screw M3 × 0.5 mm Thread, 15 mm Long | 91290A572 | 10 | 10 | McMaster-Carr | Metal |
| SV6 | Post-Assembly T-Slot Nuts, M3 (3 mm) × 0.5 | 26016-02 | 10.49 | 10.49 | Inventables | Metal |
| C1 | BC-222N - BOTTLE CAP, GL45 2-ported 1/4-1/4-28, PTFE | BC-222N | 25 | 50 | Chrom Tech | Other |
| C2 | BT45-1B - BOTTLE GL45 1 Liter, Clear Glass Press Resist | BT45-1B | 25 | 50 | Chrom Tech | Other |
| C3 | µ-Slide VI 0.5 Glass Bottom | 80607 | 16 | 16 | ibidi | Other |
| C4 | Elbow Luer Connector Male | 10802 | 3 | 6 | ibidi | Polymer |
| C5 | Polycarbonate, Straight, Male Luer Lock to Hosebarb Adapter, 1/8″ ID | EW-45504-04 | 16.6 | 16.6 | Cole-Parmer | Polymer |
| C6 | Male to Male Luer Lock Connector | 12090 | 0.14 | 0.14 | QOSINA | Polymer |
| C7 | Check Valve, Female Luer Lock Inlet, Male Luer Lock Outlet | 80129 | 0.88 | 0.88 | QOSINA | Polymer |
| R1 | Microfluidic thermal flow sensor | LVF-MFS-D-4 | 1,872 | 1872 | DARWIN microfluidics | Non-specific |
| R2 | Campbell Hausfeld Air Cleaner, Air Dryer for Air Tools | PA208503AV | 80 | 80 | Amazon | Non-specific |
| R3 | MPV Pressure Regulator | MPV1PANKKZP15PSGAAL | 541 | 541 | ProportionAir | Non-specific |
| R4 | Push-to-Connect Tube Fitting for Air & Water, Straight Adapter, 1/4″ Tube OD × 1/4 NPT Male | 7880T125 | 2.24 | 4.48 | McMaster-Carr | Metal |
| R5 | Push-to-Connect Tube Fitting for Air & Water, Straight Adapter, 1/4″ Tube OD × 1/8 NPT Male | 7880T124 | 2.24 | 6.72 | McMaster-Carr | Metal |
| R6 | 2-Station, 3/8 NPT (F) Input, Aluminum Manifold | M20-250-2 | 14.47 | 14.47 | pneumadyne | Metal |
| R7 | Push-to-Connect Tube Fitting for Air & Water, Straight Adapter, 1/4″ Tube OD × 3/8 NPT Male | 7880T126 | 2.72 | 5.44 | McMaster-Carr | Metal |
| R8 | High-Pressure Brass Pipe Fitting, Solid Plug with External Hex Drive, 3/8 NPT | 50785K336 | 2.96 | 2.96 | McMaster Carr | Metal |
| R9 | Bubble Trap for Microfluidics Kit | LVF-3525 | 128 | 128 | DARWIN microfluidics | Non-specific |
Build instructions
Note: For convenient reference, all the parts (except parts for solenoid valve array assembly) used in this guide are named with a capital letter and a number. The capital letter for a specific part is the first letter of the name of the sheet in the bill_of_materials.xlsx file where the part is listed. For parts for solenoid valve array assembly, their names start with capital letters SV. Most of the parts used to build an assembly/module are listed in a sheet with a name indicating that assembly/module. Tubings are used in multiple assembly/module building sections. Part names for tubings are listed in the sheet named ‘Tubings’ in the bill_of_materials.xlsx file.
PCB assembly
Reference the sheet named ‘PCB’ in the bill_of_materials.xlsx file for components for this section. Also reference to the PCB schematic file and the PCB layout file in a.zip file (provided in the project’s Mendeley data repository: https://doi.org/10.17632/tkm4w7wp3v.1) named ‘fluidics_system_controller_PCB_design_files.zip’ for component placement positions on the PCB.
Solder PCB components as shown in Fig. 3, (A) shows the top side of the PCB and (B) shows the bottom side of the PCB before soldering. Most components are soldered on the top side of the PCB as shown in Fig. 3 (C). An enclosure for the PCB was custom-built by laser cut acrylic panels as shown in Fig. 3 (D). Design files for the enclosure are provided in https://doi.org/10.17632/tkm4w7wp3v.1.
Fig. 3.
PCB of the controller before (A and B) and after (C) soldering and secured inside a custom-built enclosure (D).
Note: the footprint for the ESP32 downloaded from SnapEDA (at the time the PCB was designed) was incorrect, fly-wires are used to connect pins on one side of the ESP32 to one of the female header connectors Fig. 3 (C). Make sure the pins from ESP32 are inserted all the way into the headers (this should be the first thing to look at when debugging is needed).
Structural frame assembly
Reference the sheet named ‘Structural frame’ in the bill_of_materials.xlsx file for part names for this section. The structural frame refers to the aluminum frame combined with the laser cut acrylic panels that holds all the assemblies/modules and components for the fluidics system for the purpose of tubing organization.
The structural frame consists of 4 vertical positioned 30-inches T-slots (Part S1) that define the footprint of the fluidics system. 12 horizontally positioned 12-inches T-slots (Part S2) define the 6 levels that hold the major components and assemblies/modules. Except the 3rd level, from bottom to top, the major assemblies/modules and components are as follows: mini manifold, one-way-check valve assembly, Eppendorf tube adapter array, solenoid valve array assembly, controller PCB as shown in the graphic abstract in the main text. Between the two 12-inches T-slots at each level (this only applied to the four bottom levels) is one laser cut acrylic panel for tubing organization. The vertical positionings of the Eppendorf tube adapter array, the one-way-check valve assembly, and the mini manifold are critical for proper flow. The Eppendorf tube adapter array is required to be above the outlet of the mini manifold.
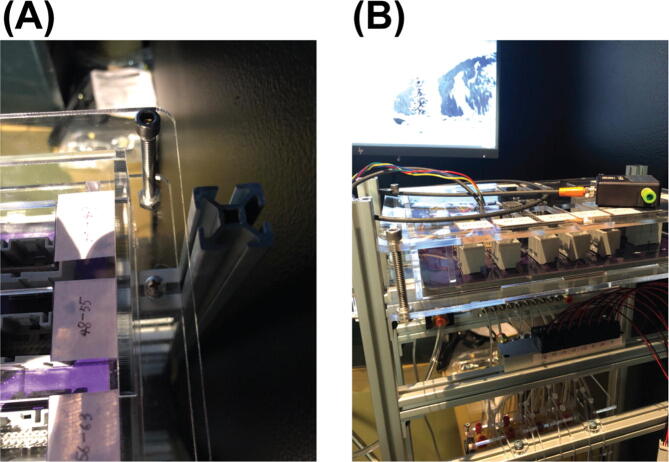
Begin by assembling the 1st level (the most bottom level) of the aluminum frame. Gather two sets of the parts shown in Fig. 4 (A), Parts S3, S4, S5, S6 (as in the bill_of_materials.xlsx file), another two of Part S5, two of Part S1, and one of Part S2. First, put the two extra Part S5s into the slot of Part S2 as indicated in Fig. (B) (The two Part S5s here can be replaced post assembly by Part S11 (Post-Assembly T-Slot Nuts, M5), same for other 12-inches T-Slots where two of Part S5 are required to put into the slot). Then, connect the two 30-inches T-slots (Part S1) with the 12-inches T-slot (Part S2) by the two sets of parts shown in Fig. 4 (A). For the 12-inches T-slot, make sure the side with the two Part S5s in it face up. The result for this step will look like Fig. 4 (C). Here, Part S2 is one inch above the bottom of Part S1.
Fig. 4.
Structural frame building process 1.
Repeat 1 to assemble another side of the frame before moving to the next step. In this step we will get two of the assembled part in Fig. 5 (C).
-
1.
Connect the two assembled parts from 2 with one acrylic panel, Part S12, as shown in Fig. 5 (A).
-
2.
Continue to install the remaining 12-inches T-slots (Part S2) onto the 30-inches T-slots (Part S1). Position each level at a height so that there will be enough space for sample loading and for reaching to all the components when maintenance is required. Remember to put two of Part S5 into the slot (the one that will be facing up) of each 12-inches T-slot for level 2, 3, 4 (counting from the bottom).
-
3.
Installed the acrylic panel, Part S13, to the two 12-inches T-slots on the 2nd level from the bottom as shown in Fig. 5 (B).
-
4.
Installed the acrylic panel, Part S14, to the two 12-inches T-slots on the 4th level from the bottom as shown in Fig. 5 (C).
-
5.
This step is optional and should be done after Section 5.3 is completed. Installed the acrylic panel, Part S15, to the two 12-inches T-slots on the 3rd level from the bottom. The acrylic panel used at this level is for organizing the tubings immediately connected to the one-way-check valves.
-
6.
Part S7 acts as a base to stabilize the whole fluidics system. Attach one Part S7 to the bottom end of the structural frame at one side with one set of Part S4, S5, S6, S8,S9, S10. Attach another Part S7 to the other side. This step should be implemented after finishing this building guide if the working area has limited space for accessing all sides of the frame.
Fig. 5.
Structural frame building process 2.
One-way-check valve assembly
Reference the sheet named ‘One-way-check valve assembly’ in the bill_of_materials.xlsx file for part names for this section. The one-way-check valves used here are for preventing backflow. They are connected to the inlets of the mini manifold (Part O1).
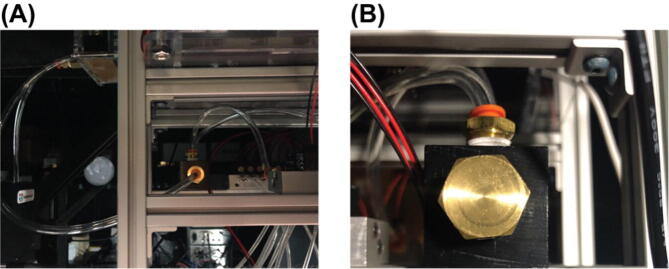
Cut tubing (Part T2) to length of ∼3 in. and insert them into the 16 inlets of the mini manifold (Part O1) as shown in Fig. 6 (A).
Fig. 6.
Installation of the mini manifold on to the structural frame.
Install the mini manifold to the structural frame as shown in Fig. 6 (B) with a screw (Part O2) and a nut (Part O3).
-
1.
Insert the other end of the tubing (that connected to the mini manifold) through the holes in the acrylic panel (Part S13)
-
2.
Connect one-way-check valves to the tubing after 3.
Two different kinds of valve are used (Part O4 and Part O5). Part O4 plus its fittings has a smaller dead volume and is used for channel # 1-12, 15, and 16 for fluorescent probe reagent injection. Part O5 plus its fittings (two of Part E6, E7, O6, and one of Part C6) has a larger dead volume but the fittings provide a more secured connection when applying high flow rate and using buffers with high viscosity like the displacement buffer. Therefore, Part O5 is used for channel # 13 and 14.
To connect check valve Part O4, cut tubing Part T6 to length of ∼3/4 in., then insert the tubing (that connected to the mini manifold) into Part T6 as shown in Fig. 7 (A). Then insert both tubings into one end of the check valve as shown in Fig. 7 (B). Here tubing Part T6 acts as a fitting to secure the connection between tubing Part T2 and the check valve. There is a direction for check valve Part O4, the yellow end is the inlet, the clear end is the outlet.
Fig. 7.
Connect check valve (Part O4) to the 0.02 “ ID tubing (Part T2) with another tubing (Part T6) cut to length of about 3/4 inches.
Fittings and the check valve Part O5 are shown in Fig. 8 (A). Assemble the parts in Fig. 8 (A) together as shown in Fig. 8 (B). Make two of this assembly. Then connect them to two outlets of the mini manifold.
Fig. 8.
Connection of fittings to check valve Part O5.
Fig. 9 shows the result after all the one-way-check valves are connected to the mini manifold.
Fig. 9.

One-way-check valve assembly.
Eppendorf tube adapter assembly
Reference the sheet named ‘Eppendorf tube adapter array’ in the bill_of_materials.xlsx file for part names for this section. The Eppendorf tube adapter is a custom designed and made 3D print part. It enables using 2 mL Eppendorf tubes as reservoirs for positive-pressure-driven liquid sampling application.
-
1.
Install heat-set inserts. Gather one of Part E1 and two of Part E2 as shown in Fig. 10 (A). Follow online tutorials (e.g.https://hackaday.com/2019/02/28/threading-3d-printed-parts-how-to-use-heat-set-inserts/) to install the two heat-set inserts Part E2 into the two holes in Part E1. The result for this step is shown in Fig. 10 (B).
-
2.
Put on an O-Ring. Gather one ofPart E3and the resulting part in1upside down as shown inFig. 11(A). Slide the O-Ring,Part E3, onto the extruded port on the adapter body,Fig. 11(B). Make sure the O-Ring is seated in the designed circular indentation closed to the edge of the port.
-
3.
Connect the pressure tubing and sampling tubing to the Eppendorf tube adapter. Cut a piece of pressure tubing, Part T4, to length of 1 ft. Cut a piece of sampling tubing, Part T2, to length of 3 ft. Gather the tubing fittings, Part E4, E5, E6 and E7, one of each. Insert the cut pressure tubing into one of Part E4 and E5 as shown in the middle of Fig. 12 (A). Insert the cut sampling tubing into one of Part E6 and E7 as shown on the right side of Fig. 12 (A). Use Teflon tape (not shown here) to tightly wrap the thread of the fitting Part E4 and E6, then screw the fittings into the heat-on inserts in the resulting part from 2. The sampling tubing goes into the hole aligned with the extruded port of the adapter body. And let out around 2 in. length of the sampling tubing from the extruded port. This portion of the tubing will go into an Eppendorf tube to sample reagent. Make sure the tip of this tubing portion just touches the bottom of the Eppendorf tube when the Eppendorf tube is properly hooked up to the port. The result will look like Fig. 12 (B).
-
4.
Test. Before continuing this step, the firmware should be uploaded to ESP32 of the PCB and make sure commands can be successfully sent to the PCB through USB to control the valves, pressure regulator, and flow rate sensor.
Connect a standard 2 mL Eppendorf tube filled with 1.5 mL DI water or color dye to the adapter as shown in Fig. 13. Connect the pressure tubing to a pressure source of 15 psi or use the controller and the pressure regulator to regular the pressure to 15 psi. Connect the sampling tubing to the flow rate sensor (Part R1) listed in the sheet named ‘Remaining components’ in the bill_of_materials.xlsx file. Downstream also connects a check valve (Part C7) to introduce a flow resistance that is comparable to that used in actual experiment (See Section 5.1 Step 3 in the Calibration and operation guide). Use serial commands in a terminal or use the user interface app to read the flow rate through the controller PCB. If the returned flow rate goes over 200 (uint8) when 15 psi pressure is applied, then the Eppendorf tube adapter assembly passes the test. If the flow rate is too low, check the seal of the fittings. If you hear loud hissing sounds from the adapter body when applying pressure and the flow rate cannot go over 200 (uint8), this means there is a leak in the 3D printed adapter. Printing extra adapters is recommended. Only assemblies that pass the test can be used for the rest of the build.
-
5.
Repeat 1 to 3 to make 20 of the Eppendorf tube adapter assembly. And select 16 of the assembly that passes the test in 4 for the rest of the build.
Fig. 10.
Installation of heat-set inserts.
Fig. 11.
Placement of an O-ring.
Fig. 12.
Connection of pressure tubing and sampling tubing to the Eppendorf tube adapter.
Fig. 13.

Quality testing of the Eppendorf tube adapter assembly.
Sample loading module assembly (Eppendorf tube adapter array)
Reference the sheet named ‘Eppendorf tube adapter array’ in the bill_of_materials.xlsx file for part names for this section. The sample loading module assembly combines the 16 Eppendorf tube adapter assemblies into a single module for organized and easy sample loading purposes.
Gather Part E8 and E9 shown in Fig. 14 (A). Align them as shown in Fig. 14 (B). Flip over both when maintaining the alignment and put them on two supports as shown in Fig. 14 (C). Put one Eppendorf tube adapter assembly built from Error! Reference source not found. in this guide into one slot like the one shown in Fig. 14 (C). Finish this step by putting 15 Eppendorf tube adapter assemblies into the remaining 15 slots.
Fig. 14.
Alignment of the bottom laser cut acrylic panel and the 3D printed slot.
Gather Part E10 shown in Fig. 15 (A) and put it on top of the resulting part from 1 as shown in Fig. 15 (B) with the fittings and tubing coming out of the rectangular holes. Align the screw holes of the top acrylic panel (Part E10), the bottom acrylic panel (Part E9) with that of the 3D printed slot panel (Part E8). Secure the assembly with 4 sets of Part E11 and E12 as shown in Fig. 15 (B) and (C).
-
1.
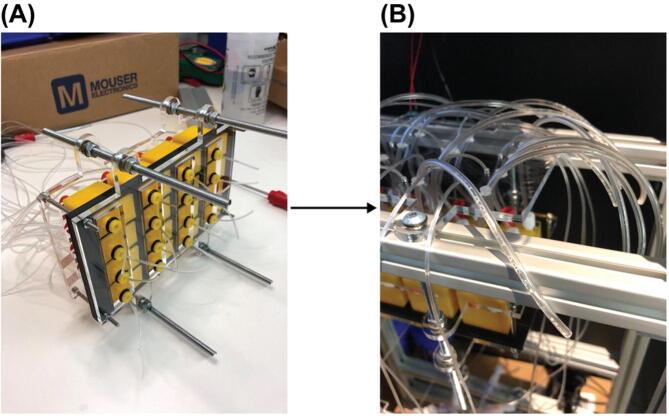
Cut two of Part E13 (a 300 mm long steel threaded rod) into half. Gather 16 sets of Part E14 and E15. Insert one of the cut Part E13 into one of the axillary holes of the acrylic panels and secured with 4 sets of Part E14 and E15 as shown in Fig. 16 (A). Then repeat this for the remaining 3 axillary holes of the acrylic panels. Put 2 Post-Assembly T-Slot Nuts (Part S11) into the bottom slot of each of the two 12-inches T-slots on the 4th level counting from the bottom of the structural frame. Install the sample loading module onto the structural frame by screwing the 4 long steel threaded rods into those T-Slot Nuts (Part S11) as shown in Fig. 16 (B). Insert the tubing into the corresponding holes in the acrylic panel for tubing organization, Fig. 16 (B).
Fig. 15.
Installation of the top laser cut acrylic panel.
Fig. 16.
Installation the sample loading module onto the structural frame.
Solenoid valve and manifold assembly
Reference the sheet named ‘Solenoid valve array’ in the bill_of_materials.xlsx file for part names for this section.
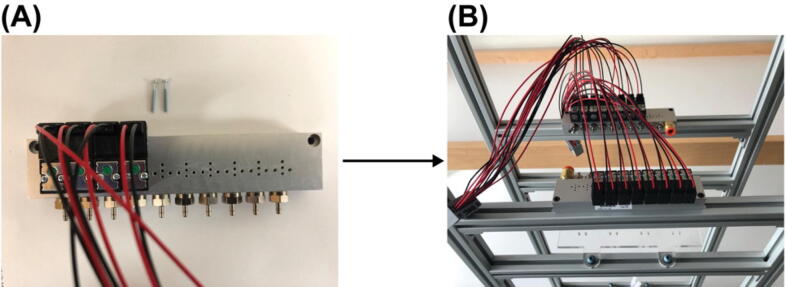
Screw fittings, Part SV3, to all 10 output ports of the 10-Station solenoid manifold, Part SV2. Install 10 solenoid valves, Part SV1, with the screws coming with them onto the manifold as shown in Fig. 17 (A). 4 solenoid valves have been installed in Fig. 17 (A). Though only 8 solenoid valves on one 10-Station solenoid manifold will be in use it is necessary to install all 10 solenoids valves to block leakage through remaining installation holes. Alternatively, 8-Station solenoid manifolds can be used but they were not available at the time when this fluidics system was being built.
-
1.
Screw fittings, Part SV4, to the pressure port of the 10-Station solenoid manifold, Part SV2.
-
2.
Repeat 1 and 2 to make another solenoid valve array.
-
3.
Put 2 Part SV6 into the top slot of each of the two 12-inches T-slots on the 5th level (counting from the bottom of the structural frame)
-
4.
Use 2 Part SV5 to secure each solenoid valve array assembly onto one of the two 12-inches T-slots on the 5th level. Specifically, insert Part SV5s into the mounting holes on the manifold (Part SV2) and screw them into Post-Assemble T-Slot Nuts (Part SV6). The result will look like Fig. 17 (B). Only 8 solenoid valves were installed in Fig. 17 (B) for demonstration but 10 were installed for the finalized build for the reason mentioned in 1.
-
5.
Cut two pieces of pressure tubing, Part T4, each to length of 3 in.. For each solenoid valve array assembly, connect the 2 output ports of the solenoid manifold that are not in use with one of the cut tubing. This is to block leakage through the output ports where the solenoid valves are not in use.
-
6.
Assemble the wires from one solenoid valve array assembly into a connector (Part P5).
-
7.
Connect the pressure tubing from the Eppendorf tube adapters to the outlet ports of the solenoid valve manifold and the sampling tubing to the one-way-check valves as shown in Fig. 18 (here shows only one-way-check valve Part O5 for demonstration purpose, but in the final built Part O5 is used only for channel # 13 and 14, Part O4 is used for the remaining channels as shown in Fig. 9).
Fig. 17.
Assembly of the solenoid valve array.
Fig. 18.
Connection of tubing to solenoid valves and one-way-check valve assembly.
Installation of the remaining components
Reference the sheet named ‘Solenoid valve array’ in the bill_of_materials.xlsx file for part names for this section.
Reference the sheet named ‘Remaining components’ in the bill_of_materials.xlsx file for part names for this section. The mounting screws and T-Slot nuts for installing the remaining components will not be listed here because they are sourced from those listed in previous sections and it should be straightforward to choose the suitable screw and T-slot nut sets to mount/install the remaining components.
-
1.
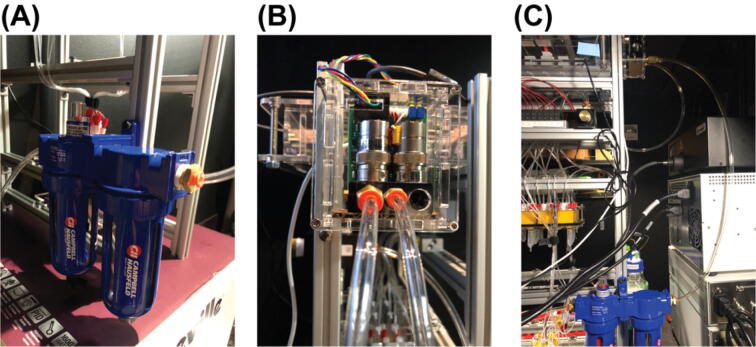
Install the air filter, Part R2, on to the structural frame as shown in Fig. 19 (A). The position of the air filter is required to be close to the bottom of the whole fluidics system.
-
2.
Install the pressure regulator, Part R3, on to the structural frame as shown in Fig. 19 (B). A custom designed laser-cut case is assembled to house the regulator. The designed file for the case is ‘case_for_pressure_regulator_laser_cut.pdf’ in the project repository.
-
3.
Connect the air filter outlet to the inlet of the pressure regulator with tubing, Part T1 as shown in Fig. 19 (C). The fitting for the inlet and outlet of the air filter is Part R4. The fitting for the inlet and outlet of the pressure regulator is Part R5. The inlet of the air filter should be connected to a compressed gas source before using the fluidics system for experiment.
-
4.
Connect the outlet of the pressure regulator to the inlet of the splitting manifold (Part R6) with tubing, Part T1, as shown in Fig. 20 (A). The fitting for the inlet of the splitting manifold is Part R7.
-
5.
Connect the two outlets of the splitting manifold to the pressure port (Part SV4) of the two solenoid valve manifolds with tubing, Part T1, as shown in Fig. 20 (A). The fitting for the outlet of the splitting manifold is Part R4.
-
6.
Screw the plug, Part R8, to the other port of the splitting manifold (Fig. 20 (B)).
-
7.
Mount the PCB controller on the top level of the structural frame using the mounting hole on the case Fig. 21 (A).
-
8.
Plug the flow rate sensor (Part R1) and the pressure regulator (Part R3) into their designated 4-pin headers (J6 and J4 in the PCB schematic respectively) on the PCB Fig. (B). The wire for the flow rate sensor must be modified from a M8 connector to be able to plug into the 4-pin header.
A bubble trap (Part R9) is recommended to be connected between the mini manifold (Part O1) and the flow rate sensor in the flow path.
-
9.
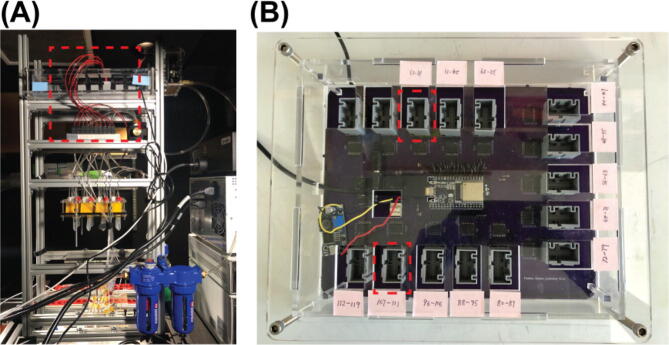
Plug the wire from the two solenoid valve array assemblies into the PCB through their connectors as indicated by the red dash line rectangle in Fig. 22 (A). The PCB has 15 male wire-to-board connectors (Part P6) and can control up to 120 solenoid valves. Plug the female wire-to-board connectors (Part P5) wired to the solenoid valve array assemblies into any of these male wire-to-board connectors will work as long as the valve number in the NIS-Elements Macro code and the user interface app (but Not the firmware!!) changed correspondingly. For experiments described in the main text and the operation guide, they are plugged into the 2 connectors indicated by the red dash line rectangles in Fig. 22 (B).
Fig. 19.
Installation of the air filter and the pressure regulator.
Fig. 20.
Connection of the pressure regulator to the splitting manifold.
Fig. 21.
Mounting of the PCB controller on to the structural frame.
Fig. 22.
Connection of the solenoid valves to the PCB.
Note: The ComponentID (defined in the firmware code) for valves used here is 16, 17, 18, 19, 20, 21, 22, 23, 104, 105, 106, 107, 108, 109, 110,111.
Operation instructions
Note: In this guide, we run through a step-by-step calibration and operation procedure for an example 14-round sequential FISH-based imaging experiment described in the main text.
Reference the sheets named ‘14-channel imaging’ (part names start with capital C), ‘Eppendorf tube adapter array’ (part names start with capital E), ‘Tubings’ (part names start with capital T), and ‘Remaining components’ (part names start with capital R) in the bill_of_materials.xlsx file for part names for this guide.
The code for the user interface app for automatic flow rate calibration and the NIS-Elements Macro code for integrating Nikon microscope for imaging with liquid handling through the fluidics system can be found in the project’s Mendeley data repository (https://doi.org/10.17632/tkm4w7wp3v.1).
The routines used in this example for fluorescently labeled oligo exchange is adapted from protocol in [19] and are given in the section named ‘Fluorescent oligo exchange and imaging routines’ in this guide.
System setup
-
1.
Use new tubing to connect two large reservoirs to channel #13 and #14 with fittings and put them into the 3D-printed holders as shown in Fig. 23. The part numbers for the bottles and caps are Part C1 and Part C2. The fittings are Parts E4, E5, E6 and E7. (3D-print holders for the bottles were installed to the base of the structural frame, the design file named ‘large_reservoir_holder.stl’ for the holder can be found in the project’s repository.
-
2.
Use a Q-tip to apply mineral oil to the O-rings of the Eppendorf tube adapters. This is for lubricating the O-ring which makes attaching the Eppendorf tubes to the adapters very easy when loading reagents in the following section.
-
3.
Connect a bubble trap (Part R9) between the outlet of the mini manifold (Part O1) and the inlet of the flow rate sensor in the flow path.
-
4.
Connect the tubing from the outlet of the flow rate sensor to one end of a channel of an idibi 6-channel slides (Part C3) with an Elbow Luer Connector (Part C4). With another Elbow Luer Connector (Part C4), connect the other end of the channel to a tubing-valve assembly as shown in Fig. 24. The components in the tubing-valve assembly from top to down are: Part T4, Part C5, Part T5, Part C6, Part C7, Part T5. The one-way-check valve (Part C7) is for the purpose of stopping the flow generated due to gravity when all the solenoid valves are closed (when there is no reagent injection happening).
Fig. 23.
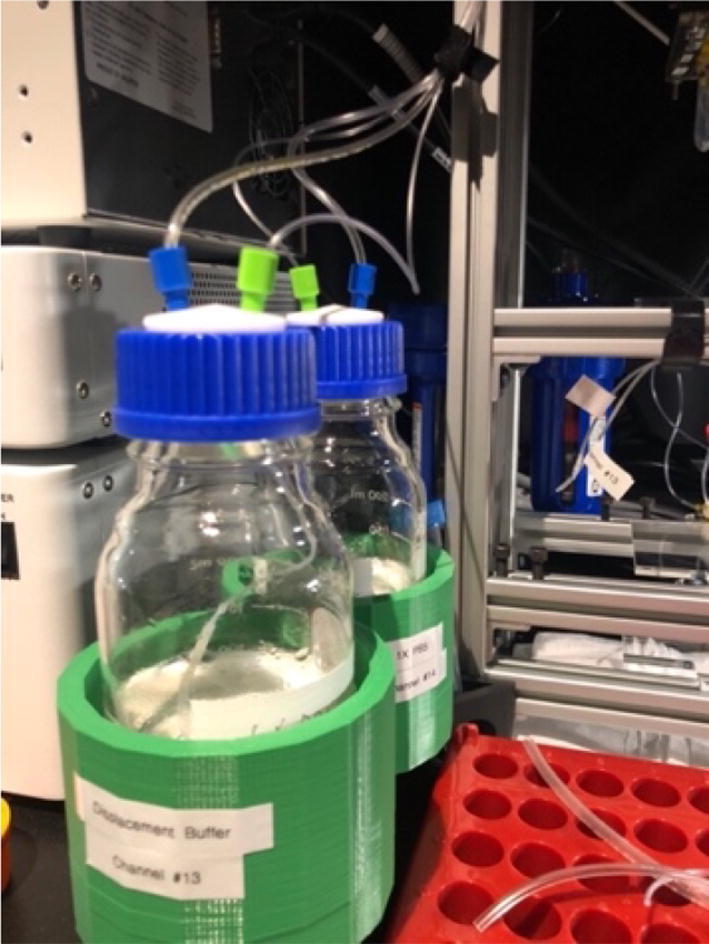
Large reservoir for PBS and displacement buffer.
Fig. 24.
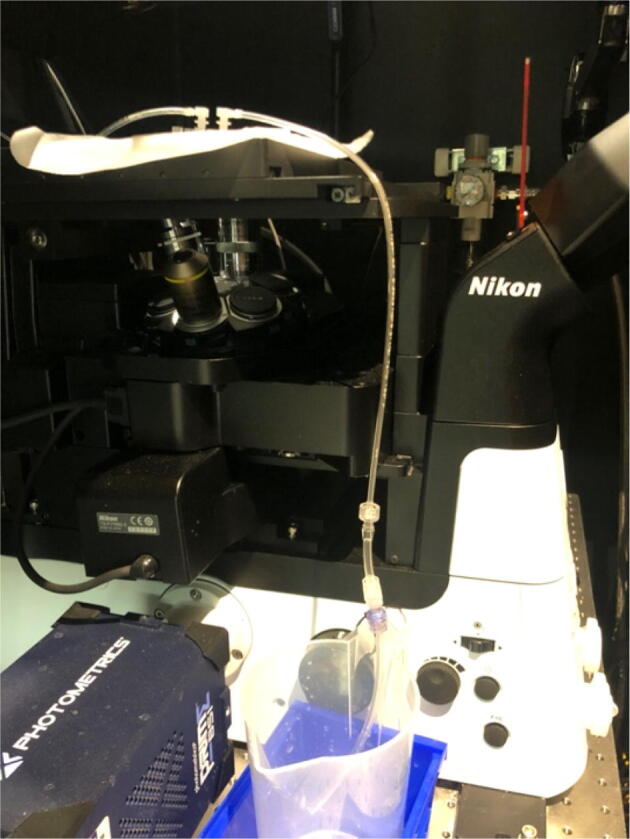
The waste end connection.
Pre-run priming
1. Load 14 2 mL Eppendorf tubes each with 1.5 mL 1X PBS onto the fluidics system.
2. Put 200 mL 1X PBS into each of the two large reservoirs. And close the two reservoirs with the caps connected to channel #13 and #14.
3. Connect the main inlet tubing of the fluidics system to a 30 psi pressure source.
4. Connect the fluidics system controller to a computer through the USB port (make sure the driver for ESP32 is installed).
5. Connect the tubing from the outlet of the air filter (Part R2) to an air source with pressure of 30 psi.
6. Open the user interface app. Choose a folder to save the calibration data by clicking the ‘Save’ button in the ‘Setup’ tab. Then click the ‘Washing and Priming’ button to start the priming process to prime the fluidics channels with the loaded 1X PBS.
One run of ‘Washing and Priming’ takes about 15 min. Two runs of ‘Washing and Priming’ are enough to fully prime the channels and eliminate bubbles from the system.
7. Check the recorded flow rate after each run. The recorded flow rate for all 16 channels will be displayed in the table in the ‘Setup’ tab of the app after the ‘Washing and Priming’ process finished. Each row is the flow rate for one channel measured every 3 secs.
The pressure for ‘Washing and Priming’ is set at 127 (uint8) which is corresponding to 15 psi and the flow rate should be close to the maximum flow rate, 255 (uint8), read out by the flow rate sensor.
Note: While the one-way-check-valve eliminates all detectable backflow when fully functional, this part can weaken and fail. If a reagent reservoir’s volume increases during the priming step, this is likely an indication of a defective one-way-check-valve that needs replacement.
Flow rate calibration and verification
-
1.
Load 14 2 mL Eppendorf tubes each with 1.5 mL 1X PBS onto the fluidics system. (The same set of Eppendorf tubes used for Section 6.2 can be re-used in this calibration step)
-
2.
Put 80 mL displacement buffer [19] into a new large reservoir and replace the reservoir connected to channel #13 with it.
-
3.
Inspect flow path, especially the section from the outlet of the mini manifold to the outlet of the ibidi channel slide, to make sure there are no air bubbles trapped in the channel. If there are bubbles, inject 1X PBS by clicking the ‘Channel_14′ button in the ‘Run single channel’ tab to try flushing out the bubbles. Bubbles tend to be trapped at the fitting used to connect the tubing to the ibidi channel slide inlet. If bubbles keep sticking at the fitting, try disconnecting the fitting and reconnecting it several times while 1X PBS is being injected until the bubbles are flushed out.
-
4.
Click the ‘Calibration’ tab and select 600 µL/min as the targeted calibration flow rate. Click the ‘Start calibration’ button to start the calibration procedure. The calibration procedure takes about 40 min to run. The calibration parameters used here are pre-tested, and more information about how to use the app to do calibration for reagents other than PBS and displacement buffer used in this example or other flow rate is presented in Section 6.7.
-
5.
Once the calibration procedure finished. Load 14 2 mL Eppendorf tubes each with 1.5 mL 1X PBS onto the fluidics system. (The same set of Eppendorf tubes used for Section 6.2 can be re-used in this calibration step).
-
6.
Click the ‘Calibration verification’ tab and click the ‘Flow rate verification’ button. This step verifies the calibrated flow rate by measuring the flow rate for each channel when applied the calibrated pressure. It takes about 15 min.
-
7.
Click the ‘Convert flow rate and show injection time’. The main table in the app window will show the flow rate converted to unit of µL/min for each channel measured in 6 (top row) and injection time (bottom row). Injection volume 800 µL (for fluorescently labeled oligos and displacement buffer) was used to calculate the injection time for this experiment. For 1X PBS, injection volume of 1.6 mL was used to calculate the injection time.
Imaging routine setup (with NIS-Elements as an example)
This section gives an overview of how to interface with NIS-Elements software for integrated imaging with fluid exchange. Depending on how the microscope is configured, components of the microscope (e.g., camera, filter wheel, automated stage, light source) may be controlled by communications relayed by NIS-Elements or by low-latency hardware triggering with TTL. In either case, the interface between the fluidics system and NIS-Elements (or equivalent if using different instrument control software) is achieved by serial communication.
-
1.
Download a.zip file named ‘NIS-Elements Macro codes.zip’ from the project’s Mendelay repository (https://doi.org/10.17632/tkm4w7wp3v.1) and extract two folders named ‘automatic update Element macros’ and ‘Macros for 16 channel fluidics system V1’. These two folders include custom written NIS-Elements macro code, macro template scripts, a Python script, and a folder with example files generated from flow rate calibration. Two files named ‘WaitTime.npy’ and ‘pr_set_channels_hex.npy’ generated by the user interface app after the calibration and verification from Section 6.3 are used as input to for the python script (named ‘update_Element_macro_script.py’) for automatically updating the injection time and the set pressure for all 16 channels in the relevant NIS-Elements Macro scripts.
-
2.
In the NIS-Elements software, open the Macro Panel and set up macro buttons with relevant scripts in the folder ‘Macros for 16 channel fluidics system V1′. Reference the help document in the actual version of the NIS-Elements in use for information about how to set up macro buttons with custom written macro scripts. The Macro Panel used for this example will look like the one in Fig. 25.
-
3.
Click the ‘Open serial port’ button in the Macro Panel. It might require changing the serial port number (the global variable named ‘nSerialPort’) in the macro script named ‘Open serial port.mac’ to the actual serial port number that is assigned to the USB port which the fluidics system is plugged into.
-
4.
Right click the ‘update variable’ button in the Macro Panel to open the macro script associated with this button. The values set for the variables named ‘WaitTimeIncubation’,’WaitTimePBS_sit’,’WaitTimePBS’,’WaitTimDB_sit’,’WaitTimeDB’ are for this specific example experiment. Users can change these values accordingly for their probes exchange handling protocol and then left click the ‘update variable’ button to apply the changes.’WaitTimePBS_sit’ and’WaitTimePBS’ work similarly but allow experimental routines that require two different wait times after injecting 1X PBS. Same with’WaitTimDB_sit’ and’WaitTimDB’.
-
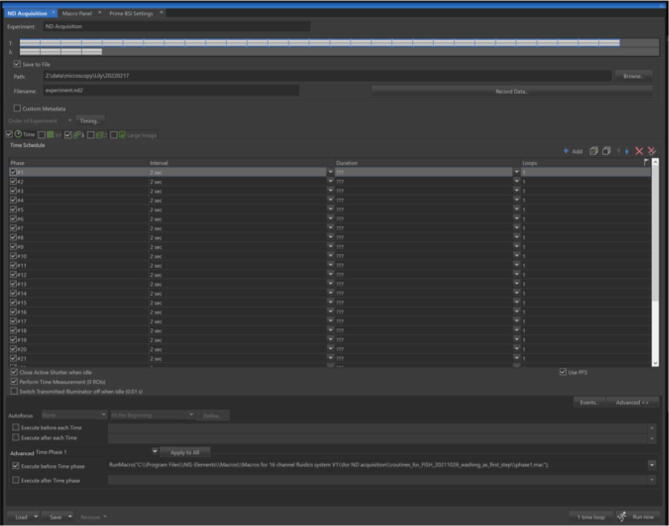
5.In this and the next two steps, only settings that are relevant to control the fluidics system are described. Reference the help document in the software for other settings in the ND Acquisition panel. Open the ND Acquisition panel in NIS-Elements, click the Time tab and select it as shown in Fig. 26. Add 29 phases each with the parameters named ‘Interval ‘set as 2 sec and ‘Loops’ set as 1.
- Each phase # is the phase number associated with the time the images were taken in the 3 fluorescent imaging channels. During each phase, serial command was sent from NIS-Elements to the fluidics system controller to control which channel to inject. Here phase # 2, 4, 6, 8, 10, 12, 14, 16, 18, 20, 22, 24, 26, 28 are phases when steps (see Fluorescent oligo exchange and imaging routines at the end of this guide) designed for fluorescently labeled oligo injection and hybridization were running (hybridization step for Fig. 5 in the main text). Other phases are when steps (see Fluorescent oligo exchange and imaging routines at the end of this guide) designed to strip fluorescently labeled oligos (i.e., the washing step for Fig. 31).
-
6.
In the Advanced section, select ‘Time Phase 1′ from the drop-down menu. Then select ‘Execute before Time phase’. In the text box next to it, put in the command named ‘RunMacro(“Path to the script”)’ with “path to the script” pointing to the location of the macro script named ‘phase1.mac’.
-
7.
Repeat 6 for the remaining 28 phases. For example, select macro script named ‘phase2.mac’ for ‘Time phase 2′, select macro script named ‘phase3.mac’ for ‘Time phase 3′, so on and so forth.
Fig. 25.
Macro Panel with macro buttons set up for controlling the fluidics system in the NIS-Elements software.
Fig. 26.
The set-up of the time phases in the ND Acquisition panel.
Fig. 31.
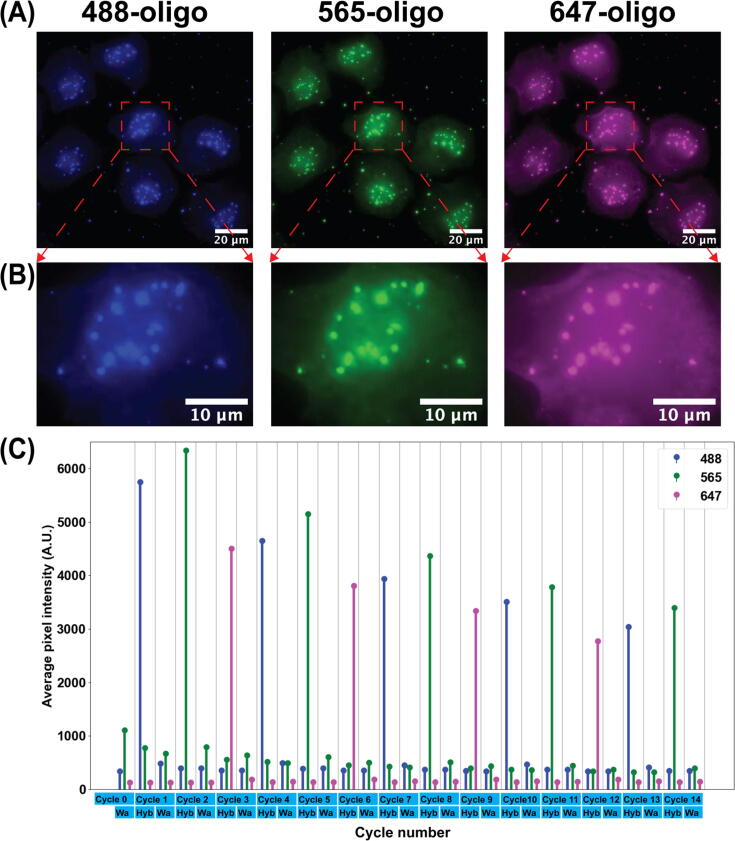
Result of the sequential FISH-based imaging targeting pan-alpha in HeLa cell. (A) Images taken after injecting fluorescently labeled oligos from fluidics channel # 1, 2, and 3 (after the hybridization step in Cycle 1, 2 and 3). (B) Zoom-in images of one cell from (A). (C) The average pixel intensity of pan-alpha puncta in images taken in fluorescent imaging channels 488 nm, 565 nm, and 647 nm in each Cycle.
Note: There are 2 issues frequently happening in this version of NIS-Elements and below give the work arounds for these 2 issues in order to continue running the experiment smoothly.
-
1)
Sometimes NIS-Elements Macro interprets time in seconds as milliseconds. Use the button named ‘time’ in the Macro Panel to test whether the time counting is correct or not. This button runs a script that sets the pressure to maximum, waits for 3 s, then sets the pressure to zero. Click once this button and observe the macro running status at the bottom of the NIS-Elements software. If the time between setting the pressure to maximum and to zero is not 3 s, restart the PC and try again. Usually, a one-time restart of the PC should fix the issue.
-
2)
Unsuccessful serial communication between NIS-Elements and the fluidics system controller when the USB of the controller first plugged in. Closing NIS-Elements and opening it back up will solve this issue.
Sample loading
-
1.
Connect an ibidi channel slide with pre-seeded Hela cell with primary probes hybridized to pan alpha satellite (reference to [19] for FISH protocol) to the fluidics system. Use the same method described in 3 of Section 6.3 to eliminate bubbles.
-
2.
Load 14 2 mL Eppendorf tubes each with 1.5 mL fluorescent oligo solution (in 1XPBS) onto the fluidics system. For this example, the fluorescently labeled oligos loaded for each channel are listed as in Table 1. The concentration used here is 1 µM.
Table 1.
Fluorescently labeled oligos loaded for each channel.
| Channel # | 1 | 2 | 3 | 4 | 5 | 6 | 7 | 8 | 9 | 10 | 11 | 12 | 15 | 16 |
|---|---|---|---|---|---|---|---|---|---|---|---|---|---|---|
| Fluor oligos | 488 | 565 | 648 | 488 | 565 | 648 | 488 | 565 | 648 | 488 | 565 | 648 | 488 | 565 |
Running the experiment
-
1.
Connect the fluidics system controller to the imaging computer through the USB port.
-
2.
Run ND acquisition in NIS-Elements once the cell sample is in focus.
Manual flow rate calibration
This section describes the procedure to conduct flow rate calibration using the user interface app for reagents other than PBS and displacement buffer used in the demonstrated example Section 6.1 to Section 6.6) and how to extend the calibration routine to achieve flow rates other than the 3 default flow rates.
The calibration routine is designed based on the linear relationship between the applied pressure and the flow rate. There is a coarse calibration followed by a fine calibration. The difference between the coarse calibration and the fine calibration is in the step size of the incremental applied pressure. The coarse calibration determines a range of applied pressure within which a more precise pressure can be determined to generate the target flow rate. The combination of coarse and fine calibrations was designed to minimize the searching time of the required pressure (to achieve the target flow rate) and the amount of the calibration reagent required. The whole calibration routine takes about 40 min and can be completed with 2 mL reagent in the Eppendorf tube reservoir.
The pressure search range can be set in the text boxes in the ‘Calibration’ tab. The pressure search range (in the order of start pressure, stop pressure, step size) for channel #1-12 and 16 can be entered in the first row. The pressure search range for channel #15 can be entered in the second row (for our internal build used for the experiments described in this manuscript, channel #15 has a much higher flow resistance due to hardware component variability). The pressure search range for channel #13 and 14 can be entered in the third and fourth row (for regular usage in our lab, these two channels are designated for large reservoirs for displacement buffer and PBS). Users can manually change these parameters: start pressure, stop pressure, step size to achieve optimal calibration result. The default values here are verified and tested to be robust for 1X PBS and displacement buffer used in the 14-round sequential FISH-based imaging experiment.
Users can load the resulting calibration data for individual channel by clicking two buttons named ‘Coarse calibration data’ and ‘Fine calibration data’ and they will be shown in the corresponding tables (first row is the applied pressure; second row is the resulting flow rate). Users can examine these calibration data to identify a more suitable calibration parameter set (start pressure, stop pressure, step size) if the calibrated pressure does not archive the target flow rate. The calibrated pressure for each channel is shown in the table under the button named ‘Calibrated set_pressure’ (In the first row it is shown as Decimal data and in the second row it is shown as Hex data).
As for flow rates other than the 3 default pre-tested flow rates, the python scripts for the interface app provided in the project’s repository can be modified (by changing the value assigned to the variable named FLOW_RATE) easily to adapt the calibration routine to calibrate other targeted flow rates.
Fluorescent oligo exchange and imaging routine
-
1.
Inject 800 µL of fluorescent hybridization solution (fluorescent oligos + 1X PBS) and incubate for 1 h.
-
2.
Wash 2X with 800 µL of 1X PBS.
-
3.
Acquire a multichannel Z-stack.
-
4.
Wash with 3X with 800 µL displacement buffer: inject 3X 800 µL displacement buffer (1X PBS + 60 % vol/vol formamide), then let it sit for 4 min.
-
5.
Wash 4X with 800 µL of 1X PBS.
-
6.
Acquire a multichannel Z-stack.
-
7.
Repeat 1 to 6 for all the fluidic channels.
Validation and characterization
Flow rate control
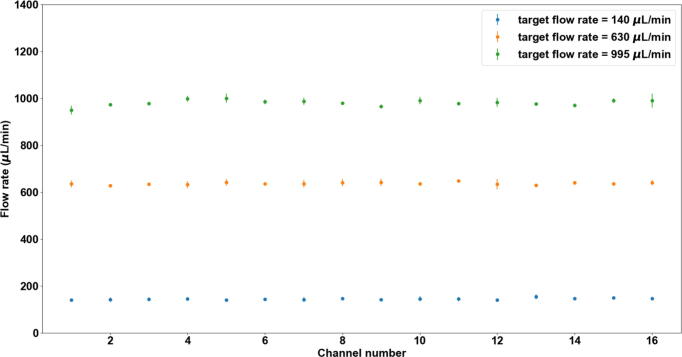
A robust flow rate control is important for controlling the injection volume. The flow rate is linearly proportional to the amount of pressure that is applied to the reservoir. A calibration routine is integrated into the user interface. This routine can complete the automatic flow rate calibration with the 1.5 mL of 1X PBS buffer that is loaded in the 2 mL Eppendorf tube. This helps to minimize the sample loading effort for calibration. By default, 3 target flow rates, 140 µL/min, 630 µL/min (denoted by 600 µL/min in the calibration tab in the user interface), and 995 µL/min (denoted by 1000 µL/min in the calibration tab in the user interface) can be selected from the user interface with tested calibration parameters. The flow rate calibration routine that can calibrate all 16 channels without any human interaction takes about 40 mins. Fig. 27 shows the measured flow rate for all 16 channels for the three target flow rates, repsectively. The average accuracy of the 16 channels is < +/-5% of the target flow rate.
Fig. 27.
Flow rate calibration result of target flow rates of 140 µL/min, 630 µL/min, and 995 µL/min. Mean and standard deviation (SD) are based on 3 measurements.
Minimum injection volume
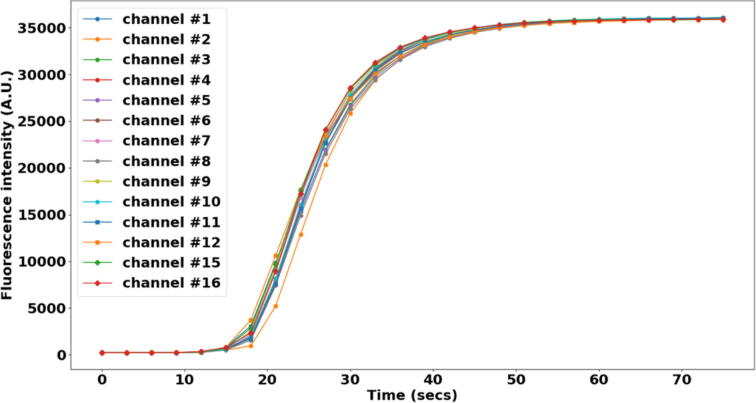
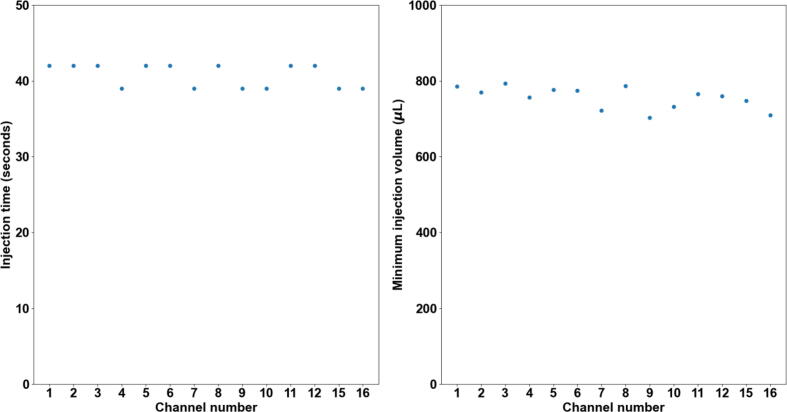
The fluidic system is designed and built to minimize dead volume (the volume of reagent that used to fill up one individual channel before injecting into the imaging chamber) to reduce reagent cost, especially that of fluorescently labeled oligos. The total dead volume measured by filling one individual channel with DI water is about 200 µL (volume of ∼1.5 ft of 0.02″ ID tubing (∼90 µL) + volume of the one-way check valve (∼20 µL) + dead volume of the 16–1 manifold (∼1.4 µL) + dead volume of in-line bubble remover (∼90 µL)). However, for a channel that is primed with a priming reagent (1X PBS or DI water), it would be required to inject a volume more than this amount to ensure the concentration of the injected reagent when reaching the imaging chamber is maximum (equal to the concentration of the reagent in the Eppendorf tube reservoir). The minimum injection volume (when a channel is primed with 1X PBS) for the reagent concentration to reach maximum in the imaging chamber is empirically determined by an experiment. During the experiment, images of the imaging chamber were recorded every 3 s in real-time for each channel from when the reagent (a blue dye is used here, ELVEFLOW Microfluidic Dyes Channels Visualization Kit, SKU: LVF-KXX-06) is injected and the imaging lasted for 75 s for each channel. Between switching channels, 2 mL 1X PBS was injected to wash out the dye from the previous channel and the fluorescent intensity of image of the imaging chamber is verified to decrease to minimum after the washing. The resulting averaged fluorescent intensities change over time for each channel is shown in the plot in Fig. 28. Channel # 1–12, # 15, and # 16 is shown here. Channel # 14 was used for injecting 1X PBS for washing during the experiment. Channel # 13 is not used for this experiment since it is designated for injecting a displacement buffer (for FISH) in the actual sequential FISH experiment. Also, the flow rate is recorded in real-time for estimating the minimum injection volume. The minimum injection volume is estimated as the volume that has been injected when the fluorescent intensity in the imaging chamber first reaches 98 % of that in the Eppendorf tube reservoir. Fig. 29 shows the resulting minimum injection volume for each channel. For all the channels, the injection volume calculated based on this experiment shows to be < 800 µL. Therefore, 800 µL is used as the default minimum injection volume.
Fig. 28.
Fluorescent intensity time course during dye injection for 14 channels: channel # 1–12, # 15 and 16. Each data point is the average fluorescent intensity of an image. The images were taken every 3 secs from the onset of the dye injection from one channel till the 75 secs end time. Flow rate is 1 mL/min.
Fig. 29.
Minimum injection volume for fluorescent intensity reaches plateau in the imaging chamber. This is calculated from Fig. 28. The minimum injection volume is determined by the time at which the fluorescent intensity reaches 98% of the maximum fluorescent intensity in the plot.
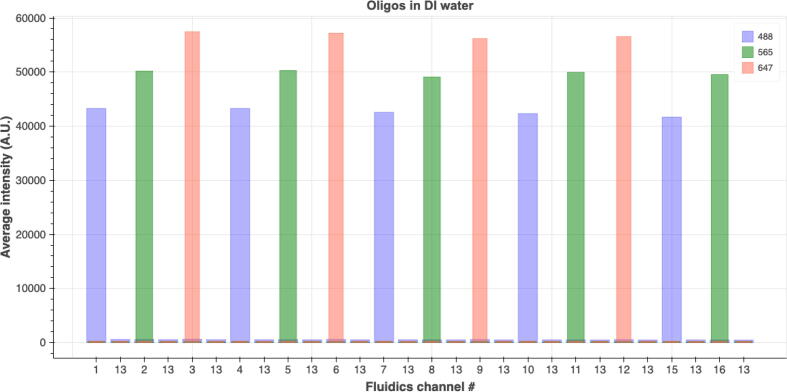
Minimal cross-contamination validation
An experiment was designed and carried out to evaluate the degree of cross-contamination between channels. Reservoirs for channels # 1–12 and 15, 16 were loaded with fluorescent oligos following this order and then repeated: 488-oligo, 565-oligo, 647-oligo. Reservoirs for channel #13 were loaded with 1X PBS as a washing buffer. And all the channels were primed with 1X PBS. Images were taken in three fluorescent channels (488, 565, 647) after injecting 800 µL (the minimum injection volume from 7.2) fluorescently labeled oligos from one fluidics channel. 2 mL of 1X PBS was injected afterwards and images were then taken again (in the three fluorescent channels). These were repeated from the first fluidics channel until the last fluidics channel. Once the reagents were loaded the experiment routine was run automatically with injection commands issued and images taken by NIS-Elements. The average fluorescent intensities in the three fluorescent channels are shown in Fig. 30. The order of which fluorescent channel has maximum intensity value follows the order of the fluorescent oligos being injected. Moreover, the fluorescent channels that are not associated with the intended injected fluorescent oligos have very low intensity values. The fluorescent intensity value is also low when 1X PBS was injected to wash the oligo away from the imaging chamber. The fluorescent intensity is very consistent across channels when the same fluorescent oligos is injected. These results show that sequential injection with the fluidics system combined with imaging can be successfully carried out without significant cross-contamination between channels and the concentration of reagent injected from each channel remains consistent.
Fig. 30.
Average fluorescent intensity of images taken in fluorescent imaging channels: 488 nm, 565 nm, and 647 nm. Fluorescently labeled oligos were loaded into the Eppendorf tube reservoirs in this order: 488-oligo for channel 1, 565-oligo for channel 2, 647-oligo for channel 3 and this order was repeated for channels # 4–12 and # 15 and # 16. Images were taken after 800 µL fluorescent oligo reagent from one channel was injected. 2 mL 1X PBS was injected as a washing step to wash out the oligos from the previous injection before injecting fluor oligos from the next channel. Images were also taken after the 2 mL 1X PBS injection finished for that round.
Automating a sequential FISH-based imaging experiment
To demonstrate the fluidics system’s capability of performing oligo probe exchange for sequential FISH-based imaging, an experiment was carried out using DNA-SABER FISH targeting the alpha satellite repeat in HeLa cells with three different fluorescent readout oligos. For experimental simplicity, we chose to cycle through imaging the same target with distinct fluorescent channels over 14 rounds in fixed tissue culture cells for our proof-of-concept demonstration. However, with a system such as the one described here, multiplexed FISH could be conducted instead against 14 distinct targets (or more if combinatorial encoding were used) and/or RNA/DNA targets in fixed tissue specimens. We do note that the SABER exchange protocol listed in Section 6.7 may need to be further optimized for different FISH targets and sample types.
Live HeLa cells were seeded into ibidi 6-channel slides (ibidi 80607) and allowed to adhere overnight in a mammalian tissue culture incubator. These cells were then fixed, permeabilized, and hybridized with primary probe using a standard “3D DNA FISH” protocol [19]. Each of the primary probes has a SABER [19] concatemer sequence (the ‘p27’ concatemer sequence) that can be targeted by SABER fluorescent oligos as readout probes. Three different SABER fluorescent oligos were loaded into the Eppendorf tubes for fluidics channels # 1–12, channels # 15 and 16 in the following order and then repeat: p27-488, p27-565, p27-647. Reservoirs for channels # 13 and 14 were loaded with a displacement buffer and 1X PBS separately. Fluorescently labeled oligos were injected sequentially and images were taken once the oligos from the current fluidics channel were incubated in the imaging chamber for 1 h (hybridization step) and after the oligos were stripped away by injecting the displacement buffer (washing step). The displacement buffer consisted of 0.4X PBS + 0.04 % (vol/vol) Tween-20 + 60 % (vol/vol) formamide. The fluorescent oligo exchange and imaging routines were controlled by NIS-Elements communicating with the fluidics system’s controller by serial commands. No human intervention was needed once the experiment started to run. The fluorescent images for the first three rounds of hybridization are shown in Fig. 31 (A). The alpha satellite pattern was illustrated by the corresponding fluorescent oligos. Zoom-in images of one cell from Fig. 31 (A) are shown in Fig. 31 (B). The average pixel intensity was quantified by averaging the fluorescent intensity of pixels belonging to the alpha satellite puncta. This is shown in the plot in Fig. 31 (C). The plot shows that the intensity has the highest value in the imaging channel that is associated with the intended injected fluorescent oligos and the intensity is very low in the other two imaging channels. Also, the intensity from images taken after introducing the displacement buffer is low (images taken after the washing step in each cycle).
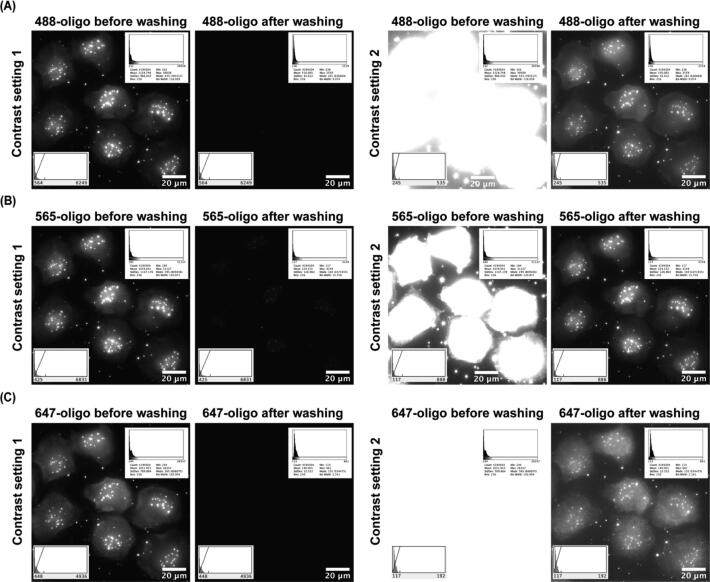
Cycle 1 to 12 inject fluorescently labeled oligos from fluidics channels #1 to 12, Cycle 13 and 14 inject fluorescently labeled oligos from fluidics channels # 15 and 16. Each cycle includes a hybridization step (indicated as Hyb in the x axis) followed by a washing step (indicated as Wa in the x axis) except Cycle 0. Cycle 0 only has a washing step. Images were taken after the hybridization step as well as after the washing step in each cycle. Fig. 32 shows that the staining pattern is entirely removed at the contrast level of the original imaging and only weakly present if the contrast is heavily increased. The decrease of intensity in the plot of Fig. 31 observed over increasing numbers of exchange cycles is likely due to the instability of the fluorescent oligos in the 1X PBS buffer. Nevertheless, the result demonstrates that the fluidics system is robust in handling complicated fluidics exchange routines for sequential FISH-based imaging. We thus anticipate this system could be used for a broad set of optical methods that require fluid exchange including live-cell imaging, multiplexed immunofluorescence, and single-molecule localization microscopy.
Fig. 32.
Removal of fluorescently labeled readout oligos using the fluidic system. The images corresponding to the first (A), second (B), and third (C) cycles from Fig. 31 are shown before and after the washing steps at min/max (left) and elevated (right) contrasts.
CRediT authorship contribution statement
Zhaojie Deng: Conceptualization, Methodology, Software, Writing – original draft. Brian J. Beliveau: Conceptualization, Methodology, Writing – review & editing.
Declaration of Competing Interest
The authors declare that they have no known competing financial interests or personal relationships that could have appeared to influence the work reported in this paper.
Acknowledgement
The authors thank Dan Fong (Nikon) for technical support with the Nikon microscope and NIS-Elements software, Sahar Attar (Beliveau Lab) for help with primary FISH, Eva Kristine Nichols, Yuzhen Liu, Chris Hsu (Beliveau Lab) for providing ibidi slides with seeded cells, and all the Beliveau Lab members for their helpful feedback on the draft manuscript and figures. We also thank the Maker Space in the University of Washington for providing resources for PCB debugging, laser cutting and 3D printing. This work was supported by a Damon Runyon Dale F. Frey Breakthrough Award (to B.J.B.), the National Institutes of Health (under grant no. 1R35GM137916 to B.J.B.), and a Brotman Baty Institute Catalytic Collaborations Award (to B.J.B.).
Biographies

Zhaojie Deng received B.S. and M.S. degrees in Electrical and Electronics Engineering from the Huazhong University of Science and Technology, Wuhan, China (2008 and 2011, respectively) and a Ph.D. degree in Biological and Agricultural Engineering from the University of Georgia (2017). She then become an Advanced Imaging Engineer/Optical Biophysicist in the Department of Genome Sciences at the University of Washington. She is currently a Computational Biology Scientist at RareCyte, Inc. She has published over eight peer-reviewed publications on the single-cell measurements of the biological clock with microfluidics. Her research interests include the application of computational methods, advanced and/or quantitative imaging, and microfluidics in biological sciences.

Brian Beliveau is an Assistant Professor of Genome Sciences at the University of Washington. His lab focuses on developing and applying technologies that map gene expression and genome folding in time and space. Particular emphasis is placed on the development of inexpensive, open source, and accessible frameworks for performing what otherwise would be complex experiments to accelerate the adoption of advanced and emerging technologies. Brian received B.S. and M.S. degrees in Cellular and Molecular Biology from Johns Hopkins University (2007 and 2008, respectively), a PhD in Genetics from Harvard Medical School under the mentorship of Ting Wu (2015), and postdoctoral training as a Damon Runyon HHMI Fellow at the Wyss Institute for Biologically Inspired Engineering at Harvard and the Department of Systems Biology at Harvard Medical School under the mentorship of Peng Yin.
Footnotes
Supplementary data to this article can be found online at https://doi.org/10.1016/j.ohx.2022.e00343.
Appendix A. Supplementary data
The following are the Supplementary data to this article:
References
- 1.Lubeck E., Cai L. Single-cell systems biology by super-resolution imaging and combinatorial labeling. Nat. Methods. 2012;9:743–748. doi: 10.1038/nmeth.2069. [DOI] [PMC free article] [PubMed] [Google Scholar]
- 2.Levesque M., Raj A. Single-chromosome transcriptional profiling reveals chromosomal gene expression regulation. Nat. Methods. 2013;10:246–248. doi: 10.1038/nmeth.2372. [DOI] [PMC free article] [PubMed] [Google Scholar]
- 3.Wang S., et al. Spatial organization of chromatin domains and compartments in single chromosomes. Science. 2016;353:598–602. doi: 10.1126/science.aaf8084. [DOI] [PMC free article] [PubMed] [Google Scholar]
- 4.Bintu B., et al. Super-resolution chromatin tracing reveals domains and cooperative interactions in single cells. Science. 2018;362 doi: 10.1126/science.aau1783. [DOI] [PMC free article] [PubMed] [Google Scholar]
- 5.Gardozo Gizzi A.M., et al. Microscopy-based chromosome conformation capture enables simultaneous visualization of genome organization and transcription in intact organisms. Molecular Cell. 2019;74:212–222. doi: 10.1016/j.molcel.2019.01.011. [DOI] [PubMed] [Google Scholar]
- 6.Mateo L.J., et al. Visualizing DNA folding and RNA in embryos at single-cell resolution. Nature. 2019;568:49–54. doi: 10.1038/s41586-019-1035-4. [DOI] [PMC free article] [PubMed] [Google Scholar]
- 7.Chen K.K., et al. Spatially resolved, highly multiplexed RNA profiling in single cells. Science. 2015;348 doi: 10.1126/science.aaa6090. [DOI] [PMC free article] [PubMed] [Google Scholar]
- 8.Shah S., et al. Dynamics and spatial genomics of the nascent transcriptome by intron seqFISH. Cell. 2018;174:363–376. doi: 10.1016/j.cell.2018.05.035. [DOI] [PMC free article] [PubMed] [Google Scholar]
- 9.Su J.-H., et al. Genome-scale imaging of the 3D organization and transcriptional activity of chromatin. Cell 182. 2020:1641–1659. doi: 10.1016/j.cell.2020.07.032. [DOI] [PMC free article] [PubMed] [Google Scholar]
- 10.Takei Y., et al. Integrated spatial genomics reveals global architecture of single nuclei. Nature. 2021;590:344–350. doi: 10.1038/s41586-020-03126-2. [DOI] [PMC free article] [PubMed] [Google Scholar]
- 11.Sequential fluid injection pack – ElveFlow. Available at: https://www.elveflow.com/microfluidic-applications/setup-microfluidic-flow-control/peristaltic-pump-compared-to-pressure-driven-flow-control/. (Accessed: 28, January 2022).
- 12.Sequential perfusion system – Aria | FLUIGENT. Available at https://www.fluigent.com/research/instruments/aria/. (Accessed: 28, January 2022).
- 13.Microfluidics Unit – BRUKER. Available at: https://www.bruker.com/en/products-and-solutions/fluorescence-microscopy/super-resolution-microscopes/microfluidics-unit.html. (Accessed: 28, January 2022).
- 14.Rodriguez-Mateos P., Filipe Azevedo N., Almeida C., Pamme N. FISH and chips: a review of microfluidic platforms for FISH analysis. Med. Microbiol. Immunol. 2020;209:373–391. doi: 10.1007/s00430-019-00654-1. [DOI] [PMC free article] [PubMed] [Google Scholar]
- 15.J.R. Moffitt, X. Zhuang, RNA Imaging with Multiplexed Error-Robust Fluorescence In Situ Hybridization (MERFISH), in: G. Filonov (Ed.), Visualizing RNA Dynamics in the Cell, Methods in Enzymology, 572, (2016) 1-49. doi: 10.1016/bs.mie.2016.03.020. [DOI] [PMC free article] [PubMed]
- 16.Almada P., et al. Automating multimodal microscopy with NanoJ-Fluidics. Nat Commun 10. 2019 doi: 10.1038/s41467-019-09231-9. Article 1223. [DOI] [PMC free article] [PubMed] [Google Scholar]
- 17.Peristaltic pumps vs. pressure driven flow control – ElveFlow. Available at: https://www.elveflow.com/microfluidic-applications/setup-microfluidic-flow-control/peristaltic-pump-compared-to-pressure-driven-flow-control/. (Accessed: 28, January 2022).
- 18.C. Watson, S. Senyo, All-in-one automated microfluidics control system. HardwareX 5, (2019) Article e00063. doi: 10.1016/j.ohx.2019.e00063. [DOI] [PMC free article] [PubMed]
- 19.Kishi J.Y., et al. SABER amplifies FISH: enhanced multiplexed imaging of RNA and DNA in cells and tissues. Nat. Methods. 2019;16:533–544. doi: 10.1038/s41592-019-0404-0. [DOI] [PMC free article] [PubMed] [Google Scholar]
Associated Data
This section collects any data citations, data availability statements, or supplementary materials included in this article.


