

Abstract
Background
Increased utilization of telemedicine has created a need for supplemental pain medicine education, especially for the virtual physical assessment of the pain patient. Traditional clinical training utilizes manual and tactile approaches to the physical examination. Telemedicine limits this approach and thus alternative adaptations are necessary to acquire information needed for sound clinical judgement and development of a treatment plan. Clinical assessment of pain is often challenging given the myriad of underlying etiologies contributing to the sensory experience. The COVID-19 pandemic has led to a dramatic increase in the use of virtual and telemedicine visits, further complicating the ease of assessing patients in pain. The increased reliance on telemedicine visits requires clinicians to develop skills to obtain objective information from afar. While eliciting a comprehensive history and medication assessment are performed in a standard fashion via telemedicine, a virtual targeted physical examination is a new endeavor in our current times. In order to appropriately diagnose and treat patients not directly in front of you, a pivot in education adaptations are necessary.
Objective
To summarize best care practices in the telemedicine physical exam while presenting an algorithmic approach towards virtual assessment for the pain practitioner.
Design
Review of the literature and expert multidisciplinary panel opinion.
Setting
Nationally recognized academic tertiary care centers.
Subjects
Multidisciplinary academic experts in pain medicine.
Methods
Expert consensus opinion from the literature review.
Results
An algorithm for the virtual physical exam for pain physicians was created using literature review and multidisciplinary expert opinion.
Conclusions
The authors here present simple, comprehensive algorithms for physical exam evaluations for the pain physician stemming from a review of the literature.
Keywords: Telemedicine Exam, Algorithmic Approach for Pain Physical Exam, Algorithmic Approach for Physical Exam, Virtual Medicine, Virtual Physical Exam
Introduction
Clinical assessment of pain is often challenging given the myriad of underlying etiologies contributing to the sensory experience. The COVID-19 pandemic led to an increase in the use of virtual and telemedicine visits [1], complicating the comprehensive pain assessment by limiting physical examination feasibility and reliability. The increased reliance on telemedicine visits requires clinicians to sharpen passive evaluation techniques [2]. While the interview portion of a patient visit conducts in a standard way, (obtaining comprehensive history of present illness, past medical history, past surgical history, review of systems, allergies, current medication list, etc.) a targeted physical examination is an essential component to elucidating the diagnosis, which can be challenging via virtual medicine.
While obtaining a thorough history is unlikely to be limited by the use of a telemedicine platform, the performance of a traditional physical examination may be limited. Traditional clinical training utilizes manual/tactile approaches to the physical examination. Telemedicine limits this approach, and thus alternative adaptations are necessary to acquire information needed for sound clinical judgement and development of a treatment plan.
Our article will provide a review of essential components to conduct a proper telemedicine physical examination for patients suffering from various types of bodily pain.
Methods
Pain Medicine, Rehabilitation, Orthopedic, Rheumatology, and Neurology physicians from across the country performed a comprehensive review of current telemedicine examination literature. They designed an algorithmic approach for the telemedicine examination. (Figures 1–3). A PubMed search was performed using the keywords Telemedicine and Pain which yielded 200 results. Ten manuscripts were selected based on their applicability to the Chronic Pain Medicine Telemedicine examination. The multidisciplinary team of physicians collaboratively crafted an algorithm in real-time based on personal experience and the information reviewed.
Figure 1.

Headache Telemedicine Algorithm.
Figure 2.

Cervical Telemedicine Algorithm.
Figure 3.

Lumbar Telemedicine Algorithm.
General Principles to the Virtual Physical Exam
Patient access to appropriate technology should be assessed prior to initiating a telemedicine video visit. Having a proper electronic device with adequate internet connection and appropriate understanding of software and hardware is paramount before the patient or patient-delegate is able to join the meeting. Specific preparation for the telemedicine visit must be performed in advance in order to minimize superfluously utilized time during the televisit. Instructional information should be prepared and presented to the patient or patient-delegate prior to the visit, by the physician administrators. This is to include, but not limited to, appropriate patient attire, video device placement, ideal lighting and environmental atmosphere. The environment should be one in which is well lit, minimizes outside noise, and spacious enough to move around in all directions. In an effort to visualize as much of the patient from a 2D view as possible, we recommend that patients wear a collarless shirt, shorts, and tie up any hair that may be sitting on the neck. The video device should be placed on a flat and stable surface top. The device should also be positioned in a hands-free way. The patient should be sitting approximately two to six feet from the video device and have six feet of space to move around in all directions. Special patient considerations should be noted and addressed prior to the telemedicine encounter—this includes, but is not limited to, the preparation of any potential props that may be helpful during the examination of a particular body region during the televisit. Personalized instructions should be made in instances where patients are not able to meet the above recommendations. The medical provider may have props, as well, to show to the patient including pictorial diagrams or anatomical models, similar to those used in the office setting. Additionally, the provider should be able to verbally describe the exam, in common language understandable to the general population. To increase the clinical value of the telemedicine visit, the clinician must listen actively and observe intently. As with all new endeavors, flexibility and openness to modify are key [3].
Physical Exam by Chief Complaint
When evaluating patients with a chief complaint of pain in a body region, both history and physical exam are integral parts of diagnosis and further appropriate treatment. Performing a history of present illness and past medical history should conduct as it normally would in an office setting, with special focus on potential for depression, anxiety, and psychosocial hardships. It may be prudent to begin the visit with a determination of the patient’s cognitive competence, which includes asking the patient their name, date of birth, reason for visit, and perhaps memory recall. The next step after eliciting cognitive competence and performing a thorough history of present illness and past medical history is a focused physical exam [3].
Headache
Performing a virtual physical examination for headache patients should be conducted via the following basic principles. Advise the patient to sit approximately two feet away from the camera, instruct patients to tie up hair such that it is out of the face and off of the neck, recommend a non-collared shirt, and limit jewelry on the head and neck. The pain physician should begin their telemedicine physical exam with a basic observation of the patients head and neck. Special focus should be on eliciting if any of the following are present—head or neck trauma, signs of toxicity, photophobia, rhinorrhea, rash, erythema, purpura, and so forth. [4]. Pupillary function may also be assessed for opiate or sympathomimetic stimulant usage, but requires the patient to have a light source such as a flashlight or cell phone light, as ambient light variability can complicate the pupillary examination. Constriction suggests opiate usage, whereas dilation may indicate opiate withdrawal or sympathetic stimulant administration [5]. In order to perform a focused optical exam, instruct the patient to look directly at the camera and place the light source in the ipsilateral hand with the arm fully extended away from their head. A full examination of the eye may be performed with the patient holding the light source and covering one eye at a time, including assessment of pupil size, reactivity to light, extraocular muscle function, accommodation, ptosis and more. Additional assessments may include instructing the patient to fixate on your finger in primary gaze and then on horizontal and vertical gaze. Facial sensation can be assessed by having the patient stroke each trigeminal nerve division bilaterally using their index finger. In addition, the patient may be asked to palpate their posterior scalp to assess for occipital neuropathy and migraine. TMJ dysfunction may be elicited by a patient-performed deep palpation of the temporomandibular joint, temporalis, pterygoid, and masseter muscles. The context of the cranio-facial and pupillary exam in a supporting clinical setting may direct the pain physician to a potential list of differential diagnoses [4] (Figure 1, Tables 1 and 7).
Table 1.
Guide to the modified neck examination through telemedicine
| Instruction |
|||
|---|---|---|---|
| Body Part | Neck Examination | Clinical Value | Images |
| Pre-visit instructions |
|
|
|
| Physician props | Diagram of neck musculature and spine model | Educate patient on neck anatomy to describe painful condition once examination is complete. | |
| Patient props |
|
|
|
| Patient Clothing and prep |
|
Allow visualization of examination areas | |
| General appearance | Sit or stand naturally facing the camera | Chin deviation from midline. Identify behaviors indicative of pain or non-organic pathology | |
| Symmetry | Sit or stand naturally facing the camera and away from the camera | Muscle atrophy, or winging or drooping of the shoulder (may be observed with radiculopathy, brachial plexopathy, or nerve entrapment). | |
| Point to area of maximum pain | Using a wooden spoon, point to area that is usually the most painful | Helps to confirm patients description of pain area |


|
| Range of motion |
|
|

|
|
Instruct the patient to place the hand on the painful side on top of the head | Improvement of radicular symptoms suggests diagnosis of cervical radiculopathy |

|
|
Instruct patient to “bear down” or try to breath out forcefully with their mouth and nose closed | Referred electric sensation suggests cervical radiculopathy | |
|
Instruct patient to rest their chin on their chest |
|

|
|
|
Cervical radiculopathy |


|
|
|
|

|
Table 7.
Guide to the modified neurologic examination through telemedicine
| Instruction |
Clinical Value | ||
|---|---|---|---|
| Body Part | Neurological Examination | ||
|
|
If patient able to perform these tasks this is suggestive of appropriate orientation immediate/delayed memory, and concentration. | |
| Look for grimacing, sighing, moaning, splinting, guarding, and cautious movement when changing position. This passive evaluation of the pain exam suggests an organic pain response. | |||
| Pupillary exam |
|
|
|
|
|
|


|
|
|
|
|
|
|
|
|
| Sensory testing | Instruct patient to use Q tip to touch medial, lateral, dorsum of affected limb and compare with non-affected limb. |
|
|
| Gait |
|
|
|
| Balance | Instruct patient to walk up to 5 feet (1.5 meters) away and then towards the computer |
|
|
| Coordination |
|
|


|


Neck and Upper Extremities
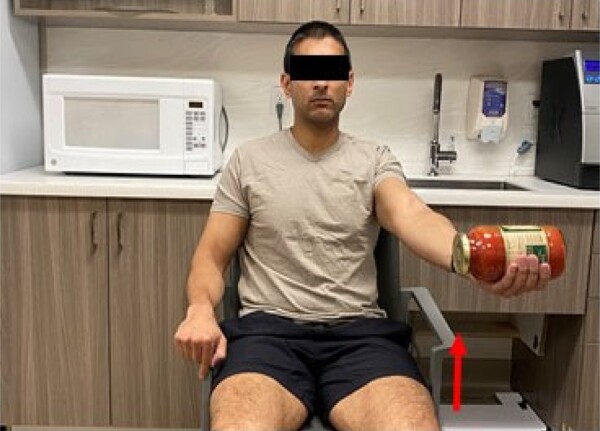
Wahezi et al. suggest that the patient with neck and upper extremity pain sit approximately 4 feet from the camera, preferably in a space where there is an abundance of props that the physician may direct the patient to use for examination assistance [3]. Potential props that may assist in examination include a pointing device, such as a 12-inch ruler or a long wooden spoon, a 16 to 28-inch hand towel, an easily graspable cylindrical object such as a 16-ounce soda bottle, 2-liter soda bottle, gallon jug of milk or jar of pasta sauce. The exam may begin by asking the patient to simply point to the area of most tenderness—this may require a finger or an elongated object such as a ruler. The pain physician may direct the patient to palpate the cervical paraspinal muscles including the occipital notch to assess for tenderness to palpation or spasm. Cervical range of motion (ROM) may be performed by instructing the patient to rotate their head laterally to each shoulder, side-bending which includes touching ear to ipsilateral shoulder, then flexion and extension maneuvers. Gross upper extremity ROM maneuvers may then be performed followed by upper extremity strength testing—this may be evaluated by patient-performed shoulder flexion with the arms extended in prone position; subtlety of weakness may be evaluated if the patient performs the task with eyes closed. Also, using a 2-liter soda bottle or a gallon jug of milk, basic strength testing of the shoulder muscles may be performed [3].
Specialty testing, such as the Spurling test for cervical radiculopathy, traditionally requires compression by the examiner [10]. During a telemedicine examination, the patient may be instructed to put a folded towel, lengthwise over their head, holding both ends. Then the patient is instructed to turn their head toward the painful side so that the chin touches the shoulder. The patient is then instructed to tilt their head so that the ear moves closer to the shoulder. If able and without significant discomfort, the towel may be used to further pull the head down toward the ground, simulating further compression. If this self-compression maneuver cannot be performed then non axial loaded rotation and extension may also provoke radicular symptoms in patients with moderate to severe foraminal stenosis. The Jobe Empty Can test can be similarly replicated as in the office by using a full 16-ounce soda bottle or pasta jar where the patient is instructed to hold their arm in 90 degrees of abduction with 30 degrees of forward flexion while the arm is held in internal rotation, so the thumb is pointing to the floor [11]. Hawkins and Neers tests may be performed with the same 16-ounce soda bottle or pasta jar prop. The patient is instructed to have their shoulder held in 90 degrees of forward flexion with the elbow in 90 degrees of flexion while the shoulder is internally rotated [12] (Figure 2, Tables 2, 3, and 7).
Table 2.
Guide to the modified shoulder examination through telemedicine
| Instruction |
|||
|---|---|---|---|
| Body Part | Shoulder Examination | Clinical Value | Images |
| Previsit instructions |
|
|
|
| Physician props | Diagram of shoulder anatomy | Educate patient on shoulder anatomy to describe painful condition once examination is complete. | |
| Patient props | Heavy cylindrical object such as a can of pasta sauce or soda can. | Easy grasp object for muscle testing | |
| Patient Clothing | Tank top | Allows inspection of shoulder | |
| Inspection | Examine the shoulders, arms, front and back looking for asymmetry, swelling, erythema, and wasting. | Any abnormal findings may help to establish a differential diagnosis. | |
| Palpation | Have the patient point to the area of maximum tenderness or pain. Use anatomic photos or models to assist. | Tenderness in the anterior acromial region or greater tuberosity may indicate rotator cuff syndrome. Tenderness in the acromioclavicular joint may be indicative of arthritis or acromioclavicular (AC) separation. | |
| Shoulder specific tests | |||
|
Patient holds glass jar of pasta sauce (or equivalent). The patients arm is held in 90 degrees of abduction with 30 degrees of forward flexion and the arm is held in internal rotation so the thumb is pointing to the floor. |
|

|
|
The shoulder is held in 90 degrees of forward flexion with the elbow in 90 degrees of flexion. The shoulder is internally rotated. | Pain may indicate subacromial impingement, rotator cuff syndrome |

|
| Modified Hawkins-Kennedy for telemedicine | Patient touches top of non-affected shoulder with hand of affected side while lifting elbow | Pain may indicate subacromial impingement, rotator cuff syndrome |

|
|
The patient abducts arms from his sides, with the thumbs pointing up. | Pain from 60 degrees to 120 degrees of abduction may indicate subacromial impingement. Pain from 150 to 170 degrees of abduction may indicate AC pathology. |

|
|
Patient holds glass jar of pasta sauce (or equivalent). The patient performs maximal forward flexion of the shoulder with the thumb pointing down. | Anterior shoulder pain with this maneuver may indicate subacromial impingement. Posterior shoulder pain is more indicative on internal impingement. |

|
|
Typically used for younger patients (under 30 years of age). Have the patient position their shoulder in 90 degrees of abduction and external rotation. | Apprehension or pain in this position may indicate moderate anterior shoulder instability or a possible labral tear. |

|
|
Can increase the forces on the anterior capsule if patient places elbow on a sold vertical surface and leans forward 10–20 degrees. | Apprehension or pain in this position may indicate small anterior shoulder instability or a possible labral tear. |

|
|
With the shoulder in 90 degrees of elevation and the elbow straight, the patient should reach across their body as far as possible using the contralateral arm to adduct the shoulder | Pain in the AC joint region with this provocative test may indicate AC pathology. |

|
|
With the hand supinated and arm outstretched raise the arm from the waist while holding a glass can or 1/2 filled 2 L bottle of soda. | Pain with this motion may indicated biceps tendon pathology or superior labrum pathology |
|
| Strength testing | Using a gallon of milk or similar heavy object have the patient raise their arm (in the thumbs up and thumbs down position) | Weakness or pain may indicate rotator cuff pathology. |

|
| Range of motion tests | |||
| Forward flexion | Elevate arms straight in front of body up above head | Evaluate for total forward flexion and symmetry. Limitations in flexion may indicate various pathologies such as impingement, adhesive capsulitis, rotator cuff tears and others. If active forward flexion is limited have the patient attempt to perform the motion with assistance from the other hand. This test can rule out adhesive capsulitis. |

|
| Abduction | Elevate arms at sides up above head. | This exam is best observed from behind, if possible, to evaluate scapulothoracic motion as the arm externally rotates at 90 degrees of abduction in order for the greater tuberosity to pass under the acromion and continue to full 180-degree abduction. If active abduction is limited have the patient attempt to perform the motion with assistance from the other hand. This test can rule out adhesive capsulitis. |

|
| External rotation at side | With the elbow close to the body and in 90 degrees of flexion the patient externally rotates both arms keeping the elbows tucked close to the body. | Normal external rotation ranges from 45–90 degrees in this position. Significant loss of external rotation can indicate adhesive capsulitis or glenohumeral arthritis |

|
| External rotation at 90 degrees of shoulder abduction | With the shoulder in 90 degrees of abduction and the elbow in 90 degrees of flexion the forearm is maximally internally and externally rotated. | This test can help to assess for shoulder anterior instability if the patient feels apprehension with external rotation, or posterior capsular tightness if there is limitations in internal rotation. |

|
Table 3.
Guide to the modified hand/wrist/elbow examination through telemedicine
| Visualization/Patient Instructions |
Clinical Value | Images | |
|---|---|---|---|
| Body Part | Hand/Wrist/Elbow | ||
| Previsit instructions |
|
|
|
| Physician props | Diagram of hand/wrist/elbow | Educate patient on hand/wrist/elbow anatomy to describe painful condition once examination is complete. | |
| Patient props | Mug with large handle, pen/pencil, sheet of paper, jar with lid | Used for fine and gross muscle motor evaluation | |
| Patient clothing | Short sleeves shirt | Allows inspection to visualize hand, wrist, forearm and elbow | |
| Inspection |
|
|

|
| Range of motion |
|
|


|
| Wrist | Have patient turn palms directly upward (90° supination) and downward (90o pronation) while keeping the elbows at sides. With patient's elbows at the side, ask the patient to press the palms together and point fingers upward; then, ask the patient to press the back of the hands together and point the fingers downward. |
|


|
| Elbow | Full flexion and extension should be without pain. Pain with flexion and extension may reflect underlying synovitis. | Pain with flexion and extension may reflect underlying synovitis. |

|
|
Grabbing and releasing large handle of a mug with digits 2–5 | Reproduces pressure at the volar aspect of the MCPs and produces finger flexion. Subsequent extension with pain and “triggering” of a digit after removing the digits from the handle may represent a trigger finger. The superficialis tendons extend to the base of the middle phalanx and the flexor profundus tendons extend to the base of the distal phalanx of each finger. If the patient experiences tenderness with pressure and a popping sensation or locking of a digit upon flexion (digits around mug handle) with pain and clicking on subsequent extension (releasing digits from the handle), it may suggest a trigger finger. |


|
|
Have patient flex and abduct thumb across palm, and then flex fingers around the thumb. Have patient bend wrist towards the 5th digit (ulnar deviation). | Pain with this maneuver may suggest tendonitis of abductor pollicis longus and extensor brevis. Patients may also have tenderness to palpation and swelling on inspection of region at radial styloid. |

|
|
Have patient extend pronated arm straight in front with wrist in flexion. With opposite hand, grip the fingers of the flexed wrist and pull downwards | A stretch should be felt in the dorsal aspect of forearm and pain may be elicited at the area of the lateral epicondyle. Patient may have pain on palpation at the lateral epicondyle. |

|
|
Have patient extend arm straight in front (palm up) with wrist in extension. With opposite hand, grip the fingers of the extended wrist and pull back | A stretch should be felt in the volar aspect of forearm and pain may be elicited at the area of the medial epicondyle. Patient may have pain on palpation at medial epicondyle. |

|
| Degenerative Joint Disease (DJD) | |||
| 1st carpometacarpal (CMC) joint | Have patient pinch a piece of paper in between thumb and 2nd digit. With opposite hand try to remove paper with a significant “tug”. Repeat using thumb and 3rd digit. | Pain at base of thumb with CMC arthritis. |

|
| 1st carpometacarpal (CMC) joint | Have patient try to twist open lid of an unopened jar | Patient will have pain at base of thumb with CMC arthritis. |

|
Lower Extremities, Low Back, Hip and Sacroiliac Joint (SIJ)
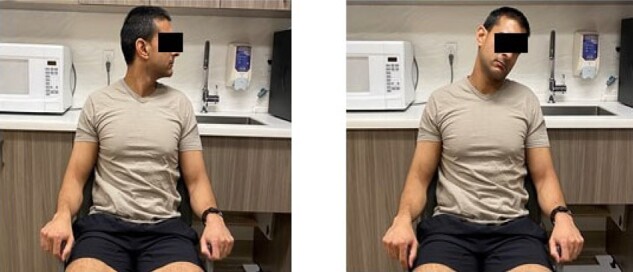
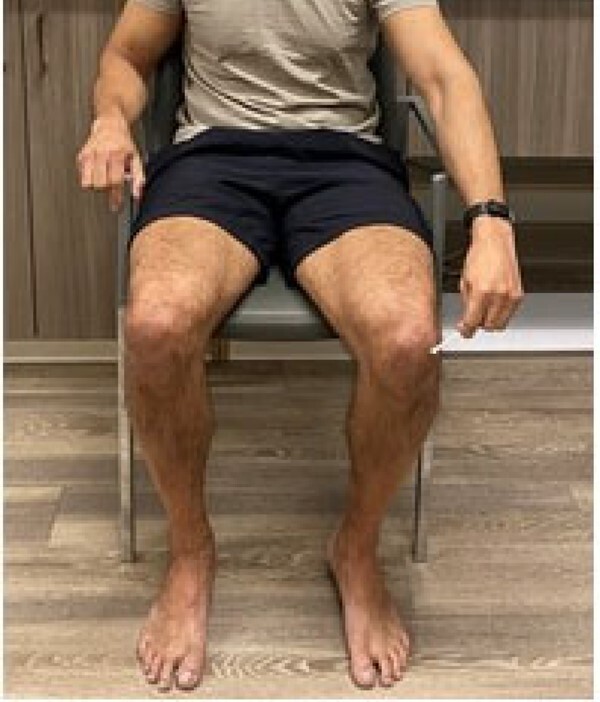
Patients with lumbar and lower extremity pain should be dressed in shorts and seated 6–8 feet away from their camera as this generally improves gross visualization of the lower extremity. Begin the exam with a pointed observation for obvious bony or musculature abnormalities in the lower extremities including the joints of the hip, knee, ankle, and foot. The clinician should observe for abnormal seated or standing posture, irregular pain behaviors, guarding, involuntarily rubbing, avoidance in touching the painful area, use of a cane or walker, and imbalance. Ask the patient to point to the site of the most tender pain. As an example, patients with SIJ pain report pain below the belt line and point at the PSIS (positive Fortin finger test). Patients with painful hip joint or SIJ pain also tend to sit or stand leaning off the painful limb [3]. The joints of the pelvis and lower extremity are interlinked in a series in the kinetic chain, such that any dysfunction or pathology at one joint potentially alters the biomechanics at other joints within the kinetic chain [6]. Similarly with the upper extremities, ROM and strength testing may be performed on the lower extremities via instruction through the basic movements that would be performed in office. Instruct the patient to bend forward as far down as possible without bending their knees. Similarly, ask the patient to stand and turn to their side, bend backwards and then sideways to the right and left to evaluate for lumbar range of motion in sagittal and coronal planes and concomitantly facet load test. Common language may help with patient instruction [3]. Observe the quality of movement and whether pain is associated. As an example, limited lumbar extension with pain may be facetogenic [13, 15], however the diagnostic accuracy is low [14]. Important questions to ask the patient are: where is the location of the pain, is the pain above or below the belt line, is there associated numbness, tingling, weakness with pain in the lower limb on the painful side. Neurological symptoms with pain suggest radiculopathy or other peripheral neuropathy [3] (Figure 3).
Gait is an important part of the physical exam, as well. Gait abnormalities may be due to pain, muscular weakness, joint instability, or a fused joint. Instruct the patient to walk at normal pace, and then walk on their heels and toes. An antalgic gait occurs with heel spurs, ankle or knee joint injury or osteoarthritis (OA). Quadricep (L3) weakness and knee instability result in back knee gait where the knee hyperextends during stance phase. A drop foot or ankle dorsiflexor (L4) weakness causes foot slap on heel strike and steppage gait, i.e., excessive knee flexion during swing phase. Patients with weak gluteus medius (L5) and hip joint OA, ambulate with lateral trunk lean, referred to as “abductor lurch” or “Trendelenburg gait.” A compensatory posterior trunk lean called an “extensor lurch” occurs with gluteus maximus (S1) weakness. Patients with plantar flexor or gastroc-soleus weakness (S1, S2) have difficulty with toe walking and single-leg heel raises and demonstrate easy fatigability on their weak side [7–9].
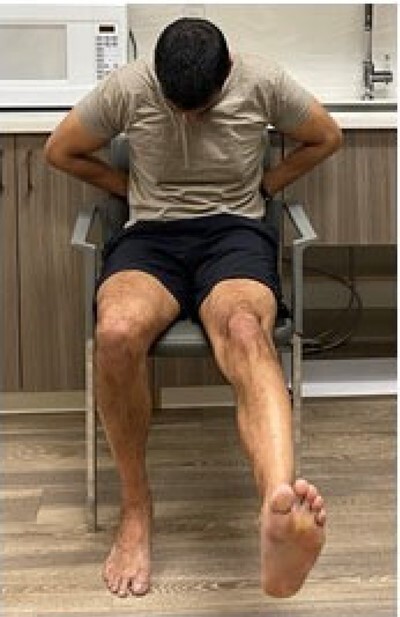
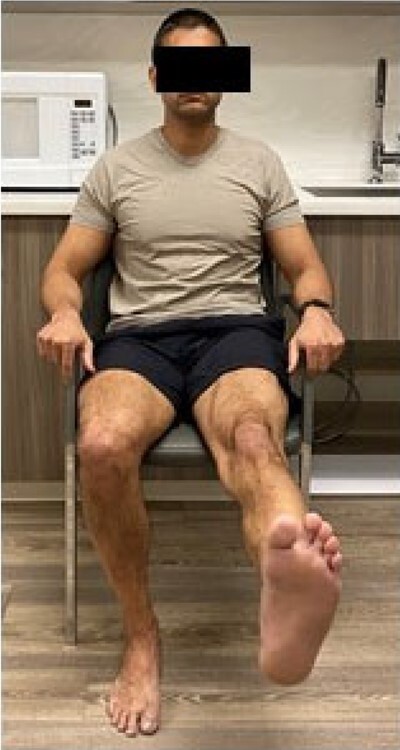
Specialty tests may be performed after ROM and strength testing. The seated straight leg raise test may be performed by asking the patient to sit and lift one leg up with the knee straight in extension in front of them. For the seated slump test, the patient sits with arms behind in forward slump position and lifts the leg up straight. Pain radiation from the lumbar spine to the back of knee or distally indicates sciatic nerve irritability with lumbar herniated nucleus pulposus [16]. Functional tests consisting of sit to stand and single leg heel raise serve as excellent substitutes for manual muscle tests (MMT). Patients with weak knee extensors (L3, L4) cannot stand up from a seated position without support from their arms. Those with ankle dorsiflexion weakness (L4) are unable to perform heel walking, while plantar flexor or gastroc-soleus weakness (S1, S2) causes difficulty with toe walking and single-leg heel raises [13].
The author’s test for hip and SIJ pain is conducted by asking the patient to cross his/her symptomatic ankle over the opposite knee while pulling the ipsilateral knee towards chest in the seated position. Groin pain suggests hip joint pain, while back pain suggests SIJ dysfunction. Next, the pain physician may ask the patient to adopt a position like that seen in a figure of 4. The FABER maneuver is conducted by having the patient place one ankle or foot on the opposite knee and then asking the patient to press down on their flexed knee. Back pain with this maneuver suggests SIJ dysfunction [17] (Figure 3, Tables 4, 5, 6 and 7).
Table 4.
Guide to the modified lumbar spine examination through telemedicine
| Instruction |
|||
|---|---|---|---|
| Body Part | Back Examination | Clinical Value | Images |
| Previsit instructions |
|
|
|
| Physician props | Spine model | Educate patient on lumbar anatomy to describe painful condition once examination is complete. | |
| Patient props |
|
|
|
| Patient Clothing | Shorts and T shirt | Allow easy visualization of examination areas | |
| Activity | Instructions | Clinical value | |
| General appearance | Patient to stand naturally in front of camera |
|
|
| Gait | Instruct patient to walk towards or away from the camera and turn around and walk back |
|

|
| Muscle strength | Instruct patient to walk on their heels |
|

|
| Instruct patient to walk on their toes | Poor/no toe walk suggests weak ankle plantar- flexors: Gastro-soleus (S1, S2) |

|
|
| Instruct patient to stand on one leg |
|


|
|
|
Ask patient to stand comfortably 6 feet from camera. |
|
|
| Posture | Advise that patient stand sideways in relation to the video camera |
|
|
| ROM | Instruct the patient to turn and touch their toes |
|

|
| ROM | Instruct the patient to extend their spine |
|

|
| ROM | Instruct patient to side bend to left and right side | Radiating leg pain suggests neuroforaminal stenosis |


|
| Hip ROM | Instruct the patient to cross one thigh over the other (Always test hip ROM with back exam) |
|

|
| Palpation | Instruct patient to press hand over lumbar area corresponding to spine, quadratus lumborum, and peri-iliac crest areas |
|

|
| Sitting Maneuvers | |||
|
Advise patient to place hands behind back, then perform chin to chest tuck and lean forwards, straighten out right leg. Repeat with left side | Positive slump test: reproducible and radiating low back and lower limb pain suggests HNP/Nerve root irritation |
|
| Muscle strength | Instruct patient to raise right knee off the chair or bed |
|

|
|
Instruct patient to extend leg while sitting in chair |
|
|
|
Instruct patient to cross leg and place ankle on opposite knee then push the bent knee down with your hand. | Ipsilateral buttock pain suspicious for SIJ pathology |

|
| Seated Valsalva | Instruct patient to perform Valsalva while seated and in truncal flexed position | Suggests HNP, but also may rule out abdominal visceral pathology as source of referred pain to lumbar region | |
Table 5.
Guide to the modified hip examination through telemedicine
| Instruction |
|||
|---|---|---|---|
| Body Part | Hip Examination | Clinical Value | Images |
| Physician props | Diagram of hip anatomy | Educate patient on hip anatomy to describe painful condition once examination is complete. | |
| Patient props | Chair and table | Chair will allow patient to perform range of motion and provocative maneuvers. Table for balance during examination. | |
| Patient clothing and prep |
|
Allow visualization of examination of torso and trunk | |
| Single leg sit stand |
|
Weakness could suggest glut med weakness or L5 radiculopathy |


|
| Raise your knee | Advise lift thigh and push the knee down with hands, | Suggests hip flexor strength, L2 radicular pathology or iliopsoas tendinopathy | |
| Hip ROM | Instruct the patient to cross one thigh over the other (Always test hip ROM with back exam). |
|
|
|
Cross leg putting your right ankle on your left knee. Now push your right knee toward the ground. Any pain? | Pain: piriformis pain or SI joint pathology |

|
| Trochanter Palpation | Palpate lateral hip for tenderness. | Suggests greater trochanteric bursitis |

|
|
|
Patients with symptomatic hip articular pathology will often experience reproduction of their typical mid-inguinal groin pain at this stage (positive test). |
Table 6.
Guide to the modified knee examination through telemedicine
| Body Part | Knee Examination | Clinical Value | Images |
|---|---|---|---|
| Previsit instructions | Ensure patient has a minimum 6 feet of space around them in order to position yourself to stand and sit at a chair, move from side to side and forward and backwards. Position camera 6 feet away so physician can see both knees and thigh up to mid torso |
|
|
| Physician props | Knee model or diagram | Educate patient on neck anatomy to describe painful condition once examination is complete. | |
| Patient props | 2 chairs for use with exam | Maneuverability and balance during exam | |
| Patient clothing | Dressed in shorts that end above the knee. May need to be rolled up for visualization of quadriceps muscle | Allow visualization of examination areas | |
| Inspection | Instruct patient to stand in front of chair with legs close together for comparison | Compare for effusion, abrasions, bruising, ecchymosis, muscle atrophy, patella alta and baja, patella subluxation/dislocation. Assess for unilateral lower extremity edema and erythema to rule out potential deep venous thrombosis (DVT). COVID infection and/or lack of activity due to pain may induce coagulopathy [2]. | |
| Gait | Have patient walk back and forth in front of camera | Assess gait pattern: antalgic, hip rise, stance phase, heel rise, swing phase, heel rise and toe touch | |
| Palpation | Have patient point to area of tenderness or maximal pain. | Helps confirm patient’s description of pain area |

|
| Active straight leg raise |
|
Checks for extensor mechanism to evaluate for quadriceps or patella tendon rupture. |

|
| Quadriceps contraction | Instruct patient sit on chair and contract quadriceps | Checks for flexion contracture/inability to fully extend for possible intraarticular pathology (meniscus, osteochondral defect, cruciate injury, hamstring tightness) | |
| Range of motion | While still sitting with both legs on other chair have patient flex affected knee then contralateral knee for comparison | Range of motion with assessment of pain | |
| Patella palpation | While sitting have patient palpate medial and lateral patella facets, inferior pole and superior pole of patella. | Assessment for chondromalacia patella, patella tendinopathy and quadriceps tendinopathy |


|
| Single leg stance | Instruct the patient stand. Then have patient single leg stance on affected side then non affected side. Have patient move from side to side. | If no pain, with good motion and balance this test can effectively rules out ACL, meniscus injury, fracture, patella dislocation, osteochondral injury. |

|
|
Instruct patient to sit on chair. Foot of affected knee firmly planted on floor with knee flexed 20–30 degrees. Have patient apply a varus load with hand to knee and then a valgus load |
|


|
|
Have the patient hold on the back of the chair with both hands while stands flatfooted on the floor. The patient then rotates his or her knee and body, internally and externally, three times, keeping the knee in slight flexion of 20 degrees |
|

|
|
With patient sitting down have patient put laterally directed stress on patella from medial side | Assessment for patella instability. Test will show apprehension and pain. |

|
Discussion
The clinical challenges associated with a virtual physical exam are ubiquitous. During clinical training, the focus of the physical exam has classically been centered around manual, tactile and resistance evaluations which assist in making the correct diagnosis, in the context of the historical information provided by the patient. While obtaining an accurate patient history is not often negatively impacted by telemedicine, the act of performing a physical exam needs to be revisited and re-learned by most physicians who plan to employ telemedicine during virtual visits. The authors here have created a practical guide for performing the telemedicine virtual physical examination based on multispecialty recommendations (Wahezi et al., “A Practical Guide and Best Practices Approach for the Orthopedic and Neurological Pain Physical Examination”).
Although the authors submit that the Telemedicine examination may be improved by following the recommendations in this manuscript we caution the reader to apply these principles carefully with patient physical and cognitive barriers in mind. The telemedicine exam can be used to assert a diagnosis if a history and radiographic evaluation is commensurate with the results of the telemedicine examination; however, if the telemedicine examination cannot be completed, or is deemed unreliable, towards that end then the patient should be invited for a person visit for a more traditional examination. We also recognize that what has been developed is a guide for future exploration and improvement of the field of Telemedicine. The approaches discussed here require validation by future controlled studies to demonstrate equivalence to their practitioner-administered counterparts we recognize that they may play an important role in the current state of medical care.
Telemedicine is a clinical tool that will be utilized for patient care into the foreseeable future. However, there is a lack of instruction on how to improve the efficiency and efficacy of the virtual examination. There is also a knowledge gap in how to create a differential diagnosis based on the findings of inspection and instruction-based physical examination. Furthermore, most clinicians struggle with performing a virtual examination, likely because it was not widely utilized prior to the COVID-19 pandemic and graduate medical education does not require it as part of their curriculum for most programs. This presents a challenge for developing education in this space, as there is a knowledge gap amongst educators which ultimately affects learners. Until telemedicine education is mandated by graduate medical education, the current de facto educational tools include peer-reviewed proactive approaches to instruct our learners. In turn, these manuscripts will be used as the basis for refining and developing educational tools for the next generation of telemedicine.
Conclusion
While pain physicians have embraced telemedicine, the efficiency and value of the examination component seems elusive. Here, authors present a review of clinical pearls for the virtual physical examination for the pain physician and an algorithmic approach that may be helpful for clinicians in all levels of training.
Funding sources: There was no external funding in the preparation of this manuscript.
Conflicts of interest: Each author certifies that he or she, or a member of his or her immediate family, has no commercial association (i.e., consultancies, stock ownership, equity interest, patent/licensing arrangements, etc.) that might pose a conflict of interest in connection with the submitted manuscript.
References
- 1. Hollander JE, Carr BG.. Virtually perfect? Telemedicine for Covid-19. N Engl J Med 2020;382(18):1679–81. [DOI] [PubMed] [Google Scholar]
- 2. Tuckson RV, Edmunds M, Hodgkins ML.. Telehealth. N Engl J Med 2017;377(16):1585–92. [DOI] [PubMed] [Google Scholar]
- 3. Wahezi S, Duarte R, Yerra S, et al. Telemedicine during Covid-19 and beyond: A practical approach for the orthopedic and neurologic pain physical examination. Pain Physician 2020;23(4S):S205–S237. [PubMed] [Google Scholar]
- 4. Wahezi SE, Duarte RA, Sidharthan S, Sehgal N, Kim C, Argoff CE.. Telemedicine for pain and headache. Pract Neurol 2021;12:4–5. [Google Scholar]
- 5. Rollins MD, Feiner JR, Lee JM, Shah S, Larson M.. Pupillary effects of high-dose opioid quantified with infrared pupillometry. Anesthesiology 2014;121(5):1037–44. [DOI] [PubMed] [Google Scholar]
- 6. Geraci MC Jr, Alleva JT.. Physical examination of the spine and its functional kinetic chain. In Cole AJ, Herring SA, eds. The Low Back Pain Handbook: A Practical Guide for the Primary Care Clinician. Philadelphia: Hanley & Belfus; 1997 [Google Scholar]
- 7. Rainville J, Jouve C, Finno M, Limke J.. Comparison of four tests of quadriceps strength in L3 or L4 radiculopathies. Spine (Phila Pa 1976) 2003;28:2466–71. [DOI] [PubMed] [Google Scholar]
- 8. Doherty M, Dacre J, Dieppe P, Snaith M.. The ‘GALS’ locomotor screen. Ann Rheum Dis 1992;51(10):1165–9. [DOI] [PMC free article] [PubMed] [Google Scholar]
- 9. Van der Post A, Noorduyn JCA, Scholtes VAB, Mutsaerts ELAR.. What is the diagnostic accuracy of the duck walk test in detecting meniscal tears? Clin Orthop Relat Res 2017;475(12):2963–9. [DOI] [PMC free article] [PubMed] [Google Scholar]
- 10. Tong HC, Haig AJ, Yamakawa K.. The Spurling test and cervical radiculopathy. Spine (Phila Pa 1976) 2002;27(2):156–9. [DOI] [PubMed] [Google Scholar]
- 11. Jobe FW, Moynes DR.. Delineation of diagnostic criteria and a rehabilitation program for rotator cuff injuries. Am J Sports Med 1982;10(6):336–9. [DOI] [PubMed] [Google Scholar]
- 12. Hegedus EJ, Goode AP, Cook CE, et al. Which physical examination tests provide clinicians with the most value when examining the shoulder? Update of a systematic review with meta-analysis of individual tests. Br J Sports Med 2012;46(14):964–78. [DOI] [PubMed] [Google Scholar]
- 13. Wilton JP. Lower extremity focused neurologic examination. Clin Podiatr Med Surg 2016;33(2):191–202. [DOI] [PubMed] [Google Scholar]
- 14. Cohen SP, Bhaskar A, Bhatia A, et al. Consensus practice guidelines on interventions for lumbar facet joint pain from a multispecialty, international working group. Reg Anesth Pain Med 2020;45(6):424–67. [DOI] [PMC free article] [PubMed] [Google Scholar]
- 15. Mann SJ, Viswanath O, Singh P.. Lumbar facet arthropathy. [Updated 2021 Jul 26]. In: StatPearls. Treasure Island, FL: StatPearls Publishing; 2021. [PubMed] [Google Scholar]
- 16. Willhuber GO, Piuzzi NS.. Straight Leg Raise Test. Treasure Island, FL: StatPearls; 2021. [Google Scholar]
- 17. Kim DK, McKenzie GA.. Accessory sacroiliac joint injection for relief of buttock pain. Pain Med 2019;20(2):412–3. [DOI] [PubMed] [Google Scholar]