

Abstract
Antibody detection assays are essential for evaluating immunity of individuals against a given virus, and this has been particularly relevant during the COVID‐19 pandemic. Current serology assays either require a laboratory setting and take >1 hr (i.e., enzyme‐linked immunosorbent assay [ELISA]) or are rapid but only qualitative in nature and cannot accurately track antibody levels over time (i.e., lateral flow assay [LFA]). Therefore, there is a need for development of a rapid and simple but also quantitative assay that can evaluate antibody levels in patients accurately over time. We have developed an assay that uses a split nanoluciferase fused to the spike or nucleocapsid proteins of the SARS‐CoV‐2 virus to enable luminescent‐based detection of spike‐ or nucleocapsid‐binding antibodies in serum, plasma, and whole blood samples. The resulting approach is simple, rapid, and quantitative and is highly amenable to low‐/medium‐throughput scale using plate‐based assays, high‐throughput scale using robotics, and point‐of‐care applications. In this article, we describe how to perform the assay in a laboratory setting using a plate reader or liquid‐handling robotics and in a point‐of‐care setting using a handheld, battery‐powered luminometer. Together, these assays allow antibody detection to be easily performed in multiple settings by simplifying and reducing assay time in a laboratory or clinical environment and by allowing for antibody detection in point‐of‐care, nonlaboratory settings. © 2022 Wiley Periodicals LLC.
Basic Protocol: SARS‐CoV‐2 antibody detection using the split‐luciferase assay on a medium‐throughput scale with a laboratory luminometer
Alternate Protocol 1: High‐throughput‐based protocol for SARS‐CoV‐2 antibody detection using a robotic platform
Alternate Protocol 2: Point‐of‐care‐based protocol for SARS‐CoV‐2 antibody detection using a handheld luminometer
Support Protocol: Determining positive/negative cutoffs for test samples and standardizing the assay between days
Keywords: antibody detection, biosensors, serology assay, split nanoluciferase
INTRODUCTION
Simple, rapid, and quantitative serology assays are essential for evaluating the humoral response in naturally infected and vaccinated individuals, and this has been of special importance during the COVID‐19 pandemic (Krammer & Simon, 2020). The enzyme‐linked immunosorbent assay (ELISA) is the gold standard for quantitative serology assays. This test, however, requires multiple incubation and wash steps, which makes it not amenable to point‐of‐care settings. Lateral flow assays (LFAs), on the other hand, are simple point‐of‐care serology detection devices, but they are qualitative in nature and do not allow for detailed tracking of antibody response over time, which is important for understanding vaccination and infection response (Whitman et al., 2020). The other most common type of serology assay is the fluorescent microparticle assay, which requires special instrumentation not regularly found in laboratories or point‐of‐care settings.
To address these issues, we recently developed a serology assay that is rapid and quantitative but simple enough to be performed in a point‐of‐care setting (Elledge et al., 2021). This assay uses the split nanoluciferase (LgBiT and SmBiT), previously developed by researchers at Promega, which can be used to evaluate when two binding partners are in close proximity via luciferase reconstitution (Dixon et al., 2016; Hall et al., 2012). For SARS‐CoV‐2 detection, we engineered the split portions by fusing them to a SARS‐CoV‐2 protein (either spike or nucleocapsid protein) that contains common epitopes of antibodies typically developed during infection (Zamecnik et al., 2020). We engineered four proteins that make up two types of sensors: (1) spike receptor‐binding domain (RBD)‐SmBiT and spike RBD‐LgBit (S sensors) and (2) nucleocapsid N‐terminal domain (NTD)‐SmBiT and nucleocapsid NTD‐LgBiT (N sensors; Elledge et al., 2021). When the sensors are mixed with patient samples containing antibodies, each of which have two binding domains, 50% of the antibodies will have one SmBiT fusion bound to one arm and an LgBiT fusion bound to the other arm (Fig. 1). This allows for the reconstitution of an active nanoluciferase enzyme given that the LgBiT and SmBiT are now in close restricted proximity to one another. Following substrate addition, luminescence is produced and can be detected by a luminometer. Therefore, this assay is able to detect the level of antibodies to SARS‐CoV‐2 that exist in an individual, whether from vaccination or infection, and can be used to quantitatively monitor those levels over time.
Figure 1.

Overview of the split‐luciferase assay for antibody detection. This assay detects patient antibodies by using protein‐based biosensors that are fusions of split nanoluciferase (SmBiT/LgBiT) and a viral protein produced by SARS‐CoV‐2. Sensors have been developed to both the spike receptor‐binding domain (S‐RBD) protein and nucleocapsid N‐terminal domain (N‐NTD) protein of the virus. Fifty percent of SARS‐CoV‐2 specific antibodies bind one SmBiT and one LgBiT fusion protein, and thus the split nanoluciferase enzyme is reconstituted as an active enzyme. Twenty‐five percent of antibodies bind two SmBiT fusions, and 25% bind two LgBiT fusions. The Basic Protocol describes how this assay can be performed in a medium‐throughput manner in the laboratory with multichannel pipettes and a tabletop luminometer. Alternate Protocol 1 describes how this protocol can be performed in high throughput with a robotics platform. Alternate Protocol 2 describes how this assay can be further applied for use in a point‐of‐care or resource‐limited setting using a handheld luminometer.
Here, we describe in detail how to use our developed split‐luciferase biosensors for SARS‐CoV‐2 antibody detection. We exemplify the protocol by incubating the recombinant protein sensors with plasma, serum, or whole blood and further incubating with luciferase substrate followed by detection on a medium‐throughput scale using a luminescence plate reader (Basic Protocol), on a high‐throughput scale using robotics (Alternate Protocol 1), or in a centralized point‐of‐care setting using handheld luminometers (Alternate Protocol 2). We provide these three different protocols depending on the user's sample amount (<90 samples, >90 samples, individual) and the available equipment for sample handling (plate vs. robotics vs. individual) and luminescent readout. See Figure 1 for a summary of these protocols. In addition, we describe a protocol (Support Protocol) for accurately determining positive and negative cutoffs for the test samples and for standardizing the assay when run on different days.
STRATEGIC PLANNING
Acquisition or Production of S/N Biosensor and Control Nanoluciferase Proteins
Limited quantities of the S and N sensors and nanoluciferase proteins can be obtained by contacting the corresponding author. Alternatively, the plasmids for expression in mammalian Expi293 culture can be obtained by contacting the corresponding author (see user guide for expressing proteins in Expi293 cells at https://assets.thermofisher.com/TFS‐Assets/LSG/manuals/MAN0019402_Expi293_ExpressionSystem_3L_UG.pdf). All four sensor proteins (S‐SmBiT, S‐LgBiT, N‐SmBiT, N‐LgBiT) and control nanoluciferase contain an 8× His Tag and can be purified by Ni‐NTA resin, as previously described (Elledge et al., 2021). The purity of the proteins should be >95% and verified by SDS‐PAGE. The purified proteins should be flash frozen in 20‐μl aliquots in phosphate‐buffered saline (PBS; pH 7.4) at concentrations >1 μM and stored at −80°C (except for Alternate Protocol 2 where after freeze‐drying/lyophilization they can be stored at room temperature). If the user is planning on expressing and purifying the sensor proteins, they should run a small test using the Basic Protocol with a positive and negative control to ensure that the sensors are properly folded, are not degraded, and work as expected.
Choosing Positive and Negative Controls
The use of controls is essential to ensure the assay is working properly and to be able to normalize data between separate experiments. National serology standards are great choices in positive controls in that they can work as positive controls for both the S and the N sensor (WHO Serology Standard [Mattiuzzo et al., 2020]; US Serology Standard [https://frederick.cancer.gov/initiatives/seronet/serology‐standard]). These standards have also been benchmarked in other assays (Mattiuzzo et al., 2020) and thus allow for comparison to other assays and samples. Another positive control we often use for the S sensor is CR3022, which is a patient antibody known to bind spike‐RBD that commercially available (InvivoGen, srbd‐mab1). A positive control we use for the N sensor is the polyclonal antibody T62, which can be purchased from Sino Biological (cat. no. 40588‐T62‐50), but any anti‐N protein antibody that recognizes the NTD is sufficient. For negative controls, we recommend obtaining three (or more) prepandemic serum or plasma controls, and these will be essential in determining a cutoff value for the assay results (see greater explanation in the Support Protocol and the Understanding Results section).
Organizing Patient Samples Ahead of Time and Sample Considerations
For the Basic Protocol and Alternate Protocol 1, it is best to aliquot samples into in a 96‐well plate (10 to 200 μl per well) so that a multichannel pipette or robotics sample transfer can be used for the assay. Aliquoting samples into plates is the most time‐laborious step and can be done days/weeks ahead of running the assay and then frozen in plate form. Serum and plasma samples can be fresh or used from frozen aliquots. Storing serum and plasma at −80°C in aliquots with minimal freeze‐thaw is recommended for preserving serum quality. Serum and plasma samples can also be stored at 4°C for up to 6 months in PBS containing 20% (v/v) glycerol, 40 mM HEPES (pH 7.3), and 0.04% (w/v) NaN3. We recommend including six total controls in a plate. If using a serology standard as a positive control, we recommend testing three different concentrations (undiluted, 1:10 dilution, and 1:100 dilution). If using individual S and N positive controls, we recommend testing CR3022 at an initial concentration of 10 nM and T62 at an initial dilution of 1:10. See Figure 2A for an example plate layout.
Figure 2.
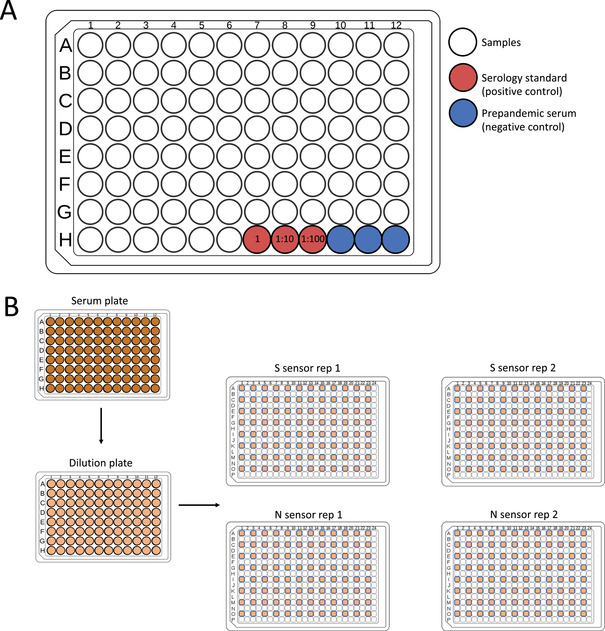
Arrangement of samples and controls in a 96‐well plate format and sample addition to the 384‐well white plate. (A) A 96‐well plate can accommodate 90 patient samples with three positive controls (suggested as three concentrations of a serology standard [red]) and three negative prepandemic serum controls (blue). (B) After arranging samples in a 96‐well format, the serum samples are diluted in the phosphate‐buffered saline containing bovine serum albumin and Tween 20 and then transferred to a 384‐well plate containing either S sensors or N sensors in every other well and row in the plate to avoid spillover signal. Each set of 90 samples will be run on four total 384‐well white plates (two replicates [rep] for each sensor).
Performing the Assay in Duplicate
Due to occasional variations in luminescent signal, we perform the assay in duplicate and take the average of the two duplicates. Therefore, for 96 test samples (including controls), we transfer diluted serum from the 96‐well plate into four separate 384‐well plates, two for the S sensor and two for the N sensor. This is done to avoid light spillover from neighboring wells. See Figure 2B for an example plate layout.
Obtaining Proper Ethical Approval/Consent for Human Samples
All human samples must be obtained with written patient consent after thorough explanation of the procedure, purpose, benefits, and risks of the study. The research protocol must be approved by an institutional review board. Data must be kept confidential and anonymized.
SARS‐CoV‐2 ANTIBODY DETECTION USING THE SPLIT‐LUCIFERASE ASSAY ON A MEDIUM‐THROUGHPUT SCALE WITH A LABORATORY LUMINOMETER
This protocol allows users to detect antibodies to spike‐RBD or nucleocapsid proteins in human plasma or serum. First, the sensor proteins that have already been expressed (see Strategic Planning) will be diluted in the assay buffer. Separately, the serum or plasma will be diluted in assay buffer in a 96‐well plate. Both will be combined into a 384‐well white plate and incubated for 20 min. After incubation, the diluted enzyme substrate is added to the plate, and samples are measured on a plate reader with a luminescence function.
The following protocol describes measuring 96 samples in total including controls (i.e., 90 samples + 6 controls) in duplicate, with both S and N sensors. Scale the reaction according to different sample numbers if needed.
Materials
Nanoluciferase dilution buffer and substrate (e.g., Promega, cat. no. N1120)
PBS containing bovine serum albumin (BSA) and Tween 20 (PBSTB; see recipe)
Spike‐RBD SmBiT purified protein aliquot in PBS (see Strategic Planning)
Spike‐RBD LgBiT purified protein aliquot in PBS (see Strategic Planning)
N protein SmBiT purified protein aliquot in PBS (see Strategic Planning)
N protein LgBiT purified protein aliquot in PBS (see Strategic Planning)
Patient serum or plasma samples and controls in 96‐well format (see Strategic Planning)
384‐well white plates with solid bottom (e.g., Greiner, cat. no. 07000058)
96‐well plates (e.g., Axygen, cat. no. P‐96‐450V‐C)
BSL‐2 laminar flow hood (e.g., Labconco Purifier BSC Class II)
Clear plate cover or foil plate sealer
Plate shaker
Luminometer (e.g., Tecan M200 plate reader or other plate reader with luminescent capabilities for 384‐well plates)
CAUTION: Human serum and plasma are considered Biosafety Level 2 (BSL‐2). Follow all appropriate guidelines and regulations for the use and handling of these samples, especially those known to be infected with SARS‐CoV‐2. Perform the assay in a BSL‐2 hood. Bleach all pipette tips and plates that have touched the samples for at least 30 min before discarding in biohazard waste. Cover plates when removing from the hood.
Protein sensor preparation
-
1
Thaw nanoluciferase buffer, and bring it to room temperature.
The buffer is supplied at 100 ml and can be aliquoted and refrozen.
-
2
Prepare working solution of S sensors: Make a single solution of 2.5 ml PBSTB containing 2 nM spike‐RBD SmBiT and 2 nM spike‐RBD LgBiT.
PBSTB contains BSA to stabilize the diluted proteins.
Make sure to mix thoroughly.
If necessary, perform sequential dilutions of the sensor protein aliquots (i.e., 1:10 or 1:100) to prevent pipetting amounts <1 μl, which may contribute to error.
-
3
Prepare working solution of N sensors: Make a single solution of 2.5 ml PBSTB containing 2 nM N protein SmBiT and 2 nM N protein LgBiT.
Make sure to mix thoroughly.
-
4
Using a multichannel pipette add 10 μl S sensor mix prepared in step 2 to every other well and every other row in a 384‐well plate (same as serum samples in Fig. 2B).
For <48 samples, one plate can be prepared to account for duplicates. If 48 to 90 samples will be assayed, prepare two plates of S sensors.
Every other well is skipped to minimize signal bleed between high‐luminescence samples. It is easiest to use a black marker to mark every other well and row on the plate for easy sample addition. Also, labeling plates S1, S2, N1, and N2 can be helpful for keeping track of sensors and replicates.
-
5
Repeat step 4 with the N sensors into separate 384‐well plates.
At the end of this step, you should have four 384‐well plates, two containing S sensor mix and two containing N sensor mix. All four plates should only have 96 wells filled with their corresponding sensor mix.
Running antibody detection assay
-
6
Add 46 μl PBSTB to each well in a new 96‐well plate.
-
7
Move plate and serum samples (in a 96‐well format) to the BSL‐2 laminar flow hood. Add 4 μl serum from the serum sample plate to the same corresponding well in the 96‐well plate with PBSTB (i.e., serum sample A1 into A1 of PBSTB dilution plate). Mix thoroughly with a multichannel pipette with new tips.
Serum and plasma samples should be thawed to room temperature.
If the serum/plasma is difficult to pipette, centrifuge the sample 10 min at 4000 × g, room temperature, and take from the supernatant.
-
8
Transfer 10 μl of each diluted serum/plasma sample to the 384‐well white plates from steps 4 and 5 in the corresponding wells as the sensors (skipping every other well and every other row; e.g., B1 from the 96‐well plate into C1 in the 384‐well plate; Fig. 2B).
Given the four plates, 40 µl of each diluted sample will be used (2 × 10 µl for S sensor and 2 × 10 µl for N sensor).
-
9
Cover with lid or foil plate sealer, and incubate on a plate shaker at room temperature at a medium speed for 20 min. Alternatively, mix well and incubate plate at room temperature.
-
10
While the plate is incubating, dilute nanoluciferase substrate 1:50 in nanoluciferase buffer to prepare 6 ml (per four plates) working substrate solution.
If only measuring two plates, 3 ml working substrate solution should be prepared.
Keep substrate on ice when removing from the −20°C freezer, and place back in the freezer once done.
-
11
After incubation, use a reservoir and multichannel pipette to add 15 μl working substrate solution to each reaction. Allow signal to stabilize at room temperature for 10 min.
-
12
Measure luminescence on the luminometer with an integration time of 1000 ms.
An example plot of the data using the International Serology Standard is shown in Figure 3. Note that users are not required to run their samples in a dilution series. This example is meant to show the range of signal of the International Serology Standard.
Figure 3.

Split‐luciferase assay demonstrated on the International Serology Standard as a sample. The International Serology Standard was run in a dilution series across the S and N sensors. The concentration of the sample in International Standard Units is correlated to the relative luciferase units (RLU) produced by the assay. Error bars represent the standard deviation of n = 3 samples. Dots represent the mean.
-
13
Determine positive and negative samples given the cutoffs determined in the Support Protocol.
Alternate Protocol 1. HIGH‐THROUGHPUT‐BASED PROTOCOL FOR SARS‐CoV‐2 ANTIBODY DETECTION USING A ROBOTIC PLATFORM
To automate the split luciferase antibody detection assay for large number of samples, we describe how a versatile robotics system can be used. The protocol is performed in two modular parts: (1) plate setup including serum dilution and transfer performed on the Biomek FX Laboratory Automation Station and (2) split‐luciferase assay including biosensor and substrate addition followed by luminescence reading using the integrated robotics system. To set up plates, each of the 90 samples and controls are first diluted 12.5‐fold. Then, the sample is transferred into the first quadrant of a 384‐well white luminescence plate (four plates in total: two for S biosensor and two for N biosensor). The purpose of using only the first quadrant of a 384‐well plate is to minimize luminescence bleed from neighboring wells using the Tecan Infinite M1000 pro. While we used the Biomek FX Laboratory Automation Station, this can also be performed using any liquid handler with 96‐channel pipettes.
To run the assay in high throughput, each sample set (four plates) are queued for addition of biosensor and substrate followed by luminescence read. While we describe here how the assay is run on our system, the essential components used in this automation system are a liquid handler, three liquid dispensers (two dispensers if only performing the assay with one of the biosensors), plate hotels for incubation, and luminescence plate reader. Since the rate‐limiting step is luminescence read at 1 s per well (up to 2 min per 96 scans on a plate) in our system, the sample queue scheduling strategy was optimized to allow for an exact incubation time of 20 min for biosensor binding and 10 min for substrate. If the assay is set up on another automated system, this queue scheduling strategy must be tested empirically to account for different robotic transfer speeds. The general method for those using different systems is as follows: First, dilute the serum source plates, and transfer them to four duplicate assay plates per source plate using a liquid handler. Second, add sensor to the plates alternating between a primary and secondary liquid dispenser each iteration for N and S sensors, respectively. Third, incubate the plates in a holding location. Fourth, add the luciferase substrate using a tertiary liquid dispenser. Fifth, incubate and lastly read the luminescence in a plate reader.
The following protocol describes measuring 90 samples (not including controls) in duplicate with both S and N sensors. The protocol can be easily scaled for >90 samples.
Additional Materials (also see Basic Protocol)
Serum dilution and transfer protocol scripts (see Supplementary Materials)
Biomek FX Laboratory Automation Workstation, model no. A31844
BioTek EL406 plate washer/dispenser with syringe pump and peridispenser option
Thermo Scientific Momentum Workflow Scheduling software, version 6.02
FANUC LR Mate 200iC robot arm
Orbitor RS2 microplate mover (e.g., Thermo Scientific, cat. no. ORB2001)
Tecan Infinite M1000 Pro microplate reader
Serum dilution and transfer (Fig. 4)
Figure 4.
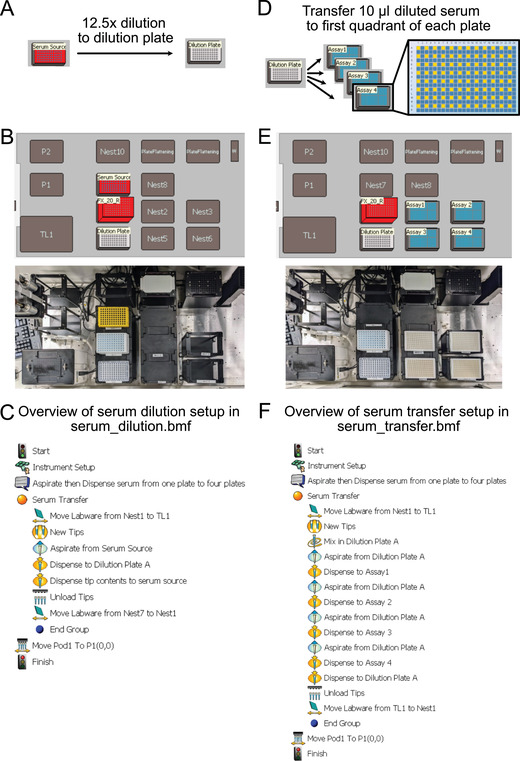
Plate setup using the Biomek FX Laboratory Automation Station. (A) Serum dilution overview. (B) Plate setup for serum dilution. (C) Step‐by‐step robotics protocol (serum_dilution.bmf) for 15‐fold dilution from serum source into dilution plate. (D) Serum transfer overview. (E) Plate setup for serum transfer. (F) Step‐by‐step robotics protocol (serum_transfer.bmf) for diluted serum transferred from dilution plate to first quadrant of four assay plates for duplicate N and S sensor reads.
-
1
Fill each well of a 96‐well plate with 46 μl PBSTB manually with a multichannel pipette.
-
2
Set up plates as shown in Figure 4B, and run serum dilution protocol (import from serum_dilution.bmf; see Supplementary Materials) on Biomek FX to transfer 4 μl serum from the serum source plate to the dilution plate and then to mix the serum in the dilution plate 10 times (Fig. 4C).
-
3
Set up plates as shown in Figure 4E, and run serum transfer protocol (import from serum_transfer.bmf; see Supplementary Materials) on Biomek FX to transfer 10 μl diluted serum to each of the four assay plates (Fig. 4F).
We use 384‐well plates for the assay but only put serum samples in the first quadrant (i.e., 96 of the 384 wells). This is to minimize luminescence reading bleeding over from neighboring samples. With newer plate readers, this may not be an issue, and all four quadrants could be used to reduce the number of plates and transfer steps
Protein sensor preparation (Fig. 5)
Figure 5.
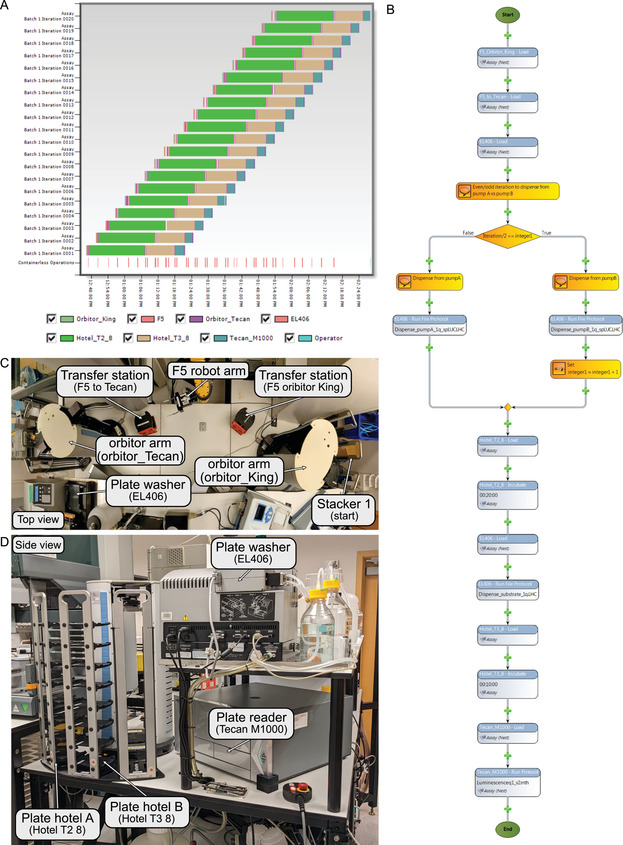
Automation system used for the split‐luciferase assay. (A) Gantt chart view of a run of 20 96‐well plates (five serum sample sets). This chart shows how multiple assays can be run at the same time on a robotics platform. Each color represents a different step in the assay. (B) Screenshot of the assay protocol in Thermo Scientific Momentum Workflow Scheduling software for one assay. Each bubble represents a step in the assay. The plate is first transferred from stacker 1 (start) to the plate washer (EL406) through a series of transfers: from stacker 1 (start) to transfer station (F5 orbitor King) by orbitor arm (orbitor King); from transfer station (F5 orbitor King) to transfer station (F5 to_Tecan) by F5 robot arm; and from transfer station (F5 to_Tecan) to plate washer (EL406) by orbitor arm (orbitor_Tecan). Then, the plate washer EL406 will dispense N sensor via pump A for odd iterations or S sensor via pump B for even iterations. The plate will then be transferred to plate hotel A (Hotel_T2_8) and incubated for 20 min at room temperature. After incubation, the plate will be transferred to the plate washer (EL406), and the substrate will be dispensed via the peripump. The plate will then be transferred to plate hotel B (Hotel _T3_8) for an incubation of 10 min. Lastly, the plate will be transferred to plate reader Tecan M1000 for luminescence read for 1 s per well. (C) Top view of robotics transfer station from stacker 1 (start) to plate washer (EL406). (D) Side view of robotics system of plate washer (EL406), plate hotels (Hotel T2 8 and Hotel T3 8), and plate reader (Tecan M1000).
-
4
Load sample plates containing the diluted serum in stacker 1.
Each serum sample set of 90 will have four diluted and distributed plates.
-
5
Prepare working solution of S sensors: Make 10 ml PBSTB + 2.5 ml per four sample plates containing 2 nM spike‐RBD SmBiT and spike‐RBD LgBiT. Mix thoroughly.
The extra 10 ml sensor is dead volume for the system to ensure no air is dispensed. This will vary for different systems.
-
6
Prepare working solution of N sensors: Make 10 ml PBSTB + 2.5 ml per four sample plates containing 2 nM N‐protein SmBiT and N‐protein LgBiT. Mix thoroughly
The extra 10 ml sensor is dead volume for the system to ensure no air is dispensed. This will vary for different systems.
-
7
Dilute nanoluciferase substrate 1:50 in nanoluciferase buffer to prepare 7 ml + 6 ml per four sample plates of working substrate solution.
The extra 7 ml substrate is dead volume for the system to ensure no air is dispensed. This will vary for different systems.
-
8
Prime BioTek EL406 syringe pumps with 10 ml of each sensor, pump A with N‐sensor, and pump B with S‐sensor. Prime peripump with 7 ml substrate.
The volume to prime with will vary for different liquid dispenser systems. The user will need to determine the volume needed for their setup.
Running antibody detection assay
-
9
Run split‐luciferase assay using Momentum software, entering the number of plates for the iteration count.
The rate‐limiting step is luminescence read at 1 s per well (up to 2 min per plate), so each plate is scheduled to initiate 2.5 min apart to allow for precise incubation time (Fig. 5A,B).
Steps 10 to 18 detail the assay completed by the robotics. The user will need to consult the Momentum software guide on how to set up the following steps.
-
10
Transfer assay plates from stacker 1 to the EL406.
To do this, we use the Orbitor RS to move the plate from the stacker to a transfer location and then grab the plate with the FANUC Robot robotic arm and move it to a receiving location. From here, a second Orbitor RS grabs the plate and loads it onto the EL406 plate washer/dispenser (Fig. 5C).
-
11
Dispense 10 μl sensor to each sample well on the plate. For odd plates (plates 1, 3, 5, …) dispense using pump A (N sensor), and for even plates (plates 2, 4, 6, …) dispense using pump B (S sensor).
This is to alternate sample plates with N sensor or S sensor. It is set up using an IF statement and an incrementally increasing integer to determine if the iteration is even or odd.
-
12
Transfer plate to plate hotel A, and incubate for 20 min (Fig. 5D).
-
13
Load plate from hotel A onto the EL406 after incubation.
-
14
Dispense 15 μl substrate to each sample well on the plate using the peripump.
-
15
Transfer plate to hotel B, and incubate for 10 min.
-
16
Load plate from hotel B into the Tecan M100 plate reader, and read luminescence for 1 s per well.
Clean up procedure and data analysis
-
17
Repeat steps 10 to 15 until all plates are finished running.
-
18
Transfer completed assay plate to stacker 2, and discard to biohazardous waste when completed.
-
19
Clean plate washer pump lines with water, ethanol, and then water again.
-
20
Export data from plate reader to a CSV file, and analyze it similarly to data from the Basic Protocol.
Alternate Protocol 2. POINT‐OF‐CARE‐BASED PROTOCOL FOR SARS‐CoV‐2 ANTIBODY DETECTION USING A HANDHELD LUMINOMETER
This protocol allows the user to use the assay described above to detect antibodies to spike‐RBD and/or nucleocapsid proteins but by using capillary blood directly from a finger stick in a nonlaboratory setting. There are important setup steps that involve aliquoting the nanoluciferase substrate and freeze‐drying (lyophilizing) the sensor proteins before implementing the assay. Since the purchased substrate comes in a large batch, it must be aliquoted beforehand for ease of use on the day of the performed assay. The sensor proteins, when in solution, need to be stored at −80°C to preserve their integrity. In order to allow them to be stored at room temperature, they must be prepared using the lyophilization process. In addition, this assay requires a control sample (recombinant nanoluciferase enzyme; also lyophilized) to be run every hour to account for slight differences in diluted substrate over time and between bottle batches. Ideally, these steps are taken ahead of time in a laboratory setting so that the assay itself can be performed in a point‐of‐care setting. Currently, this may require a partnership between a larger laboratory and a point‐of‐care clinic. On the day of the assay, the sensors can then be reconstituted in buffer, incubated with capillary blood and substrate, and measured on a handheld luminometer (Fig. 6). It is essential to choose a proper luminometer for the type of point‐of‐care application of interest. Here, we describe using the Berthold handheld luminometer, which would be useful for a centralized point‐of‐care scenario, such as a pharmacy or doctor's office. In addition, we have developed and are currently testing a more compact and rugged luminometer for use by community health workers in the field and in limited‐resource settings (Lebel et al, manuscript in preparation.) For either application, it is important that the luminometer can detect light from 1 × 10¹⁹ moles of nanoluciferase enzyme.
Figure 6.
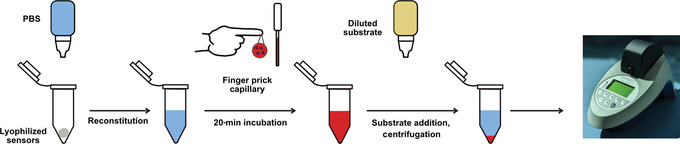
Schematic of Alternate Protocol 2 for running the split‐luciferase antibody assay in a point‐of‐care setting. Initially, the protein biosensors are lyophilized in PCR tubes and then reconstituted with phosphate‐buffered saline (PBS) at the start of the assay. Then, finger prick blood is transferred to the sensor PCR tube with a microcapillary pipette. After incubation, diluted substrate is added, and the sample is centrifuged. Luminescence is measured on a handheld luminometer.
See Strategic Planning for information on obtaining proper ethical consent for patient samples.
Additional Materials (also see Basic Protocol)
Live cell nanoluciferase substrate and diluent (e.g., Promega, cat. no. N2012)
24× PBSTB (see recipe)
Purified nanoluciferase enzyme (available from corresponding author upon reasonable request; see Strategic Planning)
Control samples and volunteer participants (see Strategic Planning)
Liquid nitrogen or dry ice/ethanol
PBS, pH 7.4 (e.g., Thermo Fisher Scientific, cat. no. 10010023) in clear 10‐ml dropper bottle
Alcohol swab
3‐ml clear dropper bottle (e.g., US Plastic Corps, cat. no. 66529)
3‐ml black dropper bottle (e.g, US Plastic Corps, cat. no. 66543)
0.2‐ml PCR tubes
PCR tube rack
Batch lyophilizer (e.g., SP VirTis BenchTop Pro with Omnitronics, BTP‐8ZGEVX, with crylic drum manifold and bulk shelf rack)
Lancet (e.g., BD Microtainer Contact‐Activated Lancet)
0.5‐ml EDTA blood collection tube (e.g., BD, cat. no. 365974)
Adhesive bandages
10‐μl microsafe capillary pipette (e.g., SAFE‐TEC, cat. no. 1010)
Battery‐powered microcentrifuge (e.g., TOMY, cat. no. 00101244)
Handheld luminometer (Junior LB 9509 Portable Luminometer or portable luminometer; Lebel et al, manuscript in preparation)
CAUTION: Human blood is considered BSL‐2. Follow all appropriate guidelines and regulations for the use and handling of these samples, especially those known to be infected with SARS‐CoV‐2. Ensure proper disposal of all items that have touched human samples.
Assay preparation
Preparation of substrate solution
-
1
At least 1 day before running the assay, aliquot 1192.5 µl substrate diluent into the clear dropper bottle. Keep at room temperature.
This substrate is different from the Basic Protocol and prevents cell lysis. Make sure to purchase the live cell nanoluciferase substrate for this protocol. One dropper bottle is enough to assay five participants. Users need to determine how many patients will be assayed in order to define the number of substrate bottles to prepare.
-
2
Add 57.5 µl substrate to the empty black dropper bottle. Cap and keep at −20°C until the day of the assay. Prepare the same amount of substrate black dropper bottles as clear diluent bottles prepared in step 1.
The bottle can be stored at −20°C for up to 1 year. On the day of the assay, keep on ice or cold packs until use.
Preparation of lyophilized sensors
-
3
Prepare one solution of purified S sensor proteins (RBD‐SmBiT, RBD‐LgBiT) at 48 nM in 24× PBSTB. Prepare 1 ml to make 200 sensors (enough for 100 participants in duplicate).
-
4
Prepare one solution of purified N sensor proteins (N‐SmBiT, N‐LgBiT) at 48 nM in 24× PBSTB. Prepare 1 ml to make 200 sensors (enough for 100 participants in duplicate).
-
5
Prepare control samples by diluting purified nanoluciferase to 500 pM in 24× PBSTB. Prepare half as many control samples as sensor samples (i.e., 100 controls tubes for 200 S sensors and 200 N sensors).
Nanoluciferase enzyme is purified in Expi293 cells similar to the sensors.
-
6
Designate 200 PCR tubes for S sensor, 200 tubes for N sensor, and 100 tubes for control samples. Label cap with S, N, and C, respectively. Organize tubes into PCR tube racks.
-
7
Aliquot 5 µl sample to the corresponding PCR tube.
-
8
With caps open, place PCR tubes into a thin layer of liquid nitrogen or a mix of dry ice and ethanol. Ensure PCR tube racks floats. Keep tubes in liquid nitrogen or dry ice/ethanol for at least 5 min.
Be careful when handling liquid nitrogen. Also be careful not to have too high of a level that liquid nitrogen enters the PCR tube.
-
9
Place rack into a batch lyophilizer with shelves to allow for lyophilization for at least 4 hr at no greater than −102°C.
-
10
After >4 hours, cap PCR tubes, and store at room temperature.
Running the assay
Setup
-
11
Place two S tubes (spike) and two N tubes (nucleocapsid) per participant on the tube holder rack.
-
12
If a new substrate bottle was prepared or if it has been >1 hr since the nanoluciferase control was run, also place two C tubes (control) on the rack.
-
13
Manually inspect each tube to make sure there is a white solid at the bottom of the tubes.
Some tubes may have static that causes the white solid to cling to the edge of the tube. Be careful when uncapping these tubes. If the solid leaves the tube, use a new tube.
-
14
Add 3 drops (∼120 μl) PBS from the dropper bottle to each tube. Cap tube.
Manually inspect each tube to make sure that the PBS has dissolved the white solid. Most times, it is necessary to flick the tube down so that the liquid reaches the bottom.
Blood collection
-
15
For each participant, clean the middle finger with an alcohol wipe and let air dry.
-
16
Hold participant's middle finger to pool blood.
-
17
Use lancet to prick the finger. Hold finger downward to keep blood pooled.
Be careful to not accidentally prick yourself with the lancet.
-
18
Collect 10 drops of blood directly into the EDTA collection tube. Bandage participant.
-
19
Cap tube and gently rotate it so that the blood interacts with the EDTA on the walls of the tube to prevent clotting.
-
20
Open tube and insert microsafe pipette so that it just touches the surface of the blood in the tube. Hold until blood fills the capillary pipette up to the black line. Try to wipe away any excess blood on the sides of the pipette.
-
21
Use the bulb to dispense the blood into a sensor tube: Insert capillary pipette into the tube, pushing gently down so that the bottom edge is just above the liquid level in the tube. Gently press bulb of the capillary pipette to dispense the blood slowly. Keep bulb pressed while removing the capillary from the tube so that you do not take up any liquid. Discard pipette after single use.
If the blood does not eject, there may be a clot in the pipette. In this case, use a new pipette.
-
22
Repeat steps 20 and 21 using a new microsafe pipette for each of the three other tubes so that all S and N tubes have blood added.
Do NOT add blood to the C sample (control).
-
23
Rotate and flick tubes up and down so that the solution is fully mixed. Flick each tube a couple of times to avoid sample accumulation in the cap of the tube.
-
24
Incubate for 20 min at room temperature. Write down patient number on the top or side of the tube to keep track of the tubes.
-
25
While tubes are incubating, prepare substrate by adding all of the diluent in all of the clear dropper bottle to the substrate in the black dropper bottle. Cap and mix well by inverting at least 10 times.
Substrate addition and measurement
-
26
Add 1 drop diluted substrate in the black dropper bottle to each sensor tube with blood. If controls were prepared, add 1 drop diluted substrate to the control samples. Start timer for 5 min. Mix tube by inverting five times.
-
27
During incubation, spin down tubes in the battery‐powered minicentrifuge for 30 s.
Make sure the tubes are secure in the centrifuge before starting the centrifugation step.
-
28
After the 5‐min incubation, read samples on the luminometer by placing the tubes directly inside the luminometer and measuring for 1 s.
-
29
Track control, S sensor, and N sensor results.
-
30
Normalize S sensor and N sensor results based on the control sensor run each round. See the Support Protocol for how to normalize samples and interpret data.
DETERMINING POSITIVE/NEGATIVE CUTOFFS FOR TEST SAMPLES AND STANDARDIZING THE ASSAY BETWEEN DAYS
An essential part of the split luminescent assay described here is determining the numerical cutoff between a positive sample (i.e., containing antibodies) and a negative sample (i.e., not containing antibodies). In this protocol, we guide the user through running control samples to determine this cutoff for their assay setup based on prepandemic negative controls. Additionally, if the user wishes to compare assays run between days, we also guide the user on how to standardize the measurements to compare samples assayed between days.
Materials
Prepandemic negative control serum/plasma samples
Positive control samples (see Strategic Planning)
-
1
Perform assay in duplicate for both the S and N sensors as described in the Basic Protocol with at least three prepandemic negative controls and a positive control(s).
We recommend using this number of controls as a minimum. If the user has access to more negative controls, we recommend running those samples as well to increase confidence in the cutoff value. Blank wells cannot be used as controls due to signal reduction in a true negative due to presence of serum.
The positive control samples can be either serology standard or purified antibody for spike + antibody for nucleocapsid protein. If using a serology standard, it is useful to also test two 10‐fold dilutions to get a range of signal for the assay. This will strengthen the precision of developing a standard to compare runs between days. If using recombinant antibodies, this part can be skipped since two wells are needed for the two controls.
-
2
To determine the cutoff, take the average of the replicates for both the S sensor and the N sensor for the negative controls.
-
3
Determine the standard deviation (SD) of the average negative control values. See Table 1 for an example.
The values that you should use to calculate the SD are in the Average column. These numbers are examples; the values may look different depending on the type of luminometer that you use.
Table 1.
Example Negative Control Values for Determining Cutoff Values for Split‐Luciferase Antibody Assay
| Sample | S sensor rep 1 | S sensor rep 2 | Average (S) | SD (S) | N sensor rep 1 | N sensor rep 2 | Average (N) | SD (N) |
|---|---|---|---|---|---|---|---|---|
| Negative 1 | 20 | 36 | 28 | 4.25 | 60 | 52 | 44 | 4.75 |
| Negative 2 | 17 | 23 | 20 | ‒ | 55 | 65 | 37.5 | ‒ |
| Negative 3 | 18 | 25 | 21.5 | ‒ | 48 | 57 | 34.75 | ‒ |
Rep, replicate; SD, standard deviation.
-
4
Determine the cutoff value, which will be the average of the negative values + 3 × SD (Table 2).
This value will allow you to determine what sample is positive (above cutoff) for COVID‐19 antibodies in your assay.
Table 2.
Cutoff Determined by Average Negative Control Values
| Sensor | Total average | 3 × SD | Final cutoff |
|---|---|---|---|
| S | 23.2 | 12.75 | 35.9 |
| N | 38.75 | 14.25 | 53.0 |
SD, standard deviation.
-
5
To standardize between runs, compare the values for the same samples between assay runs.
This can be done using positive controls, either a serology standard or recombinant antibodies. These samples must be run in the assay each time the user performs the assay and on every plate. Tables 3 and 4 are examples of positive control values from the first assay run and the same assay run on a different day. It is best to designate one assay (usually the first one you run) as the assay to be standardized to.
Table 3.
Example Data from Assay 1
| Assay 1 (standard) | S sensor rep 1 | S sensor rep 2 | Average (S) | N sensor rep 1 | N sensor rep 2 | Average (N) |
|---|---|---|---|---|---|---|
| Serology standard | 2890 | 3143 | 3016.5 | 10789 | 11450 | 11119.5 |
| Serology standard (1:10) | 310 | 290 | 300 | 987 | 1024 | 1005.5 |
| Serology standard (1:100) | 43 | 39 | 41 | 102 | 97 | 99.5 |
Rep, replicate.
Table 4.
Example Data from Assay 2
| Assay 2 | S sensor rep 1 | S sensor rep 2 | Average (S) | N sensor rep 1 | N sensor rep 2 | Average (N) |
|---|---|---|---|---|---|---|
| Serology standard | 4320 | 3890 | 4105 | 12873 | 11970 | 12421.5 |
| Serology standard (1:10) | 450 | 413 | 431.5 | 1156 | 1105 | 1130.5 |
| Serology standard (1:100) | 52 | 38 | 45 | 131 | 112 | 121.5 |
Rep, replicate.
-
6
Take the ratio between the averages from assay 2 and assay 1 (standard). Be sure to divide by the standard value (assay 1; Table 5).
Table 5.
Determining Normalization Value by Ratio Between Control Values
| Sample | Average (S) Assay 2 | Average (S) Assay 1 | Ratio | Average ratio | Average (N) Assay 2 | Average (N) Assay 1 | Ratio | Average ratio |
|---|---|---|---|---|---|---|---|---|
| Serology standard | 4105 | 3016.5 | 1.36 | 1.30 | 12421.5 | 11119.5 | 1.12 | 1.15 |
| Serology standard (1:10) | 431.5 | 300 | 1.44 | ‒ | 1130.5 | 1005.5 | 1.12 | ‒ |
| Serology standard (1:100) | 45 | 41 | 1.10 | ‒ | 121.5 | 99.5 | 1.22 | ‒ |
-
7
Use the average ratio number to normalize the values from assay 2 by dividing the samples from assay 2 by the average ratio. Compare the new values to other samples run in assay 1.
-
8
For Alternate Protocol 2, use the same negative controls to determine the negative cutoff value.
In this case, the negative controls must be run individually owing to the single channel of the handheld luminometer.
For normalizing, use the nanoluciferase enzyme control to account for difference in substrate brightness due to reconstitution or time since reconstitution. For this reason, we suggest running the lyophilized nanoluciferase control every time a new bottle of substrate is mixed and prepared, or after 1 hr has passed since the last control was run, to account for decay in luminescence signal. This signal can be normalized by taking the ratio to a previous control as described in steps 5 and 6, and all samples measured after that control can be normalized by the ratio value.
REAGENTS AND SOLUTIONS
PBSTB, pH 7.4
0.1 g BSA, fraction V, protease free (e.g., GeminiBio, cat. no. 700‐101P)
25 μl Tween 20 (e.g., Sigma‐Aldrich, cat. no. P2287)
Bring to 50 ml with 1× PBS, pH 7.4 (e.g., Thermo Fisher Scientific, cat. no. 10010023)
Mix well and sterilize through a 0.45‐μm filter (e.g., Nalgene, cat. no. 09‐741‐09)
Store at 4°C for up to 2 weeks
PBSTB, 24×, pH 7.4
2.4 g BSA, fraction V, protease free (e.g., GeminiBio, cat. no. 700‐101P)
600 μl Tween 20 (e.g., Sigma‐Aldrich, cat. no. P2287)
Bring to 50 ml with 1× PBS, pH 7.4 (e.g., Thermo Fisher Scientific, cat. no. 10010023)
Mix well and sterilize through a 0.45‐μm filter (e.g., Nalgene, cat. no. 09‐741‐09)
Store at 4°C for up to 2 weeks
COMMENTARY
Background Information
Luminescence‐based assays are among the most sensitive and powerful research technologies. Decades of work studying luciferase enzymes have allowed researchers to use these powerful enzymes for multiple biological research purposes. In particular, researchers at Promega have engineered a bright and stable light‐emitting enzyme called nanoluciferase, in which its small size compared with natural luciferase enzymes allows it to be seamlessly fused to many proteins of interest (Hall et al., 2012). The team further engineered a split version of this enzyme, termed NanoBiT, composed of two parts that are inactive in solution until brought into proximity with one another, at which point a full active enzyme is reconstituted (Dixon et al., 2016). This technology has been incredibly powerful for visualizing protein complexes (Cooley et al., 2020; Riching et al., 2018; Rozbeh & Forchhammer, 2021). We took advantage of the dual binding characteristic of antibodies to use this split enzyme to detect antibodies in solution without the requirement of sample washing or detailed processing, typical of other serology assays like the ELISA. Similar assays have been developed using nucleotide‐based strategies to detect bivalent antibodies, but these require more complex sensor preparation and sequencing readout (Tsai et al., 2018). Additionally, a similar assay using the tri‐split version of nanoluciferase was also developed to detect antibodies to SARS‐CoV‐2 (Yao et al., 2021). This assay, and the assay described here, have a similar workflow; however, the tri‐split version requires more protein components and takes twice as long as our assay.
The major advantages of the assay we describe here compared with other standard serology assays like ELISA, LFA, and microparticle assays are that it is simple, quantitative, and rapid with relatively inexpensive consumables. There are no wash steps, and minimal components are needed for the assay. It can be used to quantitatively determine levels of antibodies in a human sample by comparing to a serology standard. Additionally, we have previously shown that the signal generated is highly correlative to ELISA signal (known to be quantitative) and to neutralization efficiency (Elledge et al., 2021). The sensitivity (89% S sensor, 98% N sensor) and specificity (100% S sensor, 99.2% N sensor), as previously determined by a large infected cohort study, are comparable with or better than other serology assays (Peluso et al., 2021). Additionally, the protein biosensors are recombinant proteins that express at high quantity. For a laboratory that does not, however, have the capabilities to do mammalian cell expression and purification, these purified proteins are available from the corresponding author and in the future hopefully will be available commercially.
There are, however, some limitations to the assay that might inhibit it from being as widespread as other clinical assays. One limitation is that the assay requires a special detection instrument to detect light (luminometer), although work is ongoing to improve battery‐powered luminometers (Jung et al., 2020). Alternate Protocol 2 also requires a lyophilizer, which may not be accessible. Another limitation is that the substrate requires that it be maintained in the cold, either 4°C for short periods or −20°C for long‐term storage. Promega has improved the storage of the substrate and produced a formulation that is stable at room temperature for at least 365 days (Hall et al., 2021), although this assay has not yet been tested with the more stable substrate.
The Basic Protocol is best used when the user has <90 samples for measuring antibody titers to spike‐RBD or nucleocapsid protein. This can easily be done by hand with a multichannel pipette. If the user has >90 samples, we recommend following Alternate Protocol 1 and a robotics platform to streamline the assay. Due to the simplicity of the assay, it can easily be programmed on a robotics platform with liquid dispensers, transfer components, and a plate reader with luminescence functions. If the user would like to perform the assay in a resource‐limited or a point‐of‐care setting without the need for pipettes on the day of the assay, then Alternate Protocol 2 is the best option for using the assay to determine antibody levels. In this case, it is important that the user either prepares lyophilized proteins ahead of time or collaborates with a laboratory to help with lyophilizing the proteins. Ideally, in the future the lyophilized sensors would be commercially available.
One of the most exciting properties of this assay is that it could potentially be applied to detect antibodies from any type of antibody‐generating infection. The design of the assay is modular and allows for easy development of two different sensors based on the spike and nucleocapsid protein of SARS‐CoV‐2. We foresee the expansion of the assay for many more diagnostic applications in the future.
Critical Parameters
There are a few parameters that are required to obtain robust results from this assay. The first is the quality of the plasma, serum, or whole blood samples. They must not have any aggregated particles or microbial growth that would prevent accurate pipetting from the sample. Ideally, samples should be kept frozen at −80°C or at 4°C in a sodium azide‒based buffer to prevent microbial growth. Another important and related point is that the plasma, serum, or whole blood must be mixed properly in the dilution buffer or assay sample to ensure even distribution of the sample between the replicates and sensors. In general, proper mixing is essential for accurate replicates.
Another important consideration is the quality of the control samples, whether serum or recombinant protein. It is important that these are properly stored so that assays run on different days may be comparable to one another. Additionally, the sensors should be stored at −20°C unless lyophilized. This ensures that the sensors do not degrade over time.
Finally, it is important that the substrate is stored properly away from light at −20°C or at 4°C for short periods of time (1 to 2 days). It is important to always run a positive control to check for this issue.
Troubleshooting
See Table 6 for common problems encountered when performing these protocols and suggested solutions.
Table 6.
Troubleshooting Guide for Split‐Luciferase Antibody Assay
| Problem | Possible cause | Solution |
|---|---|---|
| No signal in positive control sample | Substrate has degraded | Run assay again with fresh substrate; run purified nanoluciferase in parallel as a positive control |
| Biosensor proteins have degraded | Run assay with a different batch of sensors; incubate sensors at a higher concentration (e.g., 1000 nM) to see if any signal is produced | |
| Positive control has degraded | Run another positive control in parallel | |
| Replicates do not match | Improper mixing of diluted sensors | Remake diluted sensors, and make sure to pipette well |
| Plate reader error | Plate reader can occasionally make an error; if the signal is >50% different between two replicates, measure luminescence again | |
| High signal in negative control | Growth in PBSTB | Prepare new PBSTB and filter sterilize |
| Degraded negative control | Run another negative control in parallel |
PBSTB, phosphate‐buffered saline containing bovine serum albumin and Tween 20.
Understanding Results
The results from Basic Protocol, Alternate Protocol 1, and Alternate Protocol 2 will be relative luciferase unit (RLU) values from the corresponding luminometer. This number can then be compared with the positive and negative controls to determine whether or not the assayed samples are positive or negative for antibodies to the spike‐RBD or nucleocapsid protein of SARS‐CoV‐2. For information on how to determine a positive and negative cutoff and normalize between assay runs, see the Support Protocol. If a national or international serology standard is available for purchase, then the signal from the assay can be calibrated in standard‐based units, which then can allow for comparison to other assays. For example, the signal from the undiluted international standard has been set at 1000 International Standard Units. Running a standard curve of the international standard can correlate the RLU value to International Standard Units so that the RLU values can be compared with other assays that are compared with the international standard. It is also important to have a collection of negative control samples to determine a cutoff value for positive versus negative. This type of cutoff can be done in a number of ways to optimize for sensitivity (% deemed positive over known true positives) versus specificity (% deemed negative over known true negatives). In our previous study (Elledge et al., 2021), we decided to determine the cutoff value to be the average of prepandemic negative controls + 3 SDs across our negative samples. These values were different between the S and N sensors based on the relative properties of the proteins. (Typically the N sensor has higher background than the S sensor.) These cutoff values are best done in the laboratory where the assay is being run and can greatly depend on the sensitivity of the luminometer as well as slight differences in assay preparation between laboratories.
Samples from mRNA‐vaccinated patients >14 days since vaccination should be positive for the S sensor and not the N sensor, since these vaccines contain the spike protein but not the N protein. Samples from naturally infected or weakened virus‐based vaccinated patients >14 days since infection or vaccination should be positive for both the S sensor and N sensor, although a mild case may only be positive for one sensor or neither. Samples from vaccinated and infected patients >14 since infection and vaccination may be positive for both S and N sensors.
In the case that no information is known about the infection or vaccination status of the individual, interpreting the results is slightly more complicated. In most cases, if the S signal is more than three times the N signal (when the N signal is negative), this is likely from an mRNA‐vaccinated individual. If the N signal is positive and the S signal is either positive or negative, then this is likely from a naturally infected or weakened virus‒based vaccinated individual. If both sensor signals are negative, this means that either the individual has not been infected or vaccinated or their antibody levels have declined over time and fallen below detection level.
Due to the simplicity of the assay, we imagine it could be readily implemented in a research laboratory that desires to do quick or high‐throughput serology assays (Basic Protocol and Alternate Protocol 1). Although ELISAs are already sold as kits, these assays still take multiple hours, whereas our assay is completed in 30 min. We believe that if the sensor proteins and positive and negative controls could be prepared and sold as part of a kit, this would greatly increase the likelihood that this assay can be implemented in the clinic and in more research laboratories. Promega has developed a similar assay that is sold as a kit to researchers (cat. no. AX9130). However, the consumable cost is greater than performing the assay with purified sensors, and this assay only detects antibodies to the spike protein. For Alternate Protocol 2, this point‐of‐care assay is unique and would be of great use to researchers working in, for instance, low‐resource settings. As of now, it still requires these laboratories to collaborate with others that have the capability to purify and lyophilize the sensors; however, we hope that these can also become commercially available in the future.
Time Considerations
For the Basic Protocol, the assay setup should take <30 min as long as protein sensors are previously purified and patient samples previously aliquoted into a plate form. Running the assay takes 30 min. For Alternate Protocol 1, setup can take 30 min (preparing sensors and substrate, again assuming samples are already in plate form), and dilution of samples can take 5 min per 96‐well plate of samples. The length of the assay itself is dependent on how many samples are being assayed. For example, running 40 plates (960 samples in duplicate for both sensors) is estimated to take 180 min at about 18 min per 96 samples. For Alternate Protocol 2, setup should take <10 min, finger prick <5 min, and running the assay on one sample (in duplicate for both sensors) 25 min. The Support Protocol should be done at least 1 day before running unknown samples and should take no longer than 2 hr for setting up the samples/assay, running the assay, and performing the cutoff calculations.
Author Contributions
Susanna K. Elledge: conceptualization, data curation, formal analysis, investigation, methodology, validation, visualization, writing—original draft, writing review and editing; Ian Eigl: data curation, methodology, writing—original draft, writing review and editing; Maira Phelps: data curation, investigation, methodology, writing—review and editing; Khayla McClinton: data curation, methodology; Xin X. Zhou: conceptualization, formal analysis, investigation, supervision, visualization, writing—review and editing; Kevin K. Leung: funding acquisition, methodology, resources, software, supervision, writing—original draft, writing review and editing; Cristina M. Tato: methodology, resources, supervision, writing—review and editing; James A. Wells: funding acquisition, resources, supervision, writing—review and editing.
Conflict of Interest
S.K.E., X.X.Z., and J.A.W. have filed a patent on the split‐luciferase assay for antibody detection. The remaining authors declare no conflicts of interest.
Supporting information
Supplementary Information
Supplementary Information
Acknowledgments
J.A.W. is grateful for funding from the Harry and Dianna Hind Endowed Professorship in Pharmaceutical Sciences and the Chan Zuckerberg Biohub that helped support this work. The National Science Foundation Graduate Research Fellowship Program supported S.K.E. (1650113). X.X.Z. was supported by a Merck Fellowship of the Damon Runyon Cancer Research Foundation (DRG‐2297‐17) and a National Institutes of Health K99/R00 award (1K99EB030587‐01). The authors acknowledge funding from the Chan Zuckerberg Biohub, Rapid Response. The authors also acknowledge Dr. Paul Lebel, Dr. Diane Wiener, Ilakkiyan Jeyakumar, and Dr. Rafael Gomez‐Sjoberg for their development of the compact and rugged luminometer for point‐of‐care use of this assay, as well as their general advice and collaboration on this project. The authors thank Dr. James Byrnes for advice and input on developing the assay and Georgios Bastios for help with lyophilizing sensors and providing the lyophilizer.
Elledge, S. K. , Eigl, I. , Phelps, M. , McClinton, K. , Zhou, X. X. , Leung, K. K. , Tato, C. M. , & Wells, J. A. (2022). Using split luminescent biosensors for SARS‐CoV‐2 antibody detection in serum, plasma, and blood samples. Current Protocols, 2, e521. doi: 10.1002/cpz1.521
Published in the Molecular Biology section
Data Availability Statement
The data that support the findings of this study are available from the corresponding author upon reasonable request.
Literature Cited
- Cooley, R. , Kara, N. , Hui, N. S. , Tart, J. , Roustan, C. , George, R. , … Downward, J. (2020). Development of a cell‐free split‐luciferase biochemical assay as a tool for screening for inhibitors of challenging protein‐protein interaction targets. Wellcome Open Research, 5, 20. doi: 10.12688/wellcomeopenres.15675.1 [DOI] [PMC free article] [PubMed] [Google Scholar]
- Dixon, A. S. , Schwinn, M. K. , Hall, M. P. , Zimmerman, K. , Otto, P. , Lubben, T. H. , … Wood, K. V. (2016). NanoLuc complementation reporter optimized for accurate measurement of protein interactions in cells. ACS Chemical Biology, 11, 400–408. doi: 10.1021/acschembio.5b00753 [DOI] [PubMed] [Google Scholar]
- Elledge, S. K. , Zhou, X. X. , Byrnes, J. R. , Martinko, A. J. , Lui, I. , Pance, K. , … Wells, J. A. (2021). Engineering luminescent biosensors for point‐of‐care SARS‐CoV‐2 antibody detection. Nature Biotechnology, 39, 928–935. doi: 10.1038/s41587-021-00878-8 [DOI] [PMC free article] [PubMed] [Google Scholar]
- Hall, M. P. , Unch, J. , Binkowski, B. F. , Valley, M. P. , Butler, B. L. , Wood, M. G. , … Wood, K. V. (2012). Engineered luciferase reporter from a deep sea shrimp utilizing a novel imidazopyrazinone substrate. ACS Chemical Biology, 7, 1848–1857. doi: 10.1021/cb3002478 [DOI] [PMC free article] [PubMed] [Google Scholar]
- Hall, M. P. , Kincaid, V. A. , Jost, E. A. , Smith, T. P. , Hurst, R. , Forsyth, S. K. , … Dart, M. L. (2021). Toward a point‐of‐need bioluminescence‐based immunoassay utilizing a complete shelf‐stable reagent. Analytical Chemistry, 93, 5177–5184. doi: 10.1021/acs.analchem.0c05074 [DOI] [PubMed] [Google Scholar]
- Jung, Y. , Coronel‐Aguilera, C. , Doh, I.‐ J. , Min, H. J. , Lim, T. , Applegate, B. M. , & Bae, E. (2020). Design and application of a portable luminometer for bioluminescence detection. Applied Optics, 59, 801–810. doi: 10.1364/AO.59.000801 [DOI] [PubMed] [Google Scholar]
- Krammer, F. , & Simon, V. (2020). Serology assays to manage COVID‐19. Science, 368, 1060–1061. doi: 10.1126/science.abc1227 [DOI] [PubMed] [Google Scholar]
- Mattiuzzo, G. , Bentley, E. M. , Hassall, M. , Routley, S. , Richardson, S. , Bernasconi, V. , … Page, M. (2020). Establishment of the WHO international standard and reference panel for anti‐SARS‐CoV‐2 antibody (Report No. WHO/BS/2020.2403). World Health Organization. https://www.who.int/publications/m/item/WHO‐BS‐2020.2403
- Peluso, M. J. , Takahashi, S. , Hakim, J. , Kelly, J. D. , Torres, L. , Iyer, N. S. , … Greenhouse, B. (2021). SARS‐CoV‐2 antibody magnitude and detectability are driven by disease severity, timing, and assay. Science Advances, 7, eabh3409. doi: 10.1126/sciadv.abh3409 [DOI] [PMC free article] [PubMed] [Google Scholar]
- Riching, K. M. , Mahan, S. , Corona, C. R. , Mcdougall, M. , Vasta, J. D. , Robers, M. B. , … Daniels, D. L. (2018). Quantitative live‐cell kinetic degradation and mechanistic profiling of PROTAC mode of action. ACS Chemical Biology, 13, 2758–2770. doi: 10.1021/acschembio.8b00692 [DOI] [PubMed] [Google Scholar]
- Rozbeh, R. , & Forchhammer, K. (2021). Split NanoLuc technology allows quantitation of interactions between PII protein and its receptors with unprecedented sensitivity and reveals transient interactions. Scientific Reports, 11, 12535. doi: 10.1038/s41598-021-91856-2 [DOI] [PMC free article] [PubMed] [Google Scholar]
- Tsai, C.‐T. , Robinson, P. V. , Cortez, F. J. , Elma, M. L. B. , Seftel, D. , Pourmandi, N. , … Bertozzi, C. R. (2018). Antibody detection by agglutination‐PCR (ADAP) enables early diagnosis of HIV infection by oral fluid analysis. Proceedings of the National Academy of Sciences of the United States of America, 115, 1250–1255. doi: 10.1073/pnas.1711004115 [DOI] [PMC free article] [PubMed] [Google Scholar]
- Whitman, J. D. , Hiatt, J. , Mowery, C. T. , Shy, B. R. , Yu, R. , Yamamoto, T. N. , … Marson, A. (2020). Evaluation of SARS‐CoV‐2 serology assays reveals a range of test performance. Nature Biotechnology, 38, 1174–1183. doi: 10.1038/s41587-020-0659-0 [DOI] [PMC free article] [PubMed] [Google Scholar]
- Yao, Z. , Drecun, L. , Aboualizadeh, F. , Kim, S. J. , Li, Z. , Wood, H. , … Stagljar, I. (2021). A homogeneous split‐luciferase assay for rapid and sensitive detection of anti‐SARS CoV‐2 antibodies. Nature Communications, 12, 1806. doi: 10.1038/s41467-021-22102-6 [DOI] [PMC free article] [PubMed] [Google Scholar]
- Zamecnik, C. R. , Rajan, J. V. , Yamauchi, K. A. , Mann, S. A. , Loudermilk, R. P. , Sowa, G. M. , … Wilson, M. R. (2020). ReScan, a multiplex diagnostic pipeline, pans human sera for SARS‐CoV‐2 antigens. Cell Reports Medicine, 1, 100123. doi: 10.1016/j.xcrm.2020.100123 [DOI] [PMC free article] [PubMed] [Google Scholar]
Internet Resources
User guide for producing proteins in Expi293 cells.
Associated Data
This section collects any data citations, data availability statements, or supplementary materials included in this article.
Supplementary Materials
Supplementary Information
Supplementary Information
Data Availability Statement
The data that support the findings of this study are available from the corresponding author upon reasonable request.