Abstract
Single-particle electron cryo-microscopy (cryo-EM) is an effective tool to determine high-resolution structures of macromolecular complexes. Its lower requirements for sample concentration and purity make it an accessible method to determine structures of low-abundant protein complexes, such as those isolated from native sources. While there are many approaches to protein purification for cryo-EM, attaining suitable particle quality and abundance is generally the major bottleneck to the typical single-particle project workflow. Here, we present a protocol using budding yeast ( S. cerevisiae ), in which a tractable immunoprecipitation tag (3xFLAG) is appended at the endogenous locus of a gene of interest (GOI). The modified gene is expressed under its endogenous promoter, and cells are grown and harvested using standard procedures. Our protocol describes the steps in which the tagged proteins and their associated complexes are isolated within three hours of thawing cell lysates, after which the recovered proteins are used directly for cryo-EM specimen preparation. The prioritization of speed maximizes the ability to recover intact, scarce complexes. The protocol is generalizable to soluble yeast proteins that tolerate C-terminal epitope tags.
Graphical abstract

Overview of lysate-to-grid workflow. Yeast cells are transformed to express a tractable tag on a gene of interest. Following cell culture and lysis, particles of interest are rapidly isolated by co-immunoprecipitation and prepared for cryo-EM imaging (created with BioRender.com).
Keywords: Cryo-EM , Yeast transformation , Co-immunoprecipitation , Protein purification , Protein complexes , Vitrification
Background
Structural determination of biological macromolecules is essential for providing insights into their function. Over the past decade, revolutionary advances in hardware and software have ushered in a new era of single-particle electron cryo-microscopy (cryo-EM) ( Kühlbrandt, 2014 ; Shen, 2017 ). The field is amidst a golden age, as evidenced by recent structures that have achieved atomic resolution ( Nakane et al., 2020 ; Yip et al., 2020 ). Such resolution has traditionally only been accessible through other established methods, such as X-ray crystallography and nuclear magnetic resonance, which also generally require a substantial amount of material (e.g., on the order of several milligrams). In contrast, single particle cryo-EM only requires enough material to cover the support grid, and a few microliters of sample between 0.1 and 1.0 micromolar concentration is often sufficient for each specimen.
Common approaches to generate sufficient material for structural studies typically depend on overexpressing proteins in heterologous systems. While overexpression systems are effective in producing large quantities of material, the purified proteins may lack relevant binding partners or post-translational modifications that do not exist in such systems. The relatively low sample volume and concentration requirements for cryo-EM make it an attractive method to determine structures of protein complexes that are isolated directly from their native sources. Indeed, cryo-EM imaging of proteins from cell extracts is increasingly becoming more feasible as a tool for discovery biology (Ho et al., 2020; Skalidis et al., 2022 ). Such top-down approaches enable the characterization of particles in a more native-like context that is inherently missing in bottom-up in vitro reconstitution methods. Yet, achieving sufficient material of scarce or short-lived complexes remains a major barrier to preparing high-quality cryo-EM specimens.
By leveraging the advantages of working with the budding yeast model organism ( S. cerevisiae ), including genetic tractability and throughput of cell growth, we have optimized a generalizable procedure that enables the rapid isolation of endogenous complexes from cell lysates. The procedure balances between speed and purity, and samples are ready for cryo-EM specimen vitrification within three hours. The prioritization of speed enables the recovery of multi-component complexes that may otherwise fall apart in lengthier procedures, such as those with overnight steps. Our procedure was used to isolate scarce complexes trapped in their active, functional states, including capturing the processes of mRNA-independent peptide synthesis by the ribosome-associated quality control complex (~300 copies per cell; Shen et al., 2015) and protein unfolding by the Shp1-Cdc48 AAA+ ATPase complex (~3,000 copies per cell; Cooney et al., 2019; protein copy numbers estimated from Ghaemmaghami et al., 2003). In both of these studies, the rapid isolation of native complexes enabled the structure determination of multi-component complexes in novel and biologically important functional states.
Here, we describe our detailed protocol of how native multi-component, soluble complexes are quickly isolated from yeast lysates and used for cryo-EM imaging. A C-terminal 3xFLAG tag is inserted into the endogenous locus of a gene of interest (GOI) via homologous recombination. Cells are grown and harvested and their lysates are prepared for co-immunoprecipitation (co-IP) experiments. The target protein and its associated complexes are recovered by competitive elution and used directly for cryo-EM specimen preparation. In principle, our protocol can be applied to isolate and image any soluble yeast protein and their associated complexes as long as their function is not disrupted by the C-terminal tag and the particles are of sufficient size to be visible by cryo-EM.
Materials and Reagents
General supplies
250 mL Erlenmeyer flasks (Corning, catalog number: 4980-250)
2.8 L Fernbach culture Pyrex flasks (Sigma-Aldrich, catalog number: CLS44202XL)
1.5 mL Eppendorf/microcentrifuge tubes (Fisher Scientific, catalog number: 14-282-302)
15 mL conical tubes (Greiner Bio-One, catalog number: 188271)
50 mL conical tubes (Greiner Bio-One, catalog number: 227270)
15 mL glass vials (Corning, catalog number: 9820-16X)
Small growth platform shaker (Lab-Line Instruments, Inc., catalog number: 3590-1)
Large growth platform shaker (Barnstead | Lab-Line, A-Class., catalog number: SHKA3000)
1 L centrifuge bottle and caps (Beckman Coulter, catalog number: C31597)
Styrofoam box
Membrane filter, 0.22 μm pore size (Millipore, catalog number: GSWP04700)
For yeast transformation (section A)
pFA6a plasmid (Longtine et al., 1998). We use pTF272 (pFA6a-TEV-6xGly-3xFLAG-HphMX) (Addgene plasmid # 44083; http://n2t.net/addgene:44083; RRID: Addgene_44083)
iProof HF 2X Master mix (Bio-Rad, catalog number: 1725310)
GeneRuler 1 kb Plus DNA ladder (ThermoFisher Scientific, catalog number: SM1331)
EZVision One Dye-as-Loading buffer, 6× (VWR, catalog number: 97064-190)
Agarose (GoldBio, catalog number: A-201-500)
Ethylenediaminetetraacetic acid (EDTA) (Fisher Scientific, catalog number: AC118432500)
Acetic acid (Fisher Chemical, catalog number: BP2401C-212)
S. cerevisiae yeast strain BY4741 (derived from S288C strain; genotype MATa; his3Δ1; leu2Δ0; met15Δ0; ura3Δ0 )
Yeast extract (Fisher Scientific, catalog number: BP9727-2)
Peptone (Fisher Scientific, catalog number: BP9725)
Adenine (Sigma-Aldrich, catalog number: A8626)
Glucose (Sigma-Aldrich, catalog number: G7021)
Agar (Becton Dickson & Company, catalog number: 2013-03-31)
Poly(ethylene glycol) (PEG) 3350 (Sigma-Aldrich, catalog number: 202444)
Sheared salmon sperm DNA (Ambion, catalog number: 1009027)
Lithium acetate (Sigma-Aldrich, catalog number: 517992)
Hygromycin B (Sigma-Aldrich, catalog number: 10843555001)
For transformation validation (section B)
Sodium dodecyl sulfate (SDS) (Fisher Scientific, catalog number: BP166)
4%–15% precast protein gel (Bio-Rad, catalog number: 4561086)
2× Laemmli sample buffer (Bio-Rad, catalog number: 1610737)
Beta-mercaptoethanol (Bio-Rad, catalog number: 161-0710)
Methanol (Fisher Scientific, catalog number: A412P-4)
PVDF membrane (Bio-Rad, catalog number: 1620177)
Precision plus protein dual color standards (Bio-Rad, catalog number: 161-0374)
Thick blot filter paper (Bio-Rad, catalog number: 1703969)
Roller (ThermoFisher Scientific, catalog number: 0084747)
Skim milk powder (MP Bio, catalog number: 902887)
Tween 20 (Sigma-Aldrich, catalog number: 11332465001)
Incubation box (Li-Cor, catalog number: 929-97301)
Monoclonal ANTI-FLAG® M2 antibody produced in mouse (Sigma-Aldrich, catalog number: F1804)
Goat anti-mouse IgG secondary antibody (Li-Cor, catalog number: 926-32210)
Sodium azide (Sigma-Aldrich, Catalog number: S2002)
For large scale culture, harvest, and lysis (sections C–D)
Glycerol (Fisher Bioreagents, catalog number: BP229)
HEPES (Fisher Bioreagents, catalog number: BP310-500)
Potassium acetate (KOAc) (Sigma-Aldrich, catalog number: P1190)
Magnesium acetate [Mg(Oac) 2 ] (Sigma-Aldrich, catalog number:M5661)
Calcium chloride (CaCl 2 ) (Fisher Chemical, catalog number: C79-500)
D-sorbitol (Sigma-Aldrich, catalog number: 1003101761)
Phenylmethylsulfonyl fluoride (PMSF) (Sigma-Aldrich, catalog number: P7626)
Aprotinin (GoldBio, catalog number: A-655)
Pepstatin (GoldBio, catalog number: P-020)
Leupeptin (GoldBio, catalog number L-010)
Dithiothreitol (DTT) (GoldBio, catalog number DTT)
Liquid nitrogen
For co-immunoprecipitation (section E)
Magnesium chloride hexahydrate (MgCl 2 ·6H 2 O) (Acros Organics, catalog number: 41341-500)
Igepal CA-630 (Sigma-Aldrich, catalog number I3021)
Anti-FLAG M2 affinity gel (Sigma-Aldrich, catalog number: A2220)
3xFLAG peptide (APExBio, catalog number: A 6001)
For quality control and cryo-EM specimen preparation (sections F–G)
Formvar/Carbon 200 mesh grids (Ted Pella, Inc., catalog number: 01801)
595 Vitrobot filter paper (Ted Pella, Inc., catalog number: 47000-100)
Uranyl acetate salt (EMS, catalog number: 22400)
Glutaraldehyde (EMS, Catalog number: 16000)
Tris hydrochloride (Tris-HCl) (Sigma-Aldrich, Catalog number: 9310-OP)
Quantifoil R1.2/1.3 or UltrAuFoil R1.2/1.3 300 mesh grids (SPT Labtech)
Compressed nitrogen gas cylinder
Compressed ethane gas cylinder
Stock solutions
50× TAE (see Recipes)
5× TBS (see Recipes)
10× transfer buffer (see Recipes)
1 M HEPES-KOH, pH 7.4 (see Recipes)
1 M KOAc (see Recipes)
1 M Mg(Oac) 2 (see Recipes)
1 M CaCl 2 (see Recipes)
1 M sorbitol (see Recipes)
1 M MgCl 2 (see Recipes)
1 M DTT (see Recipes)
2× IP buffer (see Recipes)
1 M lithium acetate (LiOAc) (see Recipes)
Gels
1% agarose gel (see Recipes)
Buffers
1× TAE (see Recipes)
Working transfer buffer (see Recipes)
Blocking solution (see Recipes)
TBST solution (see Recipes)
Yeast lysis buffer (see Recipes)
Wash buffer 1 (see Recipes)
Wash buffer 2 (see Recipes)
Mixes
Transformation PCR mix (according to Bio-Rad iProof HF manual) (see Recipes)
Colony PCR mix (see Recipes)
PEG mix (see Recipes)
Reagents
Lithium acetate (LiOAc) (see Recipes)
1% uranyl acetate (see Recipes)
Tris base (Sigma-Aldrich, catalog number: TRIS-RO)
Glycine (Sigma-Aldrich, catalog number: 50046)
Sodium chloride (NaCl) (Sigma-Aldrich, catalog number: S9888)
Dextrose (Sigma-Aldrich, catalog number: G7021)
Plates and Media
YPAD plates (see Recipes)
YPAD + hygromycin plates (see Recipes)
YPD liquid media (see Recipes)
Equipment
General equipment and supplies
Pipettes (VWR P10, P20, P200, P1000; catalog numbers: 89079-962, 89079-964, 89079-970, 89079-974)
Floor centrifuge (Beckman Coulter, model: Avanti J-26 XP)
Fixed angle centrifuge rotor (Beckman Coulter, model: JLA 8.1)
Refrigerated microcentrifuge (Sorvall Biofuge Fresco)
42°C water bath
37°C incubator
30°C incubator
Vortex mixer (Scientific Industries Inc.)
Nutator (Clay Adams, catalog number: 421105)
Spectrophotometer (ThermoFisher Scientific, catalog number: ND-ONE-W)
Gel electrophoresis apparatus
Micro spatula
GelDoc-IT (VWR)
Benchtop centrifuge (Beckman Coulter, model: Allegra 6R; GH-3.8 rotor)
For yeast transformation
Thermal cycler (Applied Biosystems, catalog number: 4484073)
Cell culture rotator
3 mm solid glass beads (Sigma-Aldrich, catalog number: Z143928)
Replica plate tool (Cole Parmer, catalog number: EW-14210-00)
Velveteen squares (Cole Parmer, catalog number: EW-14210-50)
Cryogenic vial (VWR, catalog number: 89094-800)
For whole-cell immunoblotting
Trans-Blot turbo transfer system (Bio-Rad, catalog number: 1704150)
Orbital shaker (Vevor)
Odyssey CLx imaging system (Li-Cor)
For cell lysis (freezer mill)
Cryo-gloves (Tempshield)
Face shield/goggles
Freezer/mill cryogenic grinder (Spex)
Grinding vial sets (polycarbonate cylinders, impactors, and end plugs; Spex, catalog number: 6751)
Freezer mill magnetic extractor (Spex, catalog number: 6791)
Freezer mill vial opener (Spex, catalog number: 6754)
For cryo-EM specimen preparation/vitrification
Pelco easiGlow unit (Ted Pella, Inc., catalog number: 91000)
DUMONT clamping ring medical tweezers (Ted Pella, catalog number: 38825)
Vitrobot (ThermoFisher Scientific, catalog number: VITROBOT)
Vitrobot tweezers (Ted Pella, catalog number: 47000-500)
Stainless steel long tweezers (Xducom)
Cryo-EM grid storage boxes (MiTeGen, catalog number: M-CEM-CGBSW1)
Grid box storage dewar (Worthington 25LDB Storage Dewar, Cole-Parmer, catalog number: EW-03773-57)
Procedure
-
Yeast transformation ( Figure 1)
A1. Primer design for tagging GOI
-
Choose a forward adapter sequence to amplify the entire 3xFLAG tag and a linker sequence from a pFA6a plasmid ( Longtine et al., 1998), e.g., pTF272 (Addgene). This adapter should anneal to the 5′ end of the 3xFLAG tag and be roughly 24 bases (8 codons) in length, ensuring that the reading frame of the tag is preserved. Example using the pTF272 plasmid:
5′ ggctctagagactacaaggaccac 3′
-
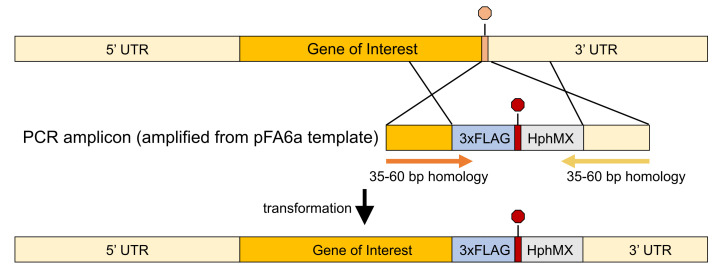
Choose a gene-specific sequence for your GOI to direct tagging to the C-terminal residue of the encoded protein. This sequence should be between 35 and 60 bases in length and end directly before the stop codon to preserve the reading frame of the tag. This gene-specific sequence is combined with the forward adapter sequence to form the final forward tagging primer. Example for the SHP1 gene as reported in Cooney et al. (2019):
5′ GATCTGCTGAACTCCGTTGTCGTGCAAAGATGGGCAggctctagagactacaaggaccac 3′ (upper case: GOI sequence; lower case: pTF272 sequence).
-
Choose a reverse adapter sequence to amplify the hphMX6 selection cassette and terminator from the plasmid. This adapter should represent the reverse complement of the sequence from the 3′ end and anneal 3′ of the TEF terminator and be roughly 24 bases in length. Example from the pTF272 plasmid:
5′ cagcagtatagcgaccagcattca 3′
-
Choose another gene-specific sequence ending directly after the stop codon of the GOI. This sequence should be between 35 and 60 bases in length. Combine the reverse complement of the gene-specific sequence with the reverse adapter sequence to form the final reverse tagging primer. Example for the SHP1 gene:
5′ AGTCTTTTCCCGTTTCTGTTTTTGTATATTTATGCcagcagtatagcgaccagcattca 3′ (upper case: GOI sequence; lower case: pTF272 sequence). For a graphical representation of the regions of homology for each primer, see Figure 2.
A2. Amplification of PCR product
Prepare the PCR reaction in a PCR tube using transformation PCR mix (see Recipes).
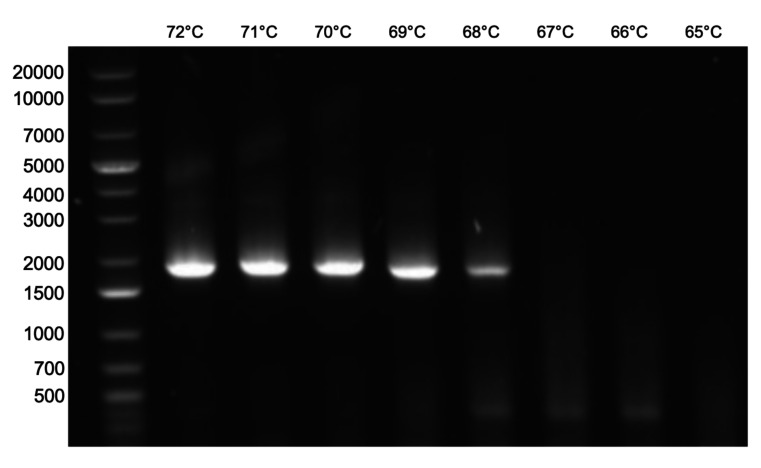
Run PCR using settings recommended by the iProof Master mix. Annealing temperatures should be determined by the calculated melting temperatures of the oligonucleotide sequences that anneal to the plasmid, which should be between 55 and 72°C. We recommend running a gradient of temperatures to determine the best settings to maximize PCR product ( Figure 3).
Load 5 µL of PCR reaction and 5 µL of DNA ladder (each mixed with 1 µL of EZVision One Dye-as-Loading buffer, 6×) into separate wells of a 1% agarose gel.
Run the gel electrophoresis apparatus with the gel submerged in 1× TAE buffer at 120 V until the leading dye reaches the bottom of the gel (estimated 30 min; see Recipes).
Image gel on GelDoc-IT. Confirm the presence of a band at the expected size of the PCR product.
Store PCR product at -20°C for up to 24 h until cells are ready for transformation.
A3. Transformation
For general guidelines about yeast culture in liquid or solid media, consult the Sigma-Aldrich Yeast Protocols sites: https://www.sigmaaldrich.com/US/en/technical-documents/protocol/microbiological-testing/pathogen-and-spoilage-testing/yeast-growth-protocols .
The transformation protocol is adapted from Gietz and Schiestl (2007) . Using aseptic technique with a sterilized pipette tip, scrape off a small amount of glycerol stock of BY4741 yeast cells and streak it out on a YPAD plate. Be careful to prevent the glycerol stock from thawing.
Incubate plate at 30°C until single colonies appear (1–2 days).
Using aseptic technique, pick one isolated colony of BY4741 from the plate by gently scraping with a sterile pipette tip.
Inoculate yeast by placing the pipette tip into 3 mL of YPD media in a 15 mL culture tube. Gently pipette up and down until the colony is suspended in the media.
Place the glass vial on a cell culture rotator and incubate at 30°C overnight.
After approximately 16 h of cell growth, prepare OD600 measurement by diluting the overnight growth 1:20 in YPD, e.g., 50 µL of cell culture into 950 µL of YPD. Blank the spectrophotometer with YPD and measure the OD 600 of the diluted cells. The target OD600 after dilution should be approximately 1.0, i.e., the actual OD600 is approximately 20.
Back dilute the overnight growth by pipetting 100 µL of the overnight growth into 10 mL of YPD in a 15 mL glass vial (1:100 dilution).
Grow cells for approximately 3 h on a cell culture rotator at 30°C. Remove the vial after the OD600 has reached approximately 1.0.
While cells are growing, prepare PEG mix with the PCR product from section A2 step 6 (see Recipes). To dissolve PEG 3350, add double-distilled water (ddH2O), vortex the mixture thoroughly, then incubate at 37°C for 5 min. Make sure that the PEG has completely dissolved and continue vortexing if needed.
Place salmon sperm DNA in a 95°C water bath for 5 min and then chill on ice prior to addition to PEG mix.
Transfer yeast culture to a 15 mL conical tube and centrifuge at 2,000 ×g for 5 min at room temperature.
Decant and discard the media supernatant.
Resuspend the cell pellet in 5 mL of ddH2O. Mix by pipetting.
Centrifuge at 2,000 ×g for 5 min at room temperature.
Decant and discard the water supernatant.
Resuspend the cell pellet in 1 mL of 100 mM LiOAc by pipetting and then transfer to a 1.5 mL Eppendorf tube.
Pellet the cells at 4,500 ×g for 1 min at room temperature and then discard the supernatant.
-
Cut 2 cm off the end of a 1,000 µL pipette tip using a razor blade ( Figure 4).
CAUTION: Use care when handling sharps.
Use this tip to pipette the viscous PEG mixture over the cell pellet. Vortex vigorously to resuspend the cell pellet into the PEG mixture.
Incubate the resuspended cells in a 42°C water bath for 40 min.
Centrifuge at 4,500 ×g for 30 s at room temperature and then discard the supernatant.
Resuspend the cell pellet in 600 µL of ddH2O.
-
Pipette 300 µL of resuspended cells onto two separate YPAD agar plates each (without antibiotic).
Note: This step is important to allow cells to recover after transformation.
Use autoclaved glass beads to spread the cells evenly across the plates.
Label the plates and incubate at 30°C for 24 h.
A4. Replica plating
A lawn of cells should be visible after 24 h of growth. The cells are now ready to transfer onto selection plates.
Place the sterilized velvet on top of the replica plate tool and firmly secure the velvet using the replica plate tool ring.
Transfer cells onto velvet by gently pressing the plate onto the velvet.
Separate the plate from the velvet and then gently press the selection plate (YPAD + hygromycin, see Recipes) onto the cell-covered velvet.
Store plates in a 30°C incubator for 2–3 days until single colonies begin to appear.
After colonies appear, streak out multiple individual colonies on new YPAD + hygromycin plates. We recommend streaking eight colonies per plate.
Store plates in a 30°C incubator until cell growth is visible.
Cell growth indicates that cells are expressing the selection marker and suggests that transformation was successful. To rule out false positives, validate the transformation by colony PCR and/or whole-cell immunoblot (Section B, below).
-
-
Transformation confirmation
B1. Colony PCR. Protocol adapted from Akada et al. (2000)
Design colony PCR primers that are specific to the transformed gene, such that one primer anneals to the GOI and the other primer anneals to the inserted sequence. We recommend targeting a PCR product approximately 300 bp in size.
-
The colony PCR forward primer should be approximately 35 bases in length and within the GOI. Example from the SHP1 gene:
5′ CTATCAAACCAATAAGCAACGATGAGACAACATTG 3′
-
The reverse primer should be designed using the reverse complement sequence from the 3′ end corresponding to approximately 35 bases within the inserted DNA. Example from the pTF272 plasmid:
5′ GAGGTGTGGTCAATAAGAGCGACCTCATACTATAC 3′
Using a pipette tip, transfer an isolated yeast colony to 20 µL of 0.25% SDS in an Eppendorf tube. We recommend repeating this for multiple colonies.
Vortex thoroughly to suspend the cells in SDS.
Place the tubes containing cells in a 95°C water bath for 3 min.
Add 60 µL of ddH2O to each tube.
Spin the cells at 17,000 × g for 1 min at room temperature in a microcentrifuge.
Add 1.5 µL of the supernatant containing genomic DNA to 18.5 µL of colony PCR Master mix (see Recipes) in a PCR tube.
Repeat steps 4–9 for the desired number of colonies to screen. We recommend up to 15 colonies.
Perform PCR and confirm presence of PCR product as in section A2 steps 3–5 (see Figure 3 for an example of PCR confirmation). Note that absence of PCR products may be interpreted as false negatives. We recommend running whole-cell immunoblots as an additional measure of validation.
B2. Whole-cell immunoblot
For each colony, add 10 mL of YPD to a 15 mL culture tube using aseptic technique.
Inoculate each tube with a separate colony from the plate.
Place the tubes on a cell culture rotator at 30°C and grow cells overnight.
Centrifuge 1 mL of culture at 4,000 × g for 5 min at 4°C.
Resuspend cell pellet in 100 µL ddH2O and 100 µL 2× working Laemmli buffer.
Heat at 95°C for 2–3 min. Avoid overboiling to prevent protein precipitation.
Centrifuge at 4,000 × g for 5 min at 4°C.
Load 15 µL of supernatant onto a precast 4%–15% SDS-PAGE gel.
Run SDS-PAGE gel at 170 V for 35 min.
Prepare 100 mL of working transfer buffer (see Recipes).
Prepare 50 mL of 100% methanol.
Soak the SDS-PAGE gel in 20 mL of working transfer buffer.
Cut a PVDF membrane to be 2 cm larger in length and width than the SDS-PAGE gel.
Soak the PVDF membrane in the 100% methanol solution.
Cut two pieces of thick blot filter paper to be 2 cm larger in length and width than the PVDF membrane.
Soak the filter paper in the remaining transfer buffer solution.
In an immunoblot transfer system cassette, assemble the transfer stack in this order from bottom to top: filter paper, PVDF membrane, SDS-PAGE gel, filter paper.
Pour the remaining working transfer buffer over the transfer stack to keep it hydrated.
Use a roller to remove any trapped air bubbles from the transfer stack.
Place the top of the cassette on the transfer stack, lock it in place, and insert the cassette into the transfer system.
Transfer the contents of the gel onto the PVDF membrane at 25 V for 30 min.
Prepare 20 mL of the blocking solution (see Recipes).
Transfer the PVDF membrane to an opaque incubation box.
Add the blocking solution to the box and incubate at room temperature for 30 min with gentle agitation.
Prepare the mouse anti-FLAG primary antibody by diluting it 1:1,000 in a 1× TBST with 5% milk.
Pour off the blocking buffer, add 10 mL of the anti-FLAG primary antibody, and then incubate with gentle agitation for at least 1 h at room temperature (or overnight at 4°C).
Pour the anti-FLAG antibody back into a 15 mL conical tube. The antibody solution may be stored at -20°C and re-used several times.
Wash membrane by adding 15 mL of TBST solution to the membrane and incubate with gentle agitation for 5 min at room temperature.
Repeat the TBST wash step three times, discarding the TBST after each wash.
Prepare the goat anti-mouse secondary antibody by diluting the antibody 1:10,000 in 1× TBST with 5% milk.
Add 10 mL of the secondary antibody and incubate for 1 h at room temperature.
Pour the secondary antibody into an opaque 15 mL conical tube. The antibody solution may be stored in the presence of 0.01% sodium azide at -20°C and re-used several times.
Repeat the washing steps in steps 28 and 29.
Image the membrane using the Odyssey CLx imaging system.
B3. Prepare glycerol stock
Using aseptic technique, pick one confirmed isolated colony by gently scraping with a sterile pipette tip.
Add to 10 mL of YPD and incubate overnight on a cell culture rotator at 30°C.
Add 500 µL of sterilized 30% glycerol (in water, v/v) to a cryogenic vial.
Add 500 µL of culture to the cryogenic vial. Discard excess culture.
Close vial and invert to mix.
Label vial and store at -80°C. The stock may be stored indefinitely and used when a fresh plate needs to be prepared.
-
Large-scale yeast cell culture and harvest (Figure 5)
Add 100 mL of YPD to two 250 mL flasks each using aseptic technique.
Inoculate each flask with a colony from a plate.
Place flasks on a platform shaker at 30°C. Grow cells for approximately 16 h or until saturation.
Using aseptic technique, add 30 mL of saturated culture to 970 mL of fresh YPD in 2.8 L flasks. Repeat this for six flasks. The target starting OD600 should be approximately 0.3.
Grow cells on a platform shaker at 30°C for approximately 4 h until they reach a mid-log phase OD600 of approximately 1.5. Measure the OD600 periodically by retrieving 500 µL of culture to estimate when cells will reach the proper OD600.
After OD600 of approximately 1.5 has been reached, harvest cells by transferring the yeast culture from flasks into 1 L bottles.
Pellet the cells by centrifugation at 4,500 × g for 6 min at 4°C.
After the cells are pelleted, pour off the media supernatant.
Resuspend all cells in a total of 30–45 mL of chilled ddH2O using an automatic pipette and then transfer the resuspended cells to a 50 mL conical vial.
Pellet the cells by centrifuging the conical vial at 4,500 × g for 5 min at 4°C.
Pour off and discard the water supernatant.
Record the weight of the cell pellet by subtracting the weight of an empty tube from the weight of tubes with the cell pellet. Typically, six liters of cell culture harvested at OD600of approximately 1.5 will weigh 10–20 g.
Add 1 mL of chilled lysis buffer and protease inhibitors (see Recipes) per 6 g of cell pellet. Mix by agitating with a pipette tip and keep on ice.
-
Fill a small Styrofoam box with liquid nitrogen.
CAUTION: Protective equipment such as eye protection and cryogenic gloves should be used when handling liquid nitrogen.
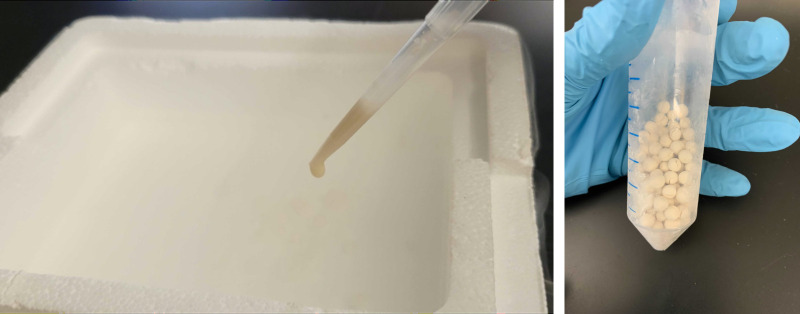
Using a cut pipette tip ( Figure 4 ), slowly drip the resuspended cell pellet into the liquid nitrogen ( Figure 6 , left). Maintain separation from the liquid nitrogen to avoid freezing the pipette tip. The yeast should form small pellets as they contact the liquid nitrogen. For best results, scatter the dripping throughout the box to prevent drops from clumping together.
Fill another larger Styrofoam container with liquid nitrogen and chill a 50 mL conical tube with the lid removed, a funnel, and long tweezers in liquid nitrogen. Hold the tube with a tube clamp so that it is mostly submerged in liquid nitrogen.
Pour the yeast pellets into the clamped tube through the chilled funnel. It is okay if the tube overflows with liquid nitrogen. Use the chilled long tweezers to scrape off any remaining pellets that are stuck to the box.
Use scissors to puncture the lid of the 50 mL conical tube ( Figure 7 ). This is important to allow liquid nitrogen to vent from the tube after it is capped.
Allow 80%–90% of the liquid nitrogen to evaporate from the 50 mL tube and then cap the tube with the punctured lid. The remaining liquid nitrogen will vent through the punctured lid.
Store the capped tube at -80°C until cells are ready to be lysed (section D).
-
Cell lysis via freezer mill
Attach a connecting hose between the liquid nitrogen tank and the freezer mill.
-
Open the valve to the liquid nitrogen tank to pre-chill the machine.
CAUTION: Eye protection and cryogenic gloves should be used when handling liquid nitrogen.
Fill a Styrofoam box with liquid nitrogen.
Chill freezer mill polycarbonate cylinders with one end plugged and impactors in the box containing liquid nitrogen. Be careful to not leave liquid nitrogen inside the cylinder.
Add the chilled impactor and frozen yeast pellets to the cylinder. Fill each cylinder up to half capacity ( Figure 8 ). Note that filling the tube more than halfway may reduce the lysis efficiency.
-
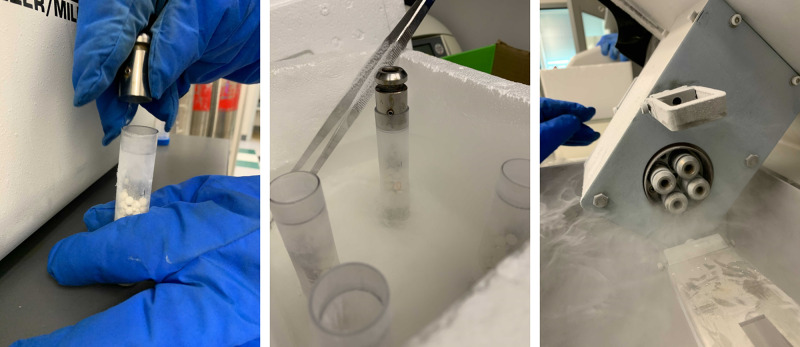
Plug the open end of the freezer mill cylinder, ensuring that there is no remaining liquid nitrogen inside of tubes ( Figure 9 ).
CAUTION: Leaving liquid nitrogen inside the tubes can cause the plugs to pop off if there is a sudden temperature change, causing injury.
Place the sealed freezer mill cylinders inside the freezer mill. Each run can accommodate four cylinders ( Figure 9 ).
Set the freezer mill settings to six cycles, 10 cps (impacts per second), 3 min grind, and 2 min cool.
Start the run, which will take approximately 45 min to complete.
When the run has completed, remove cylinders from the freezer mill and place them in a -80°C freezer for 20 min. This step is important to prevent the end plugs from popping off due to a sudden temperature change.
Fill a Styrofoam box with liquid nitrogen.
Pre-chill 50 mL conical tubes, a funnel, and a micro spatula in the box.
Remove the caps from the freezer mill tubes and transfer the lysed yeast powder into a pre-chilled 50 mL conical tube over liquid nitrogen using a micro spatula ( Figure 10 ).
-
We recommend dividing the yeast powder in 2 g aliquots. This should occupy approximately 5 mL per 50 mL conical tube ( Figure 10 ). Take care to keep the powder at -80°C or colder until they are used for co-IP. Powder should stay loose and fluffy if handled at the appropriate temperature. Each 2 g aliquot is used as a single co-IP experiment (section E). More powder may be used if higher co-IP yields are desired. Powder can be stored at -80°C for several months.
Note: An overview video of freezer mill usage and principles by Spex SamplePrep is available through the following link: https://youtu.be/Q8600XCBsnQ .
-
Co-immunoprecipitation and elution ( Figure 11 )
All steps in this section (section E) are performed at 4°C.
Prepare wash buffer 1 (see Recipes) immediately before beginning this stage of the protocol.
Retrieve the yeast powder aliquot from the -80°C freezer and immediately place on ice.
Resuspend the powder in wash buffer 1 at a 1:1 (v/w) ratio. Mix thoroughly by stirring with a pipette tip into a homogeneous slurry. The quantity of powder needed per experiment will depend on the expression level of the tagged protein of interest. We recommend 2 g of powder as a starting point.
Transfer the viscous slurry to 1.5 mL Eppendorf tubes on ice using a cut pipette tip ( Figure 4 ).
Clarify the lysate by centrifuging at 5,000 × g for 5 min in a microcentrifuge.
Transfer supernatant to a new 1.5 mL Eppendorf tube. Discard the insoluble pellet.
Clarify the lysate again by centrifugation at 10,000 × g for 10 min.
Transfer supernatant to a new 1.5 mL Eppendorf tube. Discard the insoluble pellet.
Repeat the lysate clarification by centrifugation at 15,000 × g for 10 min. Discard the insoluble pellet.
While the centrifugation step is running in step 10, equilibrate 30 µL of anti-FLAG M2 affinity gel by resuspending it in 1 mL of wash buffer 1 in a 15 mL conical tube. Spin at 1,000 × g for 2 min to pellet the resin. Pipette off and discard the supernatant, making sure not to disturb or remove the resin bed.
Transfer the clarified lysate supernatant to the equilibrated anti-FLAG M2 affinity gel and resuspend the affinity gel by gentle pipetting.
Place the tube containing affinity gel and clarified lysate on a nutator and incubate for 1 h with gentle rocking.
After incubation, centrifuge resin at 1,000 × g for 2 min. Remove and discard the unbound material by pipetting, taking care to not disturb the resin bed.
Add 1 mL of wash buffer 1 to affinity gel and resuspend by gentle pipetting.
Transfer the resuspended resin from the 15 mL conical tube to a fresh 1.5 mL Eppendorf tube by pipetting.
Centrifuge resin at 1,000 × g for 2 min.
Pipette off supernatant, being careful not to disturb the resin.
Repeat steps 15, 17, and 18 five times with wash buffer 1 and five times with wash buffer 2 (i.e., five washes in each wash buffer). Note that the number of washes may require optimization to achieve the desired balance between protocol duration and sample purity.
Add 30 µL of 3xFLAG peptide at a concentration of 1.5 mg/mL in wash buffer 2 and incubate for 30 min on a nutator.
Pellet the resin at 1,000 × g for 2 min.
Carefully transfer 30 µL of the eluate to a fresh 1.5 mL Eppendorf tube and use immediately for quality control (section F) or cryo-EM specimen preparation (section G) (step 8). See Figure 12 for an example of the quantity of eluate to recover.
-
Quality control (recommended, optional)
F1. Silver stain SDS-PAGE
Dilute protein ladder 1:50 in working Laemmli buffer and load 6 µL of the diluted ladder into an empty lane of a precast polyacrylamide gel.
Mix 5 µL of eluate with 5 µL of 2× working Laemmli buffer. Place on a heat block for 3 min at 95°C. Load the denatured sample onto precast gel.
Run gel at 170 V for 35 min or until the leading dye approaches the bottom of the gel.
We recommend the SilverQuest Silver Staining kit (Thermo Fisher Scientific) to perform silver staining of co-IP elutions because the high sensitivity of this method uses relatively low quantities of material. Follow the “Fast Staining” protocol according to the manufacturer’s handbook.
For examples of silver-stained SDS-PAGE, see Shen et al. (2015) or Cooney et al. (2019). Protein identities can be confirmed by mass spectrometry proteomics or immunoblot.
F2. Negative stain TEM
Negative stain transmission electron microscopy (TEM) provides a quick and simple way to assess particle quality before committing resources to cryo-EM. Consult your institution’s TEM facilities for access to instrumentation. For a general overview of negative stain TEM, including protocol and staining options, please see the Negative Stain module of the cryo-EM 101 website: https://cryoem101.org/chapter-1/#part5 ( Shen and Iwasa, 2018 ).
Negative stain grids are prepared at room temperature.
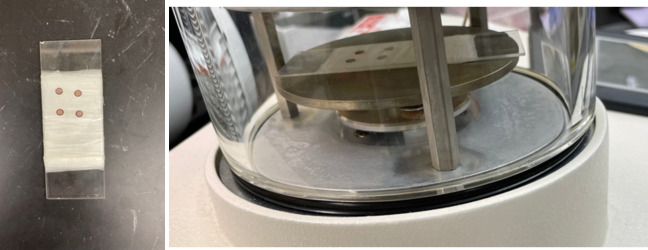
Place continuous carbon (Formvar/carbon 200 mesh) grids with the sample application side face up on a glass slide wrapped in parafilm ( Figure 13 ).
Place the slide on the glow discharge platform and cover with the glass chamber.
Glow discharge the grids at 15 mA for 30 s.
Picking up the grid with DUMONT tweezers by handling the outer rim of the grid. Clamp the tweezers with the clamping ring.
Apply 3.5 µL of the sample onto the grid for one minute.
Gently blot off the sample using 595 Vitrobot filter paper.
Wash the grid by submerging the side the sample was applied to into a droplet of water.
Remove the excess water by blotting with filter paper.
Pipette 3.5 µL of 1% uranyl acetate (see Recipes) onto the grid for 20 s.
-
Blot off the uranyl acetate solution with the filter paper.
Note: All disposables in contact with uranyl acetate must be disposed according to institutional safety guidelines.
Allow the grid to air-dry for several minutes before storing.
Image the grid using a transmission electron microscope to confirm that particles are visible and at a sufficiently high concentration for cryo-EM ( Figure 14 ).
-
Cryo-EM specimen preparation
Sample crosslinking (optional)
-
1
Crosslinking may be necessary to maintain structural integrity of complexes during cryo-EM sample preparation ( Monroe et al., 2017 ). Particle exposure to the hydrophobic air–water interface after blotting is well known to induce common problems associated with cryo-EM, including preferred orientations ( Noble et al., 2018 ) and particle denaturation (D’Imprima et al., 2019).
-
2
If performing a crosslinking reaction, prepare a 0.2% stock of glutaraldehyde.
-
3
Add 1.4 μL of 0.2% glutaraldehyde to 30 μL of eluate. Final concentration of glutaraldehyde is 0.009% (v/v; approximately 0.9 mM).
-
4
Mix by pipetting and incubate crosslinking reaction at room temperature for 10 min. Alternatively, the reaction may be performed on ice instead. The crosslinking conditions (including glutaraldehyde concentration, temperature, and incubation time) may require optimization to achieve the desired extent of crosslinking.
-
5
Quench the reaction using 1 μL of 100 mM Tris pH 7.4 (final Tris concentration is approximately 3 mM) and place the sample back on ice.
-
6
Confirm the extent of crosslinking by silver stained SDS-PAGE (section F). For an example, see Cooney et al. (2019).
Cryo-EM specimen preparation
-
7
A video of the vitrification procedure using the Mk. II Vitrobot is available at https://youtu.be/gbA5BytYBhc (credit, Helen M. Donelick). Other general guidelines and advice about grid vitrification are available on CryoEM 101: https://CryoEM101.org ( Shen and Iwasa, 2018 ).
-
8
Glow discharge grid (Quantifoil or UltrAufoil) by following the steps in section F2, steps 1–3. Note that the glow discharge settings may require optimization.
-
9
Open the compressed nitrogen gas tank and turn on Mk. II Vitrobot.
-
10
Fill the humidifier cup to the proper volume with distilled water and attach to Vitrobot.
-
11
Set the Vitrobot humidity to 100% and temperature to 4°C.
-
12
Place new blotting paper onto the blotting pads. Allow 30 min for the Vitrobot to equilibrate at the specified temperature and humidity. Adjust the various plunge freeze settings in the software. Set the instrument to the following settings:
Wait time: 20 s
Plunge time: 4 s
Blot time: 4 s for UltrAuFoil (gold) grid or 7 s for Quantifoil (carbon) grid
Blotting offset: -1 mm
Note that these settings may require optimization to achieve the desired ice thickness.
-
13
Fill a dewar with fresh liquid nitrogen.
-
14
Prepare the freezing apparatus: place the brass cup and the grid box pedestal in the insulated bowl, place the metal spider on top of the brass cup, and place the float around the grid box pedestal. Place a labeled grid box into one of the locations on the grid box pedestal.
-
15
Fill the insulated bowl with liquid nitrogen. This may need to be repeated a few times as the nitrogen will evaporate quickly during the initial cooling.
-
16
Pre-chill the brass cup using liquid nitrogen. After the liquid nitrogen in the brass cup has evaporated, place the glass pipette tip from the ethane tube into the brass cup and open the valves to the compressed ethane tank. As the ethane starts to liquify it will make a whistling sound.
-
17
Fill the brass cup with liquid ethane until the level of liquid ethane reaches the spider.
-
18
Close the ethane tank and allow the liquid ethane in the brass cup to start chilling. Remove the spider immediately after ethane begins to turn to a slush. Make sure that the ethane does not completely freeze solid; if this happens, place a separate room temperature spider upside down on the brass cup to melt the ethane into a slush.
-
19
Load a glow-discharged grid using the Vitrobot loading tweezers onto the Vitrobot. Be sure to pick up the grid by its outer rim to prevent damage to the sample application area.
-
20
Click “Place New Sample” to lower the Vitrobot arm into position.
-
21
Place the tweezers on the Vitrobot arm and click “Continue.” Make sure the sample application side of the grid is facing the side opening on the Vitrobot.
-
22
Place the freezing apparatus on the Vitrobot and click “Continue.”
-
23
Click “Start Process” and apply 3.5 μL of sample onto the grid through the side opening on the Vitrobot.
-
24
Click “Continue” to proceed with grid blotting and plunge-freezing into the liquid ethane.
-
25
Transfer the grid in a swift motion from ethane to a labeled storage container submerged in liquid nitrogen, taking care to not bend the grid.
-
26
Repeat steps 19–25 for the desired number of grids. Each grid storage container can accommodate four cryo-EM specimens.
-
27
Store the grid storage containers in a storage dewar until they are ready to be loaded into a cryo-TEM.
-
28
Shut down Vitrobot according to the manufacturer's instructions.
-
1
Figure 1. Workflow to generate a new tagged strain.
Yeast cells are transformed with PCR products via homologous recombination. After quality control and vetting successful transformation, the cells are ready to be used for downstream purification (created with BioRender.com).
Figure 2. Overview of primer design for yeast transformation.
Primers are designed with the forward strand being homologous to the 3’ end of the gene of interest (GOI) just before the endogenous stop codon and the reverse strand being homologous with a segment immediately following the stop codon. The primers anneal to a region of a pFA6a plasmid (e.g., pTF262; see Materials) that encode a 3xFLAG tag and selectable marker (in this case, hygromycin). Following PCR amplification and yeast transformation, the cells now express a 3xFLAG-tagged version of the GOI and a selectable marker.
Figure 3. Example of PCR product to be used for yeast transformation.
A gradient of annealing temperatures is used to identify optimal settings for PCR amplification. In this example, the expected PCR product of approximately 1,700 bp is generated using annealing temperatures between 68 and 72°C. These products would then be pooled for downstream yeast transformation.
Figure 4. Preparing pipette tips for viscous solutions.
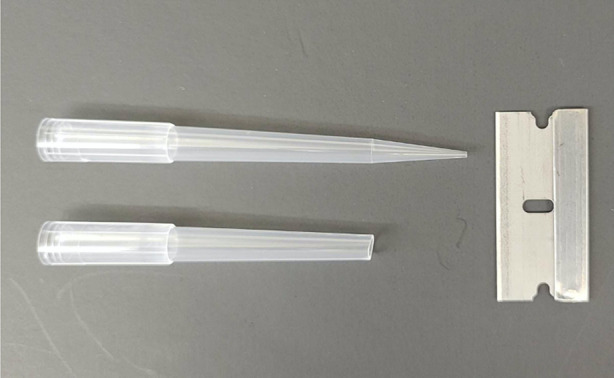
Comparison of an uncut 1,000 µL pipette tip (top) and a tip with approximately 2 cm cut off with a razorblade (bottom).
Figure 5. Workflow to grow and prepare cells for cell lysis .
(created with BioRender.com)
Figure 6. Preparing yeast pellet for freezer mill lysis.
(Left) Photo showing how the resuspended cell pellet is dripped into liquid nitrogen to create small frozen cell pellets. (Right) Photo of resulting small frozen cell pellets.
Figure 7. Preparing a 50 mL conical tube for frozen yeast pellets.
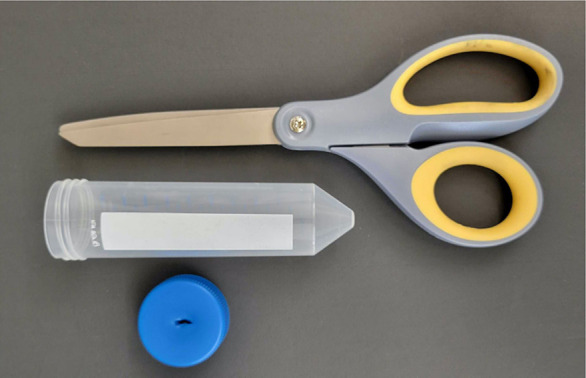
Photo of a 50 mL conical tube and punctured lid to store frozen yeast pellets. The punctured lid allows liquid nitrogen to vent after cell pellets have been poured into the tube.
Figure 8. Assembling freezer mill polycarbonate cylinders.
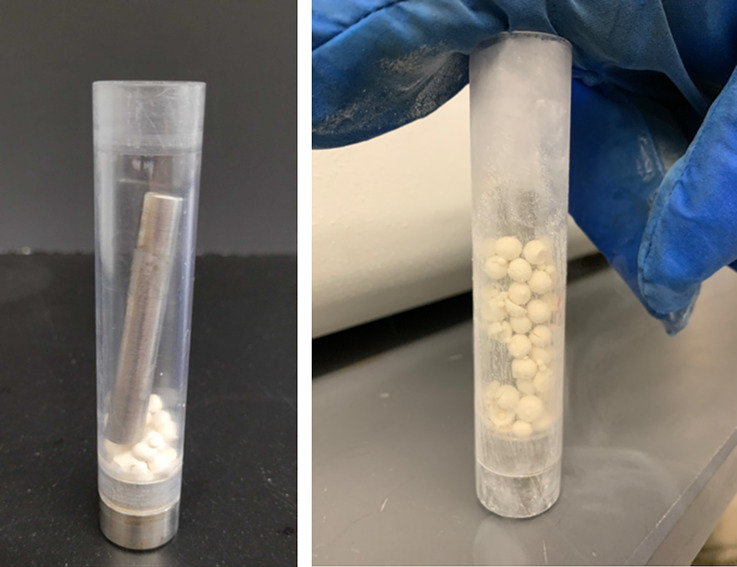
(Left) Photo showing how a freezer mill polycarbonate cylinder is loaded with an impactor and frozen cell pellets. (Right) Photo showing the tube filled to half capacity and ready to be capped.
Figure 9. Preparing the freezer mill cylinders for pulverization.
(Left) Photo showing the process of plugging the open end of the freezer mill cylinder. (Middle) Photo showing a capped freezer mill cylinder being submerged in liquid nitrogen before placing it inside the freezer mill. (Right) Photo showing all four cylinders placed inside the freezer mill.
Figure 10. Handling yeast powder.
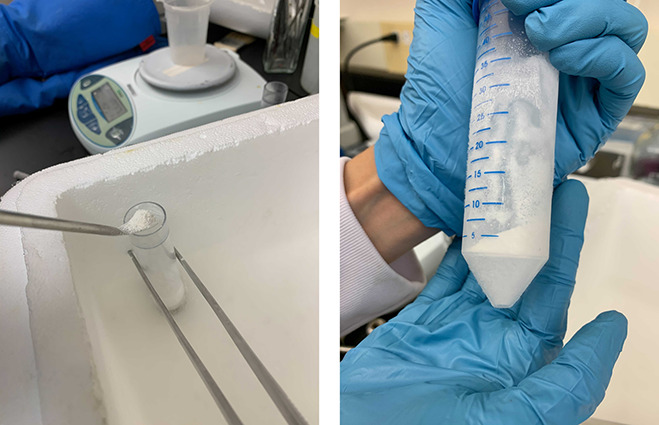
(Left) Photo showing the loose and fluffy consistency of the lysed yeast powder when handled and stored at -80°C or colder. (Right) Example 2 g aliquot of yeast powder stored in a 50 mL conical vial.
Figure 11. Workflow to purify samples, assess their quality, and prepare cryo-EM specimens .
(created with BioRender.com).
Figure 12. Elution from 3xFLAG resin.
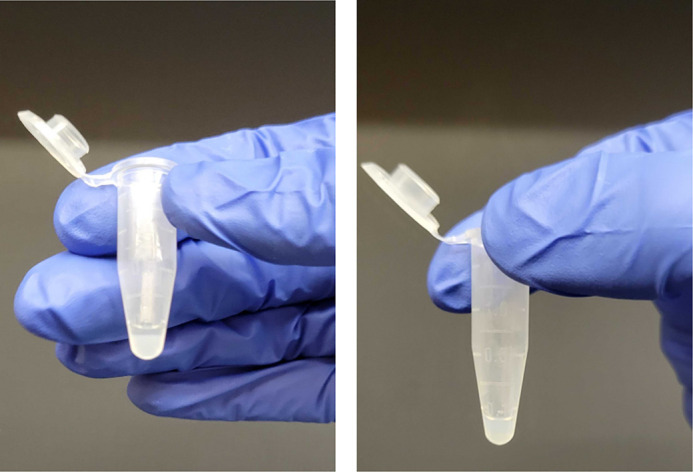
(Left) Photo of co-immunoprecipitation after addition of 3xFLAG peptide to the anti-FLAG affinity resin bed. The eluate (supernatant layer) should be carefully removed by pipetting. (Right) Photo of remaining resin after separating the eluate.
Figure 13. Preparation of grids for glow discharging.
(Left) Grids are placed on a Parafilm-wrapped glass slide. (Right) Slide is inserted in Pelco easiGlow glow discharge chamber.
Figure 14. Example of negative stain TEM image of Cdc48 complexes isolated by co-immunoprecipitation of Shp1-3xFLAG ( Cooney et al., 2019 ).
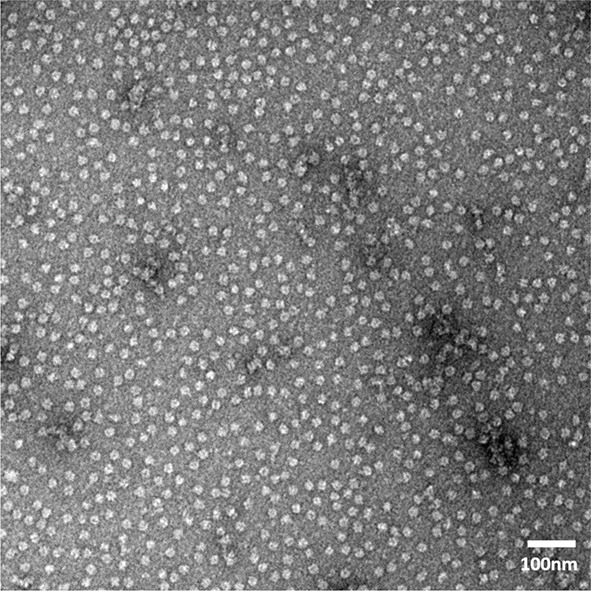
Image recorded on a Tecnai T12 transmission electron microscope equipped with a Gatan Orius CCD camera. Particles meet criteria to proceed with cryo-EM specimen preparation, including monodispersity, concentration, and size.
Data analysis
Data processing for cryo-EM will be dependent on instrumentation, particle size, and available computational hardware and software. An example of a cryo-EM data processing workflow can be found in the supplementary materials of Cooney et al. (2019). Available for free on PubMed: PMCID: PMC7362759.
Limitations
This protocol is designed for the isolation of endogenous soluble proteins and their associated complexes. We have not tested the suitability of our protocol for membrane proteins, which would require additional optimization steps with detergents.
Troubleshooting
The procedures described in this protocol are recommended as starting points. Many variables may need to be explored to optimize yield and purity for each sample. Such variables may include buffer pH, salt concentration, quantity of starting lysate and immobilizing resin, incubation times, the number of washes, and elution conditions, each of which may need to be explored to generate suitable samples for cryo-EM.
Recipes
-
Stock solutions
-
50× TAE
242 g of Tris base
57.1 mL of glacial acetic acid
100 mL of 0.5 M EDTA solution, pH 8.0
Fill with ddH2O to a final volume of 1 L. This buffer can be stored at room temperature for months.
-
5× TBS
12 g of Tris base
44 g of NaCl
Fill with ddH2O to a final volume of 1 L. This buffer can be stored at room temperature for months.
-
10× transfer buffer
30.2 g of Tris base
144 g of glycine
Fill with ddH2O to a final volume of 1 L. This buffer can be stored at 4°C for months.
-
1 M HEPES-KOH, pH 7.4
238.30 g of HEPES
Fill with ddH2O to 800 mL. Adjust pH to 7.4. Fill with ddH2O to 1,000 mL. Store at 4°C.
-
1 M KOAc
98.2 g of KOAc
Fill with ddH2O to a final volume of 1 L. Store at 4°C.
-
1 M Mg(OAc)2
214.46 g of Mg(OAc)2
Fill with ddH2 O to a final volume of 1 L. Store at 4°C.
-
1 M CaCl2
147.02 g of CaCl2
Fill with ddH2 O to a final volume of 1 L. Store at 4°C.
-
1 M D-sorbitol
182 g D-sorbitol
Fill with ddH2 O to a final volume of 1 L. Store at 4°C.
-
1 M MgCl2
203.3 g of MgCl2 ·6H2 O
Fill with ddH2 O to a final volume of 1 L. Store at 4°C.
-
1 M DTT
3.86 g of DTT
Fill with ddH2 O to a final volume of 25 mL. Prepare 100 μL aliquots and store at -20°C.
-
2× IP buffer
50 mM of HEPES-KOH, pH 7.4
200 mM of KOAc
20 mM of MgCl2
Store at 4°C.
-
1 M lithium acetate (LiOAc)
10.2 g of LiOAc
Fill with ddH2O to a final volume of 100 mL. Store at 4°C.
-
-
Gels
-
1% agarose gel
100 mL of 2× TAE (50× TAE diluted with ddH2O)
2 g of agarose
Fill with ddH2O to a final volume of 200 mL. Dissolve by boiling before pouring.
-
-
Buffers
-
1× TAE
Diluted with ddH2O from 50× TAE stock. Final volume depends on the size of the electrophoresis tank. Prepare sufficient volume to submerge agarose gel.
-
Working transfer buffer
5% methanol
1× transfer buffer (diluted with ddH2O from 10× transfer buffer stock)
-
Blocking solution
5% milk powder (w/v)
1× TBS (diluted from 5× TBS stock)
0.05% Tween 20
Fill with ddH2O to a final volume of 25 mL.
-
TBST solution
1× TBS (diluted with ddH2O from 5× TBS stock)
0.1% Tween 20
Fill with ddH2O to a final volume of 1 L.
-
Yeast lysis buffer
50 mM of HEPES-KOH pH 6.8
150 mM of KOAc
2 mM of Mg(OAc)2
1 mM of CaCl2
200 mM of sorbitol
Fill with ddH2O to a final volume of 1 L. Store at 4°C.
-
Wash buffer 1
1× IP buffer (diluted with ddH2O from 2× IP buffer stock)
5% glycerol
0.1% Igepal (CA-630)
1 mM of DTT
Protease inhibitor cocktail: 0.5 μg/mL leupeptin, 0.5 μg/mL aprotinin, 0.7 μg/mL pepstatin, and 16.67 μg/mL PMSF
Fill with ddH2O to a final volume of 20 mL (per co-IP).
*Note on preparation: Add DTT and PMSF last.
-
Wash buffer 2
1× IP buffer (diluted with ddH2O from 2× IP buffer stock)
1 mM DTT
Fill with ddH2O to a final volume of 10 mL (per co-IP).
-
2× working Laemmli sample buffer
2× Laemmli sample buffer
Add 50 μL of beta-mercaptoethanol per 950 μl of 2× Laemmli sample buffer.
-
-
Mixes
-
Transformation PCR Mix (according to Bio-Rad iProof HF manual)
For each PCR reaction:
25 µL of 2× iProof Master mix
2.5 µL of forward primer (from 10 µM stock)
2.5 µL of reverse primer (from 10 µM stock)
10 ng of pTF272 plasmid
Add ddH2O to a final volume of 50 µL.
-
Colony PCR Mix
For each PCR reaction:
10 µL of 2× iProof HF Master mix
1 µL of forward primer (from 10 µM stock; final concentration 0.5 µM)
1 µL of reverse primer (from 10 µM stock; final concentration 0.5 µM)
1.5 µL of SDS-released genomic mix
Add ddH2O to a final volume of 20 µL.
-
PEG mix
240 μL of 50% PEG 3350
36 μL of 1 M LiOAc
10 μL of ssDNA (10 mg/mL)
25 μL of PCR product (use half of a 50 μL PCR reaction product)
Add ddH2O to a final volume of 350 µL.
-
-
Reagents
-
Lithium acetate (LiOAc)
For each yeast transformation reaction:
100 mM of LiOAc (diluted with ddH2O from 1 M LiOAc stock)
Final volume of 1 mL.
-
1% uranyl acetate
10 mg of uranyl acetate salt
Add ddH2O to a final volume of 1 mL.
*Notes on preparation:
Mix by vortexing and incubate solution at 37°C for 2 h until dissolved.
Filter using 0.22 µm pore size membrane filter.
Aliquot final solution into 250 µL aliquots.
Store in an opaque tube at 4°C.
*HAZARDOUS MATERIAL: Uranyl acetate is a radiological hazard and requires safety precautions. Consult your institutional guidelines when handling this material.
-
-
Plates and media
-
YPAD plates
5.5 g of yeast extract
11 g of peptone
28 mg of adenine (Note: Adenine is not required to support growth of the BY4741 yeast strain. We use it to support other yeast strains.)
11 g of agar
50 mL of sterile 20% glucose
Add ddH2O to a final volume of 500 mL.
Sterilize by autoclave, allow the media to cool to 55–60°C, and then pour into sterile Petri dishes. Allow agar to solidify at room temperature and then store the dishes at 4°C.
-
YPAD + hygromycin plates
Follow YPAD plate recipe.
After autoclaving, allow the media to cool to 55–60°C, and then add hygromycin B to a final concentration of 0.3 mg/mL just before pouring dishes.
CAUTION: Hygromycin B is toxic, handle in hood.
-
YPD liquid media (per liter)
20 g of peptone
20 g of dextrose (glucose)
10 g of yeast
Add ddH2O to a final volume of 1 L, followed by autoclave sterilization.
-
Acknowledgments
This work was supported by grants to PSS (NIH R35 GM133772, R25 EY029124), IC (NIH F31 CA254427), DM (NIH Ruth L. Kirschstein Institutional National Research Service Award T32GM122740), and HMD (NIH Ruth L. Kirschstein Institutional National Research Service Award T32GM122740). This protocol was derived from original research reported in Shen et al. (2015) and Cooney et al. (2019).
Competing interests
The authors declare no competing interests.
Citation
Readers should cite both the Bio-protocol article and the original research article where this protocol was used.
Q&A
Post your question about this protocol in Q&A and get help from the authors of the protocol and some of its users.
References
- 1. Akada R. , Murakane T. and Nishizawa Y. ( 2000 . ). DNA extraction method for screening yeast clones by PCR . Biotechniques 28 ( 4 ): 668 670 670 , 672, 674. [DOI] [PubMed] [Google Scholar]
- 2. Cooney I. , Han H. , Stewart M. G. , Carson R. H. , Hansen D. T. , Iwasa J. H. , Price J. C. , Hill C. P. and Shen P. S. ( 2019 . ). Structure of the Cdc48 segregase in the act of unfolding an authentic substrate . Science 365 ( 6452 ): 502 - 505 . [DOI] [PMC free article] [PubMed] [Google Scholar]
- 3. D'Imprima E. , Floris D. , Joppe M. , Sanchez R. , Grininger M. and Kuhlbrandt W. ( 2019 . ). Protein denaturation at the air-water interface and how to prevent it . Elife 8 : e42747 . [DOI] [PMC free article] [PubMed] [Google Scholar]
- 4. Ghaemmaghami S. , Huh W. K. , Bower K. , Howson R. W. , Belle A. , Dephoure N. , O'Shea E. K. and Weissman J. S. ( 2003 . ). Global analysis of protein expression in yeast . Nature 425 ( 6959 ): 737 - 741 . [DOI] [PubMed] [Google Scholar]
- 5. Gietz R. D. and Schiestl R. H. ( 2007 . ). Quick and easy yeast transformation using the LiAc/SS carrier DNA/PEG method . Nat Protoc 2 ( 1 ): 35 - 37 . [DOI] [PubMed] [Google Scholar]
- 6. Ho C. M. , Li X. , Lai M. , Terwilliger T. C. , Beck J. R. , Wohlschlegel J. , Goldberg D. E. , Fitzpatrick A. W. P. and Zhou Z. H. ( 2020 . ). Bottom-up structural proteomics: cryoEM of protein complexes enriched from the cellular milieu . Nat Methods 17 ( 1 ): 79 - 85 . [DOI] [PMC free article] [PubMed] [Google Scholar]
- 7. Kühlbrandt W. ( 2014 . ). Biochemistry. The resolution revolution . Science 343 ( 6178 ): 1443 - 1444 . [DOI] [PubMed] [Google Scholar]
- 8. Longtine M. S. , McKenzie A. 3rd Demarini D. J. , Shah N. G. , Wach A. , Brachat A. , Philippsen P. and Pringle J. R. ( 1998 . ). Additional modules for versatile and economical PCR-based gene deletion and modification in Saccharomyces cerevisiae . Yeast 14 ( 10 ): 953 - 961 . [DOI] [PubMed] [Google Scholar]
- 9. Monroe N. , Han H. , Shen P. S. , Sundquist W. I. and Hill C. P. ( 2017 . ). Structural basis of protein translocation by the Vps4-Vta1 AAA ATPase . Elife 6 : e24487 . [DOI] [PMC free article] [PubMed] [Google Scholar]
- 10. Nakane T. , Kotecha A. , Sente A. , McMullan G. , Masiulis S. , Brown P. , Grigoras I. T. , Malinauskaite L. , Malinauskas T. , Miehling J. , et al. .( 2020 . ). Single-particle cryo-EM at atomic resolution . Nature 587 ( 7832 ): 152 - 156 . [DOI] [PMC free article] [PubMed] [Google Scholar]
- 11. Noble A. J. , Wei H. , Dandey V. P. , Zhang Z. , Tan Y. Z. , Potter C. S. and Carragher B. ( 2018 . ). Reducing effects of particle adsorption to the air-water interface in cryo-EM . Nat Methods 15 ( 10 ): 793 - 795 . [DOI] [PMC free article] [PubMed] [Google Scholar]
- 12. Shen P. S. ( 2018 . ). The 2017 Nobel Prize in Chemistry: cryo-EM comes of age . Anal Bioanal Chem 410 ( 8 ): 2053 - 2057 . [DOI] [PubMed] [Google Scholar]
- 13. Shen P. S. , Park J. , Qin Y. , Li X. , Parsawar K. , Larson M. H. , Cox J. , Cheng Y. , Lambowitz A. M. , Weissman J. S. , et al. .( 2015 . ). Protein synthesis. Rqc2p and 60S ribosomal subunits mediate mRNA-independent elongation of nascent chains . Science 347 ( 6217 ): 75 - 78 . [DOI] [PMC free article] [PubMed] [Google Scholar]
- 14. Shen P. S. , Iwasa J. H. ( 2018 . ). CryoEM 101: https://cryoem101.org/.
- 15. Skalidis I. , Kyrilis F. L. , Tuting C. , Hamdi F. , Chojnowski G. and Kastritis P. L. ( 2022 . ). Cryo-EM and artificial intelligence visualize endogenous protein community members . Structure 30 ( 4 ): 575 - 589 e576 . [DOI] [PubMed] [Google Scholar]
- 16. Yip K. M. , Fischer N. , Paknia E. , Chari A. and Stark H. ( 2020 . ). Atomic-resolution protein structure determination by cryo-EM . Nature 587 ( 7832 ): 157 - 161 . [DOI] [PubMed] [Google Scholar]


