Abstract
Friction Stir Welding (FSW) is a solid-state welding method that has diffusion and different metal structures can blend well. Friction stir welding (FSW) has a weakness, one of which is the lack of flexibility the welding process is only carried out on one side of the plate being welded, so it is not applied on thick materials. Double side friction stir welding is a double working process in which the plate to be welded is subjected to friction from two tools on opposite sides. In the DS-FSW welding process, the dimensions and geometry of the tool and pin greatly affect the quality of the joint. This study to determine the mechanical properties and corrosion rate of Double side friction stir welding aluminum 6061 with variation rotation speed and axis of top and bottom tools. The results of this radiographic test can be seen that specimen 4 welded with variations in speed and tool position has defects in the form of incomplete fusion (IF). The results of microstructural observations showed that the heat caused by the welding process resulted in recrystallization in the form of fine grains in the stirring area and there was no phase change. The highest hardness value in the welding area is specimen B. The largest bending value at the 1G welding positions is specimen D, which is 41.86 MPa with a strain value of 13.23%, while the smallest value at the 4G welding position is specimen A, which is 38.18 MPa with a strain value of 5.03%. The fracture and crack surfaces showed that crack initiation, propagation and material stirring failure occurred in all test specimens, even though the impact test specimen was cut in a small area of Incomplete Fusion, but the test results showed that there was still a surface of the parent metal that had not been stirred. The corrosion test method uses three electrode cells with corrosion media as a substitute for seawater with a salinity of 3.5% NaCl, result of corrosion test is specimen B at the 1G welding position has the highest corrosion rate value of 0.63856 mm/year and specimen An at the 1G welding position has the lowest corrosion rate of 0.058567 mm/year.
Keywords: Aluminum, Friction stir welding, Double side friction stir welding, Mechanical properties, Corrosion
1. Introduction
Aluminum has been extensively researched in industries due to its beneficial properties [1]. These advantageous properties include strength ratio, good ductility, corrosion resistance, relatively low cost, lightweight, and good weldability [2]. One of the industries that use aluminum is the transportation industry because it can reduce vehicle loads without compromising the safety factor [3] so that it can save fuel consumption by up to 20% and reduce CO2 emissions by up to 10% [4], This makes the use of aluminum from year to year continues to increase [5]. Vehicles that use aluminum as the base material are high-speed trains for the car body frame [6]. The weakness of the aluminum welding process is the formation of porosity which can affect the mechanical properties of the connection. This porosity is caused by the dissolved hydrogen in the weld metal, air during the welding process, filler wire/filler and the influence of the welding environment [7].
Friction Stir Welding (FSW) is a solid state welding method that has diffusion and different metal structures can blend well [8]. Materials that are difficult to join due to defects that arise during the joining process such as porosity and imperfect penetration can be joined easily with this technique [9]. However, Friction stir welding (FSW) has a weakness because FSW is still has a weakness, namely, it can only be used for welding in a flat position (flat position) but cannot be used for vertical positions, and overhead welding [10]. This requires a FSW design that can work on both sides in one welding process Cox et al., [2014] succeeded in designing double-side Friction Stir Spot Welding (FSSW) is a double working process in which the plate to be welded is subjected to friction from two tools on opposite sides. Double side friction stir welding has better strength than single side welding because the mechanical properties can be improved when compared to single side welding [11].
The working principle of this welding utilizes the rotation of the tool into the workpiece which produces heat due to friction between the tool and the workpiece or metal to be joined until the metal side softens. The presence of high heat due to friction and non-uniform cooling rate affects the mechanical properties and corrosion rate, the heat causes metallurgical transformation in all areas of the Heat Affected Zone (HAZ) and weld metal (WM) [12]. To get a connection that has good quality is not easy, because you have to pay attention to the parameters on the Friction Stir Welding (FSW) adjusted to the material to be joined. Parameters that must be considered in this welding process, namely: tool rotation, welding speed, pin shape, and penetration depth [13]. This welding parameter has a very important role to get a good quality of welded joints [14].
Simar et al. reported that initially present in Base Metal (BM) fully soluble in the nugget zone (NZ) and pronounced in the heat affected zone (HAZ) of the 6005 A-T6 aluminum FSW junction. They also describe the soft area around the center of the weld [15]. Dong et al. studied the effect of welding speed on the microstructure and mechanical properties of the 6005 A-T6FSW joint, reported an increase in the tendency of tensile properties with increasing welding speed [16]. Wang et al. concluded that FSW 6061-T6 aluminum joints made at low welding speeds exhibit lower residual stresses, due to changes in microstructure and stress relaxation that occur as a result of the longer heating times associated with low welding speeds [17]. Therefore, microstructure, and mechanical properties should be considered together to obtain an optimized FSW process.
In friction stir welding, geometrical and motion features of the tool or pin greatly influence the interaction between the tool and workpiece as well as the resulting joint microstructure and mechanical properties. A proper tool offset can increase the joints performance by avoiding the formation of defects like voids and tunnels and can also minimize the IMC thickness to improve interface bonding strength [18]. Hou et al. [19,20] examined the DS-FSW welding method by varying the eccentricity of the pin and the offset value of the tool (2 mm–0 mm), based on the results of the study showed that the variation in the eccentricity of the pin significantly increased the flow of material and the smoothness of the grain in the stir zone and increased the toughness of the weld joint, while the variation in the offset value of the tool showed that a decrease in the offset resulted in a change in the fracture location and the formation of more cavity defects and also mixing the material is inconsistent throughout the direction of welding, but an interlocking structure is formed, which will contribute to the strength of the joint. Based on the background, this study aims to analyze the mechanical properties, microstructure and corrosion rate of material after welding process using Double Side Friction Stir Welding (DSFSW) methods with variation rotation speed and axis of top and bottom tools.
2. Material and method
2.1. Material
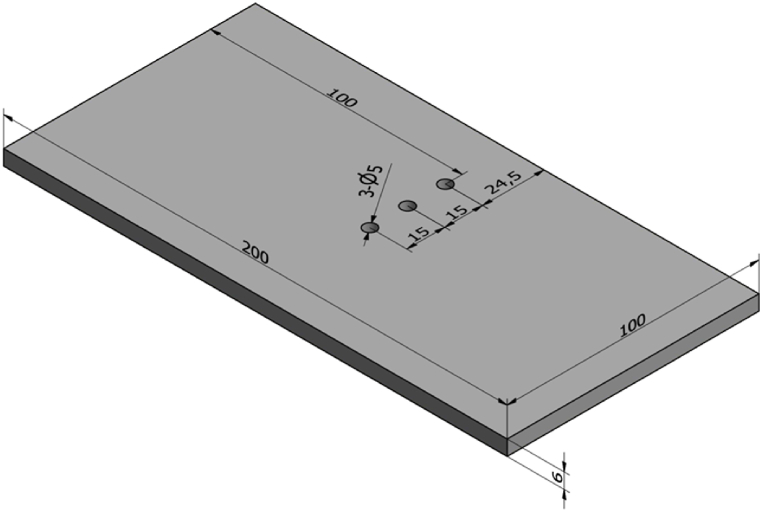
The base metal used in this study is aluminum alloy 6061 with a thickness of 6 mm with chemical composition and mechanical properties shown in Table 1 and Table 2. Dimensions of the Aluminum Alloy 6061 welding plate are shown in Fig. 2.
Table 1.
Chemical composition % of aluminum alloy 6061.
| Element | Si | Fe | Cu | Mn | Mg | Ti | Zn |
|---|---|---|---|---|---|---|---|
| Contents | 0.80 | 0.70 | 0.40 | 0.15 | 1.2 | 0.15 | 0.25 |
Table 2.
Mechanical properties of aluminum alloy 6061.
| Tensile Strength (MPa) | Yield Strength (MPa) | Elongation (%) | Harness Vickers |
|---|---|---|---|
| 276 | 386 | 12 | 107 |
Fig. 2.
Dimensions of the Aluminum Alloy 6061 welding plate.
2.2. Experimental
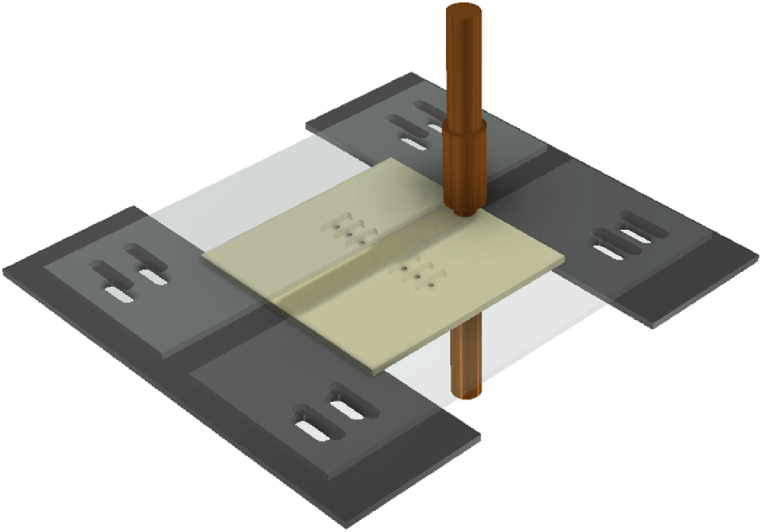
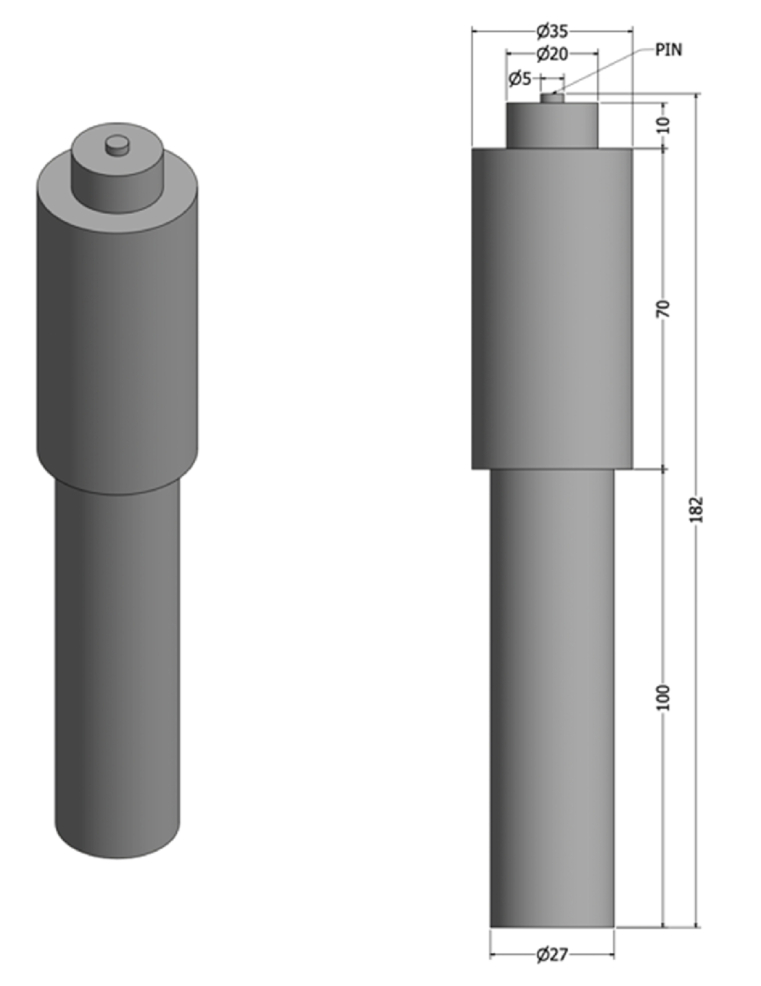
In this study, using a double side friction stir welding method can be seen in Fig. 1, with the rotation speed of the tools on the top and bottom set differently, namely 1500 RPM and 900 RPM, the transverse speed used is 30 mm/min. In this study, the axis of the top and bottom tools is determined as a variable, where the axis of the top tool is parallel to the axis of the bottom tool and the axis of the bottom tool is made as far as 5 mm from the axis of the tools tool, Table 3 shows the welding parameters used in this study. The double-sided FSW joint uses two stirrers made of AISI H13 steel. The stirring tool has been heating treated to increase hardness and wear resistance. The detailed dimensions of the stirring tool are shown in Fig. 3.
Fig. 1.
Illustration of the double side friction stir welding process.
Table 3.
Variations of double side friction stir welding.
| Specimen | Chisel Position | Top Tool Rotate Speed (Rpm) | Bottom Tool Rotate Speed (Rpm) |
|---|---|---|---|
| A | 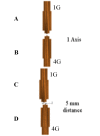 |
900 | 1500 |
| B | 1500 | 900 | |
| C | 900 | 1500 | |
| D | 1500 | 900 |
Fig. 3.
Detail dimension of the stirring tool.
2.3. Radiographic testing
Radiographic testing was carried out using X-Ray Equipment Eresco at 100kv with a current of 2.0 A. Film radiography uses the AGFA brand with type D7 film and dimensions of 4 × 15”. This test was carried out at Robutech, Surabaya.
2.4. Microstructure observation
Microstructure observation was carried out for all specimen according to Table 3 using the Olympus BX53 M Trinocular with etching using hydrofluoric acid and alcohol fluid, then the etching liquid is poured on the specimen to be observed for ±90 s. Microstructure observation with the aim of observing changes in the microstructure of the specimen after being exposed to the Double Side Friction Stir Welding process.
2.5. Hardness testing
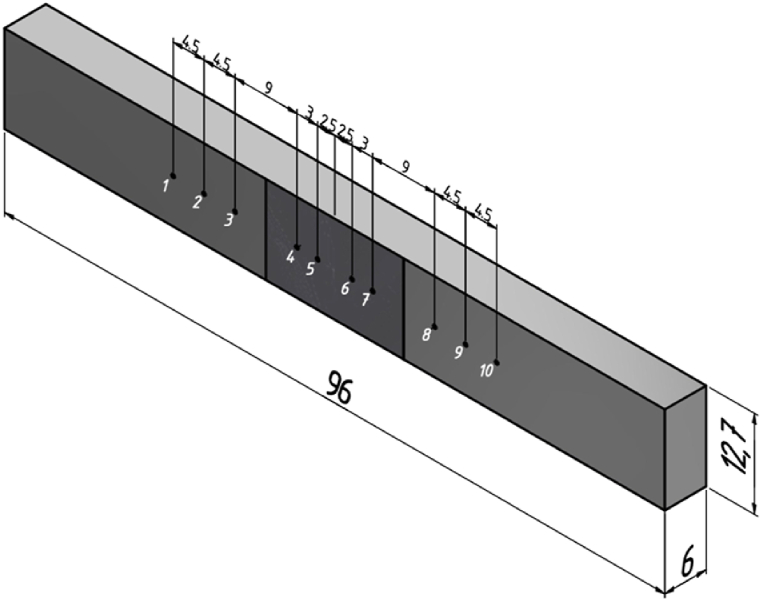
Vickers hardness was measured using the Universal Hardness Tester. Hardness testing is tested according to Fig. 4 below.
Fig. 4.
Dimensions of vickers hardness testing.
2.6. Three-point bending
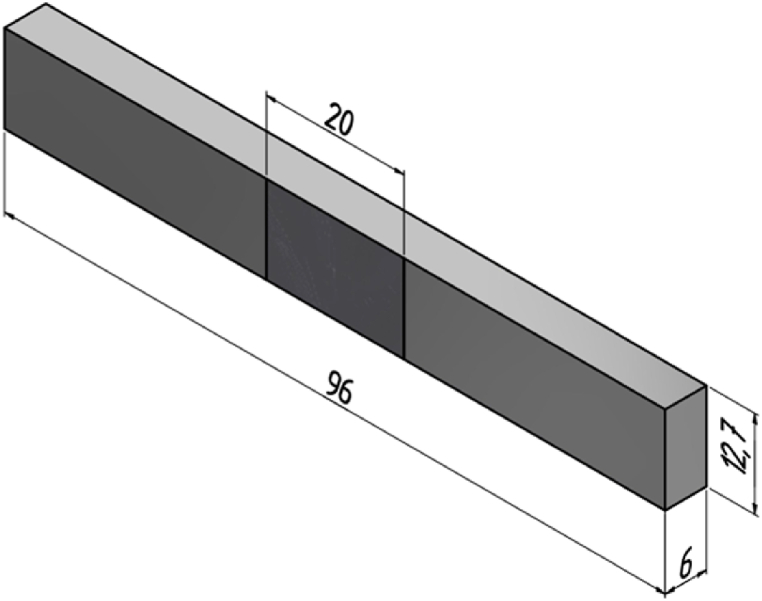
This bending test uses the ASTM D790 standard in static conditions with a cross-sectional distance of 51 mm, the standard dimensions are shown in Fig. 5 below.
Fig. 5.
Dimensions of ASTM D790 standard bending testing specimens.
2.7. Impact test
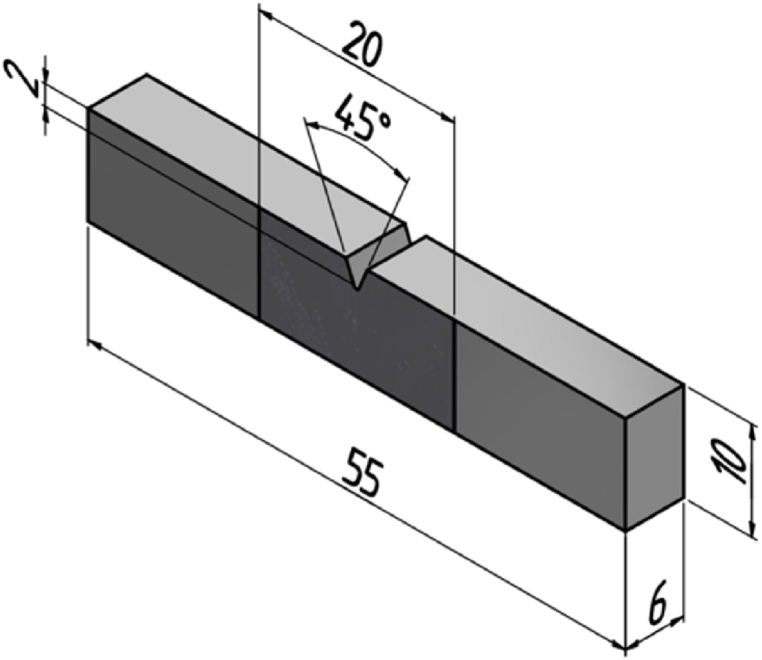
The standard dimension of impact testing in this test uses ASTM E23-07a which refers to ASTM E23, can be seen in Fig. 6 below.
Fig. 6.
Dimensions of ASTM E23-07a Standard impact testing specimens.
2.8. Corrosion
Corrosion testing is carried out in the Lab. Metallurgy, Mechanical Engineering, Universitas Brawijaya using a three-electrode cell potentiostat connected to NOVA software based on the ASTM G102 standard. The dimensions of the corrosion test specimen can be seen in Fig. 7. In this corrosion test using a chemical solution as a substitute for sea water with a 3.5% NaCl sanity according to the ASTM D1141 standard.
Fig. 7.
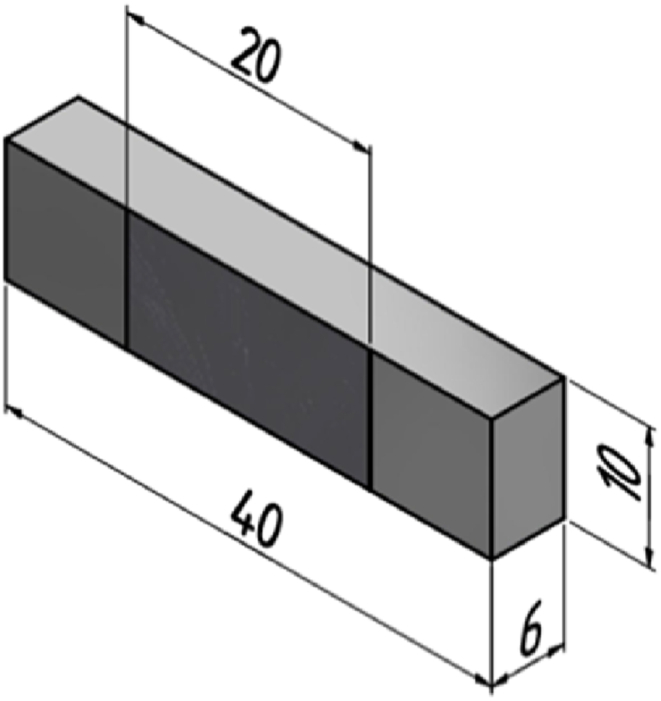
Corrosion test dimensions.
3. Result and discussion
3.1. Radiographic testing
Specimens that have been welded with a double side Friction Stir welding process with variations in tool rotation speed and tool shift.
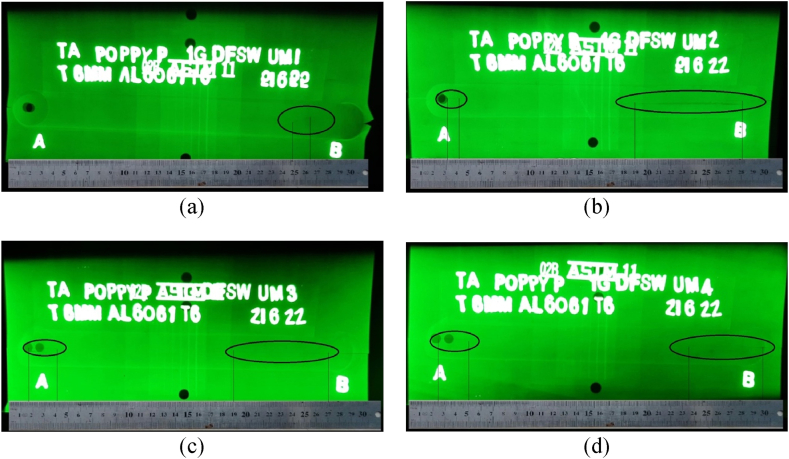
In this radiographic test, it can be seen that specimen D (Fig. 8(d)) welded with variations in speed and tool position has defects in the form of incomplete fusion (IF) specimen A (Fig. 8(a)) along 16 mm at the beginning of welding, specimen B (Fig. 8(b)) along 91 mm at the beginning of welding and 10 mm at the end of welding, specimen C (Fig. 8(c)) along 80 mm at the beginning of welding and 24 mm at the end of welding and for specimen D the length was 59 mm at the beginning of welding and 26 mm at the end of welding. Incomplete fusion that occurs in the specimen is caused by low heat input and a rapid cooling process occurs so that the test object does not reach its melting point and the tool movement is too fast. These defects are influenced by welding parameters, plate thickness, the presence of an oxide layer on the material being joined [21] and the accuracy when the welding process takes place [22].
Fig. 8.
Radiography Test shooting results (a) specimen A, (b) specimen B, (c) specimen C, (d) specimen D.
3.2. Microstructure
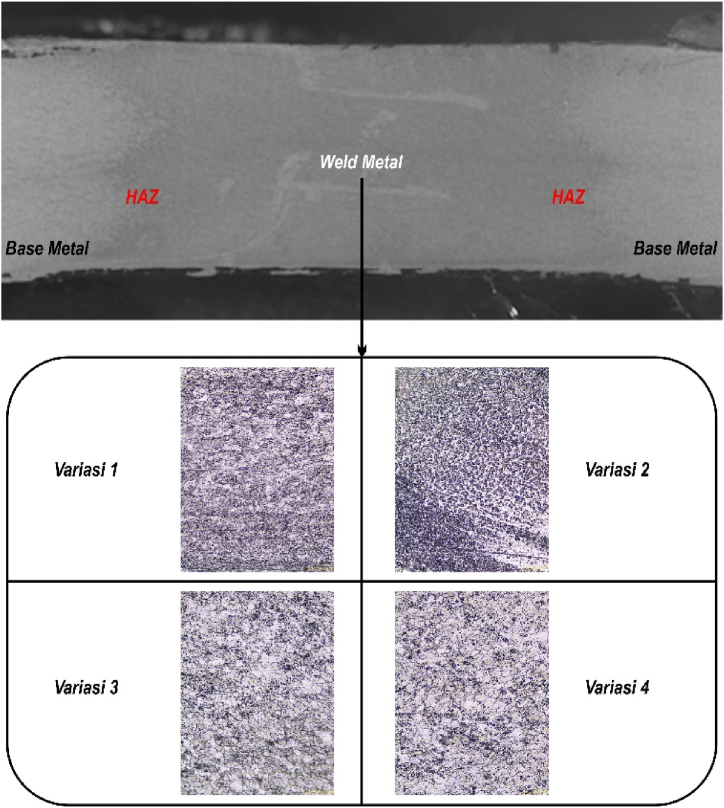
Fig. 9 shows the results of micro photos with 200× magnification, each welding result from each variation in the weld metal area (Weld Metal). Weld Metal is an area that is exposed to heat generated during the welding process and an area that is deformed due to the stirring process of the welding tool pin, so that this area experiences plastic deformation [23]. Heating that takes place during the welding process produces recrystallization in the form of fine grains in the stirring area and there is no phase change because this welding process does not use filler metal. Tool rotation speed can affect the microstructure of the weld metal [24].
Fig. 9.
Microstructure test results with 200× Magnification.
3.3. Hardness testing (micro-vickers)
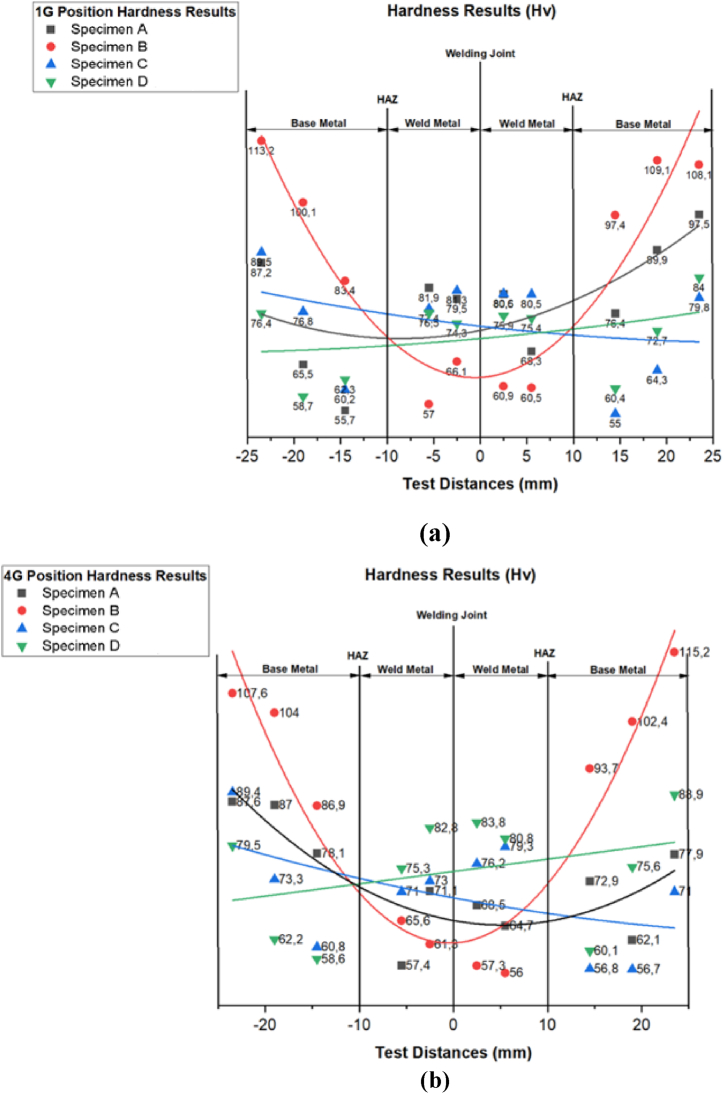
Metal surface, heat-affected zone, and weld metal area in the weld sample are the three places where hardness is evaluated to analyzes the mechanical properties. Hardness is assessed with the Vickers Hardness Tester with an applied stress of 200 g, Diamond Intensifiers reported lower weld area hardness values than the base metal area in all specimens. From Fig. 10(a) and Fig. 10(b) in all specimens, specimen D had the highest hardness value in the welding area.
Fig. 10.
Result hardness test (a) at 1G tool position, (b) at 4G tool position.
Internal tensions that form in the weld metal region are the reason for the decrease in hardness in these three places. The decrease in hardness is partly a result of changes in particle size. Even under conditions of steady tension, hardness changes in response to temperature changes. Changes in microstructure in various weld locations are closely related to specimens in hardness; as temperature rises, grain size tends to become smaller [25].
3.4. Bending test
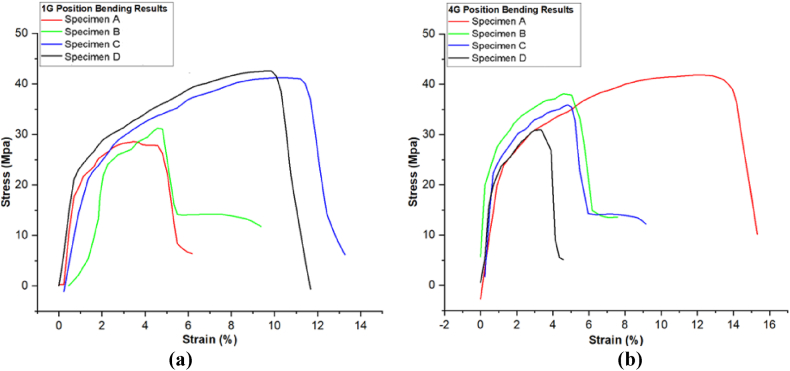
A quick, low-cost qualitative test that can be used to assess a material's ductility is the bending test. To determine the greatest angle that can be made and the greatest force that can be resisted, bending tests are performed around the weld surface and root for welded connections. Fig. 11(a) and Fig. 11(b) shows the stress and strain of the specimen at 1G an 4G welding position when it is subjected to a bending test. The highest bending value at the 1G position is specimen D, which is 41.86 MPa with a strain value of 13.23%, while the highest value at the 4G position is specimen A, which is 38.18 MPa with a strain value of 5 0.03%.
Fig. 11.
Graph Strain vs Stress Result from Bending Test (a) at 1G Tool Position, (b) at 4G Tool Position.
Specimens of unwelded AA6061 alloy base metal showed a strain value of 12%. Examination of the test sample shows that there are defects on the inside of the bent test object. When the test sample is examined, it becomes clear that the bent test object's inside has flaws. Due to the increased heat input delivered to the material and the steady rate of welding development, the flexural strength has increased. Another factor is the 6061-aluminum alloy's combination of materials' strength in copper, aluminum, and silicon [26].
3.5. Impact test
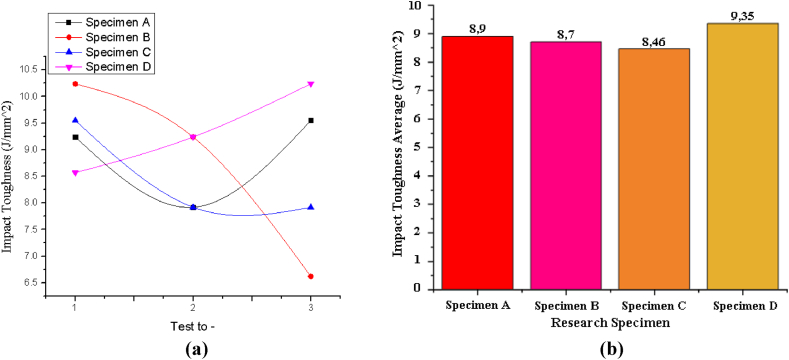
The findings regarding the joint's impact toughness are shown in Fig. 12(a) and Fig. 12(b). Ak, a measure of impact toughness, is obtained by dividing the impact energy (Ak) by the initial sample's minimum cross-sectional area. Observation of the cracked surface clearly shows that all failures occurred because all test specimens still contained unconnected parent metal. Specimen C have the smallest average value of 8.46 J/mm2, while the largest impact toughness value lies in specimen D, which is 9.35 J/mm2. Observation of the crack surface showed that crack initiation, propagation and failure of material agitation occurred in all test specimens, even though the impact test specimen was cut in a small area of Incomplete Fusion, but the test results showed that there was still a surface of the parent metal that had not been stirred.
Fig. 12.
Graph of energy results from impact testing, (a) testing 3× Repetition, (b) average of each variation.
This demonstrates that the weakest spot is in the weld center area. Because of the high thermal expansion coefficient of the alloy and the low partition coefficient, it appears that the fracture point in the macro structure is in the middle of the weld, which was previously linked to the mortar [27,28]. Some research [29,30] showed that numerous variables, including microstructure, residual stress, and mechanical characteristics, influenced how impact cracks grew. Therefore, the fine-grained equiaxed structure, which offers more grain boundaries to prevent the emergence of impact fractures, especially at low Ak values, is likely associated to the best impact performance of welding double-side friction stirs.
3.6. Macro structure
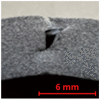
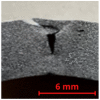
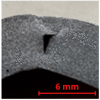
Table 4 and Table 5 is the result of macro structure test from bending and impact testing. This observation has the aim of seeing the overall object that has been tested so that the fracture area of the test results can be observed in the mixed area. Impact Fault results include brittle fractures because the welding mixture is still not fulfilled.
Table 4.
Macro structure of bending testing.
| Specimen | Welding Position | Top View | Bending Part |
|---|---|---|---|
| A | 1G |  |
 |
| 4G |  |
 |
|
| B | 1G |  |
 |
| 4G |  |
 |
|
| C | 1G |  |
 |
| 4G |  |
 |
|
| D | 1G |  |
 |
| 4G |  |
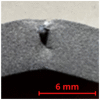 |
Table 5.
Macro structure of impact testing.
| Specimen | Isometric View | Bending Part |
|---|---|---|
| A |  |
 2 2 |
| B |  |
 3 3 |
| C |
 0 0 |
 4 4 |
| D |
 1 1 |
 5 5 |
3.7. Corrosion testing
Corrosion testing was carried out using the three-electrode method with the help of the AutoLab Potentiostat (PGSTAT2014) and NOVA 1.11 software. NOVA software automatically shows the corrosion rate of the object being tested. The data obtained from this test include current and potential. From the test results obtained a table diagram, which is a diagram that shows the potential and current density used to determine the corrosion rate of the material.
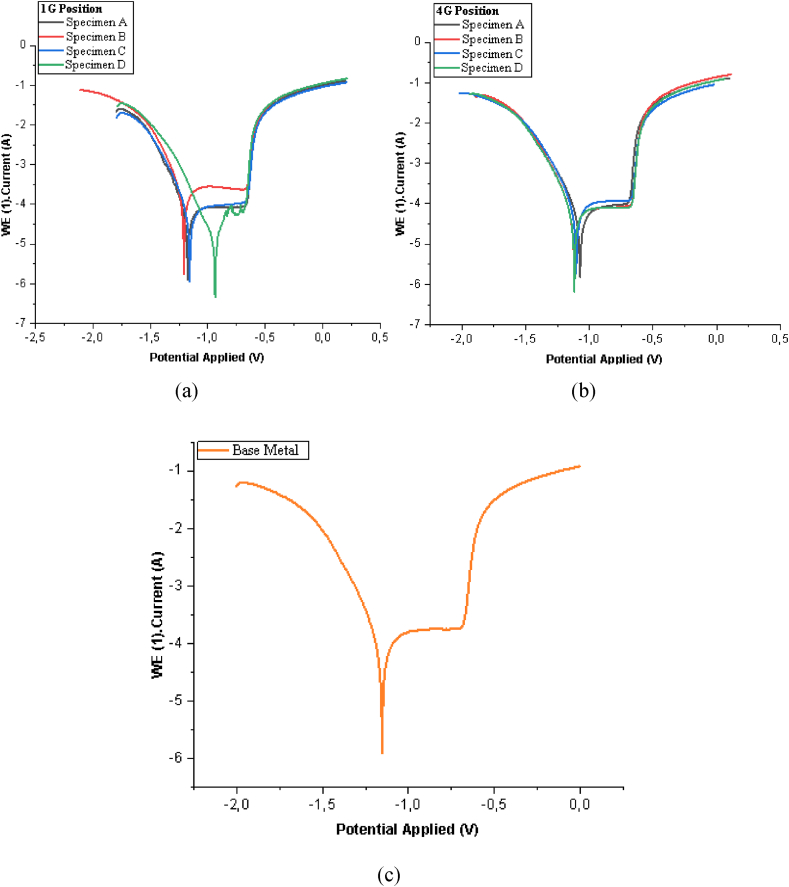
Fig. 13(a) shows the results of the corrosion test on 1G welding position, Fig. 13(b) shows the results of the corrosion test on 4G welding position and Fig. 13(c) shows results of the corrosion test on base metal. The graph that has a more negative value or negative potential means it has a high corrosion rate value. The value of the corrosion rate from the results of corrosion testing on specimens from double side friction stir welding using the electrochemical method with the help of a three-electrode cell device and NOVA 1.11 software can be seen in the table below as follows.
Fig. 13.
Tabel diagram (a) 1 G position (b) 4G position (c) Base metal.
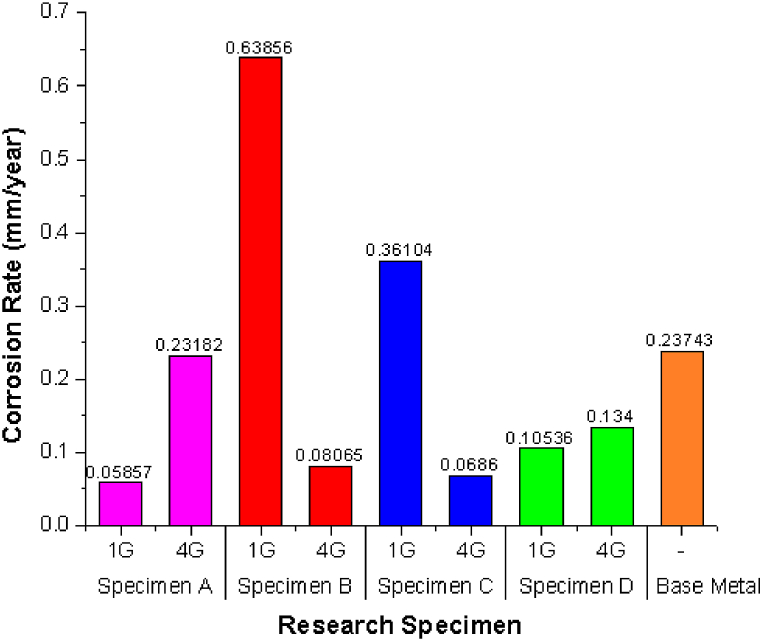
Based on the data from the corrosion test results in Table 6 and Fig. 14 using a three-electrode cell, it shows that the greater the heat input, the higher the corrosion rate. It is characterized by a small electropotential value, the more negative the electropotential value, the more oxidized it will be, so that the material is susceptible to corrosion reactions. Based on Table 6 and Fig. 13(a) show that specimen B at 1G welding positions has the highest corrosion rate value of 0.63856 mm/year and specimen An at 1G welding positions with a 900Rpm tool rotation speed variation has the lowest corrosion rate value of 0.058567 mm/year.
Table 6.
Corrosion test results using NOVA 1.11. Software.
| Double Side Friction Stir Welding |
|||||||||
|---|---|---|---|---|---|---|---|---|---|
| Specimen A |
Specimen B |
Specimen C |
Specimen D |
Base Material |
|||||
| 1 | 2 | 3 | 4 | 5 | 6 | 7 | 8 | 9 | |
| Welding Position | 1G | 4G | 1G | 4G | 1G | 4G | 1G | 4G | – |
| Welding Speed | 900 | 1500 | 1500 | 900 | 900 | 1500 | 1500 | 900 | – |
| Electropotential (mV) | −1.1769 | −1.0725 | −1.2089 | −1.1184 | −1.1583 | −1.1027 | −0.93766 | −1.1178 | −1.1543 |
| Current Density (μA/cm2) | 0.000021503 | 0.000085114 | 0.00023445 | 0.00002961 | 0.000044185 | 0.000025186 | 0.000038683 | 0.000049199 | 0.000087171 |
| Corrosion Rate (mm/year) | 0.058567 | 0.23182 | 0.63856 | 0.080648 | 0.36104 | 0.068598 | 0.10536 | 0.134 | 0.23743 |
Fig. 14.
Corrosion rate comparison diagram (mm/year).
The increased tool rotation speed can increase heat during the welding process which causes high plastic deformation [31] and roughening of the stir zone (SZ), besides the pins used during the welding process also affect the flow characteristics of the material [32]. Welding speed has an impact on the mechanical properties and microstructure of the weld joint. High welding speed has a major influence on the mechanical properties of welding nuggets [33]. The presence of high heat due to friction and non-uniform cooling rate affects the corrosion rate, this heat causes metallurgical transformation in all areas of the Heat Affected Zone (HAZ) and weld metal (WM) [12]. The difference in microstructure depends on the cooling rate and peak temperature in each region, so the corrosion behavior can be very different for each area of the weld. Unstable metallurgy makes metal or material susceptible to corrosion due to increased stress [34]. The stresses in the welded structure have been shown to be very influential on corrosion, this has a large impact on the performance of the welded joint [35].
4. Conclusion
From the research conducted to determine the mechanical properties and corrosion rate of the aluminum AA 6061 double side friction stir welding (DS-FSW) welding joint, several conclusions can be drawn based on the results of the tests that have been carried out, including the following.
-
1.
In this radiographic test, 4 specimens welded with variations in speed and tool position have defects in the form of incomplete fusion (IF).
-
2.
The results of microstructural observations showed that the heat caused by the welding process resulted in recrystallization in the form of fine grains in the stirring area and there was no phase change.
-
3.
The highest hardness value in the welding area lies in specimen B in all variations of the test specimen.
-
4.
The smallest toughness value occurs in specimen C specimens with an average value of 8.46 J/mm2, while the largest impact toughness value is found in specimen D, which is 9.35 J/mm2.
-
5.
The greatest value of welded joint strength is in the 1G position on specimen D with a tool rotation speed of 1500 rpm, which is 41.86 MPa with a strain value of 13.23%, while the largest value is in the 4G position in specimen A with a tool rotation speed of 1500 rpm, which is 38, 18 MPa with a strain value of 5.03%.
-
6.
Observation of the crack surface showed that crack initiation, propagation and failure of material stirring occurred in all test specimens, even though cutting of the impact test specimen had been chosen in a small area of Incomplete Fusion, but the test results showed that there was still a surface of the parent metal that had not been stirred.
-
7.
Based on the results of corrosion testing that specimen B at 1G welding positions has the highest corrosion rate value of 0.63856 mm/year and specimen An at 1G welding positions with a 900Rpm tool rotation speed variation has the lowest corrosion rate value of 0.058567 mm/year.
Author contribution statement
Danang Priyasudana: Performed the experiments; Wrote the paper.
Simonne Andrean Crisdion: Performed the experiments; Contributed reagents, materials, analysis tools or data; Wrote the paper.
Poppy Puspitasari: Conceived and designed the experiments; Analyzed and interpreted the data; Contributed reagents, materials, analysis tools or data; Wrote the paper.
Triyono: Conceived and designed the experiments; Analyzed and interpreted the data.
Jamasri: Analyzed and interpreted the data; Contributed reagents, materials, analysis tools or data.
Andoko: Contributed reagents, materials, analysis tools or data; Wrote the paper.
Diki Dwi Pramono: Performed the experiments; Contributed reagents, materials, analysis tools or data.
Funding statement
Poppy Puspitasari was supported by Riset Kerjasama Indonesia (RKI) as the research partner in Universitas Negeri Malang with the research host of Universitas Negeri Surakarta (UNS) [17.5.66/UN.32.20.1/LT/2022].
Data availability statement
Data included in article/supp. Material/referenced in article.
Declaration of interest's statement
The authors declare no competing interests.
References
- 1.Georgantzia E., Gkantou M., Kamaris G.S. Aluminium alloys as structural material: a review of research. Eng. Struct. 2021;227 doi: 10.1016/j.engstruct.2020.111372. [DOI] [Google Scholar]
- 2.Singh P., Deepak D., Brar G.S. Optical micrograph and micro-hardness behavior of dissimilar welded joints of aluminum (Al 6061-T6) and stainless steel (SS 304) with friction crush welding. Mater. Today Proc. 2021;44:1000–1004. doi: 10.1016/j.matpr.2020.11.171. [DOI] [Google Scholar]
- 3.Krishna G.V., Nath De T., Burman R.K., Sekhar B.V., Rao V.G. Numerical and experimental comparative study of Aluminum and hybrid mounting interfaces of launch vehicle avionics for weight reduction. Procedia Struct. Integr. 2019;14:820–829. doi: 10.1016/j.prostr.2019.07.060. [DOI] [Google Scholar]
- 4.Kumar A., Maithani R., Kumar A., Kumar D., Sharma S. An all-aluminium vehicle’s design and feasibility analysis. Mater. Today Proc. 2022 doi: 10.1016/j.matpr.2022.03.714. [DOI] [Google Scholar]
- 5.Zhou J., Wan X., Li Y. Advanced aluminium products and manufacturing technologies applied on vehicles presented at the EuroCarBody conference. Mater. Today Proc. 2015;2:5015–5022. doi: 10.1016/j.matpr.2015.10.091. [DOI] [Google Scholar]
- 6.Watson I. High-Speed Railway. 2021:665–688. [Google Scholar]
- 7.Selvamani S.T. Microstructure and stress corrosion behaviour of CMT welded AA6061 T-6 aluminium alloy joints. J. Mater. Res. Technol. 2021;15:315–326. doi: 10.1016/j.jmrt.2021.08.005. [DOI] [Google Scholar]
- 8.Singh P., Deepak D., Brar G.S. Comparative evaluation of aluminum and stainless steel dissimilar welded joints. Mater. Today Proc. 2020;33:1488–1492. doi: 10.1016/j.matpr.2020.02.682. [DOI] [Google Scholar]
- 9.Khan N., Rathee S., Srivastava M. Friction stir welding: an overview on effect of tool variables. Mater. Today Proc. 2021 doi: 10.1016/j.matpr.2021.07.487. [DOI] [Google Scholar]
- 10.Ke W.C., Oliveira J.P., Ao S.S., Teshome F.B., Chen L., Peng B., Zeng Z. Thermal process and material flow during dissimilar double-sided friction stir spot welding of AZ31/ZK60 magnesium alloys. J. Mater. Res. Technol. 2022;17:1942–1954. doi: 10.1016/j.jmrt.2022.01.097. [DOI] [Google Scholar]
- 11.Kumar A.R., Varghese S., Sivapragash M. A comparative study of the mechanical properties of single and double sided friction stir welded aluminium joints. Procedia Eng. 2012;38:3951–3961. doi: 10.1016/j.proeng.2012.06.452. [DOI] [Google Scholar]
- 12.Griffing L. Published by AMERICAN WELDING SOCIETY, 2501 N.W. 7th Street Miami, Florida 33125. 1972. Welding handbook, griffing, L., 1972 “welding handbook” 6 ed. [Google Scholar]
- 13.Pitchipoo P., Muthiah A., Jeyakumar K., Manikandan A. Friction stir welding parameter optimization using novel multi objective dragonfly algorithm. Int. J. Lightweight Mater. Manuf. 2021;4:460–467. doi: 10.1016/j.ijlmm.2021.06.006. [DOI] [Google Scholar]
- 14.Shrivas S.P., Vaidya S.K., Khandelwal A.K., Vishvakarma A.K. Investigation of TIG welding parameters to improve strength. Mater. Today Proc. 2020;26:1897–1902. doi: 10.1016/j.matpr.2020.02.416. [DOI] [Google Scholar]
- 15.Simar A., Bréchet Y., de Meester B., Denquin A., Pardoen T. Sequential modeling of local precipitation, strength and strain hardening in friction stir welds of an aluminum alloy 6005A-T6. Acta Mater. 2007;55:6133–6143. doi: 10.1016/j.actamat.2007.07.012. [DOI] [Google Scholar]
- 16.Zhitchong Chen L., Li Shengxi. Microstructure, mechanical properties and corrosion of friction stir welded 6061 Aluminum Alloy Zhitong. Syria Studies. 2015;7:37–72. [Google Scholar]
- 17.S. Wang, Feng, David, Neutron Diffraction Study of Residual Stresses in Friction Stir Welds, Submitted for publication in ICRS-6 Proceedings (March 2000).
- 18.Mehta K.P., Carlone P., Astarita A., Scherillo F., Rubino F., Vora P. Conventional and cooling assisted friction stir welding of AA6061 and AZ31B alloys. Mater. Sci. Eng. 2019;759:252–261. doi: 10.1016/j.msea.2019.04.120. [DOI] [Google Scholar]
- 19.Hou W., Ding Y., Huang G., Huda N., Shah L.H.A., Piao Z., Shen Y., Shen Z., Gerlich A. The role of pin eccentricity in friction stir welding of Al-Mg-Si alloy sheets: microstructural evolution and mechanical properties. Int. J. Adv. Manuf. Technol. 2022;121:7661–7675. doi: 10.1007/s00170-022-09793-x. [DOI] [Google Scholar]
- 20.Hou W., Ahmad Shah L.H., Huang G., Shen Y., Gerlich A. The role of tool offset on the microstructure and mechanical properties of Al/Cu friction stir welded joints. J. Alloys Compd. 2020;825 doi: 10.1016/j.jallcom.2020.154045. [DOI] [Google Scholar]
- 21.Majeed T., Siddiquee A.N., Mehta Y. Effect of friction stir welding parameters on microstructure-based defect formation and mechanical properties of Tailor Welded Blanks. Mater. Today Commun. 2022;33 doi: 10.1016/j.mtcomm.2022.104505. [DOI] [Google Scholar]
- 22.Tunde Azeez S., Madindwa Mashinini P. Radiography examination of friction stir welds of dissimilar aluminum alloys. Mater. Today Proc. 2022;62:3070–3075. doi: 10.1016/j.matpr.2022.03.225. [DOI] [Google Scholar]
- 23.Tiwan M.N. Ilman, Kusmono Sehono. Microstructure and mechanical performance of dissimilar friction stir spot welded AA2024-O/AA6061-T6 sheets: effects of tool rotation speed and pin geometry. Int. J. Lightweight Mater. Manuf. 2023;6:1–14. doi: 10.1016/j.ijlmm.2022.07.004. [DOI] [Google Scholar]
- 24.Mohammadi J., Behnamian Y., Mostafaei A., Izadi H., Saeid T., Kokabi A.H., Gerlich A.P. Friction stir welding joint of dissimilar materials between AZ31B magnesium and 6061 aluminum alloys: microstructure studies and mechanical characterizations. Mater. Char. 2015;101:189–207. doi: 10.1016/j.matchar.2015.01.008. [DOI] [Google Scholar]
- 25.Ilman M.N., Widodo A., Triwibowo N.A. Metallurgical, mechanical and corrosion characteristics of vibration assisted gas metal arc aa6061-T6 welded joints. SSRN Electron. J. 2022;6 doi: 10.2139/ssrn.4122101. [DOI] [Google Scholar]
- 26.Bansal A., Kumar M.S., Shekhar I., Chauhan S., Bhardwaj S. Effect of welding parameter on mechanical properties of TIG welded AA6061. Mater. Today Proc. 2020;37:2126–2131. doi: 10.1016/j.matpr.2020.07.567. [DOI] [Google Scholar]
- 27.Ebrahimzadeh H., Farhangi H., Mousavi S.A.A.A. Hot cracking in autogenous welding of 6061-T6 aluminum alloy by rectangular pulsed Nd:YAG laser beam. Rivista Italiana Della Saldatura. 2021;73:9–25. [Google Scholar]
- 28.Agarwal G., Kumar A., Richardson I.M., Hermans M.J.M. Evaluation of solidification cracking susceptibility during laser welding in advanced high strength automotive steels. Mater. Des. 2019;183 doi: 10.1016/j.matdes.2019.108104. [DOI] [Google Scholar]
- 29.Alatorre N., Ambriz R.R., Amrouche A., García C., Jaramillo D. Fatigue crack growth in Al-Zn-Mg (7075-T651) welds obtained by modified indirect and gas metal arc welding techniques. J. Mater. Process. Technol. 2017;248:207–217. doi: 10.1016/j.jmatprotec.2017.05.025. [DOI] [Google Scholar]
- 30.Milella . 2012. Fatigue and Corossion in Metals. [Google Scholar]
- 31.Zhang C., Cao Y., Huang G., Zeng Q., Zhu Y., Huang X., Li N., Liu Q. Influence of tool rotational speed on local microstructure, mechanical and corrosion behavior of dissimilar AA2024/7075 joints fabricated by friction stir welding. J. Manuf. Process. 2020;49:214–226. doi: 10.1016/j.jmapro.2019.11.031. [DOI] [Google Scholar]
- 32.Tiwan M.N. Ilman, Kusmono Sehono. Microstructure and mechanical performance of dissimilar friction stir spot welded AA2024-O/AA6061-T6 sheets: effects of tool rotation speed and pin geometry. Int. J. Lightweight Mater. Manuf. 2023;6:1–14. doi: 10.1016/j.ijlmm.2022.07.004. [DOI] [Google Scholar]
- 33.Rajkumar S., Mageshkumar K., Arul K., Ravi S., Maridurai T., Subbiah R. Effect of welding speed on the mechanical properties of AA6061 Al alloy joined by friction stir welding. Mater. Today Proc. 2022;59:1544–1549. doi: 10.1016/j.matpr.2022.01.473. [DOI] [Google Scholar]
- 34.Pantelis D.I., Tsiourva T.E. Trends in Oil and Gas Corrosion Research and Technologies. Elsevier; 2017. Corrosion of weldments; pp. 249–270. [DOI] [Google Scholar]
- 35.Krishna Murthy K.R., Akyel F., Reisgen U., Olschok S. Simulation of transient heat transfer and phase transformation in laser beam welding for low alloy steel and studying its influences on the welding residual stresses. J. Adv. Join. Process. 2022;5 doi: 10.1016/j.jajp.2021.100080. [DOI] [Google Scholar]
Associated Data
This section collects any data citations, data availability statements, or supplementary materials included in this article.
Data Availability Statement
Data included in article/supp. Material/referenced in article.


