Abstract
The purpose of this research is to enable users to semiautomatically segment the anatomical structures in magnetic resonance images (MRIs), computerized tomographs (CTs), and other medical images on a personal computer. The segmented images are used for making 3D images, which are helpful to medical education and research. To achieve this purpose, the following trials were performed. The entire body of a volunteer was scanned to make 557 MRIs. On Adobe Photoshop, contours of 19 anatomical structures in the MRIs were semiautomatically drawn using MAGNETIC LASSO TOOL and manually corrected using either LASSO TOOL or DIRECT SELECTION TOOL to make 557 segmented images. In a similar manner, 13 anatomical structures in 8,590 anatomical images were segmented. Proper segmentation was verified by making 3D images from the segmented images. Semiautomatic segmentation using Adobe Photoshop is expected to be widely used for segmentation of anatomical structures in various medical images.
Key words: Semiautomatic segmentation, Adobe Photoshop, MRIs, CTs, anatomical images, segmented images, three-dimensional images
Introduction
In magnetic resonance images (MRIs) and computerized tomographs (CTs), anatomical structures including pathological lesions are segmented to make three-dimensional (3D) images, which are helpful to diagnosis and treatment.1,2 Segmentation is usually performed on a workstation computer connected to MRI and CT machines.3–5 However, for medical education and research, segmentation needs to be performed on a personal computer for wider access. On a personal computer, in order to segment various kinds of anatomical structures in MRIs and CTs, the segmentation software should perform the following functions: use suitable algorithms, regulate the extent of automatization, present a convenient user interface, and prevent software bugs from occurring. However, many difficulties are encountered indeveloping an independent segmentation software that satisfies these conditions6–8; therefore, wedecided to use the popular Adobe Photoshop (version 7.0, Adobe™) for segmentation. We have not been able to find a systematized technical report, in which Adobe Photoshop was used for segmentation of medical images. We were only able to find a report in which Adobe Photoshop was used for image processing of photographs in ophthalmoscopy.9
The purpose of this research is to enable the user to semiautomatically segment the anatomical structures in MRIs, CTs, and other medical images on a personal computer. The segmented images are used for making 3D images, which are helpful to medical education and research.
To achieve this purpose, the following trials were performed. The entire body of a volunteer was scanned at 3-mm intervals to make 557 MRIs, which were transferred to a personal computer (8 bits gray). Adobe Photoshop was used to develop semiautomatic segmentation techniques. Nineteen anatomical structures in the MRIs were semiautomatically segmented using Adobe Photoshop to make 557 segmented images. The entire body of a cadaver was serially sectioned at 0.2-mm intervals to make sectioned surfaces, which were then digitalized to make 8,590 anatomical images (24 bits color). Thirteen anatomical structures in the anatomical images were also semiautomatically segmented using Adobe Photoshop to make 8,590 segmented images. Proper segmentation was verified by making and examining the coronal, sagittal, and 3D images from the segmented images.
Materials and Methods
MR Scanning of the Entire Body (MRIs)
For this research, a healthy Korean female (19 years old) with average body shape was selected. Consent was obtained from the volunteer following a full explanation about the nature of this research. The volunteer was supine on the MRI machine (GE Signa Horizon 1.5-T MRI System, Milwaukee, WI, USA). Her posture and direction were adjusted appropriately for a horizontal scan and preventing movement. The volunteer's entire body was scanned using consistent parameters (slice thickness: 3 mm, interslice gap: 0 mm, body coil, field of view: 480 × 480 mm, resolution: 512 × 512, repetition time: 800 msec, echo time: 8 msec, interleave method, number of excitation: two) to make 557 MRIs (intervals: 1 mm, pixel size: about 1 × 1 mm, T1-weighted).
The MRIs were transferred to a personal computer andconverted to tag image file format (TIFF) files. The MRIs on the workstation computer belonging to the MRI machine were transferred to the personal computer using picture archiving and communication system (PACS). The MRIs were converted from digital imaging and communication in medicine (DICOM) files (16 bits gray) to TIFF files (mr001.tif–mr557.tif, 8 bits gray) using PiView software (Infinitt Co™). Excessive margins of the MRIs were deleted, so that resolution (512 × 512) was reduced to 494 × 280 (Fig 1a) (Table 1).
Fig 1.
(a) MRIs of the entire body. (b) One form of segmented images (TIFF files) where contours of the anatomical structures are filled with colors. (c) Another form of segmented images (AI files) where only the contours are colored.
Table 1.
Features of the MR Images, Anatomical Images, and Various Types of Segmented Images
| Images (file names) | Resolution | Bits depth | One file size (kb) | Total file size (Mb) |
|---|---|---|---|---|
| MR (mr001.tif–mr557.tif) | 494 × 280 | 8 bits gray | 135 | 73 |
| Temporary segmented (ts001.psd–ts557.psd) | 494 × 280 | 24 bits color | 405 | 220 |
| Segmented (s001.tif–s557.tif) | 494 × 280 | 8 bits color | 135 | 73 |
| Triplicated (t0001.tif–t1671.tif) | 494 × 280 | 8 bits color | 135 | 220 |
| Temporary coronal (tc001.psd–tc280.psd) | 494 × 1,671 | 24 bits color | 2,418 | 661 |
| Coronal (c001.tif–c280.tif) | 494 × 1,671 | 8 bits color | 806 | 220 |
| Temporary sagittal (ts001.psd–ts494.psd) | 280 × 1,671 | 24 bits color | 1,370 | 661 |
| Sagittal (s001.tif–s494.tif) | 280 × 1,671 | 8 bits color | 456 | 220 |
| Anatomical (a0001.tif–a8590.tif) | 3,040 × 2,008 | 24 bits color | 17,899 | 150,148 |
| Segmented (s0001.tif–s8590.tif) | 3,040 × 2,008 | 8 bits color | 5,961 | 50,004 |
| Coronal (c0001.tif–c2008.tif) | 3,040 × 8,590 | 8 bits color | 25,501 | 50,004 |
| Sagittal (s0001.tif–s3040.tif) | 2,008 × 8,590 | 8 bits color | 16,844 | 50,004 |
Segmentation of the Anatomical Structures (MRIs)
Nineteen anatomical structures in the MRIs, including skin and bones, were selected to be segmented because they were not only important but also relatively distinct in the MRIs (Table 2).
Table 2.
Nineteen segmented anatomical structures in the MR images according to the systems
| Systems | Anatomical structures |
|---|---|
| Integumentary | Skin |
| Skeletal | Bones |
| Digestive | Stomach, Liver, Gallbladder, Pancreas |
| Respiratory | Trachea, Bronchi, Lungs |
| Urinary | Kidneys, Urinary bladder |
| Cardiovascular | Heart, Blood vessels |
| Lymphatic | Spleen |
| Nervous | Cerebrum, Cerebellum, Brain stem, Spinal cord |
| Sensory | Eye ball |
MRIs were printed out on papers, where contours of the anatomical structures were drawn. By using Adobe Photoshop, the size of each MRI was adjusted to fit the A4 paper, and then each MRI was printed on it. Medical experts identified the anatomical structures by flipping the MRI papers and referring to atlases of serially sectioned images.10,11 Contours of the anatomical structures were manually drawn on the MRI papers and abbreviated names of the anatomical structures were annotated using a pen.
Referring to the MRI papers, segmentation was performed by medical experts using Adobe Photoshop in the following manner.
The MRIs were converted from TIFF files to Photoshop document (PSD) files (ts001.psd–ts557.psd, resolution: 494 × 280, bits depth: 24 bits color), which were named temporary segmented images (Table 1). As a result, MRIs were put on background layers of the temporary segmented images; the background layer was named MRI layer (Fig 2b). As described above, all MRIs were simultaneously converted to PSD files in the following manner. An MRI was converted to a PSD file, the procedure of which was recorded on ACTIONS WINDOW, and then the recorded procedure was applied to all MRIs using BATCH.
Fig 2.
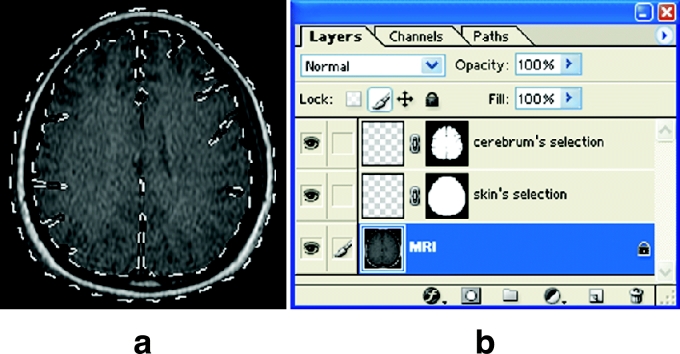
(a) Temporary segmented image showing the skin's selection and cerebrum's selection on the MRI. (b) LAYERS WINDOW showing the MRI layer, skin's selection layer, and cerebrum's selection layer.
Nineteen selection layers, to which 19 anatomical structures' selections would be put, were created in a temporary segmented image. The selection layers were named according to the anatomical structures' names: “skin's selection layer,” “cerebrum's selection layer,” and so forth (Fig 2b).
Selections were semiautomatically drawn along contours of an anatomical structure in the temporary segmented image using MAGNETIC LASSO TOOL. The options for MAGNETIC LASSO TOOL were adjusted as follows. ANTI-ALIASED was toggled “off” and FEATHER was adjusted to 0 pixel. PIXEL WIDTH and FREQUENCY were adjusted to be 5 and 100 pixels, respectively; but PIXEL WIDTH and FREQUENCY were slightly modified according to the morphological character of the anatomical structures during the drawing of selections. Mouse pointer was put on a starting point of contour of the anatomical structure, moved along thecontour, and returned to the starting point. As a result, a selection, which is the closed curve, was semiautomatically drawn along the contour of the anatomical structure (Fig 2a). If the anatomical structure appeared twice or more in a temporary segmented image, additional selections were drawn and added using ADD TO SELECTION of MAGNETIC LASSO TOOL.
The selections were semiautomatically corrected using MAGNETIC LASSO TOOL. If the selection was smaller than the contour of the anatomical structure, the selection was semiautomatically enlarged using ADD TO SELECTION of MAGNETIC LASSO TOOL. Conversely, if the selection was larger than the contour, the selection was semiautomatically reduced using SUBTRACT FROM SELECTION of MAGNETIC LASSO TOOL.
The selections were manually corrected using either LASSO TOOL or DIRECT SELECTION TOOL in case the selections were difficult to correct semiautomatically. Manual correction using LASSO TOOL was performed by manual movement of the mouse pointer exactly along the contour of the anatomical structure. If the selection was smaller than the contour, the selection was manually enlarged using ADD TO SELECTION of LASSO TOOL. Conversely, if the selection was larger than the contour, the selection was manually reduced using SUBTRACT FROM SELECTION of LASSO TOOL. The selection could also be corrected by using DIRECT SELECTION TOOL in the following manner. By using MAKE WORK PATH, the selection was converted to work path, which is a vector closed curve consisting of anchor points, segments between those anchor points, and control points. To make the work path match with the contour of the anatomical structure, by using DIRECT SELECTION TOOL, anchor points were added, subtracted, or moved; control points were moved, which affected the shape of the neighboring segments (Fig 3). After correcting the work path, it was converted back to selection using MAKE SELECTION.
Fig 3.

Temporary segmented image showing a zoomed-in work path, which consists of anchor points (□), segments between the anchor points, and control points (◊).
The selections of an anatomical structure were put on the selection layer of its own. For example, the skin's selections were put on the skin's selection layer (Fig 2).
In the same manner, selections of other anatomical structures in the temporary segmented image were semiautomatically or manually drawn and corrected along contours; they were put on the selection layers of their own (Fig 2).
The selection layers (including selections) were copied and then pasted onto other temporary segmented images, and the selections were modified. All 19 selection layers were copied and then pasted onto the next temporary segmented image, where the number and shape of new contours of the anatomical structures were slightly different. To make selections in the selection layers match with the new contours of the anatomical structures, the selections were added or subtracted using ADD TO SELECTION or SUBTRACT FROM SELECTION of MAGNETIC LASSO TOOL, and then the selections were semiautomatically corrected using MAGNETIC LASSO TOOL. The selections could also be manually corrected using LASSO TOOL or DIRECT SELECTION TOOL. The modified selections were put on the selection layers again. By repeating the above procedures continuously, 19 selection layers, where every selection matched with the contours of the anatomical structures, were made into all 557 temporary segmented images.
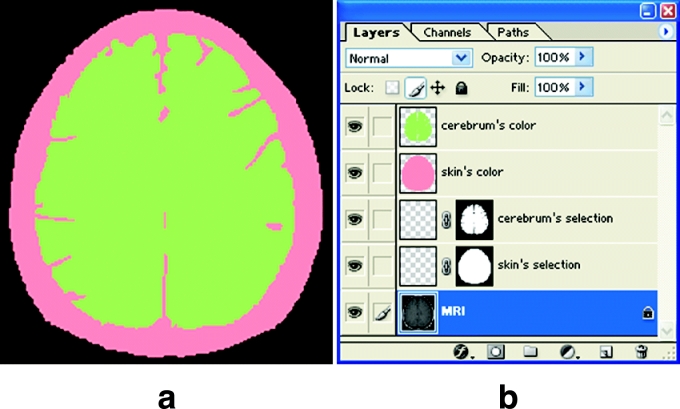
Nineteen color layers, to which 19 anatomical structures' colors would be put, were created in a temporary segmented image. The color layers were likewise named according to the anatomical structures' names: “skin's color layer,” “cerebrum's color layer,” and so forth (Fig 4b).
Fig 4.
(a) Temporary segmented images showing the pink-filled skin's selection and green-filled cerebrum's selection. (b) LAYERS WINDOW showing the MRI layer, skin's selection layer, cerebrum's selection layer, skin's color layer, and cerebrum's color layer.
Each anatomical structure's selections were filled with a specific color and were put on the color layer in the temporary segmented image. Nineteen segmentation colors were used to distinguish 19 anatomical structures in the segmented images. At this time, similar colors were not used for neighboring anatomical structures. Selections of each anatomical structure were filled with a specific segmentation color using SOLID COLOR of CREATE NEW FILL of LAYERS WINDOW. Thecolor-filled selections were put on the color layer of its own. For example, the cerebrum's selections were filled with green, and then the green-filled selections were put on the cerebrum's color layer (Fig 4).
A black layer was created in the temporary segmented image. The black layer was superimposed on the MRI layer to cover the MRI in the segmented image with black; and on the black layer, the 19 color layers were superimposed to prevent black from covering segmentation colors. Among the color layers, on the skin's color layer, the other color layers were superimposed to prevent the skin's segmentation color from covering the other segmentation colors (Figs 1b, 4a). From the above operation, 40 layers (an MRI layer, a black layer, 19 selection layers, and 19 color layers in order) were created in the temporary segmented image.
The temporary segmented image was converted from PSD file to TIFF file to create a segmented image. At this time, resolution and bits depth was adjusted to 494 × 280 and 8 bits color (indexed color), respectively. Eight bits color, which means 256 (=28) kinds of colors, was enough to represent the 19 segmentation colors (Fig 1b) (Tables 1, 2).
The serial procedures were simultaneously performed to make 557 segmented images in the following manner. The serial procedures—creating 19 color layers, filling selections with colors, putting the color-filled selections to the color layers, creating black layer, superimposing the layers in sequence, and converting temporary segmented image to TIFF file—were performed and recorded on ACTIONS WINDOW, and then the recorded procedures were applied to all temporary segmented images using BATCH. As a result, 557 segmented images (s001.tif – s557.tif) were simultaneously made (Fig 1b) (Table 1).
Manufacture of the Coronal and Sagittal Images (MRIs)
Each segmented image (intervals: 3 mm, pixel size: about 1 × 1 mm) was copied and pasted twice between the segmented image and the next segmented image. As a result, 1,671 triplicated images (t0001.tif–t1671.tif) with 1-mm intervals, which were similar to the pixel size (about 1 × 1 mm) of the segmented images, were made (Table 1).
For example, using Adobe Photoshop, the 160th coronal image (c160.tif) was made out of the triplicated images in the following manner.
The 160th temporary coronal image (tc160.psd, resolution: 494 × 1,671, bits depth: 24 bits color), which did not involve any images yet, was created (Table 1).
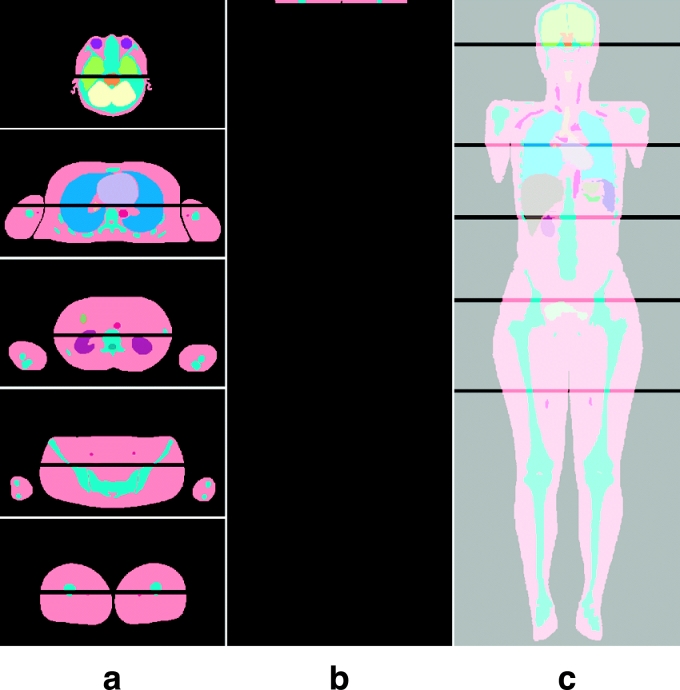
The 160th row images in all triplicated images were cut and pasted to the first row of the 160th temporary coronal image. The 160th row image in the first triplicated image (t0001.tif) was cut using SINGLE ROW MARQUEE TOOL. The 160th row image was pasted to the first row of the 160th temporary coronal image. As a result, one layer (layer 1) including a row image in the first row was created. The procedures of cutting and pasting were recorded on ACTIONS WINDOW, and then applied to other triplicated images (t0002.tif–t1671.tif) using BATCH. As a result, 1,671 layers (layer 1–layer 1671) including row images in the first rows were automatically created (Fig 5a–b).
Fig 5.
Simplified procedures for making the 160th coronal image. (a) The 160th row images in five triplicated images (t111.tif, t384.tif, t585.tif, t1050.tif) are cut. (b) They are pasted to the first row of the 160th temporary coronal image (tc160.psd). (c) They are downward distributed to make the 160th coronal image (c160.tif).
The row images in the 160th temporary coronal image were downward distributed to make the 160th coronal image. The row image in the first row of layer 1671 was cut using SINGLE ROW MARQUEE TOOL. The row image was pasted to the last1,671st row of layer 1671 using MOVE TOOL. All 1,671 layers were linked using INDICATES IF LAYER IS LINKED. A total of 1,669 row images from layer 2 to layer 1670 were downward distributed in sequence by using DISTRIBUTE VERTICAL CENTERS of MOVE TOOL. Finally, the 160th temporary coronal image was converted from PSD file to TIFF file (c160.tif), which was the 160th coronal image (Fig 5c). At this time, resolution and bits depth of the coronal image wasadjusted to 494 × 1,671 and 8 bits color, respectively (Table 1).
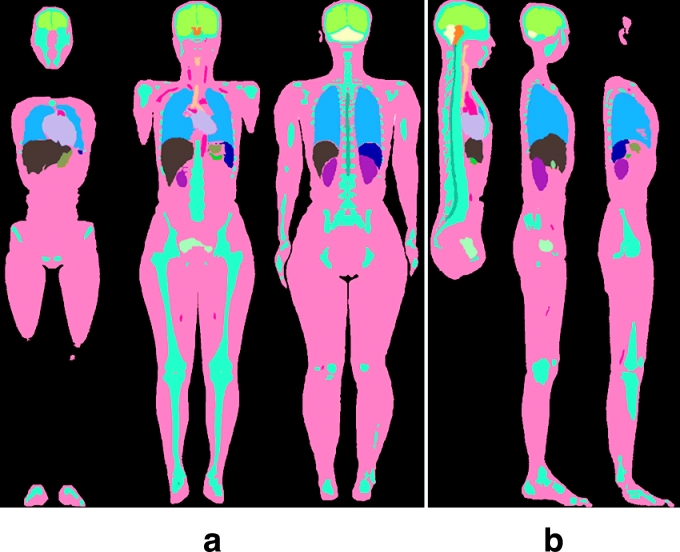
In the same manner, 280 serial coronal images (c001.tif–c280.tif) were made from the triplicated images (Fig 6a). To accelerate the creation of 280 temporary coronal images, which did not involve any images yet, a temporary coronal image was created, copied, and pasted 279 times, and then 280 temporary coronal images were renamed (tc001.psd–tc280.psd) (Table 1). For accelerating the manufacture of 280 coronal images, the procedures of distributing the row images downward and converting temporary coronal image to TIFF file were recorded on ACTIONS WINDOW, and then applied to all temporary coronal images using BATCH.
Fig 6.
(a) Coronal images and (b) sagittal images made of the segmented images from the MRIs.
In a similar manner for making the coronal images, 494 serial sagittal images (s001.tif–s494.tif, resolution: 280 × 1,671, bits depth: 8 bits color) were made from the triplicated images (Fig 6b). The different procedures for making the sagittal images were as follows. Four hundred ninety-four temporary sagittal images (ts001.psd–ts494.psd, resolution: 280 × 1,671, bits depth: 24 bits color) were created (Table 1); the column images in triplicated images were cut using SINGLE COLUMN MARQUEE TOOL; and the column images were rotated 90°before they were pasted to the first row of the temporary sagittal images.
By examining the coronal and sagittal images, the segmented images were verified. In some coronal and sagittal images, it was examined whether the color-filled anatomical structures showed smooth contours and fitted anatomical knowledge, which could be caused by the correct segmented images (Fig 6).
If the segmented images were incorrect, they were corrected by using Adobe Photoshop as follows. In the temporary segmented images which corresponded to the incorrect segmented images, incorrect selections were corrected semiautomatically or manually. The corrected selections were filled with colors, and the temporary segmented images were converted to TIFF files to make new segmented images. Based on the new segmented images, coronal and sagittal images were made and examined again.
Manufacture of the 3D Images by Surface Reconstruction (MRIs)
By using Adobe Photoshop, the temporary segmented images, where the selections of anatomical structures were colored using STROKE, were converted to Adobe Illustrator (AI) files. The colored selections were put on the color layers. MRI layers and black layers were deleted. The temporary segmented images were converted from PSD files to AI files (001.ai–557.ai), where only contours of the anatomical structures were colored whereas their insides were not filled with colors (Fig 1c).
By using 3ds max (version 5.0, Discreet™), contours of each anatomical structure were stacked and manually surface-reconstructed to make a 3D image of the anatomical structure. For example, contours of the skin were extracted from every AI file and stacked in sequence. Quadrilateral and triangular surfaces were manually filled between neighboring contours, which was a process of surface reconstruction. The quadrilateral and triangular surfaces were filled with specific colors to make a 3D image of the skin (3d-skin.max) (Fig 7). In the same manner, 3D images of other anatomical structures (3d-cerebrum.max, 3d-cerebellum.max, etc.) were made.
Fig 7.
Procedures for making 3D image of the skin. (a) Contours of the skin are stacked. (b) Quadrilateral and triangular surfaces are filled between the neighboring contours. (c) The surfaces are filled with a color.
By examining the 3D images, the segmented images were verified. By using 3ds max, the 3D image of each anatomical structure was selected to be displayed. Furthermore, 3D images of several anatomical structures were selected to be displayed together. At this time, 3D images of some anatomical structures were displayed semitransparently. The 3D images were rotated at free angles (Fig 8). It was examined whether the 3D images fitted anatomical knowledge concerning the stereoscopic shape and locational relationship of the anatomical structures. If the 3D images were incorrect, corrections were made on the segmented images.
Fig 8.
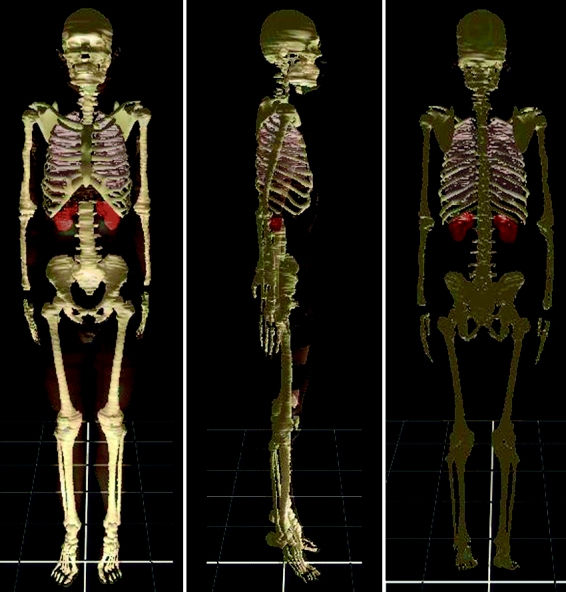
Three-dimensional image of several anatomical structures made of the segmented images from the MRIs.
Serial Sectioning of the Entire Body (Anatomical Images)
Similar to the Visible Human Project,12 the entire body of a cadaver was embedded and serially sectioned to make sectioned surfaces. For this research, a Korean male cadaver (33 years old) was selected. Consent was obtained from the subject's family after a full explanation about the nature of this procedure. In addition, we followed the cadaver management laws of South Korea. The cadaver was put into an embedding box, into which the embedding agent was poured and then frozen. The embedding box containing the cadaver was put on a cryomacrotome (HANWON™) and firmly fixed. The embedding box was serially sectioned at 0.2-mm intervals to make 8,590 sectioned surfaces of the entire body.13
The sectioned surfaces of the cadaver were digitalized to make 8,590 anatomical images. Each sectioned surface (600 × 400 mm) was photographed using a digital camera (DSC560, Kodak™, resolution: 3,040 × 2,008, bits depth: 24 bits color) to make 8,590 anatomical images (a0001.tif–a8590.tif, pixel size: 0.2 × 0.2 mm), which were recorded into the personal computer (Fig 9a) (Table 1).13
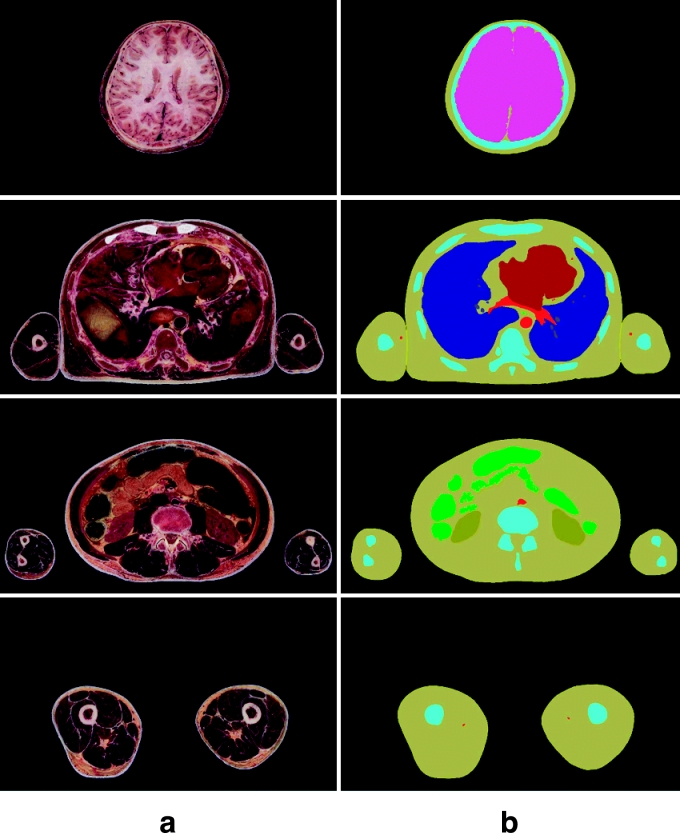
Fig 9.
(a) Anatomical images of the entire body. (b) Segmented images, where contours of the anatomical structures are filled with colors.
Segmentation of the Anatomical Structures (Anatomical Images)
Thirteen anatomical structures in the anatomical images from the sectioned cadaver were selected to be segmented. Ten anatomical structures (skin, bones, liver, lungs, kidneys, urinary bladder, heart, cerebrum, cerebellum, and brainstem) were segmented by their contours while the other three luminal structures (digestive tract, respiratory tract, and arteries) were segmented by their luminal contours (Table 3).
Table 3.
Thirteen segmented anatomical structures in the anatomical images according to the systems
| Systems | Anatomical structures |
|---|---|
| Integumentary | Skin |
| Skeletal | Bones |
| Digestive | Digestive tract (Oral cavity–Large intestine),a Liver |
| Respiratory | Respiratory tract (Nasal cavity–Segmental bronchi),a Lungs |
| Urinary | Kidneys, Urinary bladder |
| Cardiovascular | Heart, Arteriesa |
| Nervous | Cerebrum, Cerebellum, Brain stem |
aIn case of digestive tract, respiratory tract, and arteries, the luminal contours are segmented.
The anatomical structures were semiautomatically segmented using Adobe Photoshop to make 8,590 segmented images, similar to what was done for MRIs. The anatomical images were converted to PSD files, which were the temporary segmented images. In each temporary segmented image, an anatomical image layer, a black layer, 13 selection layers, and 13 color layers were created. Contours of 13 anatomical structures were semiautomatically drawn, semiautomatically or manually corrected, and put on the selection layers. Thirteen anatomical structures' selections were filled with segmentation colors and put on the color layers. The temporary segmented images were converted to TIFF files (s0001.tif–s8590.tif), which were the segmented images (resolution: 3,040 × 2,008, bits depth: 8 bits color) (Fig 9b) (Table 1).
Manufacture of the Coronal and Sagittal Images (Anatomical Images)
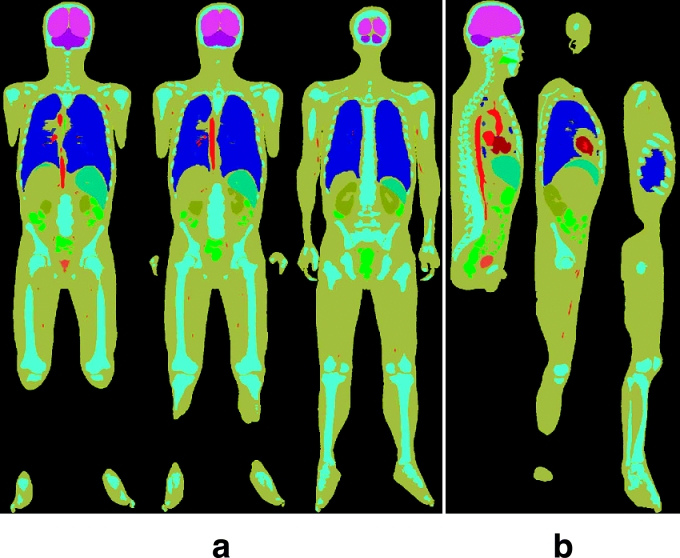
Coronal and sagittal images were made of the segmented images from the anatomical images, similar to what was done for MRIs. It was not necessary to make triplicated images because the intervals and pixel size of the segmented images from the anatomical images were already the same (0.2 mm). Through 2,008 temporary coronal images and 3,040 temporary sagittal images, 2,008 coronal images (c0001.tif–c2008.tif, resolution: 3,040 × 8,590, bits depth: 8 bits color) and 3,040 sagittal images (s0001.tif–s3040.tif, resolution: 2,008 × 8,590, bits depth: 8 bits color) were made (Fig 10) (Table 1).
Fig 10.
(a) Coronal images and (b) sagittal images made of the segmented images from the anatomical images.
By examining the coronal and sagittal images, the segmented images were verified; incorrect segmented images were corrected.
Manufacture of the 3D Images by Volume Reconstruction (Anatomical Images)
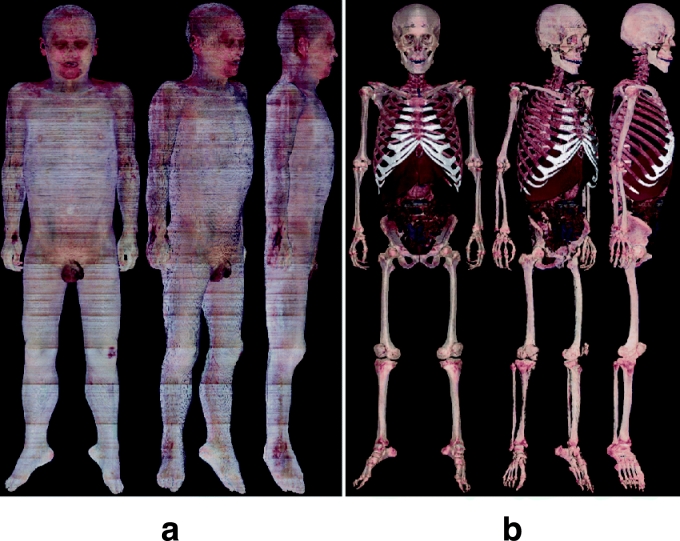
All 8,590 segmented images (3,040 × 2,008 pixels) were stacked in sequence and subsequently volume-reconstructed to make a 3D image, which consisted of 3,040 × 2,008 × 8,590 voxels. In the same manner, a 3D image was made from the anatomical images (Fig 11).
Fig 11.
(a) Three-dimensional image of skin and (b) 3D images of several anatomical structures made of the segmented images from the anatomical images.
By examining the 3D images, the segmented images were verified. By using a specially designed software, several 3D images of the anatomical structures were selected to be displayed and rotated. The 3D images represented real colors of the anatomical structures, thanks to volume reconstruction of the anatomical images. It was examined whether the 3D images fitted anatomical knowledge, which corresponded to correct segmented images (Fig 11). If the segmented images were incorrect, they were subsequently corrected.
Results
Satisfactory segmented images of several anatomical structures were prepared from MRIs and anatomical images. Five hundred fifty-seven segmented images of 19 anatomical structures were prepared from MRIs. Intervals, resolution, bits depth, and total file size of the segmented images were 3 mm, 494 × 280, 8 bits color, and 73 Mb, respectively (Fig 1b) (Table 1). A total of 8,590 segmented images of 13 anatomical structures were prepared from anatomical images. Intervals, resolution, bits depth, and total file size of the segmented images were 0.2 mm, 3,040 × 2,008, 8 bits color, and 50 Gb, respectively (Fig 9b) (Table 1). Contours of the anatomical structures in the segmented images were corrected, and verified by examining the coronal images, sagittal images, and 3D images (Figs 6, 8, 10, 11).
The segmented images were easily prepared by semiautomatic segmentation on Adobe Photoshop. Medical experts were easily acquainted not only with semiautomatic segmentation techniques but also with semiautomatic manufacture techniques of the coronal and sagittal images on Adobe Photoshop. During semiautomatic segmentation on Adobe Photoshop, suitable algorithm could be used, automatization extent could be regulated, convenient user interface could be used, and software bugs rarely occurred. Five medical experts and personal computers were devoted to this research, and the approximate time it took to finish each procedure was as follows: 10 days for identification of 19 anatomical structures on 557 MRI papers; 30 days for semiautomatic segmentation of 19 anatomical structures on 557 MRIs; three days for semiautomatic manufacture of 280 coronal and 494 sagittal images of the segmented images from MRIs; 90 days for semiautomatic segmentation of 13 anatomical structures in 8,590 anatomical images; and six days for semiautomatic manufacture of 2,008 coronal and 3,040 sagittal images of the segmented images from anatomical images.
Discussion
Adobe Photoshop, a popular software for personal computers, is appropriate for semiautomatic segmentation of anatomical structures in MRIs, CTs, and other medical color images for various reasons.
Segmentation can be semiautomatically performed using Adobe Photoshop. It is not possible to automatically perform segmentation because most anatomical structures in medical images can not be identified by the computer, but only by the medical experts. Conversely, if segmentation is manually performed, the segmentation process is very tedious, lengthy, and not guaranteed to be objective.6,8 Semiautomatic segmentation can be effectively performed and corrected using MAGNETIC LASSO TOOL of the Adobe Photoshop.
During semiautomatic segmentation using Adobe Photoshop, the extent of automatization can be regulated by adjusting PIXEL WIDTH and FREQUENCY, which are options of MAGNETIC LASSO TOOL, as follows.
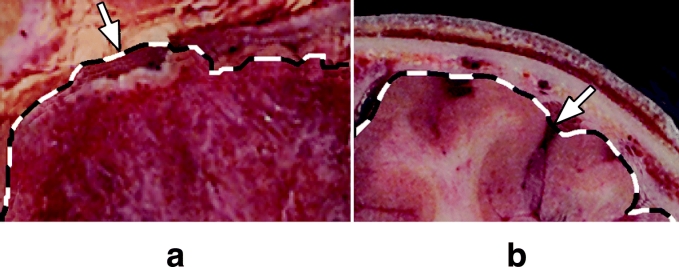
First, it is desirable to adjust PIXEL WIDTH to 5 pixels. PIXEL WIDTH (range: 1–256 pixels) means the width from the mouse pointer to the pixels, which are considered for segmentation. If PIXEL WIDTH is adjusted to 1 pixel, the mouse pointer should be moved exactly along the contour of the anatomical structure in a similar way to manual segmentation. Reversely, if PIXEL WIDTH is adjusted to 256 pixels, an unexpected selection will be drawn along contours of other anatomical structures that are distant from the mouse pointer (Fig 12a); moreover, computing takes a long time. From our experience, it is desirable that after adjusting PIXEL WIDTH to 5 pixels, the mouse pointer is not moved beyond 5 pixels from contour of the anatomical structure. Sometimes, however, PIXEL WIDTH needs to be raised to enhance the extent of automatization in case other anatomical structures do not exist around the contour of the anatomical structure.
Fig 12.
Temporary segmented images showing (a) the selection, part of which is drawn along the contour of another anatomical structure (arrow) because of the high PIXEL WIDTH, and (b) the selection, part of which is not drawn along the uneven contour of the anatomical structure (arrow) because of the low FREQUENCY.
Second, it is desirable to adjust FREQUENCY to 100 pixels. A selection is composed of selection points and the selection segments between those selection points. FREQUENCY (range: 0–100) means frequency of the selection points, which are generated during selection drawing. If FREQUENCY is adjusted to be low, selection can not be drawn along uneven contours of the anatomical structures (Fig 12b). Based on our experience, it is desirable to adjust FREQUENCY to its highest value, 100. Sometimes, however, FREQUENCY needs to be lowered to reduce computing time and enhance the extent of automatization in case the contours of the anatomical structures are very even.
Segmentation can be manually corrected using Adobe Photoshop. Semiautomatic segmentation is sufficient when the contour of the anatomical structure is relatively even, and the inside and outside of the contour show striking color differences (e.g., skin in MRIs and bones in CTs). However, in most cases, a semiautomatically drawn selection does not correspond to the contour, so that the selection needs to be manually corrected. By using Adobe Photoshop, a selection can be manually corrected using either LASSO TOOL or DIRECT SELECTION TOOL. Unlike LASSO TOOL, DIRECT SELECTION TOOL has an advantage in that it is not necessary to move the mouse pointer exactly along the contour of the anatomical structure, thanks to the anchor points and control points, which are user-friendly for making vector image corrections (Fig 3). However, DIRECT SELECTION TOOL has a disadvantage in that additional procedures are necessary to convert selection to work path and convert back. From our experience, LASSO TOOL is usually preferred to DIRECT SELECTION TOOL.
Repeating simple procedures for segmentation can be automatically performed using Adobe Photoshop. Except for the drawing procedures of selections, there are many repeated simple procedures: converting raw images to PSD files, creating color layers, filling selections with colors, putting the color-filled selections to the color layers, creating black layers, superimposing the layers in sequence, and converting temporary segmented images to TIFF files. These repeated simple procedures are not only time-consuming, they are also prone to human errors. By using Adobe Photoshop, after recording the procedures on ACTIONS WINDOW, the recorded procedures can be applied to all images using BATCH. Besides, to reduce the drawing procedures of selections, selection layers including selections in a temporary segmented image can be copied and pasted in the next temporary segmented image; and then the selections can be easily modified along the slightly differing contours of anatomical structures.
Segmentation of anatomical structures in all types of medical images can be performed using Adobe Photoshop. In this work, 19 and 13 anatomical structures in MRIs (Fig 1b) (Table 2) and colored anatomical images (Fig 9b) (Table 3) of the entire body, respectively, were segmented. From our experience, any anatomical structures including pathological lesions in various types of medical images, identified by medical experts, can be segmented without difficulty using Adobe Photoshop.
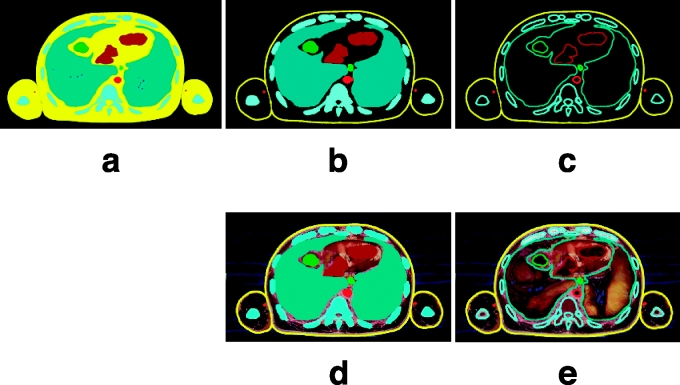
Various forms of the segmented images can be made from temporary segmented images using Adobe Photoshop. From the temporary segmented images (PSD files), various forms of the segmented images can be made as follows: the segmented images where the contours of the anatomical structures are filled with colors, and those where only the contours are colored; those where original images (MRIs or anatomical images) do not remain, and those where original images do remain at the background (Fig 13). In addition, various file formats of the segmented images can be made as follows: the segmented images of AI files, which are adequate for surface reconstruction (Figs 7, 8); those of TIFF files, which are adequate for volume reconstruction (Fig 11). Furthermore, while the temporary segmented images are being converted to the segmented images, resolution and bits depth of the segmented images can be regulated, which determine the file size. The forms of the segmented images are determined after consideration of the forms of 3D images as well as various circumstances of researchers or users. Any forms of the segmented images can be simultaneously made from the temporary segmented images using BATCH. In summary, the temporary segmented images including selection layers and background layer (MRI layer or anatomical image layer) have considerably more potential than the segmented images.
Fig 13.
Various forms of the segmented images. (a) Contours of the anatomical structures are filled with colors. (b) Contours are filled with colors except for the skin's contours. (c) Only contours are colored. (d, e) Original images remain in the background.
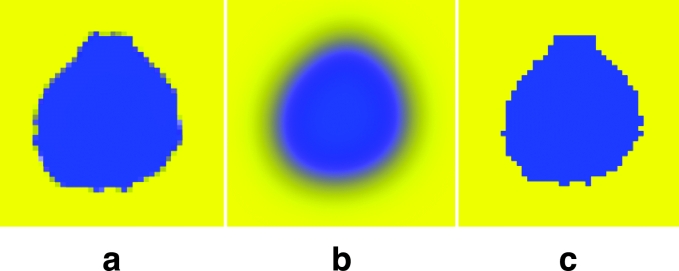
Segmented images with distinct contours can be made using Adobe Photoshop. To make the contours of the anatomical structure distinct in the segmented image, ANTI-ALIASED and FEATHER, which are options of MAGNETIC LASSO TOOL, need to be adjusted before drawing procedures of selections. If ANTI-ALIASED is not toggled off, or FEATHER is not adjusted to 0 pixel, the contour in the segmented image becomes obscure because the colors inside and outside the contour merge (Fig 14a–b). In the field of medical images, segmented images with obscure contours are not useful. Therefore, ANTI-ALIASED should be turned off and FEATHER should be adjusted to 0 pixel (Fig 14c).
Fig 14.
Segmented images showing (a) the obscure contour after using ANTI-ALIASED, (b) the obscure contour after using FEATHER with high pixels, and (c) the distinct contour.
Coronal and sagittal images for verifying the segmented images can be made using Adobe Photoshop. Even if medical experts carefully segment, mistakes can be made during segmentation of various anatomical structures in many raw images. Incorrect segmented images are not easy to find by examining the segmented images themselves. By using Adobe Photoshop, coronal and sagittal images can be semiautomatically made, and then examined to verify the segmented images (Figs 6, 10). Based on our experience, coronal and sagittal images are enough for verification purposes, so that the 3D images are no longer essential.
Segmentation can be promptly started on a personal computer using Adobe Photoshop. As a segmentation software, however, the Adobe Photoshop has certain disadvantages. Segmentation can not be performed on the DICOM image files (16 bits gray) of MRIs and CTs. New algorithms or functions for better segmentation cannot be added by the researchers. Adobe Photoshop also has many other functions that can beexasperating during segmentation. Forthese reasons, we tried to compose a new segmentation software with help from computer programmers. To make a satisfactory segmentation software, we tried to find a suitable algorithm,3–7,14,15 and had many discussions with the programmers, and we verified and modified the software many times forseveral months. Despite our efforts, however, we failed to create a satisfactory segmentation software. In contrast, we easily acquired Adobe Photoshop, and were easily acquainted with the semiautomatic segmentation techniques of Adobe Photoshop, so that we could promptly start semiautomatic segmentation on a personal computer without outside help. Furthermore, in this research, software bugs rarely occurred in Adobe Photoshop during months of continuous segmentation. We expect that this systematized technical report will help other researchers, including medical doctors, perform semiautomatic segmentation on their own.
Conclusion
Techniques of semiautomatic segmentation on the Adobe Photoshop are expected to be widely used for segmentation of the anatomical structures in the MRIs, CTs, and other medical images on the personal computer. These technical modifications on an existing software will provide new solutions in the field of medical education and research.
In this research, 557 sets of MRIs, temporary segmented images, and segmented images have been prepared, along with 8,590 sets of anatomical images, temporary segmented images, and segmented images (Table 1). All images will be presented worldwide free of charge either on-line or off-line. The raw and segmented images will encourage other researchers to make various 3D images and software for medical education and research; the temporary segmented images will help other researchers create various forms of segmented images for their own purposes.
Acknowledgment
This work was supported by a grant from Department of Medical Sciences, The Graduate School, Ajou University.
Footnotes
The authors obtained consent for this research from concerned parties (a female subject and relatives of the deceased subject) after a full explanation about the nature of this procedure. In addition, we followed the cadaver management laws of South Korea.
References
- 1.Kerr JP, Knapp D, Frake B, Sellberg M. True color surface anatomy. Mapping the Visible Human to patient-specific CT data. Comput Med Imaging Graph. 2000;24:153–164. doi: 10.1016/S0895-6111(00)00015-X. [DOI] [PubMed] [Google Scholar]
- 2.Sachse FB, Werner CD, Meyer-Waarden K, Dössel O. Development of a human body model for numerical calculation of electrical fields. Comput Med Imaging Graph. 2000;24:165–171. doi: 10.1016/S0895-6111(00)00016-1. [DOI] [PubMed] [Google Scholar]
- 3.Hosono M, Nakano Y, Urayama S, Konishi J, Uokawa K, Tanaka Y. Three-dimensional display of cardiac structures using reconstructed magnetic resonance imaging. J Digit Imaging. 1995;8:105–115. doi: 10.1007/BF03168084. [DOI] [PubMed] [Google Scholar]
- 4.Qin X, Ou Z, Zhang Y, Hou J. Data structure representation of 3D reconstruction system of medical images and surface model construction. Sheng Wu Yi Xue Gong Cheng Xue Za Zhi. 2002;19:239–243. [PubMed] [Google Scholar]
- 5.Uokawa K, Nakano Y, Urayama S, Uyama C, Kurokawa K, Ikeda K, Koito H, Tanaka Y. An improved computer methods to prepare 3D magnetic resonance images of thoracic structures. J Digit Imaging. 1997;10:85–95. doi: 10.1007/BF03168560. [DOI] [PMC free article] [PubMed] [Google Scholar]
- 6.Anderson JR, Wilcox MJ, Barrett SF. Image processing and 3D reconstruction of serial section micrographs from Musca domestica's biological cells responsible for visual processing. Biomed Sci Instrum. 2002;38:363–368. [PubMed] [Google Scholar]
- 7.Nip W, Logan C: Whole frog technical report Web site http://www-itg.lbl.gov/ITG.hm.pg.docs/Whole.Frog/Whole.Frog.html). Accessed August 11, 2004.
- 8.Quackenbush D, Ratiu P, Kerr J: Segmentation of the Visible Human datasets. The Visible Human Project Conference Proceeding, October 7 and 8, 1996
- 9.Xu L, Chen Y, Yang H. Digital photography and blurred image processing of retinal nerve fiber layer in glaucoma. Zhonghua Yan Ke Za Zhi. 2000;36:410–412. [PubMed] [Google Scholar]
- 10.Spitzer VM, Whitlock DG. Atlas of the Visible Human Male. Reverse Engineering of the Human Body. Massachusetts: Jones and Bartlett Publishers; 1998. [Google Scholar]
- 11.Dean D, Herbener TE. Cross-Sectional Human Anatomy. Baltimore, MD: Lippincott Williams & Wilkins; 2000. [Google Scholar]
- 12.Spitzer VM, Ackerman MJ, Scherizinger AL, Whitlock DG. The Visible Human male. Technical report. J Am Med Inform Assoc. 1996;3:118–130. doi: 10.1136/jamia.1996.96236280. [DOI] [PMC free article] [PubMed] [Google Scholar]
- 13.Park JS, Chung MS, Hwang SB, Lee YS, Har DH, Park HS. Visible Korean Human. Improved serially sectioned images of the entire body. IEEE Trans Med Imaging. 2005;24:352–360. doi: 10.1109/TMI.2004.842454. [DOI] [PubMed] [Google Scholar]
- 14.Pommert A, Höhne KH, Pflesser B, Richter E, Riemer M, Schiemann T, Schubert R, Schumacher U, Tiede U. Creating a high-resolution spatial/symbolic model of the inner organs based on the Visible Human. Med Image Anal. 2001;5:221–228. doi: 10.1016/S1361-8415(01)00044-5. [DOI] [PubMed] [Google Scholar]
- 15.Schiemann T, Freudenberg J, Pflesser B, Pommert A, Priesmeyer K, Riemer M, Schubert R, Tiede U, Höhne KH. Exploring the Visible Human using the VOXEL-MAN framework. Comput Med Imaging Graph. 2000;24:127–132. doi: 10.1016/S0895-6111(00)00013-6. [DOI] [PubMed] [Google Scholar]


