

Abstract
Background
Vagus nerve stimulation (VNS) is a neuromodulatory treatment for refractory epilepsy, involving electrical stimulation of the vagus nerve via a subcutaneously implanted pulse generator.
Method
We present a step-by-step description of the VNS implantation technique, incorporating tips and tricks from an epilepsy surgeon with over 20 years of experience (MB).
Conclusion
Proper patient selection, meticulous surgical technique, and comprehensive postoperative care, supported by educational resources such as surgical technique articles, videos, and simulators, are crucial for minimizing complications and optimizing patient outcomes.
Supplementary Information
The online version contains supplementary material available at 10.1007/s00701-025-06432-8.
Keywords: Vagus nerve stimulation, Drug-resistant epilepsy, Neurosurgery, Surgical technique
Relevant surgical anatomy
Carotid sheath
The carotid sheath is a key anatomical structure in the neck that encases three important structures: the vagus nerve, the common carotid artery, and the internal jugular vein. This sheath provides a protective and organized compartment for these structures. Understanding the anatomical relationship within the carotid sheath is essential for successful vagus nerve stimulation (VNS) procedures [2, 6, 10].
Vagus nerve
The vagus nerve (cranial nerve X) contains motor, sensory, and parasympathetic fibers. It originates in the medulla oblongata and descends through the jugular foramen into the neck.
Right Vagus Nerve: Predominantly influences the sinoatrial node, risking bradycardia and asystole if stimulated. Generally not used for VNS.
Left Vagus Nerve: Influences the atrioventricular node, reducing the risk of bradycardia and asystole, and is preferred for VNS implantation.
Common carotid artery and internal jugular vein
The common carotid artery ascends through the neck and bifurcates into internal and external carotid arteries at the superior border of the thyroid cartilage. It is medial to the vagus nerve within the carotid sheath. The internal jugular vein, lateral to the vagus nerve, drains the brain, face, and neck. Both structures are close to the vagus nerve at the implantation site, making precise surgical technique crucial to prevent vascular complications.
Description of the technique
Patient positioning
The procedure is performed under general anesthesia with endotracheal ventilatory support. Prophylactic antibiotics are administered 30 min before surgery. The patient is positioned supine with the head extended and turned 30 degrees to the right. The neck is extended with a shoulder roll to ease the passage of the tunneling rod (Fig. 1) [3, 5, 6, 8].
Fig. 1.
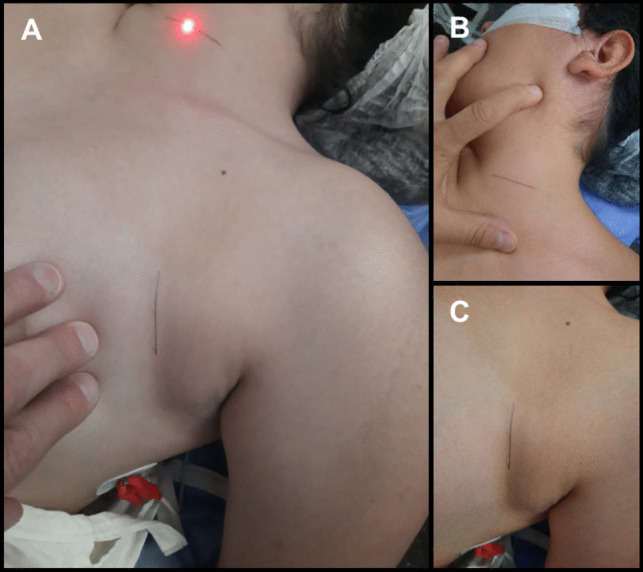
Patient Positioning and incisions: A The patient is positioned supine on the operating room table with the head on a donut pillow or a headrest, extended and turned, approximately, 30 degrees to the right. The neck is extended with a shoulder roll in order to ease the passage of the tunneling rod. B 2–3 cm transverse incision in a skin fold on the left side of the neck, located between the mastoid and the clavicle, extending to the medial border of the sternocleidomastoid muscle. C 2.5 to 3 cm-long incision following a skin crease line is performed, approximately 5 cm below the clavicle and 5 cm medially to the shoulder
Neck incision and vagus nerve dissection
Incision: In our pediatric patients, we perform a 2–3 cm transverse skin incision in a skin fold on the left side of the neck, placing it lower than the midpoint between the jawline and the clavicle, in anticipation of future device revisions (Figs. 1A, B and 2A) [5].
Dissection: The platysma muscle is divided, and dissection continues vertically, parallel to the carotid artery and jugular vein (Fig. 2B).
Retraction: Omohyoid and strap muscles are retracted inferiorly and medially, sternocleidomastoid laterally (Fig. 2C).
Carotid Sheath: The sheath is opened between the carotid artery and internal jugular vein (Fig. 2D, E, G and H). The vagus nerve is dissected approximately 4 cm, avoiding damage to its vasa nervorum and preserving the perineural sheath (Fig. 2F and I) [3, 5, 6, 8].
Nerve Retraction: The nerve is gently retracted superiorly using a vessel loop.
Fig. 2.

Neck incision and Vagus Nerve Dissection: A 2–3 cm transverse incision in a skin fold on the left side of the neck, located between the mastoid and the clavicle, extending to the medial border of the sternocleidomastoid muscle. B The subcutaneous dissection exposes the platysma, which can be divided following the directions of its fibers. C Muscle plane showing the omohyoid and other strap muscles inferiorly and medially, whereas the sternocleidomastoid is located laterally. D and G The carotid sheath is opened, showing the internal jugular vein laterally. E and H The carotid sheath is opened, showing the carotid artery medially. F and I The vagus nerve is located between the carotid artery medially and the internal jugular vein laterally
Chest incision
Subcutaneous tunneling
Tunneling: The electrodes are tunneled using the manufacturer-supplied device. The tunneler is curved to optimize the trajectory (Fig. 3A and B).
Electrode Insertion: The tunneler is passed from the neck to the chest incision, and the electrode is drawn through the sheath (Fig. 3 C, D, E and F) [3, 5, 6, 8].
Fig. 3.

Subcutaneous tunneling: A Manufacturer-supplied tunneling device, which includes an inner and an outer tunneling tube, and a bullet tip threaded onto the end of the inner tube. B Curvature of the tunneler to optimize the trajectory. C Tunneling from the neck incision towards the axillary incision. D The bullet tip is removed and the inner shaft is withdrawn, leaving the clear hollow sheath. E The free end of the electrode is inserted in the sheath and drawn, with the sheath, from the neck to the chest incision. F Electrode tunneled from the neck incision to the chest incision
Electrode placement
Nerve Retraction: The nerve is gently retracted upwards with the vessel loop.
Fixation: The inferior anchor is secured around the vagus nerve, followed by the positive and negative electrodes (Figs. 4 and 5) [3, 5, 6, 8].
Fig. 4.

Simulator: A The electrode is positioned on the right side, passing underneath the nerve. B Once positioned beneath the nerve, forceps are used to reach the suture at the end of the helix, while the other forceps holds the opposite end of the suture on the right side of the nerve. Subsequently, controlled tension is applied to open the helices in the direction of the stimulator’s rotation, ensuring a precise fit on the nerve. C The central turn of the spiral is placed first. D By pulling the lower suture, the lower helix is placed around the nerve. E and F The upper helix is passed under the nerve, following the curvature of the electrode. G Electrode correctly positioned. H A common mistake is attempting to place the helices from the left side of the vagus nerve. Since the system is designed for right-handed surgeons, starting from the left side makes the placement very challenging, if not impossible. I Another common mistake: helices tangled with each other, making placement impossible. They should be stretched before placing them on the nerve
Fig. 5.

Electrode placement: A The electrode is positioned on the right side, passing underneath the nerve. B Once positioned beneath the nerve, forceps are used to reach the suture at the end of the helix, while the other forceps holds the opposite end of the suture on the right side of the nerve. Subsequently, controlled tension is applied to open the helices in the direction of the stimulator’s rotation, ensuring a precise fit on the nerve. C and D In applying each electrode, the central part of the spiral must be positioned first, and then the upper and lower turns are wound around the nerve. The tethering (inferior) anchor is secured around the vagus nerve, and then the positive (middle helical contact) and the negative (upper helical contact) electrodes are positioned. E After the electrodes have been positioned on the nerve, it is necessary to make redundant loops so that movements of the neck do not dislodge the electrodes or put strain on the vagus nerve itself. F The electrode is secured by tacking nonabsorbable sutures to silicon holders at the deep cervical fascia
To ensure correct electrode placement, we have developed a simulator that demonstrates the proper technique. Photos of the simulator will be included in this article, and a complementary video showing the surgical placement technique will also be available (Fig. 4) [5].
Simulator steps for correct placement
Grasp each electrode by the string-like attachments and slightly stretch the helices.
Position the electrode on the right side, passing underneath the nerve (Fig. 5A).
Use controlled tension to open the helices and place them around the nerve, starting with the central turn, followed by the upper and lower turns (Fig. 5B).
Secure the inferior anchor around the vagus nerve, followed by the positive and negative electrodes (Fig. 5C and D).
Ensure redundant loops are made to allow for neck movement (Fig. 5E).
Secure the electrode with nonabsorbable sutures to silicone holders at the deep cervical fascia (Fig. 5F).
Common placement errors
Helix Tangling: It is crucial to avoid the helices tangling before device placement, as this can significantly impede electrode insertion. Stretch each helix and ensure proper positioning before starting (Fig. 4 I).
Incorrect Placement Side: Attempting to place the helices from the left side of the vagus nerve is a common mistake. The system is designed for right-handed surgeons, and starting from the left side makes placement very difficult, if not impossible (Fig. 4 H).
Connecting the lead to the pulse generator
Connection: The lead connector is fully inserted into the generator port and secured by tightening the setscrew.
Placement: The excess lead is wrapped around the pulse generator and positioned in the subcutaneous pocket. The generator is sutured in place using non-absorbable sutures.
System testing
Functionality Testing: The device is checked using the clinician programmer. A successful test indicates optimal functionality.
Impedance Testing: The lead impedance is tested by a single stimulation impulse lasting 1 min.
Wound closure
The wounds are closed using absorbable sutures for the subcutaneous layers and non-absorbable sutures for the skin.
Indications
Indications for VNS use in epilepsy include:
Partial and generalized idiopathic epilepsy
Multifocal epilepsy
Drop attacks (tonic/atonic seizures)
Generalized tonic–clonic seizures
Lennox-Gastaut syndrome
Tuberous sclerosis complex (TSC)-related multifocal epilepsy
VNS may be an alternative to corpus callosotomy or used after its failure. For patients with localizing epileptogenic lesions, VNS should be considered for those with bilateral cortical localization and after unsuccessful resective surgery [1, 4, 5, 8, 10].
Limitations
The limitations of VNS include:
Variable response: Not all patients respond uniformly.
Time to efficacy: Several months may be needed for significant seizure reduction.
Compatibility: VNS is not a cure; it is an adjunct to other treatments.
Device replacement: Pulse generators have a limited lifespan and require surgical replacement.
Cost and access: VNS is costly and not available in all centers.
How to avoid complications
To minimize complications during and after VNS implantation:
- Patient selection:
- Carefully evaluate candidates to ensure no significant medical contraindications, especially cardiac disorders.
- Surgical technique:
- Detailed anatomical understanding is crucial. Use educational resources such as surgical technique articles, procedural videos, and surgical simulators to improve precision and safety.
- Infection prevention, cardiac control, and postoperative management:
- Administer prophylactic antibiotics and maintain strict sterile technique.
- Monitor cardiac function during surgery to manage bradycardia or asystole.
Specific information for the patient
Procedure: VNS is a surgically implanted device to reduce epileptic seizures.
Benefits: Reduced frequency and severity of seizures.
- Complications:
Expectations: Periodic adjustments, possible pulse generator replacement, not a curative treatment.
10 key points summary
Anatomy understanding: Detailed knowledge of the carotid sheath anatomy is crucial for successful VNS implantation.
Patient selection: Careful evaluation to ensure candidates do not have significant medical contraindications, particularly cardiac issues.
Preoperative preparation: Administer prophylactic antibiotics and use sterile techniques to prevent infections.
Patient positioning: Proper positioning of the patient is essential to facilitate the surgical procedure.
Neck incision: In pediatric patients, a low transverse incision is made to anticipate future device revisions.
Electrode placement: Employ precise techniques and tools to ensure accurate electrode placement around the vagus nerve.
Simulator training: Use simulators for training to enhance surgical precision and technique.
System testing: Perform functionality and impedance testing to ensure optimal device operation.
Postoperative care: Close follow-up is necessary to adjust stimulation parameters and detect complications early.
Patient education: Provide comprehensive information on the procedure, benefits, risks, and expectations, emphasizing that VNS is not a curative treatment.
Supplementary Information
Below is the link to the electronic supplementary material.
(MP4 384 MB)
Acknowledgements
I would like to express my deepest gratitude to the pediatric neurologists at Juan P. Garrahan Children’s Hospital for their invaluable collaboration and for the multidisciplinary work we have carried out together.
Abbreviations
- VNS
Vagus nerve stimulation
- TSC
Tuberous sclerosis complex
Author contributions
All authors contributed to the conception and design of the study. Material preparation, data collection, and analysis were conducted by S.E.C. The first draft of the manuscript was written by S.E.C., and all authors commented on previous versions of the manuscript. Additionally, S.E.C. created the images, and recorded and edited the video, which features a surgery performed by M.B. The audio for the video was produced by J.F.C. Language editing and correction were carried out by J.F.C and G.P.G. All authors have read and approved the final manuscript.
Funding
No funding was received for this research.
Data availability
No datasets were generated or analysed during the current study.
Declarations
Ethical approval
All procedures performed in studies involving human participants were in accordance with the Declaration of Helsinki and adhered to the Good Clinical Practice Guidelines (Resolution 1480/11) of the Argentine Ministry of Health. Furthermore, approval for the protocol was obtained by the Ethics and Research Committee of "Juan P. Garrahan" Pediatric Hospital.
Informed consent
Informed consent was obtained from all individual participants included in the study.
Competing interests
The authors declare no competing interests.
Footnotes
Publisher's Note
Springer Nature remains neutral with regard to jurisdictional claims in published maps and institutional affiliations.
References
- 1.Aalbers MW, Rijkers K, Klinkenberg S, Majoie M, Cornips EM (2015) Vagus nerve stimulation lead removal or replacement: surgical technique, institutional experience, and literature overview. Acta Neurochir (Wien) 157(11):1917–1924. 10.1007/s00701-015-2547-9 [DOI] [PMC free article] [PubMed] [Google Scholar]
- 2.Ansari S, Chaudhri K, Al Moutaery KA (2007) Vagus nerve stimulation: indications and limitations. Acta Neurochir Suppl 97(Pt 2):281–286. 10.1007/978-3-211-33081-4_31 [DOI] [PubMed] [Google Scholar]
- 3.Boon P, De Herdt V, Vonck K, Van Roost D (2007) Clinical experience with vagus nerve stimulation and deep brain stimulation in epilepsy. Acta Neurochir Suppl 97(Pt 2):273–280. 10.1007/978-3-211-33081-4_30 [DOI] [PubMed] [Google Scholar]
- 4.Boon P, Vonck K, Vandekerckhove T et al (1999) Vagus nerve stimulation for medically refractory epilepsy; efficacy and cost-benefit analysis. Acta Neurochir (Wien) 141(5):447–453. 10.1007/s007010050324 [DOI] [PubMed] [Google Scholar]
- 5.Cicutti SE, Gromadzyn GP, Cuello JF, Bartuluchi M (2024) Vagus nerve stimulation in pediatric patients with drug-resistant epilepsy: a step-by-step video. Neurosurg Focus Video 11(1):V2. 10.3171/2024.4.FOCVID244. [DOI] [PMC free article] [PubMed] [Google Scholar]
- 6.Giordano F, Zicca A, Barba C, Guerrini R, Genitori L (2017) Vagus nerve stimulation: surgical technique of implantation and revision and related morbidity. Epilepsia 58(Suppl 1):85–90. 10.1111/epi.13678 [DOI] [PubMed] [Google Scholar]
- 7.Kaoutzani L, Goldman LV, Piper K, Kumar M, Vale FL (2023) Revision and removal of vagus nerve stimulation systems: twenty-five years’ experience. Acta Neurochir (Wien) 165(12):3913–3920. 10.1007/s00701-023-05875-1 [DOI] [PubMed] [Google Scholar]
- 8.Schneider UC, Bohlmann K, Vajkoczy P, Straub HB (2015) Implantation of a new Vagus Nerve Stimulation (VNS) Therapy® generator, AspireSR®: considerations and recommendations during implantation and replacement surgery–comparison to a traditional system. Acta Neurochir (Wien) 157(4):721–728. 10.1007/s00701-015-2362-3 [DOI] [PubMed] [Google Scholar]
- 9.van Schooten J, Smeets J, van Kuijk SM et al (2023) Surgical complications of vagus nerve stimulation surgery: a 14-years single-center experience. Brain Spine 4:102733. 10.1016/j.bas.2023.102733. [DOI] [PMC free article] [PubMed] [Google Scholar]
- 10.Yates CF, Riney K, Malone S et al (2022) Vagus nerve stimulation: a 20-year Australian experience. Acta Neurochir (Wien) 164(1):219–227. 10.1007/s00701-021-05046-0 [DOI] [PubMed] [Google Scholar]
Associated Data
This section collects any data citations, data availability statements, or supplementary materials included in this article.
Supplementary Materials
(MP4 384 MB)
Data Availability Statement
No datasets were generated or analysed during the current study.