Abstract
Recombinant adeno-associated viruses (rAAVs) are valuable viral vectors for in vivo gene transfer, also having significant ex vivo therapeutic potential. Continued efforts have focused on various gene therapy applications, capsid engineering, and scalable manufacturing processes. Adherent cells are commonly used for virus production in most basic science laboratories because of their efficiency and cost. Although suspension cells are easier to handle and scale up compared to adherent cells, their use in virus production is hampered by poor transfection efficiency. In this protocol, we developed a simple scalable AAV production protocol using serum-free-media-adapted HEK293T suspension cells and VirusGEN transfection reagent. The established protocol allows AAV production from transfection to quality analysis of purified AAV within two weeks. Typical vector yields for the described suspension system followed by iodixanol purification range from a total of 1 × 10¹³ to 1.5 × 10¹³ vg (vector genome) using 90 mL of cell suspension vs. 1 × 10¹³ to 2 × 10¹³ vg using a regular adherent cell protocol (10 × 15 cm dishes).
Key features
• Adeno-associated virus (AAV) production using serum-free-media-adapted HEK293T suspension cells.
• Efficient transfection with VirusGEN.
• High AAV yield from small-volume cell culture.
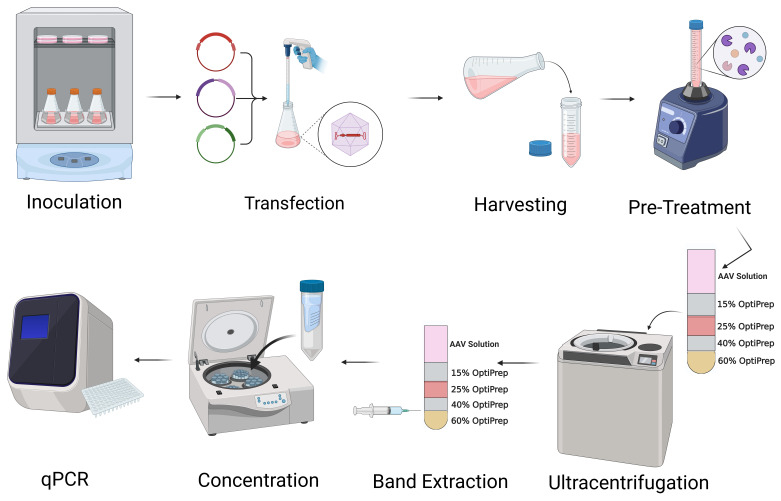
Graphical overview
Keywords: AAV, Suspension cells, Serum-free media, Transfection reagent, Iodixanol density gradient
Background
The adeno-associated virus (AAV) is a non-enveloped virus belonging to the Parvoviridae family that was discovered as a contaminant in adenovirus preparations (Atchison et al., 1965). The AAV has icosahedral protein capsids of approximately 26 nm in diameter containing a single-stranded DNA genome of approximately 4.7 kb (Wang et al., 2019). Recombinant AAV (rAAV) primarily forms non-integrating episomes and sustains long-term transgene expression. It is considered to be a non-pathogenic virus and a leading viral gene transfer vector for human gene therapy (Pupo et al., 2022). Due to the discovery of numerous naturally occurring variants (> 200) and the small size of the Cap gene, capsid engineering to confer new properties to the vector has become a hot research area (Wang et al., 2019; El Andari and Grimm, 2021). Improving rAAV production that can easily be adapted to engineered serotypes is increasingly important to meet clinical demand as well as basic science needs.
Most laboratories commonly use adherent HEK293 or HEK293T cells as producer cells because transfection of adherent cells is more efficient than that of suspension cells. However, suspension cells are easier to handle and scale up, which is of particular interest to Good Manufacturing Practice (GMP) facilities. Scalable production methods include transfection of Sf9 (Mietzsch et al., 2014), HEK293 (Grieger et al., 2016), or HEK293T cells (Zhao et al., 2020). Although the insect cell-based method is more robust (Mietzsch et al., 2014), baculoviruses must be prepared before AAV production. Therefore, transfection of mammalian cells using three plasmids (a helper AdΔF6 plasmid, a Rep/Cap plasmid, and the transgene-containing AAV transfer plasmid) is more versatile and easier to adapt to newly engineered capsids. The most common transfection reagent for suspension cells is polyethyleneimine (PEI) because it is inexpensive and effective (Grieger et al., 2016; Blessing et al., 2019; Zhao et al., 2020). However, PEI is cytotoxic. Most protocols using PEI require changing media (Zhao et al., 2020; Challis et al., 2019) or diluting transfection reagent (Grieger et al., 2016 ; Blessing et al., 2019), while VirusGEN, a newly developed transfection reagent, is less toxic and does not require media change. We found that AAV production by transfecting HEK293T suspension cells by VirusGEN is superior to PEI and its efficiency is comparable to that of transfecting adherent cells by iMFectin poly (Deng and Oka, 2020 ).
There are several methods available for the purification of AAV (El Andari and Grimm, 2021). A commonly used method involves either cesium chloride (CsCl) (Ayuso et al., 2010) or iodixanol density gradient (Zolotukhin et al., 1999), which offers an advantage in separating empty and full capsids based on their density regardless of the serotype. This method allows the simultaneous purification of multiple small-scale preparations. However, scaling up or automating this process presents challenges. Another purification method is liquid chromatography. In this approach, ion exchange columns or affinity columns are connected to fast protein liquid chromatography (FPLC) or high-performance liquid chromatography (HPLC) (Nass et al., 2018; Joshi et al., 2021; Florea et al., 2023). This method is robust and preferred for clinical-grade AAV, since it can be automated and is suitable for large-scale production. However, the affinity column does not differentiate between empty and full capsids. Generally, a second column, such as an anion exchange (AEX) column, is employed to separate empty and full capsids based on the charge difference brought on by the vector genome. However, the chromatographic purification method requires adjustments and optimizations for each serotype. The choice of purification method(s) depends on various factors, including the specific AAV serotype, the downstream application, available resources, cost, and desired purity level.
Purified AAV can be characterized by several methods for quality control (QC). The most important QC assay is genome titer, which can be standardized among laboratories using reference standard material (Ayuso et al., 2014). The most popular method for this purpose is quantitative PCR (qPCR), with digital PCR (dPCR) being the most recent advancement of qPCR technology (Quan et al., 2018). Although dPCR measures absolute numbers without a standard, dPCR has a narrow dynamic range compared to qPCR due to the limited number of partitions. The conventional assay to determine empty capsids in AAV preparations is transmission electron microscope (TEM) (Grieger et al., 2006). Nonetheless, FPLC- or HPLC-AEX (Lock et al., 2012; Khatwani et al., 2021) and HPLC coupled with size exclusion column and multi-angle light scattering (McIntosh et al., 2021) have gained popularity for their simplicity and high throughput. Analytical ultracentrifugation, mass spectrometry, and charge detection mass spectrometry (Werle et al., 2021; Ebberink et al., 2022) are used to analyze empty and full capsids, including those containing partial genomes. For detecting minor DNA contaminants, such as host DNA contamination and plasmid DNA used for transfection, next-generation sequencing (Lecomte et al., 2015; Guerin et al., 2020) is employed, which can also assess vector genome integrity. The integrity of capsid proteins can be assessed by sodium-dodecyl sulfate-polyacrylamide gel electrophoresis (SDS-PAGE), which detects major capsid proteins (VP1, VP2, and VP3) in a 1:1:10 ratio and other protein contaminants. However, the heterogeneity of capsid proteins has been reported. Another important QC parameter that may influence transgene expression is the infectivity of AAV. Different serotypes use different cellular docking sites, making a universal method difficult to achieve. The most accurate assay relying on AAV biological activities is the infectious center assay, while the most widely used is the median tissue infective dose (TCID50) assay, which determines genome replication by qPCR (Zen et al., 2004). Neither assay addresses cell type-specific infectivity. Although measuring intracellular vector genomes upon cell infection may not directly reflect biological activities (François et al., 2018), this method is simple and broadly applicable to any target cell. Therefore, the choice of QC methods is again dictated by the same factors described for purification methods.
In this protocol, a subclone of HEK293T cells adapted for serum-free media is transfected in suspension and AAV9 is purified by iodixanol density gradient (Zolotukhin et al., 1999). The critical determinants for transfection are cell viability and cell density. The combination of suspension cells and effective transfection reagents allows high-yield vector production [> 1 × 10¹³ vector genome of purified AAV9 from 90 mL of culture vs. 1 × 10¹³ to 2 × 10¹³ vg from a comparable adherence cell culture described in Deng and Oka (2020)]. In addition, hands-on time is drastically shortened compared with conventional adherent cell protocols. AAVs produced by this protocol have been characterized by qPCR, SDS-PAGE, TEM, and infectious titer assay. The quality of AAVs of different serotypes and transgenes varies and additional QCs may be required in some experiments. Using the same protocol and QCs to standardize AAVs for experiments is recommended.
Materials and reagents
Biological materials
HEK293T (ATCC, catalog number: CRL-3216) adapted for serum-free media; alternatively, request BalanCD HEK293 serum-free-media-adapted HEK293T cells (1F11S) from the corresponding author
pAdΔF6 helper plasmid (Addgene, catalog number: 112867)
pAAV2/9 Rep/Cap plasmid (Addgene, catalog number: 112865)
AV0-EF1-N-cG (control AAV transfer plasmid) (Addgene, catalog number: 192888) or AV0-EF1-N-tdT (Addgene, catalog number: 192889)
DNase I (Sigma-Aldrich, catalog number: DN25-1G)
RNase A (Thermo Fisher Scientific, catalog number: BP25391)
Forward qPCR primer such as WPRE or other vector specific primer (Sigma-Aldrich, WPRE-172 nucleotide sequence: TTTATGAGGAGTTGTGGCCC)
Reverse qPCR primer such as WPRE or other vector specific primer (Sigma-Aldrich, WPRE-392 nucleotide sequence: CAACACCACGGAATTGTCAG)
Reagents
BalanCD HEK293 media liquid or powder (Fujifilm Irvine Scientific, catalog number: 91165 or 94137, respectively)
GlutaMAX (Thermo Fisher Scientific, catalog number: 35050061)
100× Pluronic F-68 (Thermo Fisher Scientific, catalog number: 24040032)
VirusGEN AAV Transfection kit (Mirus Bio, catalog number: MIR 6750)
1 M Tris-HCl pH 8.0 (Thermo Fisher Scientific, catalog number: AAJ22638AP)
NaCl (Sigma-Aldrich, catalog number: BP35810)
MgCl2 Sigma-Aldrich, catalog number: 442611-500GM)
KCl (Sigma-Aldrich, catalog number: 1049360250)
1 M DTT (Thermo Fisher Scientific, catalog number: 11-101-3992)
Glycerol (Thermo Fisher Scientific, catalog number: J62399.AP or equivalent)
Sodium deoxycholate (Sigma-Aldrich, catalog number: D6750)
HEPES (Sigma-Aldrich, catalog number: H3784)
Sarcosyl (VWR, catalog number: D719-500G)
EDTA (Sigma-Aldrich, catalog number: E5134)
PEG8000 (Sigma-Aldrich, catalog number: P2139-2KG)
OptiPrep Density Gradient (Thermo Fisher Scientific, catalog number: NC1174452)
Phenol red (Sigma-Aldrich, catalog number: P0290-100ML)
DPBS (Gendepot, catalog number: CA008-300 or equivalent)
HyPure molecular biology grade water (Thermo Fisher Scientific, catalog number: SH3053802 or equivalent)
SYBR Green SuperMix (VWR, catalog number: 101414-168)
Sodium bicarbonate (Sigma-Aldrich, catalog number: S6014-500G)
Trypan blue (Thermo Fisher Scientific, catalog number: 15250061)
Solutions
Complete BalanCD HEK293 media (c-BalanCD HEK293) (see Recipe 1)
DNase I solution (see Recipe 2)
RNase A solution (see Recipe 3)
2 M MgCl2 (see Recipe 4)
5 M NaCl (see Recipe 5)
2.5 M NaCl (see Recipe 6)
40% PEG8000/2.5 M NaCl (see Recipe 7)
TMN (see Recipe 8)
HBS (see Recipe 9)
5% sodium deoxycholate (see Recipe 10)
PBS-MK (see Recipe 11)
PBS-NMK (see Recipe 12)
DPBS/Pluronic F-68 (see Recipe 13)
BalanCD HEK293 media—powder reconstituted (see Recipe 14)
Recipes
-
c-BalanCD HEK293 media
Reagent Final concentration Quantity BalanCD HEK293 [or BalanCD HEK293—powder reconstituted (see Recipe 14)] n/a 97 mL 100× GlutaMAX 4 mM 2 mL 100× Pluronic F-68 1× 1 mL Total n/a 100 mL Store this solution at 2–4 °C. See General Note 1 for alternatives to this recipe.
-
DNase I solution
Reagent Final concentration Quantity 1 M Tris-HCl pH 7.6 20 mM 2 mL NaCl 50 mM 0.2922 g Glycerol 50% (v/v) 50 mL 1 M DTT 1 mM 100 µL DNase I 10 mg/mL 1 g ddH2O n/a Add up to 100 mL Total n/a 100 mL Adjust pH to 7.6 (see General Note 2). See General Note 3 for more information about ddH2O. Aliquot this solution into 1.5 mL microcentrifuge tubes and store at -20 °C.
-
RNase A solution
Reagent Final concentration Quantity 1 M Tris-HCl pH 7.5 10 mM 1 mL NaCl 15 mM 87.66 mg RNase A 10 mg/mL 1 g ddH2O n/a Add up to 100 mL Total n/a 100 mL Adjust pH to 7.5. Aliquot this solution into 1.5 mL microcentrifuge tubes and store at -20 °C.
-
2 M MgCl2
Reagent Final concentration Quantity MgCl2 2 M 95.211 g ddH2O n/a Add up to 500 mL Total 2 M 500 mL Filter with a 0.22 µm pore size filter. Store this solution at room temperature.
-
5 M NaCl
Reagent Final concentration Quantity NaCl 5 M 292.2 g ddH2O n/a Add up to 1,000 mL Total 5 M 1,000 mL Filter with a 0.22 µm pore size filter. Store this solution at room temperature.
-
2.5 M NaCl
Reagent Final concentration Quantity NaCl 2.5 M 73.05 g ddH2O n/a Add up to 500 mL Total 2.5 M 500 mL Store this solution at room temperature.
-
40% PEG 8000/2.5 M NaCl
Reagent Final concentration Quantity 5 M NaCl (see Recipe 5) 2.5 M 500 mL PEG8000 40% 400 g ddH2O n/a Add up to 1,000 mL Total n/a 1,000 mL Prime a 0.22 µm pore size filter with 2.5 mL of 2.5 M NaCl before filtering the 40% PEG 8000/2.5 M NaCl solution. The filtering will take over an hour due to the viscosity of the solution. Store at room temperature.
-
TMN
Reagent Final concentration Quantity 1 M Tris-HCl pH 8.0 50 mM 50 mL 2 M MgCl2 5 mM 2.5 mL NaCl 150 mM 8.77 g ddH2O n/a Add up to 1,000 mL Total n/a 1,000 mL Adjust solution to pH 8.0. Filter with a 0.22 µm pore size filter. Store this solution at room temperature.
-
HBS
Reagent Final concentration Quantity HEPES 50 mM 2.980 g NaCl 150 mM 2.192 g Sarcosyl 1% 2.5 g EDTA 20 mM 1.46 g ddH2O n/a Add up to 250 mL Total n/a 250 mL Adjust solution to pH 8.0. Filter with a 0.22 µm pore size filter. Store this solution at room temperature.
-
5% sodium deoxycholate
Reagent Final concentration Quantity Sodium deoxycholate 5% 28.2 g ddH2O n/a Add up to 500 mL Total 5% 500 mL Filter with a 0.22 µm pore size filter. Store this solution at room temperature. Protect from light.
-
PBS-MK
Reagent Final concentration Quantity MgCl2 2.7 mM 263 mg KCl 2 mM 149.1 mg DPBS n/a Add up to 1,000 mL Total n/a 1,000 mL Filter with a 0.22 µm pore size filter. Store this solution at 2–4 °C.
-
PBS-NMK
Reagent Final concentration Quantity NaCl 1 M 29.2 g MgCl2 2.7 mM 131.5 mg KCl 2 m 74.55 mg DPBS n/a Add up to 500 mL Total n/a 500 mL Filter with a 0.22 µm pore size filter. Store this solution at 2–4 °C.
-
DPBS/0.001% Pluronic F-68
Reagent Final concentration Quantity 1× DPBS n/a 500 mL 100× Pluronic F-68 0.001% 50 µL Total n/a 500 mL Store this solution at 2–4 °C.
-
BalanCD HEK293 media—powder reconstituted
Reagent Final concentration Quantity BalanCD HEK293 powder n/a 21.32 g Sodium bicarbonate 2.20 g ddH2O n/a Add up to 1,000 mL Total n/a 1,000 mL Ensure that the pH of the solution is between 6.7 and 7.4 and the osmolality is between 280 and 320 mOsm/kg. Filter with a 0.22 µm pore size filter. Store this solution at 2–4 °C for up to one year.
Laboratory supplies
Pipet-X pipette controller (Rainin, catalog number: 17011733 or equivalent)
20 µL pipette (Rainin, catalog number: 17008650 or equivalent)
200 µL pipette (Rainin, catalog number: 17008652 or equivalent)
1000 µL pipette (Rainin, catalog number: 17008653 or equivalent)
Filtered 20 µL pipette tips (Rainin, catalog number: 30389274 or equivalent)
Filtered 200 µL pipette tips (Rainin, catalog number: 30389276 or equivalent)
Filtered 1000 µL pipette tips (Rainin, catalog number: 30389272 or equivalent)
125 mL baffled Erlenmeyer flasks (Sigma-Aldrich, catalog number: CLS431404-1EA)
250 mL baffled Erlenmeyer flasks (VWR, catalog number: 75993-572)
0.6 mL microcentrifuge tubes (Thermo Fisher Scientific, catalog number: 05-408-120)
1.5 mL microcentrifuge tubes (Thermo Fisher Scientific, catalog number: 05-408-129)
0.5 mL microcentrifuge tubes (Thermo Fisher Scientific, catalog number: 02-707-357)
Microtube racks (Thermo Fisher Scientific, catalog number: 22-313630)
Countess cell counting chamber slides (Thermo Fisher Scientific, catalog number: C10228)
24-well polystyrene microplates (Thermo Fisher Scientific, catalog number: 08-772-1)
15 mL polypropylene centrifuge tubes (VWR, catalog number: 89039-666)
15 mL steel wire racks (Thermo Fisher Scientific, catalog number: 3422306)
50 mL steel wire racks (Thermo Fisher Scientific, catalog number: FB147916A)
250 mL polypropylene centrifuge tubes (Thermo Fisher Scientific, catalog number: 05-538-53)
0.22 µm bottle top filters (Genesee Scientific, catalog number: 25-235)
10 mL serological pipettes (VWR, catalog number: 29443-047)
5 mL serological pipettes (VWR, catalog number: 29442-422)
Amicon centrifugal filter units (Sigma-Aldrich, catalog number: UFC910024)
5 mL sterile syringes (Thermo Fisher Scientific, catalog number: 14955458)
20 G sterile hypodermic needles (Thermo Fisher Scientific, catalog number: 14-817-209)
Thinwall polypropylene centrifuge tubes (Beckman Coulter, catalog number: 326823)
96-well qPCR plates (Genesee Scientific, catalog number: 27-105)
Strip caps for qPCR plate (VWR, catalog number: ST401425)
Fine-tipped markers (Thermo Fisher Scientific, catalog number: 19-166-600)
Alcohol wipes (Thermo Fisher Scientific, catalog number: 22-037790)
Equipment
Biosafety cabinet (NuAire LabGard, Class II, type A2, catalog number NU-540-400UB10 or equivalent)
CO2 resistant shaker platform (Thermo Scientific, catalog number: 88881103 or equivalent)
Agilent qPCR Machine (Agilent, model: MX30005P or equivalent)
Countess automated cell counter (Invitrogen, catalog number: C10281 or equivalent)
Reach-in CO2 incubator (Cell IQ, catalog number: MCO-80ICL-PA or equivalent)
Avanti J-15R benchtop centrifuge (Beckman Coulter, catalog number: B99517 or equivalent)
JS-4750 swinging-bucket rotor (Beckman Coulter, catalog number: B77580 or equivalent)
60 mm diameter bottle adaptors (Beckman Coulter, catalog number: 392079 or equivalent)
18 mm diameter tube adaptors (Beckman Coulter, catalog number: 359473 or equivalent)
Avanti JXN-26 centrifuge (Beckman Coulter, catalog number: B38619 or equivalent)
JA-25.50 fixed-angle rotor (Beckman Coulter, catalog number: 363058 or equivalent)
JS-5.3 swinging-bucket rotor (Beckman Coulter, catalog number: 368690 or equivalent)
Optima XPN-90 ultracentrifuge (Beckman Coulter, catalog number: A99842 or equivalent)
SW32Ti swinging-bucket rotor package (Beckman Coulter, catalog number: 369694 or equivalent)
-80 °C freezer (PHCbi, model: MDF-DU502VHA-PA)
Water bath (Thermo Fisher Scientific, catalog number: FSGPD10 or equivalent)
Microfuge 18 centrifuge (Beckman Coulter, catalog number: BE-M18C or equivalent)
Test tube rocker (Thermo Fisher Scientific, catalog number: 12-815-6Q or equivalent)
(Optional) Millipore Biopak Polisher (Sigma-Aldrich, catalog number: CDUFBI001)
(Optional) Millipak Express 20 filter (Sigma-Aldrich, catalog number: MPGP02001)
Software and datasets
MxPro—Mx3005P (version 4.10, 2/15/23)
Procedure
-
Defrosting and cell maintenance
-
Defrost cells into 30 mL of warm c-BalanCD HEK293 media (see Recipe 1) into a 125 mL baffled Erlenmeyer flask.
Note: If you are using HEK293T cells and adapting to serum-free media yourself, please view Supplementary information 1 for more information on how to adapt your cells to c-BalanCD HEK293 media.
Place the flask onto the shaker platform in the 37 °C and 5% CO 2 incubator at 120 rpm.
-
Count cell density every other day and dilute cells with c-BalanCD HEK 293 media as needed to maintain the cell density between 3 × 10⁵ live cells/mL and 3 × 10⁶ live cells/mL. Dilution will likely need to occur at least twice a week (dilute into a new, clean 125 mL baffled Erlenmeyer flask). Follow the subsequent steps to count cells and check cell viability with a Countess automated cell counter (or equivalent equipment):
Obtain a 0.6 mL microcentrifuge tube (MCT).
Aliquot 10 µL of trypan blue into the 0.6 mL MCT.
Remove the 125 mL baffled Erlenmeyer flask from the shaker platform.
Swirl the flask before taking a 10 µL aliquot of cells from the 125 mL baffled Erlenmeyer flask.
Add the 10 µL aliquot from the 125 mL baffled Erlenmeyer flask to the 10 µL of trypan blue in the 0.6 mL MCT.
Reflux the cell/trypan blue mixture.
Pipette 10 µL of the cell/trypan blue mixture onto a Countess cell counting chamber slide.
Insert the chamber slide into the automated cell counter and note the live cell count and cell viability.
Note: It is wise to systematically document these cell counts and cell viabilities so that you can monitor the growth and robustness of the cells throughout the cell maintenance process.
Pause point: The cells can be continually maintained in this way until you are ready to inoculate and transfect.
-
-
Inoculate flask (Day 1)
Warm c-BalanCD HEK293 media at 37 °C in a water bath.
-
Inoculate a 250 mL baffled Erlenmeyer flask with 1 × 10⁶ live cells/mL in a total of 90 mL of c-BalanCD HEK293 media.
Note: The cells are being expanded from the initial 30 mL maintenance volume to a larger 90 mL volume suitable for transfection.
Place the 250 mL baffled Erlenmeyer flask on the shaker platform in the 37 °C and 5% CO2 incubator at 120 rpm.
-
Transfection (Day 2)
Ensure that the cell density of the previously inoculated 250 mL baffled Erlenmeyer flask reaches 1.0–2 × 10⁶ live cells/mL (1 day after inoculation). Follow the method in step A3h to determine cell counts.
-
Transfer 0.5 mL of the cell suspension to a 24-well plate as a negative control.
Note: This is optional for your AAV transfer plasmids that contain a fluorescent marker.
Add 9 mL of complex formation solution and enhancer (CFSE) from the VirusGEN AAV Transfection kit .to a 15 mL centrifuge tube.
Add the appropriate quantity of plasmid DNA to the CFSE in the 15 mL centrifuge tube and gently reflux to combine for 10 s. Table 1 shows the DNA quantities needed for each component of the transfection mixture.
Add 270 µL of TransIt-VirusGen Transfection Reagent (3 µL per 1 mL of cells) to the CFSE/DNA mixture and gently reflux to mix well.
Let the transfection mixture incubate at room temperature for 30 min.
After the incubation period is over, gently reflux the transfection mixture well and add directly to the 250 mL flask while manually swirling the flask.
Put the 250 mL baffled Erlenmeyer flask back on the shaker platform in the 37 °C and 5% CO2 incubator at 120 rpm.
-
Harvesting after 72 h (Day 5)
(Optional) Transfer 0.5 mL of cell suspension to a 24-well plate and observe fluorescent protein expression if it exists. See Figure 1 for what a typical transfection efficiency may look for a transgene plasmid that had a fluorescent marker.
Transfer the entire contents of the 250 mL baffled Erlenmeyer flask (this should be approximately 100 mL of cell/media suspension) to a newly labeled 250 mL centrifuge tube.
Wash the flask with 24 mL of DPBS and combine with cell/media suspension.
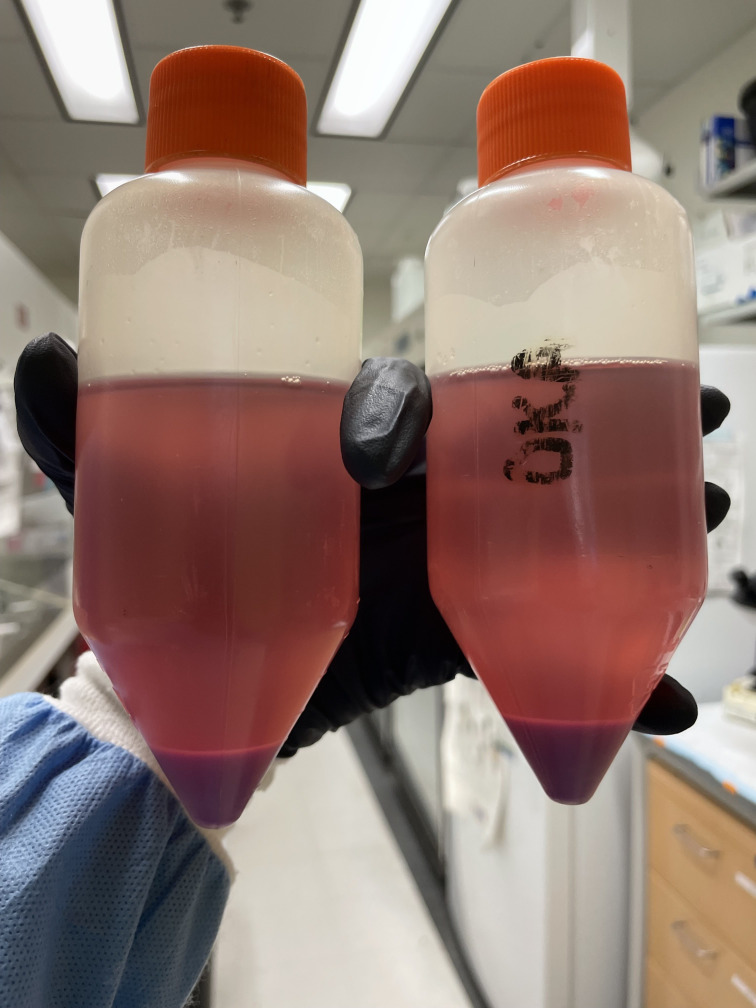
Centrifuge cell/media suspension at 335× g for 10 min at room temperature. See Figure 2 for what this may look like.
-
Digestion (Day 5)
-
Pour supernatant carefully into a newly labeled 250 mL bottle, being careful not to disturb the cell pellet.
Note: The supernatant and cell pellet are treated separately in parallel as both contain AAV. The steps during this digestion phase (step E2 for the supernatant and step E3 for the cell pellet) will serve to withdraw the virus from either the cell pellet or the supernatant. After having been treated in parallel, the crude virus from both the cell pellet and the supernatant will ultimately be combined and loaded onto one OptiPrep gradient for further purification/concentration, thus necessitating their simultaneous handling/treatment.
-
For the supernatant, complete the following steps:
To the new 250 mL bottle with the supernatant in it, add 150 µL of DNase I solution (see Recipe 2), 150 µL of RNase A solution (see Recipe 3), and 1 mL of 2 M MgCl2 (see Recipe 4).
Invert the centrifuge tube to mix and incubate for 1 h in the 37 °C and 5% CO2 incubator.
After 1 h, add 25 mL of 40% PEG 8000/2.5 M NaCl (see Recipe 7) for every 100 mL of digested supernatant.
Invert the bottle at least 20 times to mix and store at 4 °C until purification.
Pause point: The supernatant can stay at 4 °C for a maximum of two weeks before it is purified.
-
For the cell pellet, complete the following steps:
Resuspend the cell pellet in 8 mL of TMN (see Recipe 8).
Loosen the pellet by tapping the bottom of the centrifuge tube against the metal surface of the cell culture hood.
Resuspend the cell pellet in the TMN using a pipette controller and transfer the mixture to a 15 mL centrifuge tube.
Add 10% by volume of 5% sodium deoxycholate (see Recipe 3) and rock for 30 min at room temperature.
Add 100 µL of 2 M MgCl2, 150 µL of DNase I solution, and 150 µL of RNase A solution.
Mix and incubate for 1 h in a 37 °C water bath. Vortex the tube every 15 min.
Freeze at -80 °C until purification.
Pause point: The cell pellet suspension can remain at -80 °C before it is purified.
-
-
Preparation for purification (Day 6)
-
When ready to purify, complete the following steps for the supernatant:
Remove the 250 mL centrifuge tube from the 4 °C refrigerator and centrifuge it at 410× g for 30 min at 4 °C.
Aspirate the supernatant carefully, ensuring to leave the pellet intact at the bottom.
Add 2.5 mL of HBS (see Recipe 9) to the pellet.
Loosen the pellet by tapping the bottom of the centrifuge tube against the metal surface of the cell culture hood.
-
Resuspend the pellet in the HBS using a pipette controller and transfer the mixture to a 15 mL centrifuge tube.
Note: The pellet may stick to the bottom of the 250 mL centrifuge tube when homogenizing with HBS. Do your best to completely pick up the pellet and ensure that no portion of the pellet sticks to/within the serological pipette.
-
Vortex the HBS/pellet homogenate well.
Note: The pellet will not homogenize completely within the HBS at this point and may remain clumpy. This is acceptable as the pellet should dissolve in the HBS in the next step.
Place the 15 mL centrifuge tube on a rocker and rock until the pellet dissolves completely in the HBS. This will take at least 2 h, but likely longer.
-
When ready to purify, complete the following steps for the cell pellet:
Remove the cell pellet suspension from the -80 °C freezer and thaw completely in a 37 °C water bath.
Once thawed, add 100 µL of DNase I solution and 100 µL of RNase A solution.
Incubate the suspension in a 37 °C water bath for 1 h.
Centrifuge the cell pellet suspension at 410× g for 10 min at 4 °C.
Carefully combine the cleared cell lysate solution with the dissolved HBS/pellet mixture. Be careful not to touch any of the cell debris collected at the bottom of the 15 mL centrifuge tube in which the cell pellet solution was originally in. You should now have one 15 mL centrifuge tube that has the cleared cell pellet suspension solution combined with the HBS mixture.
Place this solution into the 4 °C refrigerator momentarily until the purification gradient is made, as described in the next step.
-
-
Purification (Day 6)
-
Prepare four solutions for the different densities that will be used to create the OptiPrep purification density gradient. Table 2 describes the quantities of OptiPrep, PBS-MK (see Recipe 11) or PBS-NMK (see Recipe 12), and phenol red needed for these solutions.
Note: Be very cautious to use PBS-NMK for the 15% OptiPrep solution and PBS-MK for the 25% OptiPrep and 40% OptiPrep solutions.
Into a sterile thin-wall polypropylene centrifuge tube, start by adding 7 mL of 15% OptiPrep (see Table 2) to the bottom of the tube.
-
Carefully underlay 5 mL of 25% OptiPrep (see Table 2) beneath the 15% OptiPrep layer.
Caution: Pipette carefully so that no bubbles disturb the preexisting layer.
-
Carefully underlay 5 mL of 40% OptiPrep (see Table 2) beneath the 25% OptiPrep layer. See Figure 3 for how this underlay should look.
Caution: Pipette carefully so that no bubbles disturb the preexisting layers.
-
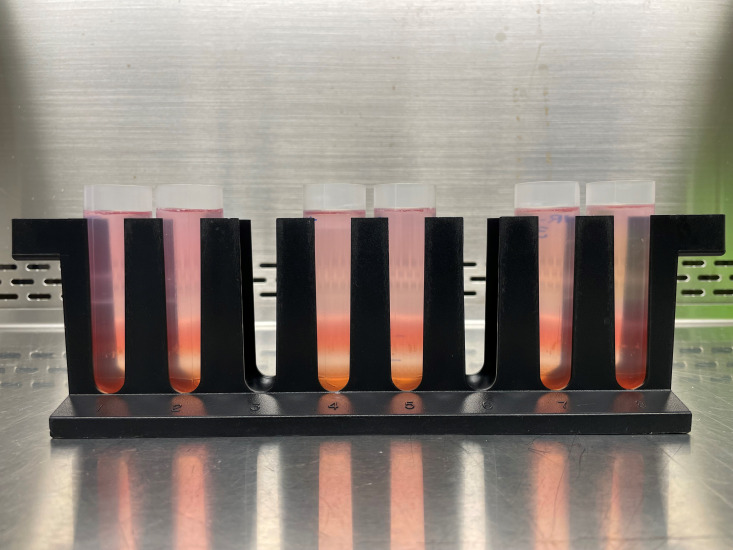
Finally, carefully underlay 4 mL of 60% OptiPrep (see Table 2) beneath the 40% OptiPrep layer. See Figure 4 for what a successfully created gradient should look like.
Caution: Pipette carefully so that no bubbles disturb the preexisting layers.
Outline the top and bottom interfaces of the 40% OptiPrep layer with a fine-tipped marker for a reference point during extraction.
Remove the cleared cell pellet suspension solution combined with the HBS/pellet mixture from the 4 °C refrigerator.
Centrifuge the combined solutions’ 15 mL centrifuge tube at 5,000× g for 10 min at 4 °C.
-
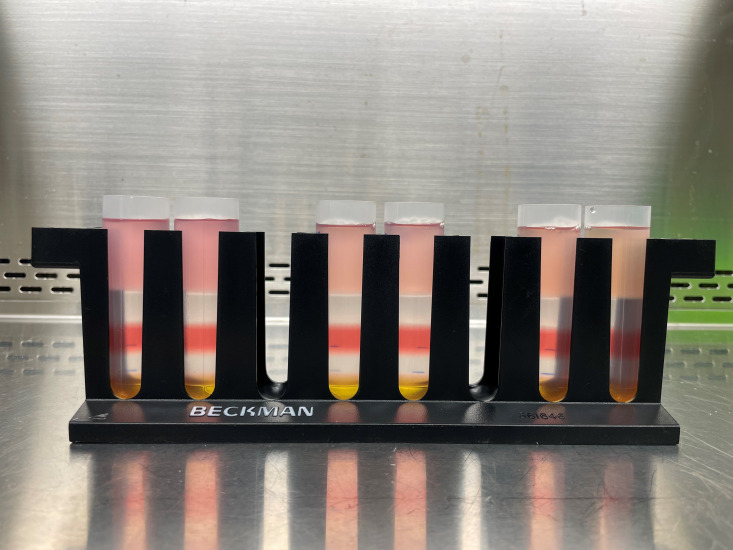
Carefully overlay the combined solution over the OptiPrep gradient. Be careful not to pipette any cellular debris that may have accumulated at the bottom of the 15 mL centrifuge tube. See Figure 5 for what the gradient should look like with the combined solution overlayed on top.
Caution: Do not disturb the density gradient you created. Adjust the speed of your pipetting to ensure that you do not see any disturbance at the interface between the topmost 15% OptiPrep layer and the combined solution you are overlaying.
Transfer the thin-wall polypropylene centrifuge tube to the SW32Ti swinging-bucket rotor in the ultracentrifuge.
-
Centrifuge at 160,713× g for 15 h at 20 °C (overnight centrifugation).
Note: Ensure that you have adequately balanced the centrifuge for proper purification and to prevent equipment malfunction/potential injury.
-
-
Band extraction (Day 7)
After the ultracentrifuge has stopped, remove the thin-wall polypropylene centrifuge tube from the rotor.
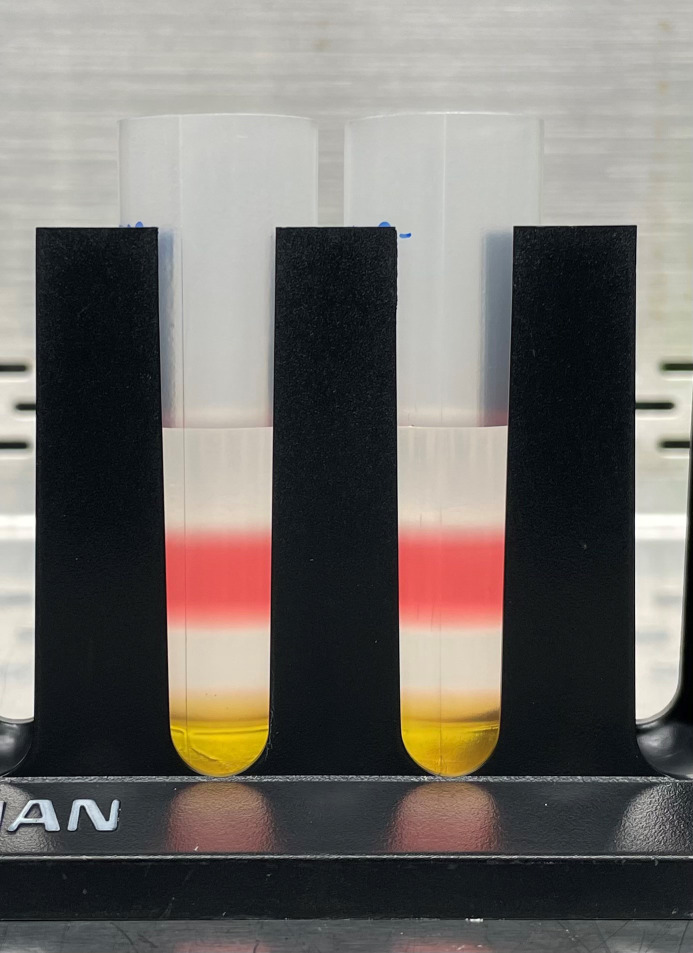
Remove the thin-wall polypropylene centrifuge tube from the adaptor and place it into a holder. See Figure 6 for what the gradient should look like after ultracentrifugation.
Prepare a 50 mL centrifuge tube in a rack.
Attach a 20 G sterile hypodermic needle to a 5 mL sterile syringe.
Use an alcohol wipe to disinfect the puncturing location (the bottom interface of the 40% OptiPrep layer that you previously marked).
-
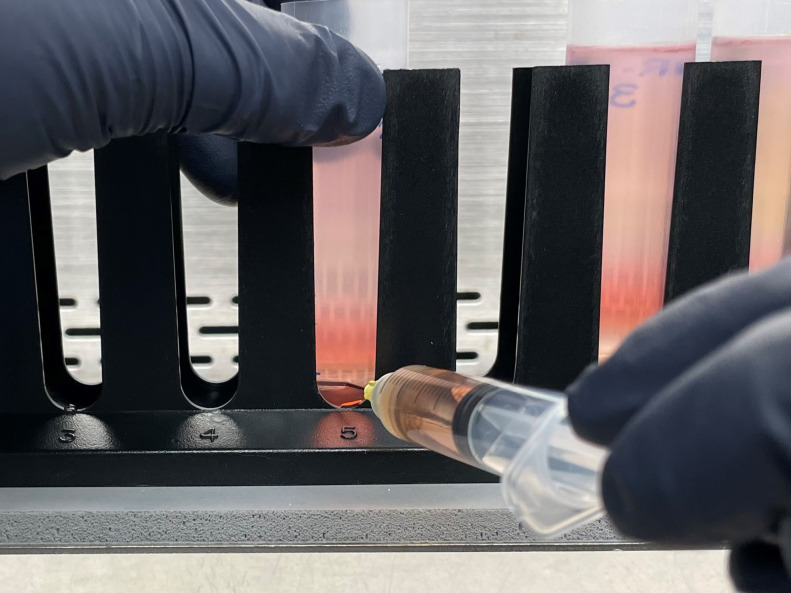
Apply even pressure and puncture the thin-wall polypropylene centrifuge tube at the previously marked bottom interface of the 40% OptiPrep layer. See Figure 7 for guidance on where to puncture the tube.
Caution: Even pressure is important. Nothing should leak from the tube as you will be losing virus, nor should you puncture with such force that you accidentally puncture another part of the thin-wall polypropylene centrifuge tube.
Extract 4–4.5 mL of the OptiPrep solution, being very careful not to accidentally extract any debris that may have sedimented at a different density in the gradient.
Empty the contents of the syringe into the pre-prepared 50 mL centrifuge tube. Be sure to squeeze out as much of the extracted solution as possible before disposing of the needle and syringe in the appropriate sharps container.
Add 45 mL of DPBS/0.001% Pluronic F-68 (see Recipe 13) up to the 50 mL mark of the 50 mL centrifuge tube and place at 4 °C.
-
Concentration of virus (Day 7)
Add 15 mL of DPBS/0.001% Pluronic F-68 to an Amicon centrifugal filter unit and let it equilibrate for 15 min at room temperature.
-
Centrifuge the Amicon filter at 2,096× g for 2 min at 20 °C. Most, but not all, of the DPBS/0.001% Pluronic F-68 should have flowed through to the collection reservoir.
Note: It is of the utmost importance that the Amicon filter does not dry out. Otherwise, the solution will not pass through the filter and the virus will fail to concentrate.
Empty the collection reservoir into a waste bucket.
Add the diluted AAV in the 50 mL centrifuge tube to the Amicon filter and centrifuge the Amicon filter at 2,096× g for 2 min at 20 °C.
Empty the flowthrough from the collection reservoir before adding any more diluted AAV.
-
Repeat the previous steps I3 and I4. Add diluted AAV to the Amicon filter. Centrifuge at 2,096× g for 2 min at 20 °C until the entirety of the diluted sample has been applied to the Amicon filter.
Note: You will have to adjust the centrifuge run time based on how quickly the solution filters through. Do not allow the Amicon filter to dry out.
When the diluted AAV is exhausted, add 30 mL of DPBS/0.001% Pluronic F-68 to the 50 mL centrifuge tube to rinse it out.
Add the rinse solution from the 50 mL centrifuge tube to the Amicon filter and centrifuge at 2,096× g for 2 min at 20 °C until the rinse solution is exhausted as well.
Centrifuge at 2,096× g for 1 min at 20 °C as many times as needed until the liquid level in the Amicon tube reaches 200 µL.
Transfer the entire 200 µL of purified AAV from the Amicon filter to another tube and store at 4 °C for up to six months. For longer storage, aliquot the purified AAV into smaller quantities and store at -80 °C.
-
QPCR for genome titer (Day 8)
Prepare a serial dilution of AV0-EF1-N-cG working standard (1 ng/µL) with molecular biology grade water to cover 0.1 ng/µL (-1 dilution) to 0.00001 ng/µL (-5 dilution).
Prepare a serial dilution of AAV with molecular biology grade water starting at 1:100 (-2 dilution) and ending at 1:100,000 (-5 dilution).
Prepare a primer mix with 80 µL of molecular biology grade water, 10 µL of forward primer, and 10 µL of reverse primer. Vortex well.
Prepare the qPCR mix for projected numbers of wells using the following proportions shown below in Table 3.
Pipette 5 µL of H2O for non-template control in duplicates.
Pipette 5 µL of the standard in duplicates.
Pipette 5 µL of each AAV virus dilution.
Pipette 15 µL of qPCR reaction mix to each well.
Place the strip cap lids over each well. Ensure that the lids have a good seal.
Centrifuge the qPCR plate at 1,087× g for 2 min to remove any air bubbles (see General Note 4).
Place the PCR plate into the qPCR machine.
-
Run qPCR cycle.
Note: For this analysis, the qPCR cycle used by the Agilent qPCR Machine is a standard preprogrammed method of 40 cycles. Each cycle consists of the following: 95 °C for 30 s (denaturation), 65 °C for 1 min (annealing), and 72 °C for 1 min (extension).
Table 1. DNA quantities (Challis et al., 2019).
| Plasmid | For 1 mL of cells | For 90 mL of cells |
|---|---|---|
| Helper plasmid (AdΔF6) | 0.57 µg | 51.3 µg |
| AAV Rep/Cap plasmid | 1.13 µg | 101.7 µg |
| AAV shuttle vector | 0.30 µg | 27 µg |
| Total DNA | 2 µg | 180 µg |
Figure 1. Transfection efficiency gauged by fluorescence.
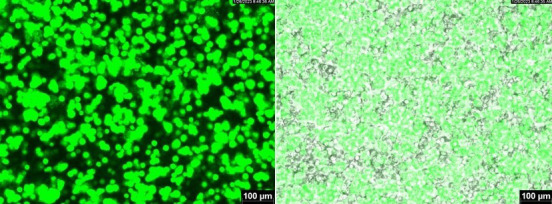
The image was taken using GFP filter (left panel) and was overlayed with a bright field image (right panel).
Figure 2. Centrifuged cell pellet and supernatant 72 h after transfection with AV0-EF1-N-tdT.
Table 2. OptiPrep gradient components.
| % OptiPrep | 60% OptiPrep | Buffer | Phenol red |
|---|---|---|---|
| 15% | 4 mL | 12 mL PBS-NMK | n/a |
| 25% | 6.7 mL | 9.3 mL PBS-MK | 40 µL |
| 40% | 10 mL | 5 mL PBS-MK | n/a |
| 60% | 10 mL | n/a | 25 µL |
Figure 3. OptiPrep underlay.
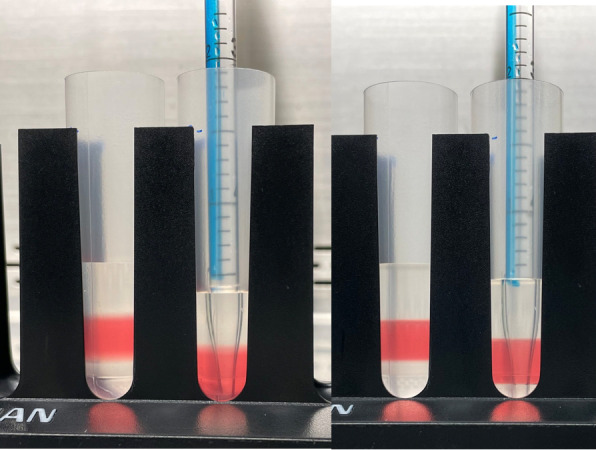
The left panel illustrates how the 25% OptiPrep is underlayed below the 15% OptiPrep layer. The right panel shows the underlaying of 40% Optiprep below 25% OptiPrep layer.
Figure 4. Complete gradient.
Discrete separation of each layer should be visible. Top→Bottom: 15%, 25%, 40%, and 60%
Figure 5. Gradient with crude virus before ultracentrifugation.
This image shows the loaded density gradient tube before ultracentrifugation. AAV containing lysate in top layer remains separate from the 15% layer.
Figure 6. Gradient after ultracentrifugation.
This image shows the centrifuge tubes after ultracentrifugation. The separation of each layer is no longer discrete.
Figure 7. Band extraction.
This image illustrates where the needle should puncture the tube. This represents the 40%–60% interface where AAV should band.
Table 3. qPCR reaction mix components.
| Reagent | For one reaction |
|---|---|
| 2× SYBR Green SuperMix | 10 µL |
| Primer mix | 1 µL |
| Molecular biology grade water | 4 µL |
| Total | 15 µL |
Data analysis
After the qPCR cycle has been run, you should analyze the data. Within the MxPro software, first ensure that the RSq of the standard curve is as close as possible to 1.000. If not, remove standard wells that skew the RSq further away from 1.000 until the value is as close to 1.000 as it can be. Export the text data and calculate the physical titer using the formula found in Deng and Oka (2020) in Section 3.5.1 (Step 8): Titer (vg/mL) = [1 × 10¹² × (Concentration in ng/µL from qPCR software) × (dilution factor)]/3.222 ng. See General Note 5 for how this formula will change based on the size of your standard plasmid. See Supplementary information 2 for more details.
Validation of protocol
We followed the above protocol for five independent preparations of AAV9. Table 4 below shows relevant information for each of those preparations.
Table 4. AAV9 preparations.
| Vector name | Serotype | Cell density at time of transfection (live cells/mL) | Viability at time of transfection | Titer from 90 mL cell suspension culture (vg/mL) | Total particles from 90 mL cell suspension culture (vg) | |
|---|---|---|---|---|---|---|
| AV0-EF1-N-cG | AAV9 | 1.6 × 10⁶ | 97% | 8.24 × 10¹³ | 1.65 × 10¹³ | |
| AV0-EF1-N-cG | AAV9 | 1.3 × 10⁶ | 97% | 1.04 × 10¹⁴ | 2.08 × 10¹³ | |
| AV0-EF1-N-cG | AAV9 | 1.3 × 10⁶ | 97% | 6.15 × 10¹³ | 1.23 × 10¹³ | |
| AV0-EF1-N-tdT | AAV9 | 1.4 × 10⁶ | 86% | 6.18 × 10¹³ | 1.23 × 10¹³ | |
| AV0-EF1-N-tdT | AAV9 | 1.1 × 10⁶ | 87% | 6.23 × 10¹³ | 1.25 × 10¹³ | |
As can be noted from this table, each prep titers at approximately the 5 × 10 13 to 1 × 10¹⁴ vg/mL range, with total particles ranging from approximately 1.2 × 10¹³ to 2.1 × 10¹³ vg.
Additional quality control assays
Protocol 1: SDS-PAGE to analyze capsid proteins
Laboratory supplies
NuPAGE 4–12%, Bis-Tris gel, 1.5 mm × 15 well (Thermo Fisher, catalog number: NP0336BOX)
PageRuler Plus prestained protein ladder, 10–250 kDa (Thermo Scientific, catalog number: Pl26620)
NuPAGE LDS sample buffer (4×) (Thermo Fisher, catalog number: NP0007)
NuPAGE MES SDS Buffer kit (for Bis-Tris gels) (Thermo Fisher, catalog number: NP0060)
SimplyBlue SafeStain (Thermo Fisher, catalog number: LC6060)
2-Mercaptoethanol (Thermo Fisher, catalog number: 21985023)
Equipment
Invitrogen PowerEase Touch 120W power supply and mini gel tank (Thermo Fisher, catalog number: PSC120MB) or equivalent
Invitrogen iBright FL 15000 imaging system or any other gel imaging system
Procedure
-
Preparation of samples (Day 1)
Pipette 5 µL of 4× Laemmli buffer supplemented with β-mercaptoethanol (1:20 dilution, 0.25 µL) into a 0.5 mL microcentrifuge tube.
Add AAV samples (a total of 1.0 × 10¹¹ vg) up to 15 µL.
Make up to 20 µL with H2O.
Heat the samples at 100 °C for 5 min. This can be done using any PCR machine.
-
Set up gel tank and run electrophoresis
Prepare running buffer by diluting 20-fold with H2O.
Remove the comb from the precast gel and rinse the wells with H2O or running buffer.
Remove the tape from the bottom of the gel.
Insert the gel into the slot in the gel tank, leaving the integrated upper buffer chamber facing the center of the cell.
Load the samples.
Run the gel at room temperature at a constant 120 V for 110 min or until the dye front runs off the gel.
-
Gel staining
After electrophoresis, remove the gel into a container and wash the gel three times for 5 min with deionized water to remove SDS and buffer salt.
Add a sufficient volume (~20 mL) of SimplyBlue SafeStain to cover the entire gel and incubate for 1 h at room temperature with gentle shaking or using a rocker platform.
Aspirate or decant staining solution and replace with 100 mL of deionized water plus 20 mL of 20% NaCl (w/v) for 1 h. The gel can be left overnight in this destaining solution.
Take the image (see an example in Figure 8) with any image analyzer.
Figure 8. SDS-PAGE.
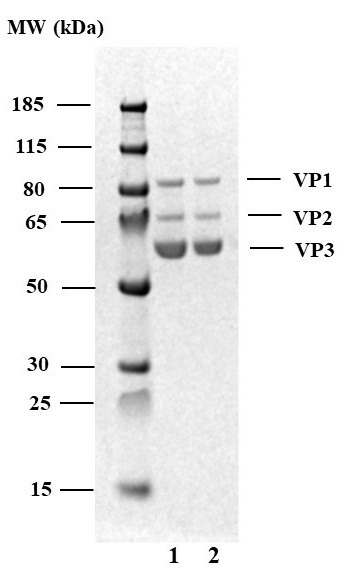
1. AAV9-EF1-N-cG produced 1F11 adherent cells. 2. AAV9-EF1-N-cG produced by 1F11S suspension cells. Prominent VP1, VP2, and VP3 bands should be visible. However, minor bands presumably derived from capsid proteins, ferritin, or of unknown origin could be observed (Sen et al., 2013; Wang et al., 2016; Nass et al., 2018; Zolotukhin et al., 1999).
Protocol 2: Infectious assay
Infectious AAV particles can be determined by measuring the presence of the intracellular vector genome after infection. Although this method does not accurately reflect biological activity (François et al., 2018), it can be adapted to any type of cultured cells and serotypes.
Laboratory supplies
HEK293T (ATCC, catalog number: CRL-3216)
Dulbecco’s modification of Eagle’s medium (DMEM), high glucose (VWR, catalog number: MT10013CM)
-
Fetal bovine serum (FBS) (VWR, catalog number: MT35010CV)
Note: Each lot requires testing for cell growth.
Trypsin-EDTA (1×) (GenDEPOT, catalog number: CA014-100)
Antibiotic-Antimycotic (×100) (GenDEPOT, catalog number: CA002-100)
E.Z.N.A Tissue DNA kit (Omega, catalog number: D3396-01)
24-well cell culture plate (Falcon, catalog number: 353047)
15-cm tissue culture dish (Falcon, catalog number: 353025)
Equipment
NanoDrop spectrophotometer or equivalent that can measure OD of DNA in a small volume
Procedure
Cells are maintained in a 15 cm dish with the growth media composed of DMEM/10% FBS/1× antibiotic-antimycotic in a humidified CO2 incubator (5% CO 2) at 37 °C. Cells are split twice a week.
-
Preparation of cells for infection (Day 1)
Aspirate the media.
Rinse the cells with 10 mL of PBS.
Aspirate the media and overlay 1 mL of trypsin.
Incubate for 1–2 min or until all cells are rounded.
Gently tap the side of the dish to detach cells.
Add 9 mL of growth media.
Measure cell density using a cell counter (see section A of the main protocol).
-
Dilute cells to 200,000 cells/mL with the growth media and aliquot 0.5 mL/well into a 24-well plate in duplicate or triplicate.
Note: Do not forget control wells (no infection control).
-
Infection (Day 2)
Add 2 µL of non diluted AAV to each well.
Mix by rocking the plate.
-
Harvest cells for DNA extraction
-
Twenty-four hours later, count the number of cells in the control wells and determine the total number of cells/well.
Note: HEK293T cells loosely attach to the culture dish. They are easily detached by pipetting in and out. If not, consider using trypsin to detach cells as outlined in step A.
Transfer cells into a 1.5 mL MCT.
Rinse the well with 0.5 mL of DPBS and combine.
Centrifuge cells at 335× g for 1 min.
Aspirate the supernatant and wash the cells with 1 mL of DPBS twice.
Resuspend the cells with 0.2 mL of PBS.
Extract DNA from cells using an E.Z.N.A. Tissue DNA kit according to the manufacturer’s instructions.
Elute DNA with 100 µL of elution buffer.
Measure OD260nm to determine DNA concentrations.
Perform qPCR using 5 µL of eluate as described in section J of the main protocol to determine infectivity.
-
Data analysis
The amount of one copy of vector DNA spiked in 1 ng of genomic DNA = 1 ng × 6,424 bp (AV0-EF1-N-cG used as standard)/6.37 × 109 bp (female genomic DNA) (Piovesan et al., 2019) = 1.0085 × 10⁻⁶ ng. Although AAV is a single-stranded DNA virus, the second strand is synthesized after AAV is taken up by cells.
Calculate the infectious titer using the following formula:
Infectious titer (ivg/mL) = (copy number/genome) × (number of cells 24 h after infection) × 0.5 (2 µL of AAV was used) × 1,000 µL
= (Concentration in ng/µL from qPCR software)/(1.0085 × 10-6 ng × DNA concentration in ng/µL) × (number of cells) × 500.
Note: Infectious titer of various AAV serotypes varies on HEK293T cells because of serotype-specific attachment sites (Weinmann et al., 2022). Generally, infection of cells with 2 µL of purified AAV is sufficient to estimate infectious titer. A typical ratio of AAV9 particle (genome titer): infectious particle (infectious titer) on HEK293 cells is 5,000–10,000:1.
Protocol 3: Electron microscopy to analyze empty and full AAV particles
Reagents, Laboratory supplies, and Equipment
Pelco EasiGlow discharge set (Ted Pella, Inc., catalog number: 9100S)
Quantifoil 2/2 200Cu + 2 nm ThinC grids (Quantifoil Micro Tools GmbH, Jena, Germany)
120 kV JOEL 1230 electron microscope (JOEL Ltd, Japan) or equivalent
Desiccator (any)
2% uranyl acetate (Fisher Scientific, catalog number: NC1085517)
Sample preparation
Dilute AAV (~0.5–1 × 10⁹ vg/µL) with DPBS.
Turn on the Pelco EasiGlow for 10 s with a current value of 15 µA and a vacuum of ~200 psig.
Deposit 5 µL of sample onto glow discharge Quantifoil 2/2 200Cu + 2 nm ThinC grids.
Incubate the carbon layer for 3 min.
Wick the excess buffer using Whitman 541 filter paper.
Wash the grids and blot twice with 20 µL of H2O.
Wash and blot with 20 µL of 2% uranyl acetate.
Drop 20 µL of 2% uranyl acetate and incubate for 1 min before blotting.
Dry the grids for a minimum of 2 h or overnight in a desiccator.
Imaging
Place the grids into an electron microscope.
Randomly select at least 10 fields.
Data analysis
Download the NIH ImageJ https://imagej.net/ij/index.html.
Convert native .dm3 files to .tiff files.
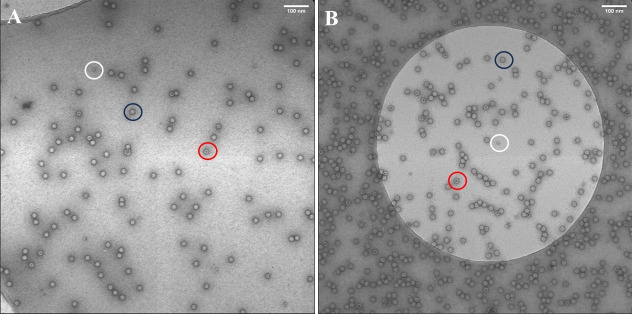
Count the number of full and empty capsids. AAV capsids containing vector genomes (full capsid) appear as particles without darkly stained centers, while empty capsids have stained centers (Figure 9).
Figure 9. Negative stain transmission electron microscopy images.
A. AAV9-EF1-N-cG produced by suspension 1F11S cells. B. AAV9-EF1-N-cG produced by adherent 1F11 cells. The black circle indicates a full capsid having no darkly stained center. The red circle indicates an empty particle showing a dark stain in the particle center. The white circle indicates impurities previously identified as ferritin (Grieger et al., 2016). Scale bar: 100 nm.
General notes and troubleshooting
General notes
If it is not possible to obtain the preformulated BalanCD HEK293 media from Fujifilm Irvine Scientific, it is acceptable to utilize their BalanCD HEK293 powder. This powder will require reconstitution yourself; the recipe may be found in Recipe 14.
The preferred method for pH balancing solutions is utilizing 3 M NaOH to increase pH and 3 M HCl to decrease pH.
Ensure that you utilize high quality ddH2O. Our preferred system of water purification is a Millipore system with a Millipore Biopak Polisher and a Millipak Express 20 filter. However, you may consider using an equivalent system under the condition that it provides high-quality water filtration.
If bubbles persist in the qPCR plate wells even after centrifugation, use your finger to lightly flick the bottom of the wells to dissipate those bubbles. After doing so, put the plate back into the centrifuge at 1,087× g for 1 min before running the qPCR cycle.
Depending on what you use for your AAV standard for the qPCR, the formula to calculate titer may change slightly. The titer formula’s divisor is dependent on the size of the AAV standard plasmid. In our case, the plasmid vector AV0-EF1-N-cG's genome size is 6,424 bp long (3.88 × 10⁶ Da). Therefore, to determine the divisor of the titer formula, you would carry out the following equation (you can input your own genome size into this equation): Mass of 1 × 10⁹ molecules of AAV ssDNA = (3.88 × 106 Da × 1 × 109/(6.02 × 1023 × 0.5) = 3.222 ng.
Troubleshooting (Table 5)
Table 5. Troubleshooting.
| Issue | Resolution |
|---|---|
| Clumping/aggregation of cells | Switch baffled Erlenmeyer flasks and change media completely. Monitor cell growth/clumping for 3–4 days. If not improved, abandon cells and defrost new cells. |
| Formation of a ring of cells inside the baffled Erlenmeyer flask | Transfer cells/media to new baffled Erlenmeyer flask. However, this ring has not shown to be detrimental in production quality, so you may choose to continue culturing those cells if you desire. |
| Slow cell growth | Monitor cell growth every day and change media if necessary. If the cells do not recover, abandon cells and defrost new cells. |
| Cells grow too fast | Dilute cells often with c-BalanCD HEK293 media. Always maintain the cell density between 3 × 10⁵ live cells/mL and 3 × 10⁶ live cells/mL. |
| Contamination of cells in baffled Erlenmeyer flask (indicated by excessive turbidity of cells and/or unnaturally fast cell growth) | Abandon cells and defrost new ones. Make sure to also appropriately discard any old media suspected of contamination and use completely new baffled Erlenmeyer flasks. You may consider adding 1× antibiotic/antimycotic to the flask but be advised that this may inhibit cell growth; proper aseptic technique should suffice in preventing contamination. |
| Empty capsid contamination | The protocol is optimized for maximizing the titer of full capsids. If the presence of empty capsids is deemed unacceptable for your specific application, a conventional plasmid ratio (helper plasmid: Rep/Cap plasmid: AAV shuttle vector = 2:1:1) can be used to mitigate this concern. |
Acknowledgments
This work was supported by the general fund of Baylor College of Medicine and the Advanced Technology Cores. TEM data was collected at the Baylor College of Medicine CryoEM ATC, which includes equipment purchased under support of CPRIT Core Facility Award RP190602. We acknowledge Fujifilm Irvine Scientific for providing BalanCD HEK293 media and technical assistance in suspension cell adaptation alongside MirusBio for providing transfection reagents. We would also like to thank Dr. William Lagor for his comments on this manuscript and Issac Foresster for technical assistance in EM.
Competing interests
The authors declare no competing financial interests.
Supplementary information
The following supporting information can be downloaded here:
Supplementary information 1
Supplementary information 2
References
- 1.Atchison R. W., Casto B. C. and Hammon W. M. (1965). Adenovirus-Associated Defective Virus Particles. Science 149( 3685): 754–756.. doi: 10.1126/science.149.3685.754 [DOI] [PubMed] [Google Scholar]
- 2.Ayuso E., Blouin V., Lock M., McGorray S., Leon X., Alvira M. R., Auricchio A., Bucher S., Chtarto A., Clark K. R., et al. .(2014). Manufacturing and Characterization of a Recombinant Adeno-Associated Virus Type 8 Reference Standard Material . Hum. Gene Ther. 25(11): 977–987.. doi: 10.1089/hum.2014.057 [DOI] [PMC free article] [PubMed] [Google Scholar]
- 3.Ayuso E., Mingozzi F., Montane J., Leon X., Anguela X. M., Haurigot V., Edmonson S. A., Africa L., Zhou S., High K. A., et al. .(2010). High AAV vector purity results in serotype- and tissue-independent enhancement of transduction efficiency. Gene Ther. 17(4): 503– 510.. doi: 10.1038/gt.2009.157 [DOI] [PubMed] [Google Scholar]
- 4.Blessing D., Vachey G., Pythoud C., Rey M., Padrun V., Wurm F. M., Schneider B. L. and Déglon N. (2019). Scalable Production of AAV Vectors in Orbitally Shaken HEK293 Cells. Mol Ther Methods Clin Dev 13: 14–26.. doi: 10.1016/j.omtm.2018.11.004 [DOI] [PMC free article] [PubMed] [Google Scholar]
- 5.Challis R. C., Ravindra Kumar S., Chan K. Y., Challis C., Beadle K., Jang M. J., Kim H. M., Rajendran P. S., Tompkins J. D., Shivkumar K., et al. .(2019). Systemic AAV vectors for widespread and targeted gene delivery in rodents. Nat. Protoc. 14(2): 379–414.. doi: 10.1038/s41596-018-0097-3 [DOI] [PubMed] [Google Scholar]
- 6.Deng S. and Oka K. (2020). Adeno-Associated Virus as Gene Delivery Vehicle into the Retina. Methods Mol Biol: 77–90. doi: 10.1007/978-1-0716-0175-4_7 [DOI] [PubMed] [Google Scholar]
- 7.Ebberink E. H., Ruisinger A., Nuebel M., Thomann M. and Heck A. J. (2022). Assessing production variability in empty and filled adeno-associated viruses by single molecule mass analyses . Mol Ther Methods Clin Dev 27: 491– 501.. doi: 10.1016/j.omtm.2022.11.003 [DOI] [PMC free article] [PubMed] [Google Scholar]
- 8.El Andari J. and Grimm D. (2021). Production, Processing, and Characterization of Synthetic AAV Gene Therapy Vectors. Biotechnol. J. 16(1): e202000025. doi: 10.1002/biot.202000025 [DOI] [PubMed] [Google Scholar]
- 9.Florea M., Nicolaou F., Pacouret S., Zinn E. M., Sanmiguel J., Andres-Mateos E., Unzu C., Wagers A. J. and Vandenberghe L. H. (2023). High-efficiency purification of divergent AAV serotypes using AAVX affinity chromatography. Mol Ther Methods Clin Dev 28: 146–159.. doi: 10.1016/j.omtm.2022.12.009 [DOI] [PMC free article] [PubMed] [Google Scholar]
- 10.François A., Bouzelha M., Lecomte E., Broucque F., Penaud-Budloo M., Adjali O., Moullier P., Blouin V. and Ayuso E. (2018). Accurate Titration of Infectious AAV Particles Requires Measurement of Biologically Active Vector Genomes and Suitable Controls. Mol Ther Methods Clin Dev 10: 223–236.. doi: 10.1016/j.omtm.2018.07.004 [DOI] [PMC free article] [PubMed] [Google Scholar]
- 11.Grieger J. C., Choi V. W. and Samulski R. J. (2006). Production and characterization of adeno-associated viral vectors. Nat. Protoc. 1(3): 1412–1428.. doi: 10.1038/nprot.2006.207 [DOI] [PubMed] [Google Scholar]
- 12.Grieger J. C., Soltys S. M. and Samulski R. J. (2016). Production of Recombinant Adeno-associated Virus Vectors Using Suspension HEK293 Cells and Continuous Harvest of Vector From the Culture Media for GMP FIX and FLT1 Clinical Vector. Mol. Ther. 24(2): 287– 297.. doi: 10.1038/mt.2015.187 [DOI] [PMC free article] [PubMed] [Google Scholar]
- 13.Guerin K., Rego M., Bourges D., Ersing I., Haery L., Harten DeMaio K., Sanders E., Tasissa M., Kostman M., Tillgren M., et al. .(2020). A Novel Next-Generation Sequencing and Analysis Platform to Assess the Identity of Recombinant Adeno-Associated Viral Preparations from Viral DNA Extracts. Hum. Gene Ther . 31: 664–678.. doi: 10.1089/hum.2019.277 [DOI] [PMC free article] [PubMed] [Google Scholar]
- 14.Joshi P. R., Bernier A., Moço P. D., Schrag J., Chahal P. S. and Kamen A. (2021). Development of a scalable and robust AEX method for enriched rAAV preparations in genome-containing VCs of serotypes 5, 6, 8, and 9. Mol Ther Methods Clin Dev 21: 341–356.. doi: 10.1016/j.omtm.2021.03.016 [DOI] [PMC free article] [PubMed] [Google Scholar]
- 15.Khatwani S. L., Pavlova A. and Pirot Z. (2021). Anion-exchange HPLC assay for separation and quantification of empty and full capsids in multiple adeno-associated virus serotypes. Mol Ther Methods Clin Dev 21 : 548–558.. doi: 10.1016/j.omtm.2021.04.003 [DOI] [PMC free article] [PubMed] [Google Scholar]
- 16.Lecomte E., Tournaire B., Cogné B., Dupont J. B., Lindenbaum P., Martin-Fontaine M., Broucque F., Robin C., Hebben M., Merten O. W., et al. .(2015). Advanced Characterization of DNA Molecules in rAAV Vector Preparations by Single-stranded Virus Next-generation Sequencing . Mol. Ther. Nucleic Acids 4: e260. doi: 10.1038/mtna.2015.32 [DOI] [PMC free article] [PubMed] [Google Scholar]
- 17.Lock M., Alvira M. R. and Wilson J. M. (2012). Analysis of Particle Content of Recombinant Adeno-Associated Virus Serotype 8 Vectors by Ion-Exchange Chromatography . Hum. Gene Ther. Methods 23(1): 56–64.. doi: 10.1089/hgtb.2011.217 [DOI] [PMC free article] [PubMed] [Google Scholar]
- 18.McIntosh N. L., Berguig G. Y., Karim O. A., Cortesio C. L., De Angelis R., Khan A. A., Gold D., Maga J. A. and Bhat V. S. (2021). Comprehensive characterization and quantification of adeno associated vectors by size exclusion chromatography and multi angle light scattering. Sci. Rep. 11(1): 3012. doi: 10.1038/s41598-021-82599-1 [DOI] [PMC free article] [PubMed] [Google Scholar]
- 19.Mietzsch M., Grasse S., Zurawski C., Weger S., Bennett A., Agbandje-McKenna M., Muzyczka N., Zolotukhin S. and Heilbronn R. (2014). OneBac: Platform for Scalable and High-Titer Production of Adeno-Associated Virus Serotype 1–12 Vectors for Gene Therapy. Hum. Gene Ther. 25( 3): 212–222.. doi: 10.1089/hum.2013.184 [DOI] [PMC free article] [PubMed] [Google Scholar]
- 20.Nass S. A., Mattingly M. A., Woodcock D. A., Burnham B. L., Ardinger J. A., Osmond S. E., Frederick A. M., Scaria A., Cheng S. H., O’Riordan C. R., et al. .(2018). Universal Method for the Purification of Recombinant AAV Vectors of Differing Serotypes. Mol Ther Methods Clin Dev 9: 33–46.. doi: 10.1016/j.omtm.2017.12.004 [DOI] [PMC free article] [PubMed] [Google Scholar]
- 21.Piovesan A., Pelleri M. C., Antonaros F., Strippoli P., Caracausi M. and Vitale L. (2019). On the length, weight and GC content of the human genome. BMC Res. Notes 12 (1): 106. doi: 10.1186/s13104-019-4137-z [DOI] [PMC free article] [PubMed] [Google Scholar]
- 22.Pupo A., Fernández A., Low S. H., François A., Suárez-Amarán L. and Samulski R. J. (2022). AAV vectors: The Rubik’s cube of human gene therapy. Mol. Ther. 30( 12): 3515–3541.. doi: 10.1016/j.ymthe.2022.09.015 [DOI] [PMC free article] [PubMed] [Google Scholar]
- 23.Quan P. L., Sauzade M. and Brouzes E. (2018). dPCR: A Technology Review. Sensors(Basel) 18(4): 1271. doi: 10.3390/s18041271 [DOI] [PMC free article] [PubMed] [Google Scholar]
- 24.Sen D., Gadkari R. A., Sudha G., Gabriel N., Kumar Y. S., Selot R., Samuel R., Rajalingam S., Ramya V., Nair S. C., et al. .(2013). Targeted Modifications in Adeno-Associated Virus Serotype 8 Capsid Improves Its Hepatic Gene Transfer Efficiency In Vivo. Hum. Gene Ther. Methods 24(2): 104–116.. doi: 10.1089/hgtb.2012.195 [DOI] [PMC free article] [PubMed] [Google Scholar]
- 25.Wang D., Tai P. W. L. and Gao G. (2019). Adeno-associated virus vector as a platform for gene therapy delivery. Nat. Rev. Drug Discovery 18(5): 358–378.. doi: 10.1038/s41573-019-0012-9 [DOI] [PMC free article] [PubMed] [Google Scholar]
- 26.Wang Q., Firrman J., Wu Z., Pokiniewski K. A., Valencia C. A., Wang H., Wei H., Zhuang Z., Liu L., Wunder S. L., et al. .(2016). High-Density Recombinant Adeno-Associated Viral Particles are Competent Vectors for In Vivo Transduction . Hum. Gene Ther. 27(12): 971–981.. doi: 10.1089/hum.2016.055 [DOI] [PMC free article] [PubMed] [Google Scholar]
- 27.Weinmann J., Söllner J., Abele S., Zimmermann G., Zuckschwerdt K., Mayer C., Danner-Liskus J., Peltzer A., Schuler M., Lamla T., et al. .(2022). Identification of Broadly Applicable Adeno-Associated Virus Vectors by Systematic Comparison of Commonly Used Capsid Variants In Vitro. Hum. Gene Ther. 33(21-22): 1197–1212. doi: 10.1089/hum.2022.109 [DOI] [PMC free article] [PubMed] [Google Scholar]
- 28.Werle A. K., Powers T. W., Zobel J. F., Wappelhorst C. N., Jarrold M. F., Lyktey N. A., Sloan C. D., Wolf A. J., Adams-Hall S., Baldus P., et al. .(2021). Comparison of analytical techniques to quantitate the capsid content of adeno-associated viral vectors. Mol Ther Methods Clin Dev 23: 254–262.. doi: 10.1016/j.omtm.2021.08.009 [DOI] [PMC free article] [PubMed] [Google Scholar]
- 29.Zen Z., Espinoza Y., Bleu T., Sommer J. M. and Wright J. F. (2004). Infectious Titer Assay for Adeno-Associated Virus Vectors with Sensitivity Sufficient to Detect Single Infectious Events . Hum. Gene Ther. 15(7): 709–715.. doi: 10.1089/1043034041361262 [DOI] [PubMed] [Google Scholar]
- 30.Zhao H., Lee K. J., Daris M., Lin Y., Wolfe T., Sheng J., Plewa C., Wang S. and Meisen W. H. (2020). Creation of a High-Yield AAV Vector Production Platform in Suspension Cells Using a Design-of-Experiment Approach . Mol Ther Methods Clin Dev 18: 312– 320.. doi: 10.1016/j.omtm.2020.06.004 [DOI] [PMC free article] [PubMed] [Google Scholar]
- 31.Zolotukhin S., Byrne B. J., Mason E., Zolotukhin I., Potter M., Chesnut K., Summerford C., Samulski R. J. and Muzyczka N. (1999). Recombinant adeno-associated virus purification using novel methods improves infectious titer and yield . Gene Ther. 6(6): 973– 985.. doi: 10.1038/sj.gt.3300938 [DOI] [PubMed] [Google Scholar]
- 32. Supplementary information .
- 33. The following supporting information can be downloaded here:


