Abstract
In the present research, microstructure, texture, roughness, hardness, and electrochemical behavior of AISI 316L austenitic stainless steel before and after shot peening were studied to elucidate the effect of conventional and severe shot peening (CSP and SSP) processes. After the shot peening, the fraction of strain-induced martensite (SIM) and mechanical twins (MTs) in the sub-surface layer was increased. The fraction of SIM and MTs in the SSP sample was higher than in the CSP sample. The XRD patterns indicated that the SSP sample had a higher peak broadening compared to the CSP sample. In the CSP and SSP samples, a gradient microstructure was formed along the depth direction. The microstructure of the topmost layer of the CSP and SSP samples exhibited numerous ultrafine grains. The grain refining during severe shot peening was faster because of the accumulation of more strain. The CSP and SSP samples revealed a gradient distribution of elements. After the SSP, the intensity of ⟨110⟩‖ED fiber texture decreased from 12.7 to 11.6 × R and the average intensity of ⟨100⟩‖ED fiber texture increased from 1.7 to 2.0 × R, respectively, compared to the CSP sample. The surface roughness of the SSP sample (Rq = 73.6 nm and Ra = 45.2 nm) was lower than that of the CSP sample which represented the roughness decreased with surface coverage increasing from 100 % to 1500 %. Also, the wettability increased after the conventional and severe shot peening processes. In addition, the microhardness of the CSP and SSP samples showed a gradient distribution. The CSP sample had the lowest corrosion current density (0.13 μA/cm2) whereas the NP (non-peened) sample exhibited the highest current density (0.65 μA/cm2). The presence of ⟨100⟩-oriented grains in both CSP and SSP samples led to the higher corrosion resistance of shot-peened steels compared to the NP sample. The presence of favorable texture with higher intensity in the CSP sample was responsible for the higher corrosion resistance of the CSP sample compared to the SSP sample. Finally, the gradient distribution of elements along the depth direction in the CSP and SSP steels improved the corrosion resistance of the surface.
Keywords: Austenitic stainless steel, Shot peening, Microstructure, Texture, Hardness, Corrosion
1. Introduction
Using orthopedic implants is widely increased because raising the age increases the risk of hard tissue failure. Thus, there is a great challenge and interest in the development of new techniques to further improve the quality of clinical implants [1]. Metallic implants are the most beneficial ones that are used for orthopedic issues. Common alloys are titanium and its alloys, cobalt-chrome alloys, and austenitic stainless steels [2]. The 316L stainless steel is one of the best materials, which is widely used as an orthopedic implant [3] and for surgical aims as well [4]. Some of its benefits are high corrosion resistance in physiological environments, good mechanical properties, fabrication by easy manufacturing process, nonmagnetic properties, high ductility, acceptable biocompatibility, and low cost as compared to titanium alloys [3]. On the other hand, the localized corrosion of 316L due to the sensitization, low hardness, weak tribological properties, and poor osseointegration can be mentioned as major drawbacks of this alloy [2,3].
The ability of 316L stainless steel to be used as an implant will be affected by the intrinsic properties of the material and production processes. However, the surface properties of an implant play a leading role in the capability of a material as an implant. This can be due to the fact that initial cracks are usually located at the surface so most of the failures start from the surface. Roughness, surface defects, residual stresses, hardness, and microstructural features are surface properties of great importance [5].
Different methods of surface treatment including coating processes, thermomechanical modifications, and mechanical treatments are used to enhance the surface properties of implants [2]. On the other hand, gradient-structured materials are more interesting because of their ability to make materials both more ductile and stronger. These materials are made by using surface plastic deformation methods such as shot peening (SP) [6].
The shot-peening is based on the impact of high-energy shots on the surface of materials [7]. SP increases the compressive residual stresses of the topmost layer. It also increases surface roughness, fatigue resistance, wear resistance, and corrosion cracking resistance [8]. Lai et al. [9] investigated the influence of shot peening time on the corrosion resistance of AISI 304 steel. It was found that the Icorr reduces with the increment of the compressive stress, and therefore, the corrosion rate of the steel decreases after SP. Chen et al. [10] studied the corrosion behavior of AISI 316LN processed by rotationally accelerated shot peening. The shot-peened steel exhibited a higher corrosion resistance by more positive Ecorr.
Severe plastic deformation (SPD) has been described as a deformation process in which exceptional grain refinement can be achieved by imposing large strains at low temperatures without considerably changing the material dimensions. Severe shot peening (SSP), as an SPD method, is one of the most preferred surface treatments due to its easily applicable procedure. After the SSP, the mechanical properties (residual stress and hardness) of the surface remarkably increase [4,6].
The SSP technique has been recently performed on different austenitic stainless steel such as AISI 304 [11,12], AISI 321 [[13], [14], [15]], and AISI 316 [6,[16], [17], [18], [19], [20], [21]]. Unal et al. [11] found that severe shot peening induces a thicker nanograin layer compared to conventional shot peening and the austenite peaks broaden via SSP. Pour-Ali et al. [13,15] indicated that dislocation slip plays a major role in the grain refining of the AISI 321 steel. By performing the SSP, dislocation tangles, dislocation walls, lamella-shaped cells, and strain-induced martensite (SIM) appeared in the original large austenite grains. Bagherifard et al. [19,20] found that the SSP induced intense grain refinement close to the surface, and the γ transformed to SIM. The SSP introduced residual stress (compressive) and work hardening in the topmost layer.
Despite the importance of crystallographic texture and its important effect on the various properties of materials such as mechanical and corrosion behavior, there are very limited works on the effect of shot peening on the texture evolution of materials [22,23]. Wang et al. [22] examined the effect of shot peening on the texture of pure copper. They found that the texture of the shot-peened copper can be categorized into three different types including (1) weak Cube orientation close to the surface, (2) α-fiber at intermediate depth, and (3) γ-fiber at larger depth.
Due to the lack of information about the shot peening effect on the texture of stainless steel, further studies are required to understand the influence of conventional shot peening (CSP) and SSP on the texture and the combined effect of microstructure and texture on the corrosion behavior of AISI 316L. The main objective of the present work is to investigate the macrotexture in conventionally and severely shot-peened 316L stainless steel by using X-ray diffraction (XRD) to take into account this effect on the surface properties of shot-peened steel. In addition, the influence of the CSP and SSP on the microstructure, roughness, wettability, hardness, and corrosion resistance of the AISI 316L stainless steel was investigated.
2. Experimental procedure
The raw material was AISI 316L cylindrical rod. The chemical composition of the used material is presented in Table 1. The rod with a 1 cm diameter was cut into samples of 1 cm height. The surface of the steels was shot-peened via CSP and SSP parameters (Table 2). Almen intensity was measured using Almen strips of type A following the procedure in the SAE J443 standard [24]. Determination of surface coverage is reported in previous work [25]. For surface cleaning a repeening process by glass beads (surface coverage of 100 %) was performed on samples. Characteristics of shots and beads are listed in Table 3.
Table 1.
The chemical composition of steel (in wt.%).
| Cr | Ni | Mo | Mn | Si | C | P | S | Fe |
|---|---|---|---|---|---|---|---|---|
| 17.11 | 10.15 | 2.03 | 1.34 | 0.47 | 0.022 | 0.034 | 0.001 | Bal. |
Table 2.
The shot peening parameters for CSP and SSP.
| Samples | Shot type | Almen intensity | Surface coverage (%) |
|---|---|---|---|
| CSP | MI 230R | 15A | 100 |
| SSP | MI 230R | 7C | 1500 |
Table 3.
Characteristics of shots and beads.
| Type | Manufacturer, Country | Material | Diameter (μm) | Hardness (HRC) |
|---|---|---|---|---|
| MI 230R | MILGRANDI S.p.A., Italy | Cast steel | 580 | 60 |
| AGB12 | Eisenwerk Würth, Germany | Glass | 120 | 47 |
For microstructural observations, the cross-section of samples was ground with SiC papers up to P3000, polished, and finally etched in a solution of HCl and HNO3 with vol% of 3:1. The microstructures of all samples were observed using a scanning electron microscope. The measurements of grain size were done by analyzing ∼200 grains using ImageJ software. For phase analysis, the X-ray diffraction (XRD) of the steels was carried out on a PHILIPS-PW1730 diffractometer over a diffraction angle range from 20° to 80°. The crystallographic texture of samples was determined using the PANalytical diffractometer. Three incomplete pole figures (PFs) consisting of (111), (200), and (220) were collected. The orientation distribution function (ODF) was achieved by the TexTools software.
The parameters of nanometer-scale roughness were calculated with an atomic force microscope (AFM, SOLVER, NT-MDT, Nova-Tech) using non-contact cantilever probes. Topography was evaluated at a scan size of 20 μm. Wettability was assessed through deionized water contact angle measurements by the sessile drop technique at ambient temperature. The water contact angle was measured once the spreading of the drop was stopped.
For microhardness measurements, the cross-sections of the steels were polished to achieve a smooth surface. The test was performed using a KOOPA Vickers hardness tester with a 200 g force and a 10 s dwell time. The measurements were carried out at a distance interval of 100 μm from the top surface of the steel.
The electrochemical behavior of steels was investigated by impedance and polarization experiments in simulated body fluid (SBF) at 37 °C. The ion concentrations of SBF are listed in Table 4. For the electrochemical tests, a saturated calomel electrode (SCE) was employed as a reference electrode, and a platinum electrode was used as an auxiliary one. A three-electrode cell was employed. The working electrode had an exposed area of 0.6 cm2. Polarization curves were obtained with a VersaSTAT 4 galvanostat/potentiostat equipped with an FRA/VersaSTAT4 impedance module device. Polarizations were performed at a scan rate of 1 mV/s from −0.75 to 1.25 V relative to open circuit potential (OCP). The impedance spectra were obtained in the frequency range from 0.01 to 100000 Hz. The data of impedance was fitted using ZView software. To calculate the corrosion rates, Faraday's law was used according to ASTM G102-89.
Table 4.
Chemical composition of SBF solution.
| Composition | Cl− | Na+ | K+ | HCO3− | Ca2+ | Mg2+ | HPO42- | SO42- |
|---|---|---|---|---|---|---|---|---|
| mM | 147.8 | 142.0 | 5.0 | 4.2 | 2.5 | 1.5 | 1.0 | 0.5 |
3. Results and discussion
3.1. Microstructure and texture
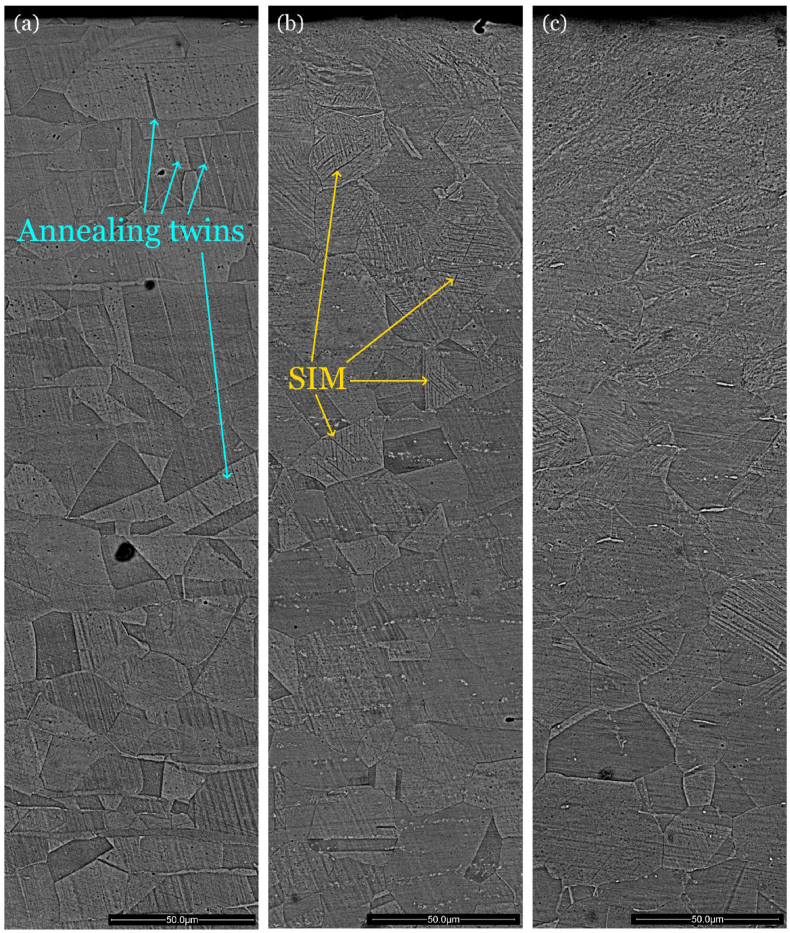
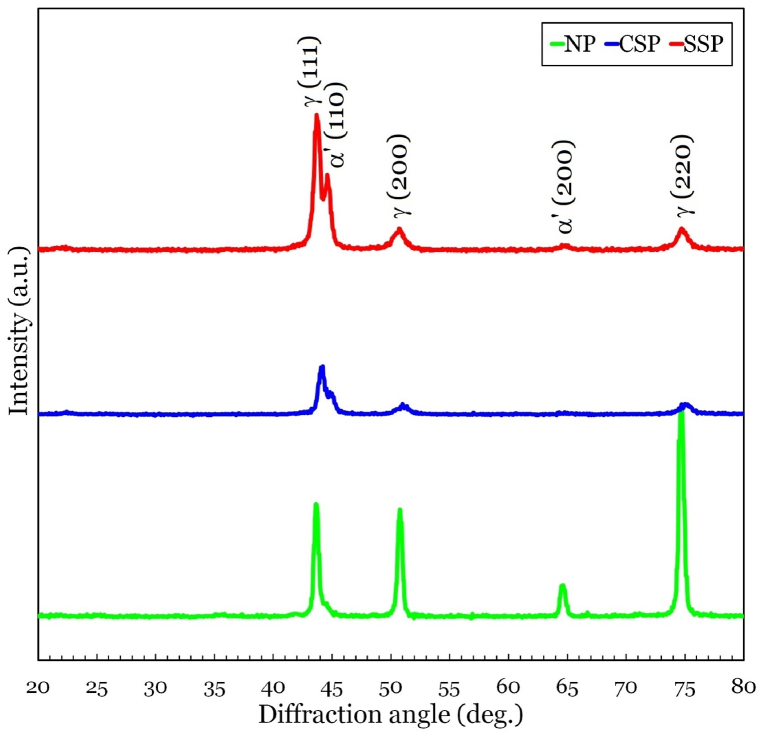
Fig. 1(a–c) shows the cross-sectional microstructures of AISI 316L with no peening (NP), CSP, and SSP. Also, the XRD patterns of all samples are depicted in Fig. 2. It can be seen that the microstructures are changed significantly via shot peening. Before shot peening, as seen in Fig. 2, the microstructure consists of γ (austenite) and α’ (strain-induced martensite, SIM) phases. After the shot peening, the fraction of SIM and mechanical twins (MTs) in the sub-surface layer is increased. This is owing to the low stacking fault energy (SFE) of austenitic stainless steel (∼20 mJ/m2) [26,27]. This low SFE steel exhibits wider stacking faults (SFs) and thus, the cross-slip mechanism becomes very difficult during shot peening. As a consequence, accommodating more plastic deformation needs the activation of a secondary plastic deformation mechanism, i.e., mechanical twinning [28]. The low SFE of austenitic stainless steel favors the formation of SFs which act as the nuclei for the formation of SIM and MTs during shot peening [29]. From Fig. 1, Fig. 2, it is clear that the fraction of SIM and MTs in the SSP sample is higher than in the CSP sample. Also, Fig. 2 demonstrates that the SSP sample has a higher peak broadening. These results can be ascribed to larger plastic deformation during the SSP compared to the CSP. As seen in Fig. 1, in the CSP and SSP samples a gradient microstructure is formed along the depth direction due to the gradient distribution of strain. With increasing the depth from the surface of CSP and SSP samples, the strain energy decreases gradually. Severe plastic deformation occurs in the topmost layer by CSP and SSP and the affected area reduces by taking distance from the surface due to the decrement of both strain and strain rate.
Fig. 1.
The SEM images of (a) NP, (b) CSP, and (c) SSP samples.
Fig. 2.
The XRD patterns of NP, CSP, and SSP samples.
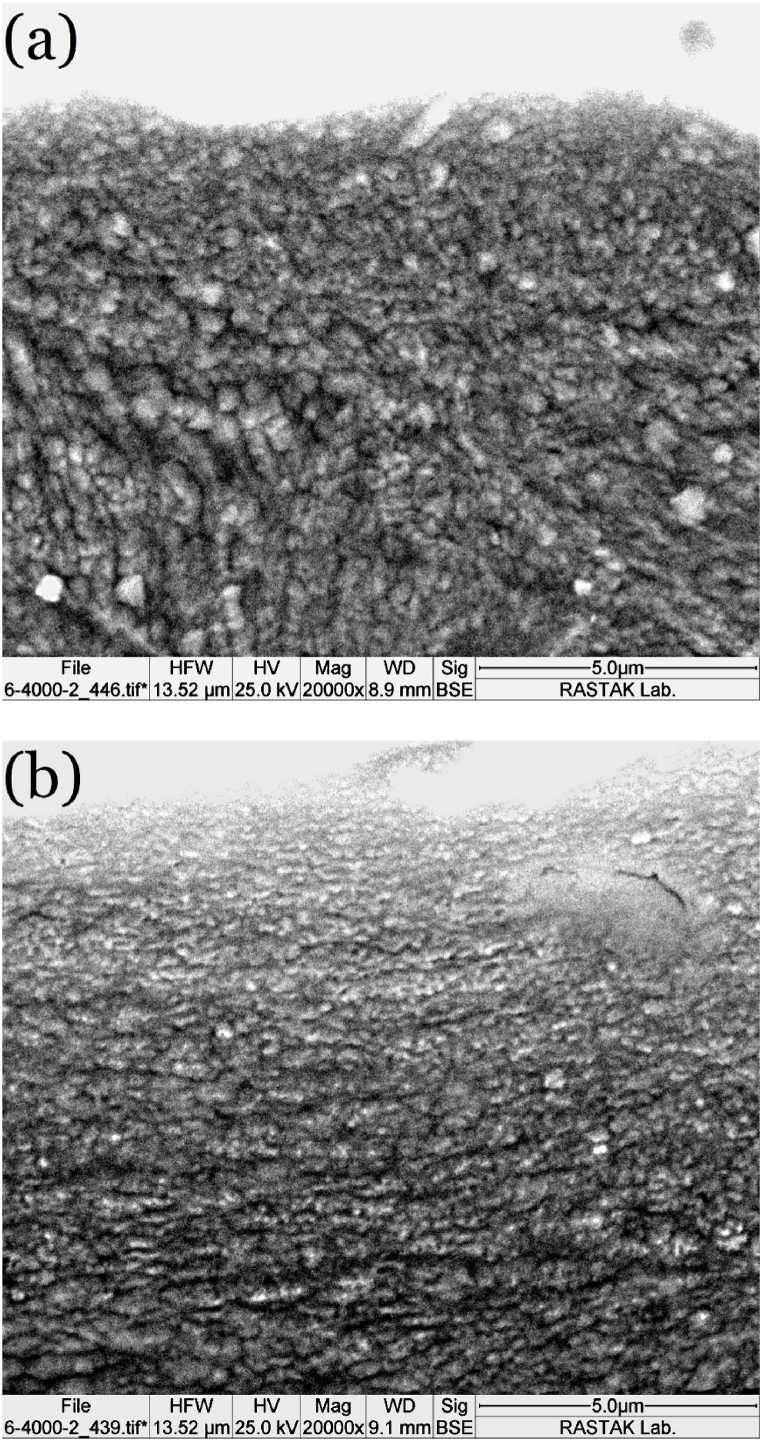
Fig. 3(a and b) depicts the high-magnification SEM images from the topmost layer of CSP and SSP steels. The microstructure of the topmost layer exhibits numerous ultrafine grains (UFGs). The grain refinement during CSP and SSP is induced by the dynamic recrystallization (DRX) mechanism. By performing CSP and SSP, first, dislocation density and twin fraction increase. To reduce the stored strain energy of the stainless steel, dynamic recovery (DRV) occurs, and subgrains are formed. Then, these subgrains undergo rotation and become grains through the continuous dynamic recrystallization (CDRX) mechanism. Another mechanism for grain refinement of AISI 316L stainless steel during CSP and SSP is the intersection of twin boundaries. The austenitic stainless steels have a low stacking fault energy; therefore, mechanical twinning is the main deformation mechanism. In addition, discontinuous dynamic recrystallization (DDRX) due to deformation heat during conventional and severe shot peening would contribute to grain refinement. As can be seen in Fig. 3, the grain size of the SSP sample is lower than that of the CSP sample. The degree of grain refinement in the topmost layer mainly depends on the level of plastic deformation. As shown in Fig. 1, increasing plastic deformation by SSP resulted in the formation of more twin intersections and thus, it provides more grain refinement (Fig. 3). In other words, the grain refining during SSP is faster than during CSP because the accumulation of strain is higher.
Fig. 3.
The microstructure of the topmost layer of (a) CSP and (b) SSP samples.
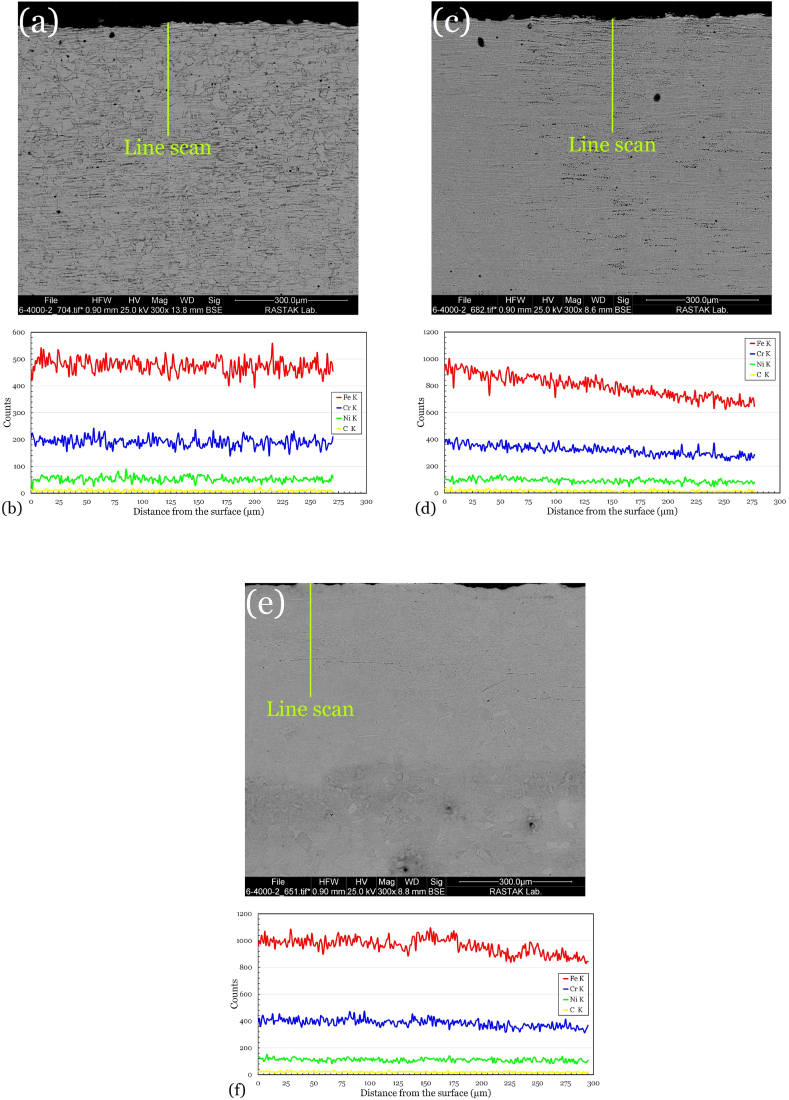
The SEM micrographs and line scans of the topmost layer of all samples are depicted in Fig. 4(a–f). According to the line scan results, the chemical elements of AISI 316L steel are mainly Fe, Cr, Ni, and C. No segregation of Fe, Cr, Ni, and C is seen on the topmost 300 μm surface layer after conventional and severe shot peening processes. The line scans of the NP sample indicate a homogeneous distribution of elements. After conventional and severe shot peening processes, a gradient distribution of elements can be observed. This can be related to the large compressive stress via the shot peening process. Therefore, the uniform distribution of elements on the surface layer of the steel turns into a gradient distribution after the CSP and SSP processes. This phenomenon is very interesting and important for the shot peening process. Similar events have been seen after the shot-peening process of aluminum alloy [30]. A uniform distribution of Fe, Cr, Ni, and C can be observed on the topmost 180 μm surface layer after SSP. In fact, the elements of Fe, Cr, Ni, and C are uniformly distributed in the severely deformed area. It can be said that the thickness of the severely deformed region of the SSP sample is about 180 μm (Fig. 4(f)). Afterward, the line scans of the SSP sample show a gradient distribution of elements similar to the CSP sample.
Fig. 4.
The SEM micrograph and corresponding line scanning analysis of (a,b) NP, (c,d) CSP, and (e,f) SSP steels.
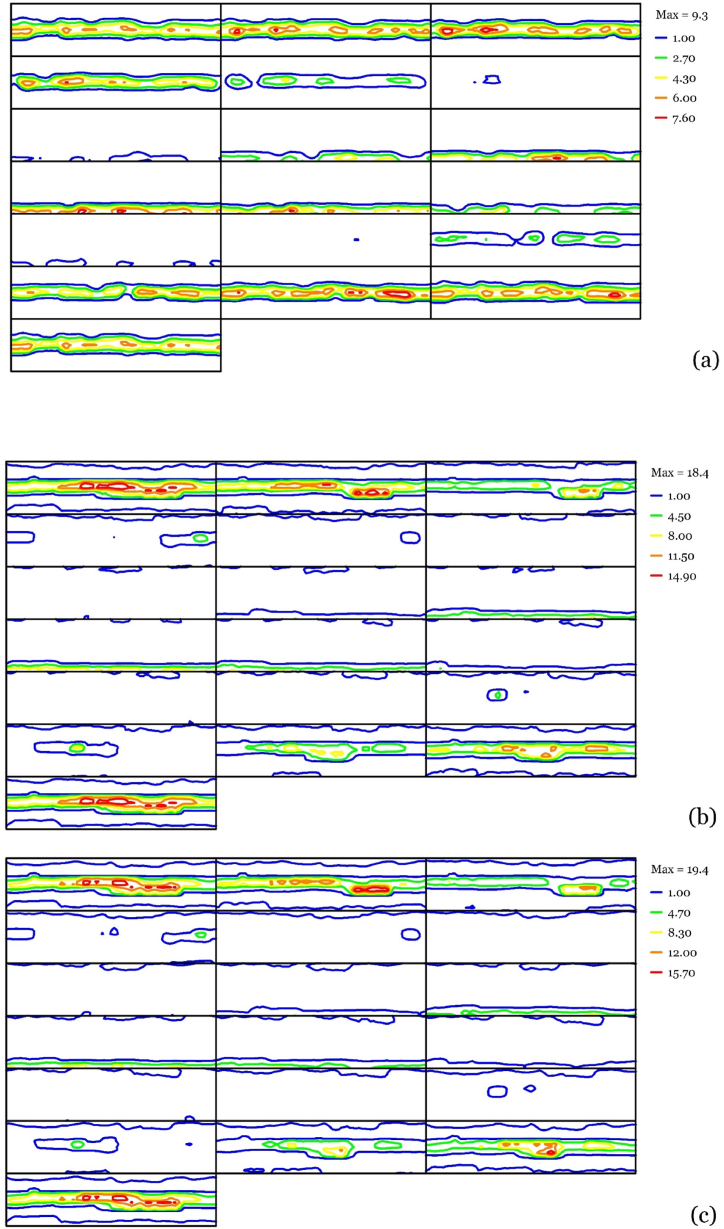
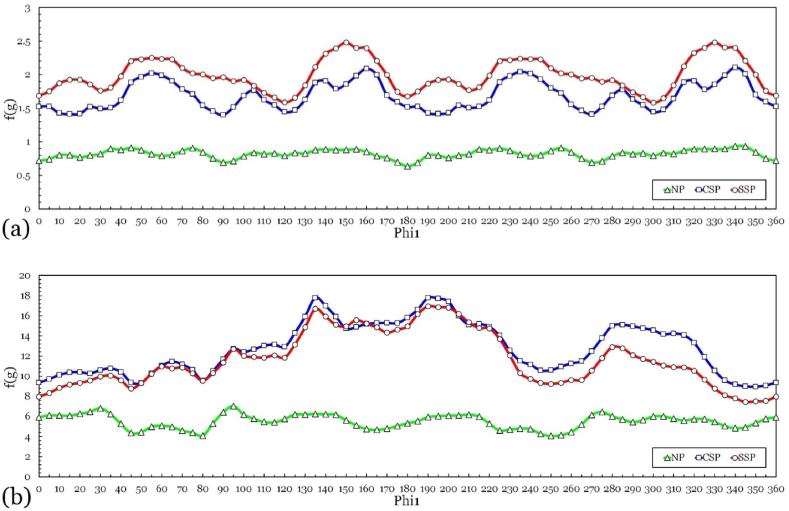
The ODF of all samples is illustrated in Fig. 5(a–c). Also, skeleton lines of ⟨100⟩‖ED and ⟨110⟩‖ED fibers for the three samples are depicted in Fig. 6(a and b). The initial rod (NP sample) exhibits a perfect ⟨110⟩‖ED fiber texture with a mean intensity of 5.5 × R (multiples of random distribution). In other words, the ⟨110⟩ crystallographic directions of most grains lay close to the extrusion direction. Such texture is typical of austenitic stainless steel after extrusion. As seen from Fig. 5, Fig. 6, the NP sample indicates a very weak ⟨100⟩‖ED fiber texture (0.8 × R). When the conventional shot peening is performed, the average intensity of ⟨110⟩‖ED and ⟨100⟩‖ED fibers increased to 12.7 × R and 1.7 × R, respectively. Strengthening the ⟨100⟩‖ED fiber in the CSP sample is attributed to the formation of new recrystallized grains at the end of the SP. On the other hand, increasing the intensity of ⟨110⟩‖ED fiber is related to the rotation of many fine recrystallized grains during shot peening. In other words, after the dynamic recrystallization, the new grains are rotated toward ⟨110⟩‖ED texture due to the plastic deformation. The Taylor factor of FCC materials ({111}⟨110⟩ slip system) during uniaxial compression is maximum on the {110} crystallographic planes and therefore the ⟨110⟩ direction is the end stable orientation [31]. After the severe shot peening, the average intensity of ⟨110⟩‖ED fiber decreased from 12.7 to 11.6 × R and the average intensity of ⟨100⟩‖ED fiber increased from 1.7 to 2.0 × R, respectively, with compared to the CSP sample. This result is attributed to the formation of new recrystallized grains in the SSP sample more than in the CSP sample, caused by larger deformation during the severe shot peening process.
Fig. 5.
The ODFs of NP, CSP, and SSP samples.
Fig. 6.
The skeleton lines of (a) ⟨100⟩‖ED and (b) ⟨110⟩‖ED fibers for NP, CSP, and SSP steels.
3.2. Surface morphology and wettability
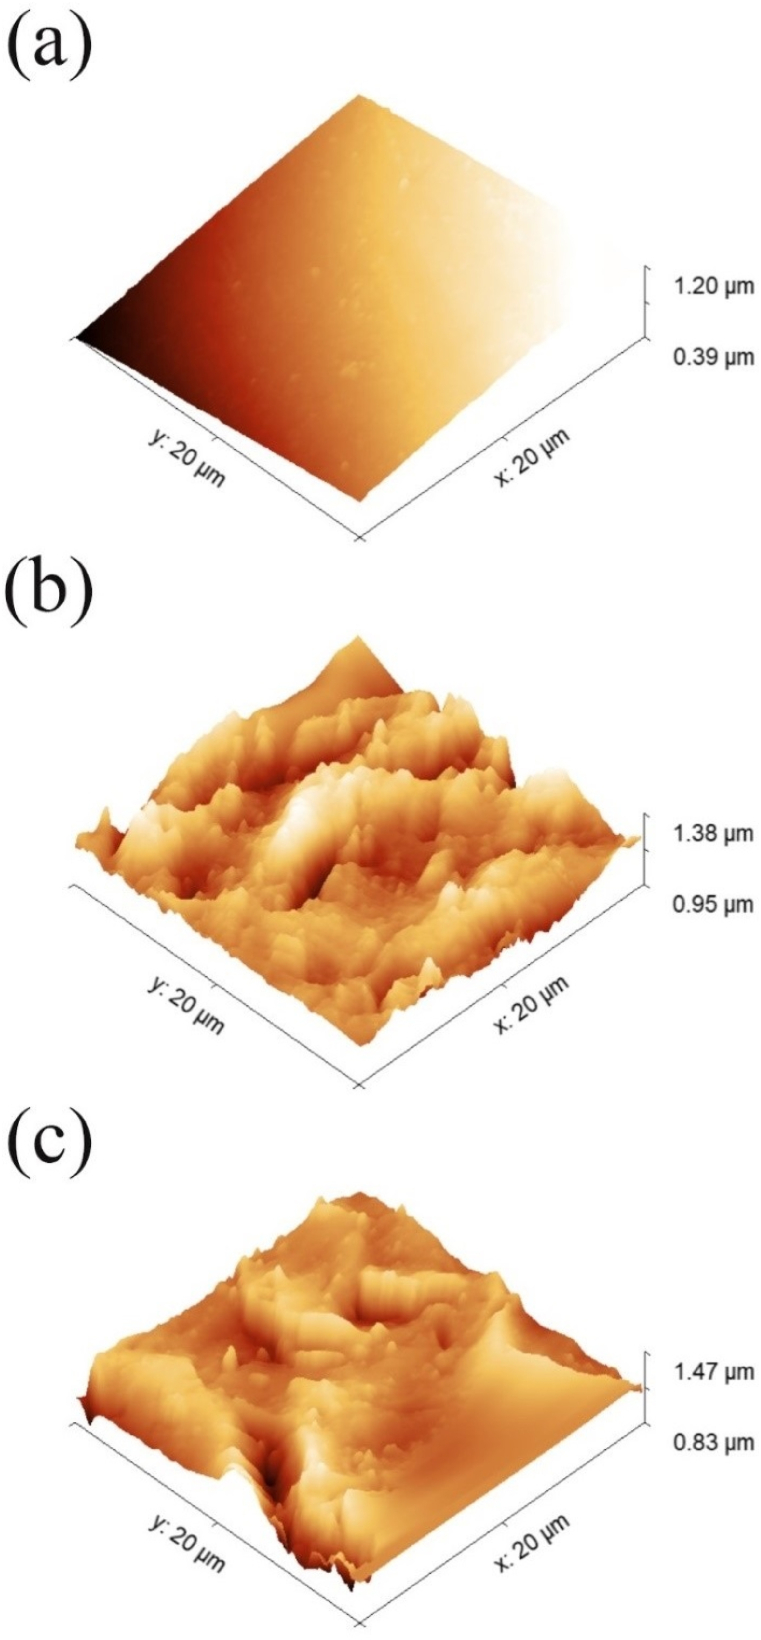
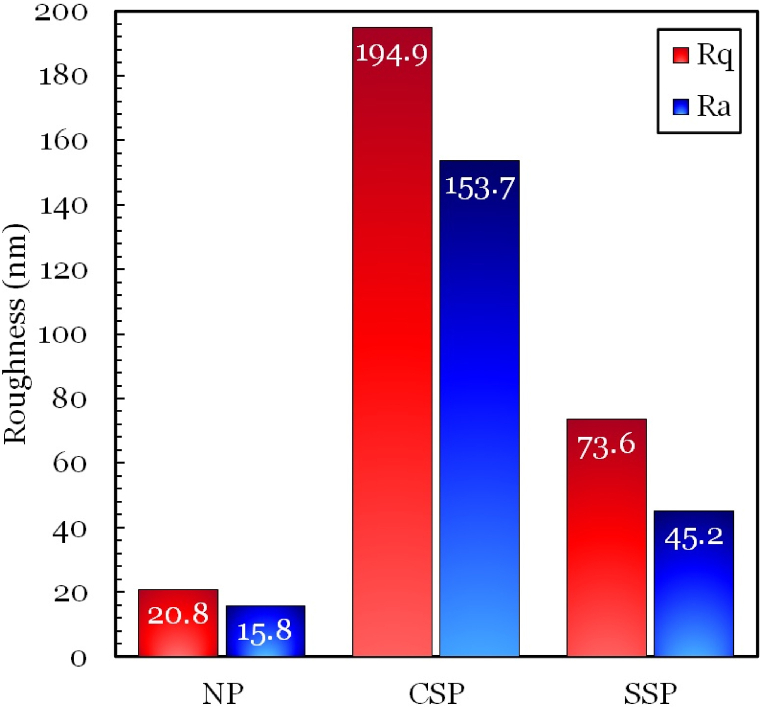
Fig. 7(a–c) depicts AFM topographic images of all steels. Also, the results of the roughness parameters Rq and Ra (root mean square and average roughness, respectively) for a sampling area of 2 μm × 2 μm are shown in Fig. 8. As seen, the Rq and Ra values of the NP sample are 20.8 and 15.8 nm, respectively. Compared with the NP sample, the surface of CSP and SSP samples illustrated a higher roughness value. The conventional shot peening led to major changes in root mean square roughness (194.9 nm) and average roughness (153.7 nm). However, the surface roughness of the SSP sample (Rq = 73.6 nm and Ra = 45.2 nm) is less than that of the CSP sample which represents the roughness decreases with surface coverage increasing from 100 % to 1500 %. This can be attributed to the high strain-hardening rate of austenitic stainless steel. During SSP, the strain hardening of the topmost layer quickly increases, therefore the surface homogeneity increases and the roughness decreases. This result is consistent with the previous studies [32].
Fig. 7.
The AFM micrographs of (a) NP, (b) CSP, and (c) SSP steels.
Fig. 8.
The roughness parameters of NP, CSP, and SSP steels.
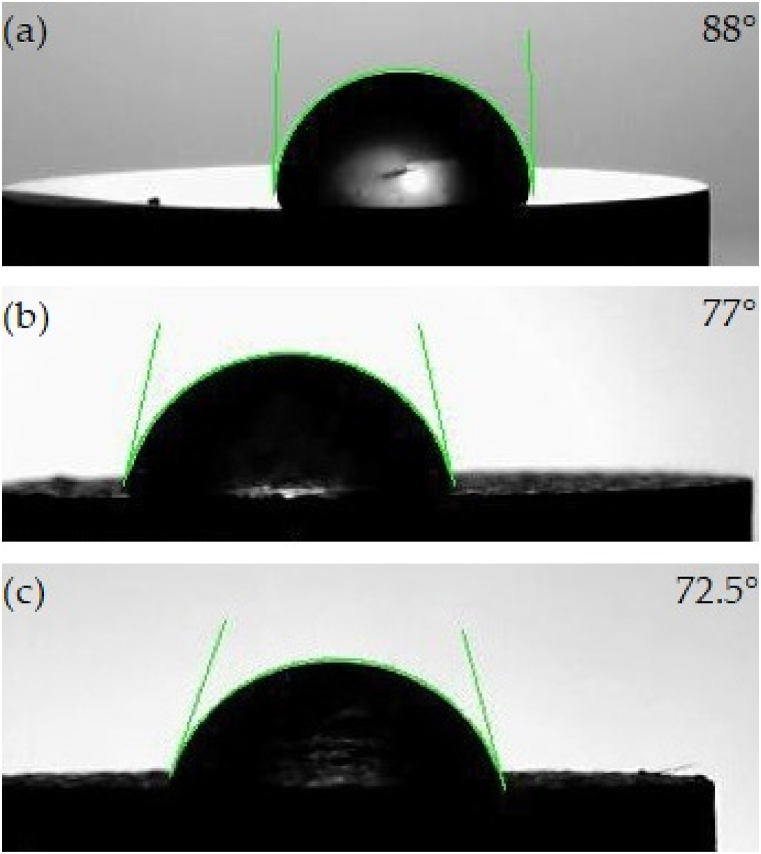
Fig. 9(a–c) depicts the water contact angle of all samples. The highest value of contact angle (88°) belongs to the NP sample due to the polishing treatment. As can be seen in Fig. 9, the shot peening (both conventional and severe) increases the wettability as indicated by the decrement of contact angle values in the CSP (77°) and SSP (72.5°) samples. Surface roughness and crystalline defects are the most important parameters that affect the contact angle. Since the roughness of the surface is effective on the surface wettability, the contact angle was reduced from 88° (for the NP sample) to 77° (for the CSP sample) by increasing the Ra from 15.8 nm to 153.7 nm. However, the SSP sample, despite having a much lower surface roughness (Ra = 45.2 nm) than the CSP sample, shows a lower contact angle of 72.5°. This indicates that the crystalline defects are effective more than surface roughness in the SSP sample. In other words, the presence of more crystalline defects such as grain boundaries, mechanical twins, martensite, and dislocations in the SSP samples led to a reduction in the contact angle. Therefore, the SSP sample is more hydrophilic compared to the NP and CSP samples.
Fig. 9.
Contact angle images of (a) NP, (b) CSP, and (c) SSP steels.
3.3. Microhardness
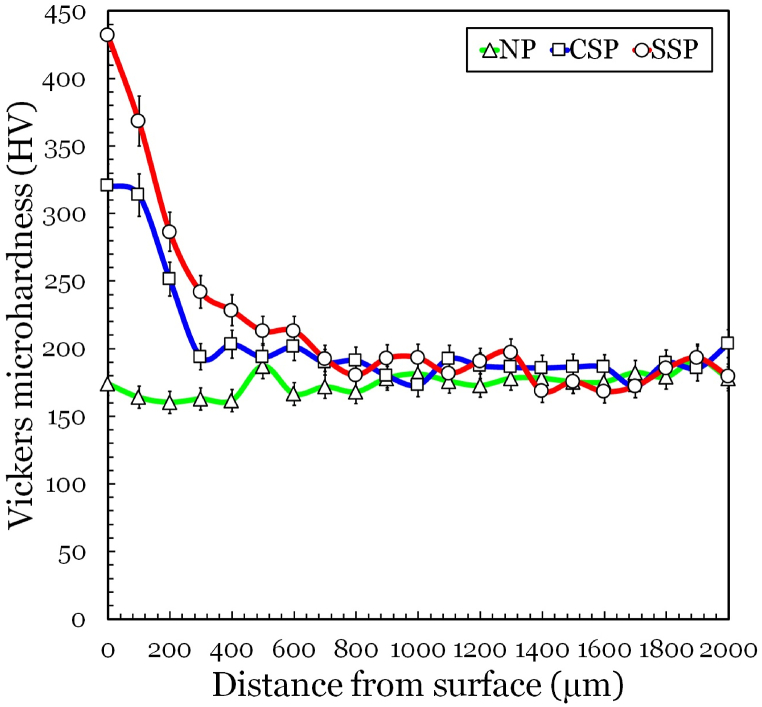
The microhardness profiles of NP, CSP, and SSP samples are depicted in Fig. 10. The microhardness of the NP sample is 175 ± 12 HV and stays at the same value with an increase in distance from the surface due to the presence of a uniform microstructure before the shot peening. The microhardness of the CSP and SSP samples shows a gradient distribution. The microhardness of the surface is the highest and the microhardness gradually reduces along the depth direction. After the CSP, the microhardness increased to a depth of ∼500 μm, with a maximum value of 320.9 HV obtained at the surface. For the SSP sample, the depth of the affected region (∼700 μm) is larger than that for the CSP sample, with the maximum microhardness value of 432.4 HV obtained at the surface. Severe shot peening induces higher impact energy with severe plastic deformation, which results in a higher deformation depth and a larger average hardness value. As discussed in the microstructure section, severe shot peening increases dislocation density and the fraction of grain boundary, mechanical twin, stacking fault, and martensite compared with conventional shot peening. Therefore, the hardness of the SSP steel is larger than that of the CSP steel.
Fig. 10.
The microhardness of NP, CSP, and SSP samples.
3.4. Electrochemical behavior
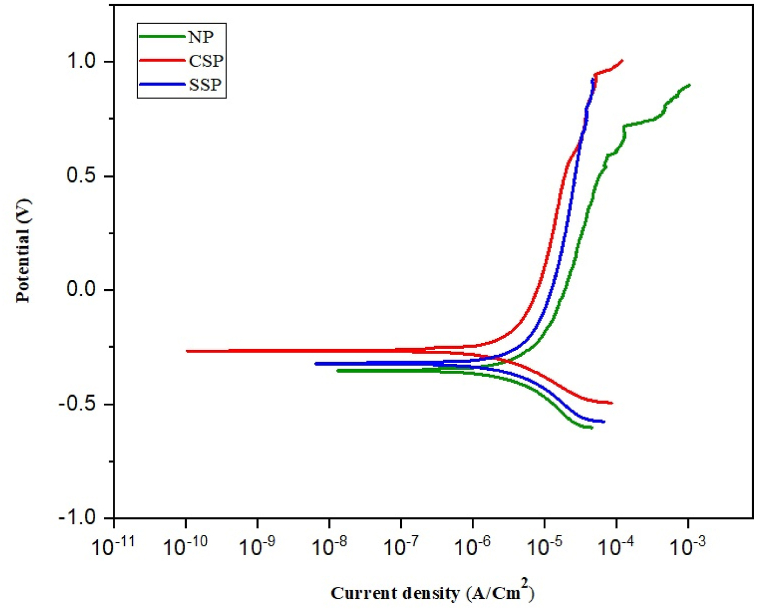
The potentiodynamic polarization (PDP) plots of the NP, CSP, and SSP steels in the SBF solution are shown in Fig. 11. The curves reveal a Tofel mode. The corrosion parameters (Ecorr, Icorr, Tafel slope, and corrosion rate) were calculated and are presented in Table 5.
Fig. 11.
The polarization curves of NP, CSP, and SSP steels.
Table 5.
The results of electrochemical corrosion for all samples.
| Sample | Icorr (μA.cm−2) | Ecorr (mV) | βa | - βc | Corrosion rate (mpy) |
|---|---|---|---|---|---|
| NP | 0.65 | −0.36 | 61.1 | 52.4 | 6.8 × 10⁻⁹ |
| CSP | 0.13 | −0.27 | 33.5 | 24.1 | 1.4 × 10⁻⁹ |
| SSP | 0.31 | −0.33 | 34.4 | 28.8 | 3.2 × 10⁻⁹ |
Fig. 11 indicates that the PDP curve of the CSP sample has shifted to lower currents compared to that of the NP and SSP samples. The CSP sample has the lowest current density (0.13 ± 0.02 μA/cm2) whereas the NP sample reveals the highest corrosion current density (0.65 ± 0.04 μA/cm2). In addition, the current density of the SSP steel was 0.31 ± 0.02 μA/cm2. It is clear that the shot-peened sample that has been processed with the lower Almen intensity (CSP sample) showed more corrosion resistance compared to the severely shot-peened sample. Therefore, it can be deduced that the Almen intensity is an effective factor in corrosion resistance. As seen in Fig. 11, a passive plateau is visible for all three samples. The conventional shot peening decreased the Ipass, Icorr, and also Ecorr (see Table 5). Ecorr value increased from −0.36 ± 0.03 mV to −0.26 ± 0.02 mV and the Icorr value decreased after the CSP, indicating that less-defective passive film is formed on the CSP sample.
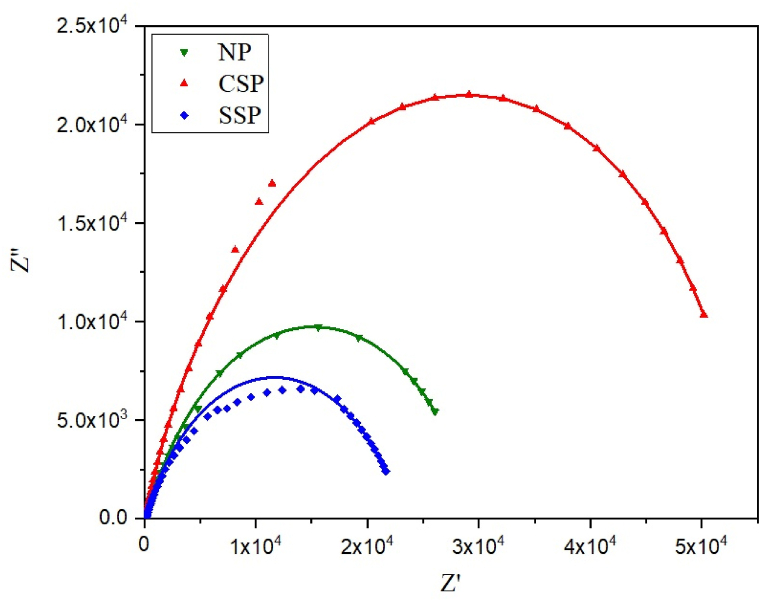
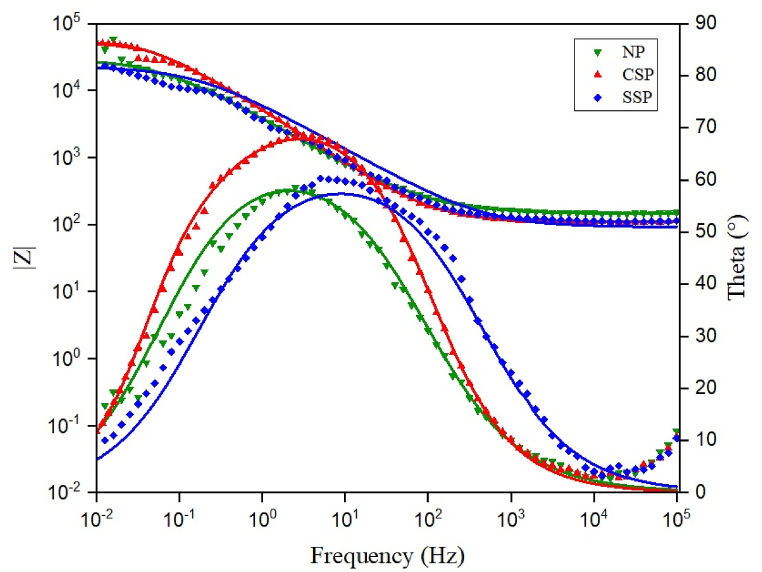
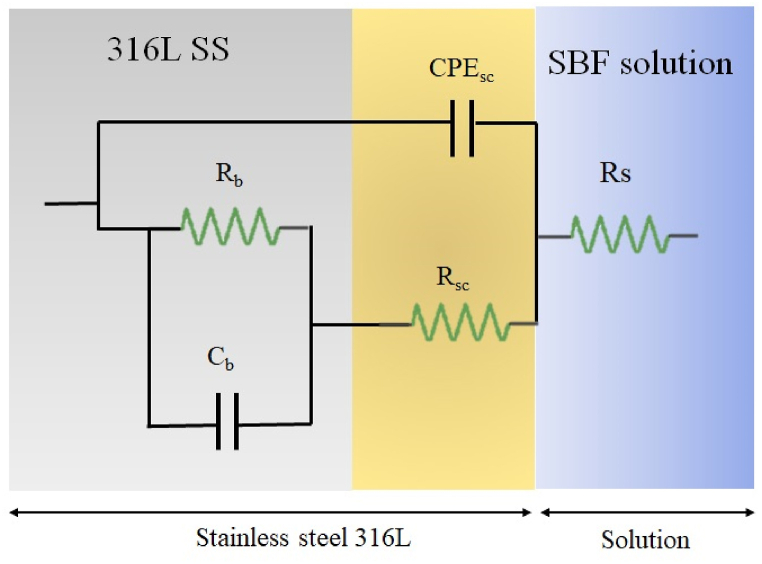
Fig. 12, Fig. 13 show the experimental and fitted Nyquist and Bode plots for NP, CSP, and SSP samples in SBF solution. The electrochemical impedance spectroscopy (EIS) spectra were fitted by an electrical equivalent circuit (Fig. 14). RS is solution resistance, Rb is the resistance of the oxide barrier layer, RSC and CPESC are the resistance and capacitance of the space-charge region (SCR), and Cb is the capacitance of the compact oxide layer. The constant phase element with the impedance of is used instead of the ideal capacitor owing to the non-uniform surfaces of the natural oxide layer and 316L austenitic stainless steel itself. Omega represents the angular frequency of AC voltage, , n is the exponent of the constant phase element, and Y0 is the admittance of the constant phase element. Since the CPE element of the barrier oxide exhibits a behavior similar to a pure capacitance, the n value was considered equal to 1. The fitted values are presented in Table 6. According to the low values of chi-squared (χ2), it can be concluded that the applied electrical equivalent circuit can satisfactorily demonstrate the surface's response to AC voltage. Results show that the corrosion resistance of all surfaces is mainly dependent on the presence of an oxide layer, where the oxide layer resistance of all samples is greater than solution resistance and charge transfer resistance. The greatest oxide layer resistance belongs to the CSP sample. The better corrosion performance of a layer (e.g., a coating or an oxide layer) is dependent on its resistance and its capacitance behavior as well. Higher resistance and lower capacitance indicate the higher corrosion resistance of a layer [7]. The higher corrosion resistance of the SSP sample compared to the NP sample can be attributed to its lower oxide layer capacitance.
Fig. 12.
The Nyquist plots of NP, CSP, and SSP samples.
Fig. 13.
The bode plots of NP, CSP, and SSP samples.
Fig. 14.
The used electrical equivalent circuit for fitting.
Table 6.
Fitting results of the EIS data of the NP, CSP, and SSP steels.
| Sample | Rs (Ω.cm2) | Rsc (Ω.cm2) | CPEsc (F.cm−2.sn−1) | n | Rb (Ω.cm2) | Cb (F.cm−2) | χ2 × 10⁻³ |
|---|---|---|---|---|---|---|---|
| NP | 144.1 | 29356 | 7.2E-05 | 0.8 | 8954 | 2.9 × 10⁻⁴ | <1 |
| CSP | 109.7 | 53917 | 5.1E-05 | 0.92 | 7675 | 1.3 × 10⁻⁴ | <4 |
| SSP | 113.4 | 23209 | 4.1E-05 | 0.71 | 1213 | 1.6 × 10⁻⁴ | <2 |
In the CSP and SSP samples, the fine-grained surface results in the formation of a passivation layer. Therefore, the substrate is protected by a passive layer which is more dense, stable, and less sensitive to corrosion. The corrosion behavior of metals and alloys depends on their passivation ability. Researchers reveal that the grain boundaries are the selective area for the nucleation process of passivation films and so improve the compactness of the passive film [33,34]. Shot peening, as it was described before, caused grain refinement which improves corrosion resistance via the passive layer formation. The higher fraction of grain boundaries in the processed steels results in the faster formation of the passive layer which improves the reaction of Cr and Fe ions with oxygen in the interface. In the case of stainless steel, the diffusion of Cr to the grain-refined surface forms a homogeneous oxide (passive) layer. A protective layer of spinel Fe1+xCr2-xO4 and stable Cr2O3 forms as a result of diffusion. However, On the surface of the coarse-grained sample (NP), this layer is not fully formed so protection is lower than on the shot-peened surfaces. The obtained results indicate that a passive film with higher stability was developed on the surface of the CSP and SSP steels. For this reason, the CSP and SSP samples revealed a lower current density compared to the NP sample. This is consistent with the previous studies [[35], [36], [37]].
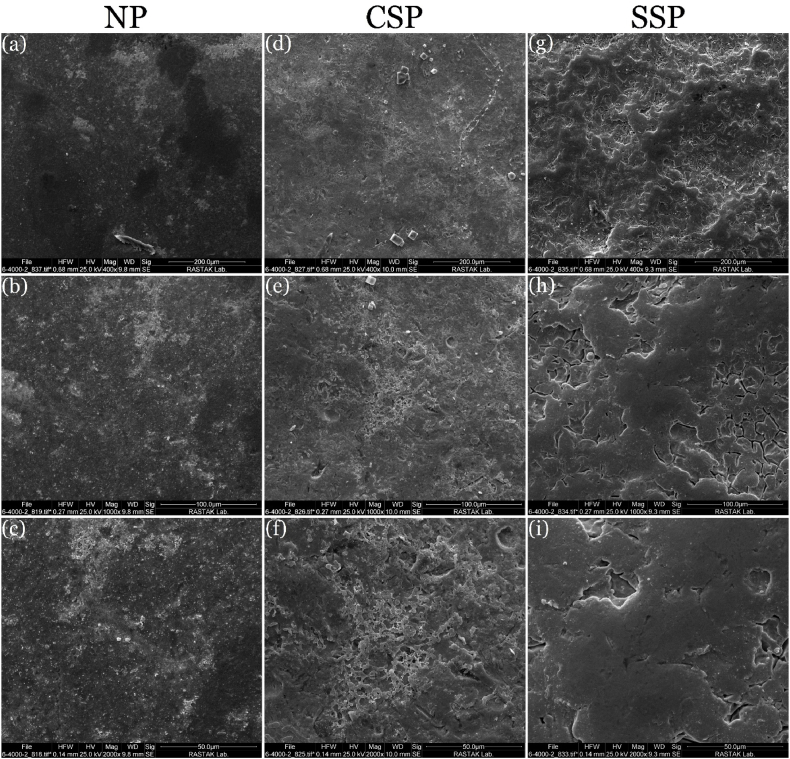
The morphologies of the corroded surface of NP, CSP, and SSP are depicted in Fig. 15(a–i). Corrosion product can be observed in all samples. A very small number of corrosion pits presented on the corroded surfaces. In fact, all samples exhibit good resistance to pitting. However, the number of pits in the shot-peened steels is more than that in the NP sample. It can be said that the shot peening causes a slight decrease in pitting resistance. The higher surface inhomogeneity and roughness are preferred locations for the initiation of pits. It should be noted that the CSP steel had the highest resistance to corrosion. This can be attributed to the presence of a large fraction of grain boundaries in the CSP sample which increases the passive film formation at the surface of the steel. This increases the corrosion resistance of the CSP sample due to the restriction of interaction between the corrosive environment and metal ions.
Fig. 15.
The SEM images of corroded surfaces of (a, b, c) NP, (d, e, f) CSP, and (g, h, i) SSP at three different magnifications.
It was reported that the formation of SIM can be harmful to corrosion resistance owing to the formation of a galvanic couple between γ and α’ [38]. According to the microstructural part, both CSP and SSP samples had SIM, however, the microstructure of the SSP sample exhibited more strain-induced martensite. However, regarding Fig. 3, there was no strain-induced martensite in the topmost layer due to the occurrence of dynamic recrystallization and the transformation of SIM to new austenite grains. Therefore, the higher corrosion rate of the SSP sample compared to the CSP sample is related to other factors such as texture and element distribution.
It should be noted that the activation energy in general corrosion is related to the atom density of the surface. The more densely packed surfaces have larger activation energy due to the presence of stronger atomic bonding [[39], [40], [41]]. Therefore, in the austenitic stainless steels, the ⟨100⟩‖ED fiber has a higher corrosion resistance than the ⟨110⟩‖ED fiber due to the larger surface atom density of ⟨100⟩‖ED fiber. In other words, the ⟨100⟩-oriented grains exhibit more corrosion resistance compared to the ⟨110⟩-oriented grains. Regarding texture evolution of NP, CSP, and SSP samples, the NP sample had no ⟨100⟩-oriented grains, while both CSP and SSP samples exhibited a ⟨100⟩‖ED fiber. This can be another reason for the larger corrosion resistance of shot-peened samples compared to NP steel. On the other hand, the intensity of ⟨100⟩‖ED fiber in the CSP sample was higher than that in the SSP sample. Also, the CSP sample exhibited the ⟨110⟩‖ED fiber with a lower density compared to the SSP sample. Based on these results, the presence of favorable texture with higher intensity in the CSP sample can also be responsible for the higher resistance to corrosion of the CSP steel compared to the SSP sample.
As mentioned before, both conventional and severe shot peening processes produced a gradient distribution of elements along depth direction due to the large compressive stress. Fig. 4 indicated that the surface atom density of the CSP and SSP samples was higher than that of the NP sample. The higher density of surface atoms in shot-peened samples can improve the corrosion resistance of the surface.
4. Conclusions
The following main conclusions can be drawn from the present study:
-
1.
After the shot peening, the fraction of SIM and mechanical twins in the sub-surface layer was increased owing to the low SFE of austenitic stainless steel. The fraction of SIM and MTs in the SSP sample was higher than in the CSP sample. The XRD patterns indicated that the SSP sample has a higher peak broadening compared to the CSP owing to the larger deformation during the severe shot peening.
-
2.
In the CSP and SSP samples, a gradient microstructure was formed along the depth direction due to the gradient distribution of strain. The microstructure of the topmost layer of the CSP and SSP samples exhibited numerous UFGs owing to the occurrence of the DRX. The grain refining during SSP was faster than during CSP because the accumulation of strain was higher during the severe shot peening process.
-
3.
The line scans indicated a homogeneous distribution of elements in the NP sample. The CSP and SSP samples exhibited a gradient distribution of elements due to the large compressive stress caused by the shot peening process.
-
4.
After the SSP, the intensity of ⟨110⟩‖ED fiber decreased from 12.7 to 11.6 × R and the average intensity of ⟨100⟩‖ED fiber increased from 1.7 to 2.0 × R, respectively, compared to the CSP sample. This result was attributed to the formation of new recrystallized grains in the SSP sample more than in the CSP sample.
-
5.
The surface roughness of the SSP sample (Rq = 73.6 nm and Ra = 45.2 nm) was lower than that of the CSP sample which represented the roughness decreased with surface coverage increasing from 100 % to 1500 %. This was due to the high strain-hardening rate of austenitic stainless steel. The conventional and severe shot peening processes increased the wettability.
-
6.
The microhardness of the CSP and SSP steels showed a gradient distribution. After the CSP, the microhardness increased to a depth of ∼500 μm, with a maximum value of 320.9 HV obtained at the surface. For the SSP sample, the depth of the affected region (∼700 μm) was larger than that for the CSP sample, with a maximum microhardness value of 432.4 HV.
-
7.
The CSP sample had the lowest current density (0.13 μA/cm2) whereas the NP sample revealed the highest current density (0.65 μA/cm2). In the CSP and SSP samples, the fine-grained surface led to the formation of a passivation layer. Therefore, the substrate was protected by a passive layer that was more dense, stable, and less sensitive to corrosion.
-
8.
The presence of ⟨100⟩-oriented grains in both CSP and SSP steels led to the higher corrosion resistance of processed steels compared to the NP sample. Finally, the presence of favorable texture with higher intensity in the CSP sample was responsible for the higher corrosion resistance of the CSP steel compared to the SSP sample.
Data availability
All data included in this study are available upon request by contact with the corresponding author.
CRediT authorship contribution statement
Fahimeh Yazdani: Writing – original draft, Software, Resources, Investigation. Sayed Mahmood Rabiee: Writing – review & editing, Supervision, Resources, Conceptualization. Roohollah Jamaati: Writing – review & editing, Writing – original draft, Supervision, Methodology, Conceptualization.
Declaration of competing interest
The authors declare that they have no known competing financial interests or personal relationships that could have appeared to influence the work reported in this paper.
References
- 1.S. Dosta, N. Cinca, A.M. Vilardell, I.G. Cano, J.M. Guilemany, Cold spray coatings for biomedical applications, Cold-Spray Coatings, Springer2018, pp. 533-557.
- 2.Singh D., Singh R., Boparai K., Farina I., Feo L., Verma A.K. In-vitro studies of SS 316 L biomedical implants prepared by FDM, vapor smoothing and investment casting. Compos. B Eng. 2018;132:107–114. [Google Scholar]
- 3.Yazıcı M., Çomaklı O., Yetim T., Yetim A., Çelik A. The effect of plasma nitriding temperature on the electrochemical and semiconducting properties of thin passive films formed on 316 L stainless steel implant material in SBF solution. Surf. Coating. Technol. 2015;261:181–188. [Google Scholar]
- 4.Omar S.A., Ballarre J., Ceré S. Protection and functionalization of AISI 316 L stainless steel for orthopedic implants: hybrid coating and sol gel glasses by spray to promote bioactivity. Electrochim. Acta. 2016;203:309–315. [Google Scholar]
- 5.Duraipandy N., Syamala K.M., Rajendran N. Antibacterial effects, biocompatibility and electrochemical behavior of zinc incorporated niobium oxide coating on 316L SS for biomedical applications. Appl. Surf. Sci. 2018;427:1166–1181. [Google Scholar]
- 6.Bagherifard S., Fernandez‐Pariente I., Ghelichi R., Guagliano M. Handbook of Mechanical Nanostructuring. 2015. Severe shot peening to obtain nanostructured surfaces: process and properties of the treated surfaces; pp. 299–323. [Google Scholar]
- 7.Kovacı H., Bozkurt Y.B., Yetim A.F., Aslan M., Çelik A. The effect of surface plastic deformation produced by shot peening on corrosion behavior of a low-alloy steel. Surf. Coating. Technol. 2019;360:78–86. [Google Scholar]
- 8.INVALID CITATION !!! [8-10]).
- 9.Lai H.-H., Cheng H.-C., Lee C.-Y., Lin C.-M., Wu W. Effect of shot peening time on δ/γ residual stress profiles of AISI 304 weld. J. Mater. Process. Technol. 2020;284 [Google Scholar]
- 10.Chen X., Li Y., Zhu Y., Bai Y., Yang B. Improved corrosion resistance of 316LN stainless steel performed by rotationally accelerated shot peening. Appl. Surf. Sci. 2019;481:1305–1312. [Google Scholar]
- 11.Unal O., Varol R. Surface severe plastic deformation of AISI 304 via conventional shot peening, severe shot peening and repeening. Appl. Surf. Sci. 2015;351:289–295. [Google Scholar]
- 12.Liu H., Wei Y., Tan C.K.I., Ardi D.T., Tan D.C.C., Lee C.J.J. XRD and EBSD studies of severe shot peening induced martensite transformation and grain refinements in austenitic stainless steel. Mater. Char. 2020;168 [Google Scholar]
- 13.Pour-Ali S., Kiani-Rashid A.-R., Babakhani A. Surface nanocrystallization and gradient microstructural evolutions in the surface layers of 321 stainless steel alloy treated via severe shot peening. Vacuum. 2017;144:152–159. [Google Scholar]
- 14.Pour-Ali S., Kiani-Rashid A.-R., Babakhani A., Virtanen S. Thermal stability of nanocrystalline surface layer of AISI 321 stainless steel. Vacuum. 2017;146:297–303. [Google Scholar]
- 15.Pour-Ali S., Kiani-Rashid A.-R., Babakhani A., Virtanen S., Allieta M. Correlation between the surface coverage of severe shot peening and surface microstructural evolutions in AISI 321: a TEM, FE-SEM and GI-XRD study. Surf. Coating. Technol. 2018;334:461–470. [Google Scholar]
- 16.Jayalakshmi M., Huilgol P., Bhat B.R., Bhat K.U. Microstructural characterization of low temperature plasma-nitrided 316L stainless steel surface with prior severe shot peening. Mater. Des. 2016;108:448–454. [Google Scholar]
- 17.Jayalakshmi M., Huilgol P., Bhat B.R., Udaya Bhat K. Insights into formation of gradient nanostructured (GNS) layer and deformation induced martensite in AISI 316 stainless steel subjected to severe shot peening. Surf. Coating. Technol. 2018;344:295–302. [Google Scholar]
- 18.Maleki E., Maleki N., Fattahi A., Unal O., Guagliano M., Bagherifard S. Mechanical characterization and interfacial enzymatic activity of AISI 316L stainless steel after surface nanocrystallization. Surf. Coating. Technol. 2021;405 [Google Scholar]
- 19.Bagherifard S., Hickey D.J., de Luca A.C., Malheiro V.N., Markaki A.E., Guagliano M., Webster T.J. The influence of nanostructured features on bacterial adhesion and bone cell functions on severely shot peened 316L stainless steel. Biomaterials. 2015;73:185–197. doi: 10.1016/j.biomaterials.2015.09.019. [DOI] [PubMed] [Google Scholar]
- 20.Bagherifard S., Slawik S., Fernández-Pariente I., Pauly C., Mücklich F., Guagliano M. Nanoscale surface modification of AISI 316L stainless steel by severe shot peening. Mater. Des. 2016;102:68–77. [Google Scholar]
- 21.Lopez-Ruiz P., Garcia-Blanco M.B., Vara G., Fernández-Pariente I., Guagliano M., Bagherifard S. Obtaining tailored surface characteristics by combining shot peening and electropolishing on 316L stainless steel. Appl. Surf. Sci. 2019;492:1–7. [Google Scholar]
- 22.Wang Z., Rifat M., Saldana C., Basu S. Quantifying the spread in crystallographic textures due to transients in strain path in shot-peening. Materialia. 2018;2:231–249. [Google Scholar]
- 23.Jamalian M., Field D.P. Effects of shot peening parameters on gradient microstructure and mechanical properties of TRC AZ31. Mater. Char. 2019;148:9–16. [Google Scholar]
- 24.Standard S.A.E. J443-Procedures for using standard shot peening test strip. SAE International; 2003. pp. 1–4. [Google Scholar]
- 25.Heydari Astaraee A., Miresmaeili R., Bagherifard S., Guagliano M., Aliofkhazraei M. Incorporating the principles of shot peening for a better understanding of surface mechanical attrition treatment (SMAT) by simulations and experiments. Mater. Des. 2017;116:365–373. [Google Scholar]
- 26.Amininejad A., Jamaati R., Hosseinipour S.J. Achieving superior strength and high ductility in AISI 304 austenitic stainless steel via asymmetric cold rolling. Mater. Sci. Eng., A. 2019;767 [Google Scholar]
- 27.Amininejad A., Jamaati R., Hosseinipour S.J. Improvement of strength-ductility balance of SAE 304 stainless steel by asymmetric cross rolling. Mater. Chem. Phys. 2020;256 [Google Scholar]
- 28.Abbaschian R., Abbaschian L., Reed-Hill R.E. Cengage Learning Stamford; 2010. Physical Metallurgy Principles. [Google Scholar]
- 29.Lu J., Hultman L., Holmström E., Antonsson K.H., Grehk M., Li W., Vitos L., Golpayegani A. Stacking fault energies in austenitic stainless steels. Acta Mater. 2016;111:39–46. [Google Scholar]
- 30.Chen C., Zhang H. Characteristics of friction and wear of Al-Zn-Mg-Cu alloy after application of ultrasonic shot peening technology. Surf. Coating. Technol. 2021;423 [Google Scholar]
- 31.H. Sato, Y. Ito, G. Kalita, Y. Watanabe, Crystallographic texture and applications of pure Cu formed by shot peening, Phys. Status Solidi n/a(n/a) 2100550.
- 32.Liu G., Lu J., Lu K. Surface nanocrystallization of 316L stainless steel induced by ultrasonic shot peening. Mater. Sci. Eng., A. 2000;286(1):91–95. [Google Scholar]
- 33.Hills G., Peter L., Scharifker B., Pereira M.D.S. The nucleation and growth of two-dimensional anodic films under galvanostatic conditions. J. Electroanal. Chem. Interfacial Electrochem. 1981;124(1–2):247–262. [Google Scholar]
- 34.Gaberšček M., Pejovnik S. Impedance spectroscopy as a technique for studying the spontaneous passivation of metals in electrolytes. Electrochim. Acta. 1996;41(7–8):1137–1142. [Google Scholar]
- 35.Wang T., Yu J., Dong B. Surface nanocrystallization induced by shot peening and its effect on corrosion resistance of 1Cr18Ni9Ti stainless steel. Surf. Coating. Technol. 2006;200(16):4777–4781. [Google Scholar]
- 36.Menezes M.R., Godoy C., Buono V.T.L., Schvartzman M.M.M., Avelar-Batista Wilson J.C. Effect of shot peening and treatment temperature on wear and corrosion resistance of sequentially plasma treated AISI 316L steel. Surf. Coating. Technol. 2017;309:651–662. [Google Scholar]
- 37.Tong W.P., Tao N.R., Wang Z.B., Lu J., Lu K. Nitriding iron at lower temperatures. Science. 2003;299(5607):686–688. doi: 10.1126/science.1080216. [DOI] [PubMed] [Google Scholar]
- 38.Pandey V., Singh J., Chattopadhyay K., Srinivas N.S., Singh V. Influence of ultrasonic shot peening on corrosion behavior of 7075 aluminum alloy. J. Alloys Compd. 2017;723:826–840. [Google Scholar]
- 39.Trisnanto S.R., Wang X., Brochu M., Omanovic S. Effects of crystallographic orientation on the corrosion behavior of stainless steel 316L manufactured by laser powder bed fusion. Corrosion Sci. 2022;196 [Google Scholar]
- 40.Lin K., Gu D., Xi L., Yuan L., Niu S., Lv P., Ge Q. Selective laser melting processing of 316L stainless steel: effect of microstructural differences along building direction on corrosion behavior. Int. J. Adv. Des. Manuf. Technol. 2019;104(5):2669–2679. [Google Scholar]
- 41.Dwivedi D., Lepková K., Becker T. Carbon steel corrosion: a review of key surface properties and characterization methods. RSC Adv. 2017;7(8):4580–4610. doi: 10.1098/rspa.2016.0852. [DOI] [PMC free article] [PubMed] [Google Scholar]
Associated Data
This section collects any data citations, data availability statements, or supplementary materials included in this article.
Data Availability Statement
All data included in this study are available upon request by contact with the corresponding author.


