

Abstract
Precise immunolocalization of proteins within a cell is central to understanding cell processes and functions such as intracellular trafficking and secretion of molecules during immune responses. Here we describe a protocol for ultrastructural detection of proteins in leukocytes. The method uses a pre-embedding approach (immunolabeling before standard processing for transmission electron microscopy (TEM)). This protocol combines several strategies for ultrastructure and antigen preservation, robust blocking of nonspecific binding sites, as well as superior antibody penetration for detecting molecules at subcellular compartments and membrane microdomains. A further advantage of this technique is that electron microscopy (EM) processing is quick. This method has been used to study leukocyte biology, and it has helped demonstrate how activated leukocytes deliver specific cargos. It may also potentially be applied to a variety of different cell types. Excluding the initial time required for sample preparation (15 h) and the final resin polymerization step (16 h), the protocol (immunolabeling and EM procedures) can be completed in 8 h.
INTRODUCTION
TEM is an outstanding tool for providing a comprehensive view of the interior of a cell at the nanometer scale, and it continues to have a crucial role in biological research and diagnostic pathology1–6. When combined with molecular detection methods, EM is the only technique with sufficient resolution to localize proteins to intracellular compartments and small membrane domains2. Visualization of specific proteins is achieved with electron-dense markers, usually gold particles, conjugated to secondary antibodies, and for this reason antigen labeling at the ultrastructural level is termed immunogold EM (Fig. 1).
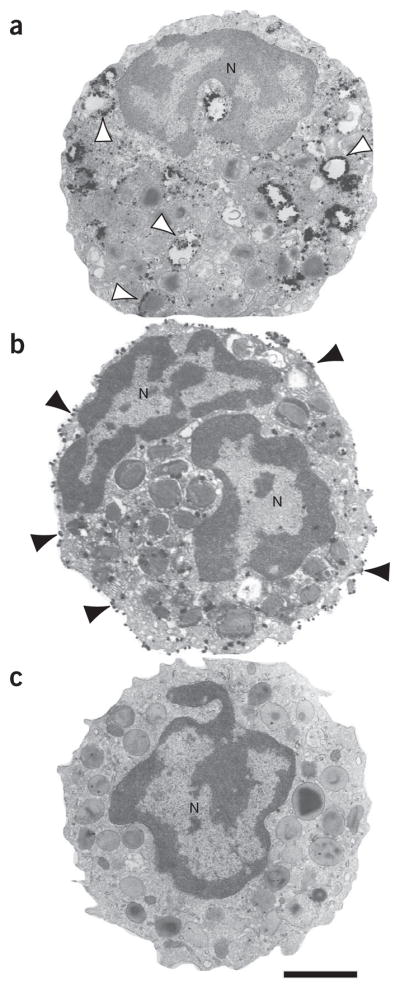
Figure 1.

Immunogold electron microscopy technique. (a,b) The protein of interest is investigated by immunolabeling with a primary antibody against the target molecule, followed by a secondary antibody (against the primary antibody) conjugated with gold nanoparticles. In our protocol, we use affinity-purified Fab fragments conjugated with 1.4-nm gold particles (Nanogold). In c, an electron micrograph shows subcellular sites of a human eosinophil leukocyte labeled for CD63. Cell surface microdomains and cytoplasmic secretory granules (Gr) and large vesicles (arrowheads) were labeled. Primary antibody was monoclonal mouse anti-human CD63, as described in Table 1. Secondary antibody was goat anti-mouse Fab fragment conjugated to 1.4-nm gold particles (1:100, Nanogold, Nanoprobes, cat. no. 2002). Cells were isolated from the blood of healthy donors as described23. Written informed consent was obtained from donors in accordance with the Declaration of Helsinki, and Institutional Review Board approval was obtained from the Beth Israel Deaconess Medical Center. N, nucleus. Scale bar, 700 nm.
Rationale for detecting antigens before embedding for EM
Immunogold EM has provided substantial insights into the cellular content of biomolecules and to cell function, but it involves many technical challenges and is considered one of the most laborious techniques in cell biology. The main challenge of immunogold EM is to provide both sensitive antigen detection and detailed information on the cell structure; however, these are conflicting technical situations. Antigen preservation may be hampered by optimal cell fixation and by dehydration and resin embedding, conventional procedures for EM, resulting in weak or negative labeling. Thus, antigens may not be detected by postembedding immunogold EM (i.e., by labeling on the surface of a thin section after EM procedures7). In addition to affecting antigenicity, labeling is restricted to the thin section surface because antibodies cannot penetrate into the resin7,8. Postembedding immunogold EM has been used since the 1970s, and it is mostly convenient for detecting abundant antigens9. An alternative method is pre-embedding immunogold EM (immunolabeling before the specimens are embedded in resin), which enables improved antigen preservation. Pre-embedding immunogold EM has been effectively applied to different biological systems7,10–13. Our group has been working with both post- and pre-embedding immunogold EM approaches for many years. We have localized enzymes involved in inflammatory pathways within leukocytes using postembedding methods14,15, but we have failed to detect intracellular sites of interleukins in the same cells using this approach.
Choice of antigen probe
In addition to choosing between a post- and a pre-embedding approach, there are other issues to consider to ensure a successful protein immunolocalization study of cells and tissues at the ultrastructural level. For precise molecular information integrated with cellular architecture, antibodies have to access small membrane domains. Antibody probes conjugated with colloidal gold particles are too large (~5–25 nm) to freely penetrate into cells, even after permeabilization of the cellular membrane8,16. Therefore, to access vesicles and other microdomains, the smallest gold particles should be used12,17. Our protocol uses very small gold particles (1.4 nm in diameter) covalently conjugated with Fab fragments (Fig. 1), which are only one-third the size of a whole IgG molecule. These very small probes improve antibody penetration and provide more quantitative labeling of antigenic sites8,18, with access to membrane microdomains. Therefore, in addition to optimal epitope preservation, this protocol provides excellent access of the antibodies to cell subcompartments. This is important for the identification of small molecules such as those of the immune signaling system that are not usually detected by postembedding EM.
Different cell types can also present unique challenges. In cells from the immune system, such as neutrophils, eosinophils and macrophages, precise immunolocalization of proteins is especially important for understanding intracellular trafficking and the secretion mechanisms of immune mediators. However, handling can easily activate these cells inappropriately. Moreover, leukocytes such as eosinophils store a multitude of preformed immune mediators and other molecules within cytoplasmic compartments19. Apparent labeling of these sites can be confused with nonspecific immunolabeling, resulting in strong background formation.
Applications of the protocol
Our methodology was primarily developed for studying human leukocytes isolated from the peripheral blood17,20–22, but it is probably applicable to virtually any cell suspension with a few additional modifications. Applied to leukocytes, the technique has been used to characterize the intracellular localization of cytokines, immune cell signaling molecules and tetraspanins17,20–25. Because vesicular traffic from secretory granules underlies secretion in different cell types, including leukocytes, a challenge to understanding this secretory pathway in more detail has been the identification of granule-derived products within transport vesicles. This protocol enabled the first ultrastructural identification of a vesicle-based transport of interleukin-4 (IL-4; ref. 20) and major basic protein-1 (MBP-1; ref. 17) from eosinophil secretory granules. The existence of vesicle-mediated secretion from leukocyte secretory granules has been previously underestimated, probably because of technical issues: inadequate preservation of vesicles and/or inability of antibodies to access them.
The protocol has also been used to study the intracellular traffic of cytokine receptors, such as IL-4Rα (ref. 21) and Notch signaling molecules22. The identification of previously unrecognized pools of cytokine receptors such as IL-4R revealed a unique mechanism contributing to the specificity of cytokine secretion. We also showed for the first time that human blood eosinophils express Notch receptors and Notch ligands22.
The methodology has also been used to ascertain localization of tetraspanins such as CD63 and CD9 (refs. 17,24,26) and protein disulfide isomerase (PDI)27 in leukocytes. We demonstrated that CD9 is abundant on the surface of eosinophil leukocytes, presenting the first EM data of the ultrastructural immunolocalization of CD9 in human eosinophils, which represents a novel insight into the organization of the antigen presentation complex of these cells24. The technique has also been applied to the study of molecules involved in the endocytic pathway such as Rab7 and LC3, labeled in phagosomes within macrophages infected with mycobacteria (R.C.N.M., unpublished observations). Therefore, the main uses of this technique involve studies focused on cellular immunology, innate and adaptive immunity, immune responses to pathogens, immunopathology and inflammatory responses. Beyond its use in these fields, the technique is applicable to the immunolocalizaton of a wide range of proteins within varied cell types.
Limitations
One limitation of this protocol is that it does not facilitate colocalization studies (i.e., simultaneous observation of two epitopes), which can be achieved with postembedding EM using larger gold probes with different sizes.
Experimental design
This protocol describes a pre-embedding immunogold EM protocol for the detection of proteins in leukocytes. Our methodology, a combination of different strategies for optimal labeling and morphology preservation, has been used for almost 10 years (refs. 17,20–24,27). Figure 2 presents a summary of all the stages of the protocol.
Figure 2.

Flowchart showing the main stages and timing of pre-embedding immunogold EM procedure.
Sample fixation
Because paraformaldehyde has less effect on antigenicity, our experience is that most cells should be first fixed with this fixative alone, labeled and then re-fixed with glutaraldehyde, which is a strong cross-linker of proteins and provides best structural preservation, but is known to lower protein antigenicity28. However, a combination of both aldehydes may work for certain antigens. We were not able to detect interleukins within leukocytes even when small amounts of glutaraldehyde (0.1%, vol/vol) were used. However, in our hands, MBP-1 was clearly labeled within human leukocytes by using high concentrations of glutaraldehyde. Therefore, because this protocol can be applied to different cell types and antigens, optimization of the best fixative may be necessary to adapt the protocol to a specific experimental condition. To strive for the best structural preservation, the fixative should be freshly prepared and added directly and gently to the cell suspension; i.e., it is not necessary to centrifuge the cells into a pellet before fixation. Moreover, we do not use a high centrifugation speed (1,000g) for the subsequent step of cell washing with buffer. After fixation, isolated cells are pre-embedded in agar to facilitate cell processing and to prevent mechanically induced artifacts. Our experience is mostly with cells in suspension (such as leukocytes isolated from the peripheral blood or pleural cavity), but we were also successful in labeling antigens in tissue fragments using this methodology. After fixation, samples must be immersed in 30% (wt/vol) sucrose overnight to avoid ice crystal formation during freezing. Storage in liquid nitrogen is preferable to −80 °C because ice crystals can still be formed at this temperature. Our experience is that samples stored in liquid nitrogen can be stored for years and assessed for different antigen immunolocalization studies. This is particularly important for precious human samples.
Immunolabeling
Our approach performs immunolabeling on 10-μm-thick cryostat sections, which enable antibody penetration throughout the section thickness, as previously reported29. Therefore, it is not necessary to include a permeabilization step, as required for whole cells30. The permeabilization step, which can interfere with the structural integrity of membranes, can be detrimental to the ultrastructure, and thus it is best avoided. Thicker sections are not adequate, as the antibody penetration may be restricted. Sections are collected on special glass slides. Regular uncoated glass slides will not allow adequate adhesion of the cells to the slide surface. Before immunolabeling, nonspecific binding sites need to be blocked. Blocking is particularly important because immunolabeling of leukocytes can result in a strong and unexpected background formation. We use two steps of blocking buffers before incubation with the primary antibody.
Silver enhancement
This stage consists of incubation with a silver enhancement solution according to the manufacturer’s instructions, and it enables nucleation of silver ions around gold particles. These ions precipitate as silver metal, and the particles grow in size facilitating observation under TEM. Before silver enhancement, cells are sequentially transferred to distilled water because buffer traces can interfere with the silver enhancement process. Therefore, adequate washing in distilled water must be done before this step. The silver enhancement solution is stored at −20 °C, but it is used at room temperature (20 °C). Therefore, keep in mind that it is necessary to thaw the solution kit before this step. Moreover, the solution is light-sensitive, and the incubation is done in a dark room. We have found that 10 min of incubation is ideal for optimal visualization of the tested antibodies (Table 1) in leukocytes. However, this time can be changed depending on the antigen. The silver layer covering the gold particles is sensitive to the action of osmium tetroxide, which can induce particle loss. To prevent this, our approach uses a procedure with sodium thiosulfate after the silver enhancement step in order to stabilize the silver-enhanced immunogold particles. Moreover, the time of treatment with osmium tetroxide is just 10 min.
TABLE 1.
Primary antibodies tested on leukocytes and other cell types.
| Antibody | Manufacturer (cat. no.) | Used conc. | Cell | Main localization(s) | Target species | Refs. |
|---|---|---|---|---|---|---|
| Aph-1 (γ secretase complex subunit) | Abcam (ab24613, rabbit IgG) | 5 μg/ml | Eosinophils | Golgi, secretory granules and peripheral cytoplasm | Human | 22 |
| CD9 | R&D (MAB1880, clone 209306, mouse IgG2B) | 10–20 μg/ml | Eosinophils | Cell surface | Human | 24 |
| CD63 | BD-Pharmigen (556019, clone H5C6, mouse IgG1) | 2 μg/ml | Eosinophils | Secretory granules (limiting membrane and intragranular pool) | Human | 17,23 |
| IL-4 | R&D (MAB604, clone 3010, mouse IgG) | 2 μg/ml | Eosinophils | Transport vesicles and granules | Human | 20 |
| IL-4Rα | Santa Cruz Biotechnology (sc-685, rabbit IgG) | 1 μg/ml | Eosinophils | Transport vesicles, granules and peripheral cytoplasm | Human | 21 |
| LC3A | Sigma-Aldrich (L8793, rabbit IgG) | 0.5 μg/ml | Macrophages and cardiomyocytes | Autophagosomes | Mouse | a |
| MBP | BD-Pharmingen (554253, clone AHE2, mouse IgG1) | 5 μg/ml | Eosinophils | Transport vesicles and secretory granules | Human | 17 |
| Nitric oxide synthase 3 (NOS3) | Santa Cruz Biotechnology (s-654, rabbit IgG) | 10 μg/ml | Platelets | α-Granules surface | Mouse | a |
| Notch 1 (anti-activated form) | Abcam (ab8925, rabbit IgG) | 5 μg/ml | Eosinophils | Secretory granules and plasma membrane | Human | 22 |
| Notch 1 (anti-activated form, cleaved-Val1744) | Abcam (ab52301, rabbit IgG) | 10 μg/ml | Eosinophils | Secretory granules, vesicles and cytoplasm | Human | a |
| Notch ligand (Jagged 1) | Santa Cruz Biotechnology (sc-8303, rabbit IgG) | 5 μg/ml | Eosinophils | Plasma membrane and secretory granules | Human | 22 |
| Notch ligand (Jagged 2) | Santa Cruz Biotechnology (sc-5604, rabbit IgG) | 5 μg/ml | Eosinophils | Plasma membrane and secretory granules | Human | 22 |
| Perilipin-2/ADRP | Fitzgerald (20R-AP002, guinea pig IgG) | 2 μg/ml | Macrophages | Lipid bodies | Human/mouse | 34 |
| PDI | Abcam (ab2792, clone RL90, mouse IgG2a) | 5 μg/ml | Eosinophils | Nuclear envelope, granules, vesicles and lipid bodies | Human | 27 |
| Rab7 | Santa Cruz Biotechnology (sc-10767, rabbit IgG) | 10 μg/ml | Macrophages, neutrophils | Phagosomes | Mouse | a |
| Syntaxin 17 | Santa Cruz Biotechnology (sc-1070095, goat IgG) | 5 μg/ml | Eosinophils | Granules and vesicles | Human | a |
Unpublished observations.
Processing for EM
This stage involves conventional procedures for EM (postfixation with osmium tetroxide, en bloc staining with uranyl acetate, dehydration in alcohol, infiltration and embedding in resin), which is usually time-consuming. Our technique uses a faster infiltration/embedding step compared with most immunoEM procedures, which use an overnight infiltration stage. We have found that 15 min is adequate for the subsequent embedding step.
Ultrathin sectioning
Thin (~80 nm) sections are obtained directly from the block surfaces without the need to cut thick 1-μm sections. Sections are mounted on uncoated 200-mesh copper grids, stained with lead citrate only and viewed with a transmission electron microscope.
MATERIALS
REAGENTS
Leukocyte suspensions or tissue of interest ▲ CRITICAL Samples must be obtained in accordance with governmental and institutional regulations.
Na2HPO4·7H2O (Fisher Scientific, cat. no. S373)
NaH2PO4·H2O (Fisher Scientific, cat. no. S369)
NaCl (Fisher Scientific, cat. no. S640)
Paraformaldehyde (Electron Microscopy Sciences, cat. no. 19208) ! CAUTION Paraformaldehyde is toxic. Use the reagent in a hood and handle it with gloves.
Agar (Bacto-agar, BD Biosciences, cat. no. 214010)
Sucrose (Sigma-Aldrich, cat. no. S9378)
Tissue-Tek O.C.T. compound (Fisher Scientific, cat. no. 14-373-65)
Toluidine blue O (Fisher Scientific, cat. no. T-161)
Sodium tetraborate (Electron Microscopy Sciences, cat. no. 21130)
Mounting medium (Permount, Fisher Scientific, cat. no. SP15-500)
Gelatin (Sigma-Aldrich, cat. no. G6650)
Glycine (Sigma-Aldrich, cat. no. G7403)
BSA (Electron Microscopy Sciences, cat. no. 25554)
Normal goat serum (NGS; Jackson ImmunoResearch, cat. no. 005-000-121)
Appropriate primary antibodies (see Table 1 for a list of antibodies we used)
Secondary antibodies (Fab fragments conjugated with 1.4-nm gold particles; Nanogold, Nanoprobes, cat. nos. 2002 (anti-mouse), 2004 (anti-rabbit), 2008 (anti-rat), 2055 (anti-guinea pig) and 2006 (anti-goat), depending on the primary antibody host species). We tested all of these ourselves
Glutaraldehyde, EM grade, 50% (wt/vol) aqueous (Electron Microscopy Sciences, cat. no. 16310) ! CAUTION Glutaraldehyde is toxic. Use the reagent in a hood and handle it with gloves.
Silver enhancement (HQ Silver, Nanoprobes, cat. no. 2012)
Sodium thiosulfate (Sigma-Aldrich, cat. no. 563188)
Osmium tetroxide, secondary fixative (Electron Microscopy Sciences, cat. no. 19100) ! CAUTION Osmium tetroxide is toxic. Use the reagent in a hood and handle it with gloves.
Uranyl acetate (Electron Microscopy Sciences, cat. no. 22400) ! CAUTION Uranyl acetate is toxic and slightly radioactive. Use the reagent in a hood and handle it with gloves.
Ethanol: 70, 95 and 100% (vol/vol)
Eponate 12 resin (Ted Pella, cat. no. 18005) ! CAUTION Eponate 12 is a severe irritant to the eyes, skin and nasal passages. Use the reagent in a fume hood and handle it with gloves.
Nadic methyl anhydride (NMA-4; Electron Microscopy Sciences, cat. no. 19000) ! CAUTION NMA is a severe irritant to the eyes and respiratory tract. Do not breathe the vapor. Use the reagent in a hood and handle it with gloves.
Dodecenylsuccinic anhydride (DDSA; Ted Pella, cat. no. 18022) ! CAUTION DDSA is a severe irritant to the eyes and skin. Use the reagent in a fume hood and handle it with gloves.
-
Propylene oxide (Fisher Scientific, cat. no. 04332-1)
! CAUTION Propylene oxide is highly flammable and a severe irritant to the eyes, skin and nasal passages. Use the reagent in a fume hood and handle it with gloves.
2,4,6-Tri(dimethylaminoethyl)phenol (DMP-30; Electron Microscopy Sciences, cat. no. 13600) ! CAUTION DMP-30 is a severe irritant to the eyes, skin and nasal passages. Use the reagent in a fume hood and handle it with gloves.
Lead citrate (Electron Microscopy Sciences, cat. no. 17800) ! CAUTION lead citrate is toxic. Use the reagent in a hood and handle it with gloves.
EQUIPMENT
Balance
Magnetic stir bars
Magnetic stirrer
Fume hood
Microcentrifuge
Microcentrifuge tubes, 300-μl
Pointed applicator sticks
Parafilm M (Electron Microscopy Sciences, cat. no. 70990)
Superfrost Plus microscope slides (Fisher Scientific, cat. no. 12-550-15)
Coverslips
Microtome blades (Leica 818, Electron Microscopy Sciences, cat. no. 63065-HP)
Diamond scriber pen (Ted Pella, cat. no. 54463)
Disposable razor blades
Fine-tipped tweezers (Electron Microscopy Sciences, cat. no. 78518-3, ultra-fine)
Regular tweezers
Dental wax
Syringe filters, 0.2 μm (Fisher Scientific, cat. no. 09-719C)
Syringes without needles, 1 and 10 ml (BD Biosciences, cat. no. 309628 and 309604)
Cryostat
Hot plate
Shaker
Stain moisture chambers, clear (Electron Microscopy Sciences, cat. no. 62010-35)
Stain moisture chamber, black with black lid (Electron Microscopy Sciences, cat. no. 71396-B)
Glass test tubes with screw caps
Ultramicrotome (Leica)
Diamond knife (DiATOME)
Filter paper, hardened
Petri dish filled with dental wax or paraffin
Copper mesh grids (Electron Microscopy Sciences, cat. no. G200-Cu)
Micropipetters
Pipette tips
Liquid nitrogen container
BROWN wide-mouthed plastic bottle (Nalgene, cat. no. 03-313-3E)
BEEM embedding capsules (Ted Pella, cat. no. 130-1)
BEEM capsule press (Electron Microscopy Sciences, cat. no. 69920-00)
Light microscope
Perfect loop (Electron Microscopy Sciences, cat. no. 70616-HD)
Transmission electron microscope
REAGENT SETUP
PBS (0.02 M, 0.15 M NaCl, pH 7.4)
Prepare a stock solution of 0.2 M phosphate buffer by dissolving 2.75 g of NaH2PO4·H2O in 100 ml of double-distilled water (part 1) and 5.36 g of Na2HPO4·7H2O in 100 ml of double-distilled water (part 2). Mix 19 ml of part 1 and 81 ml of part 2. Bring the mixture to a final volume of 1 liter (10 × dilution) with double-distilled water to achieve a final concentration of 0.02 M. Add 8.76 g of NaCl, stir and adjust the pH to 7.4. Cover the solution with Parafilm and refrigerate it. This solution can be stored at 4 °C for up to 3 months.
Paraformaldehyde and glutaraldehyde, primary fixative
The initial fixative is generally 4% (wt/vol) paraformaldehyde in 0.02 M PBS and 0.15 M NaCl (pH 7.4). In the hood, add 4 g of paraformaldehyde in 80 ml of PBS. Add 3 drops of 1 M NaOH. Heat the mixture while stirring to ~60 °C until the solution is clear. Take care that the solution does not boil. Note that the powder will not immediately dissolve. Cool it under running water. Adjust the volume to 100 ml using the same buffer. Check the pH and adjust the pH to 7.4. Cover the flask with Parafilm. Glutaraldehyde fixative at 2% (vol/vol) in distilled water is used after immunolabeling. For 50 ml of fixative, mix 2 ml of stock of 50% (vol/vol) glutaraldehyde and 48 ml of distilled water. The most effective fixative must be determined experimentally. There are several other glutaraldehyde/paraformaldehyde combinations in use depending on the antigen to be investigated, such as 4% (wt/vol) paraformaldehyde and 0.1% glutaraldehyde (vol/vol) in the same buffer. ! CAUTION Glutaraldehyde and paraformaldehyde are irritants to the eyes, skin and respiratory tract. Use them under a fume hood. ▲ CRITICAL Fixatives should be freshly prepared for every experiment to allow optimal fixation.
PBS-glycine solution (0.05 M glycine)
Mix 0.75 g of glycine in 200 ml of 0.02 M PBS (pH 7.4), stir and cover the mixture with Parafilm. For 100 ml, use 0.375 g. ▲ CRITICAL Use a freshly prepared solution.
PBS-gelatin-BSA buffer
The first blocking buffer is prepared by mixing 0.1% (wt/vol) gelatin in 0.02 M PBS (pH 7.4) under stirring and minor heating (~40 °C). Wait for complete gelatin melting, cover it with Parafilm and cool it in the refrigerator. After cooling, add 1% (wt/vol) BSA, gently stir, cover it with Parafilm and refrigerate it. ▲ CRITICAL Take out any foam formed during buffer preparation. The solution should be clean and slightly yellow. This solution can be stored at 4 °C for up to 1 month.
PBS-gelatin-BSA-NGS buffer
The second blocking buffer is prepared by mixing NGS with PBS-gelatin-BSA buffer. Reconstitute NGS by adding 10 ml of syringe-filtered distilled water into the lyophilized NGS vial. Wait for it dissolve, and then mix 10 ml of NGS and 90 ml of PBS-BSA buffer. Gently stir the mixture, cover it with Parafilm and refrigerate it. This solution can be stored at 4 °C for up to 2 weeks.
Sodium thiosulfate
This solution is prepared at 3% (vol/vol) in distilled water. ▲ CRITICAL Use a freshly prepared solution. Do not store the solution.
Osmium tetroxide, secondary fixative
The secondary fixative is 1% (wt/vol) osmium tetroxide in distilled water (just mix osmium stock solution and water 1:1 at the time of use). Stock solution is prepared at 2% (wt/vol; 1 g of osmium in 50 ml of water). File the neck of the ampoule containing osmium to weaken it. Break open carefully using the ampoule breaker. Pipette a small amount of water into the ampoule to dissolve the osmium. Place it in the stoppered bottle. Add the remaining water. Wrap the stopper with Parafilm and the whole bottle and stopper with foil to keep it light-tight. Keep the bottle in the fume hood for 1–2 d, swirling it occasionally to dissolve the contents. Filter all the newly made osmium tetroxide into a light-tight stock bottle. This stock solution can be stored at 4 °C for up to 6 months. ! CAUTION Osmium tetroxide is very toxic, and it can cause severe eye and skin burns, acute lung congestion and temporary blindness. Use it under a fume hood and handle it while wearing gloves. ▲ CRITICAL Osmium should be clear and slightly yellow. Anything other than this is considered contaminated, and it should not be put into the stock bottle or be used in any way. To dispose of used or contaminated osmium, pour it into an osmium waste bottle containing a layer of cooking or vegetable oil to neutralize the osmium.
HQ silver enhancement
The system consists of three reagents supplied in dropping bottles: initiator, moderator and activator. The working solution is prepared by combining equal volumes of each component as per the manufacturer’s instructions immediately before use. For five slides, we used 40 drops of each component. Mix the initiator and moderator thoroughly, and then add the activator and mix it thoroughly again. ▲ CRITICAL The components are stored at −20 °C; thaw and allow the components to reach to room temperature before use (at least 2 h). The moderator and activator are viscous; mixing will be easier if the components are allowed to reach room temperature first. Avoid cross-contamination of the enhancer and initiator solutions: to prevent replacing the caps on the wrong bottles, the cap of the initiator is red, whereas that of the activator is blue. The solutions are light-sensitive. Silver enhancement must be carried out in a darkroom. A safelight or other darkroom light may be used. Do not expose these reagents to heat. Avoid contact with metallic objects, as these can induce silver precipitation. Avoid skin contact: the silver enhancement reagents will stain the skin.
Uranyl acetate en bloc contrast-enhancing agent
Dissolve 1% (wt/vol) uranyl acetate in distilled water by mixing the powder with water in a glass test tube with a screw cap. Close the tube, cover the screw cap with Parafilm and place it on the center of the shaker at medium speed tied with a tape to completely dissolve the contents. The solution should be freshly prepared. ! CAUTION Uranyl acetate is slightly radioactive and toxic if ingested, inhaled or absorbed. Effects are cumulative. Use it under a fume hood and handle it while wearing gloves. ▲ CRITICAL Use a freshly prepared solution.
Eponate stock
Measure in dry glass graduated cylinders 183.5 ml of Eponate 12 resin plus 175 ml of DDSA and 67 ml of NMA, and then mix them directly in a brown wide-mouthed plastic bottle. Take time to drain all the contents well. Accuracy in measurement is crucial for the appropriate hardness of the blocks. Keep everything very dry while making this. Shake the mixture by hand for ~15 min, and then place it on the center of the shaker at a vigorous speed for the rest of the day. Store it at 4 °C tightly capped. Eponate can be stored at 4 °C for up to 6 months. ! CAUTION Eponate, DDSA and NMA are toxic and carcinogenic. They are strong skin irritants, and they are respiratory tract irritants if inhaled. Use them under a fume hood and handle them while wearing gloves.
Eponate embedding medium
Remove stock Eponate from the refrigerator early and allow it to equilibrate to room temperature (~30 min–1 h). Measure the amount of Eponate needed in a plastic tri-pour. By using a 1-ml syringe, pull up some DMP-30 a few times to lubricate the syringe to be sure that the measurement will be accurate, and add the appropriate amount to the Eponate. For each 25 ml of Eponate add 0.5 ml of DMP-30. Make at least 25 ml for every experiment. Stir it thoroughly with a glass rod for 5 min. This solution must be freshly prepared before use. The remaining solution can be stored in labeled syringes in the freezer (−20 °C) to use in the infiltration step in a future run. ! CAUTION Eponate is toxic. It is a strong skin irritant, and it is a respiratory tract irritant if inhaled. Use it under a fume hood and handle it while wearing gloves.
Lead citrate contrast-enhancing (stain) agent
Weigh 0.125 g of lead citrate and dilute it in 5 ml of 1 N NaOH in a volumetric flask. Fill the flask to 50 ml with double-distilled water, and then stopper the flask. Use a flea-sized stir bar to stir the mixture to dissolve the lead citrate. Filter the solution using the large hardened filter paper into a red volumetric flask. This solution can be stored at room temperature for up to 6 months. ! CAUTION Lead citrate is very toxic if it is inhaled or ingested. Contact with skin may cause lead poisoning. Effects are cumulative. Use it under a fume hood and handle it while wearing gloves. ▲ CRITICAL Be careful not to breathe on it. Expired CO2 may cause the lead to form crystals, which act as an artifact and can contaminate the surface of the thin section on the grid.
Toluidine blue, 0.5% (wt/vol)
Mix 1.0 g of sodium borate in 200 ml of double-distilled water. Add 1.0 g of toluidine blue slowly while it is on the stirring plate. Filter and store the solution in a brown bottle. This solution is stable and can be stored at room temperature for many months, but it should be filtered through a syringe (0.2-μm filter) or hardened filter paper before use.
PROCEDURE
Sample preparation ● TIMING ~15 h
-
1|
Fix the samples. Follow option A for cells in suspension and option B for tissues.
-
For cells in suspension
-
Carefully add the primary fixative directly on the cell suspension in plastic 10-ml test tubes. For 1–2 ml of cell suspension (for example, obtained after leukocyte isolation from the peripheral blood or cavity lavages), fill the tube to 10 ml with the fixative.
▲ CRITICAL STEP The amount of cells is crucial for obtaining a good visible pellet. In our experience, 3 million cells is the minimum necessary to make one reasonable pellet. However, it is desirable to have more cells and to prepare a more substantial pellet for better visualization during sectioning and processing. Moreover, at least two pellets for each condition should be prepared, if possible, in case something unexpected happens during processing.
Rock the tube gently and fix for 30 min at room temperature.
Remove the fixative by centrifugation at 1,000g for 10 min at room temperature.
-
Wash the samples in PBS 0.02 M buffer and then resuspend the cells in a small amount of buffer (~500 μl–1 ml) to facilitate subsequent preparation of agar pellets.
? TROUBLESHOOTING
-
-
For tissues
-
Immerse the collected fragments (~1 cm size) in ~5 ml of primary fixative in glass vials.
▲ CRITICAL STEP Tissue must be properly fixed immediately after interruption of blood supply. An interval of 10–15 min could be enough to cause artifacts. Do not ever allow the tissue to dry out. Handle the fragments gently to avoid mechanical damage.
After ~5 min, cut the fragments into small blocks of ~1 mm × 1 mm in size, and then return them to the fixative for additional fixation (60 min) at room temperature. Very dense tissues may require longer fixation (2 h). For cutting, put a small pool of buffer on a piece of dental wax and add the tissue fragment. By using a razor blade, cut the tissue into small pieces.
After fixation, remove the fixative using a pipette and wash the samples in 0.02 M PBS buffer.
-
-
-
2|
Refrigerate the samples before further processing.
▲ CRITICAL STEP Because it is generally mildly fixed with 4% (wt/vol) paraformaldehyde, the samples should not be stored at 4 °C for a long time. Paraformaldehyde is not a strong cross-linker of proteins, and fixation can be reversed, damaging the structure. We usually proceed to the next step on the same or next day.
-
3|
Make agar pellets by mixing the agar in 0.02 M (2% wt/vol) PBS and bringing it to a boil on a hot plate until the solution is completely dissolved, clear and just boiling. Leave it on the hot plate, while being stirred with a stir bar, so that the agar stays in a liquid state. Transfer the cell suspension to a microcentrifuge tube and spin it for 1 min (~9,500g) at room temperature. Carefully aspirate the small supernatant from the pelleted cells, quickly add hot agar and resuspend the cells using a toothpick. Spin the cells in a microcentrifuge for 1 min as before.
▲ CRITICAL STEP Cell suspensions must be pre-embedded in agar in order to be cut and processed. This step is not necessary for tissue fragments. In that case, proceed to Step 6.
▲ CRITICAL STEP If the agar is not adequately heated or if melted agar is not quickly added to the microcentrifuge tube, the cells will not re-form a pellet and will be spread out in the solidified agar.
? TROUBLESHOOTING
-
4|
Chill the tubes on a bucket of ice for at least 20 min to allow the agar to solidify. After solidification, carefully remove the intact pellets from the microtubes using a razor blade and a pointed applicator stick. Use a small pool of buffer to help handling of the agar blocks and to avoid drying. Cut off any excess agar.
? TROUBLESHOOTING
-
5|
Immerse the agar blocks containing the embedded cell suspensions or tissue fragments in a sucrose solution (30% wt/vol) in 0.02 M PBS overnight at 4 °C for cryoprotection.
-
6|
Freeze the samples by immersing individual samples in a small amount of Tissue-Tek O.C.T. compound on a glass slide surface and carefully transferring the sample into a suitable cryomold filled with the same compound. Alternatively (if a cryomold is not available), put a pool of O.C.T. compound on the surface of the cryostat specimen stage, transfer the sample, allow freezing and carefully detach the formed ice block from the specimen stage. The sample must be totally immersed in the embedding medium. If necessary, add additional O.C.T. compound during block solidification. Samples are then ready to be stored.
! CAUTION When you are handling liquid nitrogen, gloves, eye protection and closed shoes must be worn.
▲ CRITICAL STEP Freezing of agar pellets containing embedded cell suspensions requires special attention. In our experience, the best way to freeze these pellets is by holding (using a stick) the pellet upright (not horizontally) on the specimen stage. Thus, the area in which the cells are more concentrated will be more visible during sectioning.
? TROUBLESHOOTING
■ PAUSE POINT Store the samples in liquid nitrogen after careful labeling. Frozen samples can be stored for the long term (~3 years).
Immunolabeling ● TIMING ~5 h
▲ CRITICAL All steps are performed at room temperature.
-
7|
Cut the frozen sections. Collect 10-μm-thick sections on Superfrost Plus glass slides (Fig. 3a,b). Before sectioning, label each slide with the appropriate code using a pencil (not a permanent pen) and, during sectioning, keep the slide outside the cryostat.
▲ CRITICAL STEP Before collecting all sections that will be immunolabeled, it is important to confirm that the cells and tissues are in adequate numbers and that they are visible on the sections by quickly staining one section with a histological stain. We use a toluidine blue solution that is also used for staining of TEM thick sections in our laboratory. Quickly dry a section on a glass slide by placing the slide on a slide warmer; cover it with a few drops of staining solution, rinse off excess stain gently with distilled water, dry the slide, coverslip with regular mounting medium and analyze it on a light microscope. If sufficient cells are not visible, cut extra sections and repeat this analysis. For immunolabeling, we usually collect four sections per slide for each sample. It is important to collect several sections because some of them may be lost during processing. Each section will correspond to one resin block, and therefore there will be several blocks from each sample by the end of the process. For each antigen to be immunolabeled, it is necessary to have a control for the primary antibody (replaced by an irrelevant antibody), and it is also desirable to have a slide in which the primary and/or the secondary antibody will be omitted. Therefore, for immunolocalization of one antigen in one sample, three slides from the same sample have to be prepared.
? TROUBLESHOOTING
-
8|
After sectioning, circle the sections with a diamond scriber pen to facilitate visualization of the section area, and allow the sections to adhere to the slide for ~8 min at room temperature before subsequent steps.
-
9|
Immerse the slides containing the sections in 0.02 M PBS for 5 min. This and other steps requiring slide immersion are performed in Coplin staining jars, as shown in Figure 3c. We use small staining jars that hold a maximum of eight slides. Avoid large jars, which will consume large volumes of solutions. Moreover, our experience is that each experiment should be done with a small number of conditions to facilitate processing.
-
10|
Immerse the slides in PBS-glycine solution for 10 min. Discard PBS and add PBS-glycine solution in the staining jar (Fig. 3c).
▲ CRITICAL This step is important for fixative quenching.
-
11|
Block nonspecific binding sites with PBS-gelatin-BSA buffer for 30 min. Discard the PBS-glycine solution and add the first blocking buffer (PBS-gelatin-BSA) to the same jar containing the slides (Fig. 3c).
-
12|
Block nonspecific binding sites with PBS-gelatin-BSA-NGS buffer for 30 min. Discard the first blocking buffer and add PBS-BSA-NGS to the same jar containing the slides (Fig. 3c).
-
13|
Incubate the sections with primary antibody for 1 h. Prepare appropriate dilutions of the primary antibodies immediately before incubation. Antibodies are diluted in PBS-gelatin-BSA-NGS buffer, previously filtered in a coarse filter paper. A list of tested antibodies and their dilutions is shown in Table 1. Carefully place slides in a black moisture chamber, and cover each slide with the antibody solution (Fig. 3d,e). Cover the chamber with a black lid.
-
14|
Block the sections with PBS-gelatin-BSA-NGS for 30 min. Discard the antibody solution; place the slides in a staining jar, as shown in Figure 2c, and add PBS-gelatin-BSA-NGS buffer.
-
15|
Incubate the sections with secondary antibody for 1 h. Prepare appropriate dilutions of the secondary antibodies (Nanogold) immediately before incubation. Antibodies are diluted in PBS-gelatin-BSA-NGS buffer, previously filtered in a coarse filter paper. Usually 1:100 dilution works well for our tested antibodies (Table 1). Carefully place the slides in a black moisture chamber and cover each slide with the antibody solution (Fig. 3d,e). Cover the chamber with a black lid.
-
16|
Wash the sections in PBS-gelatin-BSA buffer for 3 × 10 min. Discard the antibody solution; place the slides in a clean staining jar and add PBS-gelatin-BSA buffer.
-
17|
Wash the sections in PBS for 3 × 5 min. Discard the PBS-gelatin-BSA buffer and add PBS to the same jar containing the slides.
-
18|
Fix the sections in 2% (vol/vol) glutaraldehyde for 10 min. Move the slides to another clean staining jar and, inside a fume hood, add 2% glutaraldehyde.
Figure 3.

Pre-embedding immunonanogold electron microscopy procedures. (a,b) Frozen cells or tissue are cut on a cryostat (10 μm-thick sections) and mounted on glass slides. (c) Slides are immersed in a sequence of blocking solutions using a Coplin staining jar. (d,e) Sections are incubated with the primary antibody, and then they are washed and incubated with the secondary antibody. (f) After a silver enhancement step, sections are processed for conventional electron microscopy. (g,h) Resin embedding is performed by inverting labeled, resin-filled plastic capsules over the slide-attached cell sections. (i) The resulting blocks, detached from the slides, show embedded sections at their surfaces. (j–l) Thin sections, cut on an ultramicrotome, are mounted on grids, stained with lead citrate (Pb) and analyzed on a transmission electron microscope (TEM).
Silver enhancement of Nanogold particles ● TIMING ~1 h
▲ CRITICAL These steps should be performed at room temperature.
-
19|
Wash the slides in distilled water for 5 × 5 min. Discard the fixative in an appropriate waste container. Place the slides in another clean jar and add distilled water.
-
20|
In a darkroom, mix HQ Silver according to the manufacturer’s instructions (Fig. 3f). Place the slides in a clear incubation chamber and cover each slide with the freshly prepared silver solution for 10 min at ~20 °C. ▲ CRITICAL STEP Incubation time affects the growth of gold particles, and therefore time must be rigorously controlled with a timer after covering each slide.
? TROUBLESHOOTING
-
21|
Wash the slides in distilled water for 5 × 5 min by immersing them in a clean jar with distilled water.
-
22|
Replace distilled water with 5% (wt/vol) sodium thiosulfate for 3 min.
EM processing: postfixation, contrasting and resin embedding ● TIMING ~2 h plus 16 h polymerization
▲ CRITICAL All steps are done at room temperature and in a fume hood.
-
23|
Postfix the sections in osmium tetroxide for 10 min. Place the slides in an incubation chamber inside a fume hood. Cover the slides with the osmium solution and cover the chamber with a black lid or aluminum foil.
-
24|
Wash the slides quickly in distilled water.
-
25|
Stain en bloc with uranyl acetate for 5 min. Discard the osmium solution and cover slides with the uranyl acetate solution in the incubation chamber inside a fume hood. Cover with a black lid or aluminum foil.
-
26|
Dehydrate the samples sequentially in 50, 70 and 95% (vol/vol) ethanol for 5 min each, followed by 100% ethanol for 1 × 10 min. Dehydration is performed with the slides in a staining jar by replacing the alcohol series. The jar should be covered after immersing in 100% ethanol.
-
27|
Infiltrate in a mixture of propylene oxide and Eponate (working solution) at a 1:3 ratio for 15 min. This mixture should be prepared in a plastic tri-pour and covered before use. Infiltration is done by placing the slides in a clear incubation chamber and covering the sections with the resin mixture. Do not cover the incubation chamber with a lid.
-
28|
Before embedding, stand the slides up for ~5 min to drain off the excess of infiltration mixture. Use a marker pen to make a circle on the bottom of each section (slide bottom) to facilitate identification of the section area when inverting the capsules. Embed the samples by inverting Eponate-filled plastic capsules over the slide-attached cell sections (Fig. 3g,h).
▲ CRITICAL STEP Labels with the sample codes (written using a pencil or typed) should be inserted inside the capsules before filling them up with resin for appropriate identification. Put the labels on the bottom of the capsules.
-
29|
Polymerize the samples at 60 °C in an oven for 16 h.
? TROUBLESHOOTING
-
30|
Separate the Eponate blocks from the glass slides. Place the slides in a bucket containing a small amount of liquid nitrogen. Cover the bucket with a lid and wait for 1–2 min. Blocks will easily detach from the slides. If small pieces of glass remain on the block surface, immerse the block again in liquid nitrogen for some seconds. Remove the blocks from the plastic capsules by using a BEEM capsule press. Embedded sections will be at the block surface (Fig. 3i).
Thin sectioning of blocks and EM analysis ● TIMING ~1 h per sample
-
31|
Under a stereomicroscope, localize the area of interest on the block surface (Fig. 3i). Circle this area with a marker pen to facilitate localization, if necessary. By using a new razor blade that has been rinsed with alcohol and dried, trim the block face, to include the area of interest, forming a trapezoid shape ~0.5 mm wide and 0.7 mm high. Ensure that the top and bottom sides of the trimmed block are perfectly parallel, so that the sections will come off the knife in a ribbon.
-
32|
Place the trimmed block in the ultramicrotome (Fig. 3j). Mount the diamond knife (1.8 mm, 45°), fill the water trough with filtered double-distilled water and align the block left to right and top to bottom so that the block face is perfectly parallel to the edge of the knife. Collect ultrathin sections of ~80 nm (silver or gold color) on uncoated 200-mesh copper grids, being careful to avoid folding of the sections. To help pick up thin sections onto each grid, use ultramicrotomy aid tools such as a loop (MATERIALS). Alternatively, a clean eyelash attached to a wooden stick is helpful to guide the sections. Prepare 2–3 grids from each block. Place grids in a small plastic Petri dish with a Whatman filter paper placed underneath the grid (Fig. 3k). Write the block code on the paper (Fig. 3k). Cover it and allow it to dry.
? TROUBLESHOOTING
-
33|
Enhance contrast of ultrathin sections (staining) by setting up a Petri dish with dental wax and placing drops of lead citrate on it. Place the grids onto drops (sections side down) for ~3–5 min. Remove the grids individually and rinse thoroughly with double-distilled water (ten dips each). Place the grids on the filter inside the same plastic Petri dish (Fig. 3k). We write the code Pb on the filter paper to distinguish between stained and unstained grids (Fig. 3k). We recommend keeping one unstained grid as reserve. The grids are now ready to be analyzed by TEM (Fig. 3l), or they can be stored in a plastic grid box for subsequent analysis.
? TROUBLESHOOTING
■ PAUSE POINT Grids can be stored at room temperature for several months.
-
34|
Perform standard TEM imaging and analysis of ultrathin sections. Check the quality of the immunolabeling.
? TROUBLESHOOTING
? TROUBLESHOOTING
Troubleshooting advice can be found in Table 2 and Figure 4.
TABLE 2.
Troubleshooting table.
| Step | Problem | Possible reason and solution |
|---|---|---|
| 1 | Low number of cells in the pellets | Inadequate sample (cell suspension) collection. At least 3 million cells should be used for each pellet, but it is desirable to have more in case you lose cells or the pellet during processing. Make sure that the pellet can be visualized after fixation and before processing. Hypocellular suspensions may need pelleting, suspending and re-pelleting several times to make an appropriate pellet. Do not go ahead if you cannot see a good pellet. Re-collect sample with sufficient number of cells |
| 3 | Cells are spread in the agar pellet | Agar pellets were prepared too slowly or agar was not adequately heated. If cells are spread you will not be able to see them in adequate numbers on the electron microscope. Re-prepare another agar pellet and check if the pellet can be seen on the tube bottom (good pellet) and not spread in the tube wall (bad pellet) |
| 4 | Watery agar pellet (agar pellet dissolves when taken out from the tube) | Supernatant was not adequately taken out from the tube after centrifugation of the cell suspension (before adding liquid agar). Re-prepare another agar pellet |
| 6, 7 | Cells are poorly visible during cryostat microtomy | If the initial pellet was made with enough cells, this problem is probably due to inadequate freezing of the pellet (incorrect position). In our experience, pellets should be frozen intact and with the bottom area (in which the cells are more concentrated) upright. This will allow better visualization of the cells during cryostat microtomy and also will guarantee sufficient number of cells to be analyzed on the thin sections. It is preferable to have a small area containing high number of cells than a larger area with spread cells. In this case, you will see a low number of cells on the electron microscope. Re-prepare samples and freeze adequately |
| 20 | Excessive growing of gold particles and/or background staining (Fig. 4) | The time of incubation with silver enhancement components is not optimized and probably was too long. Room temperature is too high. Silver enhancement is time-dependent. The enhancement time is the time required to obtain an adequate amplification of the Nanogold particles. Reduce the incubation time and test different times to find which one works best for your antigen. Check the room temperature. At 16 °C the developer solution is stable (no self-nucleation occurs) for at least 20 min; at 20 °C, the solution is stable for at least 15 min, and at 24 °C for at least 10 min. After this time, background staining may be observed. We established 10 min at ~20 °C as an ideal time period for our immunolabeling experiments |
| 29 | Resin blocks are soft | Polymerization problems can occur owing to improper oven temperature setting, insufficient time of polymerization or oscillating oven temperature. It is very important to complete resin polymerization at a constant temperature of 60 °C. Extend the polymerization time for extra few hours at the same temperature. Other possible reasons include inadequate mixing of resin components or out-of-date accelerator. In these cases, sample processing should be repeated. Water condensation may also have contaminated the resin mixture. Keep the resin dry and do not open it until it reaches room temperature |
| 32 | Trouble in cutting high-quality ultrathin sections for TEM | Ultramicrotomy requires high level of expertise and many hours of practice. Several factors such as knife angle, cutting speed, block size and water meniscus level can interfere in the procedure. One solution is to enlist the assistance of an experienced ultramicrotomist |
| 33 | Precipitation of lead on the thin sections | Contaminated lead citrate solution or inadequate washing of the grids after staining. Re-prepare the lead citrate solution. Rinse grids adequately using double-distilled water |
| 34 | Poor labeling | Inadequate fixation or primary antibody concentration is not optimized. Start using just 4% (wt/vol) paraformaldehyde as a primary fixative. Test the primary antibody by using different concentrations. In our hands 1 h of incubation at room temperature is sufficient to label different antigens (Table 1) when the primary antibody concentration is adequate. Try a different antibody that has previously worked for immunocytochemistry studies |
| Excessive labeling | Primary antibody concentration is not optimized (too high concentration). Test the primary antibody by using different dilutions |
Figure 4.

Example of excessive growth of gold particles (arrowheads) and background formation observed in the cytoplasm of a human eosinophil leukocyte after labeling for perilipin 2 (PLIN2/ADRP) and incubation with silver enhancement components for 20 min, which was too long. Primary antibody was polyclonal guinea pig PLIN2/ADRP (reactivity human/mouse/rat/bovine) (Fitzgerald, cat. no. 20R-AP002). Secondary antibody was goat anti-guinea pig Fab fragment conjugated to 1.4-nm gold (1:100, Nanogold, Nanoprobes, cat. no. 2055). Cells were isolated from the blood of healthy donors, as described in Melo et al.23. Written informed consent was obtained from donors in accordance with the Declaration of Helsinki, and Institutional Review Board approval was obtained from the Beth Israel Deaconess Medical Center. N, nucleus; LB, lipid body. Scale bar, 1.0 μm.
● TIMING
Experiments are broken down into five phases, as shown in the flowchart in Figure 2.
Steps 1–6, sample preparation: ~15 h
Steps 7–18, immunolabeling: ~5 h
Steps 19–22, silver enhancement of Nanogold particles: ~1 h
Steps 23–30, EM processing: postfixation, contrasting and resin embedding: ~2 h plus 16 h polymerization
Steps 31–34, thin sectioning of blocks and EM analysis: ~1 h per sample
ANTICIPATED RESULTS
Figure 4 shows excessive growth of gold particles and Figures 5–7 illustrate typical results obtained using this protocol. As shown in Figures 5 and 6 and Table 1, human leukocytes can be labeled for different antigens, and gold labels are observed as electron-dense particles associated with subcellular sites. We have used pre-embedding immunogold EM to investigate protein localization at cell surface microdomains (Figs. 1 and 5b; ref. 24), as well as cytoplasmic distribution of varied proteins, such as CD63 (ref. 17; Fig. 5a), MBP17 (Fig. 6a) and PDI27 (Fig. 6b), within human leukocytes isolated from the peripheral blood. The technique also provided excellent immunolabeling for tissue antigens from experimental models (Fig. 7) and humans. As a control, cells incubated with an irrelevant primary antibody (Fig. 5c) or not incubated with primary or secondary antibodies (not shown) were imaged. Figures 1 and 5–7 also demonstrate that very good preservation and imaging of cell features, such as the nucleus, nuclear envelope, secretory granules, vesicles, lipid bodies, and endo-membranes and plasma membranes, can be expected using this protocol even in suboptimally fixed specimens. Analysis of labeling density in relation to these morphologically identifiable cell organelles and structures can be performed. Values are usually expressed as the number of gold particles per μm2 (organelle profiles) or per μm in case of membrane traces (reviewed in ref. 31). For example, quantitative analyses of gold nanoparticles using our methodology showed prominent accumulation of PDI on the nuclear envelope (Fig. 6b), with a mean level of labeling of 33.2 ± 9.5 gold particles/μm (mean ± s.e.m., n = 30 cell sections; ref. 27). Moreover, the quality of cell morphology obtained using this protocol is sufficiently adequate to uncover pathological and morphological changes. For example, Figure 5a illustrates the diagnostic appearance of a cell secretory process termed piecemeal degranulation, characterized by emptying of secretory granules in response to an inflammatory stimulus32. The immunolabeling of specific proteins combined with the observation of cell morphological changes such as piecemeal degranulation by TEM are important for understanding secretion mechanisms of immune mediators during cell responses to inflammatory and allergic diseases33.
Figure 5.
Examples of pre-embedding immunonanogold labeling of human leukocytes. (a,b) Electron micrographs of eosinophils isolated from the peripheral blood and labeled for CD63 (a) or CD9 (b). Note the dense labeling at secretory granules (a, white arrowheads) and cell surface (b, black arrowheads). In c, a representative cell in which the primary antibody was replaced by an irrelevant antibody shows negative labeling. Primary antibodies were monoclonal mouse anti-human CD63 (a) and monoclonal mouse anti-human CD9 (b), as described in Table 1. In c, the irrelevant antibody was an isotype IgG1 control (BD Pharmingen). Secondary antibody was goat anti-mouse Fab fragment conjugated to 1.4-nm gold particles (1:100, Nanogold, Nanoprobes, cat. no. 2002). Cells were isolated from the blood of healthy donors, as described in Melo et al.23. Written informed consent was obtained from donors in accordance with the Declaration of Helsinki, and Institutional Review Board approval was obtained from the Beth Israel Deaconess Medical Center. N, nucleus. Scale bar, 1.5 μm.
Figure 7.

Example of immunogold labeling of a mouse tissue (skin). Platelets with specific labeling at the surface of their α-granules (Gr) for nitric oxide synthase 3 (NOS3) are seen in the lumen of a blood vessel. Primary antibody was polyclonal rabbit anti-NOS3, as described in Table 1. Secondary antibody was goat anti-rabbit Fab fragment conjugated to 1.4-nm gold particles (1:100, Nanogold, Nanoprobes, cat. no. 2004). Experimental protocols were approved by the Institutional Animal Care and Use Committee of the Beth Israel Deaconess Medical Center. Scale bar, 500 nm.
Figure 6.

Human leukocyte subcellular sites immunolabeled for different antigens using pre-embedding immunoEM. (a) Large vesiculotubular compartments (arrowheads) are positive for major basic protein (MBP), whereas (b) the nuclear envelope (arrowheads) is clearly labeled for protein disulfide isomerase (PDI). Primary antibodies were monoclonal mouse anti-human MBP (a) and monoclonal mouse anti-human PDI (b), as described in Table 1. Secondary antibody was goat anti-rabbit Fab fragment conjugated to 1.4-nm gold particles (1:100, Nanogold, Nanoprobes, cat. no. 2002). Cells were isolated from the blood of healthy donors, as described23. Written informed consent was obtained from donors in accordance with the Declaration of Helsinki, and Institutional Review Board approval was obtained from the Beth Israel Deaconess Medical Center. N, nucleus. Scale bars, 300 nm (a) and 1.1 μm (b).
Acknowledgments
We gratefully acknowledge the skillful assistance of T. Sciutto and K. Pyne (Electron Microscopy Unit, Department of Pathology, Beth Israel Deaconess Medical Center, Harvard Medical School). We acknowledge K. Bonjour for careful assistance with the illustrations (Figs. 1 and 2) used in this paper. This work was supported by US National Institutes of Health (NIH) grants R37AI020241, R01AI022571 (P.F.W., A.M.D., E.M. and R.C.N.M.), Conselho Nacional de Desenvolvimento Científico e Tecnológico (CNPq, Brazil) grants 305983/2011-3, 477475/2013-2 (R.C.N.M.) and Fundação de Amparo a Pesquisa do Estado de Minas Gerais (FAPEMIG, Brazil; R.C.N.M.).
Footnotes
AUTHOR CONTRIBUTIONS R.C.N.M., A.M.D. and P.F.W. designed the experiments. R.C.N.M. carried out sample preparation, immunolabeling and electron microscopic processing and analyses. E.M. and R.M.-E. provided technical assistance. E.M. carried out ultramicrotomy. All authors wrote the paper.
COMPETING FINANCIALINTERESTS The authors declare no competing financial interests.
Reprints and permissions information is available online at http://www.nature.com/reprints/index.html.
References
- 1.Graham L, Orenstein JM. Processing tissue and cells for transmission electron microscopy in diagnostic pathology and research. Nat Protoc. 2007;2:2439–2450. doi: 10.1038/nprot.2007.304. [DOI] [PMC free article] [PubMed] [Google Scholar]
- 2.Koster AJ, Klumperman J. Electron microscopy in cell biology: integrating structure and function. Nat Rev Mol Cell Biol. 2003;(suppl):SS6–SS10. [PubMed] [Google Scholar]
- 3.Kay KR, et al. Studying synapses in human brain with array tomography and electron microscopy. Nat Protoc. 2013;8:1366–1380. doi: 10.1038/nprot.2013.078. [DOI] [PMC free article] [PubMed] [Google Scholar]
- 4.Margus H, Padari K, Pooga M. Insights into cell entry and intracellular trafficking of peptide and protein drugs provided by electron microscopy. Adv Drug Deliv Rev. 2013;65:1031–1038. doi: 10.1016/j.addr.2013.04.013. [DOI] [PubMed] [Google Scholar]
- 5.Dvorak A, Monahan-Earley R. Diagnostic Ultrastructural Pathology. Vol. 1. CRC Press; 1992. [Google Scholar]
- 6.Loussert C, Forestier CL, Humbel BM. Correlative light and electron microscopy in parasite research. Methods Cell Biol. 2012;111:59–73. doi: 10.1016/B978-0-12-416026-2.00004-2. [DOI] [PubMed] [Google Scholar]
- 7.Schikorski T. Pre-embedding immunogold localization of antigens in mammalian brain slices. Methods Mol Biol. 2010;657:133–144. doi: 10.1007/978-1-60761-783-9_10. [DOI] [PubMed] [Google Scholar]
- 8.Baschong W, Stierhof YD. Preparation, use, and enlargement of ultrasmall gold particles in immunoelectron microscopy. Microsc Res Tech. 1998;42:66–79. doi: 10.1002/(SICI)1097-0029(19980701)42:1<66::AID-JEMT8>3.0.CO;2-P. [DOI] [PubMed] [Google Scholar]
- 9.Roth J, Bendayan M, Orci L. Ultrastructural localization of intracellular antigens by the use of protein A-gold complex. J Histochem Cytochem. 1978;26:1074–1081. doi: 10.1177/26.12.366014. [DOI] [PubMed] [Google Scholar]
- 10.Feng D, et al. Ultrastructural localization of the vascular permeability factor/vascular endothelial growth factor (VPF/VEGF) receptor-2 (FLK-1, KDR) in normal mouse kidney and in the hyperpermeable vessels induced by VPF/VEGF-expressing tumors and adenoviral vectors. J Histochem Cytochem. 2000;48:545–556. doi: 10.1177/002215540004800412. [DOI] [PubMed] [Google Scholar]
- 11.Yamaguchi H, et al. An initial step of GAS-containing autophagosome-like vacuoles formation requires Rab7. PLoS Pathog. 2009;5:e1000670. doi: 10.1371/journal.ppat.1000670. [DOI] [PMC free article] [PubMed] [Google Scholar]
- 12.Yamazaki H, et al. Relation between ultrastructural localization, changes in caveolin-1, and capillarization of liver sinusoidal endothelial cells in human hepatitis C-related cirrhotic liver. J Histochem Cytochem. 2013;61:169–176. doi: 10.1369/0022155412468590. [DOI] [PMC free article] [PubMed] [Google Scholar]
- 13.Yamamoto A, Masaki R. Pre-embedding Nanogold silver and gold intensification. Methods Mol Biol. 2010;657:225–235. doi: 10.1007/978-1-60761-783-9_18. [DOI] [PubMed] [Google Scholar]
- 14.Dvorak AM, Morgan ES, Tzizik DM, Weller PF. Prostaglandin endoperoxide synthase (cyclooxygenase): ultrastructural localization to nonmembrane-bound cytoplasmic lipid bodies in human eosinophils and 3T3 fibroblasts. Int Arch Allergy Immunol. 1994;105:245–250. doi: 10.1159/000236764. [DOI] [PubMed] [Google Scholar]
- 15.Bozza PT, Yu W, Cassara J, Weller PF. Pathways for eosinophil lipid body induction: differing signal transduction in cells from normal and hypereosinophilic subjects. J Leukoc Biol. 1998;64:563–569. doi: 10.1002/jlb.64.4.563. [DOI] [PubMed] [Google Scholar]
- 16.Hagiwara H, Aoki T, Suzuki T, Takata K. Pre-embedding immunoelectron microscopy of chemically fixed mammalian tissue culture cells. Methods Mol Biol. 2010;657:145–154. doi: 10.1007/978-1-60761-783-9_11. [DOI] [PubMed] [Google Scholar]
- 17.Melo RCN, et al. Vesicle-mediated secretion of human eosinophil granule-derived major basic protein. Lab Invest. 2009;89:769–781. doi: 10.1038/labinvest.2009.40. [DOI] [PMC free article] [PubMed] [Google Scholar]
- 18.Hainfeld JF, Furuya FR. A 1.4-nm gold cluster covalently attached to antibodies improves immunolabeling. J Histochem Cytochem. 1992;40:177–184. doi: 10.1177/40.2.1552162. [DOI] [PubMed] [Google Scholar]
- 19.Rosenberg HF, Dyer KD, Foster PS. Eosinophils: changing perspectives in health and disease. Nat Rev Immunol. 2013;13:9–22. doi: 10.1038/nri3341. [DOI] [PMC free article] [PubMed] [Google Scholar]
- 20.Melo RCN, et al. Human eosinophils secrete preformed, granule-stored interleukin-4 through distinct vesicular compartments. Traffic. 2005;6:1047–1057. doi: 10.1111/j.1600-0854.2005.00344.x. [DOI] [PMC free article] [PubMed] [Google Scholar]
- 21.Spencer LA, et al. Cytokine receptor-mediated trafficking of preformed IL-4 in eosinophils identifies an innate immune mechanism of cytokine secretion. Proc Natl Acad Sci USA. 2006;103:3333–3338. doi: 10.1073/pnas.0508946103. [DOI] [PMC free article] [PubMed] [Google Scholar]
- 22.Radke AL, et al. Mature human eosinophils express functional Notch ligands mediating eosinophil autocrine regulation. Blood. 2009;113:3092–3101. doi: 10.1182/blood-2008-05-155937. [DOI] [PMC free article] [PubMed] [Google Scholar]
- 23.Melo RCN, Perez SA, Spencer LA, Dvorak AM, Weller PF. Intragranular vesiculotubular compartments are involved in piecemeal degranulation by activated human eosinophils. Traffic. 2005;6:866–879. doi: 10.1111/j.1600-0854.2005.00322.x. [DOI] [PMC free article] [PubMed] [Google Scholar]
- 24.Akuthota P, Melo RCN, Spencer LA, Weller PF. MHC class II and CD9 in human eosinophils localize to detergent-resistant membrane microdomains. Am J Respir Cell Mol Biol. 2012;46:188–195. doi: 10.1165/rcmb.2010-0335OC. [DOI] [PMC free article] [PubMed] [Google Scholar]
- 25.Melo RCN, Dvorak AM, Weller PF. Electron tomography and immunonanogold electron microscopy for investigating intracellular trafficking and secretion in human eosinophils. J Cell Mol Med. 2008;12:1416–1419. doi: 10.1111/j.1582-4934.2008.00346.x. [DOI] [PMC free article] [PubMed] [Google Scholar]
- 26.Melo RCN, Spencer LA, Dvorak AM, Weller PF. Mechanisms of eosinophil secretion: large vesiculotubular carriers mediate transport and release of granule-derived cytokines and other proteins. J Leukoc Biol. 2008;83:229–236. doi: 10.1189/jlb.0707503. [DOI] [PMC free article] [PubMed] [Google Scholar]
- 27.Dias FF, et al. Human eosinophil leukocytes express protein disulfide isomerase in secretory granules and vesicles: ultrastructural studies. J Histochem Cytochem. 2014;62:450–459. doi: 10.1369/0022155414531437. [DOI] [PMC free article] [PubMed] [Google Scholar]
- 28.Bozzola JJ, Russell LD. Electron Microscopy, Principles and Techniques for Biologists. Jones & Bartlett Publishers; 1992. [Google Scholar]
- 29.Sawada H, Esaki M. A practical technique to postfix Nanogold-immunolabeled specimens with osmium and to embed them in Epon for electron microscopy. J Histochem Cytochem. 2000;48:493–498. doi: 10.1177/002215540004800407. [DOI] [PubMed] [Google Scholar]
- 30.Yoshimori T, et al. The mouse SKD1, a homologue of yeast Vps4p, is required for normal endosomal trafficking and morphology in mammalian cells. Mol Biol Cell. 2000;11:747–763. doi: 10.1091/mbc.11.2.747. [DOI] [PMC free article] [PubMed] [Google Scholar]
- 31.Mayhew TM, Lucocq JM. Multiple-labelling immunoEM using different sizes of colloidal gold: alternative approaches to test for differential distribution and colocalization in subcellular structures. Histochem Cell Biol. 2011;135:317–326. doi: 10.1007/s00418-011-0788-0. [DOI] [PubMed] [Google Scholar]
- 32.Melo RCN, Weller PF. Piecemeal degranulation in human eosinophils: a distinct secretion mechanism underlying inflammatory responses. Histol Histopathol. 2010;25:1341–1354. doi: 10.14670/hh-25.1341. [DOI] [PMC free article] [PubMed] [Google Scholar]
- 33.Melo RCN, Dvorak AM, Weller PF. Contributions of electron microscopy to understand secretion of immune mediators by human eosinophils. Microsc Microanal. 2010;16:653–660. doi: 10.1017/S1431927610093864. [DOI] [PMC free article] [PubMed] [Google Scholar]
- 34.D’Avila H, et al. Neutrophils recruited to the site of Mycobacterium bovis BCG infection undergo apoptosis and modulate lipid body biogenesis and prostaglandin E production by macrophages. Cell Microbiol. 2008;10:2589–2604. doi: 10.1111/j.1462-5822.2008.01233.x. [DOI] [PubMed] [Google Scholar]