Abstract
High silicon (Si) electrical steel has the potential for efficient use in applications such as electrical motors and generators with cost-effective in processing, but it is difficult to manufacture. Increasing the Si content beyond 3 wt.% improves magnetic and electrical properties, with 6.5 wt.% being achievable. The main goal of this research is to design, develop, and implement a scalable additive manufacturing process to fabricate Fe with 6.5 wt.% Si (Fe–6Si) steel with high magnetic permeability, high electrical resistivity, low coercivity, and low residual induction that other methods cannot achieve because of manufacturing limitations. Binder jet additive manufacturing was used to deposit near net shape components that were subsequently sintered via solid-state sintering to achieve near full densification. Here, it is shown that the use of solid-state sintering mitigates cracking since no rapid solidification occurs unlike fusion-based additive technologies. The Fe–6Si samples demonstrated an ultimate tensile strength of 434 MPa, electrical resistivity of 98 μΩ cm, and saturation magnetization of 1.83 T with low coercivity and high permeability. The results strongly supports to replace the only available 0.1 mm thick chemical vapor deposition (CVD) produced Si steel using the cost effective AM method with good mechanical and magnetic properties for motor applications.
Keywords: Electromagnetism, Soft magnetic alloy, Fe–6Si, Binder jet additive manufacturing, DC and AC magnetic properties, Stators
Electromagnetism, Soft magnetic alloy, Fe–6Si, Binder jet additive manufacturing, DC and AC magnetic properties, Stators
1. Introduction
Soft magnetic silicon (Si) steel with 3 wt.% Si is widely used in electrical applications such as transformers, magnetic shielding, motor stators, and generators where high magnetic permeability and low loss Fe-based materials are required [1, 2]. This is because grain-oriented, hot rolled, and secondary recrystallized 3.0 wt.% Si steel with Goss texture {110} has the magnetic properties for soft-magnetic core material for transformers and alternating current (AC) power applications [3, 4, 5]. However, higher amounts of silicon in steel increase the electrical resistance of the material and further improve the magnetic properties, and the Goss texture is difficult to achieve. For example, with 6.5 wt.% Si, the magnetostriction becomes zero and low eddy current losses are achieved [2, 6]. Unfortunately, as the Si content increases (≥4%) the material becomes too brittle to be roll processed or stamped without cracking during the production of thin sheets from the lack of ductility attributed to structural ordering of superstructures B2 and D03 types [6, 7, 8]. The brittleness can be overcome by rapid quenching from the melt, which suppresses the formation of the B2 and D03 type ordered structures in Fe-6.5 wt.% Si (Fe–6Si) alloy. However, the ribbons formed by the rapid quenching process are about 20–60 μm thick and due to the limited size of the ribbon, rapid quenching has not succeeded in industry [9]. Increasing the Si content and processing to the desired properties is still a challenge with Fe–Si materials.
Typical Fe–Si soft magnetic alloy systems of Fe with 3 wt.% Si can be hot and cold rolled as well as stamped and textured with annealing, but these processing methods require many heat treatments to achieve the required magnetic properties and cannot be used with increased Si content because of the material's brittleness [10, 11, 12, 13]. Hence, the need to increase the Si content further with other methods. Several methods have been developed in order to obtain a high Si content. Vertical type twin roll strip casting achieved 4.5 wt.% Si with Goss texture and no cracking [14], but the properties were not tested. Steel with high Si content and 0.1 mm-thick was produced using the chemical vapor deposition (CVD) resulted in low core losses, but CVD [15] process is expensive and produced material with limited success for dynamic and rotating applications due to poor ductility [16]. Special thermomechanical processing [17] and hot dipping followed by diffusion annealing [18] have also been done, but these techniques are also not cost-effective. These fabrication paths retained higher Si contents but still had obstacles in achieving the desired properties, so new manufacturing methods are needed to prepare compositions of higher Si contents, keep costs low, and explore properties.
Some lower cost methods of manufacturing Fe–Si do not yield grain orientation or Goss texturing, but non-oriented Si steel can be post-annealed to achieve texture and large grains [16], which help improve magnetic properties. Since Goss texturing normally nucleates from shear bands from deformation, it is difficult to achieve in most Si steel processing methods. Also, grain-oriented Si steel is typically achieved in the rolling process or during rapid quenching of the melt. Even in these processes, it is difficult to get grain orientation and texture, but the properties are still comparable or even tailorable when the grain size is large. It was shown that a grain diameter of 100–150 μm is optimal for total core loss with 3 wt.% Si [19]. Also, it was shown that additional Si content lowers Fe loss and affects the grain size, but non-oriented grains have less rotational loss at 50 Hz compared to grain-oriented ones [20]. Even rapidly quenched Fe–6Si had to be annealed for a long duration to achieve large grains and any texturing [21, 22]. When processing high Si steel, the consolidation technique must be considered, and it is better to use methods where the thermal and mechanical stresses are lower to increase the Si concentration.
In terms of shaping Fe–Si without rolling, modern additive manufacturing (AM) techniques can help achieve net shaping, but the microstructure, cracking, and Si contents have needed more development [23]. Fe with 6.9 wt.% Si was processed with selective laser melting, and the parts experienced some cracking, but by increasing the laser energy input, a crystallographic fiber-texture can be altered into a cube-texture, which is not as beneficial as Goss texture [23]. Further, it has been demonstrated that annealing these types of laser-processed parts results in equiaxed grains of roughly 300 μm with texture retained and the magnetic properties were comparable to other methods of fabricating high Si steel with maximum relative permeability of 24,000 and coercivity of 16 A/m [24]. Metal injection molding and subsequent debinding and sintering of Fe with 3.8 wt.% Si was demonstrated and achieved large equiaxed grains; unfortunately, no magnetic properties were reported [25]. Permanent magnets such as NdFeB have been successfully fabricated using big area additive manufacturing (BAAM) and binder jet additive manufacturing (BJAM) using polymer binders [26, 27, 28, 29, 30], however, these techniques produce parts of up to 70 vol.% magnetic material, which is not high enough density to meet certain performance requirements. Overall, the processing of printed magnetic material through modern manufacturing methods is of interest for many applications, however more work is needed to improve density and evolve the microstructure.
Since the fabrication of high Si content though melting and vapor techniques in net shape is difficult and expensive, solid-state sintering is a good approach to achieve fully dense parts. However, since these materials are harder to shape conventionally, an AM technique relying on solid-state sintering should be appropriate because the powder with the appropriate properties can be printed and sintered to full density without melting, rolling, or using a vapor phase. One such technique is BJAM, which can help make near-net shape parts, thereby mitigating process steps like stamping that result in cracking. Thus, in this study, BJAM was explored. In BJAM, a print-head passes over a bed of metal powders and deposits a polymer binder followed by a simple curing to bind the particles together. The bound powder is then coated with several layers of powder to form the desired near net shape parts. The green parts are then cured and either sintered or infiltrated.
Since Fe–Si steels are brittle above about 3.5 wt.% Si, conventional cold rolling is not possible with higher Si contents. In the present work, Fe-6.5 Si soft magnetic material was printed using BJAM. Parts were cured, followed by debinding, and solid state sintered to high densities without cracking. The parts had excellent magnetic (both direct current (DC) and AC core loss properties) and mechanical properties. The microstructure was revealed with scanning electron microscopy (SEM) and electron backscatter diffraction (EBSD) showing grain size, orientation, and texture of solid-state sintered samples. This material represents the first demonstration of additively printed Fe–6Si components without cracking. The soft magnetic properties of BJAM processed 6.5% silicon steel parts with outstanding soft magnetic properties (high magnetic induction, high permeability, and low coercivity) has a huge potential in the power electronics industry.
2. Materials and methods
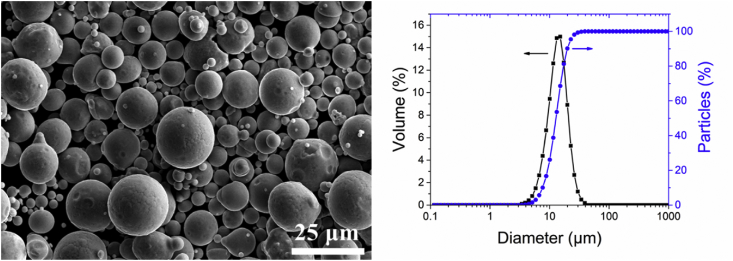
Fe–6Si powders were procured from Carpenter (PSD067, d90 < 22 μm). SEM images and particle size statistics are shown in Fig. 1. Particle analysis using laser scattering of dry powders was performed with a Horiba LA-950 particle analyzer with a volume distribution and particle percentage. The powder is spherical and has a size distribution between 6–30 μm with a d50 of 13.2 μm. This powder is ideal for BJAM because the spherical powders are easier to spread on the powder bed and, furthermore, can have higher packing than irregular shaped powder particles.
Fig. 1.
SEM image of Fe–6Si powder particles (left) and the Horiba volume distribution and particle percentage data (right).
Fig. 2 shows the schematic diagram of the processing steps for fabricating the specimens used in the current work. The first step usually involves making a computer aided design (CAD) model of the component to be printed. The CAD model is oversized to account for the shrinkage associated with densification during solid state sintering. Using the CAD file, the green part is printed on the machine and is subjected to debinding and sintering to generate the final sintered part. Before printing, the alloy powders are dried in an oven at 100 °C in air for an hour and immediately transferred to the printer. The printing of the Fe–6Si was done using an ExOne Lab BJAM machine. The feed powder to layer ratio was 2.5:1, meaning that more powder is deposited and then smoothed by the roller to get good compaction. Each printed layer was 80 μm thick, the powder spread velocity was 1 mm/s, and binder saturation (amount of binder relative to powder) and powder packing (density of the powder in the bed) were 120% and 45%, respectively. The binder used was ExOne's proprietary commercial binder (ProMetal R-1). After printing, the parts were cured at 200 °C for 1 h in air. After curing, the parts were debound by ramping up at 5 °C/min to 630 °C, held at 630 °C for 1 h, ramped to 900 °C at 10 °C/min, and held at 900 °C for 1 h while flowing Ar gas continuously at 300 cubic centimeters per min. After debinding, the parts were solid-state sintered in a W-based vacuum furnace at 1300 °C for 2 h under 10−5 Torr vacuum. Most of the characterizations were done on sintered samples. Samples were annealed at two different temperatures, 750 °C for 2 h and 800 °C for 2 h, in flowing pure H2 gas after sintering to investigate texturing and grain growth and to determine the effect on core loss properties.
Fig. 2.
Schematic of processing steps where the CAD (left) is realized, parts are printed, green parts are cured and de-powdered (center), and the green part is sintered to fully dense Fe–6Si part (right).
The sintered specimen microstructures were analyzed with SEM using a Hitachi S4800 microscope in backscatter electron imaging mode. Geometric, Archimedes, and areal densities were measured when appropriate. Geometric and Archimedes densities were measured by measuring the part dimensions, dry mass, and submerged mass. Areal density was measured using ImageJ on SEM cross-sections [31]. Shrinkage was measured with dimensions before and after sintering. Optical images were taken using a Leica DM5000 M LED system. Phase composition was determined by X-ray diffraction (XRD) with continuous θ-2θ scans performed on the PANalytical Empyrean diffractometer from nominally 5–90° 2θ with Cu Kα radiation and matched with HighScore Plus software database. EBSD was carried out on a Joel 6500 Microscope equipped with an EDAX Hikari detector. Data was collected using EDAX OIM data collection software and analyzed using EDAX OIM Data Analysis software package. Carbon content was analyzed using a combustion process from Galbraith Laboratories, Inc. using ASTM D513 (B) modified standard, which determines total or dissolved carbon present as carbon dioxide, carbonic acid, bicarbonate ion, and carbonate ion in water within the specimen [32]. Magnetic properties of printed and sintered samples were measured using a Quantum Design magnetic property measurement system. In addition, the DC and AC core loss properties of both sintered and annealed ring sample geometries were measured using the DC Hysteresisgraph Remagraph model 500C and AMH-20K–S AC/DC Hysteresisgraph, respectively. Both the AC and DC measurements were performed based on the ASTM standards A773/A773M and A927/A927 M [33, 34]. Mechanical properties were measured with sheet specimen-three tensile specimens with an Instron 4465 using ASTM E8/E8M-16a [35]. Vickers hardness measurements were performed using a LECO LM 110 A T apparatus under a 0.3 kgf load.
3. Results and discussion
BJAM successfully yielded Fe–6Si green parts with 58% bulk density as presented in Table 1 and with net shaping as shown in Fig. 2. Sintering the green parts produced highly dense parts with diametral linear shrinkage near 20% as shown in Table 1. Final parts were fully sintered and had no cracks as shown in Fig. 2. The same process was used for fabricating test specimens for magnetic and mechanical properties but in their respective geometries. The carbon content of the powder was measured and is reported in Table 1 and there was a small increase (0.25 wt.%) in carbon content after sintering, which results from the binder used for printing.
Table 1.
Properties of printed and sintered Fe–6Si including density, shrinkage, grain size, hardness, and carbon content.
| Property | Result |
|---|---|
| Theoretical Density of Fe-6.5%Si (g/cm3) | 7.48 |
| Green Density (g/cm3, %TD) | 4.2, 58 (geometric only) |
| Final Density (g/cm3, %TD) | 7.31, 99 (Archimedes only) |
| Shrinkage (linear %) | 20 |
| Grain size from EBSD after sintering (μm) | 56.3 ± 32.8 |
| Grain size after sintering and annealing in H2 (μm) | 61.1 ± 35.9 |
| Hardness (GPa) | 3.92 ± 0.12 |
| Carbon content of powder (wt.%) | 0.010 |
| Carbon content after sintering (wt.%) | 0.247 |
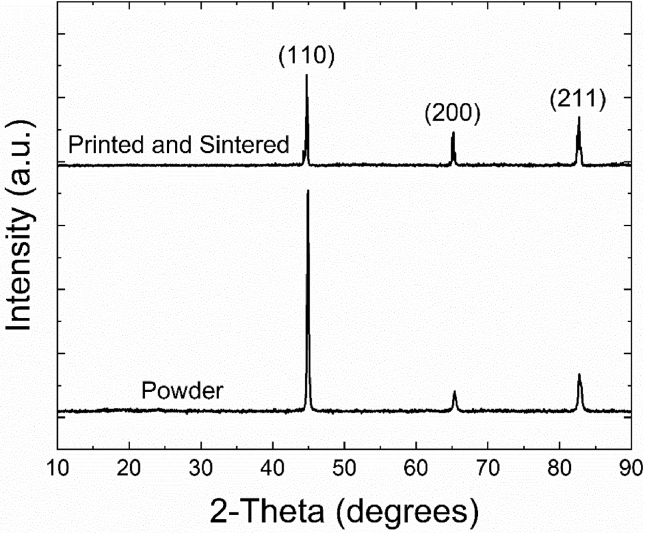
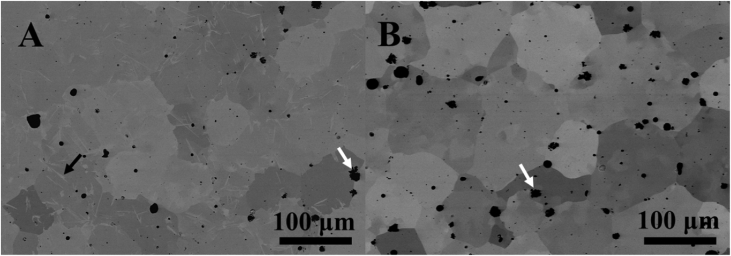
Fig. 3 shows the XRD patterns of the as-received powder and printed parts that have gone through the processing steps outlined in Fig. 2. The cubic phase was observed in both starting powders and the final sintered part. No major change in the peak intensity for the printed samples suggest no major changes observed during processing. The peaks of printed and sintered samples are sharper compared to the powder, which is attributed to an increase in grain size or strain effect. In this case, residual stresses were most likely relieved during post-annealing. Even though the XRD patterns do not show the presence of B2 and D03 phases, these phases may be present below the detection limit of X-ray diffraction equipment. Fig. 4 shows the SEM images of the microstructure of sintered and heat-treated Fe–6Si specimens. Fig. 4a is after sintering only and Fig. 4b is after sintering followed by annealing. The material had some needle-like structures in the grains of the microstructure after sintering, as pointed out by the black arrow in Fig. 4a, which are possibly Fe2Si, ferrite, or SiC.
Fig. 3.
XRD patterns of powder and final part taken through the process steps outlined in Fig. 2.
Fig. 4.
SEM images in backscatter mode of (A) final part sintered to near full density and (B) the same material annealed in H2.
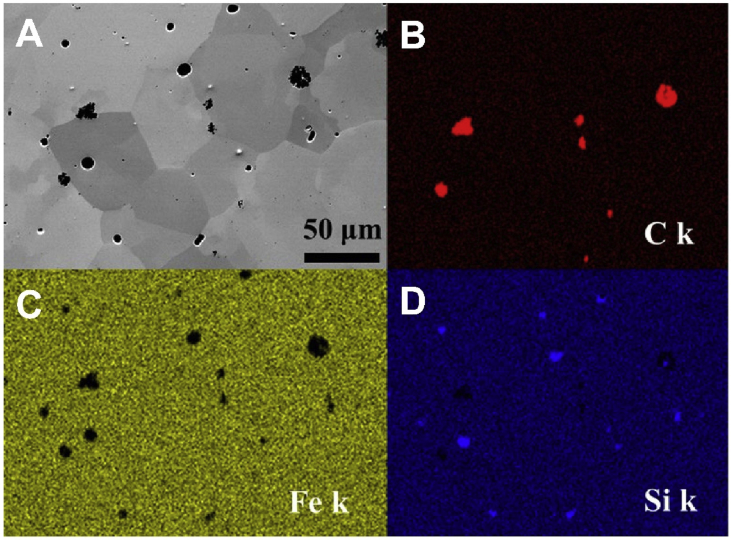
The needle-like structures were absent after annealing in H2. There was some porosity present within grains and at grain boundaries as indicated by the circular, smaller black hue in both samples. Some of the more irregular black spots are most likely carbide phase as pointed out by the white arrows. Fig. 5 (A) shows the SEM image of the H2 annealed sample. Fig. 5 (B)–(D) present the Energy-dispersive X-ray Spectroscopy (EDS) mapping images of C, Fe, and Si. The presence of C was confirmed in Fig. 5 (B). The formation of carbide phase is most likely from carbon residue that is left behind from the polymer binder after pyrolysis or burnout.
Fig. 5.
(A) SEM image of the H2 annealed sample at 800 °C for 2 h (B)–(D) EDS elemental mapping images of C, Fe, and Si, respectively.
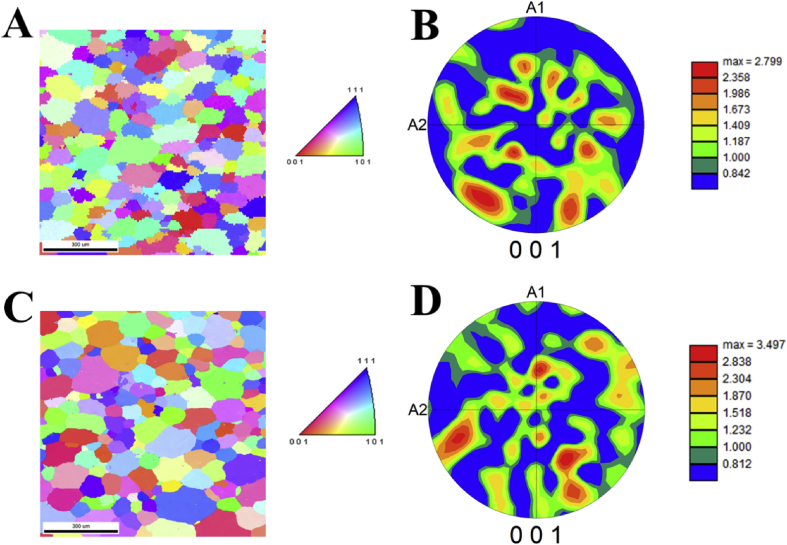
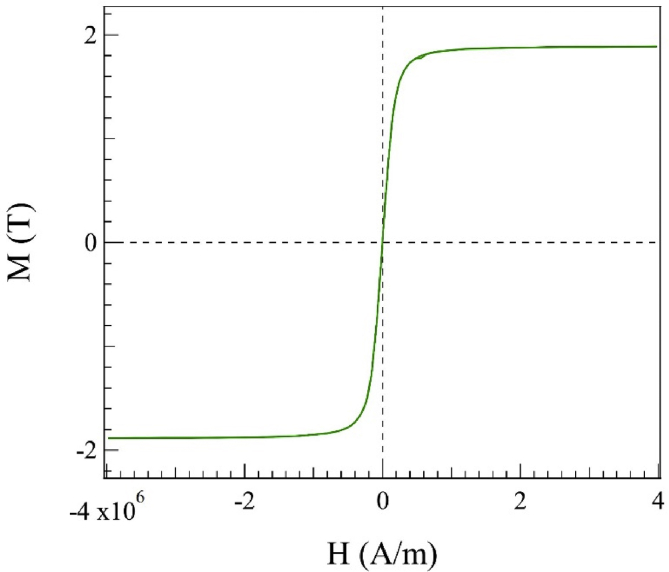
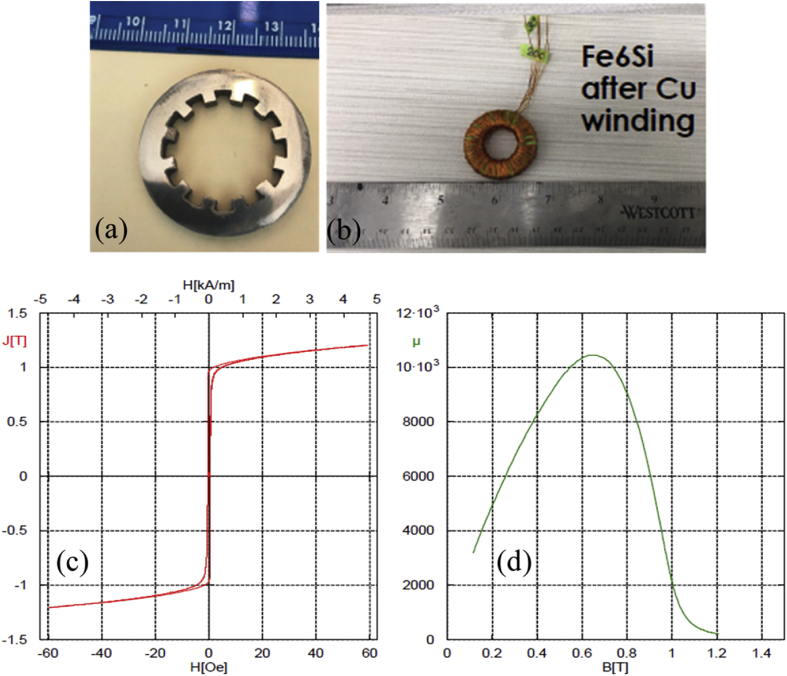
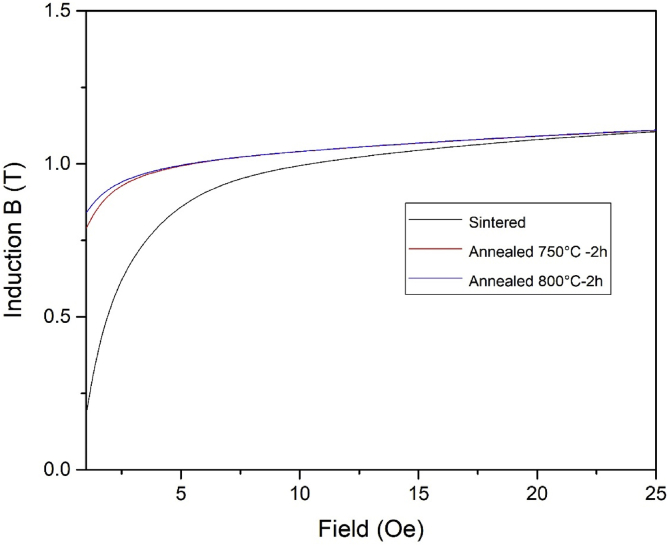
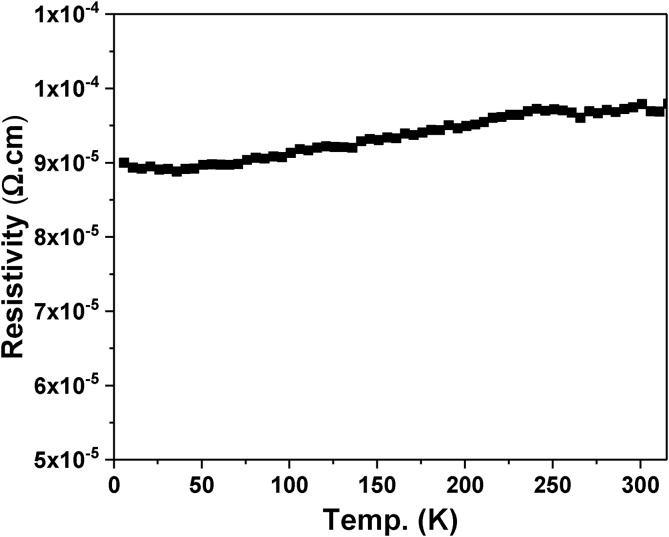
Fig. 6 shows EBSD data on Fe–6Si samples that were sintered and sintered plus annealed in H2 gas atmosphere at 800 °C for 30 min. Grain sizes and orientations were mapped with inverse pole figures (IPF) as in Fig. 6a and c and pole figure texture plots in Fig. 6b and d. The average grain size was 56.3 ± 32.8 μm for the sintered sample and 61.1 ± 35.9 μm for the sample sintered and annealed in H2 gas as reported in Table 1. The average grain size increased by roughly 10% during annealing. The IPF and texture plot both show a lack of specific texture components commonly associated with cubic materials. The maximum texture intensity is roughly 2.80 × random in the sintered sample and roughly 3.5 × random in the sintered plus annealed sample. Fig. 7 shows the saturation magnetization (Ms) value of the sintered Fe–6Si sample measured at 20 °C using a SQUID magnetometer. The saturation induction is about 1.83 T, which is equivalent to the bulk sample produced by CVD [16]. The coercivity of the Fe6Si sample is about 0.5 Oe which shows its highly soft magnetic characteristics. Fig. 8a shows the Fe–6Si ring specimens made with BJAM followed by sintering and annealing in H2 at 800 °C. The stator teeth sample was wound with a multistrand Litz wire to measure the DC and AC magnetic property measurements as shown in Fig. 8b. The hysteresis loop measured at a field of up to 60 Oe and the corresponding maximum permeability is shown in Figs. 8c and 8d, respectively. The hysteresis curve shows the square loop behavior with a low coercivity of 0.4 Oe and the maximum permeability of about 10,700. The permeability can be tuned further either by increasing the grain size or reducing the thickness of the stator ring. The printed stator rings can be sliced further into thinner parts, or thinner parts can be printed. The print thickness of 0.1016 mm which is equivalent to the CVD produced commercially available electrical steel was not tested here. Fig. 9 shows the initial magnetization curve of the as-sintered and H2 annealed samples. After annealing, the remanence was increased at a very low applied field, which enhanced the squareness of the hysteresis loop, a required parameter for many power electronic applications. Fig. 10 shows the electrical resistivity of the H2 annealed sample measured up to 300 K using a four-probe method. The electrical resistivity was about 98 μΩ cm, which is slightly higher than the value of the CVD produced 6.5% Si steel (82 μΩ.cm) [16]. The presence of a small percentage of carbon and porosity may have enhanced the electrical resistivity of the sample as evidenced in Figs. 4 and 5 (see Fig. 10).
Fig. 6.
(A) Inverse pole figure and (B) associated pole figure of the sintered Fe–6Si sample showing lack of texture (C) Inverse pole figure and (D) associated pole figure of the sintered plus annealed in H2 gas sample showing lack of texture and higher texture factor compared to the sample that is only sintered.
Fig. 7.
Hysteresis loop of the sintered BJAM Fe–6Si alloy measured at room temperature.
Fig. 8.
(a) Fe–6Si ring specimens made with BJAM followed by sintering and annealing in H2. (b) Sample wound with a multistrand Litz wire for the DC and AC magnetic property measurements. (c) and (d) represent the full hysteresis square loop measured at low field and its corresponding maximum permeability.
Fig. 9.
Initial magnetization curve of the as-sintered and annealed BJAM Fe–6Si sample.
Fig. 10.
Electrical resistivity of the BJAM sintered Fe–6Si sample.
Table 2 shows data of the AC core loss measured at 60 Hz as a function of applied magnetic field for three different sample conditions: as sintered, annealed in H2 at 750 °C for 2 h, and annealed in H2 at 800 °C for 2 h. For each applied field, it is shown that annealing is progressively better for the core loss as each case has lower core loss. Table 3 shows AC core loss data as a function of frequency and applied field for three different sample conditions: as sintered, annealed in H2 at 750 °C for 2 h, and annealed in H2 at 800 °C for 2 h. At 10 kHz and 20 kHz, the core loss of the annealed samples was significantly reduced compared with the as-sintered sample. This may be due to the increase of density, reduction of porosity, reduction of impurity phases, and grain growth. There is either no or small improvement by increasing the annealing temperature by 50°. Note that the core loss depends on the thickness of the sample and, hence, one can reduce the core loss further by making a thin stator using the binder jet method and the work is in progress.
Table 2.
Fe–6Si AC core loss in Watts/kg. measured at a fixed frequency of 60 Hz at various applied fields. The dimensions of the stator ring: OD = 33.32 mm, ID = 21.77 mm and thickness = 1.02 mm”. Density = 7.31 g/cm3.
| Bm (T) | Corr loss of as-printed and sintered | Corr loss of sintered and further post-annealed in H2 at 750 °C, 2 h | Corr loss of sintered and further post-annealed in H2 at 800 °C, 2 h |
|---|---|---|---|
| 0.5 | 2.77 | 1.96 | 1.87 |
| 1 | 14.99 | 14.23 | 13.99 |
| 1.5 | 39.37 | 41.64 | 41.34 |
Table 3.
Fe–6Si core loss in Watts/kg. measured at different frequencies and applied fields (Tesla). The dimensions of the stator ring: OD = 33.32 mm, ID = 21.77 mm and thickness = 1.02 mm. Density = 7.31 g/cm3.
| Frequency (Hz) | B (T) | Sintered | Sintered and annealed in H2 at 750 °C, 2 h | Sintered and annealed in H2 at 800 °C, 2 h |
|---|---|---|---|---|
| 60 | 0.5 | 2.77 | 1.96 | 1.87 |
| 400 | 0.5 | 67.06 | 63.49 | 62.85 |
| 1000 | 0.5 | 362 | 371 | 372 |
| 10000 | 0.1 | 293.63 | 261 | 259.5 |
| 20000 | 0.05 | 177.51 | 146.03 | 144.4 |
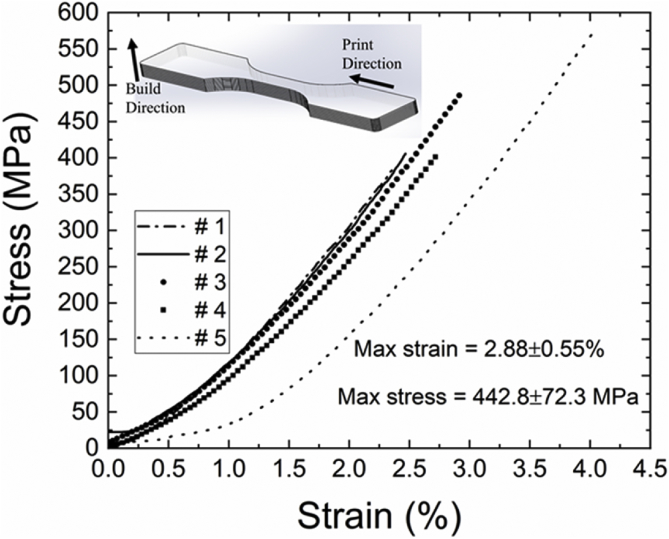
Fig. 11 shows the data from mechanical testing of tensile specimens. The slip mechanisms proposed for B2 and D03 lattices deteriorate the mechanical properties [36], so it is important to test the mechanical properties and compare to the current material. The maximum strain is 2.9 ± 0.5% and the maximum stress is 434 ± 68 MPa. This stress is most likely the ultimate tensile stress because there appears to be a lack of a linear region where a yield stress could be extracted. Compared to Fe–Si with similar Si content and annealing, the current data has similar strength but lower strain [16]. This is likely because the material is inherently more brittle or there are sizing effects with the geometry tested.
Fig. 11.
RT tensile curves of 0.5 mm thick tensile specimens of sintered Fe–6Si samples.
4. Conclusion
This study demonstrates a novel method to fabricate near net shape, fully dense soft magnetic Fe–6Si stators through binder jet additive manufacturing followed by solid state sintering to mitigate cracking. Nearly 99% dense parts with no cracks, an ultimate tensile strength of 434 MPa, and electrical resistivity of 98 μΩ cm, saturation magnetization of 1.83 T, a low coercivity of 0.4 Oe, a maximum relative permeability of 10.500 for 1.02 mm thick samples were achieved. The printed Fe–6Si parts have several advantages such as reduction in core loss at low, medium, and high frequencies, high resistivity and good magnetic permeability. The reported method shows great promise for fabricating all 3D printed motors with improved efficiencies.
Declarations
Author contribution statement
Corson L. Cramer, Chins Chinnasamy: Performed the experiments; Analyzed and interpreted the data; Contributed reagents, materials, analysis tools or data; Wrote the paper.
Peeyush Nandwana: Conceived and designed the experiments; Performed the experiments; Analyzed and interpreted the data; Contributed reagents, materials, analysis tools or data.
Jiaqiang Yan, Samuel F. Evans: Analyzed and interpreted the data.
Amy M. Elliott: Conceived and designed the experiments; Wrote the paper.
M. Parans Paranthaman: Conceived and designed the experiments; Analyzed and interpreted the data; Contributed reagents, materials, analysis tools or data; Wrote the paper.
Funding statement
This work was supported by U.S. DOE, EERE, AMO.
Competing interest statement
The authors declare no conflict of interest.
Additional information
No additional information is available for this paper.
Acknowledgements
The research on the printing at the Manufacturing Demonstration Facility (MDF) facility was supported by the U.S. Department of Energy, Office of Energy Efficiency and Renewable Energy, Advanced Manufacturing Office. Magnetic property measurement research was supported in part by the Critical Materials Institute, an Energy Innovation Hub funded by the U.S. Department of Energy, Office of Energy Efficiency and Renewable Energy, Advanced Manufacturing Office. SFE is grateful for a fellowship from the Bredesen Center for Interdisciplinary Graduate Education. The authors would like to thank Olivia Shafer for editing this manuscript.
Footnotes
This manuscript has been authored by UT-Battelle LLC under Contract No. DE-AC05-00OR22725 with the U.S. Department of Energy. The United States Government retains and the publisher, by accepting the article for publication, acknowledges that the United States Government retains a non-exclusive, paid-up, irrevocable, world-wide license to publish or reproduce the published form of this manuscript, or allow others to do so, for United States Government purposes. The Department of Energy will provide public access to these results of federally sponsored research in accordance with the DOE Public Access Plan (http://energy.gov/downloads/doe-public-access-plan).
References
- 1.Yu J.H. The effect of heat treatments and Si contents on B2 ordering reaction in high silicon steels. Mater. Sci. Eng. A. Jun. 2001;307(1–2):29–34. [Google Scholar]
- 2.Ros T., Houbaert Y., Fischer O., Schneider J. Thermomechanical processing of high Si-steel (up to 6.3% Si) IEEE Trans. Magn. Jul. 2001;37(4):2321–2324. [Google Scholar]
- 3.Mishra S., Därmann C., Lücke K. On the development of the goss texture in iron-3% silicon. Acta Metall. Dec. 1984;32(12):2185–2201. [Google Scholar]
- 4.Morawiec A. On abnormal growth of Goss grains in grain-oriented silicon steel. Scr. Mater. Mar. 2011;64(5):466–469. [Google Scholar]
- 5.Lin P., Palumbo G., Harase J., Aust K.T. Coincidence Site Lattice (CSL) grain boundaries and Goss texture development in Fe-3% Si alloy. Acta Mater. Dec. 1996;44(12):4677–4683. [Google Scholar]
- 6.Ruiz D., Vandenberghe R.E., Ros-Yañez T., De Grave E., Houbaert Y. Springer Berlin Heidelberg; Berlin, Heidelberg: 2006. “Characterizing the Ordering of Thermomechanically Processed High-Si Steel by Mössbauer Effect Techniques,” in ICAME 2005; pp. 1037–1040. [Google Scholar]
- 7.Kasama A.H., Bolfarini C., Kiminami C.S., Botta Filho W.J. “Magnetic properties evaluation of spray formed and rolled Fe–6.5 wt.% Si–1.0 wt.% Al alloy. Mater. Sci. Eng. A. Mar. 2007;449(451):375–377. [Google Scholar]
- 8.Shin J.S. Ordering–disordering phenomena and micro-hardness characteristics of B2 phase in Fe–(5–6.5%)Si alloys. Mater. Sci. Eng. A. Oct. 2005;407(1–2):282–290. [Google Scholar]
- 9.Chang C., Bye R., Laxmanan V., Das S. Texture and magnetic properties of rapidly quenched Fe-6.5wt%Si ribbon. IEEE Trans. Magn. Jul. 1984;20(4):553–558. [Google Scholar]
- 10.Hubert O., Hug E. Influence of plastic strain on magnetic behaviour of non-oriented Fe–3Si and application to manufacturing test by punching. Mater. Sci. Technol. May 1995;11(5):482–487. [Google Scholar]
- 11.Li C., Yang H., Wang Y., Yu Y. Texture of cold rolled strip of Fe-3Si steel produced by thin slab casting and rolling. J. Iron Steel Res. Int. Mar. 2011;18(3):40–46. [Google Scholar]
- 12.Li C., Yang H., Wang Y., Yu Y. Texture of hot rolled strip for Fe-3Si steel produced by thin slab casting and rolling. J. Iron Steel Res. Int. Dec. 2010;17(12):46–53. [Google Scholar]
- 13.PremKumar R., Samajdar I., Viswanathan N.N., Singal V., Seshadri V. Relative effect(s) of texture and grain size on magnetic properties in a low silicon non-grain oriented electrical steel. J. Magn. Magn. Mater. Aug. 2003;264(1):75–85. [Google Scholar]
- 14.Park J.Y., Oh K.H., Ra H.Y. The eftects of superheating on texture and microstructure of Fe-4.5wt%Si steel strip by twin-roll strip casting. ISIJ Int. 2001;41(1):70–75. [Google Scholar]
- 15.Okada K., Yamaji T., Kasai K. Basic investigation of CVD method for manufacturing 6.5% Si steel sheet. ISIJ Int. 1996;36(6):706–713. [Google Scholar]
- 16.Ouyang G., Chen X., Liang Y., Macziewski C., Cui J. “Review of Fe-6.5 wt%Si high silicon steel—a promising soft magnetic material for sub-kHz application. J. Magn. Magn. Mater. Jul. 2019;481:234–250. [Google Scholar]
- 17.Ros-Yañez T., Houbaert Y., Fischer O., Schneider J. Production of high silicon steel for electrical applications by thermomechanical processing. J. Mater. Process. Technol. Dec. 2003;143(144):916–921. [Google Scholar]
- 18.Ros-Yañez T., Houbaert Y., Gómez Rodríguez V. High-silicon steel produced by hot dipping and diffusion annealing. J. Appl. Phys. 2002;91(10):7857–7859. [Google Scholar]
- 19.Schneider J., Stöcker A., Kawalla R., Franke A. Evolution of optimum grain size for low loss ferritic FeSi steels. Steel Res. Int. Dec. 2017;88(12):1700201. [Google Scholar]
- 20.Matsumura K., Fukuda B. Recent developments of non-oriented electrical steel sheets. IEEE Trans. Magn. Sep. 1984;20(5):1533–1538. [Google Scholar]
- 21.Fish G.E., Chang C.-F., Bye R. “Frequency dependence of core loss in rapidly quenched Fe-6.5 wt. %Si. J. Appl. Phys. Nov. 1988;64(10):5370–5372. [Google Scholar]
- 22.Faudot F., Rialland J.F., Bigot J. Study of order-disorder effect on magnetic properties of rapidly quenched Fe-6.5 wt% Si alloys. Phys. Scr. Feb. 1989;39(2):263–267. [Google Scholar]
- 23.Garibaldi M., Ashcroft I., Simonelli M., Hague R. Metallurgy of high-silicon steel parts produced using Selective Laser Melting. Acta Mater. May 2016;110:207–216. [Google Scholar]
- 24.Garibaldi M., Ashcroft I., Lemke J.N., Simonelli M., Hague R. Effect of annealing on the microstructure and magnetic properties of soft magnetic Fe-Si produced via laser additive manufacturing. Scr. Mater. Jan. 2018;142:121–125. [Google Scholar]
- 25.Páez-Pavón A., Jiménez-Morales A., Santos T.G., Quintino L., Torralba J.M. “Influence of thermal debinding on the final properties of Fe–Si soft magnetic alloys for metal injection molding (MIM) J. Magn. Magn. Mater. Oct. 2016;416:342–347. [Google Scholar]
- 26.Li L. Big area additive manufacturing of high performance bonded NdFeB magnets. Sci. Rep. Dec. 2016;6(1):36212. doi: 10.1038/srep36212. [DOI] [PMC free article] [PubMed] [Google Scholar]
- 27.Paranthaman M.P. Binder jetting: a novel NdFeB bonded magnet fabrication process. JOM. Jul. 2016;68(7):1978–1982. [Google Scholar]
- 28.Li L., Post B., Kunc V., Elliott A.M., Paranthaman M.P. Additive manufacturing of near-net-shape bonded magnets: prospects and challenges. Scr. Mater. Jul. 2017;135:100–104. [Google Scholar]
- 29.Li L. Fabrication of highly dense isotropic Nd-Fe-B nylon bonded magnets via extrusion-based additive manufacturing. Addit. Manuf. 2018;21:495–500. [Google Scholar]
- 30.Gandha K. Additive manufacturing of anisotropic hybrid NdFeB-SmFeN nylon composite bonded magnets. J. Magn. Magn. Mater. 2018;467:8–13. [Google Scholar]
- 31.Ferreira T., Rasband W. 2012. ImageJ User Guide IJ 1.46r” ImageJ. [Google Scholar]
- 32.ASTM Volume 11.01 Water (I) ASTM International; West Conshohocken, PA: 2016. ASTM d513-16 standard test methods for total and dissolved carbon dioxide in water. [Google Scholar]
- 33.ASTM Volume 03.07 Magnetic Properties. ASTM International; West Conshohocken, PA: 2014. ASTM A773/A773M - 14 standard test method for direct current magnetic properties of low coercivity magnetic materials using hysteresigraphs. [Google Scholar]
- 34.ASTM Volume 03.07 Magnetic Properties. ASTM International; West Conshohocken, PA: 2018. ASTM A927/A927M - 18 Standard Test Method for Alternating-Current magnetic properties of toroidal core specimens using the voltmeter-ammeter-wattmeter method. [Google Scholar]
- 35.ASTM Volume 03.01 Metals – Mechanical Testing; Elevated and Low-Temperature Tests; Metallography. ASTM International; West Conshohocken, PA: 2016. “ASTM E8/E8M - 16a Standard Test Methods for Tension Testing of Metallic Materials. [Google Scholar]
- 36.Fu H., Yang Q., Zhang Z., Xie J. Effects of precipitated phase and order degree on bending properties of an Fe-6.5 wt% Si alloy with columnar grains. J. Mater. Res. 2011;26:1711–1718. [Google Scholar]


