Abstract
Seq-Well is a low-cost picowell platform that can be used to simultaneously profile the transcriptomes of thousands of cells from diverse, low input clinical samples. In Seq-Well, uniquely barcoded mRNA capture beads and cells are co-confined in picowells that are sealed using a semipermeable membrane, enabling efficient cell lysis and mRNA capture. The beads are subsequently removed and processed in parallel for sequencing, with each transcript’s cell of origin determined via the unique barcodes. Due to its simplicity and portability, Seq-Well can be performed almost anywhere.
Keywords: Seq-Well, single-cell RNA-sequencing, single-cell genomics, systems biology, transcriptomics, RNA-Seq, picowells
Introduction
Single-cell RNA-sequencing (scRNA-seq) is an emerging method that enables genome-wide expression profiling at cellular resolution. Population-level transcriptomic techniques, such as microarrays and bulk RNA-seq, average over a large number of cells and assume transcriptional homogeneity; yet, even related cells of the same subtype can present dramatic heterogeneity in their transcriptional activities and states[1]. ScRNA-seq allows direct measurement of this variability, as well as analyses of expression covariation across cells. This information can be used to discover gene-expression patterns that define distinct cell types and states, as well as their molecular circuits and biomarkers, affording an unprecedented view of cellular phenotype. Over the years, technological progress and protocol improvements have resulted in a substantial increase in the number of cells that can be processed in parallel[2–4], enhancing statistical power and providing opportunities to look at increasingly complex systems. Current methods used to prepare single-cell libraries include manual selection[5], FACS sorting[6], microfluidic circuits[7], droplet-based techniques[8–10], and picowells[11, 12].
Seq-Well, an example of the latter, is an easy-to-use, low cost, sample-efficient and portable platform for massively parallel scRNA-seq[11]. Seq-Well utilizes PDMS arrays containing ~88,000 subnanoliter wells in which single cells and uniquely barcoded poly(dT) mRNA beads are co-confined with a semipermeable membrane. Crucially, well size ensures that only one barcoded mRNA capture bead can fit into each well, improving cell capture efficiency. Cells, meanwhile, are loaded at a low density to minimize cell doublets, ensuring single-cell resolution. Selective chemical functionalization allows reversible attachment of a semipermeable polycarbonate membrane with 10 nm pores, permitting buffer exchange for cell lysis while trapping larger macromolecules, such as nucleic acids, to minimize cross-contamination. The co-confined mRNA capture beads are covered in oligonucleotides that consist of a universal primer, a cell barcode (unique to each bead), a unique molecular identifier (UMI; unique to each primer), and a poly-T sequence that can capture cellular mRNA upon lysis and during hybridization[13]. Following these steps, the semipermeable membrane can be peeled off for bead removal. Finally, the barcoded beads can be pooled for reverse transcription, PCR amplification, library preparation, and sequencing, with a transcript’s cell of origin and uniqueness determined via its cell barcode and UMI, respectively.
Importantly, implementing Seq-Well only requires a PDMS array, a polycarbonate membrane, a pipette, a clamp, an oven/heat source, and a tube rotator to produce stable cDNA product, making it functional in nearly every clinic and laboratory context.
Materials
All buffers and solutions are to be prepared with ultrapure water and stored at room temperature unless otherwise indicated.
2.1. Array Processing prior to reverse transcription
Bead loading buffer (BLB): 10% BSA, 100 mM sodium carbonate, pH 10. Add 2.5 mL BSA (100 mg/mL) to a 50 mL falcon tube. Add water to ~15 mL followed by 1.25 mL 2 M sodium carbonate. Add additional water to achieve a final volume of 25 mL. Titrate with glacial acetic acid to reach pH 10 (see Note 1).
Pre-Lysis buffer: 5 M guanidine thiocyanate, 1 mM EDTA (see Note 2 and Note 3).
Complete lysis buffer: 5 M guanidine thiocyanate, 1 mM EDTA, 0.5% sarkosyl, 1% β-mercaptoethanol. Combine 5 mL pre-lysis buffer with 25 uL 10% sarkosyl and 50 uL β-mercaptoethanol (see Note 4).
Hybridization buffer: 2 M NaCl, 4% PEG8000 in PBS. Combine 10 mL 5 M NaCl with 13 mL of PBS, and 2 mL 50% (w/v) PEG8000 (see Note 5).
Wash buffer: 2 M NaCl, 3 mM MgCl2, 20 mM Tris-HCl (pH 8.0), 4% PEG8000. Combine 20 mL 5 M NaCl, 150 uL 1 M MgCl2, 1 mL 1 M Tris-HCl (pH 8.0), and 4 mL 50% (w/v) PEG8000. Add water to bring volume to 50 mL (see Note 5).
Polycarbonate membranes: 0.01 micron pores, 62mm × 22mm (see Note 6).
mRNA capture beads (see Note 7).
RPMI.
RP-10: RPMI with 10% FBS.
PBS for washing.
2.2. Array Storage
Array quenching buffer: 100 mM sodium carbonate, 10 mM Tris-HCl (pH 8.0). Combine 2.5 mL 2 M sodium carbonate with 500 uL 1 M Tris-HCl. Add water to bring total volume to 50 mL. Arrays can be stored in array quenching buffer for up to one month at 4°C. (see Note 10).
Aspartic acid solution: 20 ug/mL of L-aspartic acid, 2 M NaCl, and 100 mM sodium carbonate solution (pH 10.0). Arrays can be stored in the aspartic acid solution for up to six months at 4°C (see Note 10).
2.3. Reverse Transcription
Maxima H-RT with Maxima 5x RT buffer.
30% PEG8000.
dNTP mix (10 mM each).
RNase Inhibitor.
Template Switch Oligo (see primers below).
TE-TW: 10 mM Tris-HCl pH 8.0, 1 mM EDTA, 0.01% Tween-20. Combine 49.5 mL water, 0.5 mL 1.0 M Tris pH 8.0, 100 uL 0.5 M EDTA, and 50 uL Tween-20.
TE-SDS: 10 mM Tris pH 8.0, 1 mM EDTA, 0.05% SDS. Combine 49.5 mL water, 0.5 mL 1.0 M Tris pH 8.0, 100 uL 0.5 M EDTA, and 250 uL 10% SDS.
2.4. PCR and library preparation
Exonuclease I (E. coli) with buffer (NEB Cat. No. M0293S).
10 mM Tris-HCl (pH 8.0).
Thermocycler
Microseal B adhesive seal
Microseal F foil
Qubit assay tubes
Qubit 2.0 fluorometer
96-well PCR plates, skirted
SMART PCR Primer (see below).
KAPA HiFi Hotstart Readymix PCR Kit.
Ampure DNA Spri beads.
80% ethanol.
Agilent High Sensitivity DNA Kit
Nextera XT kit.
Custom P5-SMART PCR hybrid oligo (see primers below)
2.5. Primers
Template Switch Oligo: AAGCAGTGGTATCAACGCAGAGTGAATrGrGrG
SMART PCR Primer: AAGCAGTGGTATCAACGCAGAGT
Custom P5-SMART PCR hybrid oligo: AATGATACGGCGACCACCGAGATCTACA CGCCTGTCCGCGGAAGCAGTGGTATCAACGCAGAGT*A*C
Custom Read 1 Primer: GCCTGTCCGCGGAAGCAGTGGTATCAACGCAGAGTAC
Methods
3.1. Membrane functionalization
Place a precut (22 × 66 mm) polycarbonate membrane onto a glass slide, using a gloved finger and tweezers to carefully separate the membrane and paper. Make sure the shiny side of the polycarbonate membrane is facing up. Discard any membranes that have creases or other large-scale imperfections (see Note 11).
Place membranes onto a shelf in the plasma cleaner (see Note 12).
Close the plasma cleaner door and make sure the 3-way valve lever is in the closed position. Then turn on the main power and pump switch to form a vacuum (see Note 13).
Allow a vacuum to form for 2 minutes. Once the vacuum has formed, simultaneously turn the valve clockwise to 12:00 while turning the power to the high setting.
Treat membranes with plasma for 7 minutes.
After treatment, in the following order, turn the RF level valve from HIGH to OFF, then turn off the power followed by turning off the vacuum. Then slowly open the valve until you can just barely hear air entering the chamber. Allow the chamber to slowly fill with air until the door opens. This will take about five minutes (see Note 14).
Pipet 1 mL of 1X PBS into each well of a four well plate. Transfer slides with treated membranes from the plasma cleaner to the four well plate. Quickly pipet 4 mL of 1x PBS over the membrane, preventing the membrane from folding on itself (see Note 15 and Figure 1).
Remove any air bubbles underneath the membrane by gently pressing on the membrane using wafer forceps. Membranes are now functionalized and ready for use. Membranes solvated with 1x PBS should be used within 24 hours.
Fig 1.
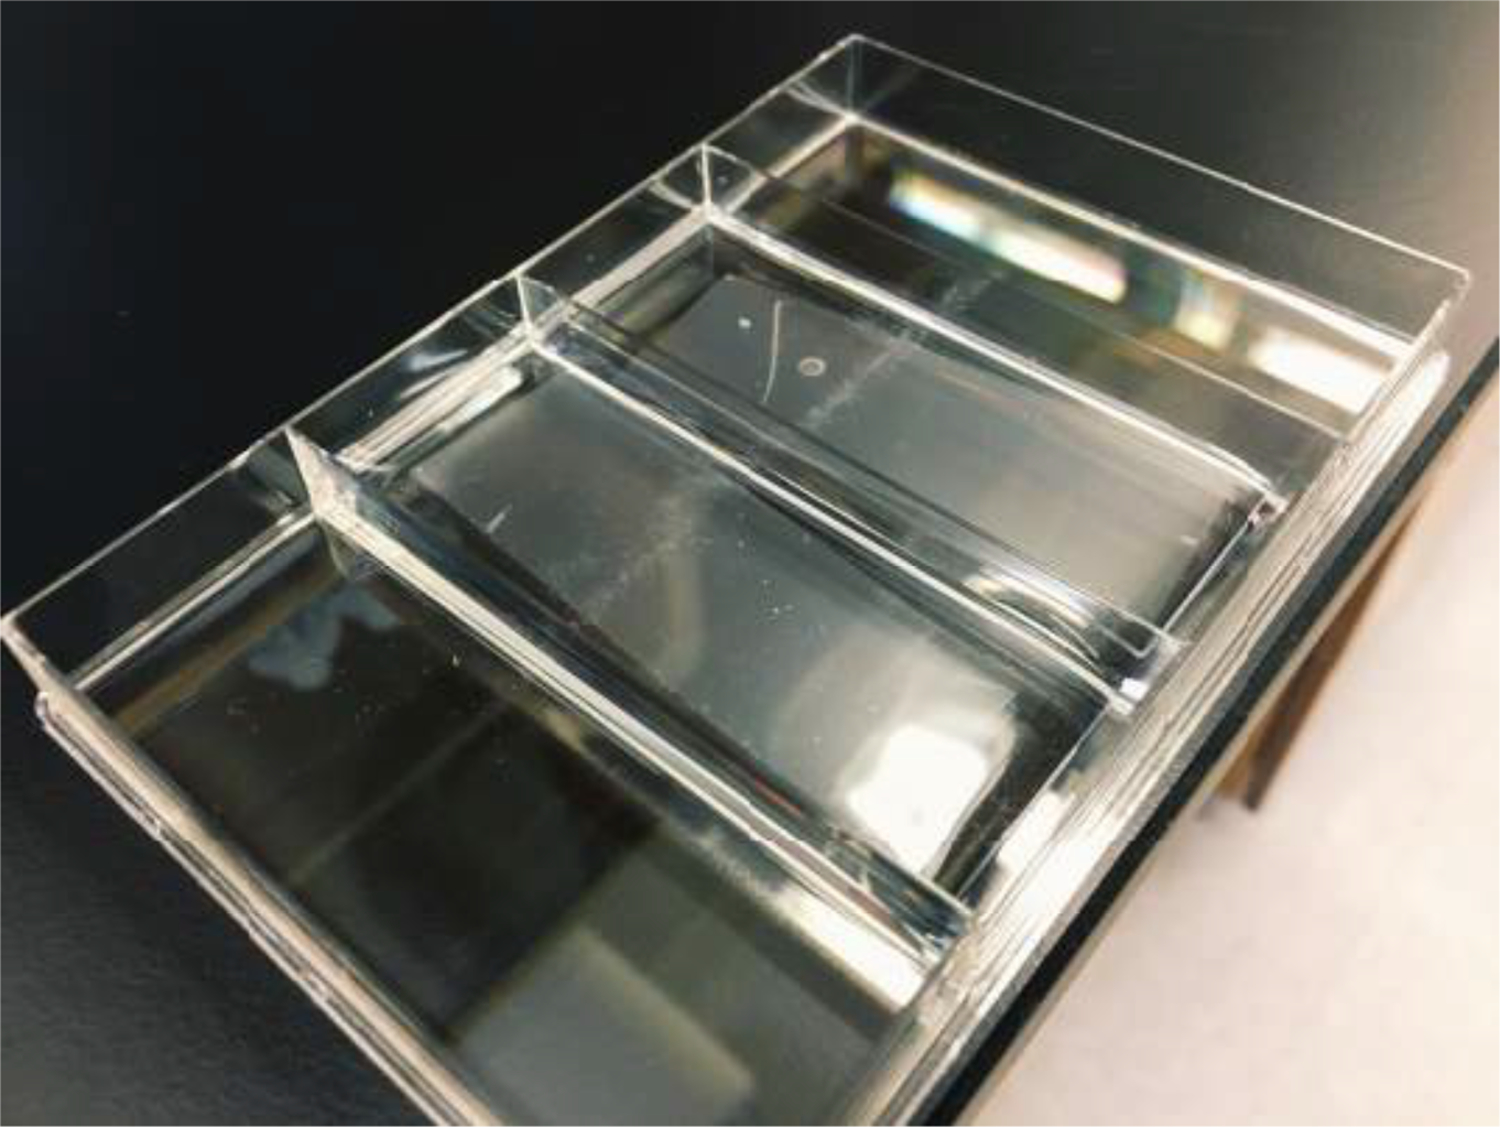
Functionalized membranes can be stored in 1x PBS for 24 hours.
3.2. Bead loading
Aspirate storage solution and solvate each array with 5 mL of BLB (see Note 16).
Aliquot ~110,000 beads per array from bead stock into a 1.5 mL tube and spin on a tabletop centrifuge for 15 seconds to form a pellet (see Note 17).
Aspirate storage buffer and replace it with 500 uL of BLB. Invert the tube several times to wash the beads. Pellet the beads and then repeat the wash step with an additional 500 uL of BLB.
Pellet beads, aspirate BLB, and resuspend in 200 uL of BLB per 110,000 beads.
Before loading beads, thoroughly aspirate BLB from the dish containing the array(s), being careful not to aspirate or dry the PDMS surface of the array(s). Center the array(s) so that there is no contact between the array(s) and the sides of the four-well dish.
Use a 200 uL pipette to apply 200 uL containing 110,000 beads, in a drop-wise fashion, to the surface of each array. Your goal is to cover the surface of the entire array with beads (see Figure 2).
Rock the four-well dish in the x & y directions for ten minutes. (see Notes 18, 19, 20).
Thoroughly wash array(s). Position each array so that it sits in the center of the 4-well dish. Dispense 500 uL of BLB in the upper right corner of each array and 500 uL in the bottom right corner of the PDMS surface of each array. Be careful not to directly pipette onto the microwells, as it can dislodge beads. Using wafer forceps, push each array against the left side of the 4-well dish to create a capillary flow – this will help remove excess beads from the surface. Aspirate the liquid from the bottom of the dish, reposition each array in the center of the four well dish, and repeat, but this time pipetting BLB onto the opposite corners. (see Note 21 and 22 and Figure 3).
Repeat step 8 as necessary. Periodically examine the array(s) under a microscope to verify that very few loose beads are present on the surface, as this will interfere with membrane attachment.
Once excess beads have been removed from the surface, solvate each array. If continuing to cell loading immediately (i.e., within 1–5 hours), loaded arrays should be stored in 5 mL of BLB. Alternatively, loaded arrays can be stored for up to two weeks in Array Quenching Buffer.
Fig 2.
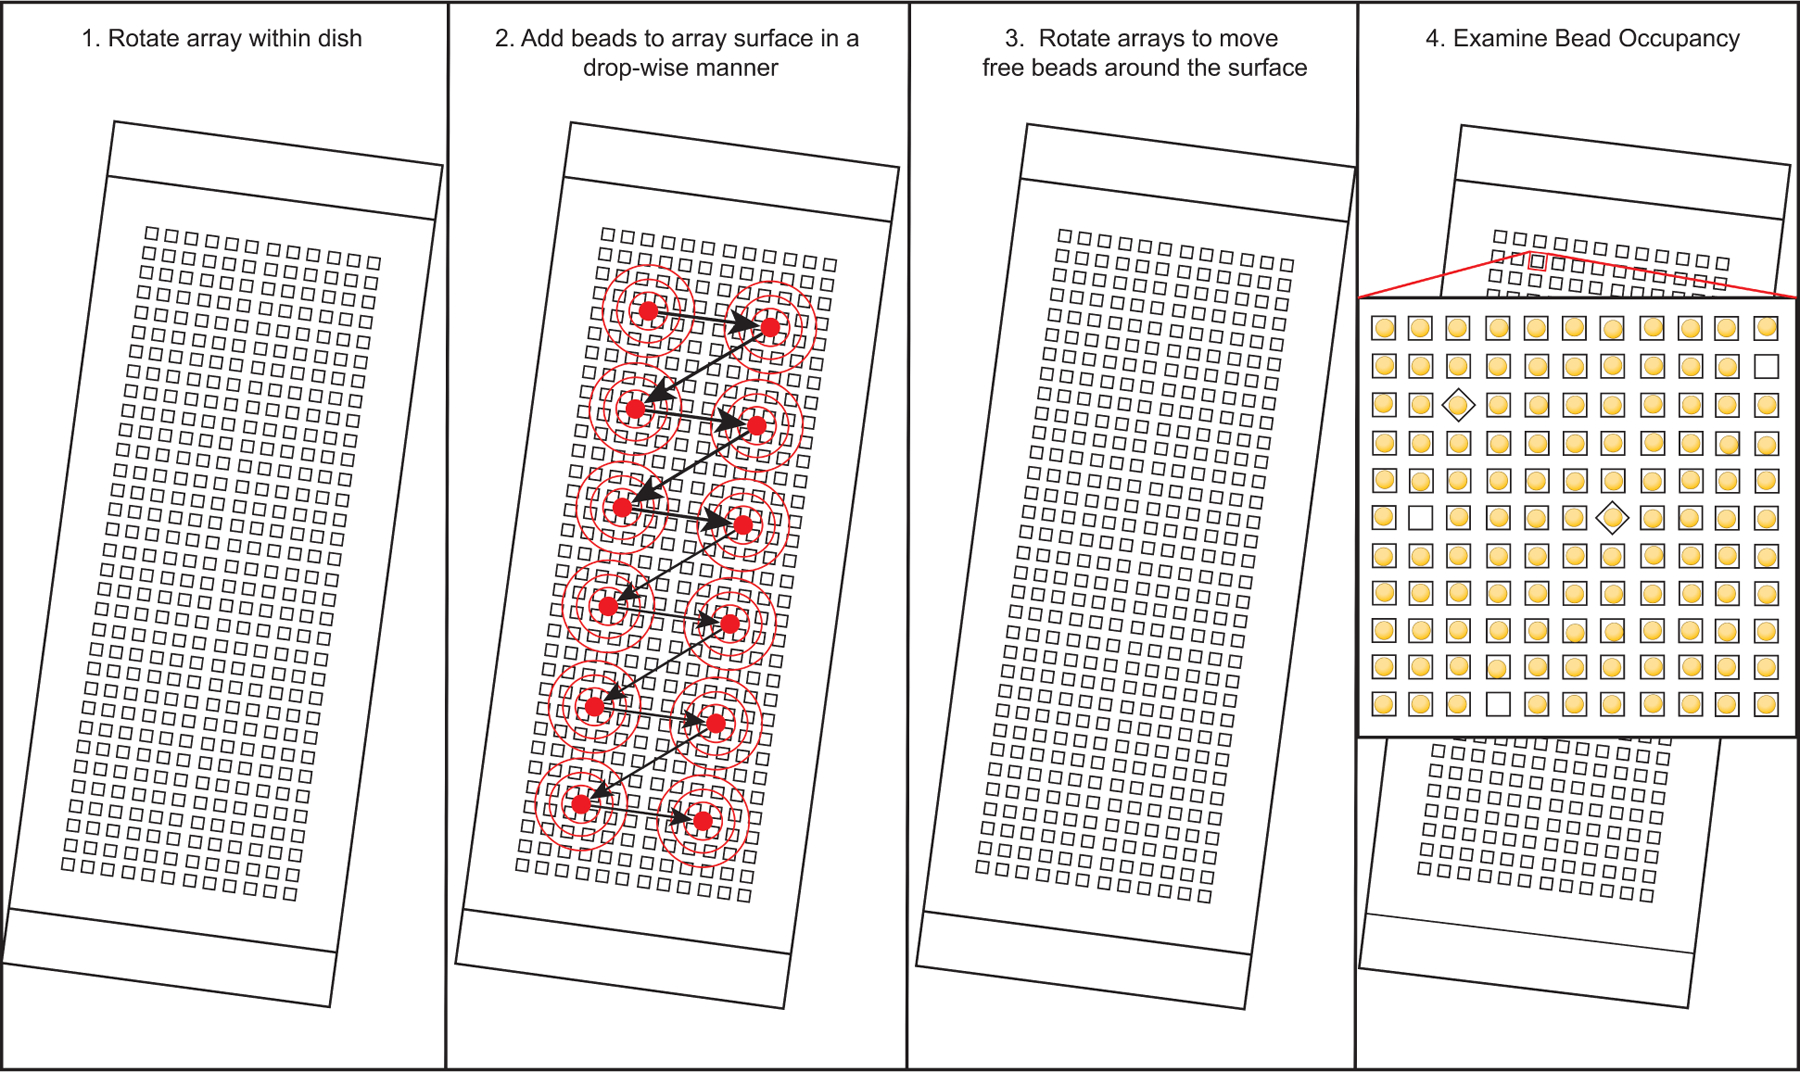
Apply beads to the array in a dropwise fashion.
Fig. 3.
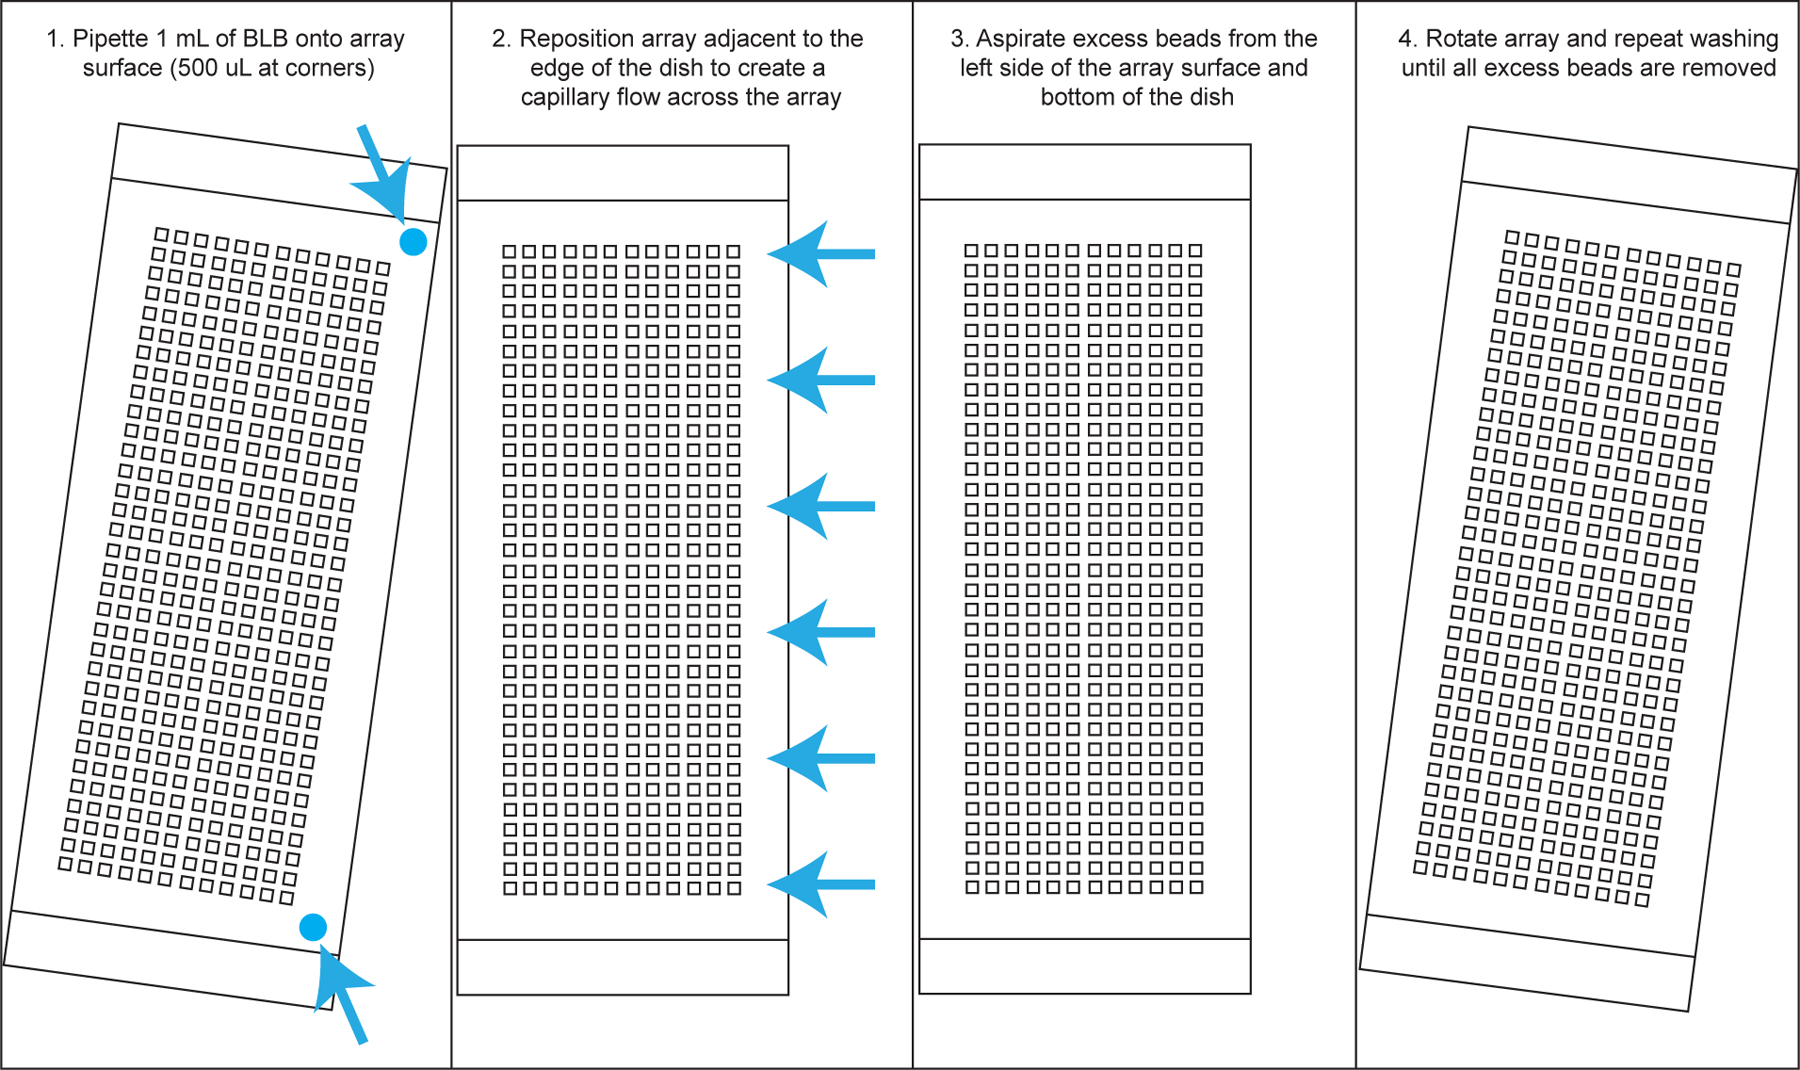
Create capillary flow to draw excess beads from the center of the array.
3.3. Cell loading
Obtain a cell or tissue sample and prepare a single-cell suspension using your preferred protocol.
Aspirate BLB from each array and soak in 5 mL of RPMI + 10% FBS (RP-10).
After obtaining a single-cell suspension, count cells using a hemocytometer and make a new solution of 15,000 cells in 200 uL of RP-10 (see Note 23).
Aspirate the RP-10 from the four well dish, center each array in well, and then load the cell loading solution in a dropwise fashion onto the surface of each array.
Rock the array in the x & y directions for a total of ten minutes - alternate between rocking for 20 seconds and letting the arrays sit for 30 seconds to let cells fall into wells.
Wash array(s) 4x with PBS to remove FBS in media (see Note 24). To wash, add 5 mL of PBS to the corner of the four-well dish and then aspirate.
Aspirate final PBS wash and replace with 5 mL of RPMI media (no FBS).
3.4. Membrane Sealing
Gather the follow materials before sealing the array(s): wafer forceps, paper towels, Agilent clamps, pre-treated membranes, and clean microscope slides.
Use the wafer forceps, transfer the array from media to the lid of a 4-well dish, being careful to keep the array as close to horizontal as possible (see Note 25).
Use the wafer forceps to remove a pre-treated membrane from the 4-well dish. Gently dab away excess moisture from the glass slide on the paper towel until the membrane does not spontaneously change position on the glass slide. Avoid touching the surface of the membrane that will be sealed to PDMS array as this may affect membrane sealing.
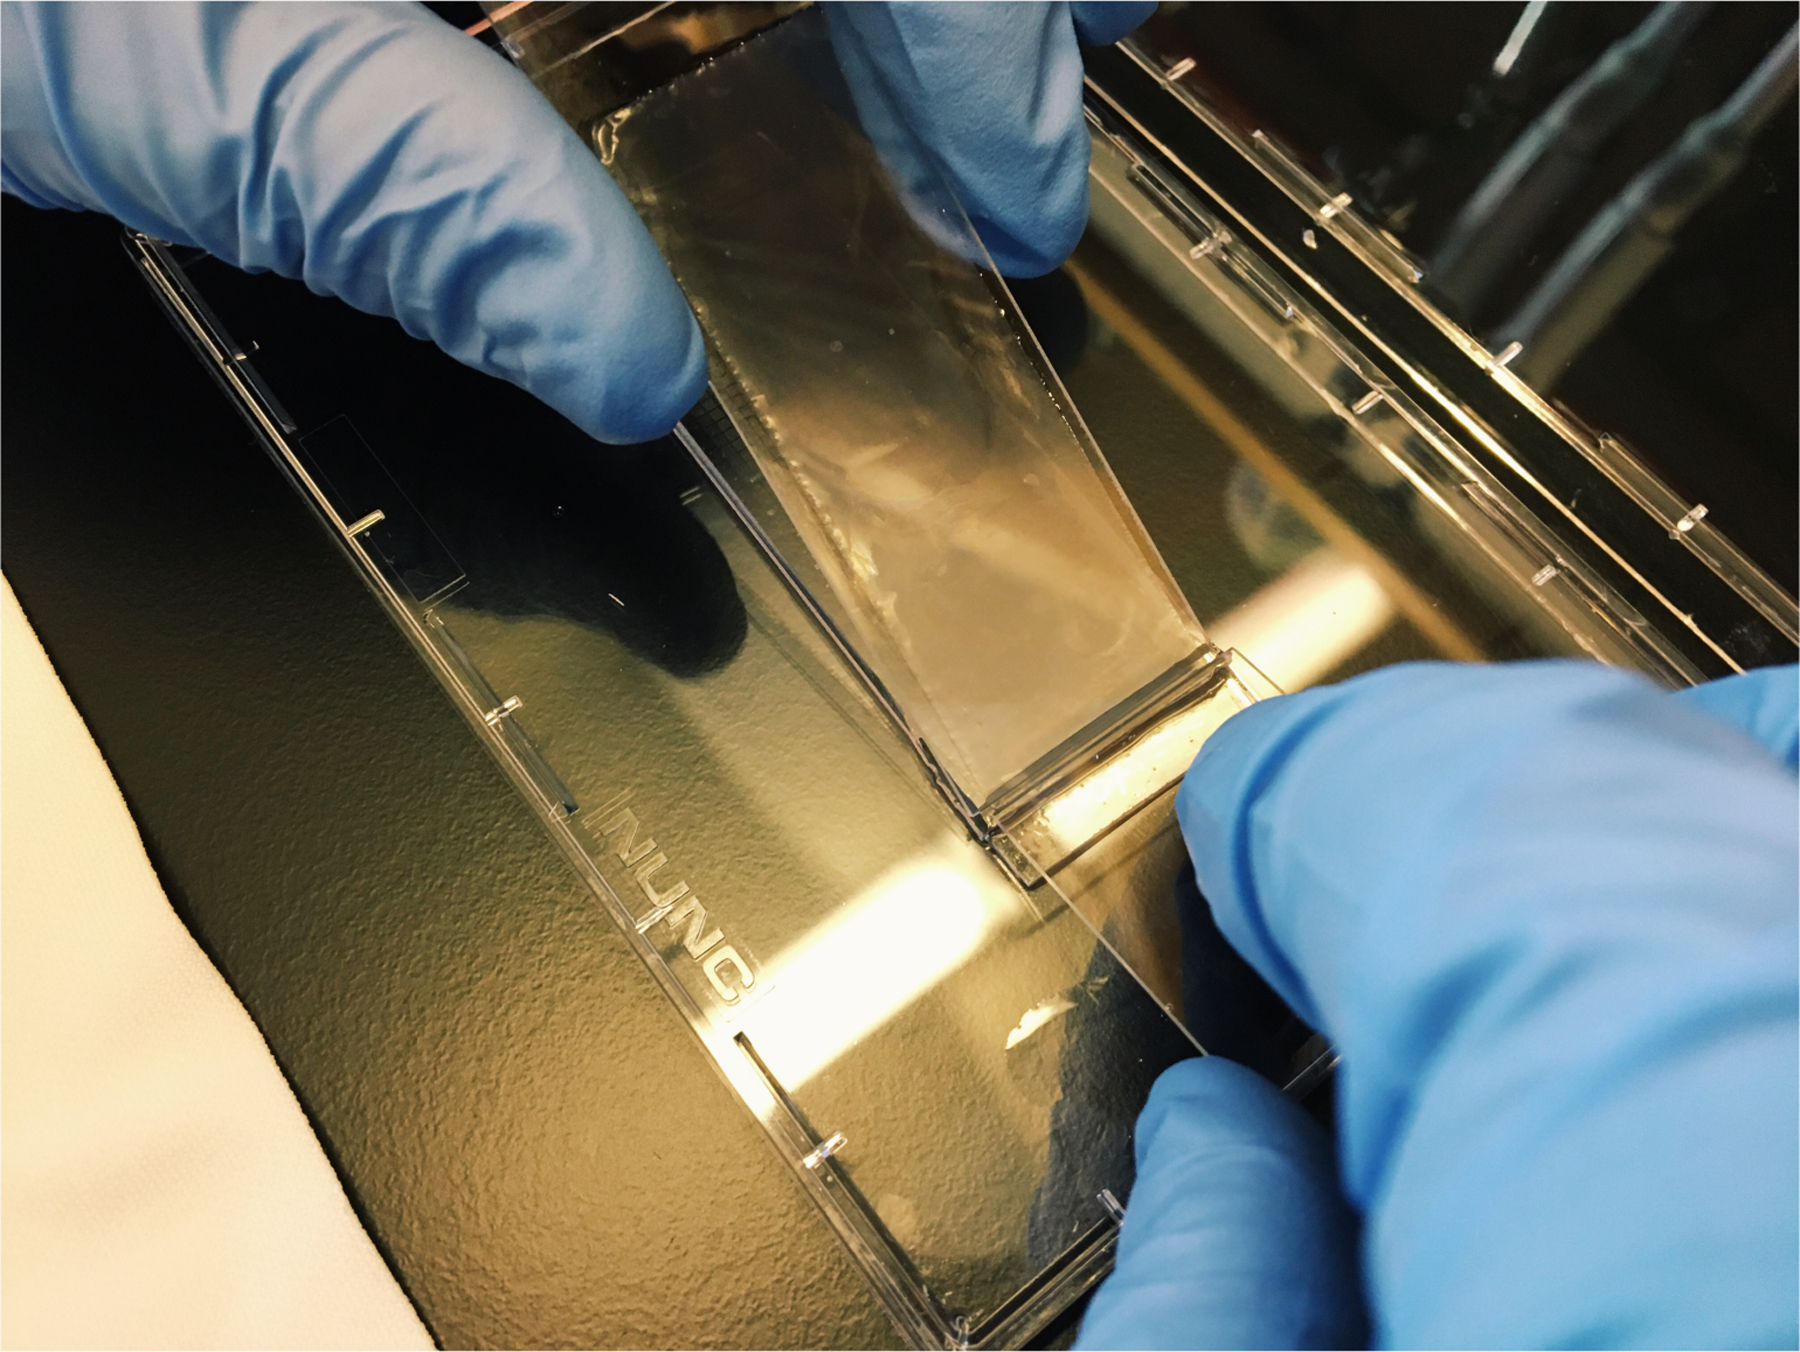
Carefully position the membrane in the center of the microscope slide leaving a small (2–3 mm) membrane overhang beyond the edge of the slide (see Note 26 and Figure 4).
Holding the membrane in your left hand, invert the microscope slide so that the treated surface is facing down.
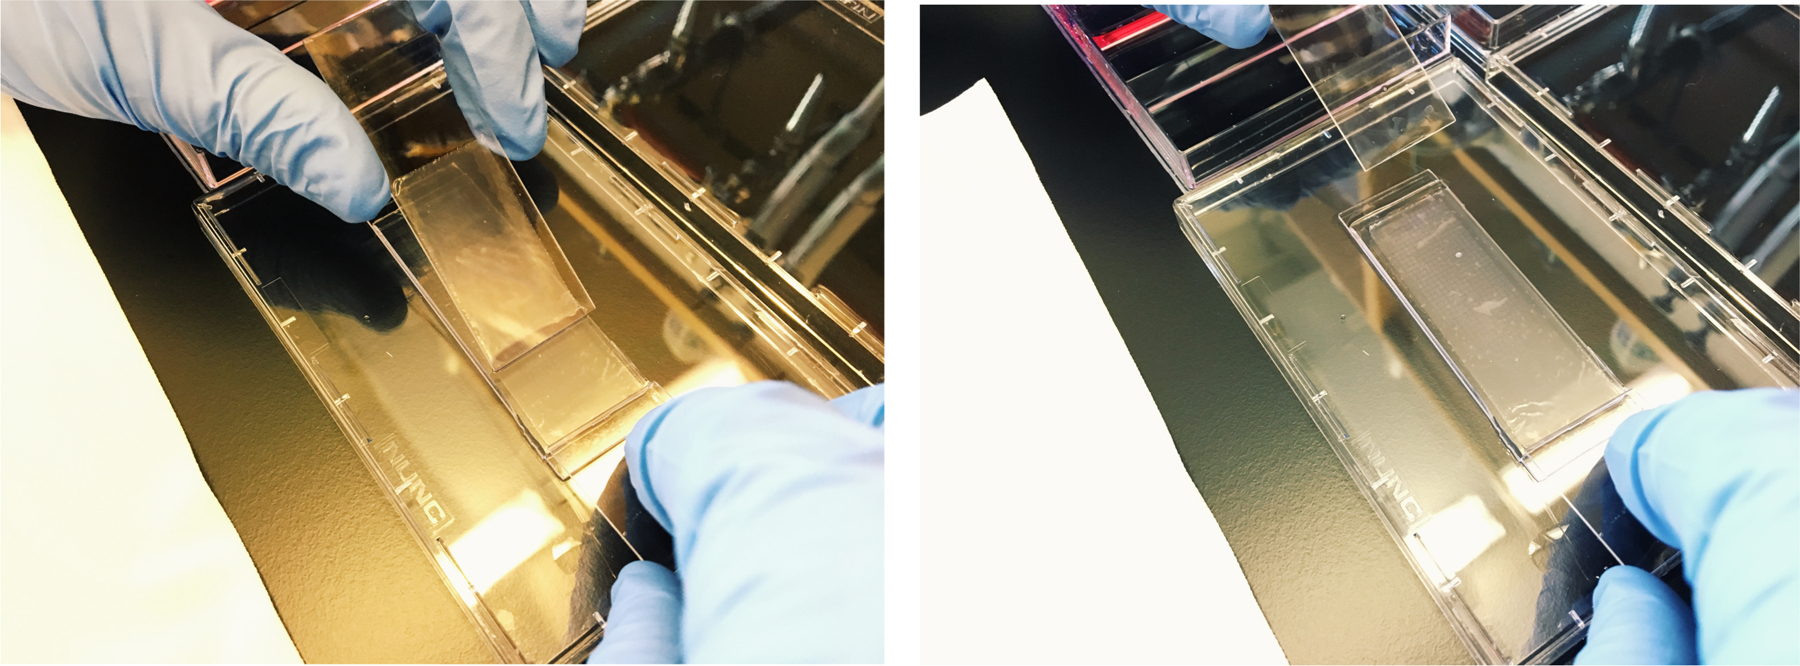
Place the overhang of the membrane in contact with the PDMS surface of the array just above the boundary of the microwells (see Figure 5)
Using a clean glass slide held in your right hand, firmly press down the overhang of the membrane against the PDMS surface of the array.
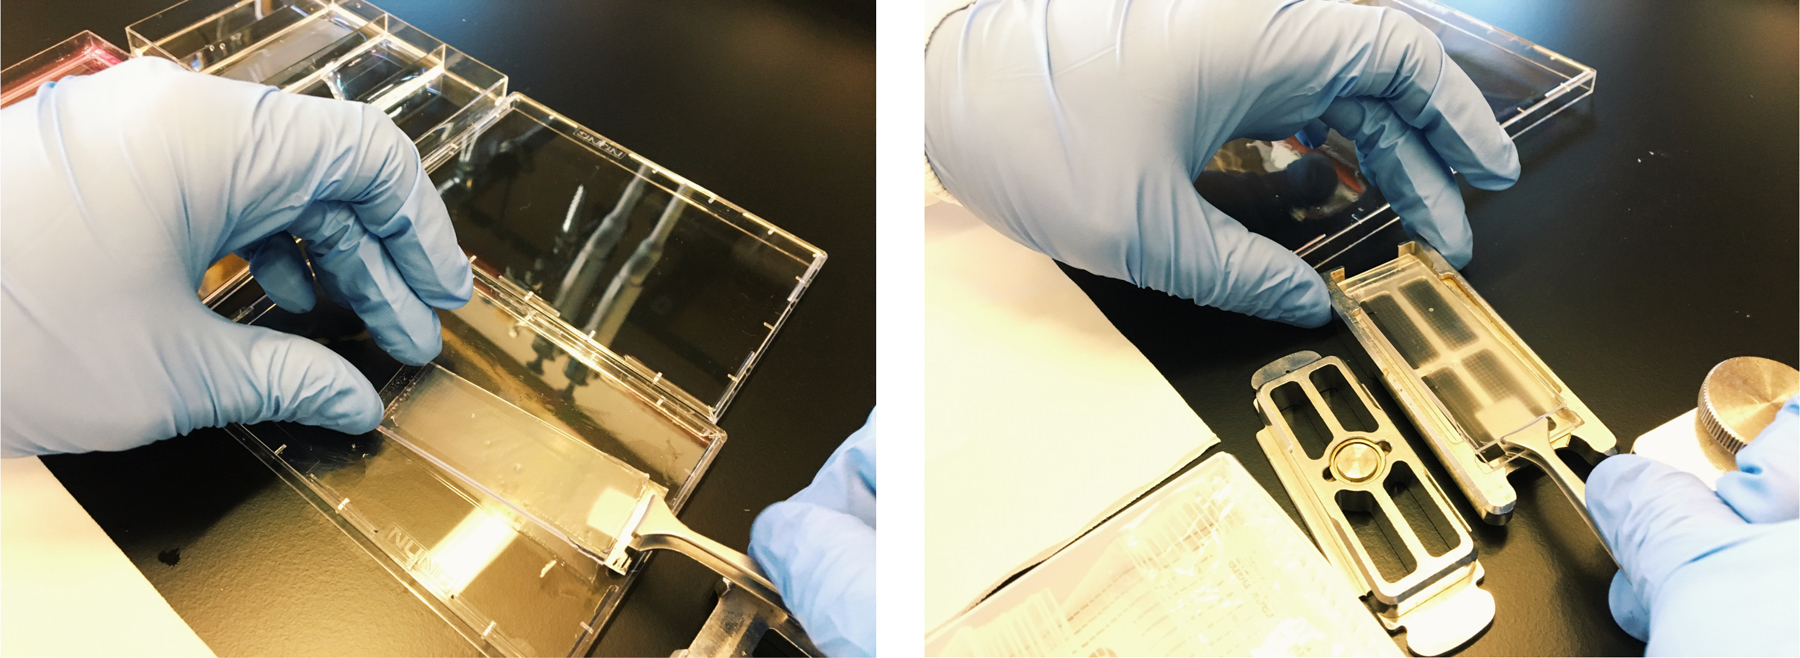
While maintaining pressure with your right hand to hold the membrane in place, gently apply the membrane by shifting your left hand across the array (see Note 27, 28, and Figure 6).
After applying the membrane, carefully pry the array and membrane from the surface of the lid and transfer to an Agilent clamp (see Figure 7).
Once the array is in the clamp, place a glass slide on top of the array and then assemble the clamp, tightening it just past the point of resistance. Be careful not to tighten too far so as not to break either of the glass slides.
Place the assembled clamp in a 37°C incubator for 30 minutes (see Note 29).
Fig 4.
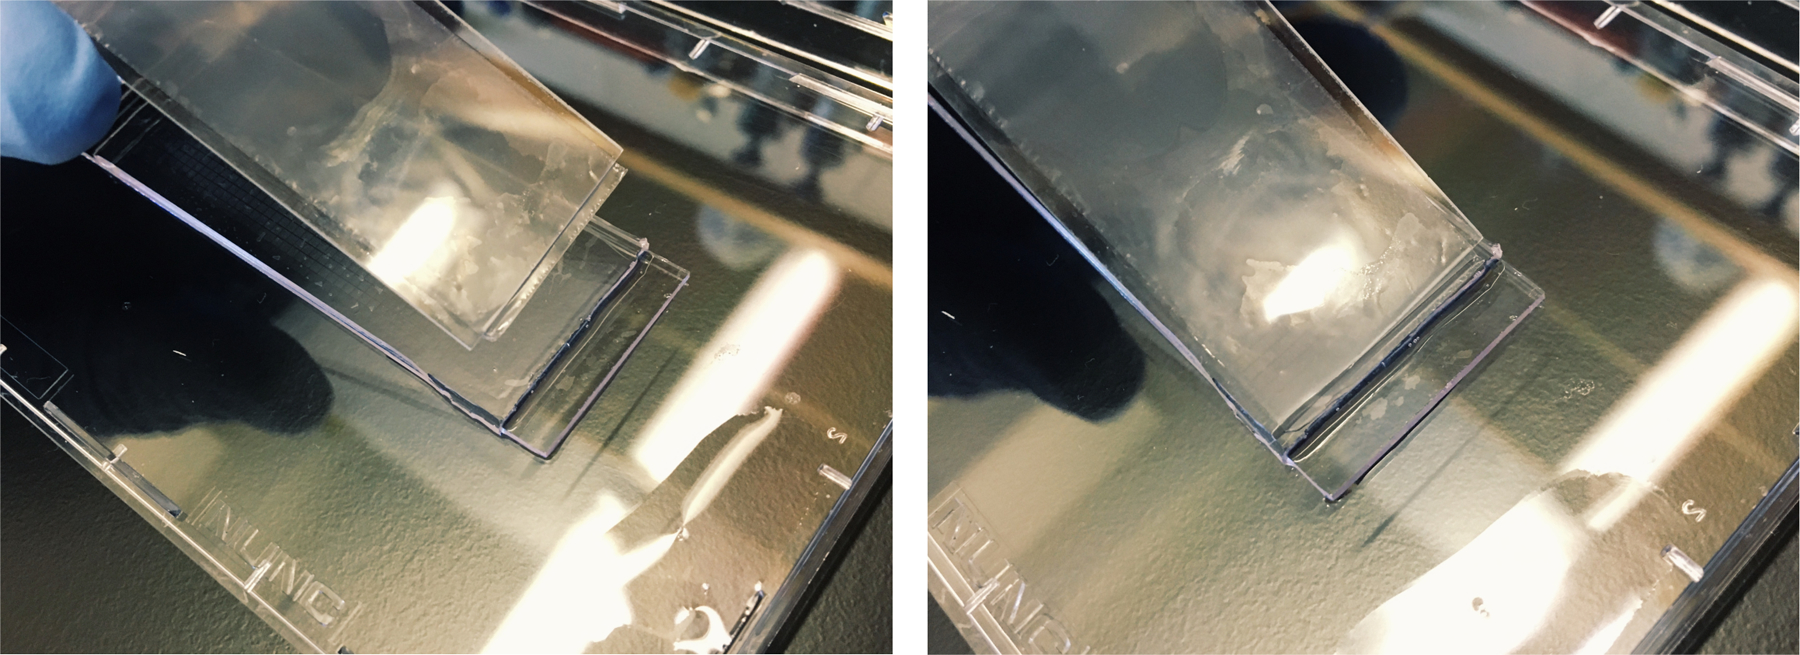
Use tweezers to position the membrane on the glass slide so that there is a small overhang and touch it to the array just above the boundary of the wells.
Fig 5.
Hold the membrane firmly against the array with a clean glass slide.
Fig 6.
Slide the hand holding the membrane across the array to apply the membrane.
Fig 7.
Place the array in a clamp and heat it at 37°C for 30 minutes to seal the membrane.
3.5. Cell Lysis and Hybridization
Remove the clamp from the incubator and then remove the array(s) from the Agilent clamp(s) (see Note 30).
Submerge each array, with top slide still attached, in 5 mL of complete lysis buffer in a new 4-well dish (see Note 31).
Gently rock the array(s) in lysis buffer until the top glass slide lifts off. Do not pry the top slide off as this can reverse membrane sealing. The time necessary for detachment of the top slide varies (10 seconds – 10 minutes). Just be patient.
Once the top slide has detached, let the array(s) rotate for 20 minutes at 50–60 rpm.
After 20 minutes, remove the lysis buffer and wash each array with 5 mL of hybridization buffer. Use a container without bleach to collect lysis buffer waste because guanidine thiocyanate can react with bleach to create toxic gas.
Remove hybridization buffer and add another 5 mL of hybridization buffer to each array. Rotate arrays for 40 minutes at 50–60 rpm. While arrays are rocking, prepare RT master mix (see Note 32).
3.6. Bead Removal
To remove beads from the array, either wash the arrays with a pipette or spin them down in a centrifuge with angled inserts.
3.6.1. Bead Removal by Pipette Washes
Aspirate hybridization buffer and replace with 5 mL of wash buffer.
Rock for 3 minutes. Fill 50 mL conical tube(s) with 48 mL of wash buffer (see Note 33).
Remove membranes with fine-tipped tweezers (see Figure 8)
Carefully position the array over the 50 mL conical tube. Repeatedly wash (~15 times) beads from the surface of the array over the 50 mL falcon tube using 1 mL of wash buffer. Flip the array and repeatedly wash (~15 times) the other end. (see Note 34 and Figure 9).
Hold the array above the 50 mL conical and gently scrape the array ten times with a glass slide, dipping the glass slide into the wash buffer after every scrape. Flip the array and repeat.
Wash again using 1 mL of wash buffer (~10 times) and inspect the array underneath a microscope to check if there are any beads remaining. If so, take a glass slide and scrape more forcefully and continue to wash until all beads have been dislodged (see Note 35).
Spin the 50 mL falcon tube at 2000 x g for 5 minutes to pellet beads (see Note 36).
Aspirate all wash buffer except for ~1 mL. Be careful not to disturb the pellet of beads.
Transfer beads to a centrifuge tube and proceed to reverse transcription.
Fig 8.
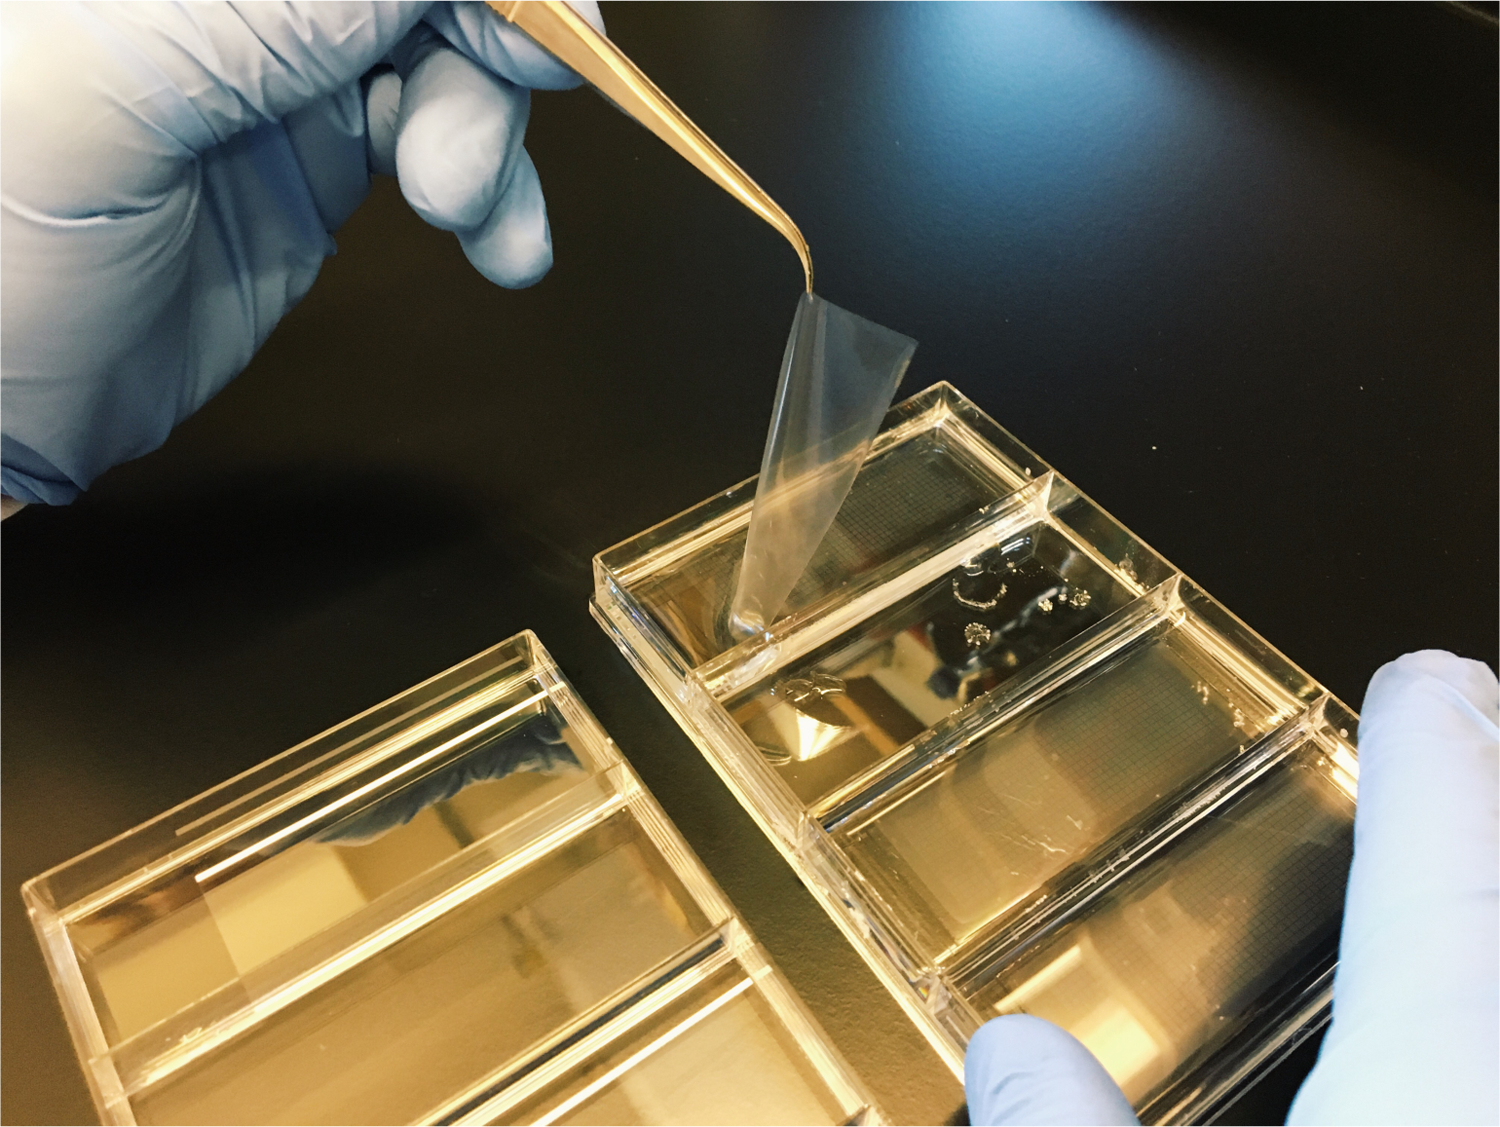
After placing the array in wash buffer, remove the membrane with tweezers
Fig 9.
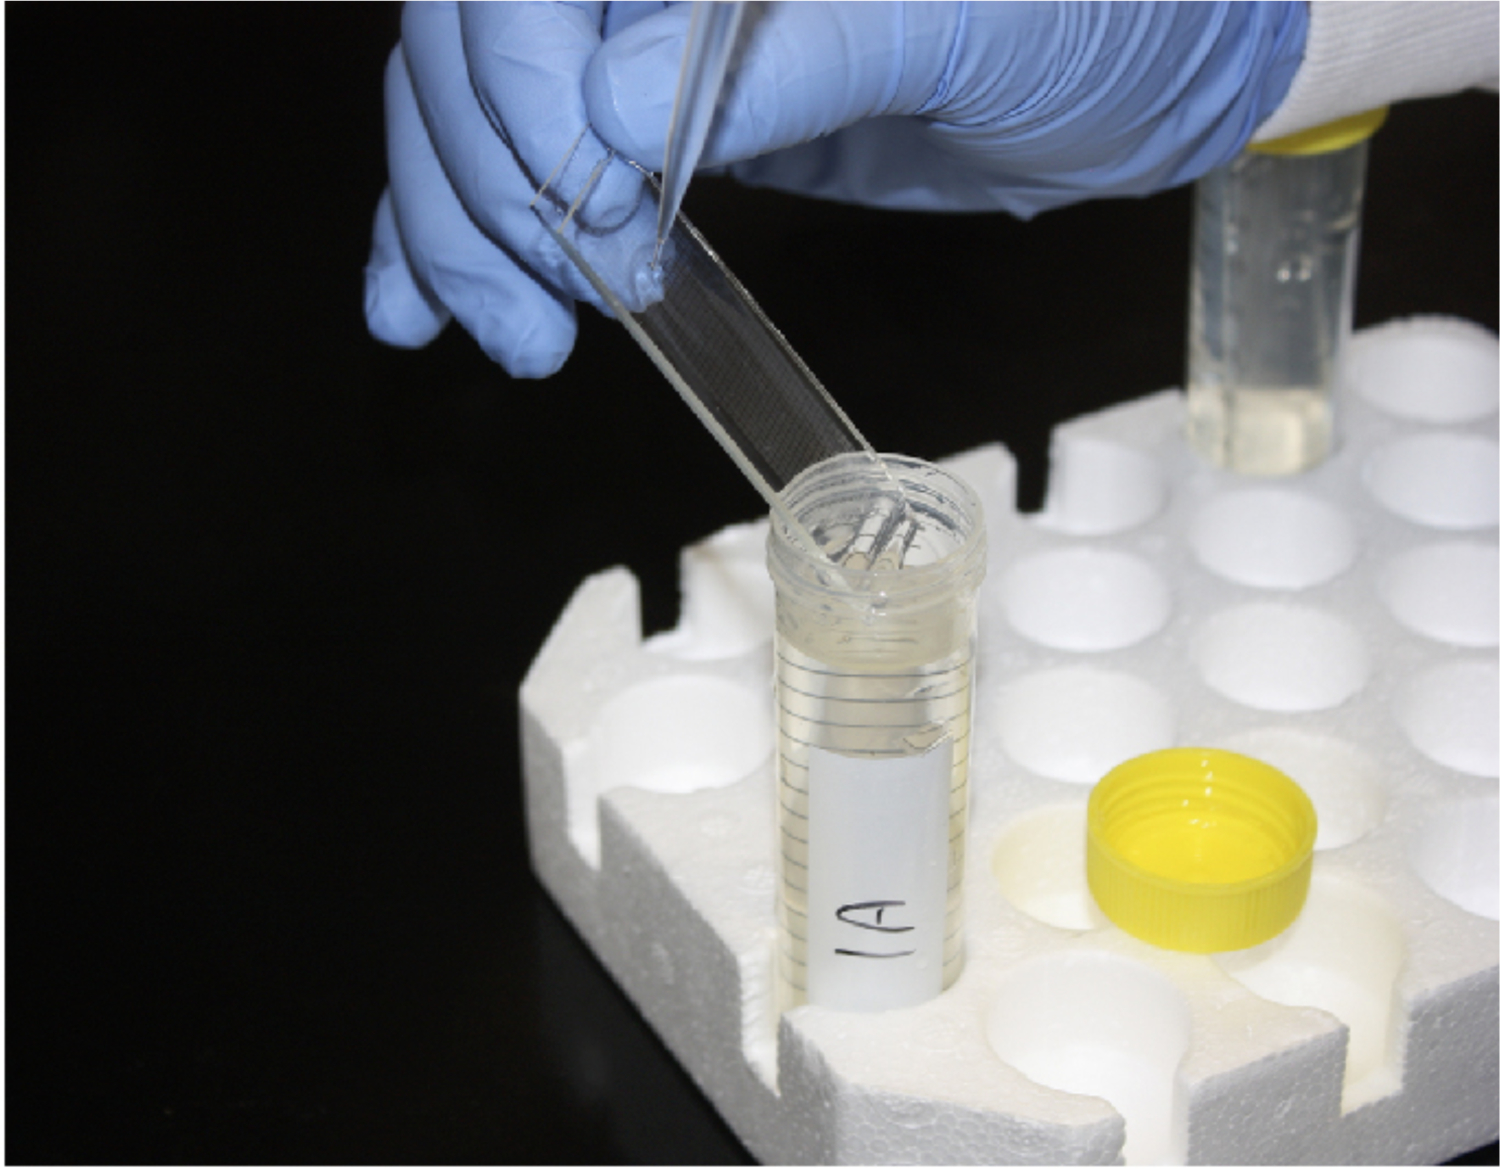
Carefully position the array over a conical of wash buffer and pipette on the array to dislodge beads.
3.6.2. Alternative Method: Bead Removal with Inserts
Alternatively, you can remove beads using 3D-printed inserts.
Aspirate hybridization buffer and replace with 5 mL of wash buffer.
Fill a Falcon tube with 45 mL of wash buffer and label with sample name.
Remove membrane and place array into the Falcon tube with wash buffer.
Ensure that the array is angled within the tube as shown below.
Place the insert so the array is secured angled as shown in the image below.
Secure the lid and seal with parafilm, if necessary (see Note 37).
Put the sealed conical in a centrifuge, making certain the PDMS surface of the array is facing away from the rotor arm (see Figure 10).
Centrifuge at 2000 x g for 5 minutes to remove the beads.
At this point you should see a small, but visible, pellet of beads at the bottom of the tube.
Aspirate 5 – 10 mL of wash buffer to enable easier removal of the array.
Remove the array and carefully position it over the top of the 50 mL tube
Repeatedly wash any remaining beads from the surface of the array over the surface of the 50mL falcon tube using 1 mL of wash buffer remaining in the tube.
Spin again at 2000 x g for 5 minutes to pellet beads
Aspirate all wash buffer except for ~ 1mL. Be careful not to disturb the pellet of beads.
Transfer beads to a 1.5 mL centrifuge tube and proceed to reverse transcription.
Fig 10.
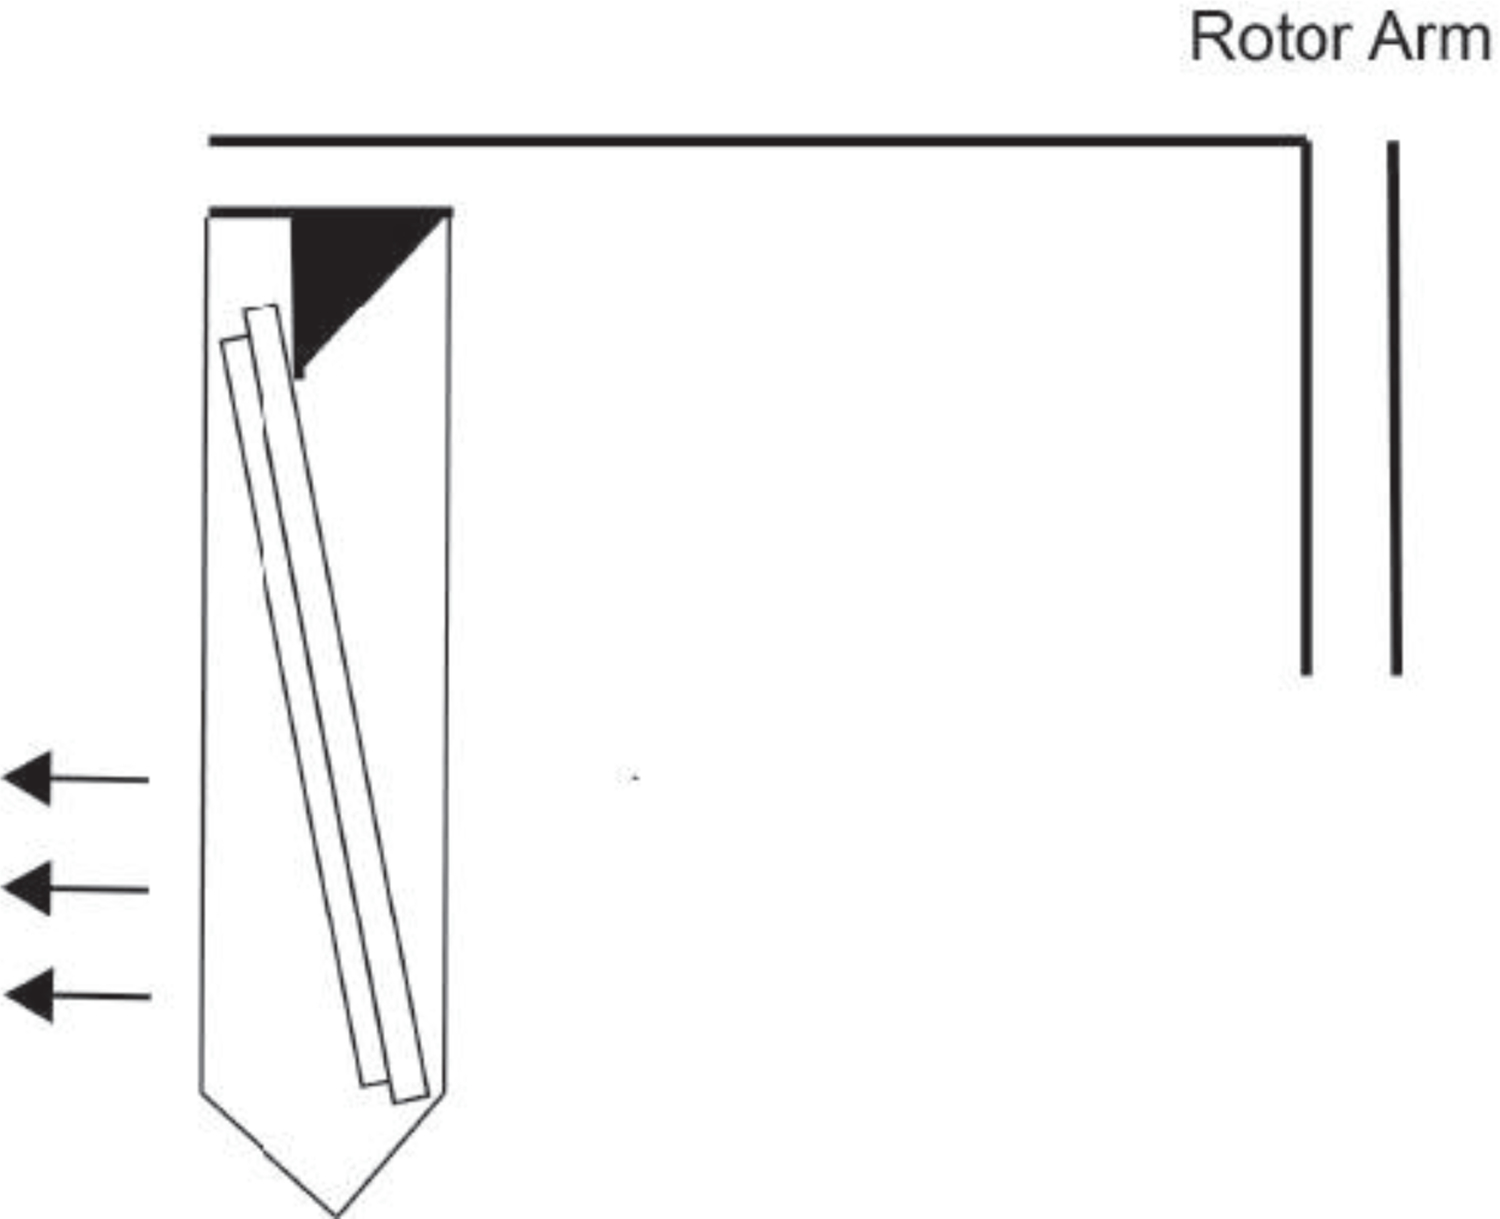
Make sure the array faces outward so that the beads will fall out of wells during centrifugation.
3.7. Reverse Transcription
-
1. Prepare the following Maxima RT Mastermix during the hybridization step (volumes provided are good for one array):
40 uL H2O
40 uL Maxima 5X RT buffer
80 uL 30% PEG8K
20 uL 10 mM dNTPs
5 uL RNase inhibitor
5 uL 100 uM Template Switch Oligo
10 uL Maxima H-RT
Centrifuge the 1.5 centrifuge tubes with beads for 1 minute at 1000 x g.
Remove supernatant and resuspend in 250 uL of 1X Maxima RT Buffer. (see Note 38).
Centrifuge beads for 1 minute at 1000 x g.
Aspirate 1X Maxima RT buffer and resuspend beads in 200 uL of the maxima RT mastermix
Incubate at room temperature for 30 minutes with end-over-end rotation
After 30 minutes, incubate at 52°C for 90 minutes with end-over-end rotation (see Note 39).
Following the RT reaction, wash beads once with 0.5 mL TE-TW, once with 0.5 mL TE-SDS, and twice with 0.5 mL of TE-TW (see Note 40 and 41)
3.8. Exonuclease I Treatment
-
Prepare the following Exonuclease I Mix:
20 uL 10X ExoI buffer
170 uL H2O
10 uL ExoI enzyme
Centrifuge beads for 1 minute at 1000 x g and aspirate the TE-TW solution.
Resuspend in 0.5 mL of 10 mM Tris-HCl pH 8.0.
Centrifuge beads again, remove supernatant and resuspend beads in 200 uL of Exonuclease I mix.
Place in a 37°C incubator for 50 minutes with end-over-end rotation.
Wash the beads once with 0.5 mL of TE-SDS, then twice with 0.5 mL TE-TW (see Note 42).
3.9. Whole Transcriptome Amplification (WTA)
Wash beads once with 500 uL of water, pellet beads, remove supernatant and resuspend in 500 uL of water.
Mix well (do not vortex) to evenly resuspend beads and transfer 20 uL of beads to a separate 1.5 mL tube to count the beads (see Note 43).
Pellet the small aliquot of beads, aspirate the supernatant, and resuspend in 20 uL of bead counting solution (10% PEG, 2.5 M NaCl) (see Note 44).
Count the beads using a hemocytometer (see Note 45).
-
Prepare the following PCR Mastermix (volumes provided are good for 2,000 beads) (see Note 46):
25 uL 2X KAPA HiFi Hotstart Readymix
24.6 uL H2O
0.4 uL 100 uM SMART PCR Primer
Pellet beads, remove supernatant, and resuspend in 50 uL of PCR Mastermix for every 2,000 beads (see Note 47).
Pipette 50 uL of PCR Mastermix with beads into a 96-well plate, making sure to PCR the entire array (see Note 48).
-
Use the following cycling conditions to perform whole-transcriptome amplification (see Note 49).
95°C 3 minutes
4 Cycles:
98°C 20 seconds
65°C 45 seconds
72°C 3 minutes
9–12 cycles:
98°C 20 seconds
67°C 20 seconds
72°C 3 minutes
Final Extension:
72°C 5 minutes
4°C infinite hold
3.10. Purification of PCR products
-
3.
Pool PCR products in a 1.5 mL microcentrifuge tube so that you have 7–8 PCR reactions per 1.5 mL microcentrifuge tube.
-
4.
Purify the product by mixing thoroughly using Ampure SPRI beads at a 0.6X volumetric ratio (beads:PCR products (see Note 50).
-
5.
Let the tubes sit in the rack off the magnet for 5 minutes, then place the rack on the magnet for 5 minutes.
-
6.
Perform two washes with 80% ethanol.
-
7.
After second wash, allow the beads to dry for 10 minutes on the magnet, then remove the rack from the magnetic, elute the beads in 100 uL, then place the rack back on the magnet and transfer the 100 uL to a new 1.5 mL microcentrifuge tube.
-
8.
SPRI the 100 uL at 0.8X volumetric ratio, repeating steps 6–8.
-
9.
After the second wash, allow the beads to dry for 5–10 minutes on the magnet, remove the rack from the magnetic, elute the beads in 15 uL, then place the rack back on the magnet and transfer the 15 uL to a new 1.5 mL microcentrifuge tube.
-
10.
Run a High Sensitivity DNA D5000 ScreenTape on an Agilent 4200 Tapestation to determine the length distribution of your cDNA. The distribution should be fairly smooth with an average bp size of 900 – 1500 bps (see Figure 11).
-
11.
Proceed to library preparation or store the WTA product at 4°C.
Fig 11.
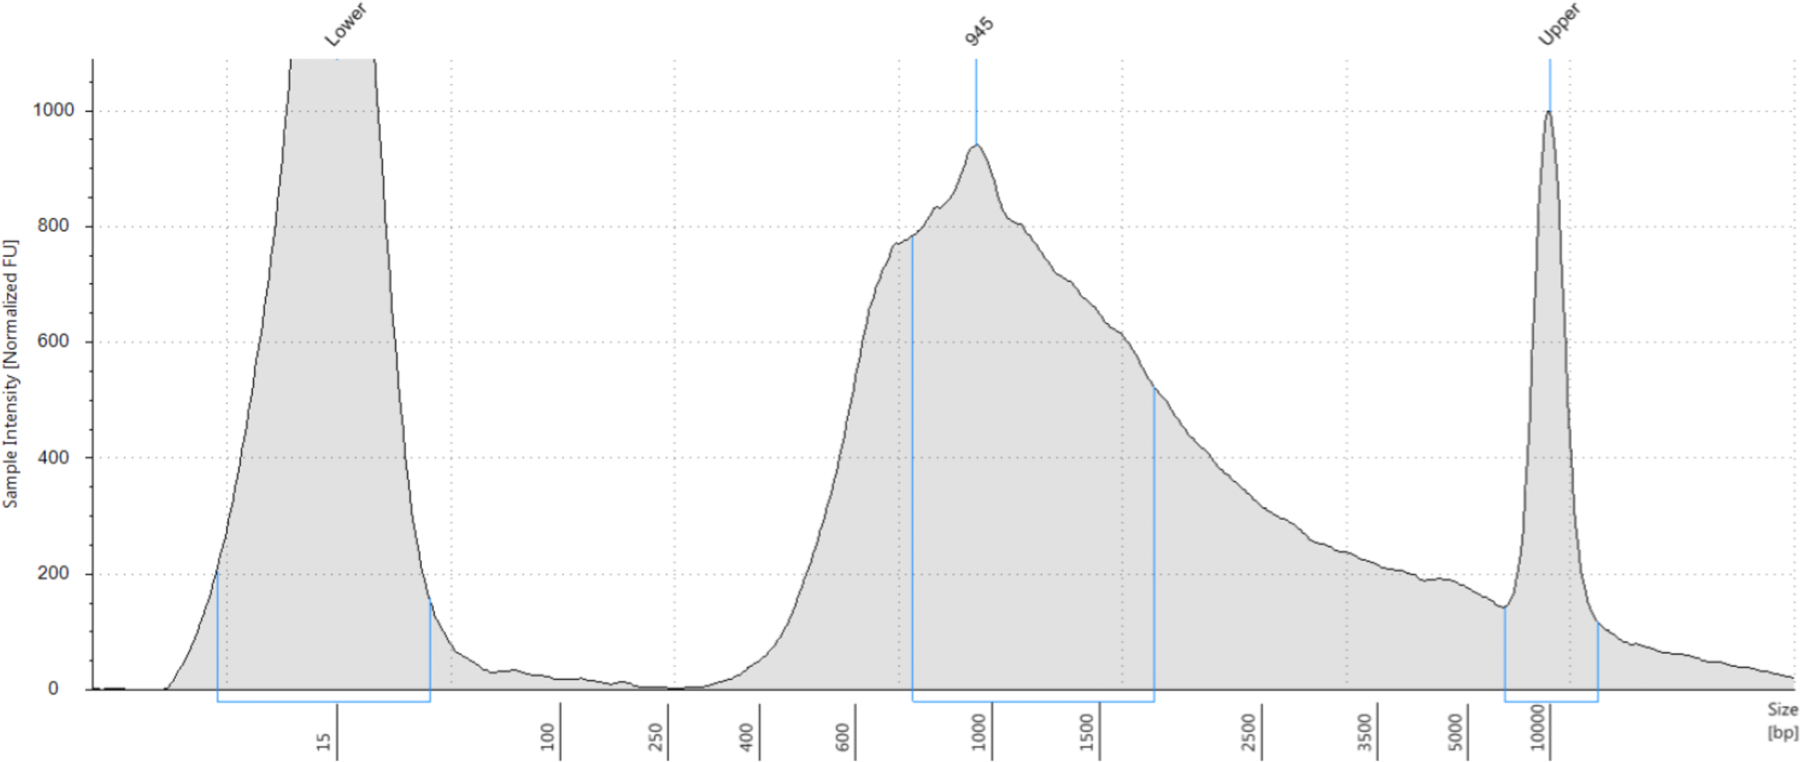
An ideal WTA product distribution has a peak at 900 – 1100 bps and has a long tail reaching 5000 bps.
3.11. Nextera Library Preparation
Make certain your thermocyclers are setup for Tagmentation (step 5) & PCR (step 9).
For each sample, combine 800 pg of purified cDNA with water in a total volume of 5 uL. It is ideal to dilute your PCR product in a separate tube/plate so that you can add 5 uL of that for tagmentation.
To each tube, add 10 uL of Nextera TD buffer, then 5 uL of ATM buffer (the total volume of the reaction is now 20 uL).
Mix by pipetting ~5 times. Spin down.
Incubate at 55°C for 5 minutes.
Let the thermocycler cool to 4°C after incubation, and then immediately add 5 uL of Neutralization Buffer. Mix by pipetting ~5 times. Spin down for 1 minute at 1000 x g. Bubbles are normal.
Incubate at room temperature for 5 minutes.
-
Add to each PCR in the following order:
15 uL Nextera PCR mix
8 uL H2O
1 uL 10 uM New-P5-SMART PCR hybrid oligo
1 uL 10 uM Nextera N700X oligo
-
After sealing the reaction tubes and spinning them down (1 minute at 1000 x g), run the following PCR program:
95°C 30 seconds
12 Cycles:
95°C 10 seconds
55°C 30 seconds
72°C 30 seconds
Final Extension:
72°C 5 minutes
4°C infinite hold
Proceed to SPRI purification or store the WTA product at 4°C.
SPRI at 0.6X volumetric ratio
Let the tubes sit in the rack off the magnet for 5 minutes, then place the rack on the magnet for 5 minutes.
Perform two washes with 80% ethanol.
After the second wash, allow the beads to dry for 5–10 minutes on the magnet, remove the rack from the magnetic, elute the beads in 100 uL, then place the rack back on the magnet and transfer the 100 uL to a new 1.5 mL microcentrifuge tube.
Spri 100uL at 0.8X volumetric ratio and repeat steps b and c.
After the second wash, allow the beads to dry for 5–10 minutes on the magnet, remove the rack from the magnetic, elute the beads in 15 uL, then place the rack back on the magnet and transfer the 15 uL to a new 1.5 mL microcentrifuge tube.
Run a High Sensitivity DNA D1000 ScreenTape on an Agilent 4200 Tapestation. Your tagmented library should be fairly smooth, with an average bp size of 600–750bp (see Note 51 and Figure 12).
Fig 12.
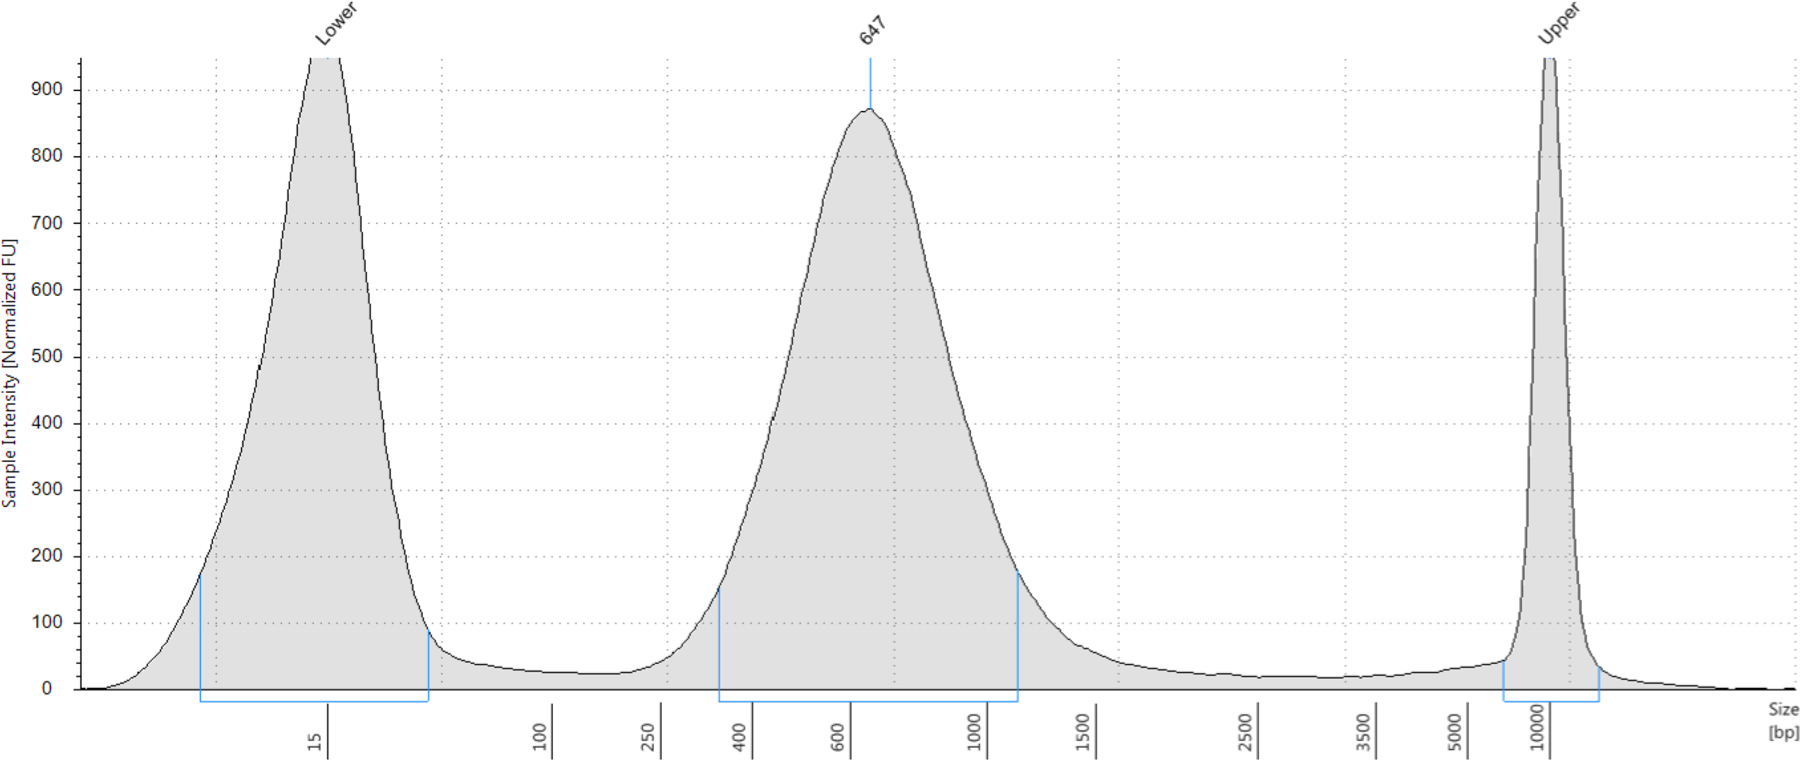
An ideal NTA product distribution is a smooth bell curve with a peak between 600 and 750 bps.
3.12. NextSeq500 Sequencing
Make a 5 uL library pool at 4 nM as input for denaturation.
To this 5 uL library, add 5 uL of 0.2 N NaOH (make this solution fresh from a 2M NaOH stock).
Flick to mix, then spin down and let tube sit for 5 minutes at room temperature.
After 5 minutes, add 5 uL of 0.2 M Tris-HCl pH 7.5.
Add 985 uL of HT1 Buffer to make a 1 mL, 20 pM library (solution 1).
In a new tube (solution 2), add 165 uL of solution 1 and dilute to 1.5 mL with HT1 buffer to make a 2.2 pM solution – this is the recommended loading concentration.
Add 6 uL of Custom Read 1 primer to 1.994 mL of HT1 buffer to make 2 mL of 0.3 uM Custom Read 1 primer.
Follow illumina’s guide for loading a NextSeq500 kit. Seq-Well requires paired-end sequencing with a read structure of 20 bp read one, 50 bp read two, and 8 bp index one.
Acknowledgements
R.G. was supported by the Intramural Research Program of the Division of Intramural Research Z01AI000947, NIAID, NIH; the UCLA-Caltech MSTP, and the NIGMS T32 GM008042. A.K.S. was supported by the Searle Scholars Program, the Beckman Young Investigator Program, the Pew-Stewart Scholars, a Sloan Fellowship in Chemistry, NIH grants 1DP2OD020839, 2U19AI089992, 1U54CA217377, P01AI039671, 5U24AI118672, 2RM1HG006193, 1R33CA202820, 2R01HL095791, 1R01AI138546, 1R01HL126554, 1R01DA046277, 2R01HL095791, and Bill and Melinda Gates Foundation grants OPP1139972, OPP1137006, and OPP1116944. J.C.L. was supported by NIH grants DP3DK09768101, P01AI045757, R21AI106025, and R56AI104274, the W.M. Keck Foundation, Camille Dreyfus Teacher–Scholar program, and the US Army Research Office through the Institute for Soldier Nanotechnologies, under contract number W911NF-13-D-0001. This work was also supported in part by the Koch Institute Support (core) NIH Grant P30-CA14051 from the National Cancer Institute.
4. Notes
You will want ~25 mL of bead loading buffer for each array. It is important that you do not add the sodium carbonate directly to the BSA to avoid denaturing the BSA. This solution should be prepared fresh just before loading beads. The stock of BSA should be filtered prior to use with a 0.22 µm filter and should be kept at 4°C.
It will take some time for the guanidine thiocyanate to dissolve. Be sure this is prepared in advance.
Pre-lysis buffer is photosensitive so wrap the buffer’s container with aluminum foil. Wrapped pre-lysis buffer can be stored at room temperature and has a shelf life of approximately 6 months.
Complete lysis buffer should be prepared immediately prior to use.
You will want 10 mL of hybridization buffer and 50 mL of wash buffer per array. Both solutions can be made in advance and stored at room temperature for three months.
We purchase membranes from Sterlitech Corporation.
We purchase the mRNA capture beads from Chemgenes (Cat. No. MACOSKO-2011-10). Currently this is the only supplier manufacturing these beads.
You can transport arrays by placing them in 50 mL conical tubes filled with array quenching buffer or the aspartic acid solution. Two arrays will fit per conical if they are arranged back to back with their glass slides touching.
An alternative transportation method is to dry the arrays and transport them in a glass slide box. To dry the arrays, remove them from the storage buffer, use a paper towel to wick off excess liquid from the glass slide (while being careful not to touch the surface of the array), and then let them sit until air dried. Rehydrate the arrays by placing them in a four-well dish with either array quenching buffer or the aspartic acid solution. Place them under vacuum until there are no air bubbles remaining in the wells of the array. Alternatively, if a vacuum chamber is not available you can let the arrays soak overnight; they will be hydrated and ready to use the following day.
Use array quenching storage buffer for short-term storage for up to 1 month. If storing longer than 1 month, it is advisable to store in aspartic acid solution.
Prepare one extra membrane in case of a mistake during membrane application.
If your plasma oven has multiple shelves, place membranes on the bottom shelf to reduce the risk of them flying when vacuum is released and atmospheric pressure is restored.
The plasma should be a bright pink color. If not, adjust the air valve to increase or decrease the amount of oxygen you are letting into the chamber. Also check to see if vacuum has formed by gently pulling on the door of the plasma oven.
If membranes have slightly folded over, slowly flip the membrane back using sharp tweezers. If membranes have blown off the slide entirely, repeat membrane preparation procedure to ensure you know which side was exposed to plasma.
If transporting solvated membranes (e.g., between buildings), remove all but ~1 mL of PBS to prevent membranes from flipping within the dish. Alternatively, membranes can be solvated in 1x PBS, dried out, and stored for one week at room temperature. When ready to use membranes, they can be rehydrated with 1x PBS. This is helpful when traveling with membranes or when you want to run Seq-Well in a laboratory without access to a plasma cleaner.
Before bead loading, use a microscope to inspect wells for air bubbles. If air bubbles are present, place array(s) under vacuum with rotation (50 RPM) for 10 minutes to remove air bubbles in wells. The house vacuum in most laboratories should be sufficient to remove any air bubbles from the wells.
Never vortex beads, as this can fragment them and interfere with bead loading and transcript capture.
Place a black background behind the four well dish to better visualize bead coverage of the array.
Be careful not to let the surface of the array dry. Sudden movements or tilting at too steep an angle can lead to spillage. If BLB falls off the surface of the array into the four-well dish, gently pipette the BLB back onto the corners of the PDMS surface of the array, being careful not to pipette directly onto wells.
It can be helpful to repeatedly (every ~30 seconds) rest the four-well dish level to allow beads to fall into wells. After tilting forwards and backwards for ten minutes, tilt the four-well dish in whichever direction is needed to cover poorly loaded areas with beads.
You can save the excess beads by pipetting the liquid into a 50 mL conical instead of aspirating it. After collecting excess beads, wash them twice by spinning down at 1,000 rcf and resuspending the pellet in TE-TW. Store the washed beads in TE-TW for future loading.
An alternative bead removal method is to add 3 mL of BLB and rock at ~30 degree angles six times to get beads to roll off the surface. Repeat this procedure three times.
You can also load cells in DMEM with 5% FBS or PBS with 0.05% BSA.
Washing with PBS is critical to ensure successful membrane attachment as FBS can interfere with membrane sealing.
Make sure the lid of the 4-well dish is dry. Position the array in the corner of the lid so the array doesn’t slide as you apply the membrane.
Occasionally, the membrane will fold back on the other side of the glass slide. Readjust the membrane until there is an overhang. An alternative method to prevent this is to first invert the glass slide and then pull the membrane past the edge of the glass slide.
For optimal results, use little to no pressure while applying the membrane with the left hand. See Instructional Video (www.shaleklab.com/seq-well) for additional details. Attempts to manually seal the microwell device using pressure result in a ‘squeegee’ effect, effectively removing moisture from the membrane while fixing membrane creases in place.
It is very important to avoid a rumpled membrane. If the membrane is creased, dip an edge of a glass slide in liquid and smooth over areas. However, there is a limited amount of remediation that is possible prior to decreasing the efficacy of sealing, so ideally create the smoothest membrane possible on the first pass.
This time is flexible and depends on the incubator. If you want to decrease this incubation time, please optimize on cell lines before proceeding with precious samples.
Sometimes the array will be stuck to the top piece of the clamp – this is fine, just carefully slide it off.
To make complete lysis buffer, combine 5 ml of pre-lysis with 25 uL of 10% sarkosyl and 50 uL β-mercaptoethanol.
The hybridization buffer may contain trace amounts of guanidine thiocyanate and therefore should be collected in the lysis buffer waste container.
Label the 50 ml conical tubes with sample names to avoid mixing up samples after removing beads from the array(s).
Make sure to pipette on the entire surface of the array, including the edges and corners.
Sometimes after scrapping empty wells will fill up with bubbles. Be careful not to mistake bubbles for beads when inspecting underneath a microscope.
You should see a small, but visible, pellet of beads at the bottom of the tube.
The array might move around at this point. This is not a problem.
Prepare 1X maxima by diluting 5X maxima buffer in RNAse free H2O.
You can also let RT continue overnight at 52°C and wash the beads the next day.
Salts in the RT buffer can cause SDS to precipitate, making it difficult to remove in subsequent washes, so it is best to begin with a single wash in TE-TW.
This is a stopping point; after the final TE-TW wash, beads can be resuspended in TE-TW and stored for up to two weeks at 4°C.
This is another stopping point; after the final TE-TW wash, beads can be resuspended in TE-TW and stored for up to two weeks at 4°C.
Don’t vortex beads as this can result in bead fragmentation
The bead counting solution aids in even dispersion of beads across a hemocytometer.
Sometimes the beads will not evenly disperse, making it difficult to count them. If this is the case, assume there are 60,000 beads for the following steps.
For instance, if you have 60,000 beads from an array, prepare a PCR mastermix with 750 uL of 2x KAPA HiFi Hotstart Readymix, 738 uL of H2O, and 12 uL of 100 uM SMART PCR Primer.
For instance, if you have 60,000 beads resuspend in 1,500 uL of PCR mastermix
Periodically resuspend the beads to make sure they are evenly dispersed in the solution.
The total number of PCR cycles necessary for amplification depends on the cell type used. Approximately 16 cycles are optimal for primary cells (e.g. PBMCs) and approximately 13 cycles are optimal for cell lines or larger cells (e.g. macrophages). For experiments on dissociated human tissue, start with 16 cycles and optimize from there.
For instance, if you have 400 uL of product add 240 uL of SPRI beads and mix for a 0.6X volumetric SPRI.
We have successfully sequenced NTA product with average bp sizes from 350 bp – 800 bp.
References
- 1.Kolodziejczyk AA, Lönnberg T (2018) Global and targeted approaches to single-cell transcriptome characterization. Brief Funct Genomics 17:209–219. 10.1093/bfgp/elx025 [DOI] [PMC free article] [PubMed] [Google Scholar]
- 2.Svensson V, Vento-Tormo R, Teichmann SA (2018) Exponential scaling of single-cell RNA-seq in the past decade. Nat Protoc 13:599–604. 10.1038/nprot.2017.149 [DOI] [PubMed] [Google Scholar]
- 3.Kolodziejczyk AA, Kim JK, Svensson V, et al. (2015) The Technology and Biology of Single-Cell RNA Sequencing. Mol Cell 58:610–620. 10.1016/j.molcel.2015.04.005 [DOI] [PubMed] [Google Scholar]
- 4.Ziegenhain C, Vieth B, Parekh S, et al. (2017) Comparative Analysis of Single-Cell RNA Sequencing Methods. Mol Cell 65:631–643. 10.1016/j.molcel.2017.01.023 [DOI] [PubMed] [Google Scholar]
- 5.Tang F, Barbacioru C, Wang Y, et al. (2009) mRNA-Seq whole-transcriptome analysis of a single cell. Nat Methods 6:377–382. 10.1038/nmeth.1315 [DOI] [PubMed] [Google Scholar]
- 6.Macaulay IC, Svensson V, Labalette C, et al. (2016) Single-Cell RNA-Sequencing Reveals a Continuous Spectrum of Differentiation in Hematopoietic Cells. Cell Rep 14:966–977. 10.1016/j.celrep.2015.12.082 [DOI] [PMC free article] [PubMed] [Google Scholar]
- 7.Shalek AK, Satija R, Adiconis X, et al. (2013) Single-cell transcriptomics reveals bimodality in expression and splicing in immune cells. Nature 498:236–240. 10.1038/nature12172 [DOI] [PMC free article] [PubMed] [Google Scholar]
- 8.Klein AM, Mazutis L, Akartuna I, et al. (2015) Droplet Barcoding for Single-Cell Transcriptomics Applied to Embryonic Stem Cells. Cell 161:1187–1201. 10.1016/j.cell.2015.04.044 [DOI] [PMC free article] [PubMed] [Google Scholar]
- 9.Macosko EZ, Basu A, Satija R, et al. (2015) Highly Parallel Genome-wide Expression Profiling of Individual Cells Using Nanoliter Droplets. Cell 161:1202–1214. 10.1016/j.cell.2015.05.002 [DOI] [PMC free article] [PubMed] [Google Scholar]
- 10.Zheng GXY, Terry JM, Belgrader P, et al. (2017) Massively parallel digital transcriptional profiling of single cells. Nat Commun 8:14049 10.1038/ncomms14049 [DOI] [PMC free article] [PubMed] [Google Scholar]
- 11.Gierahn TM, Ii MHW, Hughes TK, et al. (2017) Seq-Well: portable, low-cost RNA sequencing of single cells at high throughput. Nat Methods 14:395–398. 10.1038/nmeth.4179 [DOI] [PMC free article] [PubMed] [Google Scholar]
- 12.Bose S, Wan Z, Carr A, et al. (2015) Scalable microfluidics for single-cell RNA printing and sequencing. Genome Biol 16:120 10.1186/s13059-015-0684-3 [DOI] [PMC free article] [PubMed] [Google Scholar]
- 13.Kivioja T, Vähärautio A, Karlsson K, et al. (2012) Counting absolute numbers of molecules using unique molecular identifiers. Nat Methods 9:72–74. 10.1038/nmeth.1778 [DOI] [PubMed] [Google Scholar]


